Have you ever wondered how Olympic-class position shooters hold their aim so steady? Those bulky shooting coats help, but there is a lot of bio-mechanics involved also. Top shooters employ their body structure to help support the weight of their rifles, and to steady their aim. This interesting video, produced by GOnra Media, demonstrates rifle hold and body alignment for prone, standing, sitting, and kneeling positions. Olympic Gold Medalist Jamie Corkish (formerly Jamie Gray) demonstrates the proper stance and position of arms and legs for each of the positions.
Ideally, in all of the shooting positions, the shooter takes advantage of skeletal support. The shooter should align the bones of his/her arms and legs to provide a solid foundation. A shooter’s legs and arms form vertical planes helping the body remain stable in the shooting position.
Jamie Corkish, London 2012 Gold Medalist in Women’s 3 X 20, has retired from top-level competitive shooting. However, Jamie remains involved in the shooting sports as a Public Relations/Marketing representative for ELEY, a leading maker of rimfire ammunition. Jamie also works with shooting clubs and educational institutions to promote smallbore target shooting.
Images are stills from GOnraMedia video linked above.
High-Tech Rimfire Rigs
If you watched the smallbore position and prone shooters at recent Olympic Games, you couldn’t help but notice the exotic rifles competitors were shooting. There were wood stocks, metal stocks, factory-built rifles and customized specials. Why are there are so many different design features and stock types? To answer this question, the NRAblog’s editors called on Jessie McClain of the NRA Competitive Shooting Division.
“The customized rifles, like the Anschütz you showed me, can make a real difference in a shooter’s performance,” explained McClain. “I went from a decent shooter to making the varsity shooting team my freshman year because of the rifle.” As Jessie explained, one new feature out there is the adjustable stock, which she called the Porsche of the shooting world. Fully adjustable from the butt plate to the check piece to the hand stop and risers and bolt knobs, this component is fully customizable to the athlete … which can be a huge advantage. “Every person is different … a customizable rifle fits anyone. A rifle team can purchase four of these and field a shooting team for years.”
The Modern Anschütz Position Rifle
Smallbore match rifle makers are using modern materials in response to the need for greater adjustability (and enhanced accuracy). One of the popular new designs is the Anschütz model 1913 position rifle with a “1918 ALU Precise” brushed aluminum stock. This looks like it has been crafted in an aircraft plant.
Do you often carry a concealed handgun? Then you can benefit from Beretta’s FREE 15-page e-book, Ten Essential Tips for CCW Holders. This eBook, in handy PDF format, helps gun owners select an appropriate handgun (and holster), understand legal obligations and responsibilities, and train effectively with the firearm. This short PDF eBook offers many useful tips to consider, in particular for gun owners who are contemplating the pros and cons of everyday carry for themselves.
As the Beretta CCW booklet says, “Carrying a concealed handgun requires a certain amount of confidence. You need to be confident in your knowledge of laws and regulations. You have to have confidence in your accuracy, and you need to trust that you can carry a gun effectively, securely and comfortably. If a gun is a burden for you to carry, you probably won’t.”
Surprising Facts About Actual Defensive Handgun Use
You may be surprised to learn when and how handguns are actually used for self-defense. Most defensive uses are at very short range and the incident only lasts a matter of seconds. You need to be prepared, and train to be proficient drawing and aiming your weapon. And remember, shooting is a last resort, when a safe retreat is not available.
55% of gunfights take place in 0-5 feet.
20% of gunfights take place in 5-10 feet.
20% of gunfights take place in 10-21 feet.
95% of gunfights take place in 0-21 feet. (Source: FBI)
The average man can cover 21 feet of ground in 1.5 seconds.
The average gunfight is over in 3-5 seconds.
3 to 4 shots are usually fired.
Most gunfights take place in low-light conditions.
On average, one shot in four strikes someone.
Here are two (2) sample pages from Beretta’s CCW eBook.
At the request of our readers, we provide select “Deals of the Week”. Every Sunday afternoon or Monday morning we offer our Best Bargain selections. Here are some of the best deals on firearms, hardware, reloading components, optics, and shooting accessories. Be aware that sale prices are subject to change, and once clearance inventory is sold, it’s gone for good. You snooze you lose.
NOTE: All listed products are for sale to persons 18 years of age or older. No products are intended for use by minors.
1. EuroOptic — Tikka T3x Hunting Rifle Sale, Major Savings
⏺️ » Save up to 39% on quality rifles with accuracy guarantees
The Tikka T3x is a quality hunting rifle at an affordable price. Currently EuroOptic is running a major closeout sale, offering T3x bolt-action rifles with a wide variety of chamberings and stock styles. At $580 you can get a T3x Lite, a very good deal. If you prefer a wood stock, that’s offered in the T3x Hunter for $730. At the top end, consider the $1100 Tikka T3x Roughtech Cerca which adds some serious upgrades. The stock is composed of Roughtech material, and is modular, with an interchangeable pistol grip allowing the angle to be modified for different shooting positions.
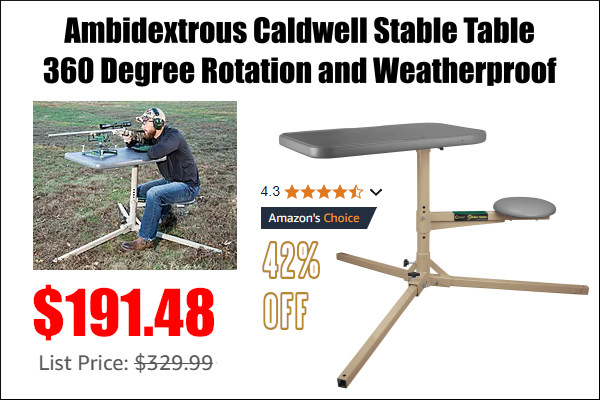
2. Amazon — Caldwell Stable Table Deluxe, $191.48
⏺️ » Positive user reviews — good set-up for varminting and home ranges
If you want a good supported shooting option that can be transported in your vehicle, check out the Caldwell Stable Table Deluxe (#ad). Now discounted 42% to $191.48, this rotating range bench is stable and comfortable. The seat and tabletop pivot (rotate) around a center axis as a single unit so you can easily swing laterally from one target to the next — that’s great for P-dog adventures. A bolt in the base allows angle adjustment of a single leg, letting you align the top parallel with the horizon. This is great unit for varmint hunting with very positive owner reviews.
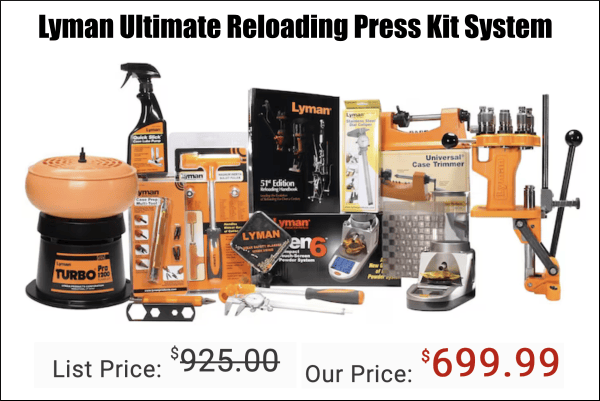
3. Amazon — Lyman Turret Press Kit, $699.99
⏺️ » Complete reloading system with 8-station turret press
The Lyman Ultimate Reloading System is a very complete multi-product kit with all the tools required to accomplish all steps in the reloading process. On sale for $699.99 ($225 discount), this combo kit includes the excellent Lyman Brass Smith 8-Station turret press ($365 MSRP), Lyman Gen 6 Electronic Scale/Dispenser ($320 MSRP), Universal Case Trimmer, Pro 1200 Turbo Tumbler, and case prep tools and more. This is a great package deal for someone getting starting in reloading.
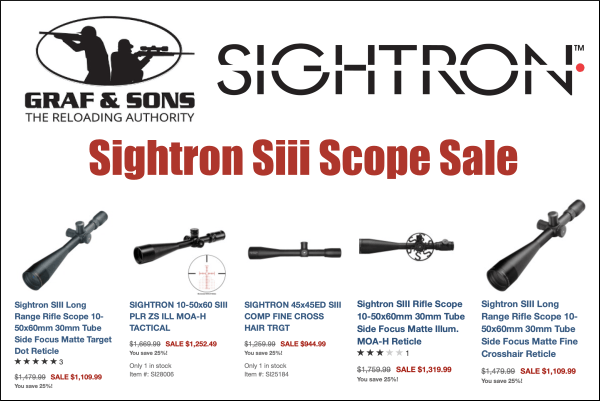
4. Graf’s — Sightron SIII Scope Sale, MOA and MIL, Save 25%
⏺️ » Major discounts on excellent competition scopes
If you need a new competition scope, definitely check out the Sightron SIII Scope Sale at Graf & Sons. There are a wide variety of scopes on sale including 45X fixed power, 6-25x50mm, 8-32x50mm, and 10-50x60mm. Many offer precision 1/8 MOA adjustments. For short-range benchrest, 600- and 1000-yard benchrest, F-Class, and PRS/NRL matches you’ll find a good scope on sale, with your choice of MOA and MIL reticles and MOA or MIL clicks. Most scopes are now 25% off, so you can save $300 to $440.
⏺️ » Very affordable combo for hunters and varminters
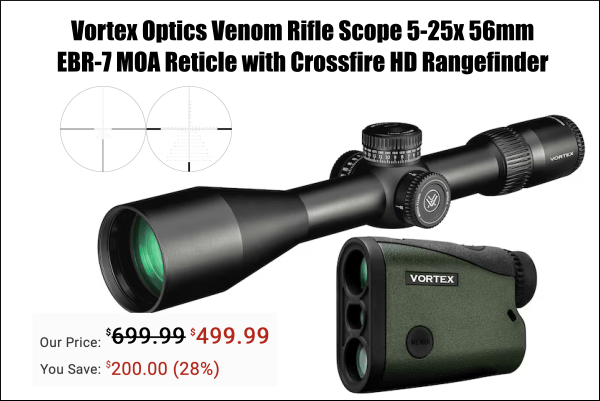
Here’s a good Vortex FFP scope plus rangefinder combo for matches, varmint hunting, and more. The Vortex Venom 5-25x56mm scope features a 34mm main tube, ample turret travel, and RevStop Zero System. The First Focal Plane EBR-7C reticle gives you accurate holds at any magnification. This $499.99 combo includes a Vortex Crossfire HD 1400 Laser Rangefinder, a handy, reliable unit. Right now you save $200 on this scope/LRF combo with this MidwayUSA sale.
⏺️ » Popular spotting scope favored by competitors
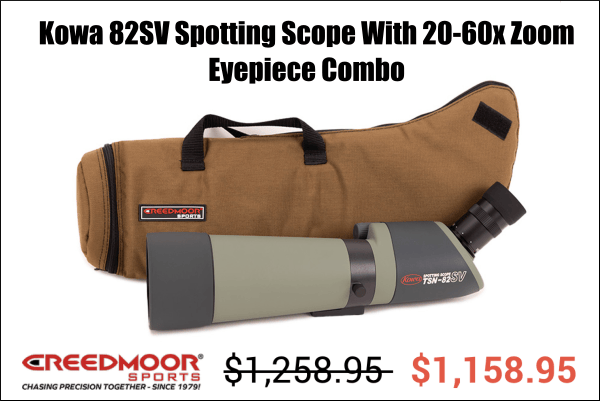
The Kowa 82SV Spotting Scope is favored by many top competitors. The 82mm lens is bright and sharp and the glass is multicoated, ensuring sharp images and a clear visual range. This combo comes with an excellent 20-60 zoom eyepiece. This Kowa 82SV spotter offers optical performance as good or better than many other spotting scopes costing much more. This Kowa spotter ships with a nice Creedmoor Sports padded cover. Save $100 now with this deal.
7. Midsouth — Nosler Ballistic Tip Ammo Sale
⏺️ » Major savings on ballistic tip hunting ammo
Need good ammo for your fall hunt? Consider picking up some Nosler Ballistic Tip Ammunition, offered for a wide selection of hunting cartridge types including .260 Rem, .270 Win, .308 Win, .30-06 Springfield, and .300 WinMag (and more). The Nosler bullets in this ammo have a heavily-jacketed base that ensures wide expansion while the boat-tail design enhances long-range accuracy. These quality hunting rounds deliver the accuracy and down-range punch required for clean kills in the field.
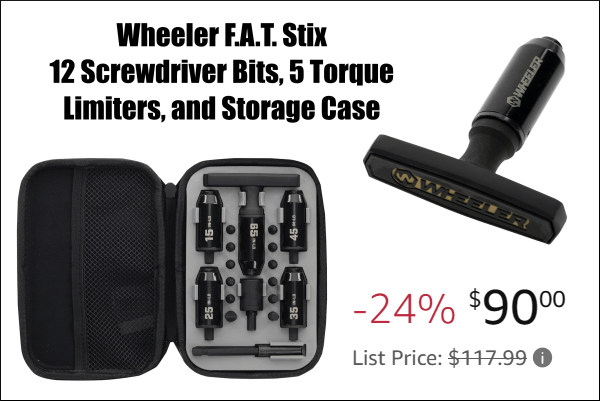
8. Amazon — Wheeler F.A.T. Stix, $90.00
⏺️ » Unique tool set for setting torque precisely
Proper torque settings for your scope rings and action are critical for accuracy. For this, we like the Wheeler F.A.T. Stix (#ad) with 12 screwdriver bits, 5 torque limiters, and storage case. This compact torque wrench set, now 24% off, takes the guesswork out of setting the correct torque. Simply attach the preset torque limiter to the t-handle, insert the desired bit, and set your screw to the right specs.
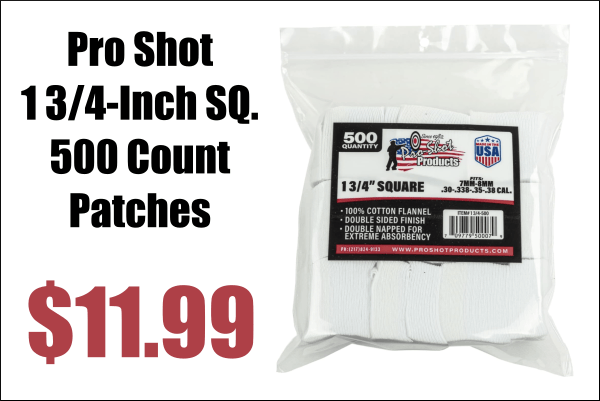
9. Amazon — Pro Shot 7mm/.38 500ct Patches, $11.99
⏺️ » 500 patches good for rifles and pistols
Cleaning barrels properly requires good patches (and plenty of them). Right now you can get 500 Pro-Shot Rifle Patches for just $11.99 on Amazon (#ad). These American-made 100%-cotton patches work great. The 100% cotton flannel fabric holds solvent well and is finished on both sides for optimal cleaning of powder and carbon residue. These patches can also be used to clean inside actions and muzzle brakes.
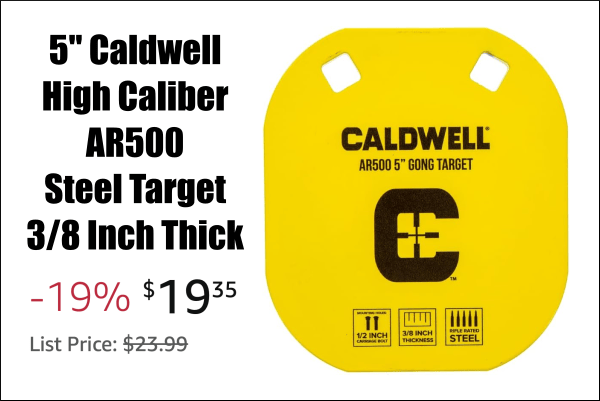
10. Amazon — Caldwell High Caliber AR500 Steel Targets, $19.35
⏺️ » Good, durable Steel gong target under $20
Available in a variety of shapes and sizes, Caldwell Gong targets are made of tough AR500 steel. These bright yellow steel targets can withstand thousands of rounds. Rated up to 3000 FPS impact velocity these will work with most common rifle types. Right now the 5″ Gong (3/8″ thick steel), is just $19.35, a 19% savings. A wide variety of other Caldwell AR500 steel targets are available including 8″ Gong, 10″ Coffin, 13″ Octagon, and Full-size IPSC.
As an Amazon affiliate, this site can earn revenues through sales commissions.
Hunting season is starting soon in most areas of the country. Here’s a way you can improve your hunting skills/knowledge. The NRA is offering a FREE online Experienced Hunter Education Course for those preparing to take advantage of the 2025 hunting season.
“Our Experienced Hunter Education Course provides those who might have taken a season or two off a convenient way to sharpen their skills before heading back into the field,” said Peter Churchbourne, director of NRA’s Hunters Leadership Forum.
NRA’s free 2-hour course is a firearm and hunting safety-training refresher in a convenient online format available through desktop, tablet, or smartphone. The course is available to everyone at www.NRAEHE.org. NOTE: The course is NOT a substitute for state-mandated hunter safety requirements and does not offer any certifications.
The NRA’s NRA Experienced Hunter Education Course, is an online training program designed to help hunters brush up their skills. Free to all, this comprehensive hunting refresher course will help hunters become safer and more confident before heading out into the field. CLICK HERE for more information.
“If you’ve taken a break from the shooting sports or haven’t hunted in a season or two, our Experienced Hunter Education Course is the perfect refresher for firearms safety and safe hunting practices,” explained Elizabeth Bush, managing director of NRA Community Engagement. “Best of all, we’re offering this service completely free of charge.”
Course Description
This online training course is specifically designed for individuals who have not hunted in the past year or more and are looking for a safety refresher before they head back out in the field. In this course, hunters will have the opportunity to refresh their skills by taking a look at safe hunting practices and firearms safety. Once completed, you will be a safer hunter in the field.
Here’s an inexpensive product that can make your case prep and loading tasks easier. We use and recommend the cleverly-designed Lyman Bleacher Blocks. These multi-level (stepped) cartridge holders save space on your bench AND make it easier to select a particular case/cartridge from a full block. Each row is a different height for convenience. With Bleacher Blocks it’s also easier to check for powder levels, or place bullets before the seating process.
Lyman’s Bleacher Block cartridge holders have many advantages over conventional, single-level blocks. Use the different levels for sorting brass. Or, migrate the brass from top to bottom as you proceed through case prep stages. If you are assembling loads with different bullets for load testing, you could arrange the loaded rounds on different levels for easy recognition. For example put V-Max loaded rounds on the top tier, and Berger Hybrid loaded rounds on the bottom tier. Or, if you are experimenting with neck tension, you can use different rows for cases processed with different bushings.
Made of durable orange polymer, Lyman Bleacher Blocks are now molded in five sizes — small pistol, large pistol, and three rifle sizes. The smallest rifle block (with 0.388″-diam holes) fits .223 Rem-size case heads. The middle size rifle block (with 0.485″-diam holes) fits .308 Win-size case heads. That works for 6mmBR/Dasher sized cases perfectly. The biggest rifle Bleacher Block has 0.565″-diameter recesses for magnum-size cases. There are also two pistol blocks — .445″ hole size for 9mm/.357 size and .565″ diameter for larger .44/.45 pistol cartridges.
Here’s what Lyman says about its innovative cartridge block design: “Our [stepped] loading blocks allow for easier handling of cases in and out of the loading block. Our stepped design allows you to easily grip a single case without jamming your fingers down into a group of cases like in traditional loading blocks, and allows for a smaller ‘footprint’ on your bench.”
Lyman Bleacher Blocks are among the Reloading Tools reviewed in this helpful video:
“I have molested that rifle on several different occasions over the years. It is more beautiful in person if that is possible. Fine craftsmanship in every aspect.” — Forum Member Matt K.
Today’s Sunday GunDay feature is a “blast from the past”, part of our big Guns of the Week archive. Some years back, Forum member Corbin Shell told us he had a new, full-custom 1000-yard prone rifle. When he sent some photos of the maple-stocked masterpiece, our collective jaws dropped. Check it out — this is truly a “Maple Marvel”.
Corbin’s GunDay rig is an eye-catcher for sure. This is one handsome rifle, built with all-premium components and a stunning Curly Maple thumbhole stock with adjustable cheekpiece. The rifle is chambered in .243 Winchester. It features a custom stainless RBRP action Nesika R action, with keycuts in the bottom instead of recoil lug. A Grünig & Elmiger trigger has been specially modified (milled and pinned) to work with the Nesika action. The primary barrel is a 30″ Broughton 5R Palma-contour tube. Interestingly, Corbin has a second 30″ Broughton barrel chambered in 6mmBR for use at shorter ranges.
The trigger guard, fore-arm rail, cheek adjuster, and 4-way adjustable butt assembly are all custom metal, designed by Dan Gleason. The stock is cut from exhibition-grade fiddleback maple (from Cecil Fredi Gunstocks in Las Vegas) with a Gaboon Ebony tip wood and butt-plate spacer.
Fast and Accurate
Corbin tells us the gun will put five shots into the size of a quarter at 300 yards “when he does his part.” Corbin shoots pointed Berger 105gr VLDs and 45.5 grains of H4831SC. That load runs 3180 fps. He can push it faster, but “that’s where the node was and where it shoots best”, according to Corbin.
Forum member Jim Hardy has seen (and shot against) this beautiful rifle. Jim reports: “A casual observer might think that the trigger guard, cheek plate and butt plate hardware are Anschutz — as the stock takes on the Anschutz prone pattern. However, this is ALL custom metal. The G&E trigger breaks like a glass rod and will makes my BR triggers feel inferior at best. I had the pleasure of holding, shouldering, and lusting over this gun at Camp Perry… and it is even more impressive in person. The killer is that there is yet ANOTHER one in a beautiful, dark figured walnut owned by Corbin’s shooting partner. BTW, both guns will hammer at 1000 yards prone.”
Long Range Prone Shooting with the .243 Winchester
Is the .243 Winchester capable at 1000 yards? Absolutely. John Whidden has used the .243 Win to capture multiple NRA National Long-Range Championships. John selected the .243 Win because it offers excellent ballistics with manageable recoil. John says that, at least for a sling shooter, the .243 Win is hard to beat at long range. John explains that, while you CAN get somewhat better ballistics with a .284 Win or .300 WSM, you’ll pay a heavy price in increased recoil with those bigger cartridges.
Running at an impressive 3275 FPS from his .243 Win, Berger 6mm 105 grain Hybrids are hard to beat, according to Whidden: “My .243 Win shoots inside a 6.5-284 with 142-grainers. Nothing out there is really ahead of [the .243], in 1000-yard ballistics unless you get into the short magnums or .284s and those carry a very significant recoil penalty.” John has tried bigger cases: “In the past I did shoot the 6.5-284. I went to the .243 Win because it had similar ballistics but had much less recoil. It doesn’t beat me up as much and is not as fatiguing.” READ Whidden .243 Winchester Report.
Hunting season is coming soon in most areas of the country, so many of our readers will soon be trekking in the backcountry in pursuit of deer, elk and other game. As a way to celebrate the outdoors, here are some great rifle-centric outdoor photos courtesy of Nightforce Optics. Perhaps these “gunscapes” will encourage you to grab your rifle and head out to the range this Labor Day to sight-in your rifle and get ready for hunting season. These images can be an inspiration for a September shooting adventure.
These fine photographs remind us of the lure of the great outdoors for a rifleman. We hope that many of our readers will soon experience the grandeur of America’s mountains and wild backcountry. These images were part of a series of rifle photos posted on the Nightforce Facebook page. Can you identify the optics, and any of the locations?
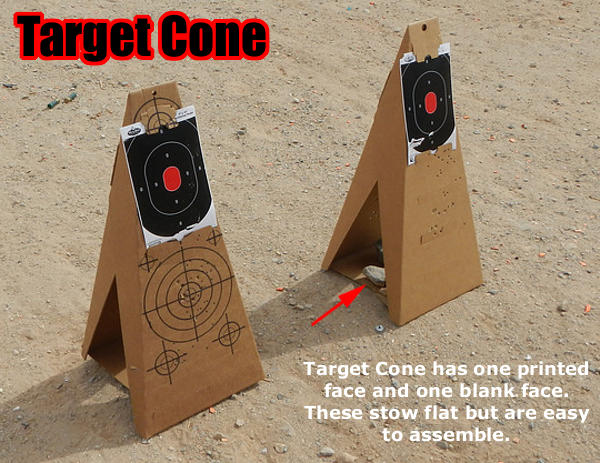
Sometimes you have an opportunity to go shooting but you’re a long way from home and don’t have your regular tall target frame(s). Here’s a handy product — a 28″ tall foldable cardboard cone — you can easily carry in your vehicle and deploy any time.
With this innovative Target Cone you can easily carry a target-holder wherever you go. The Target Cone from Re-Nine Safety transports flat so it can be easily stowed in the trunk of your car (or even under a seat). When you’re ready to use it, simply fold the flaps to create a self-supporting cone with pre-printed targets on one side. Place a rock on the base to hold it steady. The Target Cone can be used by itself or, as shown below, you can attach other targets, such as Re-Nine’s Silhouette Target (below right).
We think this is a great innovation. Keep a couple Target Cone flats in the back of your car or truck and you’ll always have a target support. For spur-of-the-moment range sessions, this is much easier than toting around a big target frame. The Re-Nine Safety Target Cones come flat, fold together and interlock forming a sturdy 28″ tall stand-alone target. These are sold as a 5-pack for $25.00.
If you shoot high quantities of ammunition in pistol or rifle competition, you should consider acquiring a good progressive press. Because multiple operations (sizing, powder dropping, bullet seating etc.) take place with a single pull of a lever, a progressive press can produce way more ammo in a given period of time than any single stage press. With a progressive, on the ram up-stroke, the multiple stations can simultaneously remove spent primer, full-length size case, drop powder, seat bullet, and crimp (if desired). Most progressives are also set up to prime cases with the ram in the lower position — though some guys prefer to prime manually.
Progressive presses aren’t just for high-output pistol ammo or bulk rifle ammunition. Good progressives can be adapted to do certain reloading tasks for top-on-the line match ammo. You might use a progressive for decapping, priming, and sizing, then throw powder and/or seat bullets separately. Some Champion shooters do use progressives to load their match ammo! For example 5-Time National Long Range Champion John Whidden and 2020 Berger SWN F-Open Champion Jay Christopherson both use progessive presses for some (but not all) operations.
To help you get started with progressive presses, here are six videos from UltimateReloader.com that cover seven popular machines, from the elite Mark 7 Evolution to the affordable Lee Loadmaster. With many of these machines you can add separate vertical bullet feeder systems that further increase loading efficiency. Machines Covered: Lyman Mark 7, Dillon XL-650, Dillon XL-750, Dillon RL-550c, RCBS Pro Chucker 7, Hornady Lock-N-Load AP, and Lee Load Master.
Mark 7 Evolution Press — Distributed by Lyman
Dillon XL-650 vs. Dillon XL-750
RCBS Pro Chucker 7 with Bullet Feeder
Dillon 550C with 6mm Creedmoor and 9x19mm
Hornady Lock-N-Load AP Progressive
Lee Load-Master Features and Loading 9mm
SAFETY BONUS — Why You Need a Lock-Out Die
The RCBS Lock-Out Die can also be used with some Dillon and Hornady progressive presses.
If you load pistol or rifle ammo with a progressive press, we strongly recommend you get a Lock-Out Die from RCBS. This unique reloading die will prevent your progressive press from advancing if the dispensed powder charge is more or less than about 0.3 grains too high or too low. The Lock-Out Die really works.
The Lock-Out Die works by using a central die detection rod that sets its vertical position based on the height of the powder column in the case. Through an ingenious design, if the powder column height is too low or too high, the rod locks in place as you start to pull the press handle. This halts the press before the ram can lift and the cartridge plate can advance. Unlike a beeping alarm system (which can be ignored or defeated), the Lock-Out Die physically stops the movement of the press ram and prevents a bullet being seated in the “problem” case.
It takes a bit of tweaking to get the Lock-Out Die detection rod setting just right, but once it is correctly positioned, the Lock-Out Die works smoothly in the background. The Lock-Out Die won’t interfere with the loading process unless it detects a high or low charge — and then it positively stops the progressive loading cycle.
While crafted for use in RCBS progressive presses, the RCBS Lock-Out Die can also be used on a Dillon XL Progressive or Hornady Lock-N-Load progressive — though it does take up one station which could otherwise be used for a final crimp die (after the seating die). This Editor has used the RCBS Lock-out die very successfully on an RCBS 2000 progressive press for many years.


 High-Tech Rimfire Rigs


 Today’s Sunday GunDay feature is a “blast from the past”, part of our big