Most of us own a .223 Rem rifle. Now, thanks to our friends at Rifleshooter.com we can assess exactly how velocity changes with barrel length for this popular cartridge.
Rifleshooter.com performed an interesting test, cutting the barrel of a .223 Rem rifle from 26″ all the way down to 16.5″. The cuts were made in one-inch intervals with a rotary saw. At each cut length, velocity was measured with a Magnetospeed chronograph. To make the test even more interesting, four different types of .223 Rem/5.56 ammo were chron’d at each barrel length. The Rifleshooter.com team that conducts these tests has a full-service gun shop, 782 Custom Gunworks — visit 782guns.com.
Test Barrel Lost 25.34 FPS Per Inch (.223 Rem Chambering)
How much velocity do you think was lost, on average, for each 1″ reduction in barrel length? The answer may surprise you. The average speed loss of the four types of .223/5.56 ammo, with a 9.5″ shortening of barrel length, was 240.75 fps total (from start to finish). That works out to an average loss of 25.34 fps per inch.
5.56/.223 Barrel Cut-Down Speed Test 26″ to 16.5″
Start FPS at 26″
End FPS at 16.5″
Total Loss
Average Loss Per Inch
UMC .223 55gr
3182*
2968
214
22.5 FPS
Federal M193 55gr
3431
3187
244
25.7 FPS
Win m855 62gr
3280
2992
288
30.3 FPS
Blk Hills .223 68gr
2849
2632
217
22.8 FPS
*There may have been an error. The 25″ velocity was higher at 3221 fps.
Rifleshooter.com observed: “Cutting the barrel from 26″ to 16.5″ resulted in a velocity reduction of 214 ft/sec with the UMC 223 55-grain cartridge, 244 ft/sec with the Federal M-193 cartridge, 288 ft/sec with the Winchester M855 cartridge and 217 ft/sec with the Back Hills 223 68-grain match cartridge.”
How the Test Was Done
The testers described their procedure as follows: “Ballistic data was gathered using a Magnetospeed barrel-mounted ballistic chronograph. At each barrel length, the rifle was fired from a front rest with rear bags, with five rounds of each type of ammunition. Average velocity and standard deviation were logged for each round. Once data was gathered for each cartridge at a given barrel length, the rifle was cleared and the bolt was removed. The barrel was cut off using a cold saw. The test protocol was repeated for the next length. Temperature was 45.7° F.”
See More Barrel Cut-Down Tests on Rifleshooter.com
Rifleshooter.com has performed barrel cut-down tests for many other calibers/chamberings including 6mm Creedmoor, .308 Winchester, and .338 Lapua Magnum. See these test results at Rifleshooter.com.
Much Different Results with 6mmBR and a Longer Barrel
The results from Rifleshooter.com’s .223/5.56 test are quite different than the results we recorded some years ago with a barrel chambered for the 6mmBR cartridge. When we cut our 6mmBR barrel down from 33″ to 28″ we only lost about 8 FPS per inch. Obviously this is a different cartridge type, but also our 6mmBR barrel end length was longer than Rifleshooter.com’s .223 Rem start length. Velocity loss may be more extreme with shorter barrel lengths. And, of course, different cartridge types and powder/bullet combinations will yield different results.
If you want to use an AR-platform rifle in the varmint fields, consider getting a 20-caliber barrel chambered for the efficient, low-recoil 20 Practical cartridge. The 20 Practical is simply a .223 Remington necked down to 20 caliber. The parent .223 Rem cartridge of course works great in an AR, but the 20 Practical offers some notable advantages for high-volume varmint shooters. The 20 Practical delivers very high velocity with very low recoil while still providing outstanding accuracy. The 20 Practical is great option for folks who favor “fast and light” — smaller, lower-mass bullets traveling at very high velocities. This little cartridge can launch 40-grainers at over 3900 fps, and 32-grainers even faster. This makes the 20 Practical a great choice for an AR-based varmint rifle.
20 Practical Ultimate Varminter
Over a decade ago, as a “proof-of-concept”, AccurateShooter.com created a 20 Practical AR15 Ultimate Varminter with a custom 20-caliber upper from Robert Whitley of AR-X Enterprises, LLC. That project rifle was ultra-accurate — every 5-shot group out of the gun was less than the size of a dime. That gun was auctioned off, but Robert Whitley produced many other 20 Practical AR15 uppers. (The 20 Practical cartridge is simply the .223 Rem necked down to 20 caliber — you can use standard .223 brass and load with standard.223 Rem dies. Just swap in a smaller expander and use smaller neck bushings.)
Robert learned that the accuracy of the first 20 Practical AR15 was no fluke. After building six (6) more 20 Practical uppers, he tested them for accuracy and they all shot great. These uppers featured DPMS low-pro receivers with side-charging handles. They are fitted with PacNor 1:11″ twist, 3-groove stainless barrels. Three of the uppers had 24″ barrels, two had 20″ barrels, and one had an 18″ barrel (See below).
Robert reports: “We [made] more 20 Practical AR15 uppers and I have to say I am astounded by the accuracy of [all those uppers]. For shooting little tiny groups out of an AR15 with bullets going 3500+ fps, it’s hard to beat the 20 Practical cartridge.”
In four of these uppers I shot re-sized Winchester brass using 25.3 grains of WC844 powder with Berger 40gr BTHP bullets loaded at 2.225″ OAL (about .015″ off the lands). WC844 is inexpensive military surplus powder that is nearly identical to H335. I tried three different primers and the choice did not seem to matter (CCI BR4, Rem 7 1/2s and Win Small Rifle — the old silver ones). All these four uppers shot great.”
Below is an animated GIF with targets from uppers #6, 10, and 11. All groups are mag-fed, 5-shot groups shot at 100 yards using a front rest and rear bag.
Targets Shot with Three Different 20 Practical AR Uppers
20 Practical Shooters Explain Why They Love this Little Cartridge
A popular thread in our Shooters’ Forum focuses on favorite variants of the .223 Rem cartridge. The thread asks: “What is your favorite and most versatile round that you have made from a .223 Rem parent case?” Many cartridges were named, but the wildcat cartridge cited most often was the 20 Practical. Here are some comments by Forum members, who explain the appeal of this great little 20-caliber cartridge:
“The 20 Practical is just a hoot to shoot. Outstanding precision, minimal recoil, easy case forming and inexpensive to shoot. What’s not to like?” — JLT
“The 20 Practical for me. Never had as much fun shooting a rifle as I did with the 20 Practical. Also, [it is] the easiest wildcat to form. Just get cases, a couple of bushings to get the right neck tension, and you are shooting.” — NMKid
“My favorite was and is the 20 Practical. No fire-forming, no neck-turning, and with the increased BC of the 20 Cal bullets, it’s hard to wipe the smile off your face in a prairie dog town[.]” — Region Rat
“20 Practical and the [original] .223 Rem are my favorites. Accurate, cheap to shoot. The 20 Prac allows you to see your hits and it’s fast.” — Alguapo
Smart Tips on Forming 20 Practical Cases
Varmint ace Warren B, aka “Fireball” in our Forum, explains how to form 20 Practical Cases. “Forming 20 Practical cases is very easy and no fire-forming is required. Start with any good quality .223 Rem brass. One can simply run the case into your bushing die with the appropriate bushing and call it done. I however like to make it a little more involved by doing the neck reduction in steps. I find that taking steps doesn’t overwork the brass as much as one step does. Also, if you resize the neck in too large of a step, sometimes, depending on the neck thickness, the neck will not be dimensionally what you would expect when finished. This is especially important towards the last step when one is getting close to the final required neck diameter.
For my cases the first thing I did was to run them into an old RCBS .223 Rem full length die with the decapping assembly removed. This will take care of any dented necks on the raw cases and bring the necks down to around 0.243″. Since all standard full-length dies oversize the necks way too much, starting with a .223 FL die actually reduces the neck diameter quite a bit — and obviates the need to buy an extra bushing for the first step. I then use my Redding Type-S die with two bushing sizes to get down to where I need to be. In other words, I start with the FL sizer, then move to a Type-S with a 0.233″ bushing and finish with a 0.228″ bushing. I use progressively smaller increments in size between the reductions.”
Efficient Loading of 20 Practical Cartridge
The beauty of the 20 Practical as a cartridge is its simplicity. You can start with .223 Rem brass, and use .223 Rem dies with minor modifications. No special case-forming dies are necessary. To prepare the brass, all you need is a .223 Rem bushing die with .233″ and .225″ bushings, plus a 20 Cal decapping rod assembly, Redding part #14206. First remove the .223 Rem decapping assembly and replace it with the 20 Cal decapping rod assembly (the same assembly used with Redding .204 Ruger dies). Put the .233″ bushing in a Redding Type ‘S’ bushing die and run your cases through for a first pass. Then swap in the smaller .225″ bushing for the second pass. Now your brass is sized and ready for loading.
You can seat bullets using a regular Redding, Whidden, Lee, or Hornady .223 Rem seating die with no mods. Use the .225″ bushing for neck sizing for all subsequent loadings once the cases have been necked down the first time. It is simple and easy.
In the above video, Robert Whitley shows how to neck down .223 Rem brass using two bushings in sequence. Then seats a bullet with the Redding Comp Seater die. To save time in the video, Robert skipped the steps of adding primer and powder. But those steps require no special equipment for the 20 Practical.
20 Practical vs. 20 Tactical
Varminter Kevin Weaver, who shoots both the 20 Practical and 20 Tactical, states that: “Both the 20 Tactical and the 20 Practical are fine .20 caliber cartridges. However, my favorite would be the 20 Practical. The 20 Practical gives the SAME performance as the 20 Tactical without fire-forming, or having to buy expensive forming dies.
So with the 20 Practical you do less work, you shell out a lot less money, yet you give up nothing in performance. What’s not to like? To create 20 Practical cases, just buy a .223 Rem Redding Type “S” Bushing Die set with a .230 or .228 bushing and have fun with this great little cartridge.
The 20 Practical and the 20 Tactical are almost identical cartridges. There are only slight differences in case outside diameter, shoulder angle, and case body length. Neck length on the 20 Tactical is a bit longer, but there is still plenty of neck on the 20 Practical to grip the popular bullets, such as the 32gr V-Max.”
20 Practical and 20 Tactical Specifications:
Cartridge
Bolt face to shoulder
Shoulder O.D.
Shoulder Angle
Total length
20 Practical
1.5778″
.3553
23°
1.760″
20 Tactical
1.5232″
.360
30°
1.755″
Parting Shot — Yes the 20 Practical works in Bolt Guns too!
“Favorite .223 Rem Wildcat? The 20 Practical hands down for me. I have two of them built on Savage actions right now. One has a 20″ BHW barrel and the other has a 26″ Criterion. It is my go-to caliber for shooting up a Prairie Dog town and the ones I have are insanely accurate. Here are some typical 100- and 200-yard groups with my 20 Practicals.” — IA_Shooter
Can a human, with a sling, shoot as well as a mechanical rest? The answer is “yes” (at least once in a great while) IF that sling shooter can deliver a record-breaking performance. Here’s an interesting tale of man vs. machine from our archives…
The USAMU posed an interesting challenge — could one of their shooters match the performance of a mechanical rest? Who would win in this battle between man and machine? You might just be surprised. At 600 yards, with an AR-platform rifle, the results can be remarkably close, based on targets provided by the USAMU. When clamped in a test rig, a USAMU M16A2 produced a 200-18X group with handloads. The USAMU says this was “one of our better 20-shot groups at 600 yards, testing ammo from a machine rest”. Can a human do better?
Remarkably, a human soldier came very close to matching the group shot from the machine rest. The photo below shows a 20-shot group shot by a USAMU marksman with sling and iron sights, using USAMU-loaded ammunition. The score, 200-16X, was nearly the same. As you can see, the USAMU rifleman didn’t give up much to the machine rest, even at 600 yards!
In fairness, this was no ordinary human performance. The 200-16X score represented a new National Record set in December, 1994. This was fired by PFC Coleman in an Interservice Match at Okeechobee, Florida. Brilliant Performance.
Photos and Facebook post by Tactical Rifle Shooters
Yet another .300 Blackout disaster. Unfortunately, that .300 Blackout cartridge can fit in a .223 Rem chamber. Shooting a .308-caliber bullet in .223 bore is a recipe for disaster.
The .300 AAC Blackout aka “300 BLK”, is a compact 30-caliber cartridge designed to work in AR-15 rifles. It has a shorter cartridge case to accommodate the bigger 30-caliber bullet while still fitting in a standard AR-15 magazine. Unfortunately, that’s the danger. A careless shooter can toss a .300 Blackout cartridge in with .223 Rem rounds without noting. And because the case-head size is the same as the .223 Rem (5.56×45) the rifle’s bolt assembly will happily chamber and fire the .300 BLK round. Problem is, that forces a .308 diameter bullet down an undersized .223-caliber bore. Not good!
This images were provided by Tactical Rifle Shooters on Facebook. The message was clear: “Don’t try to run 300 Blackout in your .223/5.56mm. It won’t end well. The problem is identical rifles and identical magazines but different calibers.”
Image from Accurate Shooter Forum. Cutaway shows the jammed .30-Cal bullet:
For those who MUST have a .300 Blackout, here are some things you can do:
1. Use different colored magazines for .300 Blackout vs. .223 Rem.
2. Fit all your uppers with caliber-labeled ejection port covers.
3. Mark .223 Rem upper handguards with the caliber in bright paint.
4. Mark all .300 BLK Rounds with heavy black marker.
Comments by Folks Who Viewed these .300 Blackout Disaster Photos:
“The .300 Blackout is simply a badly-designed round. A properly-designed round would have had a feature in the shape that would have prevented cross loading in the first place.” — D. Santiago
“I almost made that mistake… I had a magazine of 300 BLK inserted in my .223/5.56 all night. Fortunately, I never pulled the trigger. Once I realized the mistake, I almost got ill. [After that incident] I no longer own a 300 BLK.” — B. Welch
“Happened to me hog hunting from a helo. Gun exploded in my face.” — B. Hood
“Fire-forming projectiles [is] so wrong in centerfire!” — M. Stres
“Had some dude come into the store the other day wanting .300 Blackout ammo to shoot in his 5.56 AR. It took 15 minutes of explaining for him to understand you got to have a .300 Blackout Upper!” — R. Williams
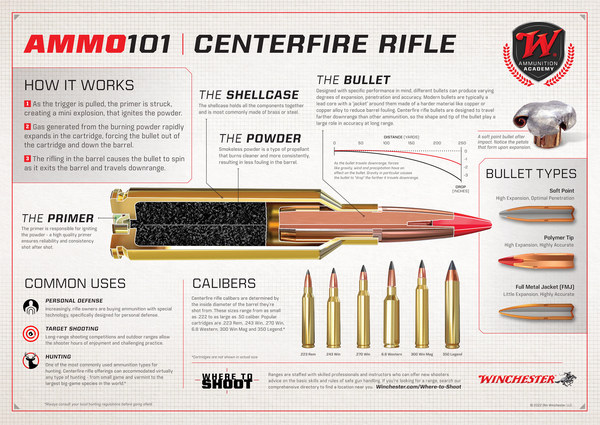
Winchester’s new “Introduction to Ammunition — Ammo 101” is a four-part series including custom illustrations and information for four major ammunition categories: rifle, pistol, rimfire, and shotshell. The Ammo 101 series provides a detailed overview of centerfire rifle, centerfire pistol, rimfire, and shotshell ammunition, showcasing ammunition construction, components, calibers, and common usage. The Ammo 101 resource is free to download from Winchesters.mediaassets.com. Or, simply click one or more diagrams below. Each image will launch a large PDF which you can print or download.
TIP: Click Each Image for Full-Screen Printable PDF
Shown below are the first four ammunition information sheets prepared by Winchester. These show all the key components of cartridges and shotshells, and explain the functions. These diagrams are useful for training, and for persons getting started in reloading.
Ammo 101 Centerfire Rifle Cartridge Diagram (click for PDF)
Ammo 101 Rimfire Cartridge Diagram (click for printable PDF)
Ammo 101 Pistol Cartridge Diagram (click for printable PDF)
Ammo101 Shotshell Diagram (click for printable PDF)
About the Ammo 101 Series
The FREE Ammo 101 resources can help instructors nationwide who introduce new entrants to the shooting sports and hunting. Instructors can incorporate these resources into their training presentations, use them as handouts, or have them printed locally.
“The basics of ammunition… is what we want to deliver with the Ammo 101 series,” said Matt Campbell, Winchester V.P. of Sales & Marketing. “With millions of people across the United States starting their journey in the shooting sports as new firearm owners, providing easy-to-understand information on ammunition types is one way we can help educate our customers.”
First there was F-Class, and now there will be E-Class, the “E” standing for “Economy”. The NRA Competitive Shooting Division has just approved a new form of rifle competition starting in 2025: E-Class. Unlike F-Class, E-Class will have tight rifle and gear cost controls. This is a clear response to rising F-Class costs, which have spiraled out of control. The first major E-Class National event will be a preview match held this summer at Camp Atterbury in Indiana.
The NRA’s sanctioning of E-Class competition makes sense. Let’s face it, top-level F-Class competition, both F-TR and F-Open, has become just too expensive. A modern F-Open rifle capable of winning a championship can now cost $9000.00 or more, including rest, premium trigger, and optics. Under the NRA’s new E-Class Rules, rifles can cost no more than $2000.00 total, including optics and rest (E-Open) or bipod (E-TR). In addition, new E-Class rules will recognize a special division, called E-Factory, that is limited to factory rifles, such as the Savage Axis II and Howa rifles. The E-Factory Class will also be restricted to .223 Remington to keep ammo costs down.
COST COMPARISON — F-Open, E-Open, and E-TR Factory
E-TR Factory Division
Complete Rifle
Savage Axis II: $1079 MSRP
Barrel: Included
Stock: Included
Optics: $500
Trigger: Included
Bipod: $150
Rear Bag: $50 Total: $1779.00
Under the new E-Class rules, TOTAL Cost for an E-Open or E-TR Rifle is limited to $2000.00, including optics, front rest or bipod, and rear bag. There are specific gear limits. Scope maximum is $500.00. Front rest or bipod is limited to $300.00. In the chart above you see how an E-Open rifle could be built for $1900 with a $400 action and a $400 optic. In the third column we’ve priced out an E-Factory rifle, based on a Savage Axis II Rifle, at $1779.00.
A top-of-the-line F-Open set-up like this can cost more than $8000.00 with custom stock, high-end optic, and coax front rest. All new E-Class rifles must cost less than $2000 including rests and scope.
These E-Class rigs cost less than a quarter of the price of a Top-of-the-line $8750.00 F-Open Rig. That’s a huge savings, that will allow more shooters to enjoy competitive shooting. E-Class combines the fun challenge of the F-Class course of fire, with a vastly lower investment. With the rising costs of taxes, food, fuel, and everything else, it’s high time we get serious about the money we throw away on competition rifles. We know the wives will approve!
Keeping on Lid on Expenses
In the Wings — Controls on Ammo Costs as Well
Shooters know that the price of the rifle, optics, and rests is only part of the cost equation. The price of ammunition is also significant. Currently, in F-Open, competitors can easily pay $1.40 per round just for the expendables — bullets, powder, and primers. Add in the cost of premium cartridge brass and the cost per shot goes up significantly. One competitor lamented “Shooting a match these days really empties your wallet. I cringe every time I pull the trigger, knowing what it costs.”
Therefore, the NRA is considering E-Class ammo restrictions. Starting in 2026, E-Factory class competitors would be required to shoot recycled bulk brass and blem bullets. Bulk Lake City 5.56 brass will be offered by ARMorAlly.com, and blem bullets will be offered by Midsouth Shooters Supply. Purists may complain about using surplus brass, but it only costs $199.99 for 500 cases! That’s a huge savings.
The Final Step — Claiming Rules for E-Class
As in every competitive endeavor, there may be temptation to bend or even break the rules. Predictably, some E-Class competitors may try to substitute more expensive components, such as high-cost triggers, or modified actions. To prevent this, the NRA plans to impose claiming rules for E-Class matches. This means that any rifle that captures first or second place in a major match can be claimed by another competitor for the fee of $2000.00. This procedure may seem radical but it is used in other sports to ensure parity among the competitors. If a shooter wins with a “cheater” $5000.00 rifle, he can be forced to sell it to a competitor for $2000.00.
Right now the 2025 Southwest Nationals 1000-yard individual competition is underway at the Ben Avery range outside Phoenix. Along with the F-Class matches (for F-TR and F-Open), there is a “hard-hold” division with competitors shooting rifles with sling in prone position. At the SWN this sling division has two sub-classes: “A” for “Any Rifle, Any Sight” and “P” for Palma rifles. These Palma rifles must shoot with iron sights, and they are limited to two chamberings: .223 Remington (5.56×45) and .308 Winchester (7.62×51). These Palma rifles typically feature long barrels for enhanced velocity, and a sophisticated stock that offers multiple adjustments.
Palma rifle division shooter at the Southwest Nationals a few seasons back.
Today’s Saturday showcase we features six videos showing key features of modern Palma rifles. In addition, we offer insight into loading the .308 Win cartridge for long-range accuracy. Even with iron sights, modern top-tier Palma rifles are capable of shooting exceptional scores at 600 to 1000 yards.
About Palma Rifle Competition
The Palma discipline is a prone Iron Sight competition that originated in 1876, making it the second oldest continuing rifle match in the world. Except for a hiatus in the late 1900s, there is a nearly 150-year history of Palma matches. The Palma Course of Fire includes stages at 800, 900, and 1000 yards. At each yard-line you get two (2) sighting shots followed by 15 shots for record, for a grand total of 51 shots.
Under U.S.A. Palma rules the gun must be a rifle with metallic sights chambered for .308 Win (7.62×51) or .223 Rem (5.56×45). Most of the rifles featured in these videos are chambered for .308 Winchester, but we do have a video of John Whidden shooting his .223 Rem Palma gun — you’ll notice the significantly reduced recoil. CLICK HERE for more information on Palma Rules.
Here is Bryan Litz, creator of Applied Ballistics software, with his .308 win Palma rig.
Components of Modern Palma Rifle and Palma Competition Basics
We definitely recommend you watch this video. Hosted by SSG Robert Germanelo of the U.S. Marine Corps Shooting Team, this video explains the basic rules of Palma competition and covers the key features of a modern, tubegun-style Palma rifle. The featured rifle has a Eliseo Competition Machine stock, Krieger 30″ 1:13″-twist barrel, Defiance Machine single-shot Rem 700-compatible action, Jewell trigger, Warner Tool Aperture Rear Sight, and Stallings Machine “Right Sight” in the front.
John Whidden Shoots His Modern .223 Rem Palma Rifle
With the latest bullets, long barrels, and strong Lapua brass, the .223 Rem CAN compete successfully in modern Palma competition. Here we feature a .223 Rem Palma rig belonging to 5-time NRA Long Range Champion John Whidden. Watch video at 00:25 and you’ll see the recoil of Whidden’s .223 Rem Palma rifle is significantly less than a .308 Win Palma rig. John joked: “With the .223 Rem there is just a pop and a wiggle after the shot.” CLICK HERE for full 1200-word report on this rifle with many more photos.
Modern .308 Win Palma Rifle with Custom Anschutz-style Stock
Here a Palma competitor showcases his modern .308 Win Palma rifle built with an custom-made, Anschutz 1913 model-style stock with the main frame crafted by the host’s father. This rig has a 30″ barrel chambered for 155gr bullets. The video explains how the components were chosen, why the barrel is so long, and how the stock adjusts in numerous ways to fit the shooter’s particular prone style. Below is a diagram of the sight picture. This is covered at 1:56 in the video.
Palma Rifles Shooting 1000 Yards at Bisley in the UK
This UK-produced video features Palma matches at the Stickledown Range at Bisley. This video showcases the Inter-Counties match, where competitors use iron-sighted Palma rifles on targets at 1000 yards. This video provides a good introduction to the Palma discipline as practiced in Great Britain.
Canadian Palma Fun — Nova Scotia Shooters at 900 Yards
In this video, filmed at a beautiful range in Nova Scotia, two Canadian shooters compete at 900 yards with their iron sighted .308 Win Palma rifles. The video combines three different views into one frame, so you can simultaneously see downrange, see the shooters, and see the shot impact on the electronic target display. The shooters fired .308 Win cartridges loaded with Vihtavuori N140 powder and 155gr Sierra #2156 PALMA bullets.
Ballistics Guru Shoots Palma at 800 Yards
The talented Bryan Litz, head honcho of Applied Ballistics LLC, demonstrates his shooting skills in this video. Watch Byran complete the 800-yard phase of the Palma course shot at Camp Atterbury, Indiana in the summer of 2008.
Palma Chambering and Bullet Weight Limits
There is, understandably, quite a bit of confusion concerning caliber limitations for Palma rifles and Palma competition. Some folks say you can shoot a .308 Winchester (or 7.62×51) with a bullet weight up to 156 grains. Others say you can shoot a .308 Win (or 7.62×51) with any bullet weight. Still others opine that you can shoot EITHER a .223 Rem (5.56×45) or a .308 Win (or 7.62 NATO).
So who is right? Well, all these viewpoints are correct in part. That’s because different rules apply in different venues. In most, but not all United States Palma competitions, you can shoot either a .223 Rem or .308 Win with no restriction on bullet weights. But in some U.S. Matches, most notably the Spirit of America, certain prizes are limited to .308s with 156gr max bullet weights OR .223s with 81gr max bullet weights. What’s the bottom line? In most USA Palma competitions you can shoot either a .308 or a .223 with no limit on bullet weight. In International Palma competitions you can shoot either a .308 or a .223 but the max bullet weight is limited.
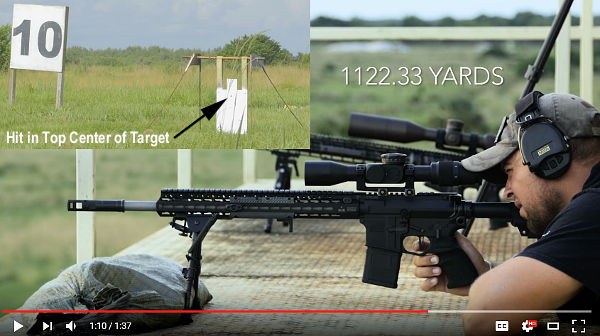
Many of our readers have never had a chance to shoot much past 600 yards. How far away does a 1000-yard+ target really seem to the naked eye? Well this short video answers that question. Gorilla Ammo, the video’s producers, used a camera-carrying aerial drone to fly downrange from the firing line all the way out to 1122 yards (and back again). Watch the drone footage at 0:00-0:07 and especially 0:48-1:03. The “bird’s-eye view” really gives you a sense of the distance. The “fly-back” at 0:48-1:03 time-mark is what makes this video worth watching.
The video features prone shooting at steel targets placed at 750 and 1122 yards. We do apologize for the lame, “oh so serious” voice-over which attempts to make this rather ordinary range session seem like some kind of life-changing experience. (Frankly, you may just want to turn the sound off — it’s that annoying.) It’s really not that big a deal to hit steel at 750 yards with a quality AR-15, chambered in .223 Rem, shooting Sierra 77 grain MatchKings.
Hitting Steel at 1122 Yards with 2540 FPS Ammo Can Be Challenging
The 1122-yard hits are a bit more impressive. Gorilla Ammo lists a relatively sedate 2540 fps Muzzle Velocity for its .223 Rem 77gr SMK ammunition. According to JBM Ballistics, at 1125 yards, that 2540 fps load has 68.3 MOA of drop from a 100-yard zero (firing at sea level and 80° F ambient). Moreover the bullet goes trans-sonic around 750 yards (losing stability) and is traveling just 933 fps at impact. And the wind’s the killer — at 1125 yards, with this bullet/load, a mere 2 mph, full-value wind change can move the Point of Impact over three feet!
Howa Model 1500 Mini Action rifles are popular with hunters and varminters. These rifles have smooth actions, very good 2-stage triggers, are lighter than most rifles, and are very affordable. And now Mini Action rifles are offered in the modern 22 ARC cartridge. Developed for the AR-15 and small actions, the 22 ARC is efficient and allows use of high-BC bullets in a very compact action. We think the 22 ARC is a great choice for a field-carried varmint rifle.
The Howa Mini Action series has been offered with a half-dozen chambering options and now the 22 ARC is available — a very good option for varmint shooting and small game. Hornady claims the 22 ARC outperforms all .22-caliber cartridges in its class. In the Mini Action, the 22 ARC rivals 22-250 performance, has dual-purpose match and varmint applications and is designed to take advantage of today’s long ogive, high-BC bullets with a variety of ammo offerings available from Hornady. Along with the 22 ARC, HOWA Mini Action rifles are offered in .223 Rem, 7.62×39, 6.5 Grendel, 6mm ARC, 350 Legend, 300 Blackout.
Howa 22 ARC Mini Action Features and Options:
Barrel Options: 22″ Steel, 20″ Light Varmint Steel, or 20″ Carbon Fiber Barrel (all 1:7″ twist). Threaded barrels are suppressor-ready.
Receiver (Action): Compact machined receiver with forged one-piece bolt and tool-less firing pin removal
Stock Options: Synthetic OD, Black & Yote dip, Walnut, Carbon Fiber, or APC Chassis
Trigger: Excellent two-stage trigger with 3-position safety
Magazine: Standard 5-round detachable magazine
HOWA Mini Action bolt is 09″ shorter than a short action, and 1.4″ shorter than a long action.
About the 22 ARC Cartridge
The 22 ARC (Advanced Rifle Cartridge) is a compact cartridge that fits into an AR-15 but is equally at home in a bolt action. The modern catridge shape is efficient and allows longer bullets to be fitted. The case capacity and sized offers performance, that rivals the 22-250. This makes the 22 ARC a good choice for varminters who want something with more punch than a .223 Remington case.
Hornady states: “The 22 ARC was engineered to use modern, high-BC bullets. Designing the cartridge and chamber in unison provides consistent accuracy, great velocity spreads and an outstanding shooting experience. This cartridge is the result of careful and meticulous design, following the same proven methodology as the highly acclaimed 6mm ARC.”
The 22 ARC is tailored to fit the AR-15 platform with a maximum overall length of 2.260″. In both ARs and bolt guns such as the Howa Mini, the cartridge should feed and function very well.
For many years, the U.S. Army Marksmanship Unit (USAMU) regularly published reloading “how-to” articles on the USAMU Facebook page. In this article, the USAMU’s reloading gurus address a question frequently asked by prospective handloaders: “Should I buy a single-stage press, or a progressive?” The USAMU says the best answer is Solomon-esque in both its wisdom and simplicity: “Get BOTH!” However, there is definitely more to the issue, as the USAMU explains below.
Progressive Press Safety Considerations
by USAMU Staff
Many are the beginning handloaders who have asked a friend about their “setting up” a progressive press for them. The idea is that the newbie could then just feed in components and crank out buckets of practice ammo without needing to really learn much about handloading. Tempting though this might be, that’s simply not how it works. Such an approach might be ok if there were never a malfunction with either press or operator, but that’s unrealistic. Our hypothetical newbie would then lack the knowledge to problem-solve most situations.
Worse yet, several different handloading operations would be occurring at different stations on the progressive press at the same time. It takes an experienced operator to keep track of, and truly understand the significance of, all those potential mini-problems. Loading without this experience is a recipe for potential disaster – such as a double powder charge (especially with pistol cartridges) dropped while the loader was attending to some other function, etc. Progressives are an animal unto themselves, and while they offer many benefits, they do take some getting used to – even by experienced handloaders!
ILLUSTRATIVE HORROR STORY
Here, enter a 40-year veteran handloader who decided to jump onto the progressive bandwagon late in his career, having used only single-stage presses all his life. A High Master NRA High Power Rifle competitor, he had no background in competitive pistol shooting, where historically most progressive presses are found.
Experienced Action Pistol shooters have typically encountered multiple episodes in which shooters “skipped” a powder charge for some reason, leading to a squib round and a bullet possibly lodged in the bore. Thus, at matches, it’s reflexive for them to yell “STOP!” in unison if they see a shooter get a “click” vs. a “bang”, and rack the slide to keep firing. This writer has personally seen several pistols saved in just such scenarios over the years.
Click No Bang — What NOT to Do
Our High Master set up a popular progressive press and began turning out .223 Rem 100-yard practice ammo with abandon. He was using a moly-coated 52gr match bullet and an economical, fast-burning surplus powder that gave great accuracy. Once on the range, he began practicing strings of rapid-fire. All was well, until he heard “Click!” rather than “Boom”.
Lacking the above experience or onlookers to halt him, he reflexively operated the charging handle on his expensive, custom NM AR15 Service Rifle, and the next trigger squeeze reportedly registered on seismographs over at least a three-state radius. He sat, uninjured but bewildered, until the hail of expensive bits and pieces quit raining down around him.
When the smoke cleared, he immediately cursed the horrid, evil, demonically-possessed progressive press for this, his first-ever reloading mishap. His $1400 NM upper was ruined, but thankfully, his $800 pre-ban lower… and he had escaped injury.
This tale is told not to discourage the use of progressive presses, but to emphasize the need to EASILY and IMMEDIATELY KNOW what is happening with the press at each station, every time the handle is cranked. Not to do so is, as they say, “bad ju-ju.”
It illustrates why we at the USAMU Handloading Shop agree in recommending that new handloaders should begin with a single-stage press. Once one thoroughly learns the steps in each phase of handloading by repeated experience, then one will be qualified to move on to a progressive press.
The single-stage press will REMAIN virtually indispensable for one’s entire handloading career, even after having purchased a progressive press (or two). There are endless small projects that are best handled on a single-stage press, and a poll of USAMU’s Handloading staff reveals that not one would willingly be without his single-stage press, despite owning at least one progressive.


 20 Practical Ultimate Varminter
 Robert learned that the accuracy of the first 20 Practical AR15 was no fluke. After building six (6) more 20 Practical uppers, he tested them for accuracy and they all shot great. These uppers featured DPMS low-pro receivers with side-charging handles. They are fitted with PacNor 1:11″ twist, 3-groove stainless barrels. Three of the uppers had 24″ barrels, two had 20″ barrels, and one had an 18″ barrel (See below).


 Varmint ace Warren B, aka “Fireball” in our Forum, explains how to form 20 Practical Cases. “Forming 20 Practical cases is very easy and no fire-forming is required. Start with any good quality .223 Rem brass. One can simply run the case into your bushing die with the appropriate bushing and call it done. I however like to make it a little more involved by doing the neck reduction in steps. I find that taking steps doesn’t overwork the brass as much as one step does. Also, if you resize the neck in too large of a step, sometimes, depending on the neck thickness, the neck will not be dimensionally what you would expect when finished. This is especially important towards the last step when one is getting close to the final required neck diameter.
 Varminter Kevin Weaver, who shoots both the 20 Practical and 20 Tactical, states that: “Both the 20 Tactical and the 20 Practical are fine .20 caliber cartridges. However, my favorite would be the 20 Practical. The 20 Practical gives the SAME performance as the 20 Tactical without fire-forming, or having to buy expensive forming dies.


 The
The