The 30 BR is an amazing little cartridge. However, 30 BR shooters do have to neck-up 6mmBR or 7mmBR brass and then deal with some issues that can arise from the expansion process. One of our Forum members was concerned about the donut that can form at the new (expanded) neck-shoulder junction. Respected bullet-maker Randy Robinett offers tips on how to deal with the “dreaded donut”.
The Forum member was concerned about thinning the brass if he turned his 30 BR necks after expansion: “Everything I have found on 30 BR case-forming says to simply turn off the bulge at the base of the neck caused by the old 6BR shoulder. I expanded my first case and measured the neck at 0.329″ except on the donut, where it measures 0.335″. Looking inside the case… reveals a groove inside the case under the donut. Now, it is a fact that when I turn that neck and remove the donut, the groove is still going to be there on the inside? That means there is now a thin-spot ring at the base of the neck that is .005 thinner than the rest of the neck. Has anyone experienced a neck cracking on this ring?”
Randy Robinett, who runs BIB Bullet Co., is one of the “founding fathers” of the 30 BR who help prove and popularize the 30 BR for benchrest score shooting. Randy offers this advice on 30 BR case-forming:
While the thinner neck-base was one of our original concerns, unless one cuts too deeply INTO the shoulder, it is not a problem. For my original 30BR chamber, thirty (30) cases were used to fire 6,400 rounds through the barrel. The cases were never annealed, yet there were ZERO case failures, neck separations, or splits. The case-necks were turned for a loaded-round neck diameter of .328″, and, from the beginning, sized with a .324″ neck-bushing.
The best method for avoiding the ‘bulge’ is to fire-form prior to neck-turning (several methods are successfully employed). Cutting too deeply into the shoulder can result in case-neck separations. I have witnessed this, but, with several barrels and thousands to shots fired, have not [personally] experienced it. The last registered BR event fired using that original barrel produced a 500-27x score and a second-place finish. [That’s] not bad for 6K plus shots, at something over 200 firings per case.
Check Out the 30 BR Cartridge Guide on AccurateShooter.com
You’ll find more information on 30 BR Case-forming in our 30 BR Cartridge Guide. Here’s a short excerpt from that page — some tips provided by benchrest for score and HBR shooter Al Nyhus:
30 BR Case-Forming Procedure by Al Nyhus
The 30 BR cartridge is formed by necking-up 6mmBR or 7mmBR brass. You can do this in multiple stages or in one pass. You can use either an expander mandrel (like Joe Entrekin does), or a tapered button in a regular dies. Personally, I use a Redding tapered expander button, part number 16307. This expands the necks from 6mm to .30 cal in one pass. It works well as long as you lube the mandrel and the inside of the necks. I’ve also used the Sinclair expander body with a succession of larger mandrels, but this is a lot more work and the necks stay straighter with the Redding tapered button. This button can be used in any Redding die that has a large enough inside diameter to accept the BR case without any case-to-die contact.
Don’t be concerned about how straight the necks are before firing them the first time. When you whap them with around 50,000 psi, they will straighten out just fine! I recommend not seating the bullets into the lands for the first firing, provided there is an adequate light crush-fit of the case in the chamber. The Lapua cases will shorten from approx. 1.550″ to around 1.520″ after being necked up to 30-caliber I trim to 1.500″ with the (suggested) 1.520 length chambers. I don’t deburr the flash holes or uniform the primer pockets until after the first firing. I use a Ron Hoehn flash hole deburring tool that indexes on the primer pocket, not through
Jonathan Ocab, a High Power shooter from California, had gunsmith Doan Trevor install a Sako-style extractor in the Rem 700 bolt in Ocab’s 6mmBR Eliseo R5 tubegun. Jonathan produced an excellent video showing how the Sako extractor improves the ejection of the short, fat 6mmBR cartridges in his rifle. Jonathan’s video demonstrates 6mmBR case ejection with an unmodified Rem 700 factory bolt versus a factory bolt fitted with a Sako-style extractor.
Johnathan explains: “Note how even when slowly operating the bolt, the bolt with the Sako extractor easily ‘kicks’ out the brass on ejection with minimal chance of operator error resulting in a failure to extract. While the unmodified bolt has issues ejecting brass on slow operation, it will eject if the operator pulls the bolt back quickly (fast and with some force).
While a Sako-style extractor isn’t an absolute necessity, this video shows the definite improvement this modification provides. For short cartridges like the 6mmBR, this is very useful. This modification is highly recommended for competition shooters, especially High Power competitors who seek improved function in rapid-fire stages. This modification is fairly inexpensive and any competent gunsmith should be able to perform the work (usually under $100 with parts and labor).”
EDITOR’s NOTE: In his video, Jonathan deliberately worked the unmodified Remington bolt slowly to show how the standard Rem extractor can struggle with short fat cases like the 6mmBR. In fact, when you work a standard, unmodified bolt more quickly, the extraction can be much more positive. Cycling the bolt with more “snap” provides more energy to eject the cases. We have run an R5 Tubegun chambered in 6mmBR with an unmodified Rem 700 bolt (no SAKO extractor), and the extraction was reliable, provided the bolt was worked quickly.
With the 6mm Dasher cartridge becoming popular with PRS/NRL competitors as well as the benchrest crowd, we thought it was time to re-visit a special rifle chambered for the 6mm Dasher wildcat. This gun has a great story behind it. Forum member Bob A. (aka “Killshot”) used his “Forum Classifieds Special” to beat all comers in the F-Class Division in the American-Canadian Match and the Long Range Regional Match in 2013 in Sacramento, CA.
Bob’s 6mm Dasher sports a blue-printed Rem 700 action. Who says you need a high-dollar custom action to run with the big dogs? In fact, this same gun, built with components sourced from AccurateShooter Forum Classified Ads, set a Sacramento F-Class range record of 200-17X a few years back. In this story, Bob talks about the build, and he explains his methods for loading ultra-accurate Dasher ammo.
Bob’s Budget-Build Dasher F-Classer
I wanted to build a proper rifle for F-Open but needed to keep it simple and, well, cheap. I found a solid “base” to build on in the form of a Dave Bruno-built, “pre-owned” 6-6.5×47 Lapua that I located in the AccurateShooter Forum classifieds in late 2011. The base action was a trued and blue-printed Remington 700 receiver circa 1971 with a spiral-fluted bolt. It was in a Shehane ST1000 stock painted sky blue and had a Jewell 1.5-oz BR trigger. I sent the bolt to Greg Tannel (Gretanrifles.com) to have the firing pin hole bushed and sleeved, the ejector removed and the hole filled and the face trued. I upgraded to Tannel’s Light Steel firing pin assembly while it was out.
Having the working bits completed, I needed a barrel. So I went to the AccurateShooter classifieds again and found a 1:8″-twist, 30″ x 1.25″ (diam.) Bartlein with a 0.236″-land bore. I called Dave Kiff and explained my pursuit and he recommended his PT&G “world record” 6 Dasher reamer (.2704″ no-turn neck and .104″ freebore). A month or so later the reamer and gauges arrived.
I had the barrel chambered by Marc Soulie of Spartan Precision Rifles (510-755-5293, Concord, CA). Marc is a great builder and I’m pleased to call him a friend.
The rifle got its good looks from a Pennsylvania artist named Kenny Prahl. His Prahl Designs shop (724-478-2538) added the white ghost-flames over the existing sky blue metallic paint.
Looks Great, Shoots Better
Fire-forming showed great promise — ten-shot groups of half an inch at 200 yards were typical. I lost only one case to a split neck and the “blow lengths” are good and consistent. This was followed up with load development which saw 100-yard, five-shot groups in the .1s and .2s as the rifle showed its preference for Reloder 15 over Varget powder, and for CCI 450s over all other primers. The bullet of choice was the ever-popular Berger 105gr Hybrid Target.
In February 2012 I began shooting the Dasher in monthly club matches at the Sacramento Valley Shooting Center, the home range of a number of excellent F-Class, Benchrest and High Power shooters. Using a Farley Coaxial rest up front (also picked up from a WTB ad on AccurateShooter’s Forum) and an Edgewood bag in the back, I gradually improved my gun-handling to the point where I could shoot a respectable score. This was very different from the bipod shooting I’d done in the past in F/TR.
Dasher Loading Tips
My chamber is set up for blue box Lapua 6mmBR brass. My case preparation is straight-forward. I fire-form with virgin cases right out of the box. I don’t size them but I will give the primer holes a good look and clean up the flash hole with a .058″ bit in a pin vise. To fire-form, I seat a Berger 108gr BT .030″ into the lands over a standard 6mmBR load of Varget.
For match loads, I use Alliant Reloder 15. While Varget is less sensitive to temp changes, RL15 has given me lower extreme spreads and better long range control. [Bob acknowledges that every barrel is unique, so a different powder, such as H4895 might work better for you.]
I clean my fired cases with stainless steel media in a Thumler’s rotary tumbler after every firing. I anneal after every other firing using a Bench-Source machine which is very well made and easy to operate. I use a Whidden full length bushing die with Redding bushings for sizing.
After sizing, I chamfer the inside of the neck with the K&M tool which has a pilot rod centered in the flash hole. Then I’ll give the neck and mouth a “once over” with some 0000 steel wool. I finish loading off with a Redding Competition Seating Die with the micrometer top.
I use a carbide ball on the expander rod of the full length sizing die. I use a .266″ TiN-coated bushing and the ball just kisses the inside walls of the sized neck. I get very consistent neck tension this way and have had no issue with split necks.
Seating Depth Considerations
With fire-formed brass, the junction of the bullet’s bearing surface and boat-tail is above the neck/shoulder junction of the case, so I have no issues with donuts. You can see how a loaded round looks in the photo at left. For occasional trimming, I use a very nice little Possum Hollow trimmer that indexes on the case shoulder.
Get WAY Better Groups with New Criterion Pre-Fit Custom Barrel
In our Shooters’ Forum, you’ll find a lengthy thread about accuracy problems with a Savage LRPV, chambered in 6mmBR. The gun would repeatedly split groups at 100 yards, and at 300 yards, the “flyers” would open up the groups to 1.5 MOA or larger. Interestingly, the factory test target (at right) showed a split group — not a good sign.
The gun’s owner, forum member LR_Shooter, tried a variety of tweaks: “I did this, done that… [changed] torque, tang floated, bedded action, recut chamber, and [adjusted firing pin]”. But nothing really helped. Frustrated, LR_Shooter asked his fellow Forum members for help. Much advice was proffered, including the novel idea of removing the middle action screw in the Savage 3-screw target action. Some of the advice proved helpful, but none of the suggested remedies produced a major improvement. This rifle, out of the box, tossed flyers and no amount of tweaking (or changes in shooting technique) really cured the basic problem. That is, until, the factory barrel got replaced…
New Criterion Pre-Fit Barrel Works Wonders
LR_Shooter acquired a Criterion pre-fit barrel from Jim Briggs at Northland Shooters Supply (NSS). These pre-fits are designed for easy installation with the standard Savage barrel nut. Wouldn’t you know it, with a new 30″ heavy-contour barrel on the LRPV, the gun started shooting way better. No more crazy fliers, no more split groups, no more excessive vertical. And the improvement came without any other major modifications. LR_Shooter reports: “I got a replacement barrel from Jim at NSS. It is a 30″ bull Criterion barrel. So far, without playing with torque screws and having my old setup… I’m very satisfied with the barrel I got. Now I have no problem getting [groups] under 0.25 MOA. Finally this thing can shoot!” The targets below, shot with the new Criterion barrel, speak for themselves. The left target was shot at 100 yards, while the target on the right was shot at 300 yards (very impressive).
Targets Shot with Savage LRPV Fitted with Criterion Barrel
Moral of the Story — Sometimes A New Barrel Really Is the Right Solution
All of us have struggled at times with a rifle that won’t live up to expectations. This Editor personally struggled for over a year with a .260 Rem Savage with a factory tube. The gun tended to split groups and the POI walked as the barrel heated. I tried one powder/primer combination after another, working through a variety of seating depths over many months. I was persistent. Out of stubbornness, I just believed that sooner or later I’d find the magic load.
Well folks, sometimes there’s really nothing you can do about a sub-par barrel. It is what it is. To really improve a gun’s accuracy (particularly a gun with a factory tube), you may need to open your wallet and get a quality aftermarket barrel. Spending months trying one recipe after another may simply be an overwhelming waste of powder, bullets, and your precious time.
Albert Einstein supposedly said: “Insanity is defined as doing the same thing over and over again, and expecting different results.” Well that sort of describes my efforts with my .260 Rem. Once I had enough evidence that my barrel split groups no matter what load combo (and seating depth) I tried, it was time to pony up for a new barrel. When I did finally screw on a nice PacNor 3-groove SuperMatch, that Savage suddenly became a true tack-driver. As re-chambered in 6mmBR with the Pac-Nor, in calm conditions, my Savage will now consistently shoot in the twos with heavy bullets, and it can sometimes dip down into the ones with Berger 80gr flat-base bullets. The moral of the story here is simple — don’t waste weeks or months chasing your tail with a barrel that just won’t deliver (after a reasonable amount of testing). Save up for a custom barrel, get it chambered properly, and stop your cycle of frustration.
When a rifle isn’t shooting up to it’s potential, we need to ask: “Is it the gun or the shooter?” Having multiple shooters test the same rifle in the same conditions with the same load can be very revealing…
When developing a load for a new rifle, one can easily get consumed by all the potential variables — charge weight, seating depth, neck tension, primer options, neck lube, and so on. When you’re fully focused on loading variables, and the results on the target are disappointing, you may quickly assume you need to change your load. But we learned that sometimes the load is just fine — the problem is the trigger puller, or the set-up on the bench.
Here’s an example. A while back we tested two new Savage F-Class rifles, both chambered in 6mmBR. Initial results were promising, but not great — one gun’s owner was getting round groups with shots distributed at 10 o’clock, 2 o’clock, 5 o’clock, 8 o’clock, and none were touching. We could have concluded that the load was no good. But then another shooter sat down behind the rifle and put the next two shots, identical load, through the same hole. Shooter #2 eventually produced a 6-shot group that was a vertical line, with 2 shots in each hole but at three different points of impact. OK, now we can conclude the load needs to be tuned to get rid of the vertical. Right? Wrong. Shooter #3 sat down behind the gun and produced a group that strung horizontally but had almost no vertical.
Hmmm… what gives?
Shooting Styles Created Vertical or Horizontal Dispersion
What was the problem? Well, each of the three shooters had a different way of holding the gun and adjusting the rear bag. Shooter #1, the gun’s owner, used a wrap-around hold with hand and cheek pressure, and he was squeezing the bag. All that contact was moving the shot up, down, left and right. The wrap-around hold produced erratic results.
Shooter #2 was using no cheek pressure, and very slight thumb pressure behind the tang, but he was experimenting with different amounts of bag “squeeze”. His hold eliminated the side push, but variances in squeeze technique and down pressure caused the vertical string. When he kept things constant, the gun put successive shots through the same hole.
Shooter #3 was using heavy cheek pressure. This settled the gun down vertically, but it also side-loaded the rifle. The result was almost no vertical, but this shooting style produced too much horizontal.
A “Second Opinion” Is Always Useful
Conclusion? Before you spend all day fiddling with a load, you might want to adjust your shooting style and see if that affects the group size and shape on the target. Additionally, it is nearly always useful to have another experienced shooter try your rifle. In our test session, each time we changed “drivers”, the way the shots grouped on the target changed significantly. We went from a big round group, to vertical string, to horizontal string.
Interestingly, all three shooters were able to diagnose problems in their shooting styles, and then refine their gun-handling. As a result, in a second session, we all shot that gun better, and the average group size dropped from 0.5-0.6 inches into the threes — with NO changes to the load.
That’s right, we cut group size in half, and we didn’t alter the load one bit. Switching shooters demonstrated that the load was good and the gun was good. The skill of the trigger-puller(s) proved to be the limiting factor in terms of group size.
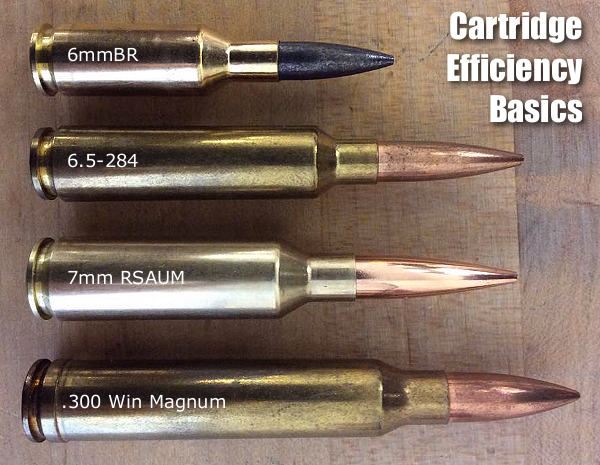
Efficient cartridges make excellent use of their available powder and case/bore capacity. They yield good ballistic performance with relatively little recoil and throat erosion.
Cartridge Efficiency: A Primer (pun intended!)by USAMU Staff
The U.S. Army Marksmanship Unit (USAMU) published a series of reloading articles on its Facebook Page. In this article, the USAMU discusses cartridge case efficiency and its benefits. While this is oriented primarily toward NRA High Power Rifle and Long Range (1000-yard) competition, these factors also apply to medium/big game hunters. Assuming one’s rifle and ammunition are accurate, key considerations include ballistic performance (i.e., resistance to wind effects, plus trajectory), recoil, and throat erosion/barrel life.
Efficient cartridges make excellent use of their available powder and case/bore capacity. They yield good ballistic performance with relatively little recoil and throat erosion. A classic example in the author’s experience involved a featherweight 7x57mm hunting/silhouette rifle. When loaded to modern-rifle pressures, just 43-44 grains of powder pushed a 139gr bullet at 2900 fps from its 22″ barrel. Recoil in this light rifle was mild; it was very easy to shoot well, and its performance was superb.
An acquaintance chose a “do everything” 7mm Remington Magnum for use on medium game at short ranges. A larger, heavier rifle, it used ~65 grains of powder to achieve ~3200 fps with similar bullets — from its 26″ barrel. Recoil was higher, and he was sensitive to it, which hampered his shooting ability.
Similarly efficient calibers include the 6mm BR [Norma], and others. Today’s highly-efficient calibers, such as 6mm BR and a host of newer developments might use 28-30 grains of powder to launch a 105-107gr match bullet at speeds approaching the .243 Winchester. The .243 Win needs 40-45 grain charges at the same velocity.
Champion-level Long Range shooters need every ballistic edge feasible. They compete at a level where 1″ more or less drift in a wind change could make the difference between winning and losing. Shooters recognized this early on — the then-new .300 H&H Magnum quickly supplanted the .30-06 at the Wimbledon winner’s circle in the early days.
The .300 Winchester Magnum became popular, but its 190-220gr bullets had their work cut out for them once the 6.5-284 and its streamlined 140-142gr bullets arrived on the scene. The 6.5-284 gives superb accuracy and wind performance with about half the recoil of the big .30 magnums – albeit it is a known barrel-burner.
Currently, the 7mm Remington Short Action Ultra-Magnum (aka 7mm RSAUM), is giving stellar accuracy with cutting-edge, ~180 grain bullets, powder charges in the mid-50 grain range and velocities about 2800+ fps in long barrels. Beyond pure efficiency, the RSAUM’s modern, “short and fat” design helps ensure fine accuracy relative to older, longer cartridge designs of similar performance.
Recent design advances are yielding bullets with here-to-fore unheard-of ballistic efficiency; depending on the cartridge, they can make or break ones decision. Ballistic coefficients (“BC” — a numerical expression of a bullet’s ballistic efficiency) are soaring to new heights, and there are many exciting new avenues to explore.
The ideal choice [involves a] balancing act between bullet BCs, case capacity, velocity, barrel life, and recoil. But, as with new-car decisions, choosing can be half the fun!
Factors to Consider When Evaluating Cartridges
For competitive shooters… pristine accuracy and ballistic performance in the wind are critical. Flat trajectory benefits the hunter who may shoot at long, unknown distances (nowadays, range-finders help). However, this is of much less importance to competitors firing at known distances.
Recoil is an issue, particularly when one fires long strings during competition, and/or multiple strings in a day. Its effects are cumulative; cartridges with medium/heavy recoil can lead to shooter fatigue, disturbance of the shooting position and lower scores.
For hunters, who may only fire a few shots a year, recoil that does not induce flinching during sight-in, practice and hunting is a deciding factor. Depending on their game and ranges, etc., they may accept more recoil than the high-volume High Power or Long Range competitor.
Likewise, throat erosion/barrel life is important to competitive shooters, who fire thousands of rounds in practice and matches, vs. the medium/big game hunter. A cartridge that performs well ballistically with great accuracy, has long barrel life and low recoil is the competitive shooter’s ideal. For the hunter, other factors may weigh more heavily.
Cartridge Efficiency and Energy — Another Perspective
Former Lapua staffer Kevin Thomas explains that efficiency can be evaluated in terms of energy:
“Cartridge efficiency is pretty straight forward — energy in vs. energy out. Most modern single-based propellants run around 178-215 ft/lbs of energy per grain. These figures give the energy potential that you’re loading into the rifle. The resulting kinetic energy transferred to the bullet will give you the efficiency of the round. Most cases operate at around 20-25% efficiency. This is just another way to evaluate the potential of a given cartridge. There’s a big difference between this and simply looking at max velocities produced by various cartridges.”
Many visitors to the site ask us, “I’ve got a .223 and .308. What will a 6mmBR Norma (6BR) give me that I’m not getting already?” Well first you will probably average consistently smaller groups than your current .223 or .308 rifle (assuming the 6BR has a quality barrel and trigger). A good .308 Winchester can be superbly accurate, no question about that, but the lesser recoil of the 6BR works in the shooter’s favor over a long string of fire. Even with a Rem 700 or Savage action factory action, a 6BR with a benchrest stock, premium barrel, and a high-quality chambering job should deliver 5-shot groups in the high twos to mid-threes, provided you do your job. We have one 6BR rifle that shoots Lapua factory-loaded 6BR ammunition in the low twos and high ones. That’s exceptional, we admit, but it still shows how the 6BR is an inherently accurate cartridge, even with factory loads.
Compared to a .223, the 6BR offers a much better selection of high-BC projectiles, and will deliver considerably more power on the target. So it’s a better choice for hunters and 600-yard benchrest shooters. Compared to the .308 Win shooting 168gr MatchKings, a 6BR shooting 105-107gr bullets offers better ballistics all the way out to 1000 yards. Plus, for most people, the 6BR is just easier to shoot than a .308 Win. Recoil is less than half of the .308 Win cartridge. Both the .308 and 6BR chamberings offer good barrel life, but the 6BR uses 15-18 grains less powder, saving you money. On the other hand the .308 Win is the designated cartridge for F-TR and Palma shooting, so it may be a more versatile chambering for Long-Range competition. So which would we choose between the 6BR and the .308? Actually we think you should have both. The 6BR is a favorite cartridge out to 500 yards, and we like the .308 Win for F-TR. The .308 Win has shown outstanding accuracy, as displayed last week at the NRA F-class Nationals in Arizona.
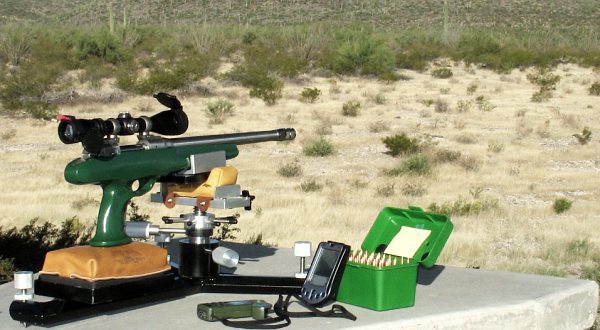
Here’s something you’ve probably never seen before — a single-shot, bolt-action pistol chambered for the 6mmBR Norma cartridge (aka 6BR). Featured as one of our Guns of the Week a while back, this Green Machine is a Savage Striker upgraded by Chuck G. from Arizona, a self-described “Savage Maniac”. This impressive bolt-action pistol has shown exceptional accuracy.
Chuck transformed this Savage Striker single-shot from a ho-hum .308 into a reliable half-MOA precision 6BR that can run with accurized rifles all the way out to impressively long ranges. Here we provide highlights from our original article. Click the link below to read our full Savage Striker article, which is three times longer than this story, and has more photos, plus videos and a detailed load development section.
The Striker Project — Pursuit of Precision, by Chuck G.
I didn’t even know Savage Strikers existed until I saw one for sale on Gunbroker.com. I snagged it with a $400 bid. My idea was to build an accurate, long-range pistol on a pauper’s budget. As purchased, the Striker had a .308 barrel with an unknown round count, the standard center-grip, black synthetic stock, an odd two-piece custom brake, and an old Burris 4X pistol scope in a Conetrol 2-piece ring set. The trigger was very heavy, 6-8 lbs I’d estimate, with a lot of take-up and over-travel.
Initial Disappointments — Too Much Recoil, Poor Accuracy
My initial attempts to get the Striker to shoot well at even 100 yards were disappointing. I was never able to get better than a 3″, 5-shot group at 100. Not what I was looking for. Being used to benchrest triggers, the pull on this one was hard for me to manage. The gun would roll around on any type of front rest I had, and from a cement bench on a bipod it would jump about 18 inches up and sideways with every round. Not being used to this type of gun, I found the recoil and muzzle blast to be unsettling. It was hard not to flinch. I started off using my 1K .308 rifle load, 175 SMKs over 44 grains of Varget. That probably would have knocked the hell out of a deer, but it wasn’t much fun to shoot from the bench.
New Caliber, New Barrel — Way Better Accuracy!
I decided to rebuild the Striker in a caliber that would be more fun to shoot. 6mmBR was an obvious choice for all the usual reasons–good brass, wide choice of match bullets, easy to load, low recoil, very accurate, and relatively cheap to shoot. As part of a SavageShooters.com group buy, I ordered a 15″, SS match grade, 3-groove, heavy varmint contour, 10-twist barrel from Pac-Nor. To set the freebore, I provided Pac-Nor with a dummy case with an 88gr LD Berger bullet seated to use as a guide. Total delivered price was $340 chambered and threaded for a muzzle brake from JP Rifles.
This image below features a target created by the founder of AccurateShooter.com and 6mmBR.com. You can CLICK HERE to visit our target page with this and many other free targets.
When I bought it, the Striker, with factory .308 barrel, shot 3″ groups at 100. Now, with a Pac-Nor 6BR Match barrel, 3″ fore-arm plate, upgraded trigger, 24X scope, and match bullets, the gun consistently groups 1/2″ or better at 100 yards. What a transformation!”
Striker Project — Mission Accomplished
With further load development and bench practice, the gun is showing even more accuracy potential. Using a 24X target scope, the Striker has delivered 5-shot groups in the 3s and 4s during recent range visits. All in all, I’m very satisfied with the project. I ended up with an accurate, fun-to-shoot gun for under $1,000 including scope, paint, and bedding materials.
Stock Modifications
While waiting for the barrel I started working on the stock. As virtually no aftermarket stocks were readily available for the center-grip Striker, I decided to rebuild the standard black synthetic stock. The grip fit my hand poorly so I worked it over with a Dremel tool and sandpaper, built up the grip with Bondo, filled in some holes and bedded the action using Devcon Plastic Steel. This was my very first attempt at these tasks so progress was slow. Once I had re-shaped the stock, I sprayed five coats of “John Deere” green topped by several coats of auto clear. It came out surprisingly well considering I had never painted a stock before. I had originally planned to build up the fore-end to 3″ wide using Bondo but later decided to just use a Sinclair Benchrest Adapter that I had on hand.
Chuck notes: “I’m really pleased with the C & J one-piece Rest. It’s solid, heavy, and well-designed. There is no real need for a windage top; small adjustments are easily made by slightly shifting the pistol butt. Elevation adjustments are positive and once the pistol is set up on this rest NOTHING moves.”
Varminting for Fun — With Rimfires and Centerfires
One of the most fun things you can do with a rifle is to shoot varmints such as ground squirrels, prairie dogs, rockchucks, and groundhogs. There’s great satisfaction making a perfect hit on a critter that sends the beastie spinning in the air. Varminting also affords a great excuse to acquire more rifles, because it really does make sense to own and use multiple varmint rifles in various calibers.
Having multiple rifles on a varmint safari lets you preserve barrel life, and shoot lesser-recoiling calibers at the shorter distances. For example, with California ground squirrels, we like a .17 HMR inside 125 yards, then switch to a 20 Practical (20-223 Rem). For prairie dogs, you may want that 20 Practical, plus a nice .22 BR for 250-400 yards, and a .243 Ackley (or 6XC or 6mm CM) for long shots.
Seven Varmint Rifles — Rimfire and Centerfire
With 980,000 subscribers, the Backfire YouTube Channel is highly popular. The capable hosts provide honest, candid reviews. This video covers seven different varmint rigs. First off is the Air Arms TX 200 (00:25). Then the excellent .22 LR CZ 457 is featured (01:33), followed by a .223 Rem AR15-platform rifle (02:30). Next up is the .22 LR Christensen Arms Ranger 22 (03:40), which proved to be “crazy accurate”. Then the video showcases a Bergara Premier in 22-250 (04:20), an “excellent coyote gun that you could use on varmints as well”. Last up is the Ruger American Predator (05:20) in .17 HMR.
6XC Rifle Featured in Gunwerks Rockchuck Adventures
This Gunwerks video showcases varmint hunting in the Western USA. In this video Aaron Davidson and the Gunwerks crew try out some new rifles on some rockchucks. Most of the the rifles were suppressed but the host said the rockchucks took cover after the first shot, so this required good coordination among shooters and spotters. A 6XC varminter is featured at 2:44 and there’s some nice drone footage starting at 2:00.
6mmBR for Longer Range Varmint Adventures
The video creator reports “I spent a great deal of time deciding what 6mm cartridge I would pick for my next varmint build. I was sure of certain things. First, it had to fit an action that I owned. Most importantly, it had to be highly accurate, with light recoil. Quality, highly frangible bullets had to be available in the 50 to 70 grain weight range (for smaller to larger varmint hunting). For flat shooting ballistics, I wanted velocity above 3300 fps. I decided that the 6mmBR, with a slow twist barrel, was what I was looking for.” Components for this rifles are: Borden Alpine Action, Krieger Barrel, Grayboe Ridgeback Stock, Bix’N Andy Trigger, Thunderbeast Ultra Suppressor.
.22-250 Nails Ground Squirrels and Rock Hyraxes in South Africa
Here’s an interesting video from South Africa. The video maker starts with shots on ground squirrels. His .22-250 blasts them into little pieces. They he switches to more distant targets, a furry ground-hog size animal called the Rock Hyrax, Cape Hyrax, or Dassie. Mature Rock Hyraxes weigh 4-5 kilograms and have short ears and tail. These Rock Hyraxes are found at higher elevations in habitats with rock crevices, allowing them to escape from predators (but not skilled varmint hunters).
20 Practical — Great Choice for AR-Platform Rifle
If you want to use an AR-platform rifle in the varmint fields, consider getting a 20-caliber barrel chambered for the efficient, low-recoil 20 Practical cartridge. The 20 Practical is simply a .223 Remington necked down to 20 caliber. The parent .223 Rem cartridge of course works great in an AR, but the 20 Practical offers some notable advantages for high-volume varmint shooters. The 20 Practical cartridge is simply the .223 Rem necked down to 20 caliber — you can use standard .223 brass and load with standard.223 Rem dies. Just swap in a smaller expander and use smaller neck bushings.
The 20 Practical delivers very high velocity with very low recoil while still providing outstanding accuracy. The 20 Practical is great option for folks who favor “fast and light” — smaller, lower-mass bullets traveling at very high velocities. This little cartridge can launch 40-grainers at over 3900 fps.
.17 WSM — The Most Powerful .17 Cal Rimfire
We think that every varmint hunter should own a nice .17 Cal rimfire rig. Out to 200 yards or so the .17 WSM or .17 HMR is very effective on small varmints. It’s nice to be able to shoot affordable ammo out of the box and not have to scrounge for hart-to-find powder and primers. This video features a superb .17 Cal varmint rig, the Primal Rights TS Custom chambered for the impressive .17 WSM cartridge.
Prairie Dog Hunting with .17 HMR Savage A17 Rifle
On varmint excursions, we like to have a .17 rimfire for the closer shots, inside 150 yards. This video shows a successful Prairie Dog hunt with a .17 HMR. Watch and you’ll see hits out to 160 yards (00:50), proving the effective range of the .17 HMR cartridge. The host is shooting a Savage A17 semi-auto 17 HMR rifle in a Boyds laminated stock.
Varminters now enjoy three .17-caliber rimfire options. The .17 Mach 2, .17 HMR, and .17 WSM are all good choices, with the 17 Mach 2 (17 HM2) being the cheapest and the .17 WSM the most powerful. With a 3000 fps MV, the .17 WSM has some really impressive ballistics, — with a much flatter trajectory than both the .17 HMR and .22 WMR:
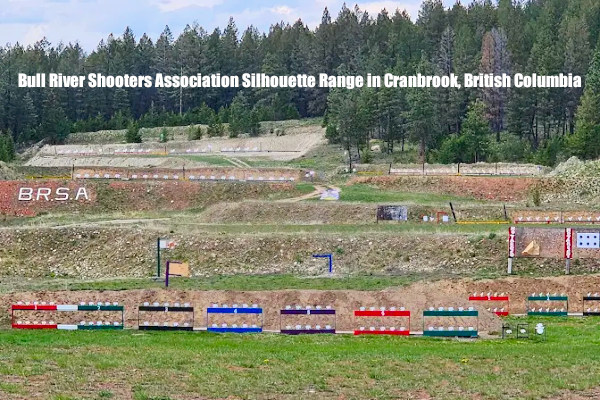
Erich Mietenkorte Wins 2025 Canadian Rifle Silhouette National High Power Championship.
Team Lapua’s Erich Mietenkorte took top honors at the 2025 Canadian High Power Rifle Silhouette National Championships, winning the 240-shot High Power Aggregate with an impressive combined score of 195/240. Held at the Bull River Shooters Association range in Cranbrook, British Columbia, from June 29 to July 5, the national championship featured both Smallbore and High Power rifle disciplines, with competitors engaging steel silhouette targets from the standing offhand position at distances of 200, 300, 385, and 500 meters.
Mietenkorte competed in both High Power categories — Standard Rifle and Hunting Rifle — scoring 99/120 with his 6.5×47 Lapua in the Standard division, and 96/120 with his 6mm BR in the Hunting Rifle division. Mietenkorte’s combined performance earned him first place overall in the High Power aggregate and national titles in both rifle categories.
“Success in this discipline requires absolute confidence in your equipment. When it comes to consistency, reliability, and performance,?Lapua cases and bullets,?Vihtavuori powders, and?Berger bullets?are unmatched,” commented Mietenkorte. “I used Lapua 108gr and 139gr Scenar bullets in my 6.5×47, and Berger 95gr and 115gr bullets in my 6BR, all handloaded with Vihtavuori N140 powder. These components gave me the precision and consistency needed[.]”
What’s next? Mietenkorte will be competing at the U.S. NRA Rifle Silhouette National Championships at the NRA Whittington Center in Raton, NM, July 20-26, 2025.
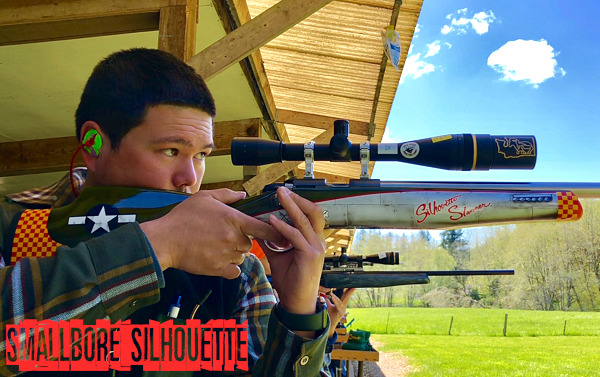
In addition to his success in the Canadian High Power competition, Mietenkorte finished 4th overall in the Smallbore Standard Rifle category. In the video below Eric demonstrates Smallbore Silhouette marksmanship skills.
Silhouette Champion Shares His Skills
In the video below, silhouette champion Eric Mietenkorte explains proper hold: “Consistency is key! Form a solid stance that is repeatable and allows you to have a natural point of aim. If you don’t come down on target adjust your feet, don’t rotate your body with your torso muscles.”
Erich explains his aiming method: “Pick a spot on the target and shoot for that. Try not to hesitate, if you’re on target, take the shot. It’s easy to get locked up by trying to make a great shot better. Make sure to follow through, keep that trigger pulled back. Don’t forget to have fun!”


 The 30 BR is an amazing little cartridge. However, 30 BR shooters do have to neck-up 6mmBR or 7mmBR brass and then deal with some issues that can arise from the expansion process. One of our Forum members was concerned about the donut that can form at the new (expanded) neck-shoulder junction. Respected bullet-maker Randy Robinett offers tips on how to deal with the “dreaded donut”.


 Dasher Loading Tips
 I use a carbide ball on the expander rod of the full length sizing die. I use a .266″ TiN-coated bushing and the ball just kisses the inside walls of the sized neck. I get very consistent neck tension this way and have had no issue with split necks.

 In our


 Many visitors to the site ask us, “I’ve got a .223 and .308. What will a 6mmBR Norma (6BR) give me that I’m not getting already?” Well first you will probably average consistently smaller groups than your current .223 or .308 rifle (assuming the 6BR has a quality barrel and trigger). A good .308 Winchester can be superbly accurate, no question about that, but the lesser recoil of the 6BR works in the shooter’s favor over a long string of fire. Even with a Rem 700 or Savage action factory action, a 6BR with a benchrest stock, premium barrel, and a high-quality chambering job should deliver 5-shot groups in the high twos to mid-threes, provided you do your job. We have one 6BR rifle that shoots Lapua factory-loaded 6BR ammunition in the low twos and high ones. That’s exceptional, we admit, but it still shows how the 6BR is an inherently accurate cartridge, even with factory loads.