The latest issue of Shooting USA magazine has a detailed EIGHT-page feature on the Kestrel wind meter. This story covers the development of the Kestrel and explains the advanced technologies now offered with the hand-held Kestrel systems.
The eZine version of Shooting Sports USA (SSUSA) is available for free online. In the latest December 2017 issue you’ll find two excellent articles of interest to all serious rifle shooters. One covers the development of the Kestrel weather meter, which has evolved to serious levels of sophistication. Now premium Kestrels include built-in ballistic calculators and they can “talk” with mobile devices, sharing command functions and data. The second article covers shooting skills. In the first of a three-part series, Glen Zediker talks about NRA High Power rifle competition. Glen spotlights the skills you must master to move from the beginning level, Marksman, to higher levels.
Kestrel Technology Today
The December SSUSA issue features the origin of ballistics-enabled Kestrel weather meters. SSUSA’s Editor John Parker covers the history of the Kestrel, and explains how more and more features were packed into the handheld device as it evolved. Today’s Kestrel is so much more than an impeller with wind speed/direction read-outs.
The impressive Kestrel 5700 Elite with Applied Ballistics software is the latest model of a product that revolutionized long-range shooting by combining ballistic computer and weather meter in one portable device. Shooters can select either G1 or G7 ballistic coefficients, or to be even more specific they can select bullets from the Applied Ballistics custom curves library. With the Kestrel and its software, shooters can plot very precise trajectories, even to extreme long ranges.
Marksman to High Master
High Power Rifle competition originally evolved from the U.S. military course of fire. Climbing the classification ranks in NRA High Power Rifle can be daunting — it requires focus, practice and commitment to move up the ladder from Marksman all the way to High Master.
In Glen Zediker’s three-part series, “Climbing the High Power Ladder”, Glen shares his tips for competitors that are looking to improve their skills beyond the intermediate level. The first installment focuses on stepping past Marksman classification to Sharpshooter. Read PART ONE HERE. In the months ahead, look for parts Two and Three in future SSUSA issues. These will cover the next stages in the climb: Expert, Master, High Master.
DVD Resource for High Power Training
If you’re serious about improving your High Power skill set, we suggest you view a DVD by David Tubb, 11-time National High Power Champion. David’s instructional DVD, “The Art & Technique of the Modern Match Rifle”, is a great resource for any High Power or position shooter. This 2-disc DVD provides over 4.5 hours of instruction and shooting demonstrations. We can confirm that this video is packed with great information — novice High Power and prone shooters who apply David’s methods should definitely improve their scores.
David has included highlights from that DVD in a shorter promo video. While the shorter video is a sales tool, it’s very informative in its own right. Watch the video and you’ll learn a great deal just by watching how David shoulders his rifle, and how he adjusts and maintains his shooting position. David shows examples of prone, sitting, and standing positions. In the short “trailer”, David also provides helpful tips on adjusting sights, and placing the spotting scope.
If you shoot Service Rifle, High Power, or prone, you can benefit from watching this short sampler video. The full 2-disc DVD is available for $49.95 from Creedmoor Sports. With over 4.5 hours of content, the DVD covers all the across-the-course positions, the set-up and use of aperture sights and diopters, High Power and long range targets, the approach method in offhand, proper placement and use of spotting scopes. The DVD includes bonus footage of David shooting strings in all of the across-the-course positions.
Team Applied Ballistics will soon release a new DVD on the science, skills, and strategy required for successful Extreme Long Range (ELR) shooting. The new DVD features a reality-style documentary following Team Applied Ballistics in the 2017 King Of 2 Mile (KO2M) competition. Team AB has now won this prestigious event two years in a row. Team shooter Mitchell Fitzpatrick won the KO2M title in 2016, followed by team-mate Derek Rodgers in 2017.
Bryan Litz tells us: “Applied Ballistics is proud to announce the release of our latest DVD: ELR Shooting With Applied Ballistics. With lessons learned from our successful 2016 KO2M campaign, you can see how the AB ELR team developed our equipment and approach through practice and careful analysis. Learn the essential elements of ELR competition from the top team in the sport.”
This documentary, filmed over the course of a year, shows Team Applied Ballistics preparing for, and competing in, the 2017 KO2M match. This presentation includes interviews from all Team AB members, along with tips on ELR shooting.Pre-Order the ELR DVD and Save $5.00 (Pre-Order Price $19.95)
2017 K02M Match-Winning Performance on Video
The video below shows Team Applied Ballistics shooter Derek Rodgers winning the 2017 King of 2 Miles event. This excellent video combines firing line and target-cam views. You can see the strings-of-fire at 2667 and 3028 yards. Then Watch Derek, after four misses, hit the last target with his fifth (and final) round! That plate was set at a mind-numbing 3368 yards (1.91 miles). Derek had Paul Phillips as a spotter and Emil Praslick as a wind coach — a very powerful team and it showed.
If you want to learn more about ELR shooting and how team Applied Ballistics achieves great results in ELR competition, we recommend an excellent article just released byShooting Sports USA. SSUSA’s Editor John Parker interviewed Team Applied Ballistics members Bryan Litz and Paul Phillips. Both men said that successful Extreme Long Range shooting requires solid team-work.
Bryan Litz (center) conferring with Team AB members Emil Praslick (L) and Doc Beech (R).
Paul Phillips explained: “ELR is very difficult. It requires a great shooter with 1/2-MOA accuracy, a really good wind coach and spotter to see impacts, trace and the ability to quickly negotiate and engage the targets. It’s one fluid team working together.”
Bryan Litz, Applied Ballistics founder, concurred: “Of all the various precision rifle disciplines, ELR shooting is particularly suited to a team approach. All aspects of ELR shooting are both highly challenging as well as critical to success. One individual is typically not able to stay on top of all the variables effectively enough to hit targets at extreme ranges all by themselves.”
Litz says superior wind-reading skills are vital in the ELR game: “One of the important challenges of hitting targets at long range is reading the wind. All the shooters on our team can read wind, but when we’re shooting a match, we put our strongest wind-reader in this position for all shooters. Emil Praslick is arguably the best in the world at putting a number on the wind. He’s got a well-rehearsed process that works in all scenarios. When Emil isn’t available, someone else on our team will apply his process and focus specifically on the wind.”
Wouldn’t it be nice to have a print resource at your fingertips that has hundreds of true-size cartridge illustrations, plus technical descriptions of thousands of popular cartridge types? That could be a real time-saver. It’s no wonder this book is an Amazon category best-seller.
If you’re a serious shooter, the latest 6th Edition of the Ammo Encyclopedia belongs in your library. This 1008-page book by Michael Bussard is probably the most comprehensive and up-to-date book in print covering current and obsolete cartridges and shotshells. The Ammo Encyclopedia is a massive resource work. The 6th Edition now boasts 100+ chapters, covering thousands of handgun, rifle, and shotgun cartridges from the past century and a half.
One of the best features is a full-color section depicting actual size drawings of over 320 current rimfire/centerfire cartridges and shotshells. You won’t find that many “life-size” cartridge drawings in one place even on the internet. Cartridge profiles and ballistic charts have been expanded to include many new factory cartridges. The authors have even included air rifle pellets and historical images and charts. Softcover, 1008 pages, $38.80.
Comments from guys who bought the book:
“This book contains a vast array of information on many modern and even obsolete ammunition. Definitely recommend for any modern reloader novice or experienced.” – Duggaboy460
“It’s a great reference book for individuals who reload their own ammunition. There is a lot more info in this Edition. Everyone who likes this information should have it in their library.” – Reloader
“I like the general and technical comments that are available for each and every cartridge. Information that predicts if a cartridge will stay in production for many more years or rapidly become obsolete.” – RSL1
If you haven’t visited the Norma website recently, you should click over to www.norma.cc/us. There you will find Norma’s Ammo Academy, a technical resource that provides information on Ballistics, Powder Storage, Barrel Wear, and Bullet Expansion. In addition, the Ammo Academy now links to Norma’s Reloading Data Center, where you’ll find loads for nearly 70 cartridge types including: .223 Rem, .22-250, 6mmBR Norma, 6XC, 260 Rem, 6.5-284, 6.5×55, 7mm-08, .270 Win, .284 Win, .308 Win, .30-06, 300 Win Mag, .338 Lapua Mag and dozens more.
The Ammo Academy’s Ballistics section contains some fascinating technical facts:
After the trigger is pulled, it takes around 0.005 seconds before the firing pin reaches the primer.
From the firing of the primer it takes 0.0015-0.002 seconds until the bullet exits the muzzle.
When the bullet leaves the muzzle, the hot gases surround and overtake the bullet, continuing the acceleration for a few centimeters.
Because the barrel is always angled slightly upwards, the bullet’s flight starts about 3-5 cm below the line of sight.
Norma also offers some good advice about Powder Storage:
To maintain the product quality for as long as possible, you have to keep the powder in a suitable place under suitable conditions. Where possible, store the powder at a constant temperature, ideally between 12 and 15°C (54°F to 59°F), and a relative humidity of 40–50%. If the air is too dry, it will dry out the powder, which will cause the pressure to be higher, thus affecting performance. Also make sure that you close the powder container properly afterwards. Cartridges should be stored under the same ambient conditions to maintain their quality.
You may not realize it… but to get the optimum BC from your bullets (i.e. the lowest aerodynamic drag), you must spin the bullets fast enough. Bullet drag increases (as expressed by lower BC) if the bullet spins too slowly. Bryan Litz of Applied Ballistics explains how BC changes with twist rates…
More Spin, Less Drag
In this article, we look at how twist rate and stability affect the Ballistic Coefficient (BC) of a bullet. Again, this topic is covered in detail in the Modern Advancements book. Through our testing, we’ve learned that adequate spin-stabilization is important to achieving the best BC (and lowest drag). In other words, if you don’t spin your bullets fast enough (with sufficient twist rate), the BC of your bullets may be less than optimal. That means, in practical terms, that your bullets drop more quickly and deflect more in the wind (other factors being equal). Spin your bullets faster, and you can optimize your BC for best performance.
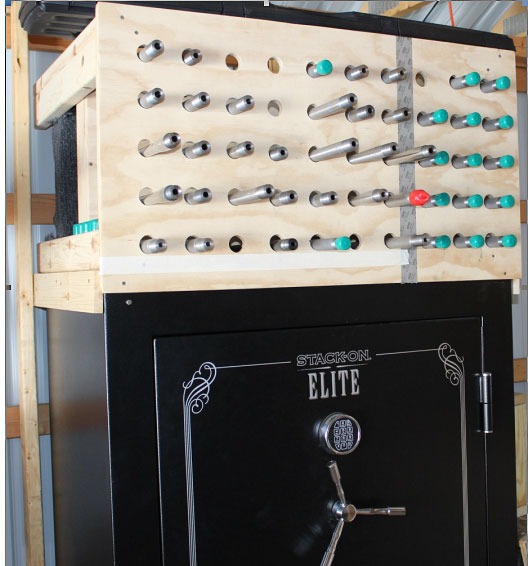
Any test that’s designed to study BC effects has to be carefully controlled in the sense that the variables are isolated. To this end, barrels were ordered from a single barrel smith, chambered and headspaced to the same rifle, with the only difference being the twist rate of the barrels. In this test, 3 pairs of barrels were used. In .224 caliber, 1:9” and 1:7” twist. In .243 caliber it was 1:10” and 1:8”, and in .30 caliber it was 1:12” and 1:10”. Other than the twist rates, each pair of barrels was identical in length, contour, and had similar round counts. Here is a barrel rack at the Applied Ballistics Lab:
Applied Ballistics used multiple barrels to study how twist rate affects BC.
“The Modern Advancements series is basically a journal of the ongoing R&D efforts of the Applied Ballistics Laboratory. The goal of the series is to share what we’re learning about ballistics so others can benefit.” –Bryan Litz
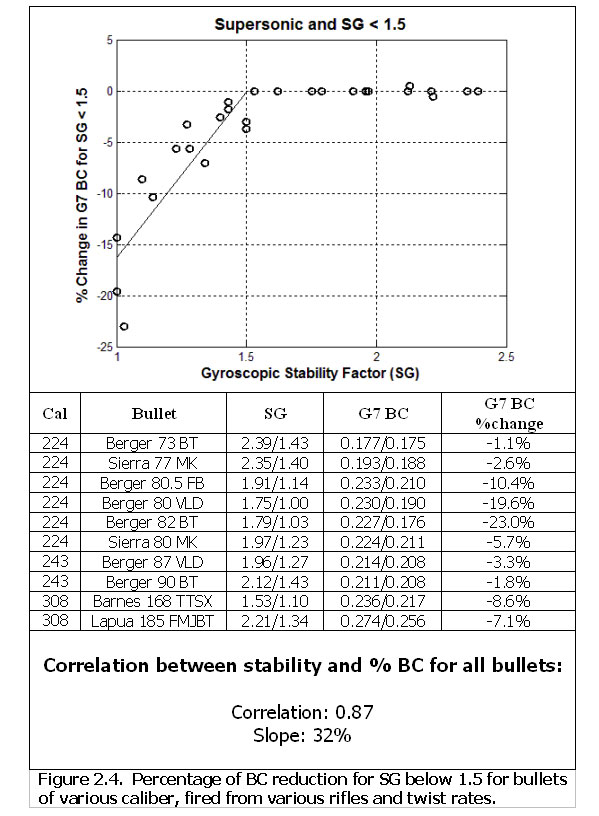
Barrel twist rate along with velocity, atmospherics, and bullet design all combine to result in a Gyroscopic Stability Factor (SG). It’s the SG that actually correlates to BC. The testing revealed that if you get SG above 1.5, the BC may improve slightly with faster twist (higher SG), but it’s very difficult to see. However, BC drops off very quickly for SGs below 1.5. This can be seen in the figure below from Modern Advancements in Long Range Shooting.
The chart shows that when the Gyroscopic Stability Factor (SG) is above 1.5, BC is mostly constant. But if SG falls below 1.5, BC drops off dramatically.
Note that the BC drops by about 3% for every 0.1 that SG falls below 1.5. The data supports a correlation coefficient of 0.87 for this relationship. That means the 3% per 0.1 unit of SG is an accurate trend, but isn’t necessarily exact for every scenario.
It’s a common assumption that if a shooter is seeing great groups and round holes, that he’s seeing the full potential BC of the bullets. These tests did not support that assumption. It’s quite common to shoot very tight groups and have round bullet holes while your BC is compromised by as much as 10% or more. This is probably the most practical and important take-away from this test.
To calculate the SG of your bullets in your rifle, visit the Berger Bullets online stability calculator. This FREE calculator will show you the SG of your bullets, as well as indicate if your BC will be compromised (and by how much) if the SG is below 1.5. With the stated twist rate of your barrel, if your selected bullet shows an SG of 1.5 (or less), the calculator will suggest alternate bullets that will fully stabilize in your rifle. This valuable online resource is based directly on live fire testing. You can use the SG Calculator for free on the web — you don’t need to download software.
Learn More About SG and BC This article is just a brief overview of the interrelated subjects of twist rate, Gyroscopic Stability, and BC. The coverage of twist rates in Modern Advancements in Long-Range Shooting is more detailed, with multiple live fire tests.
Other chapters in the book’s twist rate section include: · Stability and Drag – Supersonic
· Stability and Drag – Transonic
· Spin Rate Decay
· Effect of Twist rate on Precision
Other sections of the book include: Modern Rifles, Scopes, and Bullets as well as Advancements in Predictive Modeling. This book is sold through the Applied Ballistics online store. Modern Advancements in Long Range Shooting is also available in eBook format in the Amazon Kindle store.
Have you recently purchased a new scope? Then you should verify the actual click value of the turrets before you use the optic in competition (or on a long-range hunt). While a scope may have listed click values of 1/4-MOA, 1/8-MOA or 0.1 Mils, the reality may be slightly different. Many scopes have actual click values that are slightly higher or lower than the value claimed by the manufacturer. The small variance adds up when you click through a wide range of elevation.
In this video, Bryan Litz of Applied Ballistics shows how to verify your true click values using a “Tall Target Test”. The idea is to start at the bottom end of a vertical line, and then click up 30 MOA or so. Multiply the number of clicked MOA by 1.047 to get the claimed value in inches. For example, at 100 yards, 30 MOA is exactly 31.41 inches. Then measure the difference in your actual point of impact. If, for example, your point of impact is 33 inches, then you are getting more than the stated MOA with each click (assuming the target is positioned at exactly 100 yards).
How to Perform the Tall Target Test
The objective of the tall target test is to insure that your scope is giving you the proper amount of adjustment. For example, when you dial 30 MOA, are you really getting 30 MOA, or are you getting 28.5 or 31.2 MOA? The only way to be sure is to verify, don’t take it for granted! Knowing your scopes true click values insures that you can accurately apply a ballistic solution. In fact, many perceived inaccuracies of long range ballistics solutions are actually caused by the scopes not applying the intended adjustment. In order to verify your scope’s true movement and calculate a correction factor, follow the steps in the Tall Target Worksheet. This worksheet takes you thru the ‘calibration process’ including measuring true range to target and actual POI shift for a given scope adjustment. The goal is to calculate a correction factor that you can apply to a ballistic solution which accounts for the tracking error of your scope. For example, if you find your scope moves 7% more than it should, then you have to apply 7% less than the ballistic solution calls for to hit your target.
NOTE: When doing this test, don’t go for the maximum possible elevation. You don’t want to max out the elevation knob, running it to the top stop. Bryan Litz explains: “It’s good to avoid the extremes of adjustment when doing the tall target test.I don’t know how much different the clicks would be at the edges, but they’re not the same.”
Should You Perform a WIDE Target Test Too?
What about testing your windage clicks the same way, with a WIDE target test? Bryan Litz says that’s not really necessary: “The wide target test isn’t as important for a couple reasons. First, you typically don’t dial nearly as much wind as you do elevation. Second, your dialed windage is a guess to begin with; a moving average that’s different for every shot. Whereas you stand to gain a lot by nailing vertical down to the click, the same is not true of windage. If there’s a 5% error in your scope’s windage tracking, you’d never know it.”
Verifying Scope Level With Tall Target Test
Bryan says: “While setting up your Tall Target Test, you should also verify that your scope level is mounted and aligned properly. This is critical to insuring that you’ll have a long range horizontal zero when you dial on a bunch of elevation for long range shots. This is a requirement for all kinds of long range shooting. Without a properly-mounted scope level (verified on a Tall Target), you really can’t guarantee your horizontal zero at long range.”
NOTE: For ‘known-distance’ competition, this is the only mandatory part of the tall target test, since slight variations in elevation click-values are not that important once you’re centered “on target” at a known distance.
Each Wednesday, the U.S. Army Marksmanship Unit publishes a reloading “how-to” article on the USAMU Facebook page. This past week’s “Handloading Hump Day” article, the latest in a 7-part series, relates to chronograph testing and statistical samples. We highly recommend you read this article, which offers some important tips that can benefit any hand-loader. Visit the USAMU Facebook page next Wednesday for the next installment.
Chronograph Testing — Set-Up, Sample Sizes, and Velocity Factors
Initial Chronograph Setup
A chronograph is an instrument designed to measure bullet velocity. Typically, the bullet casts a shadow as it passes over two electronic sensors placed a given distance apart. The first screen is the “start” screen, and it triggers an internal, high-speed counter. As the bullet passes the second, or “stop” screen, the counter is stopped. Then, appropriate math of time vs. distance traveled reveals the bullet’s velocity. Most home chronographs use either 2- or 4-foot spacing between sensors. Longer spacing can add some accuracy to the system, but with high-quality chronographs, 4-foot spacing is certainly adequate.
Laboratory chronographs usually have six feet or more between sensors. Depending upon the make and model of ones chronograph, it should come with instructions on how far the “start” screen should be placed from one’s muzzle. Other details include adequate light (indoors or outdoors), light diffusers over the sensors as needed, and protecting the start screen from blast and debris such as shotgun wads, etc. When assembling a sky-screen system, the spacing between sensors must be extremely accurate to allow correct velocity readings.
Statistics: Group Sizes, Distances and Sample Sizes
How many groups should we fire, and how many shots per group? These questions are matters of judgment, to a degree. First, to best assess how ones ammunition will perform in competition, it should be test-fired at the actual distance for which it will be used. [That means] 600-yard or 1000-yard ammo should be tested at 600 and 1000 yards, respectively, if possible. It is possible to work up very accurate ammunition at 100 or 200 yards that does not perform well as ranges increase. Sometimes, a change in powder type can correct this and produce a load that really shines at longer range.
The number of shots fired per group should be realistic for the course of fire. That is, if one will be firing 10-shot strings in competition then final accuracy testing, at least, should involve 10-shot strings. These will reflect the rifles’ true capability. Knowing this will help the shooter better decide in competition whether a shot requires a sight adjustment, or if it merely struck within the normal accuracy radius of his rifle.
How many groups are needed for a valid test? Here, much depends on the precision with which one can gather the accuracy data. If shooting from a machine rest in good weather conditions, two or three 10-shot groups at full distance may be very adequate. If it’s windy, the rifle or ammunition are marginal, or the shooter is not confident in his ability to consistently fire every shot accurately, then a few more groups may give a better picture of the rifle’s true average.
Shooters contemplating purchase of a .338 LM rifle often ask: “What length barrel should I get?” Rifleshooter.com recently performed a test that provides interesting answers…
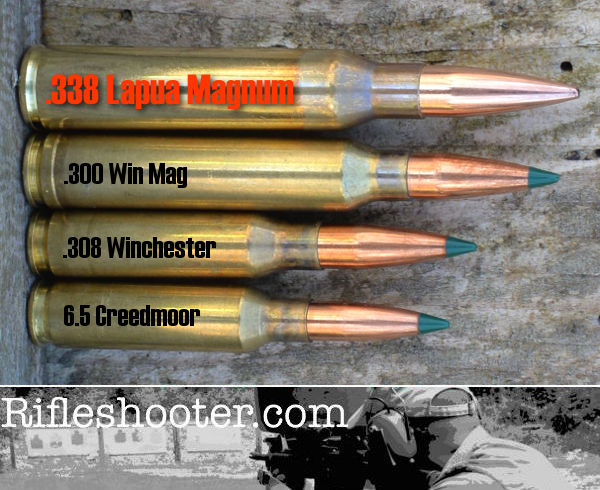
Our friends at RifleShooter.com like to slice and dice — barrels that is. They have done barrel length cut-down tests for popular calibers like the .223 Rem, 6.5 Creedmoor, and .308 Winchester. But now they’ve tackled something way bigger — the .338 Lapua Magnum, a true “Big Boomer”. Starting with a beefy 30″-long Pac-Nor Barrel, RifleShooter.com chopped the tube down in one-inch increments all the way down to 17 inches (that’s 14 different lengths). At each new (shorter) barrel length, velocity was measured with a MagnetoSpeed chronograph using two different loads, 250gr SMKs with H4831sc and 300gr SMKs with Retumbo. Four shots were fired at each length with each load, a total of 112 rounds.
Load #1: 250gr Sierra MK, Lapua brass, CCI #250 primer, H4831SC, OAL 3.720″.
Load #2: 300gr Sierra MK, Lapua brass, Win WLRM primer, Retumbo, OAL 3.720″.
The .338 Lapua Magnum is a jumbo-sized cartridge, that’s for sure…
Donor Barrel Sacrificed for Science
Rifleshooter.com’s Editor explains: “Brandon from Precision Addiction offered to send us his .338 barrel for our .338 Lapua Mag test. I took him up on his offer and he sent me his used Pac-Nor chrome-moly barrel with about 600 rounds though it. This thing was a beast! A heavy 1.350″ shank that ran straight for 6″, until tapering to 1″ at 30″ in length.”
Results Summary
.338 Lapua Magnum with 250gr Sierra MatchKings
After shortening the barrel from 30″ to 17″, total velocity reduction for the 250-grainers was 395 FPS, an average loss of 30.4 FPS per 1″ cut. The amount of velocity loss per inch rose as the barrel got shorter, with the biggest speed reduction, a loss of 55 FPS, coming with the cut from 18″ to 17″.
Start Velocity: 2942 FPS | End Velocity: 2547 FPS | Average Loss Per Inch: 30.4 FPS
.338 Lapua Magnum with 300gr Sierra MatchKings
Shooting the 300-grainers, total velocity reduction was 341 fps, an average of 26.2 FPS loss per 1″ cut (30″ down to 17″). However, the speed actually increased with the first cut from 30 inches to 29 inches. The tester noted: “The 300 SMK load showed a slight increase from 30″ to 29″. I’ve recorded this in other tests and it seems to be more common with a heavier load. I suspect it is primarily due to the small sample sizes being used along with the relative proximity of muzzle velocities in adjacent lengths.”
Start Velocity: 2833 FPS | End Velocity: 2492 FPS | Average Loss Per Inch: 26.2 FPS*
*Velocity rose with first cut. Velocities ranged from 2,871 FPS (29″) to 2,492 FPS (17″) for a total velocity loss of 341 FPS.
RifleShooter.com crunched the velocity numbers in some interesting ways. For example they analyzed rate of velocity loss, concluding that: “after the initial rate change, the rate of the change in velocity is fairly consistent.” (View Rate of Change Graph)
How Velocity Loss Alters Long-Range Ballistics
The testers wanted to determine how the velocity reductions “affect our ability to hit targets downrange”. So, Rifleshooter.com plotted changes in elevation and wind drift at all barrel lengths. This revealed something interesting — drift increased significantly below 26″ barrel length: “Above 26″ things look pretty good, below 22″ they change quickly.”
We highly recommend you read the whole story. Rifleshooter.com put in serious time and effort, resulting in solid, thought-provoking results. The data is presented in multiple tables and graphs, revealing inch-by-inch velocities, change “deltas”, and SDs at each length.
Applied Ballistics has produced a series of YouTube videos about precision long range shooting. Featuring ace long-range shooter and professional ballistician Bryan Litz, these videos address various topics of interest to long-range marksmen. This featured video looks at Long Range mistakes — Bryan Litz reveals the most common ballistics-related shooting errors at Long Range. And then Bryan explains how to improve your shooting (and wind reading) to eliminate those common errors.
Watch Applied Ballistics Video about Common Mistakes in Long Range Shooting:
Bryan Litz of Applied Ballistics often hears the question: “What are the main reasons people miss their target at long range?” To answer that question, in this video, Bryan explains the most important variables in Long Range shooting. Bryan says: “Probably the number one thing is range — you have to have a [precise] range to your target because your bullet is dropping, and to hit the target you need to correct for bullet drop.” Distance may be indicated on the target bay (or berm), but for open ranges you should ascertain distance-to-target with a quality laser rangefinder. Even when the distance to target is shown with a sign or marker, you may want to confirm the distance with your rangefinder. (You may be surprised — we’ve seen marked target distances at commercial ranges off by 25+ yards!) Bryan says: “Get a good laser range to the target and you’ll be within a couple yards”.
After distance to target, the most important variable is the wind. This is the most challenging factor because the wind is constantly changing. Bryan explains: “After 300 or 400 yards, the wind [will] move your shots off the target if you don’t correct for it. The best way to account for the wind is to measure it at your location with a Kestrel. The Kestrel can give you the speed and direction of the wind at your location, which can baseline your wind call for your long-range shot.” Bryan acknowledges that there will still be variables: “The wind isn’t always blowing the same downrange as at your location… and the wind is always changing”. Bryan notes that you need to account for variances in wind between the time you gauge the wind angle and velocity and the time you actually you take your shot.
Shoot 101 Quiz
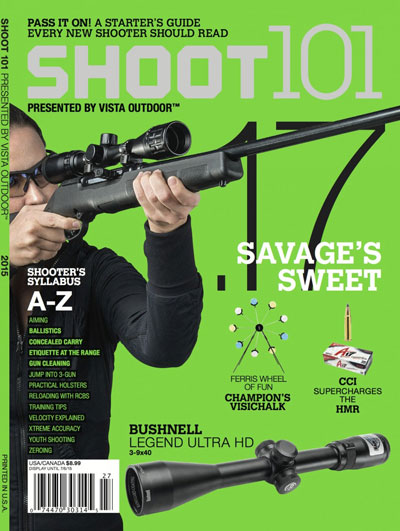
How much of an expert are you when it comes to firearms and ballistics? Test your knowledge with this interactive test. Vista Outdoors (formerly ATK Sporting Group) has launched a new multi-platform media campaign called Shoot 101, which provides “how to” information about shooting, optics, and outdoor gear.
On the Shoot 101 website, you’ll find a Ballistics Quiz. The questions are pretty basic, but it’s still fun to see if you get all the answers correct.
You don’t need a lot of technical knowledge. Roughly a third of the questions are about projectile types and bullet construction. Note, for some reason the layout doesn’t show all the possible answers at first. So, for each question, be sure to scroll down using the blue scroll bar on the right.


 Kestrel Technology Today
 Marksman to High Master
 DVD Resource for High Power Training


 Verifying Scope Level With Tall Target Test


 Shoot 101 Quiz


