They say that a man can never have too much money or too much time. Darrell Jones would add that a man can never have too many BR-based rifles. Darrell had a fleet of BRs, in 22BR, 6mm BR, 6.5 BR, 7 BR, and 30 BR. But he was intrigued by the potential of a rifle in the .257 caliber. Could it shoot as well as a 6mm BR? Could it challenge the more popular calibers in the highly competitive 600-yard benchrest game? Through careful research and component selection, Darrell created a 25 BR rifle that proves the viability of the 25 BR as a competition round. Pushing 115gr high-BC Berger bullets at 2837 fps, Darrell’s 25 BR “Peppermint” won first place in its very first match.
The Barely Bigger BR — Exploring the .25 Caliber Option
Rifle Report by Darrell Jones
I decided to build a 25 BR after several weeks of deliberation and ruling out a .257 Ackley Improved. Part of my dilemma was that I wanted to shoot F-Class competition at 600 yards, and I was unsure about the accuracy potential of the 25 BR. However, I currently have several BRs chambered in 22 BR, 6BR, 6.5 BR, 7 BR, and 30 BR and they all shoot exceptionally well at 600 yards. This lead me to believe a 25 BR should deliver fine accuracy, just like its other BR siblings. Why wouldn’t a 25 BR shoot accurately provided that I built it with the right components? The feasibility saga began. I began searching diligently for custom 25-caliber bullets. Unfortunately, there are not many 25-caliber custom bullet makers. I actually found only two custom bulletsmiths who produce the 25s. I did look at Fowlers and then looked at Bergers. Both Jeff Fowler and Berger made 110-grain flat-base bullets when I was looking. [Editor — this 110gr bullet is no longer listed by Berger]. The Berger 110gr FB bullets (.414 ballistic coefficient) shot very well out of my 12-twist 25-06 Ackley. However, I wanted to shoot a heavier bullet if possible. Berger makes a 25-caliber 115gr VLD boat-tail with a high ballistic coefficient. This needs a 10-twist barrel.
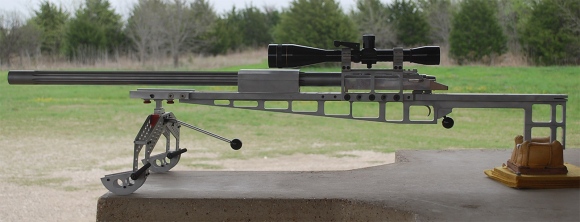
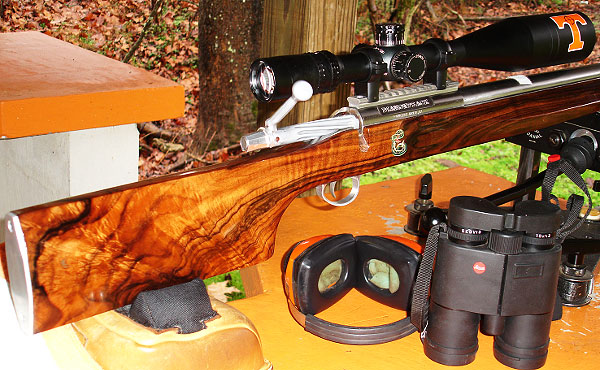
Panda Action, McMillan Stock, Weaver T-36
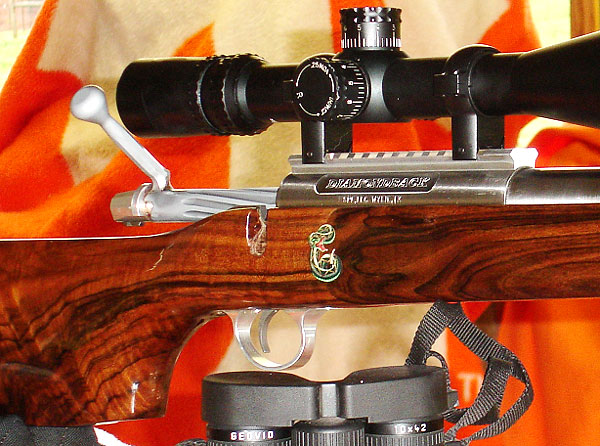
As you can see, I went with a Panda polished action and a weighted McMillan BR stock painted metallic silver with red candy cane stripes thus the name “Peppermint”. This gun actually does double duty now as a 25 BR and 6 PPC switch barrel. When I want to run the gun as a 6 PPC for short range, I simply screw on the PPC barrel, then swap in a bolt (fitting the PPC bolt face) from another Panda action I own. That’s one advantage of owning custom Kelbly actions! Don’t even think about exchanging bolts between factory guns. Kelbly rings and a Weaver T-36 fixed-power scope handle the optical duties while a Jewell trigger set at one ounce takes care of the firing mechanism.
Chambering for the .25 Caliber BR Wildcat
I wanted a chamber that would let me shoot both the 110s and the 115s. I took some time surfing the net looking for rental reamers that had suitable throat dimensions. I found that Elk Ridge Reamer Rentals had a 25 BR pilot reamer available. I called and Elk Ridge faxed me a reamer diagram that indicated it was designed to tight SAMMI specs. I asked how often was the reamer used and was told “not very often”.
I did want a minimum no-turn neck optimized for Lapua brass. The drawing indicated that the reamer would cut a .281″ neck and a throat of 1.0315″. This was very close to ideal, though I did have to turn two thousandths off the necks of Lapua 6BR brass after I necked it up. I resized using a .277″ bushing and the loaded rounds came out to be .279″. Realizing that this was in the ball park, I decided to go with the Elk Ridge Reamer and build a 25 BR that could shoot 110gr or 115gr bullets. Now the question was where to get a match-grade 25-caliber barrel. I called quite a few of the custom barrel-makers, including BlackStar Barrels in Texas (no longer operating). I have had wonderful success with the BlackStar barrel on my 6BR “Chantilly” — it delivered great accuracy and impressive velocities. Since the 25 BR was so similar, I went with another BlackStar. I ordered a 10-twist, 6-groove, 1.250″-diameter straight-contour tube.
After chambering, the barrel finished at 1.245″ diameter and 27.5″ inches with an 11° crown. I actually had the throat lengthened to accept both Berger 110gr and 115gr bullets. The bases of the FB 110-grainers sit flush with the neck-shoulder junction, when they are seated .010″ into the lands. With the longer 115gr VLDs, the bottom of the bearing surface (i.e. start of boat-tail) is just about even with the neck-shoulder junction.
Accurate Load Development
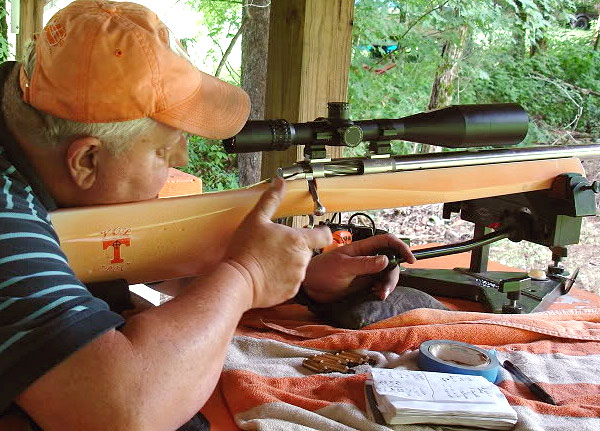
The barrel broke in easily with just 10 shots, using a “shoot one and clean” process. The load I started with was 31.5 grains of Varget with CCI 450 primers. The Berger 110s and Berger 115s had the same Point of Impact (POI) at 100 yards. However, the 115s impacted two inches higher at 600 yards with the same load. That shows the benefits of a higher BC. Pushed by the CCI 450s and 31.5 grains of Varget, the 115-grainers were running about 2837 FPS. I boosted the load up to 32.0 grains but I noticed primer cratering, so I backed off, settling on 31.5 grains for the 115gr Berger VLD.
Peppermint Wins at 600 Yards
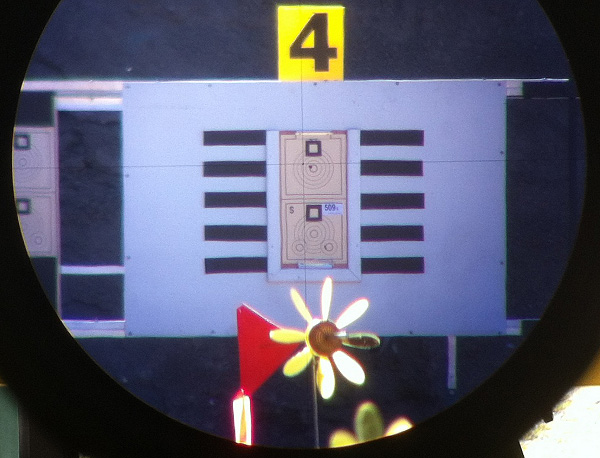
For her debut in competition, I took “Peppermint” to our local 600 yard F-class match. Shooting the Berger 115s with 31.5 grains Varget, she won with a perfect score of 200 with 14 Xs. At my club, we use a SR3 target. The X-Ring measures 3″ in diameter and the 10-Ring measures 7″. At the match there were some very good shooters with top-flight custom rifles in accurate calibers such as 6.5-284 and 22 Dasher. I was very fortunate to come out on top, but I give the credit to Peppermint’s good bench manners and outstanding accuracy.
As you can see from the target, “Peppermint” is a very accurate rifle that has proven herself in competition. It takes a good gun to finish “on top” in her very first match. So far, I’m very happy with the project, and more than satisfied with the accuracy of the 25 BR. This is definitely a worthy cartridge for Egg Shoots, 500m varmint matches, and the 600-yard F-Class game.
BR-Based Cartridge Comparison
CALIBER
22 BR
6mm BR
25 BR
6.5 BR
7 BR
30 BR
Bullet
80gr SMK
107gr SMK
115gr Berger
107gr SMK
130gr SMK
118gr BIB
BC
.420
.527
.522
.420
.391
na
Load Grains
31.0 H4350
30.0 Varget
31.5 Varget
32.0 Varget
34.0 AA2460
34.0 H4198
Barrel Length
27″
27″
27.5″
27.5″
28″
24″
Velocity
3100 fps
2880 fps
2837 fps
2851 fps
2719 fps
2970 fps
Comparing the BR-Based Variants
Now that I have several calibers in the BR cartridge family, (22 BR, 6mm BR, 6.5 BR, 7 BR, and a 30 BR), it is my humble opinion that they each have their own place. A varmint hunter’s dream, the 22 BR can push a bullet faster and more accurately than the 22-250. With an 8-Twist barrel, the 22 BR can send an 80gr SMK to 600 yards with extreme accuracy.
The 6 BR can do it all. The 6mm caliber offers a wide variety of quality bullets suitable for any shooting situation. All the major custom barrel makers produce outstanding 6mm barrels in a full range of twists. Moreover, since the 6 BR cartridge is so popular, there is a great store of knowledge about reloading for the 6 BR. It is easy to find a load that will shoot superbly in any bullet weight.
The 25 BR has proved to be easily tuneable, proficient and not fickle. You can obtain extreme accuracy without great effort in load development. The 115gr Berger offers a good high-BC projectile for this caliber, making the 25 BR a viable alternative to the 6 BR. As I’ve shown, it is competitive with a 6 BR in head to head competition.
Compared to the 25 BR, the 6.5 BR has a small edge in ballistics. However, there are not many light bullet choices available, especially from custom makers. The 123gr Lapua Scenar is an excellent bullet with a .547 stated BC, but it may be a bit heavy for the case capacity.
The 7 BR was designed for silhouette shooting, and it excels at that task. The 7 BR can push a 130 grain bullet fast enough to knock over the steel silhouettes at 500 meters with real consistency.
The 30 BR is nothing less than outstanding. The 30 BR is now the dominant cartridge on the benchrest Score-shooting circuit. It is also highly accurate for group shooting at 200 yards and very capable of winning a 600-yard F-Class match. Barrel life of over 6,000 rounds is realistic.
I like all the “flavors” of BR derived from the 6mm BR Norma case. However, if I could only have one BR in my safe, give me my 8-Twist, 6 BR “Chantilly” and I will be a happy camper. The final point I would make is if a cartridge is stamped BR on the case, it will shoot extremely accurately if you can.
Look and be amazed! In competition, a rifle drilled FIVE perfectly-overlapped bullet holes — the last virtually indistinguishable from the first — at a target a football field (100 yards) away.
Today we feature a benchrest rifle that earned its place in history by setting a small-group record in 2013 that may never be broken. This .30-caliber benchrest rig shot a 0.0077″ five-shot group at 100 yards. That’s the smallest 100-yard group ever shot in competition by ANY gun at 100 yards in history. And we may never see anything smaller in our lifetimes.
In setting that .0077″ (seventy-seven ten-thousandths of an inch) record, the shooter, Mike Stinnett, broke a record that stood for four decades — the 0.009″ five-shot group credited to Mac McMillan. The previous NBRSA Light Varmint Record of .009″ for five shots (at 100 yards) was set on 9/23/1973, 49 years ago. Experts considered that record “untouchable”, “unassailable” — in other words “unbreakable.” But Mike broke Mac’s record 40 years after it was set.
The Record-Setting Rifle and Cartridge
The gun that produced the historic .0077″ group was a Light Varmint-class Benchrest rifle chambered as a .30-caliber wildcat, the 30 Stewart. That cartridge is based on the 6.5 Grendel case necked up. The load had Hodgdon H4198 powder behind BIB 114gr, 10-ogive bullets. Notably, the record-setting ammo was pre-loaded before the match.
The Smallest 100-yard Group in History
All target shooters strive for perfect shot placement. Well one man has come closer to perfection than any other shooter who ever lived. You are looking at Michael Stinnett’s .0077″ NBRSA world-record group, the smallest 100-yard 5-shot group ever shot in the history of rifle competition. The group was certified at .0077″ (though labeled .008″ on the range-signed target below). A moving backer verified that this was FIVE shots — no question about that. You may be surprised but this was NOT shot by a 6 PPC, but rather a .30-caliber wildcat, based on the 6.5 Grendel.
Group Is Smaller than ANY 100-yard Group Shot in ANY Class
Mike’s amazing group stands as a NBRSA Light Varmint Class record. But it is also smaller than the current NBRSA 5-shot, 100-yard records for ALL other classes, even Unlimited (Rail Gun). Likewise Stinnett’s .0077″ group is smaller than the IBS records for ALL classes:
Better than any Rail Gun too — Mike Stinnett’s .0077″ group was smaller that ANY group shot in ANY class — event Unlimited Rail Guns, as shown below:
Below is a larger-than-life-size view. Using this photo we measured the group with target-calculating software, and it came out .006″ (the software only goes to three digits). We recognize that it would be much better to work from the real target rather than a photo, so we are not challenging the official measurement in the least. But this does confirm that this is a phenomenally small five-shot group.
Stinnett Sets .0077″ Record with a .30-Caliber Modified Grendel Cartridge, Pre-Loaded
Many folks have asked about the gun and ammo that produced the .0077″ group. The rifle was chambered as a .30-caliber wildcat, the 30 Stewart, which is based on the 6.5 Grendel case necked up. Mike was using Hodgdon H4198 powder behind BIB 114gr, 10-ogive bullets. Notably, the record-setting ammo was pre-loaded before the match. Unfortunately, we don’t have a photo of the target yet — it is still in the hands of the official NBRSA certification committee. However, Mike has been kind enough to tell us about his rifle and his load.
Mike Stinnett .0077″ Record Group Equipment Report
Mike reports: “Several guys have asked so here is my equipment listing. The hardware build actually started in 2008 with the goal of building two identical Benchrest rifles which could be used for both group and score. The idea was to shoot 6PPC and a .30 Cal without a base rifle change.”
Record-Setting Rifle Equipment and Components
Action: Kelbly Panda “Speedy Shorty” with solid bolt and PPC-diameter bolt face. Kelbly was asked to build several actions which were identical with the intent to eliminate any variance in head space between the two new rifles. This helped me use a single set-up on sizing dies for both rifles and ammo is interchangeable. Both actions were sent to Thomas ‘Speedy’ Gonzalez to be blue-printed and have Jewell triggers installed.
Reamer: 30 STEWART (I just call it a 30 PPC as that is what everyone expects, but it is in fact a custom design and Ralph deserves about 99% of the credit).
Barrels: Krieger was selected for the barrels. After discussions with Randy Robinett of BIB Bullets, a 1:17″ twist was identified as the correct, safe solution. Ralph Stewart has cut all my chambers using a custom-designed reamer. [Our goal] was consistent headspace and Ralph has been able to keep my barrels within .0002 variance. The barrel tuner also comes from Ralph Stewart.
Stock: Larson (including action bedding)
Scope: Leupold 45X Competition in Kelby Single Screw Tall Rings
Brass: Lapua (Base case is 6.5 Grendel)
Bullets: Randy Robinett (BIB) 30 Cal. 114gr, 10 Ogive (secondary bullet; primary is 112gr BIB)
Powder: H4198 – Stout Load with 2980 FPS Velocity
Front Rest: Farley Coaxial
Bags: Micro Fiber
Flags: Graham Wind Flags (large)
About the Cartridge — 30 Stewart (Based on Lapua 6.5 Grendel Parent Brass)
Mike explains: “Our goal was to shoot H4198 as the optimal powder for stability. There were several versions of the reamer before we settled on the current configuration. I am optimized for the 10 Ogive BIB bullet, powder to the base of the bullet. I found in testing the small 30-cal case did not like compression at all. The bullet is seated only 0.12″ into the case with zero freebore.
Cases were initially created with the .220 Russian (like a PPC) but I later decided it was better to build from the 6.5 Grendel. I size the brass and bump the shoulder back until it will fit into the chamber, fill to shoulder with International Clays, cotton wad packed on top. I have a fire-forming barrel. (I would not recommend this Clays and cotton wad method in a good barrel.) After initial fire-forming, I then mandrel the neck up the rest of the way to .30 caliber, turn the necks and trim.
It takes at least 8 firings to fully form a case! If you fire only three loads I find the brass does not have a sharp shoulder or any pressure on the bolt so any die selection is incorrect. Brass continues to harden well past 25 firings. I have match brass with well over 500 rounds fired, and I have never blown a case or neck yet (using my forming method).
For loading I use a Hornady Custom Shop Sizing Die and a Ralph Stewart Custom Seating Die. For those who are curious, yes the small group was fired with pre-loaded rounds. I do this now and then with local matches or may load 50 in a batch for one match.”
Mike wanted to thank his smiths, Randy Robinett, and all the folks involved in running the matches: “A big THANKS — as these are the guys that make our matches possible and without question maintain the integrity of the targets and record system. I was very fortunate to have all the right people in the right places for this match and my record. As for measurement – I only saw the target for about 10 seconds up close and can say I’m very happy I did not have to measure that group! Thanks again to everyone!” — Mike Stinnett
Forest of Windflags at World Benchrest Championships in France in 2011
There’s a simple, inexpensive “miracle device” that can cut your groups in half. If you’re not using this device, you’re giving away accuracy. The “miracle device” to which we refer is a simple wind indicator aka “windflag”. Using windflags may actually improve your accuracy on target much more than weighing charges to the kernel, or spending your life savings on the “latest and greatest” hardware.
Remarkably, many shooters who spend $3000.00 or more on a precision rifle never bother to set up windflags, or even simple wood stakes with some ribbon to show the wind. Whether you’re a competitive shooter, a varminter, or someone who just likes to punch small groups, you should always take a set of windflags (or some kind of wind indicators) when you head to the range or the prairie dog fields. And yes, if you pay attention to your windflags, you can easily cut your group sizes in half. Here’s proof…
Miss a 5 mph Shift and You Could DOUBLE Your Group Size
The table below records the effect of a 5 mph crosswind at 100, 200, and 300 yards. You may be thinking, “well, I’d never miss a 5 mph let-off.” Consider this — if a gentle 2.5 mph breeze switches from 3 o’clock (R to L) to 9 o’clock (L to R), you’ve just missed a 5 mph net change. What will that do to your group? Look at the table to find out.
Values from Point Blank Ballistics software for 500′ elevation and 70° temperature.
Imagine you have a 6mm rifle that shoots half-MOA consistently in no-wind conditions. What happens if you miss a 5 mph shift (the equivalent of a full reversal of a 2.5 mph crosswind)? Well, if you’re shooting a 68gr flatbase bullet, your shot is going to move about 0.49″ at 100 yards, nearly doubling your group size. With a 105gr VLD, the bullet moves 0.28″ … not as much to be sure, but still enough to ruin a nice small group. What about an AR15, shooting 55-grainers at 3300 fps? Well, if you miss that same 5 mph shift, your low-BC bullet moves 0.68″. That pushes a half-inch group well past an inch. If you had a half-MOA capable AR, now it’s shooting worse than 1 MOA. And, as you might expect, the wind effects at 200 and 300 yards are even more dramatic. If you miss a 5 mph, full-value wind change, your 300-yard group could easily expand by 2.5″ or more.
If you’ve already invested in an accurate rifle with a good barrel, you are “throwing away” accuracy if you shoot without wind flags. You can spend a ton of money on fancy shooting accessories (such as expensive front rests and spotting scopes) but, dollar for dollar, nothing will potentially improve your shooting as much as a good set of windflags, used religiously.
Windflags Sources and Options
Which Windflag to buy? There are many vendors selling windflags of various types, some with daisy wheels others without. You may want to go to a match and see what types works best for you. CLICK HERE for the Benchrest Central Classifieds with multiple windflag types and accessories for sale. Here is a sample:
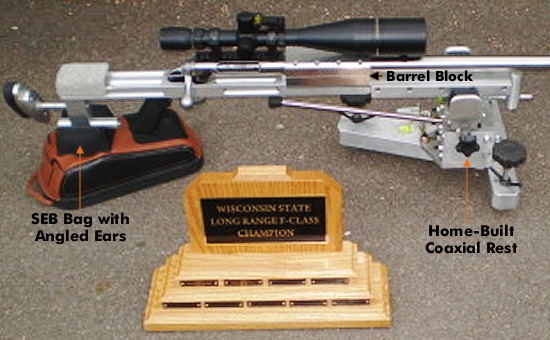
Look carefully at the photo above. That stylish black rear bag doesn’t look anything like an Edgewood or Protektor — it’s a Lenzi bag from Italy. The front Bag-holder on the SEB Neo Rest is also a Lenzi product.
Lenzi Rear Sand Bag
Pat Reagin of PMA Tool offers a really superb rear bag that comes from Italy. Pat tells us: “We are now carrying rear bags made by Italian benchrester Alberto Lenzi. Made in Italy, these Lenzi bags are AWESOME! They are available for short range and one that is slightly taller for long range.” The Lenzi rear bags feature a big, 8″x6″ footprint with a thick, slightly concave base that sits very flat on the bench top. The Long Range Model is 1/2″ shorter with slightly taller ears. For both bag versions, chose Nylon ear fabric or 3M Slick covering.
Lenzi bags are very stable with a reassuring “dead” feel on the bench. Guys who have tried this bag really like it. Pat says: “I can’t explain it, but the bag seems to absorb energy/recoil better than other bags — the gun tracks a little better and I get back on target really well.” CLICK HERE for more information: Lenzi Long Range Rear Bag | Lenzi Standard Rear Bag.
– Black leather with Cordura at stock contact points with blue stitching.
– 1/2″ flat between medium ears.
– Heavy 8″x6″ base with built-in “donut”.
– Weight about 15.5 lbs filled with heavy sand in bottom & white sand in ears.
– Bags offered with Nylon Ear Covering OR 3M Slick Ear Fabric.
Lenzi Replacement Top for SEB NEO Front Rest
Some SEB NEO rest owners prefer a conventional front bag instead of the SEB standard three-piece front bag. This rest top made by Alberto Lenzi addresses the issue by replacing the entire rest top. The rest top features a more conventional design and includes a traditional style front bag that conforms to IBS and NBRSA rules.
For today’s Sunday GunDay story we showcase seven interesting metal-chassis rifles. While we love the look and feel of wood and fiberglass, metal does have its advantages. It can be crafted very straight and true, and the designs can achieve a very low center-of-gravity without sacrificing rigidity. In addition, a precisioned machined metal chassis tends to track extremely well.
Massive IBS Heavy Gun Milled from Solid Aluminum Billet
This remarkable 70-lb IBS Heavy Gun, was machined from solid aluminum billet, by Bruce Baer. It rests on a G&G Alvey rest split in the middle to comply with rules. This “heavy metal” CNC-machined wonder is a work of art designed for the 1000-yard game in the Heavy Gun class. Wood stocks, and to a lesser extent fiberglass stocks, are more forgiving, offering greater damping and recoil absorption. However, metal stocks offer superior rigidity, and the CNC machining allows tracking surfaces to be perfectly parallel.
Williamsport limits Heavy Guns to 100 pounds. Under IBS and NBRSA rules weight is unlimited. You will see a few massive 200-lb behemoths at IBS matches, but most competitors find that something in the 60-90 pound range works best. Bruce Baer explains, “You can’t stop a gun from recoiling. If it doesn’t recoil it will jump. If it jumps you might as well go home because you won’t shoot a good group. So it is pointless to try to build a gun so heavy as to eliminate all recoil. The more you restrict the rifle’s recoil the more temperamental that rifle will be. The 200-pounders just don’t out-perform something in the 60- to 80-pound range, and I think the optimal weight is 60-70 pounds.”
Bruce Baer likes the 70-lb overall weight for a heavy gun: “Extreme mass is not necessarily an advantage. Watch a locomotive starting up from zero–it will vibrate from one end to another. If the gun is too heavy I think it will vibrate at the start of recoil and that will kill accuracy. I want the gun to start from recoil with very little effort so it will be smooth from start to stop.”
Water-Cooled World Record-Setting Wondergun
We like “outside of the box” thinking. And in the world of competitive shooting, it can’t get more unconventional than this. But this radical liquid-cooled benchrest rig wasn’t just a crazy experiment — it actually delivered the goods. This IBS Heavy Gun, built by Joel Pendergraft, produced a superb 10-shot, 3.044″ group that stood as an International Benchrest Shooters (IBS) 1000-Yard Heavy Gun record for seven years, not being broken until 2016.
Using this water-cooled wondergun, Joel shot the record-breaking group in April 2009 at Hawks Ridge, NC. This monster features a .30-Caliber 12-twist, 4-groove Krieger barrel inside a water-filled sleeve (like on a liquid-cooled machine gun). Joel shot BIB 187gr flat-based bullets in Norma brass, pushed by a “generous amount” of Alliant Reloder 25 and Federal 210M primers. The cartridge was a big custom wildcat Joel listed as “.300 Ackley Improved”.
Pendergraft’s 3.044″ 10-shot group was a great feat, breaking one of the longest-standing, 1000-yard IBS World Records. And Joel’s 3.044″ record stood for 7 years!
Richard King’s Radical .223 Rem F-TR Skeleton Rifle
Here’s something exotic from our Gun of the Week archives. We like this rig because it is so radical (we doubt that you have ever seen anything quite like it). Gun-builder Richard King calls this his “Texas-T”, noting that “this is my personal gun, built the way I wanted it. I know it’s radical and some may not care for it. But it works.” The rig was designed to shoot F-TR, but it can also be converted easily to shoot F-Open with a front rest.
Richard reports: “This is pretty much an all-aluminum rifle. The action is a Kelbly F-Class with a Shilen stainless steel competition trigger. The scope is a 1″-tube Leupold 36X with a Tucker Conversion set in Jewell spherical bearing rings. The .223 barrel is 30″ Pac-Nor 3-groove, 1:6.5″-twist mounted in a V-type barrel block. The bipod has vertical adjustment only via a dovetail slide activated by a stick handle. It works like a joy-stick, but for vertical only. I adjust for windage by moving the rear sandbag.”
Richard likes how the barrel block works: “With the barrel block forward, the vibrations should be at a low frequency. Instead of one long rod whipping, I now have two short rods (barrel halves) being dampened. This is my fourth barrel block gun. They work, but so does a good pillar-bedded action. [This rifle] is designed for my style of shooting. It is not meant to be a universal ‘fit all’ for the general public. However, I will say the design is adaptable. I can easily convert the system to run in F-Open Class. I would drop a big-bore barreled action into the V-block, slide on a heavier pre-zeroed scope and rings, add plates on the sides up front to bring the width to 3″, and maybe a recoil pad.”
F1 F-Open Chassis from Competition Machine
Along with his famed tube-guns, Gary Eliseo of Competition Machine has designed a modern, low-profile chassis system for F-Open competition. Assembled with Cerakoted aluminum beams, these F1 F-Open chassis systems offer great tracking with an ultra-low center of gravity.
Here is the F1 Chassis with “Marine Corps Red” powder coat finish. Read Full Report.
This F1 aluminum alloy chassis stock features a super-low center of gravity, plus adjustable length of pull, cheek rest, and drop. The stock is available in a wide choice of Cerakote finishes. The current Model F1 chassis features a action block mounting system to fit most actions. There was also an earlier version that had a free-floated action with the barrel in a barrel block, secured with epoxy. Both F1 versions (action block and barrel block) shot great, with excellent performances in competition.
Gen 1 F1 F-Open Chassis System with Barrel Block
State Championship Win with Home-Built Aluminum Stock
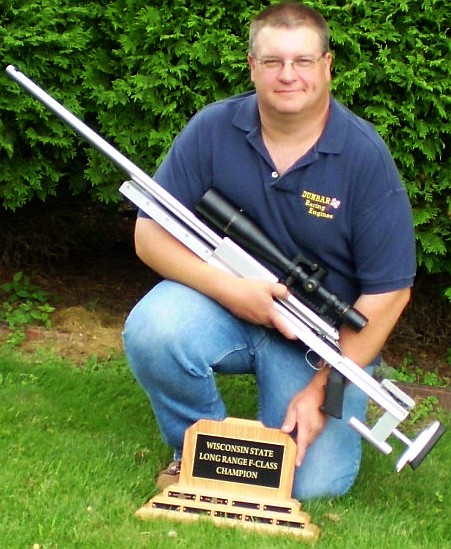
While most of the stocks featured above were crafted by professionals, the properties of aluminum allow it to be used by persons with some basic mechanical skills and metal-working tools. Here’s proof. Back in 2009, Forum Member John Dunbar (aka JD12) crafted his own aluminum F-Open stock. And he used that impressive metal stock to win the Wisconsin State F-Class championship. READ Full Story.
The stock for John’s “home-built” .284 Winchester was mated with a Savage target action. John designed and fabricated the aluminum stock himself. It features a central barrel block clamping a 32″ Brux barrel. Get this — John completed the rifle only 5 days before the match: “I finished machining/assembly on Monday night, did load workup Wednesday and Thursday nights, loaded rounds Friday night, and headed to Lodi at 4:30 on Saturday morning.” John even made his own co-axial front rest (see below)
When Fiberglass Fails, Aluminum Stock Saves the Day
Australian Mark Fairbairn performed a “Quick Fix” during the 2018 Berger SW Nationals. Mark’s F-Open rifle, in a conventional fiberglass stock, was giving him random vertical during one yardage: “I had a bit of a problem with elevation — the stock was hitting somewhere [causing vertical]. I was X-X-X then a shot popped up in the 9 ring with no good reason. So I figured I better put a new stock on it. I got my old aluminium stock I brought from Australia and quickly adjusted it to fit on the Stolle.”
Right on the firing line berm Mark swapped his barreled action into the metal stock of his own design. The clock was ticking… but the story had a happy ending. For the next yardage Mark shot a brilliant 150-7X, not dropping a point. So the “Quick Fix” did the trick. As they say Down Under — “Good on Ya, Mate!”
Home-Built Aluminum Chassis with Innovative A-Arm Bipod
Here is another home-built rig featuring an aluminum chassis mated to a Savage barreled action via a forward-mounted barrel block. This rig was crafted by Forum member Patrick Lundy, who followed the maxim: “If you can’t buy it, then build it.”
Patrick Lundy was so impressed with a fellow shooter’s barrel-block rifle, that he build a similar match gun himself, complete with barrel block and aluminum chassis. Patrick was inspired by a metal stock belonging to Peter Gagne. But he added his own custom touches, including an innovative “A-Arm”-design bipod for shooting in F-TR class. The gun has been very successful in competition. READ FULL Report
Pat told us: “This new stock was a milestone in my shooting career — it was my very first attempt to build a stock. I wasn’t much of a wood worker but I did have a talent for building with metal. The stock was fabricated from 6061 T6 aluminum. With this gun I was able to shoot from a rest or a bipod.”
Pat crafted the bipod from aluminum tubing: “The bipod was a very rigid A-frame design with welded aluminum tubing. I added slippery feet under the pod skis to facilitate smoother recoil. I realized that a wide-stance bipod had to recoil the same on both sides or the group would string horizontally.” Here is the innovative “A-Arm” bipod that Pat Lundy built for his rifle.
The Tack Driver Showdown is a one-of-a-kind “all comers” rifle match. This unique multi-discipline match will reveal what rifle types are truly the MOST accurate, at least out to 300 meters. The Tack Driver Showdown II match will be held Saturday, November 6-7, 2021 at the Mid-Carolina Gun Club in Orangeburg, South Carolina. The organizers have invited virtually any type of rifle (except railguns) to compete at 300 meters for group and score honors. There should be nearly 100 competitors at the event this coming weekend. No organization membership is required. NOTE: Registration closes Wednesday November 3, 2021 at 6:00 PM. Contact Match Director Jim Cline at: 843-957-6546. Forum members can also send a PM to Jim Cline aka jcline.
Unlike any other rifle match in the world, on the firing line you will see 6 PPC LV/HV rifles, 30 BR score rigs, 17-lb 600-yard and 1000-yard benchrest guns, F-TR rifles, F-Open rifles, Palma rifles, PRS rifles, and maybe even an AR15 or two.
The concept behind the event is to settle the unending arguments about which guns are TRULY the most accurate. The 6PPC is king in 100/200 group competition, the 30BR rules 100/200 score, 6mmBRs and 6BR Improveds dominate in 600-yard Benchrest, the .284 Win is the leading F-Open cartridge, and various 6mms and 6.5mms win PRS matches. It will be interesting to see which chamberings and bullet weights will “rule the roost” at 300 meters. Match Director Jim Cline plans to post match results on our AccurateShooter.com Forum. For more information, read this Forum Thread.
Tack Driver II targets will be placed at 300 meters (328 yards). That’s not even “mid-range” by benchrest standards, but it should be far enough that the higher BCs of the bullets shot by F-Class and 600/1000-yard benchrest rigs could come into play.
Basic Information on the Tack Driver Shoot:
There are two divisions — bolt-action rifles and semi-auto gas guns. There are no specific design limits other than a 22-lb maximum weight, and a .338 maximum caliber. Past IBS President Jeff Stover tells us: “We envision the full array of the world’s most accurate rifles on the line: short and long range benchrest rifles, F-Class, AR, other tactical, egg-shoot rifles, whatever…[.]” Key rules are listed below. Semi-autos will need chamber flags, otherwise bolts must be out at all times. You do not have to be a member of the IBS to shoot. The range will be open Friday, November 13th starting at 12:00 noon for practice and flag setting.
Cash Payouts for the Winners in both Group and Score
Match Director Jim Cline noted that First place through Fifth place will be paid in both score, group and Grand Aggregate finishing positions. Match fee is $120, which includes a catered lunch both days. Jim states: “We will have an additional $30 cash option, $50 cash option and a $100 cash option. You have to be in the $30 cash option to get in the $50 cash option and in the $50 to be in the $100.”
2021 Tack Driver II Showdown Rules Overview
1. NO membership of any organization required.
2. NO one piece rest, all shooting will be done off benches. You may use a bi-pod, bags or rest combination.
3. You have to shoot the same gun at all targets. If you have a catastrophic failure, you have to continue with a gun of the SAME caliber and cartridge. (Has to be approved by the match director ONLY.) Scope failure will require a scope change.
4. No electronic equipment of any type will be allowed on the bench or downrange.
5. No spotting scopes allowed on the bench or people spotting for you.
6. No coaching under any circumstances (except youth).
7. Any gun is legal 30 caliber and under with a 22 pound weight maximum.
8. Any protest will be handled by the committee and their decision is FINAL!
2021 Tack Driver II Showdown Match Course of Fire
1. Competition will consist of 5 group targets and 5 IBS 200 yard score targets at 300 METERS.
2. All targets will be 7-minute matches. There will NO warm-up match on either day. ALL
shots count in the scoring area of the target.
3. Range will be made available for practice on Friday before the match starting at 8:00 AM only closing to set flags. Flag setting times are 7-8 am, 9-10 am, 11am-12pm and the
range will be called cold at 3:00 pm to end all practice.
4. We will alternate targets each time:
Day 1: Score/Group/Score/Group/Score
Day 2: Group/Score/Group/Score/Group
5. We will rotate 10 benches for the second day’s course of fire.
6. Winner will be determined by place of finish at each discipline. If there is a tie we will break it by highest place of finish. If that can’t break it we will go to group place of finish.
Covered Firing Line at Mid-Carolina Gun Club. Photo from 2019 100/200m Score Nationals.
Jim Cline tells us: “Preregistration is REQUIRED. A $100 nonrefundable deposit is required with your form to hold a spot. Limited to the first 100 guns! There will be a $60 nonrefundable deposit to hold a camping spot 1st come first serve. I have 13 with full hook-ups and 7 with power and water. There is space for self-contained camping as well.” For more information, including camping/RV details at the Mid-Carolina Gun Club venue, contact Jim Cline at 843-957-6546, or post questions on this Accurateshooter Forum Thread.
Today we feature the short-range group Benchrest game, where it’s all about shooting tiny groups in the ones and even “zeros”. Seeing the tiny groups 6 PPC aces produce, it’s easy to think that precision is all about the equipment. But there is a lot more involved. A talented human still has to watch the flags, run the gun properly, and tune his loads for the conditions. Here are some tips from one of the world’s best benchresters, Charles Huckeba.
If you were an aspiring basketball player, you’d surely study All-Stars such as Stephen Curry and Devin Booker to see how they shoot so well. This article provides a chance to see how a world-class benchrest All-Star drills tiny 5-shot groups at 100 and 200 yards.
Texan Charles Huckeba was the top individual shooter at the 2013 World Benchrest Championships (WBC) held near Sydney Australia in October 2013. In this video, 2013 WBC Two-Gun Overall winner Charles shoots a 1/8th MOA group at 200 yards — “a little bitty dot” as a fellow Team USA shooter observes. That’s impressive. If you can describe Huckeba’s style in a nutshell it would be “smooth, consistent, and rapid but not hurried”.
Charles also employed some unusual hardware. In the video, take a close look at the joystick on the Farley Coaxial front rest. There’s no knob at the end. In its place is a small, wood ammo caddy. Charles removed the standard knob from the handle of his Farley rest and replaced it with a home-made wood block that holds cartridges for the record target. The 10.5-lb Light Varmint rifle is chambered in 6PPC with a BAT Machine Action and a composite wood and carbon-fiber stock.
Watch Charles Huckeba Shoot 1/8 MOA, 200-yard group at World Benchrest Championships
Here is the actual 200-yard, 5-shot group Charles shot in the video. Photo (by Stuart Elliot) taken through the lens of Huckeba’s 50X March scope (reticle has 1/16th MOA Dot).
Analyzing the Fine Points — What Makes Huckeba So Good
Short-range benchrest shooter Boyd Allen saw some interesting things in Huckeba’s WBC performance, as captured on video. Boyd noticed Huckeba’s smooth gun-handling and efficient loading. But Boyd also spied some interesting equipment, including an innovative joystick “handle-caddy”.
1. Low Friction Bags — When Huckeba slid his rifle, there was very little apparent friction. The front bag features the new 3M material (ScotchLite) on the sliding surfaces. The rear Protektor bag has ears of the same low-friction material.
2. Pause Before Chambering — While he was watching the flags and deciding when to start firing, Charles kept his first round in the action, but out of the barrel’s chamber, probably so as not to heat the cartridge and change the round’s point of impact.
3. Ammo Caddy on Joystick Arm – Charles shoots a Right Bolt/Left Port action, so he pulls his rounds with his left hand. Note that Huckeba’s record rounds rest in a small, wood ammo caddy attached to the end of the joystick shaft. Look carefully, you’ll see the wood ammo block in place of the normal black ball at the end of the joystick. That allows Charles to pull shots with the absolute minimum of hand movement. Ingenious! Huckeba is very fast, with a great economy of motion. I believe that because his ammo was literally at hand, Charles was better able to keep his focus on aiming and the flags.
4. Smooth-Cycling BAT Action — Note how smoothly Huckeba’s action operates. When Charles lifts the bolt handle (to extract a round and cock the firing pin), this does not disturb the rifle. Likewise, as he closes the bolt, the gun doesn’t wobble. The smooth action allows Charles to hold point of aim even when shooting relatively quickly. Huckeba’s BAT action is chrome-moly steel. Some shooters believe this metal makes for a smoother action than stainless steel or aluminum.
5. Long-Wheelbase Stock — The wood and carbon fiber stock is light, long, and stiff. Yet, importantly, the stock is also well-damped. The longer-than-average stock length (with extended forearm) seems to help the gun track well without jumping or rocking. The longer forearm allows a longer “wheelbase”, effectively shifting the weight distribution rearward (less weight on the front, more weight on the rear). This places a greater share of the gun’s weight on the rear bag, as compared to a more conventional benchrest stock. Huckeba’s stock, built by Bob Scoville, is at the cutting edge of short-range benchrest design. Its light-weight balsa wood and carbon fiber construction provides a combination of stiffness and vibration damping that allows its relatively long fore-end to be fully utilized to increase the weight on the rear bag (always an issue with 10.5-pound rifles).
To learn more about this benchrest stock design, read the comments by stock-builder Bob Scoville in our PPC with Pedigree story in our Gun of the Week Archives. Bob observed:
“There is a lot more to the structure of the stocks than meets the eye. The carbon fiber skin with which I cover the stocks creates a light, tough exterior surface. However, this contributes very little to the overall performance of the stocks. The real strength and stiffness is the result of an internal beam utilizing balsa core/carbon fiber technology.
This type construction can be found in aircraft, race cars, powerboats, and sailboats. It is interesting to note, balsa has the highest strength to weight ratio of all woods and carbon fiber is one of the lowest stretch (modulus of elasticity) relative to weight of all materials. The marriage of these two materials is common in the high-performance world. Additionally, balsa is used commercially for vibration dampening and sound reduction.”
Video find by Boyd Allen. Video by Stuart Elliot of BRT Shooters Supply, Brisbane, Australia.
All target shooters strive for perfect shot placement. Well one man has come closer to perfection than any other shooter who ever lived. You are looking at Michael Stinnett’s .0077″ NBRSA world-record group, the smallest 100-yard 5-shot group ever shot in the history of rifle competition. The group was certified at .0077″ (though labeled .008″ on the range-signed target below). A moving backer verified that this was FIVE shots — no question about that. You may be surprised but this was NOT shot by a 6 PPC, but rather a .30-caliber wildcat, based on the 6.5 Grendel.
Call it stunning, call it humbling, call it amazing. It is, quite simply the apotheosis (“perfect example”) of accuracy. This is what we all hope to achieve. It’s staggering to see that a rifle can drill FIVE perfectly-overlapped holes — the last virtually indistinguishable from the first — at a target a football field (100 yards) away. It’s great to see a benchmark like this, if only to remind us what is possible in our sport of precision shooting. (Sighters appear below record target.)
Mike’s amazing group stands as a NBRSA Light Varmint Class record. But it is also smaller than the current 5-shot, 100-yard records for all other classes, even Unlimited (Rail Gun). Likewise Stinnett’s .0077″ group is smaller than the IBS records for all classes:
Below is a larger-than-life-size view. Using this photo we measured the group with target-calculating software, and it came out .006″ (the software only goes to three digits). We recognize that it would be much better to work from the real target rather than a photo, so we are not challenging the official measurement in the least. But this does confirm that this is a phenomenally small five-shot group.
The Record-Setting Rifle and Cartridge
Many folks have asked about the gun and ammo that produced the .0077″ group. The Light Varmint-class Benchrest rifle was chambered as a .30-caliber wildcat, the 30 Stewart, which is based on the 6.5 Grendel case necked up. Mike was using Hodgdon H4198 powder behind BIB 114gr, 10-ogive bullets. Notably, the record-setting ammo was pre-loaded before the match. Here is Mike’s tuner-equipped rifle. CLICK HERE for more information on the rifle and cartridge.
Record Rifle Equipment Report by Mike Stinnett
Action: Kelbly Panda “Speedy Shorty” with solid bolt and PPC-diameter bolt face. Kelbly was asked to build several actions which were identical with the intent to eliminate any variance in head space between the two new rifles. This helped me use a single set-up on sizing dies for both rifles and ammo is interchangeable. Both actions were sent to Thomas ‘Speedy’ Gonzalez to be blue-printed and have Jewell triggers installed.
Reamer: 30 STEWART (I just call it a 30 PPC as that is what everyone expects, but it is in fact a custom design and Ralph deserves about 99% of the credit).
Barrels: Krieger was selected for the barrels. After discussions with Randy Robinett of BIB Bullets, a 1:17″ twist was identified as the correct, safe solution. Ralph Stewart has cut all my chambers using a custom-designed reamer. [Our goal] was consistent headspace and Ralph has been able to keep my barrels within .0002 variance. The barrel tuner also comes from Ralph Stewart.
Stock: Larson (including action bedding)
Scope: Leupold 45X Competition in Kelby Single Screw Tall Rings
Brass: Lapua (Base case is 6.5 Grendel)
Bullets: Randy Robinett (BIB) 30 Cal. 114gr, 10 Ogive (secondary bullet; primary is 112gr BIB)
Shooting Prairie Dogs at extreme long range takes some highly specialized equipment. Forum Member VolDoc and his friends have taken long-range varminting to a whole new level. With his Savage-based, Hart-barreled 20 BR, VolDoc managed a verified 1,032-yard Prairie Dog kill, possibly the longest recorded with a .20-Caliber rifle. But that’s just part of VolDoc’s impressive precision varminting arsenal. Here we showcase three of VolDoc’s accurate rigs: his stunning English Walnut Diamondback 6BR/Dasher, his Nesika-actioned “Orange Crush” Dasher, and the 1K Prairie Dog-slaying 20 BR Savage.
Diamondback Switch-Barrel Rifle Specifications
The action is a Stiller Diamondback, drop-port. The custom stock is similar to a Shehane ST-1000, but crafted from 40-year-old English Walnut. [Editor’s note: the wood on this gun is gorgeous!] There are three barrels for the gun with three different chamberings: 6BR Brux 1:8″-twist HV; 6BRX Krieger 1:8″-twist HV, and 6mm Dasher Krieger 1:8.5″ twist fluted straight contour (no taper). The scope is a Nightforce 12-42x56mm, with 2DD reticle.
Comments: This rifle is a good study in comparison of the three different chamberings. On the same rifle platform (same stock and action), each of these barrels had killed prairie dogs over 1,000 yards. So if someone asks which is best, a 6BR, or 6BRX, or 6 Dasher, VolDoc says they are all effective. The improved cartridges will deliver higher velocities, which can be an advantage. On the other hand it is simpler to load 6mmBR brass right out of the box, and it’s easy to find an accurate load for the 6mmBR (see photo).
Nesika 6mmBR/Dasher Rifle Specifications
VolDoc’s “Big Orange Crush” rifle has a stainless Nesika ‘J’ action, with 2 oz. Jewell trigger, in a painted fiberglass Shehane ST-1000 stock. Originally a 6BR, the gun is now chambered as a 6mm Dasher with a .271 no-turn neck. The barrel is a 1:12″-twist Krieger fited with Vais muzzle brake. On top is a NightForce NXS 12-42x56mm scope with double-dot reticle. The double-dot gives precise aiming and lower dot can be used as an aming point, when you need a few more MOA of elevation in the field.
Comments: Big Orange Crush shoots 87gr V-Maxs into bugholes at 3,400 fps. VolDoc’s load with the 87s is very stout, more than 32 grains of Vihtavuori N-135 with Wolf SRM primers. Cases are full-length sized, with an 0.266″ bushing for the necks.
This 3400 fps load with the 87gr V-Maxs has accounted for hundreds of Prairie Dogs killed from 97 yards to 1,050 yards. The 87gr V-Max at this speed literally picks Prairie Dogs up and throws them 10 feet vertically and laterally. VolDoc reports: “The barrel now has more than 3,000 rounds down the tube and exhibits little throat fire-cracking and no loss of accuracy. I can’t explain why, it just hasn’t deteriorated yet. This rifle is my best-ever ‘go-to’ Prairie Dog rifle.”
Savage 20 BR Rifle Specifications
The action is a Savage Dual Port, with an aftermarket Sharp Shooter Supply (SSS) 4 oz. Evolution trigger. The stock is a modified Savage factory unit that has been pillar-bedded. The factory barrel was replaced with a 28″ Hart stainless, 1:9″ twist barrel fitted with a Rayhill muzzle brake. The gun is chambered in 20 BR with a 0.235″ no-turn neck. Kevin Rayhill did the smithing. To provide enough elevation to shoot at 1,000 yards plus, Ray fitted a +20 MOA Bench Source scope base. This +20 rail is very well-crafted, and made especially for the Savage Model 12.
Comments: VolDoc reports: “When I got the Savage back from Kevin Rayhill, it still had my 6 BR factory barrel on it, as I use it to compete in Factory-class regional matches. I put on the new 20 BR Hart barrel Kevin had chambered and quickly put in a full day of load development using the 55gr Bergers (0.381 G1 BC) and the 40gr V-Maxs. Both proved very easy to tune and I soon had my loads. My 55gr Berger load with runs about 3590 fps. Varget was very accurate with the 55s (see load dev. targets below).
The mild recoil of the 20 BR, along with a very good muzzle break (Rayhill’s design) enables me to spot every hit or miss myself. Kevin also re-contoured the underside of the Savage stock so it tracks straight back on recoil, also making seeing hits easier.”
The 20 Caliber 1000-Yard Prairie Dog Quest
Making the 1032-Yard Shot with a 20 BR by Dr. John S. (aka “VolDoc”)
This article covers my recent successful quest for a 20-caliber varmint kill past 1,000 yards. This may be a first — I couldn’t find anyone else with a confirmed 20-Cal Prairie Dog kill at 1000+. I started a thread on the Varmint section of the AccurateShooter.com Forum about building a 20 BR capable of 1,000-yard Minute of Prairie Dog accuracy and many said 20 Cal bullets just could not do it. Some came to my defense and said those that doubted had never studied the ballistics of the 20BR with the new Berger 55gr bullets now available. Well, folks, I can tell you, hitting a Prairie Dog at 1000 yards isn’t easy — but it IS possible. Here’s how it was done….
Gale-Force Winds and High Temps
After arriving at our Prairie Dog Ranch in Colorado, I soon realized my quest was going to be especially difficult because we had continual 40+ mph winds and 100° heat every day. We had a special place where Birdog and I had made many 1,000-yard+ kills in years past, so I knew the ideal location but needed a small window of opportunity either early morning or late afternoon. Based on past experience, I knew I needed about 21 MOA from my 100-yard zero to get to 1,000 yards. On the first day of the Safari, I shot the 20 BR in the 45 mph brutal winds and heat of 97°. But after about 20 shots, I connected on a dog and lifted him about three feet high. Well, that’s a start.
Winds Subside — Here’s Our Chance …
On the second day of our shoot, I had listened to the early weather forecast, so I knew that there was to be a brief period of light winds early in the morning. We were out on the Colorado prairie at daylight and the conditions were perfect. The sunrise was at my back and we had about a 10 mph tailwind. I looked through my Leica Geovid Rangefinder Binos and the Prairie Dogs were out for breakfast. I quickly ranged the targets and found a group at about 1,050 yards. The technique is to find the dogs, range them, click-up according to your ballistic chart and shoot.
My first shot was very, very close. I added about four clicks up and a couple of clicks left for windage and let another go. That shot threw dirt all over, but the dog didn’t even flinch. This is another good point to remember about long-range Prairie Dog hunting. To be successful, the dogs can’t be too skittish, because if they have been shot at even a few times, they will go down and stay down. So, you should have an agreement with those in your party as to where each member is going to be shooting and respect this boundary. Drive-by shooting style is OK if that’s your thing, it’s just not mine.
Hitting the Mark — Dead Dog at 1032 Yards
On the fourth shot, I saw the dog go belly up and kick its final throws. My quest for the 20-Caliber 1,000-yard Prairie Dog had become a reality. We confirmed the distance with our lasers at 1,032 yards. Our technique for retrieving a dead dog at that range is worth mentioning. When I killed that dog, I left it in the crosshairs of my Nightforce scope. My shooting buddy kept looking through the scope (of my gun) and guided me to the deceased dog using Motorola walkie-talkies. When I got to the dog I was jubilant. I marked it with my tripod and orange jacket, and we took some pictures. (See view through scope photo below). The 55gr Bergers require a center mass hit as they will not expand, especially at that range. I centered this dog in the head — his BAD LUCK, my GOOD.
After making the 1,032-yard kill, I shot many many other Prairie Dogs with the Savage 20 BR using the 40gr V-Maxs. The dog flights were spectacular — red mist and helicopters, counter-clockwise or clockwise on demand. I killed at least five at over 500 yards. I will not use the 55 Bergers on Prairie Dogs again since the quest is over. I will use the 40gr V-Maxs and 39gr Sierra BlitzKings for next trip’s 20 BR fodder.
To get the best accuracy out of any benchrest rifle, you need to find the optimal position of front rest and rear bag. The important point to remember is that each rig is different. One gun may perform best with the front rest right at the tip of the forearm (Position ‘D’ in photo), while another gun will work best with the rest positioned much further back. This Editor’s own 6mmBR rifle has a laminated stock that is pretty flexy in the front. It shoots best with the front rest’s sandbag located a good 6″ back from the forearm tip (position ‘A’).
Here’s some benchrest advice that can help you reduce vertical and shoot tighter groups… without spending another penny. Many benchrest shooters spend a fortune on equipment and devote countless hours to meticulous handloading, but they never experiment with their rifle’s position/balance on the bags. This article explains why you should test your rifle in various positions. What you learn may surprise you (and improve your scores).
Next time you go to the range, experiment with the position of your rifle on the front rest, and try a couple different positions for the rear bag. You may find that the rifle handles much better after you’ve made a small change in the placement of your gun on the bags. Recoil can be tamed a bit, and tracking can improve significantly, if you optimize the front rest and rear bag positioning.
This competitor has the front rest positioned fairly far forward but not all the way out. Note the stop on the front rest — this limits forward stock travel.
A small change in the position of the forearm on the front rest, or in the placement of the rear bag, can make a big difference in how your gun performs.
Balance Your Gun BEFORE You Spend Hours Tuning Loads
In the pursuit of ultimate accuracy, shooters may spend countless hours on brass prep, bullet selection, and load tuning. Yet the same shooters may pay little attention to how their gun is set-up on the bags. When you have acquired a new rifle, you should do some basic experimentation to find the optimal position for the forearm on the front rest, and the best position for the rear bag. Small changes can make a big difference.
Joel Kendrick, past IBS 600-yard Shooter of the Year, has observed that by adjusting forearm position on the front rest, he can tune out vertical. He has one carbon-fiber-reinforced stock that is extremely rigid. When it was placed with the front rest right under the very tip of the forearm, the gun tended to hop, creating vertical. By sliding the whole gun forward (with more forearm overhang ahead of the front sandbag), he was able to get the whole rig to settle down. That resulted in less vertical dispersion, and the gun tracked much better.
Fore/aft stock position is important even with very wide fore-ends.
Likewise, the placement of the rear bag is very important. Many shooters, by default, will simply place the rear bag the same distance from the front rest with all their guns. In fact, different stocks and different calibers will NOT behave the same. By moving the rear bag forward and aft, you can adjust the rifle’s overall balance and this can improve the tracking significantly. One of our shooters had a Savage 6BR F-Class rifle. By default he had his rear bag set almost all the way at the end of the buttstock. When he slid the rear bag a couple inches forward the gun tracked much better. He immediately noticed that the gun returned to point of aim better (crosshairs would stay on target from shot to shot), AND the gun torqued (twisted) less. The difference was quite noticeable.
A small change in the position of the forearm on the front rest, or in the placement of the rear bag, can make a big difference in how your gun performs. You should experiment with the forearm placement, trying different positions on the front rest. Likewise, you can move the rear bag back and forth a few inches. Once you establish the optimal positions of front rest and rear bag, you should find that your gun tracks better and returns to battery more reliably. You may then discover that the gun shoots smaller groups, with less vertical dispersion. And all these benefits are possible without purchasing any expensive new gear.


 I did want a minimum no-turn neck optimized for Lapua brass. The drawing indicated that the reamer would cut a .281″ neck and a throat of 1.0315″. This was very close to ideal, though I did have to turn two thousandths off the necks of Lapua 6BR brass after I necked it up. I resized using a .277″ bushing and the loaded rounds came out to be .279″. Realizing that this was in the ball park, I decided to go with the Elk Ridge Reamer and build a 25 BR that could shoot 110gr or 115gr bullets. Now the question was where to get a match-grade 25-caliber barrel. I called quite a few of the custom barrel-makers, including BlackStar Barrels in Texas (no longer operating). I have had wonderful success with the BlackStar barrel on my 6BR “Chantilly” — it delivered great accuracy and impressive velocities. Since the 25 BR was so similar, I went with another BlackStar. I ordered a 10-twist, 6-groove, 1.250″-diameter straight-contour tube.
 After chambering, the barrel finished at 1.245″ diameter and 27.5″ inches with an 11° crown. I actually had the throat lengthened to accept both Berger 110gr and 115gr bullets. The bases of the FB 110-grainers sit flush with the neck-shoulder junction, when they are seated .010″ into the lands. With the longer 115gr VLDs, the bottom of the bearing surface (i.e. start of boat-tail) is just about even with the neck-shoulder junction.
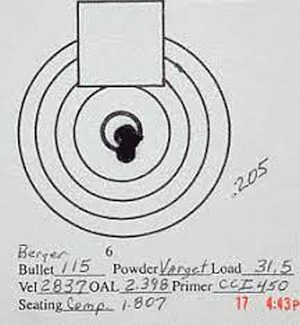 For her debut in competition, I took “Peppermint” to our local 600 yard F-class match. Shooting the Berger 115s with 31.5 grains Varget, she won with a perfect score of 200 with 14 Xs. At my club, we use a SR3 target. The X-Ring measures 3″ in diameter and the 10-Ring measures 7″. At the match there were some very good shooters with top-flight custom rifles in accurate calibers such as 6.5-284 and 22 Dasher. I was very fortunate to come out on top, but I give the credit to Peppermint’s good bench manners and outstanding accuracy.
 Now that I have several calibers in the BR cartridge family, (22 BR, 6mm BR, 6.5 BR, 7 BR, and a 30 BR), it is my humble opinion that they each have their own place. A varmint hunter’s dream, the 22 BR can push a bullet faster and more accurately than the 22-250. With an 8-Twist barrel, the 22 BR can send an 80gr SMK to 600 yards with extreme accuracy.


 There’s a simple, inexpensive “miracle device” that can cut your groups in half. If you’re not using this device, you’re giving away accuracy. The “miracle device” to which we refer is a simple wind indicator aka “windflag”. Using windflags may actually improve your accuracy on target much more than weighing charges to the kernel, or spending your life savings on the “latest and greatest” hardware.


 3. Ammo Caddy on Joystick Arm – Charles shoots a Right Bolt/Left Port action, so he pulls his rounds with his left hand. Note that Huckeba’s record rounds rest in a small, wood ammo caddy attached to the end of the joystick shaft. Look carefully, you’ll see the wood ammo block in place of the normal black ball at the end of the joystick. That allows Charles to pull shots with the absolute minimum of hand movement. Ingenious! Huckeba is very fast, with a great economy of motion. I believe that because his ammo was literally at hand, Charles was better able to keep his focus on aiming and the flags.


 Making the 1032-Yard Shot with a 20 BR

 Hitting the Mark — Dead Dog at 1032 Yards


