On our main Accurateshooter.com website, you’ll find a comprehensive review of the STM system for cleaning cartridge brass with stainless media. To clean brass with stainless media, start with five pounds of small stainless pins sold by StainlessTumblingMedia.com. Place these along with a gallon of water, a little liquid cleaner, and two pounds of cartridge brass in a rotary tumbler, and run the machine for one to four hours.
Forum Member Tests STM System
Our reviewer, Forum member Jason Koplin, purchased the STM media and a new Thumler’s Tumbler. He then tested the STM cleaning procedure on his own brass, including some extremely dirty and tarnished “range pick-up” brass. Jason was thoroughly impressed with how well the STM process worked — as you can see from the “before and after” photos below. Brass which looked like it was ready for the scrap heap was restored to “like-new” appearance. The process works equally well on both rifle brass and pistol brass. Jason observed that one surprise benefit of the STM cleaning procedure is a big reduction in noise. Jason said the water-filled rotary tumbler was much quieter than his vibratory tumblers.
You’ll want to read Jason’s full review which shows more before and after images. The full article features a “how-to” video created by Forum member Cory Dickerson, the young man who pioneered the stainless tumbling process and founded STM. The video shows how to load brass, media, and cleaner solutions into the tumbler, and how to separate media from brass once the tumbling is done.
In our Shooters’ Forum a reader recently asked: “How much neck tension should I use?” This prompted a Forum discussion in which other Forum members recommended a specific number based on their experience, such as .001″, .002″, or .003″. These numbers, as commonly used, correspond to the difference between case-neck OD after sizing and the neck OD of a loaded round, with bullet in place. In other words, the numbers refer to the nominal amount of interference fit (after sizing).
While these commonly-used “tension numbers” (of .001″, .002″ etc.) can be useful as starting points, neck tension is actually a fairly complex subject. The actual amount of “grip” on the bullet is a function of many factors, of which neck-OD reduction during sizing is just one. Understanding these many factors will help you maintain consistent neck tension as your brass “evolves” over the course of multiple reloadings.
Neck Tension (i.e. Grip on Bullets) Is a Complex Phenomenon
While we certainly have considerable control over neck tension by using tighter or looser bushings (with smaller or bigger Inside Diameters), bushing size is only one factor at work. It’s important to understand the multiple factors that can increase or decrease the resistance to bullet release. Think in terms of overall brass-on-bullet “grip” instead of just bushing size.
One needs to understand that bushing size isn’t the beginning and end of neck tension questions, because, even if bushing size is held constant, the amount of bullet “grip” can change dramatically as the condition of your brass changes. Bullet “grip” can also change if you alter your seating depth significantly, and it can even change if you ultrasonically clean your cases.
Bullet grip is affected by many things, such as:
1. Neck-wall thickness.
2. Amount of bearing surface (shank) in the neck.
3. Surface condition inside of neck (residual carbon can act as a lubricant; ultrasonic cleaning makes necks “grabby”).
4. Length of neck (e.g. 6BR neck vs. 6BRX).
5. Whether or not the bullets have an anti-friction coating.
6. The springiness of the brass (which is related to degree of work-hardening; number of firings etc.)
7. The bullet jacket material.
8. The outside diameter of the bullet and whether it has a pressure ridge.
9. The time duration between bullet seating and actual firing (necks can stiffen with time).
10. How often the brass is annealed
— and there are others…
Seating Depth Changes Can Increase or Decrease Grip on Bullet
You can do this simple experiment. Seat a boat-tail bullet in your sized neck with .150″ of bearing surface (shank) in the neck. Now remove the bullet with an impact hammer. Next, take another identical bullet and seat it with .300″ of bearing surface in another sized case (same bushing size/same nominal tension). You’ll find the deeper-seated bullet is gripped much harder.
Neck-Wall Thickness is Important Too
I have also found that thinner necks, particularly the very thin necks used by many PPC shooters, require more sizing to give equivalent “grip”. Again, do your own experiment. Seat a bullet in a case turned to .008″ neckwall thickness and sized down .003″. Now compare that to a case with .014″ neckwall thickness and sized down .0015″. You may find that the bullet in the thin necks actually pulls out easier, though it supposedly has more “neck tension”, if one were to consider bushing size alone.
In practical terms, because thick necks are less elastic than very thin necks, when you turn necks you may need to run tighter bushings to maintain the same amount of actual grip on the bullets (as compared to no-turn brass). Consequently, I suspect the guys using .0015″ “tension” on no-turn brass may be a lot closer to the guys using .003″ “tension” on turned necks than either group may realize.
Toward a Better Definition of Neck Tension
As a convenient short-cut, we tend to describe neck tension by bushing size alone. When a guy says, “I run .002 neck tension”, that normally means he is using a die/bushing that sizes the necks .002″ smaller than a loaded round. Well we know something about his post-sizing neck OD, but do we really have a reliable idea about how much force is required to release his bullets? Maybe not… This use of the term “neck tension” when we are really only describing the amount of neck diameter reduction with a die/bushing is really kind of incomplete.
My point here is that it is overly simplistic to ask, “should I load with .001 tension or .003?” In reality, an .001″ reduction (after springback) on a thick neck might provide MORE “grip” on a deep-seated bullet than an .003″ reduction on a very thin-walled neck holding a bullet with minimal bearing surface in the neck. Bushing ID is something we can easily measure and verify. We use bushing size as a descriptor of neck tension because it is convenient and because the other important factors are hard to quantify. But those factors shouldn’t be ignored if you want to maintain consistent neck tension for optimal accuracy.
Consistency and accuracy — that’s really what this all about isn’t it? We want to find the best neck tension for accuracy, and then maintain that amount of grip-on-bullet over time. To do that you need to look not only at your bushing size, but also at how your brass has changed (work-hardened) with time, and whether other variables (such as the amount of carbon in the neck) have changed. Ultimately, optimal neck tension must be ascertained experimentally. You have to go out and test empirically to see what works, in YOUR rifle, with YOUR bullets and YOUR brass. And you may have to change the nominal tension setting (i.e. bushing size) as your brass work-hardens or IF YOU CHANGE SEATING DEPTHS.
Remember that bushing size alone does not tell us all we need to know about the neck’s true “holding power” on a bullet, or the energy required for bullet release. True bullet grip is a more complicated phenomenon, one that is affected by numerous factors, some of which are very hard to quantify.
On his Riflemans’ Journal blog, German Salazar wrote an excellent article about cartridge Case-Head Separation. We strongly recommend that you read this article. German examines the causes of this serious problem and he explains the ways you can inspect your brass to minimize the risk of a case-head separation. As cases get fired multiple times and then resized during reloading, the cases can stretch. Typically, there is a point in the lower section of the case where the case-walls thin out. This is your “danger zone” and you need to watch for tell-tale signs of weakening.
The photo below shows a case sectioned so that you can see where the case wall becomes thinner near the web. German scribed a little arrow into the soot inside the case pointing to the thinned area. This case hadn’t split yet, but it most likely would do so after one or two more firings.
One great tip offered by German Salazar involves using a bent paper clip to detect potential case wall problems. Slide the paper clip inside your case to check for thin spots. German explains: “This simple little tool (bent paper clip) will let you check the inside of cases before you reload them. The thin spot will be immediately apparent as you run the clip up the inside of the case. If you’re seeing a shiny line on the outside and the clip is really hitting a thin spot inside, it’s time to retire the case. If you do this every time you reload, on at least 15% of your cases, you’ll develop a good feel for what the thin spot feels like and how it gets worse as the case is reloaded more times. And if you’re loading the night before a match and feel pressured for time — don’t skip this step!”
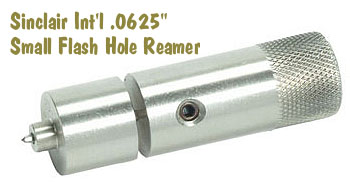
Even with high-quality brass from Lapua, Norma, and RWS, occasionally you may find one or two cases per box which have a small flake or obstruction in the flash-hole. This will appear like a thin crescent on one side of the flash hole (see photo). You should inspect ALL new brass before loading to identify any pieces with a partially-obstructed flash hole. It’s a good idea to remove any flake or thin crescent left as an artifact of the flash-hole forming process. Because the flash-hole itself is normally centered and of the correct diameter, it is not necessary to ream the flash-hole to a larger diameter. All you really need to do is remove the small obstruction(s). This can be done quickly with inexpensive tools.
Use a Small Pin Vise to Remove Flash-Hole Obstructions
Folks have asked if there is a tool that can remove obstructions from a Lapua small, BR-sized flash hole without opening the hole size. The Lapua PPC/BR flash hole is spec’d at 1.5mm, which works out to 0.059055″. Most of the PPC/BR flash-hole uniforming tools on the market use a 1/16″ bit which is nominally 0.0625″, but these often run oversize — up to 0.066″.
If you want to just clear out any obstructions in the flash hole, without increasing the flash hole diameter, you can use an inexpensive “pin vise” with an appropriate drill bit. For $1.00, eHobbyTools.com sells a 1.5mm drill bit, item 79186, that matches the Lapua flash hole exactly. Other vendors offer a #53 pin vise drill bit that measures .0595″ or .060″ (depending or source). An 0.0595″ bit is close enough. You can find pin vises and these small-diameter drill bits at hobby stores.
For quite some time, Sinclair Int’l has sold a similar device for small (PPC and BR-size) flash holes. Like the new 07-3081 unit for large flash holes, the 07-3000 Reamer for small flash holes works from the outside, so it can index off the primer pocket. It reams to .0625″, and also costs $45.99. The standard dimension for Lapua 220 Russian and 6mmBR flash holes is 1.5mm or .0590″. This tool will permit standard-size decapping rods with .0625″ tips to work without binding. However, note that both Forster and Redding normally supply .057″ decapping pins with their PPC and BR dies. So, it is NOT necessary to ream your Lapua BR/PPC flashholes, unless you prefer to do so for uniformity. It IS, however, a good idea to check BR/PPC flash holes for burrs before loading the first time.
NOTE: If you purchase either the 07-3081 or 07-3000 Sinclair Flash Hole Reamer tools, we recommend you mic the cutter tip before you process a bunch of cases. Sometimes a tip comes through that is oversize. This will ream the flash holes larger than you may intend.
We are organizing our crew for the 2013 SHOT Show, which runs January 15-18 in Las Vegas, at the Sands Expo Center. To whet your appetite, here is a product report from SHOT Show 2010 that you may have missed the first time around. In this video Robert Ruch, CFO of Forster Products, shows off the Forster’s 3-in-1 Case Trimming Tool. This is a very smart tool that can dramatically speed up your case prep operations.
Tool Cuts Brass to Length, and Chamfers Inside and Outside
Forster’s new 3-in-1 Carbide cutting tool works with all existing Forster case trimmers. This unit does three jobs at the same time. It trims the case to length, it puts a 14-degree chamfer on the INSIDE of the neck, AND (last but not least), it cuts a 30-degree chamfer on the OUTSIDE of the neck. It does this all quickly and efficiently — in a matter of a few seconds. We tested the new tool ourselves on a few cases. The tool is solid and well made. The carbide cutting tips do perform a very clean cut. Be aware, however, if you have turned your necks already, you may have to reset the blade positions before you start trimming your brass.
Forster’s CFO, Robert Ruch, demonstrates the 3-in-1 case trimming/chamfering tool in the video below. As you can see, the tool turns very smoothly (no chatter) and the job is finished in a few seconds. The actual cutting time, per case, is just a few second. The tool has an MSRP of $70.00, but we expect it to sell for around $50.00 at major vendors. It can be fitted on Forster trimmers and other hand lathes with a .490″ shaft diameter.
John Whidden Demonstrates Forster Co-Ax Press and Trimmer
In this promo video, produced for the Outdoor Adventure ‘What-the-Stuff’ TV show, John Whidden of Whidden Gunsworks, talks about the benefits of precision case trimming and demonstrates how to use the unique Forster Co-Ax Press.
Here’s good news for folks looking for another domestic source of cartridge brass. Federal Premium, the folks who make Federal Gold Medal match ammo, is now offering new, virgin, unprimed cartridge brass for a variety of rifle and pistol cartridge types. The new Federal Premium brass will be sold by Sinclair International, Grafs.com and other popular retailers. Sinclair has Federal brass in stock now for the most popular rifle cartridges, including .223 Rem, .243 Win, .270 Win, .308 Win, .30-06 Springfield, .300 WSM and seven more cartridge types (13 rifle brass types total — see chart below).
Federal’s new brass for reloaders starts at $25.99 for fifty (50) cases of .308 Win Brass. The equivalent of $51.98 per hundred cases, that’s pretty affordable. However, note that some types of Federal brass are much more expensive. For example, Federal’s .300 WSM brass costs $43.99 for fifty (50) cases at Sinclair. Click Here for Federal Premium Brass at Sinclair.
Sinclair Int’l notes: “Federal ammunition has long been prized for its reliability, consistency, and quality. But the only way to get Federal brass for reloads was to save your spent shells or scrounge them off the range – until now. Pristine, unfired, properly head-stamped Federal brass for popular rifle cartridges is now available from the manufacturer, and we’re pleased to offer it.”
Product Tip from EdLongrange. We welcome submissions from readers.
Serious reloaders know that PMA Tool makes some of the best specialty reloading tools you can buy. To help folks get the most out of their 21st century products, the company has created a new informational website. PMA’s Pat Reagin explains: “We have created a side-site, linked off of our main website, that is just for information. We will adding new product tips regularly. On this page we will post in-depth information about our tools, videos, customer-submitted information and photos, as well as a calendar of shooting events.” You can access PMA’s “At the Bench” info site at: atthebench.pmatool.com.
One highlight of the new PMA info site is a section dedicated to PMA’s new Micro-Adjust Case Trimmer. Pat tells us: “We’ve had quite of bit of interest in the new case trimmer, but a lot of guys want to see it in action. So we’ve created a couple of videos featuring the new trimmer. The first intro video, linked below, shows how to adjust and use the trimmer in various modes. We also produced a longer, 14-minute Instructional Video with more detail on trimmer adjustment and set-up.”
Watch Micro-Adjust Case Trimmer Video
The PMA Micro-Adjust Case trimmer indexes off the shoulder but it also provides precise control over neck length. You aren’t limited to a built-in, neck-length setting like some other shoulder-indexed trimmers. The PMA Micro-Adjust Trimming tool currently sells for $119.95 including one cartridge insert. The inserts, which can be purchased for $13.95 separately, can often work for a multiple cartridge types within the same family. For example, you can use the same insert for both .243 Win and .260 Rem. There is another insert that works with both 7mm-08 and .308 Win.
PMA Micro-Adjust Case Trimmer Features:
Indexes off shoulder for easy, consistent trim length.
Cases captured in no-scratch, Delrin™ inserts.
Fully rotating head with bearing for smooth operation and clean, square cuts.
Sharp carbide cutter for quick, smooth cuts with minimal burr.
Spring loaded head allows complete control of rate of feed.
How to use the PMA Micro-Adjust Case Trimmer
The trimmer indexes case off the case shoulder through the use of interchangeable Delrin™ inserts which capture the shoulder and neck of the case. This insert is contained in a spring-loaded tool head that rides on a linear bearing. The Micro-Adjust Trimmer can be used in three ways.
First, you can secure the case in a PMA caseholder chucked in a power drill, drill press, or lathe. You hold the trimming tool with your hand and feed in the spinning case. (This method is handy because if you leave the case in the holder, after you have trimmed to length, you can switch tools and chamfer the case-mouth using the same power source).
In the second method, the trimmer’s adjustment knob is removed (after locking the setting) and the cutting shaft is chucked in a drill, drill press. or lathe. Using this method, the case itself is held by hand and fed into the cutter. Lastly, the trimmer can be used manually, holding the case in one hand and the trimmer in the other. That’s the slowest method, but it works if you do not have power tools handy.
Creedmoor Sports is running a one-day sale, today only (August 8, 2012). Get 10% off the price of Lapua Brass, with order of two boxes or more. NOTE: This offer is limited to in-stock Lapua cartridge brass inventory only (supplies are limited). No coupon or discount code is needed — the discount will be applied at checkout!
Bryan at Powder Valley Inc. (PVI) let us know that Powder Valley is offering a “Freedom Special” on July 4th. You get free shipping (exclusive of hazmat and insurance) for online orders (over $150) placed on July 4th. Bryan explains: “In celebration of Independence Day and the wonderful men and women who have fought for our great nation Powder Valley is offering free freight (does not include hazmat and insurance) on all orders over $150.00.”
IMPORTANT: To qualify, Orders must be placed ONLINE between 12:01 AM and 11:59 PM ET on July 4, 2012.. Don’t forget that, where required, hazmat fees and insurance costs will still charged with shipments.
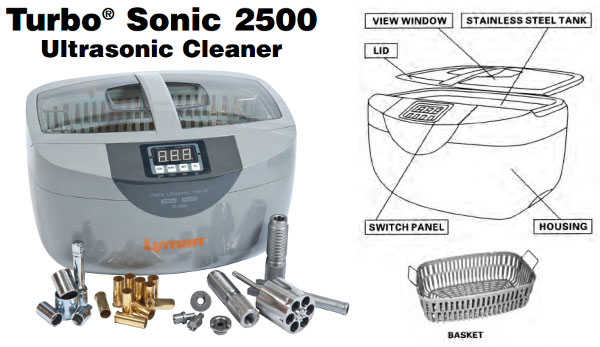
Lyman has introduced two new Turbo®Sonic Ultrasonic Cleaning units, a large 6.3-quart model TS-6000 and a smaller 23.6 oz. model TS-700. Along with the original mid-sized TS-2500 model introduced in 2011, Lyman now offers a full line-up of three (3) ultrasonic cleaning units: large, medium, and small. By most reports the TS-2500 worked well, so we expect the new TS-6000 and TS-700 will also handle ultrasonic cleaning duties well.
TS-6000
The large Model TS-6000 processes up to 1300 9mm cases or four handgun frames in less than 15 minutes (when the built-in heater is used). This workhorse is powered by two industrial-grade transducers and has an integral drain and hose for easy solution changes. The unit’s two-color LED display panel controls five different timed cleaning cycles.
TS-700
The small-footprint Model TS-700 fits in tight spaces. This unheated model handles up to 100 9mm cartridge cases. The compact TS-700 can also clean parts such as dies, muzzle brakes, and mould blocks. Note: Lyman recommends using its Steel & Stainless Steel Solution for dies and other steel components. The TS-700 features oscillation circuitry and five (5) timed cleaning cycles.
TS-2500
The mid-sized TS-2500 model, with heated tank, shown below, process up to 900 9mm cases per cleaning cycle. Introduced in 2011, this product has been widely adopted by hand-loaders. The TS-2500 will clean cases inside and out, including primer pockets, in less than 15 minutes.
Lyman TS-6000 and TS-2500 Units Can Heat Solution for Faster Cleaning
Ultrasonic cleaning machines employ ultrasonic cavitation to gently lift and dissolve carbon, dirt, lubricants, and other residues left on fired cases and small metal parts. Lyman’s TS-6000 and TS-2500 TurboSonic cleaning units feature tank heaters to warm the cleaning solution. Because ultrasonic cavitation works faster and better with a warm solution, Lyman claims its machines’ built-in heaters will speed up your cleaning job, by cutting processing time.
Lyman Cleaning Solutions (Three Types) — Lyman now offers its Brass Cleaning Solution and Steel & Stainless Steel Cleaning Solutions in 4 oz., 16 oz. and 32 oz. sized bottles. For even more versatility a new 16 oz. Jewelry Solution is available. For more information visit www.lymanproducts.com.


 On our main Accurateshooter.com website, you’ll find a comprehensive review of the STM system for cleaning cartridge brass with stainless media. To clean brass with stainless media, start with five pounds of small stainless pins sold by StainlessTumblingMedia.com. Place these along with a gallon of water, a little liquid cleaner, and two pounds of cartridge brass in a rotary tumbler, and run the machine for one to four hours.


 In our
  Neck-Wall Thickness is Important Too
 On his


 Here’s good news for folks looking for another domestic source of cartridge brass. Federal Premium, the folks who make Federal Gold Medal match ammo, is now offering new, virgin, unprimed cartridge brass for a variety of rifle and pistol cartridge types. The new


 Bryan at Powder Valley Inc. (PVI) let us know that Powder Valley is offering a “Freedom Special” on July 4th. You get free shipping (exclusive of hazmat and insurance) for online orders (over $150) placed on July 4th. Bryan explains: “In celebration of Independence Day and the wonderful men and women who have fought for our great nation Powder Valley is offering free freight (does not include hazmat and insurance) on all orders over $150.00.”
 IMPORTANT: To qualify, Orders must be placed ONLINE between 12:01 AM and 11:59 PM ET on July 4, 2012.. Don’t forget that, where required, hazmat fees and insurance costs will still charged with shipments.