The folks at Applied Ballistics have a new toy — a large trailer filled with all the latest and greatest tech gear for testing long-range ballistics. Bryan Litz reported: “The maiden voyage for the AB Mobile Lab in Texas this week was a huge success! We look forward to supporting more long range shooting events.” Mitchell Fitzpatrick was there in the Lone Star state with fellow Applied Ballistics staffer Christopher Palka. The Applied Ballistics team will be trailering the Mobile Lab to Indiana where it will be on hand for the NRA National Championships at Camp Atterbury this month.
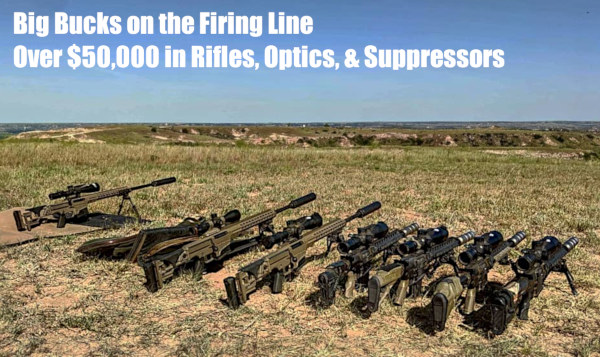
Ten rifles, heaps of cables, huge Doppler Radar unit, military-grade Laser RFs on tripods, spare barrels, safety gear — all ready for action in Texas.
About the Applied Ballistics Mobile Lab
Q: What is the basic purpose of the Applied Ballistics Mobile Lab?
Mitchell Fitzpatrick: The Mobile Lab allows us to effectively carry out ballistics testing in the field and at events. It has most of the capabilities of our normal lab, but on wheels.
Q: What hardware and electronics are carried in the Mobile Lab? What are its capabilities?
Bryan Litz: The Mobile Lab will transport most everything that’s in the main lab including the Doppler radar. This rig is new and we haven’t fully outfitted it yet. The load-outs will be somewhat flexible depending on the venue we are supporting.
The three rifles on the left are Barrett MRADS, $6000-$6154 MSRP, before optics.
NOTE to Readers — Check back at the end of the day. We will have more technical information from Bryan Litz and the Applied Ballistics team…
The .375 EnABELR cartridge was developed to offer magazine feeding capabilities with the highest-BC solid bullets available. Applied Ballistics observes: “The best magazine is one that retains the cartridge shoulder and doesn’t allow the tip of the bullet to impact the front of the magazine during recoil.” Cadex Defense has designed magazines that fit Cadex’s bottom metal and chassis for the EnABELR line of cartridges which allows for maximum magazine fed performance. These mags are beautifully made, but they will be very EXPENSIVE. Expect to pay about $275 per magazine — what the Cadex 375/408 CheyTac magazine currently costs (Product Code: MAG4300, USD $273.95).
Q: Is this different than Cadex’s regular CheyTac magazine?
A: Mitchell Fitzpatrick of Applied Ballistics Weapons Division replied: “Yes, the ribs that retain the shoulder are moved back to hold the case back and prevent the bullet tip from hitting the front of the magazine. We had been playing with inserts welded into place, which worked great, but dedicated mags directly from Cadex was the ultimate goal.”
Here is Mitchell Fitzpatrick, shooting the .375 EnABELR in an ELR Competition.
“CADEX and Applied Ballistics. Two companies taking ELR seriously and trying to get that last 1-2% of performance out of the system. Keep up the good work!” — Mark N.
The .375 EnABELR Cartridge — Big and Fast
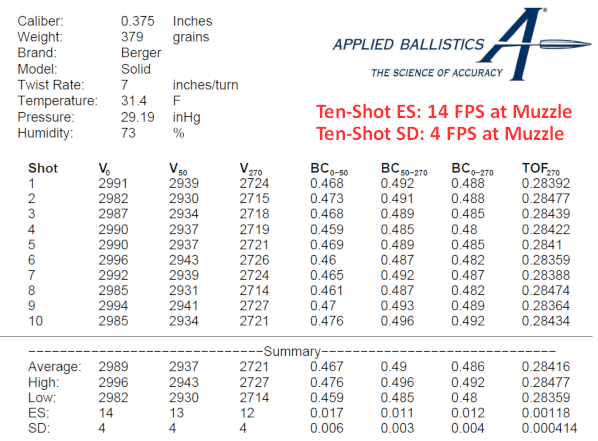
The .375 EnABELR cartridge is slightly shorter than a .375 CheyTac so it allows the round to mag-feed. Applied Ballistics is currently using brass made by Peterson. The .375 EnABELR has achieved impressive velocities — 2990 FPS — with prototype Berger 379-grain solid bullets fired from a 1:7″-twist 30″ barrel. Applied Ballistics may also test 1:8″-twist and 1:9″-twist barrels. READ Bullet Testing Report.
The .375 EnABELR cartridge was designed to offer .375 CheyTac performance in a slightly shorter package: “The problem with the .375 CheyTac is that, when loaded with the highest performance .375 caliber bullets (379-407 gr Berger Solids, and the 400-425 grain Cutting Edge Lazers) the round is not magazine feed-able in any action that’s sized for CheyTac cartridges.
“Knowing the .375 CheyTac produced substantial performance, and that it was just too long for magazine feeding, made it easy to converge on a design for the .375 EnABELR. We just had to make the case short enough to achieve magazine length with the desired bullets, while adding a little more diameter to keep the case capacity similar to the .375 CheyTac. The resulting basic shape is quite similar in proportions to the successful .338 Norma Magnum Cartridge which, interestingly, was selected as the cartridge for General Dynamics Lightweight Medium Machine Gun (LWMMG).”
Berger Twist-Rate Stability Calculator
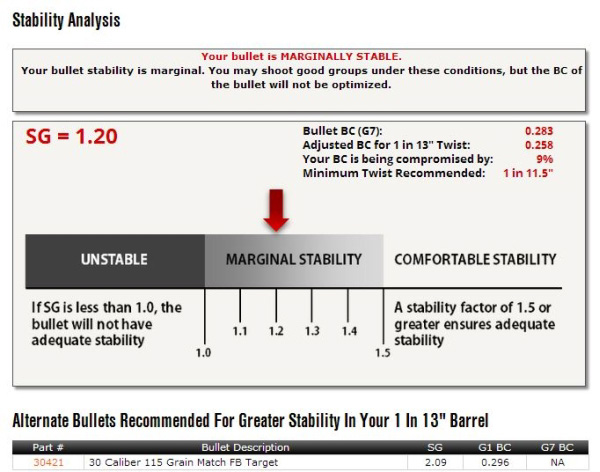
On the Berger Bullets website you’ll find a handy Twist-Rate Stability Calculator that predicts your gyroscopic stability factor (SG) based on mulitiple variables: velocity, bullet length, bullet weight, barrel twist rate, ambient temperature, and altitude. This cool tool tells you if your chosen bullet will really stabilize in your barrel.
How to Use Berger’s Twist Rate Calculator
Using the Twist Rate Calculator is simple. Just enter the bullet DIAMETER (e.g. .264), bullet WEIGHT (in grains), and bullet overall LENGTH (in inches). On its website, Berger conveniently provides this info for all its bullet types. For other brands, we suggest you weigh three examples of your chosen bullet, and also measure the length on three samples. Then use the average weight and length of the three. To calculate bullet stability, simply enter your bullet data (along with observed Muzzle Velocity, outside Temperature, and Altitude) and click “Calculate SG”. Try different twist rate numbers (and recalculate) until you get an SG value of 1.4 (or higher).
Gyroscopic Stability (SG) and Twist Rate
Berger’s Twist Rate Calculator provides a predicted stability value called “SG” (for “Gyroscopic Stability”). This indicates the Gyroscopic Stability applied to the bullet by spin. This number is derived from the basic equation: SG = (rigidity of the spinning mass)/(overturning aerodynamic torque).
If you have an SG under 1.0, your bullet is predicted not to stabilize. If you have between 1.0 and 1.1 SG, your bullet may or may not stabilize. If you have an SG greater than 1.1, your bullet should stabilize under optimal conditions, but stabilization might not be adequate when temperature, altitude, or other variables are less-than-optimal. That’s why Berger normally recommends at least 1.5 SG to get out of the “Marginal Stability” zone.
In his book Applied Ballistics For Long-Range Shooting, Bryan Litz (Berger Ballistician) recommends at least a 1.4 SG rating when selecting a barrel twist for a particular bullet. This gives you a safety margin for shooting under various conditions, such as higher or lower altitudes or temperatures.
Story idea from EdLongrange. We welcome reader submissions.
Hail the King — Paul Phillips wears crown as the new 2019 King of Two Miles.
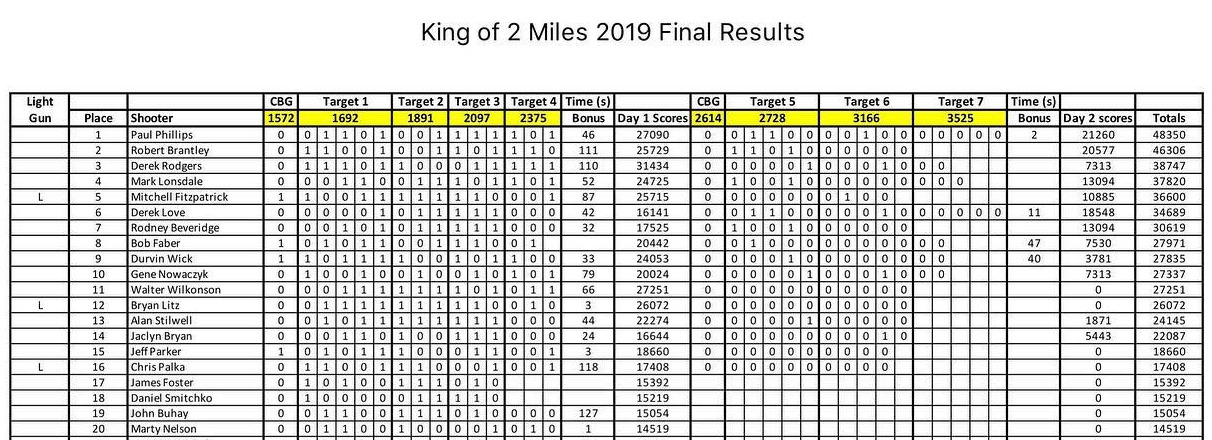
Paul Phillips, Captain of Team Global Precision Group (GPG), is the 2019 King of 2 Miles. Hail the new King! Paul won the event with a score of 48350, beating runner-up Robert Brantley who scored 46306. Fellow GPG shooter and 2017 K02M winner Derek Rodgers finished third with 38747. Phillips secured his K02M crown with good shooting in Raton, NM on both Day 1 and Day 2. On the final day, Paul had two hits at 2728 yards and one at 3166 yards. No competitor scored more than one hit at 3166 yards (1.799 miles), and no competitor scored even a single hit at the farthest target, placed at 3525 yards (2.0028 miles). So the actual 2-Mile target was never hit during the event.
Here are the target locations and yardages for K02M Day 2 Finals.
Team GPG members Derek Rodgers, Paul Phillips (center), and Mark Lonsdale with KO2M-winning rifle, K02M Trophy, $5000 Winner’s Prize from McMillan, and Nightforce Certificate.
Team Global Precision Dominates with Three of Top Four Places
Team Global Precision Group was top team overall with Paul Phillips in First Place, Derek Rodgers in Third, and Mark Lonsdale in Fourth. Team GPG, in its first world-level match together, dominated the field of 80 of the best ELR shooters in the world. First, Third, and Fourth — that’s mighty impressive gentlemen!
2019 KO2M Top 20 Results. Click on the table to see full-screen version:
Paul Phillips, who recently competed in the European K02M match in France, gave credit to his sponsors and team-mates: “Team GPG is honored to be … King of 2 Mile Champions. I’ve always wondered what it would feel like to be carried around on the King chair. I am humbled to be added to the list of great shooters that have been crowned before me.”
Paul added: “Big shout-out to all our sponsors, the match organizers, Eduardo, FCSA, and the volunteers who work so hard to make these ELR matches a major success. We’ll definitely be back in 2020!”
“Paul Phillips your win in this match is yet another example of the value of hard work paying off. I can honestly say that I don’t know anyone who works harder at ELR competition and promotion than you do. You deserve this win!” — Bryan Litz, Applied Ballistics
Equipment List for .416 Barrett 2019 KO2M-Winning Rifle
Paul’s massive KO2M rig features a BAT EX .50-Cal action with a 38″ Bartlein 1:9″-twist 5R barrel chambered for the standard .416 Barrett cartridge. The stock is a McMillan Beast One model. To tame recoil, Paul runs a T5 Terminator muzzle brake. The scope is a Nightforce 7-35x56mm ATACR F1 with MOAR Reticle. Up front is a Phoenix Precision Bipod, with an Edgewood Mini-Gator Bag in the rear. Paul is running a Bix’N Andy Comp Trigger with a 4-ounce, single-stage pull.
The complete rifle weighs 40 pounds. Bartlein did the .416 Barrett chambering using a Dave Manson reamer. Alex Sitman bedded the action in the McMillan stock as he did for the other GPG rifles. In fact, all three Team GPG rifles are essentially identical.
Load Details: Standard .416 Barrett cartridge, running .416 Caliber 550gr solid Cutting Edge Bullets at 3000 fps. The powder is Vihtavuori 20N29 ignited by RWS .50 Caliber primers. The cartridge brass is Barrett brand, produced by RUAG.
Support Gear: Ballistics are calculated with Applied Ballistics Software using velocity data from a LabRadar chronograph. Swarovski provided Team GPG with two big BTX 95 binocular spotting scopes. Phillips says “these BTX 95s really help us follow trace, spot impacts, and get on target quickly.”
Here are Team Applied Ballistics competitors at the 2019 KO2M event in Raton, NM. Applied Ballistics’ Mitchell Fitzpatrick posted: “[There were] some unique challenges this year, but I managed to finish in 5th place running a sub-25 pound rifle. That’s the result of a lot of our ESSO research.”
$5000 KO2M Winner’s Prize from McMillan Fiberglass Stocks
McMillan Fiberglass Stocks is a strong supporter of the shooting sports. Here Kelly McMillan presents Paul Phillips with a $5,000 check from McMillan Fiberglass Stocks for winning the 2019 King of 2 Mile while shooting a McMillan stock. Teammates Derek Rodgers and Mark Lonsdale also used McMillan stocks in the 2019 K02M Finals. Along with the McMillan check, Paul Phillips received $5000 from Nightforce Optics, and $1200 from Cutting Edge Bullets. Paul told us he will divide all the winnings with his team-mates because: “I won with my team — we won together.”
The Applied Ballistics 2019 Spring Seminar will be held at Snowbird Resort in Utah on June 1-2, 2019. The Seminar Fee is $625.00. However, now through April 21st you can use Code ABWIRE for $75 off registration. Note — Seminar fees do NOT include lodging! However, through May 4, 2019, attendees can reserve rooms at the Center-Cliff Lodge at the special seminar rate of $145.00 per night plus tax.
Primary speaker Bryan Litz will present material from his books, the Applied Ballistics Lab, and his experience shooting in various disciplines. Additional speakers addressing ballistics and long-range shooting topics will include Nick Vitalbo, Doc Beech, Alan Barnhart, Mitchell Fitzpatrick and other industry experts.
Seminar attendees will receive multiple Applied Ballistics products, all included in the registration fee:
1) Full library of Applied Ballistics Books and DVD set, valued at $275.
2) Applied Ballistics Analytics software, valued at $200.
3) Binder including hand-outs, articles, and worksheets.
2. Trajectory Features – Zeroing, Point Blank Range, Danger Space, and Uphill/Downhill Effects.
3. Sights – Tall Target Test (Sight Scale Factor and Cant), Aperture Sights, Turrets vs. Holding Reticles, and Extreme Adjustment for ELR.
4. Drag Modeling – What is a drag model, how is drag measured, how is a drag model used, and standard drag models.
5. Ballistic Coefficients – What is a BC, G1 and G7, Curve Fitting Challenges (averaged BCs, segmented BCs), and Estimating BCs.
6. Wind – Nature of wind, Mechanism of wind deflection (velocity scaling, lag time, wind deflection), near vs. far wind, wind measurement, terrain and vertical wind, competition Wind strategies, Wind coaching.
10. ELR Shooting – Transonic effects, Secondary Effects, Critical Nature of (Ranging, MV Measurement, Drag Modeling, Wind), Equipment Currently Being Used and Bullet Selection.
12. Ballistic Solvers – Components (Interface, Solver/Simulation, Model), Potential Accuracy, and walk-through of use with technical explanation of inputs.
13. Other Topics – Technology, Laser RangeFinders, Non-Linear Divergence, and Much More.
Have you recently purchased a new scope? Then you should verify the actual click value of the turrets before you use the optic in competition (or on a long-range hunt). While a scope may have listed click values of 1/4-MOA, 1/8-MOA or 0.1 Mils, the reality may be slightly different. Many scopes have actual click values that are slightly higher or lower than the value claimed by the manufacturer. The small variance adds up when you click through a wide range of elevation.
In this video, Bryan Litz of Applied Ballistics shows how to verify your true click values using a “Tall Target Test”. The idea is to start at the bottom end of a vertical line, and then click up 30 MOA or so. Multiply the number of clicked MOA by 1.047 to get the claimed value in inches. For example, at 100 yards, 30 MOA is exactly 31.41 inches. Then measure the difference in your actual point of impact. If, for example, your point of impact is 33 inches, then you are getting more than the stated MOA with each click (assuming the target is positioned at exactly 100 yards).
How to Perform the Tall Target Test
The objective of the tall target test is to insure that your scope is giving you the proper amount of adjustment. For example, when you dial 30 MOA, are you really getting 30 MOA, or are you getting 28.5 or 31.2 MOA? The only way to be sure is to verify, don’t take it for granted! Knowing your scopes true click values insures that you can accurately apply a ballistic solution. In fact, many perceived inaccuracies of long range ballistics solutions are actually caused by the scopes not applying the intended adjustment. In order to verify your scope’s true movement and calculate a correction factor, follow the steps in the Tall Target Worksheet. This worksheet takes you thru the ‘calibration process’ including measuring true range to target and actual POI shift for a given scope adjustment. The goal is to calculate a correction factor that you can apply to a ballistic solution which accounts for the tracking error of your scope. For example, if you find your scope moves 7% more than it should, then you have to apply 7% less than the ballistic solution calls for to hit your target.
NOTE: When doing this test, don’t go for the maximum possible elevation. You don’t want to max out the elevation knob, running it to the top stop. Bryan Litz explains: “It’s good to avoid the extremes of adjustment when doing the tall target test.I don’t know how much different the clicks would be at the edges, but they’re not the same.”
Should You Perform a WIDE Target Test Too?
What about testing your windage clicks the same way, with a WIDE target test? Bryan Litz says that’s not really necessary: “The wide target test isn’t as important for a couple reasons. First, you typically don’t dial nearly as much wind as you do elevation. Second, your dialed windage is a guess to begin with; a moving average that’s different for every shot. Whereas you stand to gain a lot by nailing vertical down to the click, the same is not true of windage. If there’s a 5% error in your scope’s windage tracking, you’d never know it.”
Verifying Scope Level With Tall Target Test
Bryan says: “While setting up your Tall Target Test, you should also verify that your scope level is mounted and aligned properly. This is critical to insuring that you’ll have a long range horizontal zero when you dial on a bunch of elevation for long range shots. This is a requirement for all kinds of long range shooting. Without a properly-mounted scope level (verified on a Tall Target), you really can’t guarantee your horizontal zero at long range.”
NOTE: For ‘known-distance’ competition, this is the only mandatory part of the tall target test, since slight variations in elevation click-values are not that important once you’re centered “on target” at a known distance.
Berger Bullets has created some impressive solid bullets for Extreme Long Range (ELR) shooting. These ultra-long, lathe-turned solids were unveiled at SHOT Show 2019, and they should reach Berger dealers by Mid-April this year. To test their consistency and develop refined BC numbers, the Applied Ballistics test team has braved cold winter weather to test Berger’s new 379 grain solids. The results have been impressive.
The Applied Ballistics testers have loaded the new Berger solids in an innovative .375-Caliber cartridge called the .375 EnABELR. This is slightly shorter than a .375 CheyTac so it allows the round to mag-feed. The brass is made by Peterson. The testers report: “We’ve been loading and shooting a pile of .375 EnABELR this month. The Berger 379gr Solids are proving to be incredibly consistent. Here’s a 10-shot string for one of our guns, shots number 931-940.”
The .375 EnABELR is achieving impressive velocities — 2990 FPS — with the 379-grainers from a 30″ barrel. The test team states: “We’ve been shooting [a 30″-long] 1:7″ twist which works good, but are going to try some 1:8″ and 1:9″ also”.
The .375 EnABELR Cartridge — Big and Fast
The .375 EnABELR cartridge was designed to offer .375 CheyTac performance in a slightly shorter package: “The problem with the .375 CheyTac is that, when loaded with the highest performance .375 caliber bullets (379-407 gr Berger Solids, and the 400-425 grain Cutting Edge Lazers) the round is not magazine feed-able in any action that’s sized for CheyTac cartridges.
“Knowing the .375 CheyTac produced substantial performance, and that it was just too long for magazine feeding, made it easy to converge on a design for the .375 EnABELR. We just had to make the case short enough to achieve magazine length with the desired bullets, while adding a little more diameter to keep the case capacity similar to the .375 CheyTac. The resulting basic shape is quite similar in proportions to the successful .338 Norma Magnum Cartridge which, interestingly, was selected as the cartridge for General Dynamics Lightweight Medium Machine Gun (LWMMG).”
Brass Source — Purchase the Peterson-made .338 EnABELR and .375 EnABELR brass through the Applied Ballistics WebStore. Price for both .338 EnABELR and .375 EnABELR is $125.00 for 50 cases.
Why You CANNOT Rely on the MV Printed on the Ammo Box!
When figuring out your come-ups with a ballistics solver or drop chart it’s “mission critical” to have an accurate muzzle velocity (MV). When shooting factory ammo, it’s tempting to use the manufacturer-provided MV which may be printed on the package. That’s not such a great idea says Bryan Litz of Applied Ballistics. Don’t rely on the MV on the box, Bryan advises — you should take out your chrono and run your own velocity tests. There are a number of reasons why the MV values on ammo packaging may be inaccurate. Below is a discussion of factory ammo MV from the Applied Ballistics Facebook Page.
Five Reasons You Cannot Trust the Velocity on a Box of Ammo:
1. You have no idea about the rifle used for the MV test.
2. You have no idea what atmospheric conditions were during testing, and yes it matters a lot.
3. You have no idea of the SD for the factory ammo, and how the manufacturer derived the MV from that SD. (Marketing plays a role here).
4. You have no idea of the precision and quality of chronograph(s) used for velocity testing.
5. You have no idea if the manufacturer used the raw velocity, or back-calculated the MV. The BC used to back track that data is also unknown.
1. The factory test rifle and your rifle are not the same. Aside from having a different chamber, and possibly barrel length some other things are important too like the barrel twist rate, and how much wear was in the barrel. Was it just recently cleaned, has it ever been cleaned? You simply don’t know anything about the rifle used in testing.
2. Temperature and Humidity conditions may be quite different (than during testing). Temperature has a physical effect on powder, which changes how it burns. Couple this with the fact that different powders can vary in temp-stability quite a bit. You just don’t know what the conditions at the time of testing were. Also a lot of factory ammunition is loaded with powder that is meter friendly. Meter friendly can often times be ball powder, which is less temperature stable than stick powder often times.
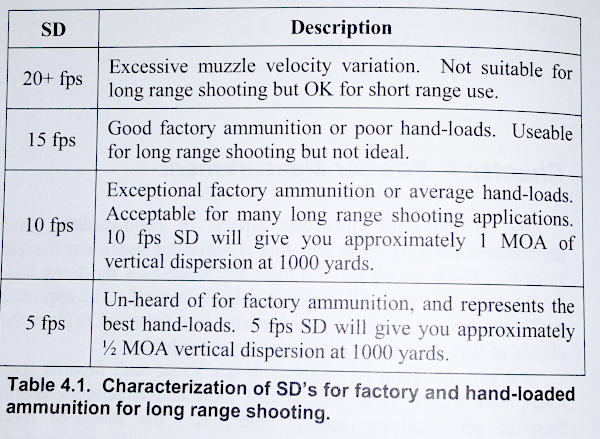
3. The ammo’s Standard Deviation (SD) is unknown. You will often notice that while MV is often listed on ammo packages, Standard Deviation (normally) is not. It is not uncommon for factory ammunition to have an SD of 18 or higher. Sometimes as high as 40+. As such is the nature of metering powder. With marketing in mind, did they pick the high, low, or average end of the SD? We really don’t know. You won’t either until you test it for yourself. For hand-loaded ammo, to be considered around 10 fps or less. Having a high SD is often the nature of metered powder and factory loads. The image below is from Modern Advancements in Long Range Shooting: Volume II.
4. You don’t know how MV was measured. What chronograph system did the manufacturer use, and how did they back track to a muzzle velocity? A chronograph does not measure true velocity at the muzzle; it simply measures velocity at the location it is sitting. So you need to back-calculate the distance from the chrono to the end of the barrel. This calculation requires a semi-accurate BC. So whose BC was used to back track to the muzzle or did the manufacturer even do that? Did they simply print the numbers displayed by the chronograph? What kind of chronograph setup did they use? We know from our Lab Testing that not all chronographs are created equal. Without knowing what chronograph was used, you have no idea the quality of the measurement. See: Applied Ballistics Chronograph Chapter Excerpt.
5. The MV data may not be current. Does the manufacturer update that data for every lot? Or is it the same data from years ago? Some manufacturers rarely if ever re-test and update information. Some update it every lot (ABM Ammo is actually tested every single lot for 1% consistency). Without knowing this information, you could be using data for years ago.
CONCLUSION: Never use the printed MV off a box of ammo as anything more than a starting point, there are too many factors to account for. You must always either test for the MV with a chronograph, or use carefully obtained, live fire data. When you are using a Ballistic Solver such as the AB Apps or Devices integrated with AB, you need to know the MV to an accuracy down to 5 fps. The more reliable the MV number, the better your ballistics solutions.
File photo showing Kestrel 5700 Elite. See video below for 6.5 Creedmoor rifle.
It’s not easy to place a first shot on target at 1500 yards. You must measure the wind speed with precision, know your exact muzzle velocity, and have a sophisticated ballistics solver. In this short video from Ryans Range Report, the shooter manages a first-round hit on a steel silhouette at 1500 yards. He used a Kestrel 4500 NV Weather Meter with Applied Ballistics software to figure out the trajectory for his 6.5 Creedmoor rounds.
The Kestrel recorded a wind velocity, and the internal software calculated a solution of 17 Mils elevation (that’s 928 inches of drop) with 2.5 Mils windage. “Bang” — the shooter sends it, and 2.6 seconds later “Clang” he had a hit (flight time was 2.6 seconds). Bryan Litz observes: “This is the science of accuracy (in the form of an Applied Ballistics Kestrel) being put to good use at 1500 yards”.
Later in the video (1:05-1:15) the shooter places three rounds on steel at 1000 yards in just 10 seconds. The three shots all fall within 10″ or so — pretty impressive for rapid fire. The shooter reports: “[In my 6.5 Creedmoor] I’m using a 136gr Lapua Scenar L. This bullet has impressed me. It screams out of my barrel at 2940 fps and holds on all the way out to 1,500 yards.”
The rifle was built by Aaron Roberts of Roberts Precision Rifles (RPRifles.com). Chambered for the 6.5 Creedmoor, it features a Leupold Mark VI 3-18x44mm scope.
Roberts Precision Rifles
19515 Wied Rd. Suite D
Spring, Texas 77388
Phone: 281-651-5593
Email: rprifles @ gmail.com
Today is Day One of the Berger Southwest Nationals, at the Ben Avery Range outside Phoenix, AZ. There will be a 600-yard mid-range match. Many of the nation’s most talented F-Class and sling shooters will be there. But no matter what your skill level, it is still possible to make major mistakes, that can spoil the day and/or put you out of the running for the entire match.
Photo by Sherri Jo Gallagher.
In any shooting competition, you must try to avoid major screw-ups that can ruin your day (or your match). In this article, past F-TR National Mid-Range and Long Range Champion Bryan Litz talks about “Train Wrecks”, i.e. those big disasters (such as equipment failures) that can ruin a whole match. Bryan illustrates the types of “train wrecks” that commonly befall competitors, and he explains how to avoid these “unmitigated disasters”.
Urban Dictionary “Train Wreck” Definition: “A total @#$&! disaster … the kind that makes you want to shake your head.”
Success in long range competition depends on many things. Those who aspire to be competitive are usually detail-oriented, and focused on all the small things that might give them an edge. Unfortunately it’s common for shooters lose sight of the big picture — missing the forest for the trees, so to speak.
Consistency is one of the universal principles of successful shooting. The tournament champion is the shooter with the highest average performance over several days, often times not winning a single match. While you can win tournaments without an isolated stellar performance, you cannot win tournaments if you have a single train wreck performance. And this is why it’s important for the detail-oriented shooter to keep an eye out for potential “big picture” problems that can derail the train of success!
Train wrecks can be defined differently by shooters of various skill levels and categories. Anything from problems causing a miss, to problems causing a 3/4-MOA shift in wind zero can manifest as a train wreck, depending on the kind of shooting you’re doing.
Photo by Sherri Jo Gallagher.
Below is a list of common Shooting Match Train Wrecks, and suggestions for avoiding them.
1. Cross-Firing. The fastest and most common way to destroy your score (and any hopes of winning a tournament) is to cross-fire. The cure is obviously basic awareness of your target number on each shot, but you can stack the odds in your favor if you’re smart. For sling shooters, establish your Natural Point of Aim (NPA) and monitor that it doesn’t shift during your course of fire. If you’re doing this right, you’ll always come back on your target naturally, without deliberately checking each time. You should be doing this anyway, but avoiding cross-fires is another incentive for monitoring this important fundamental. In F-Class shooting, pay attention to how the rifle recoils, and where the crosshairs settle. If the crosshairs always settle to the right, either make an adjustment to your bipod, hold, or simply make sure to move back each shot. Also consider your scope. Running super high magnification can leave the number board out of the scope’s field view. That can really increase the risk of cross-firing.
2. Equipment Failure. There are a wide variety of equipment failures you may encounter at a match, from loose sight fasteners, to broken bipods, to high-round-count barrels that that suddenly “go south” (just to mention a few possibilities). Mechanical components can and do fail. The best policy is to put some thought into what the critical failure points are, monitor wear of these parts, and have spares ready. This is where an ounce of prevention can prevent a ton of train wreck. On this note, if you like running hot loads, consider whether that extra 20 fps is worth blowing up a bullet (10 points), sticking a bolt (DNF), or worse yet, causing injury to yourself or someone nearby.
[Editor’s Note: The 2016 F-Class Nationals will employ electronic targets so conventional pit duties won’t be required. However, the following advice does apply for matches with conventional targets.]
3. Scoring/Pit Malfunction. Although not related to your shooting technique, doing things to insure you get at least fair treatment from your scorer and pit puller is a good idea. Try to meet the others on your target so they can associate a face with the shooter for whom they’re pulling. If you learn your scorer is a Democrat, it’s probably best not to tell Obama jokes before you go for record. If your pit puller is elderly, it may be unwise to shoot very rapidly and risk a shot being missed (by the pit worker), or having to call for a mark. Slowing down a second or two between shots might prevent a 5-minute delay and possibly an undeserved miss.
4. Wind Issues. Tricky winds derail many trains. A lot can be written about wind strategies, but here’s a simple tip about how to take the edge off a worse case scenario. You don’t have to start blazing away on the command of “Commence fire”. If the wind is blowing like a bastard when your time starts, just wait! You’re allotted 30 minutes to fire your string in long range slow fire. With average pit service, it might take you 10 minutes if you hustle, less in F-Class. Point being, you have about three times longer than you need. So let everyone else shoot through the storm and look for a window (or windows) of time which are not so adverse. Of course this is a risk, conditions might get worse if you wait. This is where judgment comes in. Just know you have options for managing time and keep an eye on the clock. Saving rounds in a slow fire match is a costly and embarrassing train wreck.
5. Mind Your Physical Health. While traveling for shooting matches, most shooters break their normal patterns of diet, sleep, alcohol consumption, etc. These disruptions to the norm can have detrimental effects on your body and your ability to shoot and even think clearly. If you’re used to an indoor job and eating salads in air-conditioned break rooms and you travel to a week-long rifle match which keeps you on your feet all day in 90-degree heat and high humidity, while eating greasy restaurant food, drinking beer and getting little sleep, then you might as well plan on daily train wrecks. If the match is four hours away, rather than leaving at 3:00 am and drinking five cups of coffee on the morning drive, arrive the night before and get a good night’s sleep.”
Keep focused on the important stuff. You never want to lose sight of the big picture. Keep the important, common sense things in mind as well as the minutia of meplat trimming, weighing powder to the kernel, and cleaning your barrel ’til it’s squeaky clean. Remember, all the little enhancements can’t make up for one big train wreck!


 The
The 


 Verifying Scope Level With Tall Target Test


 It’s not easy to place a first shot on target at 1500 yards. You must measure the wind speed with precision, know your exact muzzle velocity, and have a sophisticated ballistics solver. In this short video from


 Train Wrecks (and How to Avoid Them)

 4. Wind Issues. Tricky winds derail many trains. A lot can be written about wind strategies, but here’s a simple tip about how to take the edge off a worse case scenario. You don’t have to start blazing away on the command of “Commence fire”. If the wind is blowing like a bastard when your time starts, just wait! You’re allotted 30 minutes to fire your string in long range slow fire. With average pit service, it might take you 10 minutes if you hustle, less in F-Class. Point being, you have about three times longer than you need. So let everyone else shoot through the storm and look for a window (or windows) of time which are not so adverse. Of course this is a risk, conditions might get worse if you wait. This is where judgment comes in. Just know you have options for managing time and keep an eye on the clock. Saving rounds in a slow fire match is a costly and embarrassing train wreck.


