Based on the questions we get on a daily basis on our 800 (Customer Support) line, twist is one of the most misunderstood subjects in the gun field. So let’s look deeper into this mystery and get a better understanding of what twist really means.
When you see the term 1:14″ (1-14) or 1:9″ twist, just exactly what does this mean? A rifle having a 1:14″ twist means the bullet will rotate one complete revolution every fourteen inches of the barrel. Naturally a 1:9″ turns one time every nine inches that it travels down the barrel. Now, here’s something that some people have trouble with. I’ve had calls from shooters thinking that a 1:14″ twist was faster than a 1:9″ because the number was higher with the 1:14″. The easiest way to remember this is the higher the number, the slower the twist rate is.
Now, the biggest misconception is that if a shooter has a .223 with a 1:8″ twist, his rifle won’t stabilize a 55gr bullet or anything lighter. So let’s look at what is required. The longer a bullet is for its diameter, the faster the twist has to be to stabilize it. In the case of the .223 with a 1:8″ twist, this was designed to stabilize 80gr bullets in this diameter. In truth the opposite is true. A 1:8″ will spin a 55gr faster than what is required in order to stabilize that length of bullet. If you have a bullet with good concentricity in its jacket, over-spinning it will not [normally] hurt its accuracy potential. [Editor’s Note: In addition, the faster twist rate will not, normally, decrease velocity significantly. That’s been confirmed by testing done by Bryan Litz’s Applied Ballistics Labs. There may be some minor speed loss.]
Many barrel-makers mark the twist rate and bore dimensions on their barrel blanks.
Think of it like tires on your truck. If you have a new set of tires put on your truck, and they balance them proper at the tire shop, you can drive down a street in town at 35 MPH and they spin perfect. You can get out on the highway and drive 65 MPH and they still spin perfect. A bullet acts the same way.
Once I loaded some 35gr HP bullets in a 22-250 Ackley with a 1:8″ twist. After putting three shots down range, the average velocity was 4584 FPS with an RPM level of 412,560. The group measured .750″ at 100 yards. This is a clear example that it is hard to over-stabilize a good bullet.
Twist-rate illustration by Erik Dahlberg courtesy FireArmsID.com. Krieger barrel photo courtesy GS Arizona.
Modern binoculars and Laser Rangefinders have built-in sensors and microprocessors that can provide ballistics solutions. These work via on-board software as well as systems that talk (via Bluetooth) to a mobile device with a Ballistics App installed. Today we feature an Applied Ballistics Podcast that covers these impressive products with integrated ballistics functionality.
AB Integrated Products and Features In this podcast, Applied Ballistics Founder Bryan Litz and Product Manager Francis Colon answer some of the most common questions received from listeners. They primarily discuss the latest Applied Ballistics integrated devices and highlight their capabilities.
Along with describing the basics of optics and rangefinder products with Applied Ballistics functionality, Bryan and Francis talk about how software can tailor the ballistics output to specific applications and firearms. Francis explains Drop Scale Factor (“DSF”) — a means by which you “train” your solver to match your specific equipment.
NOTE: As we cannot embed the full 42-minute podcast here, you’ll need to go to the Applied Ballistics site to listen. CLICK HERE.
Integrated Solution — Leica LRF and Kestrel with AB Software
This video shows how to pair a Leica Rangemaster 2800.com to a Kestrel Elite 5700. The Leica Rangemaster 2800.com provides the Kestrel with the Range, Firing Direction, and Inclination angle. The Kestrel will then calculate the firing solution and provide that solution on its own display as well as feed that back to the Leica which then displays the hold-over when looking through the Rangefinder. This allows for remote, hands-free operation of the Kestrel in a mount while still being able to see the firing solution in the range finder. NOTE: This is an older video, but similar systems operate with the latest products.
Here are two different bullet types, seated to the same CBTO length, but different COAL. Note the shiny scratches on the bullets made by the comparator tool which indicates a point on the bullet ogive near where the ogive will engage the rifling.
Effects Of Cartridge Over All Length (COAL) And Cartridge Base To Ogive (CBTO) – Part 2 by Bryan Litz forBerger Bullets. Part One of this series focused on the importance of COAL in terms of SAAMI standards, magazine lengths, seating depths, and pressure levels. Another measure of length for loaded ammunition is highly important to precision, namely Cartridge Base to Bullet Ogive Length (CBTO).
Figure 2. Chamber throat geometry showing the bullet jump to the rifling or lands.
Look at Figure 2. Suppose the bullet was seated out of the case to the point where the base of the bullet’s nose (ogive) just contacted the beginning of the riflings (the lands) when the bolt was closed. This bullet seating configuration is referred to as touching the lands, or touching the riflings and is a very important measurement to understand for precision hand-loading. Due to the complex dynamics of internal ballistics which happen in the blink of an eye, the distance a bullet moves out of the case before it engages the riflings is highly critical to precision potential. Therefore, in order to systematically optimize the precision of his handloads, it’s critically important that the precision hand-loader understands how to alter bullet seating depth in relation to the barrel rifling. Part of the required knowledge is understanding how to accurately and repeatably measure the Cartridge Base To Ogive (CBTO) dimension. This is explained in the FULL ARTICLE.
Bryan Litz offers an extended discussion on how to measure CBTO using different tools and methods, including the Hornady OAL gauge. You can read this discussion in the full article found on the Berger Bullets website. CLICK HERE to Read Full Article.
Why Not Use CBTO as a SAAMI Standard?
If CBTO is so important to rifle accuracy, you might ask, “Why is it not listed as the SAAMI spec standard in addition to COAL?” There is one primary reason why it is not listed in the standard. This is the lack of uniformity in bullet nose shapes and measuring devices used to determine CBTO.
Benefits of Having a Uniform CBTO
There is another aspect to knowing your CBTO when checking your COAL as it pertains to performance. With good bullets, tooling, and carefully-prepared cases you can easily achieve a CBTO that varies less than +/- .001″ but your COAL can vary as much as .025″ extreme spread (or more with other brands). This is not necessarily bad and it is much better than the other way around. If you have a CBTO dimension that varies but your COAL dimension is tight (within +/- .002″) then it is most likely that your bullet is bottoming out inside the seater cone on the bullet tip. This is very bad and is to be avoided. It is normal for bullets to have precisely the same nose shape and it is also normal for these same bullets to have nose lengths that can vary as much as .025″.
Summary of Cartridge Base To Ogive (CBTO) Discussion
Here are four important considerations regarding bullet seating depth as it relates to CBTO:
1. CBTO is a critical measurement to understand for handloaders because it’s directly related to precision potential, and you control it by simply setting bullet seating depth.
2. Tools and methods for measuring CBTO vary. Most of the measurement techniques have pitfalls (which may give rise to inconsistent results) that you should understand before starting out.
3. A CBTO that produces the best precision in your rifle may not produce the best precision in someone else’s rifle. Even if you have the same rifle, same bullets, same model of comparator gauges, etc. It’s possible that the gauges are not actually the same, and measurements from one don’t translate to the same dimension for another.
4. Once you find the CBTO that produces the best precision in your rifle, it’s important to allow minimal variation in that dimension when producing quality handloads. This is achieved by using quality bullets, tooling, and properly preparing case mouths and necks for consistent seating.
Over the past 12 months, this article was one of the TOP 20 most-read Daily Bulletin features. We’re reprising it today for those who may have missed it the first time. The above diagram comes from a TiborasurasRex YouTube Video comparing G1 and G7 BC models. CLICK HERE to watch the video.
The better, up-to-date ballistics programs let you select either G1 or G7 Ballistic Coefficient (BC) values when calculating a trajectory. The ballistic coefficient (BC) of a body is a measure of its ability to overcome air resistance in flight. You’ve probably seen that G7 values are numerically lower than G1 values for the same bullet (typically). But that doesn’t mean you should select a G1 value simply because it is higher.
Some readers are not quite sure about the difference between G1 and G7 models. One forum member wrote us: “I went on the JBM Ballistics website to use the web-based Trajectory Calculator and when I got to the part that gives you a choice to choose between G1 and G7 BC, I was stumped. What determines how, or which one to use?”
The simple answer is the G1 value normally works better for shorter flat-based bullets, while the G7 value should work better for longer, boat-tailed bullets.
G1 vs. G7 Ballistic Coefficients — Which Is Right for You?
G1 and G7 refer both refer to aerodynamic drag models based on particular “standard projectile” shapes. The G1 shape looks like a flat-based bullet. The G7 shape is quite different, and better approximates the geometry of a modern long-range bullet. So, when choosing your drag model, G1 is preferable for flat-based bullets, while G7 is ordinarily a “better fit” for longer, boat-tailed bullets.
Drag Models — G7 is better than G1 for Long-Range Bullets
Many ballistics programs still offer only the default G1 drag model. Bryan Litz, author of Applied Ballistics for Long Range Shooting, believes the G7 standard is preferrable for long-range, low-drag bullets: “Part of the reason there is so much ‘slop’ in advertised BCs is because they’re referenced to the G1 standard which is very speed sensitive. The G7 standard is more appropriate for long range bullets. Here’s the results of my testing on two low-drag, long-range boat-tail bullets, so you can see how the G1 and G7 Ballistic coefficients compare:
G1 BCs, averaged between 1500 fps and 3000 fps:
Berger 180 VLD: 0.659 lb/in²
JLK 180: 0.645 lb/in²
The reason the BC for the JLK is less is mostly because the meplat was significantly larger on the particular lot that I tested (0.075″ vs 0.059″; see attached drawings).
For bullets like these, it’s much better to use the G7 standard. The following BCs are referenced to the G7 standard, and are constant for all speeds.
Many modern ballistics programs, including the free online JBM Ballistics Program, are able to use BCs referenced to G7 standards. When available, these BCs are more appropriate for long range bullets, according to Bryan.
[Editor’s NOTE: BCs are normally reported simply as an 0.XXX number. The lb/in² tag applies to all BCs, but is commonly left off for simplicity.]
This article is copyright 2023 AccurateShooter.com. No 3rd Party republication of this article is allowed without advance approval and payment of licensing fees.
Today’s Saturday Showcase features Palma rifles and Palma competition. The Palma discipline is a prone Iron Sight competition that originated in 1876, making it the second oldest continuing rifle match in the world. Except for a hiatus in the late 1900s, there is a nearly 150-year history of Palma matches. The Palma Course of Fire includes stages at 800, 900, and 1000 yards. At each yard-line you get two (2) sighting shots followed by 15 shots for record, for a grand total of 51 shots.
Under U.S.A. Palma rules the gun must be a rifle with metallic sights chambered for .308 Win (7.62×51) or .223 Rem (5.56×45). Most of the rifles featured in these videos are chambered for .308 Winchester, but we do have a video of John Whidden shooting his .223 Rem Palma gun — you’ll notice the significantly reduced recoil. CLICK HERE for more information on Palma Rules.
Components of Modern Palma Rifle and Palma Competition Basics
We definitely recommend you watch this video. Hosted by SSG Robert Germanelo of the U.S. Marine Corps Shooting Team, this video explains the basic rules of Palma competition and covers the key features of a modern, tubegun-style Palma rifle. The featured rifle has a Eliseo Competition Machine stock, Krieger 30″ 1:13″-twist barrel, Defiance Machine single-shot Rem 700-compatible action, Jewell trigger, Warner Tool Aperture Rear Sight, and Stallings Machine “Right Sight” in the front.
John Whidden Shoots His Modern .223 Rem Palma Rifle
With the latest bullets, long barrels, and strong Lapua brass, the .223 Rem CAN compete successfully in modern Palma competition. Here we feature a .223 Rem Palma rig belonging to 5-time NRA Long Range Champion John Whidden. Watch video at 00:25 and you’ll see the recoil of Whidden’s .223 Rem Palma rifle is significantly less than a .308 Win Palma rig. John joked: “With the .223 Rem there is just a pop and a wiggle after the shot.” CLICK HERE for full 1200-word report on this rifle with many more photos.
Modern .308 Win Palma Rifle with Custom Anschutz-style Stock
Here a Palma competitor showcases his modern .308 Win Palma rifle built with an custom-made, Anschutz 1913 model-style stock with the main frame crafted by the host’s father. This rig has a 30″ barrel chambered for 155gr bullets. The video explains how the components were chosen, why the barrel is so long, and how the stock adjusts in numerous ways to fit the shooter’s particular prone style. Below is a diagram of the sight picture. This is covered at 1:56 in the video.
Palma Rifles Shooting 1000 Yards at Bisley in the UK
This UK-produced video features Palma matches at the Stickledown Range at Bisley. This video showcases the Inter-Counties match, where competitors use iron-sighted Palma rifles on targets at 1000 yards. This video provides a good introduction to the Palma discipline as practiced in Great Britain.
Canadian Palma Fun — Nova Scotia Shooters at 900 Yards
In this video, filmed at a beautiful range in Nova Scotia, two Canadian shooters compete at 900 yards with their iron sighted .308 Win Palma rifles. The video combines three different views into one frame, so you can simultaneously see downrange, see the shooters, and see the shot impact on the electronic target display. The shooters fired .308 Win cartridges loaded with Vihtavuori N140 powder and 155gr Sierra #2156 PALMA bullets.
Ballistics Guru Shoots Palma at 800 Yards
The talented Bryan Litz, head honcho of Applied Ballistics LLC, demonstrates his shooting skills in this video. Watch Byran complete the 800-yard phase of the Palma course shot at Camp Atterbury, Indiana in the summer of 2008.
Brass Test in .308 Win Rifle — Lapua vs. Norma Brass
This video by our friend Keith Glasscock is not specifically about Palma rifles. But it does provide key information about the .308 Win cartridge, the most popular chambering for Palma rifles. Keith tests two different brands of .308 Win brass — Lapua and Norma. The results are enlightening. We have observed that Lapua brass can probably take higher loads and has greater longevity. NOTE: For this test a .308 Win F-TR rifle chambered for heavier bullets was used. But it’s still a good comparison test for .308 Win brass.
Palma Chambering and Bullet Weight Limits
There is, understandably, quite a bit of confusion concerning caliber limitations for Palma rifles and Palma competition. Some folks say you can shoot a .308 Winchester (or 7.62×51) with a bullet weight up to 156 grains. Others say you can shoot a .308 Win (or 7.62×51) with any bullet weight. Still others opine that you can shoot EITHER a .223 Rem (5.56×45) or a .308 Win (or 7.62 NATO).
So who is right? Well, all these viewpoints are correct in part. That’s because different rules apply in different venues. In most, but not all United States Palma competitions, you can shoot either a .223 Rem or .308 Win with no restriction on bullet weights. But in some U.S. Matches, most notably the Spirit of America, certain prizes are limited to .308s with 156gr max bullet weights OR .223s with 81gr max bullet weights. What’s the bottom line? In most USA Palma competitions you can shoot either a .308 or a .223 with no limit on bullet weight. In International Palma competitions you can shoot either a .308 or a .223 but the max bullet weight is limited.
Want to improve your understanding of Ballistics, Bullet Design, Bullet Pointing, and other shooting-related tech topics? Well here’s a treasure trove of gun expertise. Applied Ballistics offers dozens of FREE tech articles on its website. Curious about Coriolis? — You’ll find answers. Want to understand the difference between G1 and G7 BC? — There’s an article about that.
“Doc” Beech, technical support specialist at Applied Ballistics says these articles can help shooters working with ballistics programs: “One of the biggest issues I have seen is the misunderstanding… about a bullet’s ballistic coefficient (BC) and what it really means. Several papers on ballistic coefficient are available for shooters to review on the website.”
Credit Shooting Sports USA Editor John Parker for finding this great resource. John writes: “Our friends at Applied Ballistics have a real gold mine of articles on the science of accurate shooting on their website. This is a fantastic source for precision shooting information[.] Topics presented are wide-ranging — from ballistic coefficients to bullet analysis.”
Here are six (6) of our favorite Applied Ballistics articles, available for FREE to read online. There are dozens more, all available on the Applied Ballistics Education Webpage. After Clicking link, select Plus (+) Symbol for “White Papers”, then find the article(s) you want in the list. For each selection, then click “Download” in the right column. This will send a PDF version to your device.
If you are planning to shoot a PRS match with factory ammo or use factory ammo when hunting, you should definitely check the ammo velocity in YOUR rifle. Otherwise your ballistics come-up tables could be all wrong. It’s not uncommon to find that the actual velocity in YOUR gun is NOT the same as the listed velocity on the ammunition package. We explain why in today’s article…
Why You CANNOT Rely on the MV Printed on the Ammo Box!
When figuring out your come-ups with a ballistics solver or drop chart it’s “mission critical” to have an accurate muzzle velocity (MV). When shooting factory ammo, it’s tempting to use the manufacturer-provided MV which may be printed on the package. That’s not such a great idea says Bryan Litz of Applied Ballistics. Don’t rely on the MV on the box, Bryan advises — you should take out your chrono and run your own velocity tests. There are a number of reasons why the MV values on ammo packaging may be inaccurate. Below is a discussion of factory ammo MV from the Applied Ballistics Facebook Page.
Five Reasons You Cannot Trust the Velocity on a Box of Ammo:
1. You have no idea about the rifle used for the MV test.
2. You have no idea what atmospheric conditions were during testing, and yes it matters a lot.
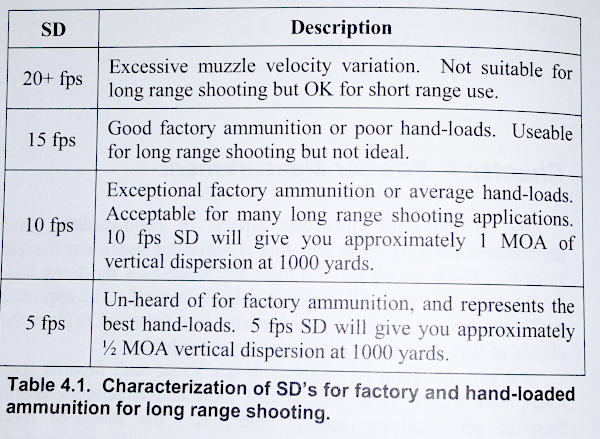
3. You have no idea of the SD for the factory ammo, and how the manufacturer derived the MV from that SD. (Marketing plays a role here).
4. You have no idea of the precision and quality of chronograph(s) used for velocity testing.
5. You have no idea if the manufacturer used the raw velocity, or back-calculated the MV. The BC used to back track that data is also unknown.
1. The factory test rifle and your rifle are not the same. Aside from having a different chamber, and possibly barrel length some other things are important too like the barrel twist rate, and how much wear was in the barrel. Was it just recently cleaned, has it ever been cleaned? You simply don’t know anything about the rifle used in testing.
2. Temperature and Humidity conditions may be quite different (than during testing). Temperature has a physical effect on powder, which changes how it burns. Couple this with the fact that different powders can vary in temp-stability quite a bit. You just don’t know what the conditions at the time of testing were. Also a lot of factory ammunition is loaded with powder that is meter friendly. Meter friendly can often times be ball powder, which is less temperature stable than stick powder often times.
3. The ammo’s Standard Deviation (SD) is unknown. You will often notice that while MV is often listed on ammo packages, Standard Deviation (normally) is not. It is not uncommon for factory ammunition to have an SD of 18 or higher. Sometimes as high as 40+. As such is the nature of metering powder. With marketing in mind, did they pick the high, low, or average end of the SD? We really don’t know. You won’t either until you test it for yourself. For hand-loaded ammo, to be considered around 10 fps or less. Having a high SD is often the nature of metered powder and factory loads. The image below is from Modern Advancements in Long Range Shooting: Volume II.
4. You don’t know how MV was measured. What chronograph system did the manufacturer use, and how did they back track to a muzzle velocity? A chronograph does not measure true velocity at the muzzle; it simply measures velocity at the location it is sitting. So you need to back-calculate the distance from the chrono to the end of the barrel. This calculation requires a semi-accurate BC. So whose BC was used to back track to the muzzle or did the manufacturer even do that? Did they simply print the numbers displayed by the chronograph? What kind of chronograph setup did they use? We know from our Lab Testing that not all chronographs are created equal. Without knowing what chronograph was used, you have no idea the quality of the measurement.
5. The MV data may not be current. Does the manufacturer update that data for every lot? Or is it the same data from years ago? Some manufacturers rarely if ever re-test and update information. Some update it every lot (ABM Ammo is actually tested every single lot for 1% consistency). Without knowing this information, you could be using data for years ago.
CONCLUSION: Never use the printed MV off a box of ammo as anything more than a starting point, there are too many factors to account for. You must always either test for the MV with a chronograph, or use carefully obtained, live fire data. When you are using a Ballistic Solver such as the AB Apps or Devices integrated with AB, you need to know the MV to an accuracy down to 5 fps. The more reliable the MV number, the better your ballistics solutions.
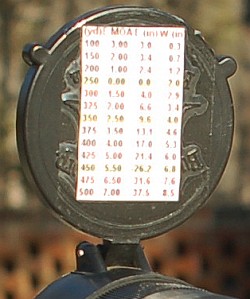
When shooting any match that requires moving back and forth between multiple target distances it is very handy to have your ballistics data, i.e. your “come-ups”, placed within easy view. That way you can instantly see your elevation for various target distances in seconds. This can really help a PRS/NRL competitor on timed stages. And having a convenient “Dope” display of elevation at various distances can also benefit varminters who are shooting critters. In our varmint hunters we targeted p-dogs from about 80 yards out to 500+.
PRC DOPE Roller QD Ballistic Data Turret
The PRC DOPE Roller QD Ballistic Data Turret provides a handy, low profile display of windage and elevation data. You can see your “dope” without breaking position from behind the rifle. Then simply rotate the knob to display data from various distances. The ballistic data is placed by wrapping a simple 1″ x 3″ adhesive address label around the outside surface of the DOPE Roller. This handy quick-detach roller retails for $64.95 from Precision Rifle Components.
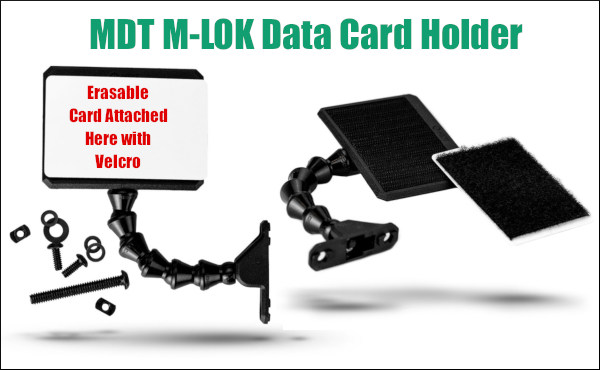
MDT M-LOK Data Card Holder
The MDT M-LOK Data Card Holder has an adjustable neck allowing you to easily position your ballistics data for optimal viewing. Data entries are written on on a reusable card that attaches with Velcro. The Data Card Holder Kit comes with hardware to mount to any M-Lok rail. In addition the card holder fits directly to an MDT ACC chassis attachment point. This MDT kit includes: M-LOK Data Card Holder, Wet Erase Data Card, Wet Erase Marker, and installation hardware. NOTE: The Card Holder sticks out about 6.7″ when fully extended, but arm links can be removed to make the arm shorter. The unit folds flat for storage. This complete kit is $59.95 at Creedmoor Sports.
Warne Universal Data Card Holder
The Warne Universal Data Card Holder easily attaches to the scope tube, in left or right configurations, for a universal fit. Data is displayed in a convenient location to make quick and accurate target transitions, and the articulating arm allows for low profile storage while not in use. The Warne Universal Data Card Holder retails for $88.49 at Warnescopemounts.com. Three ring sizes are offered: 30mm, 34mm, 35mm. A 50-pack of Warne Data Card label refills is currently $16.99 from Warne.
Scope-Cover Mounted Ballistics Table
Another option is to place your ballistics card on the back of the front flip-up scope cover. This set-up is used by Forum member Greg C. (aka “Rem40X”).
With your ‘come-up’ table on the flip-up cover you can check your windage and elevation drops easily without having to move out of shooting position.
Greg tells us: “Placing my trajectory table on the front scope cover has worked well for me for a couple of years and thought I’d share. It’s in plain view and not under my armpit. And the table is far enough away that my aging eyes can read it easily. To apply, just use clear tape on the front objective cover.”
Cheap But Effective — Tape on the Stock with Ballistics Data
At the 2021 Nightforce ELR Steel Challenge, Applied Ballistics guru Bryan Litz wrote his come-ups on blue masking tape applied to his stock. He did this based on a tip from Chase Stroud. With the tape applied behind the action, the numbers are easily visible. This “cheap trick” does work apparently — Bryan won the match with a convincing victory over 220 other shooters. READ Match Report.
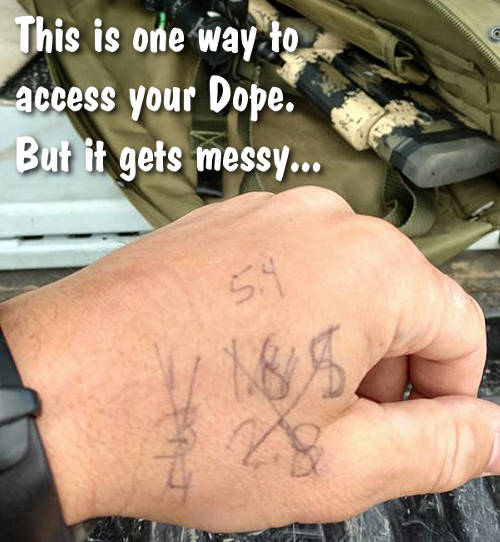
Cheap But NOT So Effective — Numbers on Hand
Many of us have scribbled some come-ups on the back of a hand or on our forearm using a marking pen. That can work if you only have a couple distances to deal with — say 100 and 300 yards. But if you want a more complete Come-up table, get one of the card-holders shown above. Writing numbers on the skin is generally not such a good idea….
Q: What’s more important — wind speed, or direction?
A: Obviously they both matter, but they do trade dominance based on direction. For example, a 10 mph wind between 2:30 and 3:30 is only changing its value from 9.7 to 10 to 9.7 mph (bracket of 0.3 mph). However a 10 mph wind between 11:30 and 12:30 is changing its cross wind component value from 2.6 mph left to zero to 2.6 mph right (bracket of 5.2 mph). There is the same 30° change in direction, but this results in a massively different bracket.
Point being, in this case, a direction change is far more critical if it’s near 6 or 12 o’clock. A small direction change when it’s close to 3 or 9 o’clock is negligible.
On the contrary, a change in wind SPEED when it’s near 3 or 9 affects your crosswind component directly. But for a near head or tail wind, a fluctuation in wind speed only causes a small fraction of a change to the crosswind component.
SUMMARY: If you’re in a near full-value wind, pay more attention to wind SPEED. If you’re closer to a head- or tail-wind, nailing the exact DIRECTION will be more important.
Get More Tips on Bryan Litz Ballistics Facebook Page
This post is from the new Bryan Litz Ballistics Facebook Page. FB users should check that page regularly for more tips from Bryan, American’s leading ballistics expert and founder of Applied Ballistics LLC.
Every Tuesday an interesting technical feature is posted on the Applied Ballistics Facebook Page. For today’s 4/23/24 “Tech Tuesday”, a fascinating video of a bullet in flight was posted. This Schlieren video illustrates a 6mm 109gr Berger LRHT bullet traveling at 3163 FPS. The stunning video reveals the bullet shockwave and the turbulent wake. Check it out:
About the Schlieren Imaging Process — What It Shows
Schlieren Imaging is a way of making airflow features visible. You can clearly see the compression (shock) wave at the front of the bullet. A compression wave is formed when the air has to move faster than the speed of sound to get out of the way, which is certainly the case for this bullet which is moving about 2.5 times the speed of sound (Mach 2.5). That shock wave is the ‘snap’ you hear when bullets fly past you if/when you’re downrange. Also, compressing the air into a shockwave takes energy, and that energy comes directly out of the forward velocity of your bullet and gets converted into heat and noise as the shock wave forms and dissipates. The turbulent wake at the base of the bullet shows where/how base drag applies. The third and smallest component of drag for a supersonic bullet is skin friction drag, which is a viscous boundary layer effect, and is the least visible in this image.
Above is a second Schlieren imaging video. This shows a 6mm 109gr Berger LRHT bullet at ~2800 fps as fired from a PRS rifle at the Applied Ballistics Lab. Bryan Litz notes: “You can clearly see the compression (shock) wave at the front of the bullet. A compression wave is formed when the air has to move faster than the speed of sound to get out of the way, which is certainly the case for this bullet which is moving about 2.5 times the speed of sound (Mach 2.5).”
Science of Accuracy Exclusive Content for Subscribers
Applied Ballistics has a huge archive of shooting-related ballistics and technical information plus exclusive videos. You can access all this information plus great members-only podcasts by subscribing to the Science of Accuracy Academy for $9.95/month.


 In this podcast, Applied Ballistics Founder Bryan Litz and Product Manager Francis Colon answer some of the most common questions received from listeners. They primarily discuss the latest Applied Ballistics integrated devices and highlight their capabilities.


 Effects Of Cartridge Over All Length (COAL) And Cartridge Base To Ogive (CBTO) – Part 2

 The better, up-to-date ballistics programs let you select either G1 or G7 Ballistic Coefficient (BC) values when calculating a trajectory. The ballistic coefficient (BC) of a body is a measure of its ability to overcome air resistance in flight. You’ve probably seen that G7 values are numerically lower than G1 values for the same bullet (typically). But that doesn’t mean you should select a G1 value simply because it is higher.
 Drag Models — G7 is better than G1 for Long-Range Bullets


 Scope-Cover Mounted Ballistics Table