Close-up view of a sectioned case. This one here was “fixin’ to pop”, observed Glen Zediker.
Here are highlights from an article Glen Zediker wrote for the Midsouth Blog. In that article Glen, who sadly passed away in 2020, focused on cartridge brass. Glen identified the most common failures that appear with brass that has been shot multiple times, or which has been fired at excessive pressures. Glen explained some simple ways to check your cartridge brass to detect “early warning signs” of case failure, particularly case head separation, which can be very dangerous.
How Cases Degrade with Multiple Firings By Glen Zediker
This article explains when, and then how, to check after the progress of changes commencing with the firing on a new case. It’s the “progress of degeneration,” in a way of looking at it because the concern is getting a handle on when enough change in the brass has come about to require attention. Or abandonment. As said then, for me that’s 4 firings. That, as said last time, is when I might see changes that need attention. Also as said, that figure didn’t come out of a hat, but from my own notes in running my competition NRA High Power Rifle loads. [Editor’s Note: With Lapua brass, using moderate loads, in bolt-action rifles, we typically get about 10 good (match-worthy) firings. But if you anneal your Lapua brass, and run modest pressures, Lapua brass can perform well for 20 or more load cycles.]
The areas most affected are the case neck and case head area. Case neck walls get thicker [but] the case head area body walls get thinner. Primer pockets get shallower and larger diameter.
This case shows a cracked neck AND a crack (separation) above the case head. Zediker says it is “rare to see one case with both of the most common failures. [This case] was attacked by an M14.”
Case Head — Causes of Separation and Cracking
When a case is under pressure during firing, the brass, like water, flows where it can, where it’s more free to move. Of course, the chamber steel limits the amount it can expand. The case shoulder blows fully forward and the case base is slammed back against the bolt face. There is, therefore and in effect, a tug on both ends — it gets stretched. The shoulder area is relatively free to expand to conform to the chamber, but the other end, the case head area, is not. Since that’s the area of the case with the thickest walls, it doesn’t expand “out” much at all. What it does is stretch. The “case head area,” as I refer to it here, is the portion of the case above the web, which is just above the taper that leads in to the extractor groove. The “area” extends approximately an eighth-inch up the case body.
Here’s a “pressure ring.” You’ll see this after firing, if you see it. And, if you see it, that case is done. The bright ring indicates excessive stretching, which indicates excessive thinning. If you see a ring circling the case, noticeable because it’s lighter color than the case body, and it’s in this area, I’d say that case is done. And that’s right where a “head separation” occurs. It can crack and also blow slap in two, and that’s the “separation” part of case head separation.
Photo courtesy GS Arizona.
This is a spot to keep close watch on as cases age. It is also the area that is more “protected” by sizing with less case shoulder set-back. That is, pretty much, where the freedom for the stretching movement in this area comes from (the case shoulder creates a gap). If you’re seeing a sign that a head separation [might happen with relatively few firings], chances are the shoulder set-back is excessive, and also… the load pressure level.
Bent Paper Clip Case-Wall Gauge
Editor: You can use a bent paper clip to detect potential case wall problems. Slide the paper clip inside your case to check for thin spots. GS Arizona explains: “This simple little tool (bent paper clip) will let you check the inside of cases before you reload them. The thin spot will be immediately apparent as you run the clip up the inside of the case. If you’re seeing a shiny line on the outside and the clip is really hitting a thin spot inside, it’s time to retire the case.” Photo by GS Arizona.
Monitor Primer Pocket Dimensional Changes
Another case-head-area and pressure-related check is the primer pocket. As said, the primer pocket will get larger in diameter and shallower in depth each firing. As with many such things, the questions are “when” and “how much,” and the main thing, “how much?”
If the pocket gets excessively shallow, and that’s judged by a primer that seats fully but isn’t at least a tick below flush with the case base, there could be function issues. There’s a risk of a “slam-fire” with a semi-auto that uses a floating firing pin, and, if there is actual protrusion, that has the same effect as insufficient headspace. A primer pocket uniformer can reset the depth of a shallowed primer pocket to what it should be, but the real test for me is how easily the next primer seats into it. If it’s significantly less resistance, I’ll say that case is done. Shallower can be refurbished. That’s a primary function of a primer pocket uniformer. Larger diameter, though, can’t be fixed. I’ve mentioned in another article or two that, any more at least, my main gauge of load pressure has become how much primer pocket expansion there’s been.
Ever wondered what caused a particular bulge or marking on a case? And more importantly, does the issue make the case unsafe for further use? Sierra Bullets Ballistic Technician Duane Siercks offers some insight into various issues and their causes in two Case Diagnostic articles from the Sierra Blog.
Incipient Case-Head Separation
This is a Winchester .308 Win case that has a real issue. This case has a very obvious incipient case head separation in the process of becoming a complete failure.
This is most commonly caused by over-sizing the case causing there to be excess headspace on the case. After a few firings and subsequent re-sizing, this case is just about ready to come completely apart. Proper die adjustment is certainly a requirement here. Of course this case is not safe to reuse.
Excessive Pressure (Load Too Hot)
If you will notice in the picture of the case rim, there are two pressure signs to notice. First, look at the primer. It is basically flattened to about the max of what could be considered safe. If this was the only pressure sign noted, I would probably be fine with this load, but would constantly keep an eye on it especially if I was going to use this load in warmer temperatures. This load could easily cross into the “excess pressure” realm very quickly.
There is another sign of pressure that we cannot ignore. If you’ll notice, there is an ejector mark apparent that is located over the “R” of the R-P headstamp. This absolutely tells us that this load would not have been in the safe pressure range. If there were any of these rounds loaded, they should not be fired and should be dis-assembled. This case should not be reloaded.
Split Case-Neck
Here we have an R-P .22-250 case that has died the death. Everything looks fine with this case except the neck is split. This case must be tossed.
A split neck is a normal occurrence that you must watch for. It is caused by work-hardening of the brass. Brass cases get harder with age and use. Brand new cases that are stored for a period of time can become hard enough that they will split like this case within one to two firings. I have had new factory loads do the same thing. Then as we resize and fire these cases repeatedly, they tend to get harder and harder. Eventually they will split. The life of the case can be extended by careful annealing practices. This is an issue that would need to be addressed in an article by itself. Of course this case is no longer usable.
In the classes that I teach, I try to use examples like this to let the students see what they should be looking for. As always, if we can assist you, whether you are new to reloading or very experienced, contact us here at Sierra Bullets by phone at 1-800-223-8799 or by email at sierra@sierrabullets.com.
Dented Case Body
Here we have a Lake City 7.62×51 (.308 Win.) case with two heavy marks/dents in the case body.
This one may be a bit of a mystery. It appears as if this case may have been caught in the action of a semi-auto rifle when the firearm jammed or the case failed to clear during the cycling process. I probably would not reload this case just to prevent any feeding problems. This also appeared to be a factory loaded round and I don’t really see any pressure issues or damage to the case.
Multiple Problems — Lake City 5.56×45 unknown year.
This case has suffered multiple failures and cannot be re-used. First its has have a very rounded shoulder that is split. Upon first look it was obvious that this round had been a victim of excess pressure. The firearm (perhaps an AR?) was apparently not in full battery, or there was possibly a headspace issue also. While taking a closer look, the primer was very flat and the outside radius of the primer cup had been lost. High pressure! Then I also noticed that there was an ejector mark on the case rim. This is most certainly an incident of excessive pressure. This case is ruined and should be discarded.
It is very important to observe and inspect your cases before each reloading. After awhile it becomes second nature to notice the little things. Never get complacent as you become more familiar with the reloading process. If ever in doubt, call Sierra’s Techs at 1-800-223-8799.
Close-up view of a sectioned case. This one here was “fixin’ to pop”, observed Glen Zediker.
Here are highlights from an article Glen Zediker wrote for the Midsouth Blog. In that article Glen, who sadly passed away in 2020, focused on cartridge brass. Glen identified the most common failures that appear with brass that has been shot multiple times, or which has been fired at excessive pressures. Glen explained some simple ways to check your cartridge brass to detect “early warning signs” of case failure, particularly case head separation, which can be very dangerous.
How Cases Degrade with Multiple Firings By Glen Zediker
This article explains when, and then how, to check after the progress of changes commencing with the firing on a new case. It’s the “progress of degeneration,” in a way of looking at it because the concern is getting a handle on when enough change in the brass has come about to require attention. Or abandonment. As said then, for me that’s 4 firings. That, as said last time, is when I might see changes that need attention. Also as said, that figure didn’t come out of a hat, but from my own notes in running my competition NRA High Power Rifle loads. [Editor’s Note: With Lapua brass, using moderate loads, in bolt-action rifles, we typically get about 10 good (match-worthy) firings. But if you anneal your Lapua brass, and run modest pressures, Lapua brass can perform well for 20 or more load cycles.]
The areas most affected are the case neck and case head area. Case neck walls get thicker [but] the case head area body walls get thinner. Primer pockets get shallower and larger diameter.
This case shows a cracked neck AND a crack (separation) above the case head. Zediker says it is “rare to see one case with both of the most common failures. [This case] was attacked by an M14.”
Case Head — Causes of Separation and Cracking
When a case is under pressure during firing, the brass, like water, flows where it can, where it’s more free to move. Of course, the chamber steel limits the amount it can expand. The case shoulder blows fully forward and the case base is slammed back against the bolt face. There is, therefore and in effect, a tug on both ends — it gets stretched. The shoulder area is relatively free to expand to conform to the chamber, but the other end, the case head area, is not. Since that’s the area of the case with the thickest walls, it doesn’t expand “out” much at all. What it does is stretch. The “case head area,” as I refer to it here, is the portion of the case above the web, which is just above the taper that leads in to the extractor groove. The “area” extends approximately an eighth-inch up the case body.
Here’s a “pressure ring.” You’ll see this after firing, if you see it. And, if you see it, that case is done. The bright ring indicates excessive stretching, which indicates excessive thinning. If you see a ring circling the case, noticeable because it’s lighter color than the case body, and it’s in this area, I’d say that case is done. And that’s right where a “head separation” occurs. It can crack and also blow slap in two, and that’s the “separation” part of case head separation.
Photo courtesy GS Arizona.
This is a spot to keep close watch on as cases age. It is also the area that is more “protected” by sizing with less case shoulder set-back. That is, pretty much, where the freedom for the stretching movement in this area comes from (the case shoulder creates a gap). If you’re seeing a sign that a head separation [might happen with relatively few firings], chances are the shoulder set-back is excessive, and also… the load pressure level.
Bent Paper Clip Case-Wall Gauge
Editor: You can use a bent paper clip to detect potential case wall problems. Slide the paper clip inside your case to check for thin spots. GS Arizona explains: “This simple little tool (bent paper clip) will let you check the inside of cases before you reload them. The thin spot will be immediately apparent as you run the clip up the inside of the case. If you’re seeing a shiny line on the outside and the clip is really hitting a thin spot inside, it’s time to retire the case.” Photo by GS Arizona.
Monitor Primer Pocket Dimensional Changes
Another case-head-area and pressure-related check is the primer pocket. As said, the primer pocket will get larger in diameter and shallower in depth each firing. As with many such things, the questions are “when” and “how much,” and the main thing, “how much?”
If the pocket gets excessively shallow, and that’s judged by a primer that seats fully but isn’t at least a tick below flush with the case base, there could be function issues. There’s a risk of a “slam-fire” with a semi-auto that uses a floating firing pin, and, if there is actual protrusion, that has the same effect as insufficient headspace. A primer pocket uniformer can reset the depth of a shallowed primer pocket to what it should be, but the real test for me is how easily the next primer seats into it. If it’s significantly less resistance, I’ll say that case is done. Shallower can be refurbished. That’s a primary function of a primer pocket uniformer. Larger diameter, though, can’t be fixed. I’ve mentioned in another article or two that, any more at least, my main gauge of load pressure has become how much primer pocket expansion there’s been.
Ever wondered what caused a particular bulge or marking on a case? And more importantly, does the issue make the case unsafe for further use? Sierra Bullets Ballistic Technician Duane Siercks offers some insight into various issues and their causes in two Case Diagnostic articles from the Sierra Blog.
Incipient Case-Head Separation
This is a Winchester .308 Win case that has a real issue. This case has a very obvious incipient case head separation in the process of becoming a complete failure.
This is most commonly caused by over-sizing the case causing there to be excess headspace on the case. After a few firings and subsequent re-sizing, this case is just about ready to come completely apart. Proper die adjustment is certainly a requirement here. Of course this case is not safe to reuse.
Excessive Pressure (Load Too Hot)
If you will notice in the picture of the case rim, there are two pressure signs to notice. First, look at the primer. It is basically flattened to about the max of what could be considered safe. If this was the only pressure sign noted, I would probably be fine with this load, but would constantly keep an eye on it especially if I was going to use this load in warmer temperatures. This load could easily cross into the “excess pressure” realm very quickly.
There is another sign of pressure that we cannot ignore. If you’ll notice, there is an ejector mark apparent that is located over the “R” of the R-P headstamp. This absolutely tells us that this load would not have been in the safe pressure range. If there were any of these rounds loaded, they should not be fired and should be dis-assembled. This case should not be reloaded.
Split Case-Neck
Here we have an R-P .22-250 case that has died the death. Everything looks fine with this case except the neck is split. This case must be tossed.
A split neck is a normal occurrence that you must watch for. It is caused by work-hardening of the brass. Brass cases get harder with age and use. Brand new cases that are stored for a period of time can become hard enough that they will split like this case within one to two firings. I have had new factory loads do the same thing. Then as we resize and fire these cases repeatedly, they tend to get harder and harder. Eventually they will split. The life of the case can be extended by careful annealing practices. This is an issue that would need to be addressed in an article by itself. Of course this case is no longer usable.
In the classes that I teach, I try to use examples like this to let the students see what they should be looking for. As always, if we can assist you, whether you are new to reloading or very experienced, contact us here at Sierra Bullets by phone at 1-800-223-8799 or by email at sierra@sierrabullets.com.
Dented Case Body
Here we have a Lake City 7.62×51 (.308 Win.) case with two heavy marks/dents in the case body.
This one may be a bit of a mystery. It appears as if this case may have been caught in the action of a semi-auto rifle when the firearm jammed or the case failed to clear during the cycling process. I probably would not reload this case just to prevent any feeding problems. This also appeared to be a factory loaded round and I don’t really see any pressure issues or damage to the case.
Multiple Problems — Lake City 5.56×45 unknown year.
This case has suffered multiple failures and cannot be re-used. First its has have a very rounded shoulder that is split. Upon first look it was obvious that this round had been a victim of excess pressure. The firearm (perhaps an AR?) was apparently not in full battery, or there was possibly a headspace issue also. While taking a closer look, the primer was very flat and the outside radius of the primer cup had been lost. High pressure! Then I also noticed that there was an ejector mark on the case rim. This is most certainly an incident of excessive pressure. This case is ruined and should be discarded.
It is very important to observe and inspect your cases before each reloading. After awhile it becomes second nature to notice the little things. Never get complacent as you become more familiar with the reloading process. If ever in doubt, call Sierra’s Techs at 1-800-223-8799.
Close-up view of a sectioned case. This one here was “fixin’ to pop”, observed Glen Zediker.
Here are highlights from an article Glen Zediker wrote for the Midsouth Blog. In that article Glen, who sadly passed away in 2020, focused on cartridge brass. Glen identified the most common failures that appear with brass that has been shot multiple times, or which has been fired at excessive pressures. Glen explained some simple ways to check your cartridge brass to detect “early warning signs” of case failure, particularly case head separation, which can be very dangerous.
How Cases Degrade with Multiple Firings By Glen Zediker
This article explains when, and then how, to check after the progress of changes commencing with the firing on a new case. It’s the “progress of degeneration,” in a way of looking at it because the concern is getting a handle on when enough change in the brass has come about to require attention. Or abandonment. As said then, for me that’s 4 firings. That, as said last time, is when I might see changes that need attention. Also as said, that figure didn’t come out of a hat, but from my own notes in running my competition NRA High Power Rifle loads. [Editor’s Note: With Lapua brass, using moderate loads, in bolt-action rifles, we typically get about 10 good (match-worthy) firings. But if you anneal your Lapua brass, and run modest pressures, Lapua brass can perform well for 20 or more load cycles.]
The areas most affected are the case neck and case head area. Case neck walls get thicker [but] the case head area body walls get thinner. Primer pockets get shallower and larger diameter.
This case shows a cracked neck AND a crack (separation) above the case head. Zediker says it is “rare to see one case with both of the most common failures. [This case] was attacked by an M14.”
Case Head — Causes of Separation and Cracking
When a case is under pressure during firing, the brass, like water, flows where it can, where it’s more free to move. Of course, the chamber steel limits the amount it can expand. The case shoulder blows fully forward and the case base is slammed back against the bolt face. There is, therefore and in effect, a tug on both ends — it gets stretched. The shoulder area is relatively free to expand to conform to the chamber, but the other end, the case head area, is not. Since that’s the area of the case with the thickest walls, it doesn’t expand “out” much at all. What it does is stretch. The “case head area,” as I refer to it here, is the portion of the case above the web, which is just above the taper that leads in to the extractor groove. The “area” extends approximately an eighth-inch up the case body.
Here’s a “pressure ring.” You’ll see this after firing, if you see it. And, if you see it, that case is done. The bright ring indicates excessive stretching, which indicates excessive thinning. If you see a ring circling the case, noticeable because it’s lighter color than the case body, and it’s in this area, I’d say that case is done. And that’s right where a “head separation” occurs. It can crack and also blow slap in two, and that’s the “separation” part of case head separation.
Photo courtesy GS Arizona.
This is a spot to keep close watch on as cases age. It is also the area that is more “protected” by sizing with less case shoulder set-back. That is, pretty much, where the freedom for the stretching movement in this area comes from (the case shoulder creates a gap). If you’re seeing a sign that a head separation [might happen with relatively few firings], chances are the shoulder set-back is excessive, and also… the load pressure level.
Bent Paper Clip Case-Wall Gauge
Editor: You can use a bent paper clip to detect potential case wall problems. Slide the paper clip inside your case to check for thin spots. GS Arizona explains: “This simple little tool (bent paper clip) will let you check the inside of cases before you reload them. The thin spot will be immediately apparent as you run the clip up the inside of the case. If you’re seeing a shiny line on the outside and the clip is really hitting a thin spot inside, it’s time to retire the case.” Photo by GS Arizona.
Monitor Primer Pocket Dimensional Changes
Another case-head-area and pressure-related check is the primer pocket. As said, the primer pocket will get larger in diameter and shallower in depth each firing. As with many such things, the questions are “when” and “how much,” and the main thing, “how much?”
If the pocket gets excessively shallow, and that’s judged by a primer that seats fully but isn’t at least a tick below flush with the case base, there could be function issues. There’s a risk of a “slam-fire” with a semi-auto that uses a floating firing pin, and, if there is actual protrusion, that has the same effect as insufficient headspace. A primer pocket uniformer can reset the depth of a shallowed primer pocket to what it should be, but the real test for me is how easily the next primer seats into it. If it’s significantly less resistance, I’ll say that case is done. Shallower can be refurbished. That’s a primary function of a primer pocket uniformer. Larger diameter, though, can’t be fixed. I’ve mentioned in another article or two that, any more at least, my main gauge of load pressure has become how much primer pocket expansion there’s been.
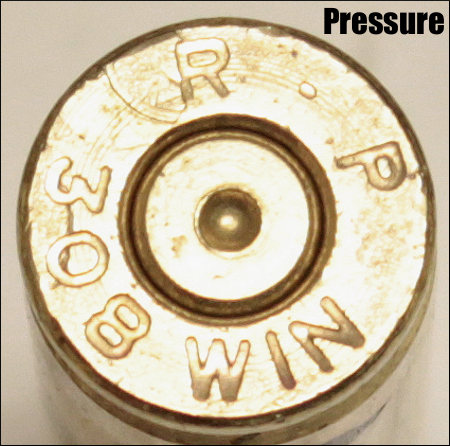
Ever wondered what caused a particular bulge or marking on a case? And more importantly, does the issue make the case unsafe for further use? Sierra Bullets Ballistic Technician Duane Siercks offers some insight into various issues and their causes in two Case Diagnostic articles from the Sierra Blog.
Incipient Case-Head Separation
This is a Winchester .308 Win case that has a real issue. This case has a very obvious incipient case head separation in the process of becoming a complete failure.
This is most commonly caused by over-sizing the case causing there to be excess headspace on the case. After a few firings and subsequent re-sizing, this case is just about ready to come completely apart. Proper die adjustment is certainly a requirement here. Of course this case is not safe to reuse.
Excessive Pressure (Load Too Hot)
If you will notice in the picture of the case rim, there are two pressure signs to notice. First, look at the primer. It is basically flattened to about the max of what could be considered safe. If this was the only pressure sign noted, I would probably be fine with this load, but would constantly keep an eye on it especially if I was going to use this load in warmer temperatures. This load could easily cross into the “excess pressure” realm very quickly.
There is another sign of pressure that we cannot ignore. If you’ll notice, there is an ejector mark apparent that is located over the “R” of the R-P headstamp. This absolutely tells us that this load would not have been in the safe pressure range. If there were any of these rounds loaded, they should not be fired and should be dis-assembled. This case should not be reloaded.
Split Case-Neck
Here we have an R-P .22-250 case that has died the death. Everything looks fine with this case except the neck is split. This case must be tossed.
A split neck is a normal occurrence that you must watch for. It is caused by work-hardening of the brass. Brass cases get harder with age and use. Brand new cases that are stored for a period of time can become hard enough that they will split like this case within one to two firings. I have had new factory loads do the same thing. Then as we resize and fire these cases repeatedly, they tend to get harder and harder. Eventually they will split. The life of the case can be extended by careful annealing practices. This is an issue that would need to be addressed in an article by itself. Of course this case is no longer usable.
In the classes that I teach, I try to use examples like this to let the students see what they should be looking for. As always, if we can assist you, whether you are new to reloading or very experienced, contact us here at Sierra Bullets by phone at 1-800-223-8799 or by email at sierra@sierrabullets.com.
Dented Case Body
Here we have a Lake City 7.62×51 (.308 Win.) case with two heavy marks/dents in the case body.
This one may be a bit of a mystery. It appears as if this case may have been caught in the action of a semi-auto rifle when the firearm jammed or the case failed to clear during the cycling process. I probably would not reload this case just to prevent any feeding problems. This also appeared to be a factory loaded round and I don’t really see any pressure issues or damage to the case.
Multiple Problems — Lake City 5.56×45 unknown year.
This case has suffered multiple failures and cannot be re-used. First its has have a very rounded shoulder that is split. Upon first look it was obvious that this round had been a victim of excess pressure. The firearm (perhaps an AR?) was apparently not in full battery, or there was possibly a headspace issue also. While taking a closer look, the primer was very flat and the outside radius of the primer cup had been lost. High pressure! Then I also noticed that there was an ejector mark on the case rim. This is most certainly an incident of excessive pressure. This case is ruined and should be discarded.
It is very important to observe and inspect your cases before each reloading. After awhile it becomes second nature to notice the little things. Never get complacent as you become more familiar with the reloading process. If ever in doubt, call Sierra’s Techs at 1-800-223-8799.
Close-up view of a sectioned case. This one here was “fixin’ to pop”, says Glen Zediker.
Here are highlights from an article Glen Zediker wrote for the Midsouth Blog. In this article Glen focuses on cartridge brass. Glen discusses the most common failures that appear with brass that has been shot multiple times, or which has been fired at excessive pressures. Glen explains some simple ways to check your cartridge brass to detect “early warning signs” of case failure, particularly case head separation, which can be dangerous.
How Cases Degrade with Multiple Firings By Glen Zediker
This article explains when, and then how, to check after the progress of changes commencing with the firing on a new case. It’s the “progress of degeneration,” in a way of looking at it because the concern is getting a handle on when enough change in the brass has come about to require attention. Or abandonment. As said then, for me that’s 4 firings. That, as said last time, is when I might see changes that need attention. Also as said, that figure didn’t come out of a hat, but from my own notes in running my competition NRA High Power Rifle loads. [Editor’s Note: With Lapua brass, using moderate loads, in bolt-action rifles, we typically get about 10 good (match-worthy) firings. But if you anneal your Lapua brass, and run modest pressures, Lapua brass can perform well for 20 or more load cycles.]
The areas most affected are the case neck and case head area. Case neck walls get thicker [but] the case head area body walls get thinner. Primer pockets get shallower and larger diameter.
This case shows a cracked neck AND a crack (separation) above the case head. Zediker says it is “rare to see one case with both of the most common failures. [This case] was attacked by an M14.”
Case Head — Causes of Separation and Cracking
When a case is under pressure during firing, the brass, like water, flows where it can, where it’s more free to move. Of course, the chamber steel limits the amount it can expand. The case shoulder blows fully forward and the case base is slammed back against the bolt face. There is, therefore and in effect, a tug on both ends — it gets stretched. The shoulder area is relatively free to expand to conform to the chamber, but the other end, the case head area, is not. Since that’s the area of the case with the thickest walls, it doesn’t expand “out” much at all. What it does is stretch. The “case head area,” as I refer to it here, is the portion of the case above the web, which is just above the taper that leads in to the extractor groove. The “area” extends approximately an eighth-inch up the case body.
Here’s a “pressure ring.” You’ll see this after firing, if you see it. And, if you see it, that case is done. The bright ring indicates excessive stretching, which indicates excessive thinning. If you see a ring circling the case, noticeable because it’s lighter color than the case body, and it’s in this area, I’d say that case is done. And that’s right where a “head separation” occurs. It can crack and also blow slap in two, and that’s the “separation” part of case head separation.
Photo courtesy GS Arizona.
This is a spot to keep close watch on as cases age. It is also the area that is more “protected” by sizing with less case shoulder set-back. That is, pretty much, where the freedom for the stretching movement in this area comes from (the case shoulder creates a gap). If you’re seeing a sign that a head separation [might happen with relatively few firings], chances are the shoulder set-back is excessive, and also… the load pressure level.
Bent Paper Clip Case-Wall Gauge
Editor: You can use a bent paper clip to detect potential case wall problems. Slide the paper clip inside your case to check for thin spots. GS Arizona explains: “This simple little tool (bent paper clip) will let you check the inside of cases before you reload them. The thin spot will be immediately apparent as you run the clip up the inside of the case. If you’re seeing a shiny line on the outside and the clip is really hitting a thin spot inside, it’s time to retire the case.” Photo by GS Arizona.
Monitor Primer Pocket Dimensional Changes
Another case-head-area and pressure-related check is the primer pocket. As said, the primer pocket will get larger in diameter and shallower in depth each firing. As with many such things, the questions are “when” and “how much,” and the main thing, “how much?”
If the pocket gets excessively shallow, and that’s judged by a primer that seats fully but isn’t at least a tick below flush with the case base, there could be function issues. There’s a risk of a “slam-fire” with a semi-auto that uses a floating firing pin, and, if there is actual protrusion, that has the same effect as insufficient headspace. A primer pocket uniformer can reset the depth of a shallowed primer pocket to what it should be, but the real test for me is how easily the next primer seats into it. If it’s significantly less resistance, I’ll say that case is done. Shallower can be refurbished. That’s a primary function of a primer pocket uniformer. Larger diameter, though, can’t be fixed. I’ve mentioned in another article or two that, any more at least, my main gauge of load pressure has become how much primer pocket expansion there’s been.
Glen’s books, Handloading For Competition and Top-Grade Ammo, are available at Midsouth HERE. For more information about other books by Glen, visit ZedikerPublishing.com
Can you list all the serious problems that excessive headspace can cause? For that matter, could you even explain what, exactly, is meant by the term “headspace”? If not, you should watch this instructional video from Brownells. This video defines the term “headspace”, explains why proper headspacing is critically important, and illustrates how headspace gauges work.
Headspace is a measurement from the bolt-face to a point in the chamber. This point of measurement will vary based on the type of cartridge. Improper headspace, either excessive or (conversely) under SAAMI specifications, can cause a variety of problems, many serious.
Problems Caused by Too Much Headspace
Excessive headspace issues can include: light primer strikes, failure to fire, bulged/blown cases, case separations, split shoulders, or unseated primers after firing. Case ruptures caused by excessive headspace can lead to catastrophic failures causing serious injury. That is why headspace is such an important measurement.
Problems Cause by Too Little Headspace
Insufficent (or excessively tight) headspace can prevent the firearm from going into battery, resulting in failure to fire or deformation of the cartridge case. Various feeding and functioning problems can be caused by cases with too little headspace, even if a round can be chambered (with effort).


 Glen’s books, Handloading For Competition and Top-Grade Ammo, are available at Midsouth


