Lyman’s popular Case Trim Xpress is an affordable, variable-speed case trimmer with a razor-sharp CARBIDE CUTTER. The Case Trim Xpress can quickly and accurately trim brass at a rate of approximately 15 cases a minute. The unit has its own power source — a strong variable-speed motor. Using the 10 provided bushings, the unit indexes off the case shoulder — that’s simple, fast and reliable. Plus a precision trim adjustment wheel allows case lengths to be easily “dialed in” to 0.001″ increments. To trim your brass, simply push the case against the carbide cutter until the shoulder stops on the bushing (with precise case OAL set by the wheel). The Case Trim Xpress comes with 10 bushings that fit the most popular bottleneck rifle cartridges, so no pilots are needed. This is available now for $142.03 on Amazon.
Review by F-Class John
Case trimming can be one of the most boring and tedious steps in the reloading processes. This is largely because of outdated tools that either require manual turning, clunky pilot systems, or difficult adjustments. In order to overcome these obstacles, you might have to spend $500 for some premium systems. But Lyman’s bright orange Case Trim Xpress delivers premium trimming performance at an affordable price. Available for around $145, this trimmer offers an easily-adjustable cutting head plus a smart, shoulder-indexing bushing system to improve consistency and speed up the trimming process.
CLICK photo for full-screen view of Case Trim Xpress unit.
Video Shows How Carbide Cutter Head Adjusts Easily with Index Wheel
The Lyman Case Trim Xpress comes with the main trimming unit, power cord, and 10 bushings in a storage case. These 10 orange bushings let you trim more than 50 popular cartridge types (yes including the 6mmBR, 6.5 Creedmoor, and .308 Win of course). Set-up was simple and straight-forward. Install the bushing you need, turn the unit on and slowly push a piece of brass towards the cutting head. Once the brass is fully depressed, you can start adjusting the dial one click at a time until the case makes contact. Then you start making progressive adjustments and trim until you reach your desired length. The process is so simple that it’ll leave you wondering how you ever used anything else.
Sinclair International has created a series of helpful articles on rifle cartridge reloading. Today’s feature lists ten basic steps for precision hand-loading, with links to longer, detailed Sinclair Int’l technical articles providing more complete information. There’s a lot of helpful info here guys, if you click all the links to access the ten “long form” articles.
Tying It All Together: 10 Steps To Precision Handloads
Feature based on article by Roy Hill, Brownells/Sinclair Copywriter
Sinclair Int’l offers a series of detailed articles on hand-loading precision rifle ammunition. The articles are included in Sinclair’s GunTech Articles Archive, but sorting through the index to find each article takes time. To help you access all these articles quickly, here’s a handy summary of ten key topics, with links to longer articles covering each subject in detail.
Part 1: The first step in making high-quality handloads is to carefully choose the best brass for your application. You need to know how to identify the different types of brass and how to choose the best kind for the ammo you want to load. CLICK HERE for Part 1.
Part 2: Even high-quality brass can have burrs around the flash hole that can interfere with the primer flame and cause inconsistent ignition – which can lead to shot groups opening up. Flash hole deburring is a critical step in making sure primers ignite powder consistently. CLICK HERE for Part 2.
Part 3: The next step is to make sure the primer pockets are square and uniform. Like flash hole deburring, primer pocket uniforming may reduce variations in primer ignition by ensuring more consistent primer seating. CLICK HERE for Part 3.
Part 4: Making sure all your cases are precisely the same length is crucial, especially when you use cases that have been fired before. Case trimming is the way to get there. CLICK HERE for Part 4.
Part 5: After trimming, cases still have to be resized. In order for them to work through the resizing die, they have to be lubricated. The case lube method you choose is crucial to making precision handloads. CLICK HERE for Part 5.
Part 6: Now it’s time to choose the dies that will resize your cases. There are several important options to consider in selecting the right sizing dies. CLICK HERE for Part 6.
Part 7: Wait! You’re not quite ready to start sizing yet. There’s yet more to consider before you start cranking cases through the press. Learn more about setting up and adjusting your sizing dies. CLICK HERE for Part 7.
Part 8: Once the cases are completely prepped, it’s time to start putting fresh components back into them. We start off by seating primers. CLICK HERE for Part 8.
Part 9: After the primers are seated, it’s time to drop in the powder. There are several tools that will help you handle powder for precision handloads. CLICK HERE for Part 9.
Part 10: The final step in the process is carefully seating the bullet to just the right depth. And then… you’re ready to try your loads at the range. CLICK HERE for Part 10.
Sinclair International has created a series of helpful articles on rifle cartridge reloading. Today’s feature lists ten basic steps for precision hand-loading, with links to longer, detailed Sinclair Int’l technical articles providing more complete information. There’s a lot of helpful info here guys, if you click all the links to access the ten “long form” articles.
Tying It All Together: 10 Steps To Precision Handloads
Feature based on article by Roy Hill, Brownells/Sinclair Copywriter
Sinclair International offers a series of detailed articles on hand-loading precision rifle ammunition. The articles are included in Sinclair’s GunTech Articles Archive, but sorting through the index to find each article takes time. To help you access all these articles quickly, here’s a handy summary of ten key topics, with links to longer articles covering each subject in detail.
Part 1: The first step in making high-quality handloads is to carefully choose the best brass for your application. You need to know how to identify the different types of brass and how to choose the best kind for the ammo you want to load. CLICK HERE for Part 1.
Part 2: Even high-quality brass can have burrs around the flash hole that can interfere with the primer flame and cause inconsistent ignition – which can lead to shot groups opening up. Flash hole deburring is a critical step in making sure primers ignite powder consistently. CLICK HERE for Part 2.
Part 3: The next step is to make sure the primer pockets are square and uniform. Like flash hole deburring, primer pocket uniforming may reduce variations in primer ignition by ensuring more consistent primer seating. CLICK HERE for Part 3.
Part 4: Making sure all your cases are precisely the same length is crucial, especially when you use cases that have been fired before. Case trimming is the way to get there. CLICK HERE for Part 4.
Part 5: After trimming, cases still have to be resized. In order for them to work through the resizing die, they have to be lubricated. The case lube method you choose is crucial to making precision handloads. CLICK HERE for Part 5.
Part 6: Now it’s time to choose the dies that will resize your cases. There are several important options to consider in selecting the right sizing dies. CLICK HERE for Part 6.
Part 7: Wait! You’re not quite ready to start sizing yet. There’s yet more to consider before you start cranking cases through the press. Learn more about setting up and adjusting your sizing dies. CLICK HERE for Part 7.
Part 8: Once the cases are completely prepped, it’s time to start putting fresh components back into them. We start off by seating primers. CLICK HERE for Part 8.
Part 9: After the primers are seated, it’s time to drop in the powder. There are several tools that will help you handle powder for precision handloads. CLICK HERE for Part 9.
Part 10: The final step in the process is carefully seating the bullet to just the right depth. And then… you’re ready to try your loads at the range. CLICK HERE for Part 10.
Great Case Trimmer for under $130.00
We think Lyman’s new Case Trim Xpress will be a “game changer” for hand-loaders. If you’re like most of us, trimming your brass to length has been a dull, laborious and time-consuming process unless you shell out $500 or more for a top-of-the-line unit. Lyman has broken that mold by releasing an accurate, easy-to-adjust, shoulder-indexing, carbide-bladed, and SPEEDY case trimmer for under $130.00! Given its outstanding performance for the price, the Lyman Case Trim Xpress is a definite winner.
CLICK photo for full-screen view of Case Trim Xpress unit.
Lyman Case Trim Xpress “Hands-On” Review
Review by F-Class John
Case trimming can be one of the most boring and tedious steps in the reloading processes. This is largely because of outdated tools that either require manual turning, clunky pilot systems, or difficult adjustments. In order to overcome these obstacles, you might have to spend $500 for some premium systems. But that has changed with Lyman’s introduction of the new Case Trim Xpress. This bright orange wonder delivers premium trimming performance at a budget price. Available for around under $130, this trimmer offers an easily-adjustable cutting head plus a smart, shoulder-indexing bushing system to improve consistency and speed up the trimming process.
Video Shows How Carbide Cutter Head Adjusts Easily with Index Wheel
The Lyman Case Trim Xpress comes with the main trimming unit, power cord, and 10 bushings in a storage case. These 10 orange bushings let you trim more than 50 popular cartridge types (yes including the 6mmBR, 6.5 Creedmoor, and .308 Win of course). Set-up was simple and straight-forward. Install the bushing you need, turn the unit on and slowly push a piece of brass towards the cutting head. Once the brass is fully depressed, you can start adjusting the dial one click at a time until the case makes contact. Then you start making progressive adjustments and trim until you reach your desired length. The process is so simple that it’ll leave you wondering how you ever used anything else.
Once the machine was adjusted for our brass, we were amazed at how easily and quickly cases could be trimmed. The unit is fairly hefty, so we found it pretty stable just sitting on the bench. If you wish, the unit can also be screwed down for added stability, using the holes in the lower “wings” of the orange housing. There’s a dial adjustment on the side that controls cutter rotation speed (RPM). In our testing, the trimmer worked well across its entire RPM range. These means you can do fast, quick cuts or make slow and precise cuts, as you prefer. And you can adjust the cutter speed to the type of brass you are trimming.
As for trim length control, the adjustment dial has good, positive clicks and the trim length holds very constant. Even after trimming 80+ pieces of brass, we observed trim consistency held within .001″.
One of the things that sets the Case Trim Xpress apart from most trimmers is how it indexes off the shoulder. This ensures that case lengths from mid-shoulder to end of neck are identical for every case (whether they have been sized or not). This is critical for consistent reloading results and will help ensure that every case is optimally positioned in your chamber. A cutting system that indexes off the shoulder is arguably better than a system than merely trims to a given case OAL for both fired and unfired cases.
Another great feature is that this trimmer can be mounted flat on a bench-top, on the underside of a shelf, or even on a vertical wall surface (if oriented horizontally). You can choose different mountings because the clear plastic shroud that catches brass shavings can rotate. This allows the shavings exit port to be orientated to any point on the circle. We liked being able to choose various mounting configurations. Employing little-used wall or shelf space opens up precious bench-top real estate.
Summary — Outstanding Performance for the Price
Overall the Case Trim Xpress is hard to beat for the price. It is one of the few power trimmers we can recommend without hesitation. The machine trims quickly and accurately, the cutter-depth control is precise and easy to use. And the variable speed control is great. Of course we do wish the machine could also de-burr and chamfer brass. But of course that would add quite a bit to the cost, and would probably require a completely different cutting system. For trimming-to-length only, Lyman’s Case Trim Xpress is probably the best trimmer currently available for under $200. This unit should definitely be on the short list of anyone shopping for a variable-speed motorized trimmer.
When it comes to reloading hardware, some guys have to have the best of the best, regardless of cost. For those guys, K&M Precision has introduced an impressive new variable-speed, multi-station case prep center. This is quite a step up from other variable-speed case prep devices.*
K&M offers two versions, one with a single spindle (tool driver) running 50-200 rpm, and another modular design that can have up to six (6) spindles, running from 50 to 533 rpm. This Ferrari of case prep centers costs $2395.00 with all six spindles, with lesser prices for fewer spindles (e.g. $1795 with three spindles). The basic 50-200 rpm one-spindle machine costs $695.00. That’s still a pretty sizable investment. But for some guys, price is no object.
Watch Video to see six-spindle machine in action. Being able to adjust the speed within a broad rpm range really is a big deal. You can go slow when needed, then instantly bump up the rpm when you need to do other tasks at a higher rate. Cutting vs. brushing work best at different speeds.
The K&M Benchtop Case Prep Machine is an industrial-grade unit that features an industrial DC brushless motor for constant torque control over a speed range from 50 to 533 rpm (or 50-200 rpm for basic model). The speed can be quickly changed by simply rotating the dial switch and pressing to enter the speed. Watch the video to see the speed control in action. Models are available from one- to six-spindle configurations. The driven spindles feature a unique collet design that accepts ¼” hex shank tools that are oriented horizontally for natural ergonomics. Collet and idler spindles ride on oil-impregnated bronze bearings for smooth operation. You can use K&M-made tools or drive other types of tools using a ¼” hex tool shank adapter with either 8-32 or 3/8-24 threads. Each model has a spring-loaded spindle lock pin to hold the spindle position while setting tools or loading/unloading cartridges into the power adapter.
All machines come with quality hard case with foam, chip pan, chip brush, 1/4” hex drive adapter for 8-32 and 1/4” hex drive adapter for 3/8-24.
Product tip from EdLongRange. We welcome reader submissions.
* Lyman will soon introduce the Case Trim Xpress a single-head case trimmer with speed control for the trimmer head. RCBS offers a 6-station Case Prep Center, with variable speeds, controlled by a rheostat. Four of the six heads run up to 350 rpm, while the two high-speed heads run up to 550 rpm.
How do you trim your cases? We use a variety of tools, including power case trimmers. But our go-to trimmer for Benchrest-type cartridges is the L.E. Wilson Trimmer unit, now available in a handsome and durable stainless assembly. This thing is slick. It trims very precisely with the use of Wilson case holders combined with a micrometer-type stop for length control. As sold complete with micrometer, quick clamp, and metal stand, this new Wilson Stainless Trimmer is $139.95 at Creedmoor Sports. We think that’s a fair price for a unit that can last a lifetime, trimming many thousands of cases.
In this video, Bill Gravatt demonstrates the new Stainless Wilson trimmer. Gravatt offers some smart tips so this video is worth watching even if you’ve used a Wilson trimmer before:
Tips for Trimming with Wilson SS Micrometer Trimmer:
1. After inserting brass in the case holder, tap the case lightly to ensure it seats fully.
2. When starting your case-trimming session, do one or two test cases to check cut length. Adjust length with micrometer, then test length again. If “good to go”, set length stop. NOTE: Release the Stop Screw to make major adjustments. Use the Micrometer to make fine adjustments, in .001″ increments.
3. After trimming operations, be sure to chamfer case mouth after cutting to remove burrs. NOTE: After you have made the chamfer, we recommend gently spinning the chamfer tool backwards a couple times in the case neck. This will burnish/smooth the newly-cut champing, which helps with bullet seating.
Features of Deluxe Wilson Stainless Case Trimmer with Micrometer
— Long lasting Stainless finish with Micrometer adjustment.
— New 304 Stainless Steel Handle included with Micrometer Trimmer.
— Rotary-style clamp swings to secure case-holder — quick and easy.
— Larger stop screw adjustment from 3/8″ (old) to 1/2″ (new) with increased width on stop nut. Coated with black oxide for a long lasting durable finish.
— Made in the USA with American Steel.
— Power Adaptor compatible.
The Giraud power trimmer indexes off the shoulder of the case. It is costly, but offers high production rates, trimming to length and chamfering in one operation.
The folks at PMA Tool, makers of arbor presses, neck-turning tools, and other case-prep tools, offer some good advice about case trimming on the PMA Tool Blog. Here we reprint a PMA blog post that explains case trimming basics and helps you choose the right case-trimming tool for your needs.
Case Trimming Basics
Trimming the cartridge case to the proper length is a crucial step in case preparation that should not be overlooked or underestimated. The cartridge case or the rifle can be damaged, or even worse you get badly injured. In most instances cases should be trimmed after firing and sizing. Trimming new brass is necessary for a lot of wildcats and can be beneficial in some instances, but by and large, trimming new brass is not necessary for most situations (unless you are neck-turning). Cases should be trimmed after you have sized the case, because the expander ball on the decapping pin can (and will) stretch the neck. Those of us who neck size should get into the habit of trimming after sizing as well. This is a good rule of thumb to go by, and hopefully it will keep you safe during the reloading and shooting process.
There are so many case trimmers out there that work, deciding which one is right for you can be confusing. Even though I have trimmed thousands of cases, using about every method possible, I can’t answer the question of what case trimmer is right for you because of all the variables that may be involved. I can, however shed some light on the subject.
The two most popular designs of trimmers either index (1) off the base or the head of the case, (2) off the shoulder or datum line of the case. There are pros and cons to each and it all depends on what you are willing to live with.
Indexing off the Base (Case Head)
Let’s talk about the first one I have listed, indexing off the base, or the head of the case. The pros to this method are that you can achieve a very accurate over all length and that is after all, what it is all about. The cons to this method are that you can get some variation doing it this way. Let me explain, the base is not always square to the body or can be damaged during firing especially if it is fired through a military style rifle with a very aggressive ejector. These cases should be discarded, but sometimes they can be overlooked. This condition can lead to an over all length that is incorrect. The case head being out of square will be corrected upon firing, however that case will wind up being shorter than the rest of your cases, possibly creating a difference in the neck tension on the bullet. The more you can do to eliminate variables in your reloads the better off you are going to be. This method can also be very slow, and if the user gets careless the result will be a inconsistent over all length.
Indexing off the Shoulder (Datum Line)
The second method I mentioned, trimming off the shoulder or the datum line of the case, has its pros as well. I have found this to be the quickest of the methods and very accurate as well. After the case has been sized through the die the dimensions (particularly the headspace) of the cases are usually very uniform and exact, this allows the case to be trimmed by indexing off the shoulder. This method can be done very quickly, by hand, or by powering either the case, or the trimmer. You also don’t have to worry about the case heads being out of square with the body using this method. Generally the trimming time is cut in half, and this leads to greater focus on the job, without becoming careless.
The PMA Micro-Adjust Case Trimmer indexes case length off of the shoulder of a properly fire-formed and full-length re-sized case. We accomplish this through the use of interchangeable Delrin™ inserts which capture the shoulder and neck of the case. This insert is contained in a spring-loaded tool head that rides on a linear bearing. When the case is captured within the tool head the tool head rotates along with the case, the spring allows for the case to self-align squarely to the cutter and allows you to control the feed rate into the cutter.
— Indexes off shoulder for easy, consistent trim length
— Fully rotating head with bearing for smooth operation keeps cuts square
— Large, ergonomic design fits the hand well
— Sharp carbide cutter for quick, smooth cuts with minimal bur
— Cases captured in Delrin™ (completely non-marring material)
— Spring loaded head allows complete control of rate of feed.
Our trimmer can be used in three ways. The first method utilizes our PMA Tool caseholder drivers and your power screwdriver, drill, case lathe, drill press or lathe. Trimming via this method the case is spun and fed into the trimmer while it is held in your hand. In the second method, the trimmer’s adjustment knob is removed (after adjusting and locking the setting) and the cutting shaft is chucked in a drill, drill press or lathe. Using this method, the case itself is held by hand and fed into the cutter. We’ve found this to be the quickest method to trim.
Summary
The choice is yours to make. I hope that this was some help to you, whether you are looking for your first trimmer or looking to replace the trimmer you have. Just remember to always put safety first and accuracy second, and you will start making little bug holes in no time.
Story Tip by EdLongrange. User Submissions are welcome.
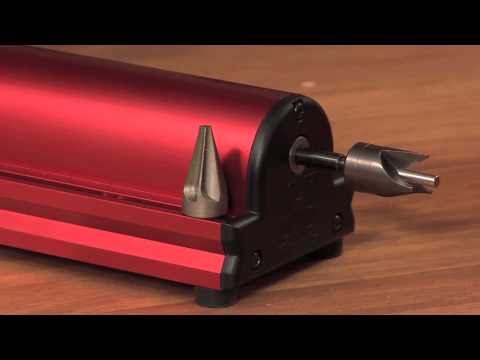
Becigneul Case Turning Motor, by German Salazar
Although there have been a variety of similar devices and ‘case lathes’ offered for sale in the past, they’ve been priced fairly high. Paul’s unit is reasonably priced ($220.00) and built like a tank. The motor turns at about 180 rpm which is just right for neck turning. What’s really nice is that the motor has enough torque to hold its speed throughout the whole operation and a/c power to run all day long!
The unit’s design is fairly straight-forward: a surplus electric motor turns a Forster case-holding collet. Paul makes a nice knurled collar to open and close the collet.Power is controlled by a household type wall switch attached to a long cabe. The whole assembly is mounted on a nice hardwood base.
Video of Paul Becigneul’s Case Turning Motor in Use
In operation, it works very well. The collet has enough clamping power to hold the case after a quick hand-tightening, no wrench is needed (although you can use one if you are so inclined). A quarter turn of the collar opens the collet and a quick turn of the wrist tightens it back up. As with any powered case neck turning device, the case wobbles a bit as it turns. This doesn’t matter a bit as the turning cutter is held in your hand (which is free to move) and the cutter’s arbor is the actual alignment device. The wobble is the same or less than what I had using a power screwdriver with a K&M holder.
For more information, email Paul Becigneul via: pbike4466 [at] directv.net. In 2012, the basic unit cost $220.00 each collet was $10 and shipping is $20 to most U.S. locations.
Editor’s Comment: In the video, Paul uniforms case flash-holes with a Lyman tool (from the inside) and then uniforms primer pockets (from the outside) with a K&M tool. While we do believe that flash-holes should be inspected to ensure there are no obstructions or flakes blocking the hole, we have not found that flash-hole or primer-pocket uniforming produced measurable improvements in accuracy with Lapua 6mmBR brass. In fact, in our tests using a manual K&M flash-hole uniformer, ES/SD actually got worse after the flash-holes were “uniformed”.
Keep in mind also that many deburring tools for 0.059 (PPC-size) flash-holes actually over-cut substantially, reaming the holes to as wide as 0.068″. The Lapua PPC/BR flash hole is spec’d at 1.5mm, which works out to 0.059055″. Most of the PPC/BR flash-hole uniforming tools on the market use a 1/16″ bit which is nominally 0.0625″, but these often run oversize — up to 0.067″. If you like to uniform your primer pockets, be our guest (this can be useful with lesser-quality brass). But before pocket-uniforming dozens of cases, you might do a comparison test (by shooting uniformed vs. un-uniformed ammo) to see whether this operation actually improves accuracy with the brass you are using.
High-volume hand-loaders can save time and effort by using power case prep machines. High Power shooters and varmint hunters, in particular, need to process large quantities of cartridge brass. One of the more versatile power case prep units on the market is the new Case Prep Xpress from Lyman. With five (5) power take-offs conveniently arranged on top of the machine, you can perform multiple functions quickly. Watch the video to see the unit in operation.
Lyman Case Prep Xpress Just $89.99 with Sinclair Code
Now through 12/19/2011, with Sinclair Promo Code 555444, you can get the Case Prep Xpress for just $89.99. That price includes a full set of accessories: Inside Deburr (VLD) Tool, Outside Deburr Tool, Flash Hole Uniformer, Primer Pocket Uniformer (Large and Small), Primer Pocket Cleaner (Large and Small), Case Neck Brushes (4 sizes), Case Neck Lube (Mica), Removable Dump Pan and Clean-up Brush. Editor’s NOTE: This is a very good price. We’ve seen the Case Prep Xpress priced at high as $117.00 elsewhere.
Here’s a user review from a Lyman Case Prep Express Owner: “The Lyman unit has more than adequate power/torque, unlike some other case prep units on the market, plus a solid exterior case, plus a decent selection of threaded tools. I’ve prepped several thousand cases without a hitch. I have no complaints or criticisms.”
Hot Deal Tip from EdLongrange. We welcome reader submissions.
Hornady has a new, compact, one-station Case Prep Assistant for 2011. This handy, affordable unit easily fits on your benchtop. The dual-voltage (110v/220v) Case Prep Assistant can power inside and outside chamfer tools as well as neck brushes and primer pocket cleaners/uniformers. Included with the Case Prep Assistant are chamfer and deburr tools, with plenty of onboard storage for optional case prep accessories such as primer pocket cleaners, case neck brushes and other 8-32 thread tools. The unit is compatible with both 110V or 220V power. The Case Prep Assistant retails for under $90.00 — Midsouth Shooter’s Supply has it for $83.88 currently.
The new compact Case Prep Assistant complements Hornady’s large Case Prep Center, introduced in 2010. The large prep center performs all case prep functions, including case trimming which is handled by a vertical (drill-press-type) motorized trim station. Cases are held with a cam-lock shell-holder and then lowered vertically on to the spinning trimmer head. Hornady’s Dave Emary demonstrated both products for us at the 2011 SHOT Show. Dave then told us about the Vintage Sniper Rifle Matches which he has helped organize for the CMP.