Grafs.com is now featuring some hard-to-find products that are very popular with our Forum members. These are items that sell out quickly, or may be back-ordered for months. Grab ‘em while you can.
Berger 7mm 180gr Hybrids
Graf’s has the ultra-accurate, high-BC 7mm 180gr Berger Hybrid bullet. This 7mm Hybrid is probably the most popular projectile in use by top F-Class Open shooters. Yes, 7mm Hybrids are in stock now and ready to ship for $45.99 per 100.
Forster Co-Ax Reloading Press
Graf’s has the superb Forster Co-Ax Press in stock and ready to ship. This unique product is the “Cadillac of reloading presses”. Sizing and seating dies slide into universal jaws for quick die changes. The dies can also self-align in the press for reduced run-out on your loaded rounds. If you’ve been wanting a Co-Ax, grab one now as they can be hard to find between production runs.
Magnetospeed V3 Chronograph
Graf’s now sells the remarkable Third Generation Magnetospeed Chronograph. The original Magnetospeed was a “game-changer” in the shooting industry. This compact chrono attaches directly to your barrel so you don’t need to set up a tripod, and fiddle around aligning sky-screens or diffusers. You also don’t have to worry about putting a bullet hole (or two) in the middle of your chronograph. The latest “V3″ model Magnetospeed features an improved attachment system, an upgraded display/control module, plus software enhancements. And Magnetospeed now provides a rugged polymer case that holds the “bayonet” sensing unit, display module, and all other components. Price is $379.99
NOTE: All these prices include shipping with one $7.95 flat fee per order.
“All dressed up and nowhere to go” was the comment our IT guy, Jay Christopherson, sent with this photo. This is Jay’s testing set-up at his home range, complete with PVM-21 chronograph and wireless target-cam. The camera signal is sent, via WiFi, to Jay’s laptop computer. However, even with all that high-tech electronic gear, you can’t make the shot if you can’t see the target through the rifle-scope. On this morning, heavy ground fog completely obscured the target. Jay told us: “I ended up waiting a little over an hour for the fog to burn off enough so that I could see the 600-yard target. What was funny was that I had a perfectly clear picture of the target via the target-cam and monitor. But there was no way to aim the rifle since the riflescope showed nothing but fog.”
This photo was taken by Jay at the Cascade Shooting Facility in Ravensdale, WA. The rifle is Jay’s .284 Shehane F-Class rifle. Jay was testing primers for Extreme Spread (ES) variation around 9:00 am. Nature was not cooperating. Jay was running Hodgdon H4831sc and testing various primers to see which provided the best numbers.
The chronograph is the Kurzzheit PVM-21. Equipped with infrared sensors, the PVM-21 is our “go-to” chron for most velocity testing, with an Oehler 35P for “back-up”. The PVM-21 (now updated with Kurzzheit’s BMC-19 model) sets up quickly and gives reliable results in any light conditions. But there is something even more sophisticated on the horizon — the new Labradar, a “stand-off” chronograph that uses Doppler radar to measure bullet speed.
Jay explains: “I am (somewhat) patiently waiting for the new Labradar to release. The PVM-21 works pretty well most of the time and is easy to setup. I do get odd readings out of it every so often, but they are pretty obvious when they occur.” The advantage of the Labradar (if it ever comes to market) is that the unit sits to the left or right of the rifle. The Labradar is situated out of the bullet path, so there is no chance of shooting the chronograph by accident. Another advantage of the Labradar is that you can set it up without needing to go forward of the firing line, which would require a safety break.
Put the same load in a variety of barrels (with the same length and chamberings) and you’ll see a wide variance in muzzle velocity. In fact, it’s not unusual to see up to 100 fps difference from one barrel to the next. We demonstrated this with a comparison test of Lapua factory ammo.
Chron Testing Lapua Factory Ammo
At our Southern California test range, we chronographed Lapua 105gr 6mmBR factory ammo in three different 8-twist barrels of similar length. The results were fascinating. Lapua specs this ammo at 2790 fps, based on Lapua’s testing with its own 26″ test barrel. We observed a speed variance of 67 fps based on tests with three aftermarket barrels.
Brand ‘S’ and Brand ‘PN’ were pre-fit barrels shot on Savage actions. Brand ‘K’ was fitted to a custom action. All test barrels were throated for the 100-108 grain bullets, though there may have been some slight variances in barrel freebore. With a COAL of 2.330″, the rounds were “jumping” to the rifling in all barrels. Among the four barrels, Brand ‘PN’ was the fastest at 2824 fps average — 67 fps faster than the slowest barrel. Roughly 10 fps can be attributed to the slightly longer length (27″ vs. 26″), but otherwise this particular barrel was simply faster than the rest. (Click Here for results of 6mmBR Barrel Length Velocity Test).
Results Are Barrel-Specific, Not Brand-Specific
These tests demonstrate that the exact same load can perform very differently in different barrels. We aren’t publishing the barrel-makers’ names, because it would be wrong to assume that ‘Brand X’ is always going to be faster than ‘Brand Y’ based on test results from a single barrel. In fact, velocities can vary up to 100 fps with two identical-spec barrels from the SAME manufacturer. That’s right, you can have two 8-twist, 26″ barrels, with the same land-groove configuration and contour, from the same manufacturer, and one can be much faster than another.
Don’t Demand More Than Your Barrel Can Deliver
We often hear guys lament, “I don’t get it… how can you guys get 2900 fps with your 6BRs and I can only get 2840?” The answer may simply be that the barrel is slower than average. If you have a slow barrel, you can try using more powder, but there is a good chance it may never run as fast as an inherently fast barrel. You shouldn’t knock yourself out (and over-stress your brass) trying to duplicate the velocities someone else may be getting. You need to work within the limits of your barrel.
Factory Ammo Provides a Benchmark If you have a .223 Rem, 6BR, .243 Win, 6.5×47 Lapua, 6.5×55, .308 Win, 30-06, or 300 WM Rifle, we recommend you buy a box of Lapua factory-loaded ammo. This stuff will shoot great (typically around half-MOA), and it can give you a baseline to determine how your barrel stacks up speedwise. When you complete a new 6BR rifle, it’s wise to get a box of the factory ammo and chronograph it. That will immediately give you a good idea whether you have a slow, average, or fast barrel. Then you can set your velocity goals accordingly. For example, if the factory 6BR ammo runs about 2780-2790 fps in your gun, it has an average barrel. If it runs 2820+ in a 26″ barrel (or 2835 fps in a 28″), you’ve got a fast tube.
“This new series is heavily based in experimental ballistics, and takes a ‘Myth Busters’-type approach to many of the questions and problems faced by modern long range shooters,” stated Litz. Volume I of the series is scheduled for release in late July, 2014. The book will cost $39.95, but you can pre-order now for $35.95, a 10% savings.
Bryan adds: “Anyone interested in the underlying science behind shooting can benefit from this book. We address the important questions… How much does faster twist affect MV? How does stability affect BC from the muzzle and downrange? What chronographs are capable of high accuracy and precision? What characteristics should you look for in your long range rifle and optic set up? What new gadgets are being developed to enhance long range shooting?
New Book Features Extensive Live-Fire Test Results
Bryan tells us: “The book spotlights state-of-the-art technologies (and methodologies) in long range shooting. New equipment and old ideas are explored using experimental, live-fire testing. Extensive test results are reported in an easy-to-understand way. Among other things, our tests explore the effects of twist rate on muzzle velocity, BC (supersonic and transonic), precision, even spin rate decay for various rifling profiles as they are tested experimentally.
Chronographs and Optics Are Tested and Compared
Litz’s new book traces the evolution of modern rifle, bullet, and optic design. Results from chronograph comparison tests are presented, showing the strengths and weaknesses of available commercial chronographs. High-tech instrumentation such as laser rangefinders and wind measurement devices are explained in detail by contributing author Nick Vitalbo.
The New Book Puts Theory into Practice
We asked Bryan Litz how this new book differs from his previous treatises. Bryan replied: “My original Applied Ballistics for Long-Range Shooting book explains the fundamental elements of external ballistics. It’s the academic background which all future work relies on. The new book, Modern Advancements in Long Range Shooting, covers the ongoing development of equipment and ideas. We explore things like twist rate effects, modern rifle and optic design, and some of the high tech instruments which are being used to enhance the effectiveness of long range shooting.
If you only know Bryan Litz from his Applied Ballistics Books and DVDs, you may not realize that this guy is a great marksman (along with being an actual rocket scientist). This guy can shoot. At the recent Berger Southwest Nationals (SWN), Bryan took top honors among all sling shooters — and he managed to do that while performing many other important match duties. The pay-off for Bryan was getting his name on a really cool “ghost dancer” perpetual trophy. Litz joked: “With what the wind gods can do at shooting matches, it makes sense to have a trophy that puts you in touch with the spirit world.”
This is actually the second time Litz has finished first in Sling class at the Southwest Nationals. After his impressive win, we asked Bryan if he had any advice for other long-range competitors. First Bryan provided three tips concerning Ballistics, his special area of expertise. Next Bryan offered three more general tips about long-range competition — how to analyze your shooting, how to choose your ‘wind strategy’, and how to avoid the most costly mistakes, i.e. how to avoid the “train-wrecks”.
Litz Ballistics Tips
Ballistics TIP ONE. If you’re having trouble getting your ballistic software to match actual drops, you need to look at a number of possible reasons. Here are some common issues that can cause problems.
Click Values Are Not Exact. Scopes and iron sights don’t always produce accurate adjustments. In other words, if your ballistics program predicts 30 MOA of drop, and you dial 30 MOA but hit low, it might be that your sight actually only moved 28 MOA (for example). To see if your sight is adjusting accurately, shoot a tall target at 100 yards and measure group separation when dialing your sight.
Barometric vs. Station Pressure. This is a commonly misunderstood input to ballistics programs. You can avoid this pitfall by remembering the following: station pressure is the actual measured pressure at your location, and you don’t need to tell the program your altitude when using station pressure. Barometric pressure is corrected for sea level. If you’re using barometric pressure, you also have to input your altitude.
Muzzle Velocity. Chronographs are not always as accurate as shooters think they are — your true MV may be off by 10-20 fps (or more). If your drop is different than predicted at long range, it might be because your muzzle velocity input is wrong.
Mixing Up BC (G1 vs. G7). Knowledgeable long range shooters know that the G7 standard is a more representative standard for modern LR bullets. However, using G7 BCs isn’t just a matter of clicking the ‘G7′ option in the program. The numeric value of the BC is different for G1 and G7. For example, the G1 BC of the Berger 155.5 grain Fullbore bullet is .464 but the G7 BC is .237. If you were to enter .464 but click on G7, the results would be way off.
Ballistics TIP TWO. A properly installed level is absolutely essential for long range shooting. Without a good level reference, your long range wind zero will be off due to minor canting of the rifle from side to side. You can verify that your level is installed correctly on a 100-yard ‘tall target’. Draw a plumb line straight up the target and verify that your groups track straight up this line as you go up in elevation.
Ballistics TIP THREE. If your long range ballistic predictions aren’t tracking, always come back and verify your 100-yard zero. Sometimes a simple zero shift can be misconstrued as errors in long range ballistics predictions.
Litz Competition Shooting Tips
Competition TIP ONE. Improving your scores in long range competition is a constant process of self-assessment. After each match, carefully analyze how you lost points and make a plan to improve. Beginning shooters will lose a lot of points to fundamental things like sight alignment and trigger control. Veteran shooters will lose far fewer points to a smaller list of mistakes. At every step along the way, always ask yourself why you’re losing points and address the issues. Sometimes the weak links that you need to work on aren’t your favorite thing to do, and success will take work in these areas as well.
Competition TIP TWO. Select your wind shooting strategy carefully. For beginners and veterans, most points are typically lost to wind. Successful shooters put a lot of thought into their approach to wind shooting. Sometimes it’s best to shoot fast and minimize the changes you’ll have to navigate. Other times it’s best to wait out a condition which may take several minutes. Develop a comfortable rest position so you have an easier time waiting when you should be waiting.
Competition TIP THREE. Actively avoid major train wrecks. Sounds obvious but it happens a lot. Select equipment that is reliable, get comfortable with it and have back-ups for important things. Don’t load on the verge of max pressure, don’t go to an important match with a barrel that’s near shot out, physically check tightness of all important screws prior to shooting each string. Observe what train wrecks you and others experience, and put measures in place to avoid them.
NRA Media recently released a series of informative videos about the Science of Shooting. These videos feature high production values, with super-slow motion segments, as well as helpful computer graphics to illustrate the principles covered.
The videos are narrated by our friend Jessie Duff, a top action pistol shooter (and the first women ever to achieve USPSA Grand Master status). Jessie is assisted by talented shooters such as Top Shot Season 4 Champion Chris Cheng.
There are eight (8) videos in the Firearm Science Video Series. Here are two videos, with links to the rest below.
RECOIL — The Physics of Recoil Explained
While this video focuses on handguns, the principles involved apply to all firearms. The force of recoil is affected by the mass of the firearm, and by the speed and weight of the projectile. On a revolver, as shown in the video, there are various phases of recoil. Grip, and “compensation” porting can change the perceived force of recoil (though the energy is constant for any given ammunition specification).
VELOCITY — Calculating the Speed of a Bullet
This video shows a conventional chronograph with front and rear light sensors. The bullet first trips the front sensor and then the rear sensor as it flies over the unit. The difference in sensor time is used to calculate bullet speed. This is not the only kind of chrono in common use today. The popular MagnetoSpeed chrono works by tracking the bullet as it passes over two magnetic sensors mounted on a bayonet-style fixture on the barrel. Steinert Sensing Systems offers an Acoustic Chronograph that works by measuring the bullet’s supersonic shock-wave. This system has a much larger “sweet spot” than most optical chronographs. Last (but certainly not least) is the brand new Doppler Radar chronograph from MyLabradar.com. This can measure the speed of a bullet without the need to send the round directly over sensors.
Interestingly, this video also explains how, in the days before electric lamps, digital processors, and radar, scientists used a mechanical “Ballistic Pendulum” to calculate bullet velocity using Newtonian physics. The Ballistic Pendulum was first used in the mid 1700s. We have come a long way since then.
Put the same load in a variety of barrels (with the same length and chamberings) and you’ll see a wide variance in muzzle velocity. In fact, it’s not unusual to see up to 100 fps difference from one barrel to the next. We demonstrated this with a comparison test of Lapua factory ammo.
Chron Testing Lapua Factory Ammo
At our Southern California test range, we chronographed Lapua 105gr 6mmBR factory ammo in three different 8-twist barrels of similar length. The results were fascinating. Lapua specs this ammo at 2790 fps, based on Lapua’s testing with its own 26″ test barrel. We observed a speed variance of 67 fps based on tests with three aftermarket barrels.
Brand ‘S’ and Brand ‘PN’ were pre-fit barrels shot on Savage actions. Brand ‘K’ was fitted to a custom action. All test barrels were throated for the 100-108 grain bullets, though there may have been some slight variances in barrel freebore. With a COAL of 2.330″, the rounds were “jumping” to the rifling in all barrels. Among the four barrels, Brand ‘PN’ was the fastest at 2824 fps average — 67 fps faster than the slowest barrel. Roughly 10 fps can be attributed to the slightly longer length (27″ vs. 26″), but otherwise this particular barrel was simply faster than the rest. (Click Here for results of 6mmBR Barrel Length Velocity Test).
Results Are Barrel-Specific, Not Brand-Specific
These tests demonstrate that the exact same load can perform very differently in different barrels. We aren’t publishing the barrel-makers’ names, because it would be wrong to assume that ‘Brand X’ is always going to be faster than ‘Brand Y’ based on test results from a single barrel. In fact, velocities can vary up to 100 fps with two identical-spec barrels from the SAME manufacturer. That’s right, you can have two 8-twist, 26″ barrels, with the same land-groove configuration and contour, from the same manufacturer, and one can be much faster than another.
Don’t Demand More Than Your Barrel Can Deliver
We often hear guys lament, “I don’t get it… how can you guys get 2900 fps with your 6BRs and I can only get 2840?” The answer may simply be that the barrel is slower than average. If you have a slow barrel, you can try using more powder, but there is a good chance it may never run as fast as an inherently fast barrel. You shouldn’t knock yourself out (and over-stress your brass) trying to duplicate the velocities someone else may be getting. You need to work within the limits of your barrel.
Factory Ammo Provides a Benchmark If you have a .223 Rem, 6BR, .243 Win, 6.5×47 Lapua, 6.5×55, .308 Win, 30-06, or 300 WM Rifle, we recommend you buy a box of Lapua factory-loaded ammo. This stuff will shoot great (typically around half-MOA), and it can give you a baseline to determine how your barrel stacks up speedwise. When you complete a new 6BR rifle, it’s wise to get a box of the factory ammo and chronograph it. That will immediately give you a good idea whether you have a slow, average, or fast barrel. Then you can set your velocity goals accordingly. For example, if the factory 6BR ammo runs about 2780-2790 fps in your gun, it has an average barrel. If it runs 2820+ in a 26″ barrel (or 2835 fps in a 28″), you’ve got a fast tube.
Here’s good news for owners of Shooting Chrony Chronographs — you can purchase a Chrony LED Lamp (CLL) upgrade kit that allows your Chrony to work indoors. In addition, the new LED illuminators will enhance outdoor performance in uneven or shaded lighting conditions. The CLL kit costs $87.95 and can be ordered directly from the Shooting Chrony Website, or from vendors such as MidwayUSA.com.
Why the LED Illuminator Kit Is Needed
Shooting Chronys are popular “entry-level” chronographs. They are inexpensive to purchase and they stow compactly with their signature “folding box” design. This Editor used a Shooting Chrony (Beta Master model) for a few years with generally good results. However, I quickly learned that the Shooting Chrony gave the most reliable readings in diffuse mid-morning light with mildly overcast skies (thin cloud layer). The unit did not like to work in the late afternoon with the sun at a low angle. Likewise, uneven, shady conditions caused problems. In summertime, the ultra-bright, noontime summer sun, directly overhead, seemed to “over-power” the diffusers, causing errors. So, I learned to do my speed tests only when conditions were most favorable for the Shooting Chrony. Now, admittedly, not all Shooting Chronys are so temperamental — I’ve seen a few that worked great in bright overhead sunlight. But most Shooting Chronys do seem to struggle with shady conditions or low-angle sunlight.
LED Lamp Kit Components and Accessories
To improve Shooting Chrony reliability in all light conditions, Shooting Chrony offers a $87.95 LED kit (Item #110) that comes with LED-equipped 14″ white diffusers mounted on 16″ wire support rods. The LEDs provide a constant, consistent light source, so you can shoot in the late afternoon and evenings. The kit includes a 120V/220V AC Adapter, output 12VDC @500mA. If AC power is not available, you can run the LED Lamp with an optional 12v dc “Power Station” battery pack (Item #111, $47.95), or you can draw 12v current through an available cigarette lighter-style adapter (Item #112, $10.00).
LED Kit Users Say It Works
We haven’t tested the LED kit ourselves yet, but here’s what one kit buyer had to say:
“If you shot in poor light, you are going to miss velocities no matter what chronograph you are using. You go to all the work of assembling your handloads, set up the chronograph, and then shoot at the target through the detectors… only to get ‘Err 2′ or ‘Err 9′ and use up most or all of the carefully assembled handloads without getting any velocity data. The Chrony LED Lamp assembly has been perfect. Bright sun/no clouds, hazy/cloudy, or shadows/shade makes no difference — all the readings come through without a single ‘Err X’ code. Current draw is also surprisingly low. With the C.L.L. on for five straight hours, the battery pack still shows a full charge.”
How to Avoid Shooting your Chrono: There is nothing more frustrating (or embarassing) than sending a live round into your expensive new Chronograph. When setting up a chrono, we always first remove the bolt and bore-sight to ensure that the path of the bullet is not too low. When bore-sighting visually, set up the rifle securely on the sandbags and look through the bore, breech to muzzle, lining up the barrel with your aim point on the target. Then (during an appropriate cease-fire), walk behind the chronograph. Looking straight back through the “V” formed by the sky-screens, you should be able to see light at the end of the barrel if the gun is positioned correctly.
Adjust the height, angle and horizontal position of the chronograph so the bullet will pass through the middle of the “V” below the sky-screens, no less than 5″ above the light sensors. We put tape 5″ up on the front sky-screen supports to make it easy to align the bore to the right height over the light sensors. Make sure the chrono housing is parallel to the path of the bullet. Don’t worry if the unit is not parallel to the ground surface. What you want is the bullet to pass over both front and rear sensors at the same height. Don’t try to set the chrono height in reference to the lens of your scope–as it sits 1″ to 2″ above your bore axis. To avoid muzzle blast interference, set your chronograph at least 10 feet from the end of the muzzle (or the distance recommended by the manufacturer).
IRON SIGHT Rifles: A common mistake, particularly with newbie AR15 shooters, is to use the iron sights when setting the height of the chronograph. All too often, people forget that AR sights are positioned roughly 2.4″ above the bore axis (at the top of the front sight blade). If you set your bullet pass-through point using your AR’s front sight, the bullet will actually be traveling 2.4″ lower as it goes through the chrono. That’s why we recommend bore-sighting and setting the bullet travel point about 5-8″ above the base of the sky-screen support shafts. (Or the vertical distance the chronograph maker otherwise recommends).
TARGET AIM POINT: When doing chrono work, we suggest you shoot at a single aiming point no more than 2″ in diameter (on your target paper). Use that aiming point when aligning your chrono with your rifle’s bore. If you use a 2″ bright orange dot, you should be able to see that through the bore at 100 yards. Using a single 2″ target reduces the chance of a screen hit as you shift points of aim. If you shoot at multiple target dots, place them in a vertical line, and bore sight on the lowest dot. Always set your chron height to set safe clearance for the LOWEST target dot, and then work upwards only.
Though it is a 20-year-old design, the Oehler Model 35P Chronograph remains one of the best chronographs on the market. By employing three screens instead of two, the 35P takes two (2) measurements of each shot — adding an extra measure of reliability. It has very simple controls, so you don’t need to bring a 100-page manual to the range. The Model 35P features an integrated printer that conveniently records every shot and calculates Average Velocity, SD and ES for your strings. We like having the “hard-copy” output from our tests. This way we can simply staple the our paper record to the target and nothing gets lost.
Model 35P is Back in Production Oehler Research decided to phase out the model 35P Proof Chronograph a few years back. But consumer demand never abated. In fact, the prices of used units started to climb. So Ken Oehler decided to bring back the model 35P, and we’re glad he did. In the video below Ken explains that the Model 35P is back in regular production, now that his company has found a source for printer components. The Model 35P, complete with printer, skyscreens, and mounting rail costs $575.00. Ken told us “If we knew how to make them cheaper, we would … but we make ‘em so they work.”
If you already own or use a Model 35P, be sure to watch the video through to the end. In the last minute, Ken Oehler demonstrates how to position the metal support that holds the paper roll. Putting this support in place can be tricky to say the least. But the video shows how to accomplish the task quickly, without losing your temper.
Another helpful tip, provided by Ken’s wife, will help you feed the paper into the machine. Simply take the end of the paper and fold both left and right sides in toward the middle, forming a ‘V’ (like the nose of a paper airplane). This will then advance much easier through the printer’s internal spools when you load new paper.


 If you have a .223 Rem, 6BR, .243 Win, 6.5×47 Lapua, 6.5×55, .308 Win, 30-06, or 300 WM Rifle, we recommend you buy a box of


 NRA Media recently released a series of informative videos about the Science of Shooting. These videos feature high production values, with super-slow motion segments, as well as helpful computer graphics to illustrate the principles covered.


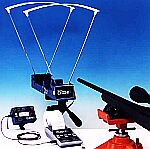 How to Avoid Shooting your Chrono: There is nothing more frustrating (or embarassing) than sending a live round into your expensive new Chronograph. When setting up a chrono, we always first remove the bolt and bore-sight to ensure that the path of the bullet is not too low. When bore-sighting visually, set up the rifle securely on the sandbags and look through the bore, breech to muzzle, lining up the barrel with your aim point on the target. Then (during an appropriate cease-fire), walk behind the chronograph. Looking straight back through the “V” formed by the sky-screens, you should be able to see light at the end of the barrel if the gun is positioned correctly.
 If you already own or use a Model 35P, be sure to watch the video through to the end. In the last minute, Ken Oehler demonstrates how to position the metal support that holds the paper roll. Putting this support in place can be tricky to say the least. But the video shows how to accomplish the task quickly, without losing your temper.


