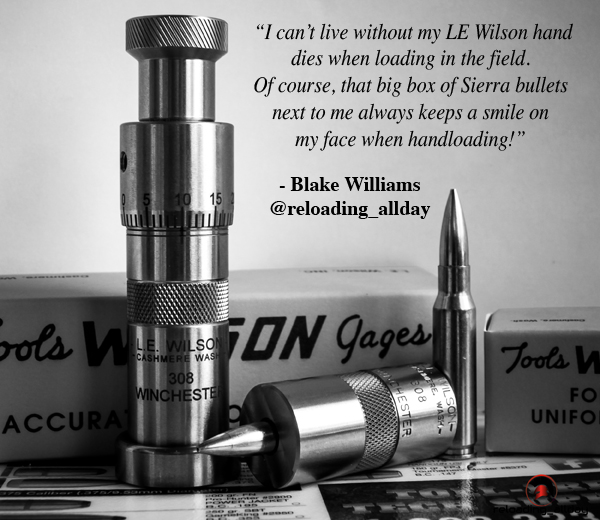
Sierra Bullets asked a few hand-loaders to reveal their favorite reloading tool or accessory: “What is your favorite ‘don’t know how you ever lived without it’ piece of reloading equipment?” Some of the answers are listed below. We were interested to see some high-tech, micro-processor items mentioned, such as the AMP Annealer, and the AutoTrickler powder dispenser. Old standbys, such as the rugged RCBS Rockchucker and Dillon 650, also made the favorites list. You can nominate your own favorite reloading hardware in the comments section of the Sierra Bullets Blog.
Sierra Bullets Ballistic Technician Philip Mahin answered: “A comparator gauge to measure from the base of a case to the ogive of the bullet. This bypasses the tip of the bullet, so I can repeat the same seating depth the next time I visit a specific combination.”
Bill, Editor of Rifleshooter.com, answered: “I have so many favorite reloading tools, it’s hard to pick one. But if I had to, it would be my Forster Co-Ax press. I like the ease [with which] you can change dies and that it doesn’t require traditional shell holders. It’s a great tool to have!”
Sierra Bullets Ballistic Technician Duane Siercks answered: “I don’t know that you would actually call this equipment, but the item that comes to mind would be my reloading room/shoot house. I had always had to squeeze everything into a corner or even an unheated shed. After we bought our current house, I built a garage and placed it so that I had a window looking down a 250-yard range. I built a dedicated room with heat and A/C. It contains my reloading bench and a shooting bench. The shooting bench lets me slide open the window and shoot down the range. It is very handy to not have to load everything up to go to the range. It also makes load development a lot simpler and efficient. I don’t know how I ever got along without it.
I also wonder what I did before I acquired the Lyman 1200 DPS Powder Dispenser. This has made the process so much simpler and much easier. I also have a Lee Precison Universal Decapping Die that I would gladly spend the money on again. This may be a small thing, but it certainly is handy. The Lee would accommodate some very large cases that some of the others were too small for.”
Jon Addis answered: “Putting an A&D FX-120i scale with AutoTrickler and Auto-Throw on the bench has changed the way I reload. It’s kernel accurate in about 15 seconds. Saves time and reduces a variable. And of course, the system is made better by the Area 419 Billet Adjustable base for the trickler and Billet Powder Cup.”
This video shows the AutoTrickler V2 and Auto-Throw Combo:
Sierra Bullets Chief Ballistician Tommy Todd answered: “A brass annealing machine and a RCBS Chargemaster complimented with a Sartorious scale.”
Sierra Bullets Ballistician Gary Prisendorf answered: “RCBS Rock Chucker Press, it’s built like a tank, and it will last me a lifetime.”
Sierra Bullets Production Manager Chris Hatfield also answered: “RCBS Rock Chucker single-stage reloading press.”
Jeremy Kisner answered: “My Giraud trimmer has taken [three operations] and combined them into one easy task. I can now size my brass and then sit down and trim, chamfer, and debur to a 0.001″ tolerance in one motion.”
Dan Blake answered: “My Annealing Made Perfect (AMP) annealer. With consistent neck tension being one of the largest contributions to small Extreme Spread on muzzle velocities, I believe this induction annealer is truly the best on the market.”
This manufacturer-produced video shows how the AMP annealing machine operates:
Trevor Aldinger answered: “Area 419 Master Funnel Kit. In the past I’ve used plastic funnels and even other metal ones. This system fits case necks and flows much better than any others I’ve used, and there is no static since it’s metal. We spend a lot of time and money to get precise charges, I don’t want to lose or miss a kernel because of a cheap funnel.”
Tyler Riley answered: “My RCBS bench primer (priming tool). It has a lot more leverage than a hand primer and still has a good feel to how tight primer pockets are. Makes it much easier on my hands to prime large runs, especially new brass with tight pockets.”
Craig Arnzen answered: “My Annealeez [annealing machine] is one of the best tools in my reloading room. Neck tension is SO important, and annealing every firing really helps with that. This is an inexpensive tool that can anneal a lot of cases at once, and help me produce more consistent ammo.”
Josh Temmen answered: “Time is critical for me so my RCBS Chargemasters are indispensable (pun intended.) They cut down on time at my reloading bench while maintaining the weight tolerances required for long range shooting.”
Josh Bartlett answered: “I have my Dillon 650 set up with Whidden floating tool heads to do decapping and sizing on my match ammo. The case feeder and progressive function of the press save me a TON of time when doing lots of several hundred rounds.”
Ryan Brandt answered: “… A quality set of calipers. My reloading room is full of very nice equipment but little does more to satisfy my perfectionism than a good check with the calipers.”
The Tactical Rifle Shooters Facebook Group recently showcased tools used to measure case headspace before and after “bumping” the shoulder. After a case is fired, hand-loaders who full-length size their cases will typically bump the shoulders back anywhere from .001″ to .0035″, depending on the rifle and application. With our 6mmBR and Dasher cases we like about .0015″ bump.
You want the amount of case sizing and bump to be the same for all your brass. To ensure uniformity, it makes sense to measure your cases before and after the FL sizing process. When we have time, we check every case. Other folks will simply check the first 3-4 cases coming out of the FL sizing die to ensure the FL die setting is correct and delivering desired headspace/bump.
1. Whidden Gunworks Shoulder Bump Gauge
There are a variety of tools that can be used to measure shoulder bump. Our favorite is a special cartridge-specific bushing made by Whidden Gunworks. The Whidden Shoulder Bump Gauge enables you to adjust your sizing die to the desired measurement. The bump gauge is attached to your calipers with a set screw and determines the measurement from the base to the shoulder of the case. The photo below, from Tactical Rifle Shooters, shows the Whidden Bump Gauge for the .375 CheyTac cartridge.
2. Dave Manson Vertical Comparator with Dial Read-Out
Dave Manson states: “This tool was designed to make life easier for the advanced shooter and re-loader by allowing precise measurement of ammunition, case, and chamber headspace. With this information, the re-loader will be able to fine-tune clearances and fits between his ammunition and chamber, with resultant improvements in accuracy and case life.” The functions of the Comparator are:
1. Measure headspace of factory or reloaded ammunition
2. Quantify chamber headspace by measuring headspace of a fired case
3. Ensure minimal shoulder set-back when setting up re-loading dies
4. Compare base-to-ogive length to ensure consistent bullet-to-rifling relationship.
In addition to the Dial Indicator and Stand, the $130.00 Vertical Comparator is supplied with multiple Datum Blocks of precise length and inside diameter (.3300″/.3750″/.4000″/.4375″). MORE INFO HERE.
3. Hornady L-N-L Headspace Comparator System
Hornady makes comparator gauges matched to the red comparator holder that mounts on your caliper. These Lock-N-Load Headspace Gauges are inexpensive. You can get a set of five gauges for $31.99. Hornady explains: “The Lock-N-Load® Headspace Comparator… gauge measures variations in brass before and after firing or re-sizing. It allows for headspace comparison between fire-formed brass and re-sized brass.” IMPORTANT: Hornady states: “To determine the proper bushing diameter for your cartridge, simply add the neck diameter and the shoulder diameter and divide that number by two. Use the bushing closest to that number.” Hornady offers five: .330″, .350″, .375″, .400″, and .420″.
One tip — We have found the Hornady gauges may vary a little from unit to unit even with the same nominal size. If you have more than one gauge for the same cartridge, test each on your brass — you may then note a slight difference in your bump measurements.
4. Pistol Brass Case DIY Bump Gauge
Last is a “field expedient” set-up if you do not have any of the comparator tools shown above. A sized .45 ACP case (or other suitable pistol case) can be used to measure shoulder bump. The mouth of the pistol case sits on the shoulder of your rifle cartridge brass.
Make sure the .45 ACP case is trimmed square and that it is round. We recommend you first run it through an expander, then size it, trim it and chamfer. Next, take the .45 ACP case and slip it over the neck of a fired, unsized rifle case with the primer removed. Align the two cases between the jaws of your calipers and note the length from rim to rim (See left photo below).
OK, now you have the length for a fired rifle case BEFORE sizing. Next, take a full-length sized rifle case (without primer) and do the same thing, placing the .45 ACP case over the neck of the FL-sized case (Right Photo). The difference between the two numbers is the amount of “bump” or set-back you are applying to the shoulder. Here the difference is .0015″. The amount of bump you need varies with your chamber and your load, but .0015-.002″ is a good initial setting.
Alliant’s Powder for 50-Caliber Applications
In 2009 Alliant unveiled Reloder 50, a new powder designed for long-range, 50-caliber rifle shooters. According to Alliant, the burn rate is “a little slower than Winchester 860″ and the powder is showing excellent lot-to-lot consistency. Load density is optimized for the 50 BMG and similar cases. Like Reloder 17, Reloder 50 employs a process which penetrates the kernels with the burn-rate-controlling chemical. This should allow a longer, flatter pressure curve, yielding more velocity than conventional powders can deliver. Alliant says that Reloder 50 offers “superior velocity and the ability to burn cleaner (with less residue).” Reloder 50 comes in both 1-lb (#150527) and 8-lb (#150528) containers.
Giraud 50 BMG Case/Bullet Comparator Giraud Tool makes a comparator for 50-Cal cartridges. The double-ended comparator is quite versatile. In one orientation you can measure base-to-ogive bullet length and also measure cartridge OAL from rim to bullet ogive. When reversed, you can use the comparator to measure cartridge headspace. The $30.00 Giraud 50 BMG Comparator gauge is constructed of 303 stainless and fits most any vernier, dial, or digital caliper. CLICK HERE for more info.
Forster 50 BMG Trimmer
50 BMG enthusiasts asked for a dedicated 50 BMG case trimmer, so Forster created a trimmer specifically for that cartridge. Forster’s cutter tip is much sharper than the cutter on the Lyman 50 Cal. AccuTrimmer. However, with the Forster tool you will pay more for that superior cutting ability — Forster’s 50 BMG trimmer costs $95.99 at Sinclair International. Yes, Lyman also makes a dedicated 50 BMG Case trimmer ($66.49 at MidwayUSA), but the Forster cutter head is much sharper, and we prefer the Forsters collet-style case-holder. Bottom line — the Forster gets the job done more quickly, with less effort, so it’s worth the extra money.
We asked a few Sierra Bullets bulletsmiths “What is your favorite ‘don’t know how you ever lived without it’ piece of reloading equipment?” Along with the not-so-surprising “reloading press” responses, there are some interesting answers, including a reloading room, an annealing machine, a comparator, and a home-made tool for detecting incipient case head separation. Check out all the answers below. We would love to hear from you too, please share your response in the comments below.
What Is Your Favorite Piece of Reloading Equipment?
Ballistic Technician Carroll Pilant answered: “Dillon 550 and 650 presses.”
Ballistic Technician Rich Machholz answered: “My universal decapping die is as handy as a pocket on a shirt.”
Ballistic Technician Philip Mahin answered: “A comparator gauge to measure from the base of a case to the ogive of the bullet. This bypasses the tip of the bullet, so I can repeat the same seating depth the next time I visit a specific combination.”
Ballistic Technician Duane Siercks answered: “I don’t know that you would actually call this equipment, but the item that comes to mind would be my reloading room. I had always had to squeeze everything into a corner or even an unheated shed. After we bought our current house, I built a garage and placed it so that I had a window looking down a 250-yard range. I built a dedicated room with heat and A/C. It contains my reloading bench and a shooting bench. The shooting bench lets me slide open the window and shoot down the range. It is very handy to not have to load everything up to go to the range. It also makes load development a lot simpler and efficient. I don’t know how I ever got along without it.”
Ballistic Technician Paul Box answered: “The Lee hand priming tool.”
Former Ballistic Technician Robert Treece answered “My homemade dental pick. I use it to check incipient case-head separations. We all see the ‘bright ring’ down close to the case head, that’s natural, but after several firings could be starting to split apart. You could start by just straightening out a paper clip; flattening one end; sharpening and turning it 90 degrees, then bend if about 1/8″ long will even fit all the way down into .204″ cases. On the other end, bend about 3/4″ to 90 degrees also, in the same direction as the pick. That will give you a handle and also ‘points’” in the direction of the pick as you scrape along the side wall from down inside at the bottom upward along the side wall. If the pick hooks into a crevice — DON’T TRY TO SIZE THE CASE. It will pull apart in your die.”
Dan Blake answered: “My Annealing Made Perfect (AMP) annealer. With consistent neck tension being one of the largest contributions to small Extreme Spread on muzzle velocities, I believe this induction annealer is truly the best on the market.”
This manufacturer-produced video shows how the AMP annealing machine operates:
Production Toolsetter Brad Vansell answered: “Redding Ultramag single-stage reloading press for my rifle and my Dillon 650 for my pistol loading.”
Process Engineer David Palm answered: “Homemade case lube.”
Plant Engineer Darren Leskiw answered: “Beyond the normal equipment, I’d say my electronic scale. Using the beam balance for the past 9 years was ok, but nowhere as easy as using an electronic scale.”
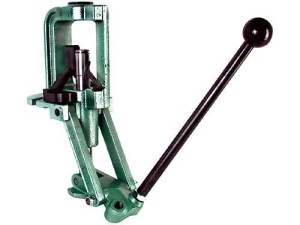
There were many votes for the classic RCBS Rock Chucker single-stage press:
Ballistician Gary Prisendorf answered “RCBS Rockchucker Press, it’s built like a tank, and it will last me a lifetime.”
Production Manager Chris Hatfield answered: “RCBS single stage reloading press.”
Maintenance & Machine Shop Lead Craig Westermier answered: “RCBS Rock Chucker.”
Production Resource Manager Dan Mahnken answered “RCBS Rock Chucker! Buy one and it lasts a lifetime.”
Each Wednesday, the U.S. Army Marksmanship Unit publishes a reloading “how-to” article on the USAMU Facebook page. This week’s “Handloading Hump Day” post covers an important safety issue — why you should never assume that a stated “book” load for a particular bullet will be safe with an equal-weight bullet of different shape/design. The shape and bearing surface of the bullet will affect the pressure generated inside the barrel. Visit the USAMU Facebook page next Wednesday for the next installment.
Beginning Handloading, Part 13:
Extrapolating Beyond Your Data, or … “I Don’t Know, What I Don’t Know!”
Last week, we addressed several key facets of Service Rifle reloading. Today, we continue our Handloading Safety theme, focusing on not inadvertently exceeding the boundaries of known, safe data. Bullet manufacturers’ loading manuals often display three, four, or more similar-weight bullets grouped together with one set of load recipes. The manufacturer has tested these bullets and developed safe data for that group. However, seeing data in this format can tempt loaders — especially new ones — to think that ALL bullets of a given weight and caliber can interchangeably use the same load data. Actually, not so much.
The researchers ensure their data is safe with the bullet yielding the highest pressure. Thus, all others in that group should produce equal or less pressure, and they are safe using this data.
However, bullet designs include many variables such as different bearing surface lengths, hardness, and even slight variations in diameter. These can occasionally range up to 0.001” by design. Thus, choosing untested bullets of the same weight and caliber, and using them with data not developed for them can yield excess pressures.
This is only one of the countless reasons not to begin at or very near the highest pressure loads during load development. Always begin at the starting load and look for pressure signs as one increases powder charges.
Bullet bearing surface length (BSL) is often overlooked when considering maximum safe powder charges and pressures. In photo 1 (below), note the differences in the bullets’ appearance. All three are 7mm, and their maximum weight difference is just five grains. Yet, the traditional round nose, flat base design on the left appears to have much more BSL than the sleeker match bullets. All things being equal, based on appearance, the RN/FB bullet seems likely to reach maximum pressure with significantly less powder than the other two designs.
Photo 1: Three Near-Equal-Weight 7mm Bullets with Different Shapes
Due to time constraints, the writer used an approximate, direct measurement approach to assess the bullets’ different BSLs. While fairly repeatable, the results were far from ballistics engineer-grade. Still, they are adequate for this example.
Bullet 1 (L-R), the RN/FB, has a very slight taper and only reaches its full diameter (0.284”) very near the cannelure. This taper is often seen on similar bullets — it helps reduce pressures with good accuracy. The calculated BSL of Bullet 1 was ~0.324”. The BSL of Bullet 2, in the center, was ~0.430”, and Bullet 3’s was ~ 0.463”. Obviously, bullets can be visually deceiving as to BSL!
Some might be tempted to use a bullet ogive comparator (or two) to measure bullets’ true BSL for comparison’s sake. Unfortunately, comparators don’t typically measure maximum bullet diameter and this approach can be deceiving.
Photo 2: The Perils of Measuring Bearing Surface Length with Comparators
In Photo 2, two 7mm comparators have been installed on a dial caliper in an attempt to measure BSL. Using this approach, the BSLs differed sharply from the original [measurements]. The comparator-measured Bullet 1 BSL was 0.694” vs. 0.324” (original), Bullet 2 was 0.601” (comparator) vs. 0.430” (original), and Bullet 3 (shown in Photo 2) was 0.602” (comparator) vs. 0.463” (original). [Editor’s comment — Note the very large difference for Bullet 1, masking the fact that the true full diameter on this bullet starts very far back.]
Please join us again next week as we examine other lesser-discussed variables that affect pressure and velocity during handload development. In the meantime, stay safe, and favor center!
Harrell’s Precision sells “semi-custom” full-length bushing dies for the PPC and 6BR chamberings. While the Harrell brothers do not cut the die to spec, they carry a large selection of dies made with slightly different internal dimensions. When you send in your fired brass, the Harrells choose a die from inventory with just the right amount of sizing (diameter reduction) at the top and bottom of the case. Given the quality, and precise fit, Harrell’s full-length dies are a good value at $75.00 plus shipping.
Bump Measuring Collar
The Harrell brothers provide a nice bonus item with each full-length die — a neat, little shoulder bump measuring device as shown in the photo at right. Hornady/Stoney Point sells a stand-alone tool that does the same job, but the Harrell’s bump collar is simpler and faster. To measure your shoulder bump, simply place the Harrell’s bump collar over the upper section of your deprimed case (before sizing) and measure the OAL with your calipers. The collar should seat on the shoulder without any wobble. After taking the measurement, then size the case in your full-length die, replace the collar and repeat the measurement. You want to set your die so the shoulder moves back about .001″ to .0015″ for most applications. (With semi-auto guns you may want more bump — .003″ or more.)
When measuring for shoulder bump, you need to remove the primers first. Our friend Boyd Allen explains: “Use a decapping tool or die to remove the fired primer before taking the initial measurement. When working to thousandths, even the raised edge of a crater or a slightly raised primer can throw you off by a significant amount.”
Sinclair International has a new tool assembly that lets you sort bullets by base to ogive length. The $79.95 Sinclair Bullet Sorting Stand with Dial Comparator (item 59-2000) comes with a heavy black granite base that stays put on your loading bench. The included dial indicator has a quick-release lever allowing easy placement and removal of bullets into the comparator. This lever allow the spring-loaded indicator shaft to pop up out of the way.
The special base comparators used with this tool (see photo), are sold separately for $10.99, and are offered in 22 caliber, 6mm, 6.5mm, 7mm, 30 caliber, and 338 caliber. The sorting stand can also be used with Sinclair multi-caliber hex comparators (item 09-700, $18.25).
Measuring Bullet Bearing Surface with Calipers and Comparators
While we like this Sinclair tool, the same function can be performed with a regular set of calipers, using two comparators with caliber inserts. If you use the Hornady (formerly Stoney Point) OAL system you probably already have a #B2000 comparator body and a caliber-specific insert ($3.99 at Grafs.com).
Buy a second body ($14.39 at Grafs.com) and second insert (of the same caliber) and mount one on each caliper jaw, opposite each other. Tuck the bullet’s boat-tail in one insert and the “pointy end” in the other, and you can quickly measure the bearing surface. It takes a few tries to get the right “feel” of how hard to close the caliper jaws. But if the comparator bodies are set up right, the process should be quite repeatable, and you can probably measure just as fast with calipers as with the Sinclair measuring stand. However, the Sinclair unit should be a bit more precise, if you’re trying to resolve bullet lengths to less than one-thousandth. If you want to measure base to ogive (rather than bearing surface length), just remove one comparator and measure with the heel of the bullet (end of boat-tail) touching one jaw, and the bullet’s “pointy end” in the remaining comparator.


 Sierra Bullets Ballistician Gary Prisendorf answered: “RCBS Rock Chucker Press, it’s built like a tank, and it will last me a lifetime.”


 Alliant’s Powder for 50-Caliber Applications
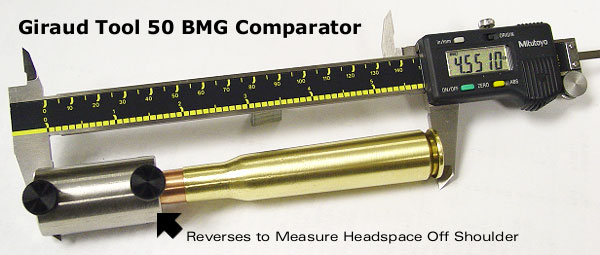


 Plant Engineer Darren Leskiw answered: “Beyond the normal equipment, I’d say my electronic scale. Using the beam balance for the past 9 years was ok, but nowhere as easy as using an electronic scale.”


 Bump Measuring Collar
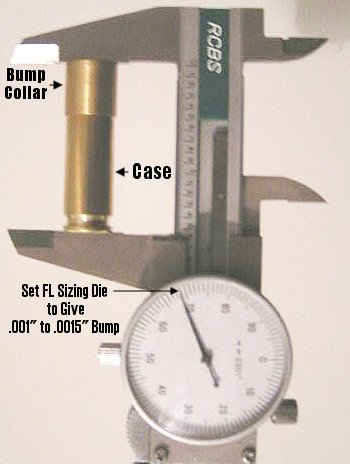
 Sinclair International has a new tool assembly that lets you sort bullets by base to ogive length. The $79.95 Sinclair


