How and Why to Create a Dummy Round
When you have a new custom rifle built, or a new barrel fitted to an existing rifle, it makes sense to create a dummy round. This should have your preferred brass and bullet types, with the bullet positioned at optimal seating depth. A proper dummy round helps the gunsmith set the freebore correctly for your cartridge, and also ensure the proper chamber dimensions.
Respected machinist, tool-maker, and gunsmith Greg Tannel of Gre-Tan Rifles explains: “I use the dummy round as a gauge to finish cut the neck diameter and throat length and diameter so you have [optimal] clearance on the loaded neck and the ogive of the bullet just touches the rifling.” He recommends setting bullet so the full diameter is just forward of the case’s neck-shoulder junction. “From there”, Greg says, “I can build you the chamber you want… with all the proper clearances”.
Greg Tannel has created a very helpful video showing how to create a dummy round. Greg explains how to measure and assemble the dummy and how it will be used during the barrel chambering process. Greg notes — the dummy round should have NO Primer and No powder. We strongly recommend that every rifle shooter watch this video. Even if you won’t need a new barrel any time soon, you can learn important things about freebore, leade, and chamber geometry.
This has been a very popular video, with 244,000 views. Here are actual YouTube comments:
That is the best explanation I’ve ever seen. Thank you sir. — P. Pablo
Nice video. You do a very good job of making this easy for new reloaders to understand. I sure wish things like this were available when I started reloading and having custom rifles built. Once again, great job, and your work speaks for itself. — Brandon K.
Beautiful job explaining chambering clearances. — D. Giorgi
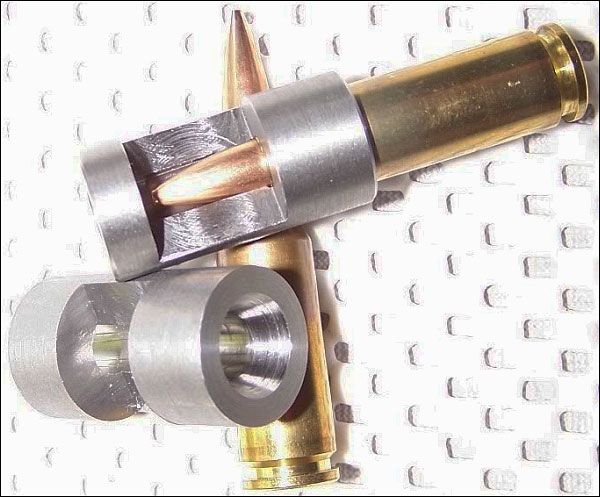
Another Cool Tool — The Stub Gauge
When you have your gunsmith chamber your barrel, you can also have him create a Stub Gauge, i.e. a cast-off barrel section chambered like your actual barrel. The stub gauge lets you measure the original length to lands and freebore when your barrel was new. This gives you a baseline to accurately assess how far your throat erodes with use. Of course, as the throat wears, to get true length-to-lands dimension, you need take your measurement using your actual barrel. The barrel stub gauge helps you set the initial bullet seating depth. Seating depth is then adjusted accordingly, based on observed throat erosion, or your preferred seating depth.
Here’s a tip we feature every year or so, because it is something that costs nothing, yet can be very useful in the reloading process. With a simple, easy modification to a fired case, you can determine the length to lands in your rifle barrel. As long as you set the tension right, the measurements should be repeatable, and you’ve just saved yourself $31 — the price of a commercial OAL gauge.
To achieve best accuracy with a rifle, you must control bullet seating depth very precisely, so all bullets end up in the same place relative to the entrance of the lands, every time. There may be multiple cartridge OALs which prove accurate. However, with each, you first need to determine a “zero” point — a reliable, and repeatable OAL where the bullet is “just touching” the lands.
There are tools, such as the Hornady (formerly Stoney Point) OAL Gauge, that will help you find a seating OAL just touching the lands. However, the tool requires that you use a special modified case for each cartridge you shoot. And, while we find that the Hornady OAL Gauge is repeatable, it does take some practice to get in right.
Make Your Own Length-to-Lands Gauge with a Dremel
Here’s an inexpensive alternative to the Hornady OAL tool — a slotted case. Forum member Andris Silins explains how to create a slotted case to measure length to the lands in your rifle:
“Here’s what I did to find length to lands for seating my bullets. I made four cuts into the neck of fire-formed brass. Then I pressed the bullet in lightly and chambered the entire gauge. As the cartridge chambers, the bullet slides back into the case to give you length to lands. It took less than five minutes to get it cut and working. A little light oil in the barrel just past the chamber helps ensure the bullet does not get stuck in the lands. It works great and is very accurate.
I made the cuts using a Dremel with a cut-off wheel. You can adjust tension two ways. First, you can make the cuts longer or shorter. Longer cuts = less tension. If you used only three cuts insted of four you would get more tension. The trick is to be gentle when you open and close the bolt. If you ram the bolt closed you may wedge the bullet into the lands. When you open the bolt it helps to keep a finger or two near by to guide the case out straight because the ejector wants to push it sideways.”
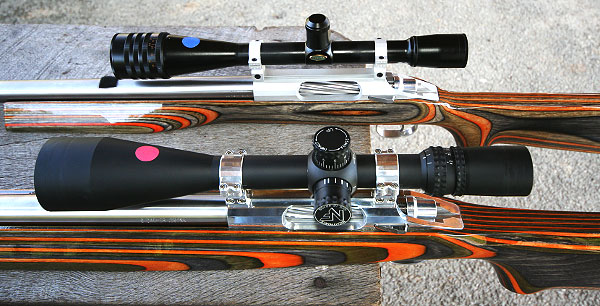
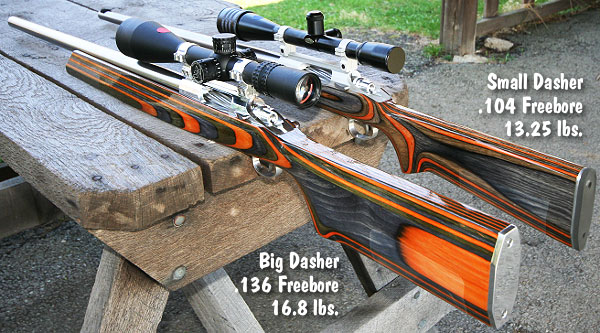
Forum Member Chuck L. (aka “Ridgeway”) has created a handsome duo of 6mm Dashers for competitive benchrest and varmint matches in Pennsylvania. Both guns are built on Kelbly Panda RBLP actions, with Bartlein 8-twist barrels, and Shehane Laminated Tracker Stocks. However, the two rifles are not exact twins, as you can see. One, which we’ll call the Big Dasher, is built on a Shehane ST1000 Tracker stock. The other gun, the Small Dasher, sports Shehane’s “Baby Tracker” stock — a design used with great success by Richard Schatz. The Big Dasher, optimized for 1000-yard competition, also has a slightly longer freebore — 0.136″ vs. 0.104″ for the Small Dasher.
Chuck tells us: “I don’t get out shooting competition as much as I want due to time and family, but when I do compete, I shoot a Groundhog match at Southfork Rifle Club in Beaverdale, PA. Info on Southfork Club events can be found at Southforkrifleclub.com. The Southfork match is basically a 100-, 300- and 500-yard match with one sighter the entire match and 5 shots at each yardage for score. The Small Dasher, with the shorter ‘Baby Tracker’ stock, was set up for the Southfork Rifle Club’s ‘Light Unlimited’ class which has a 13.5-lb max weight.” (Editor: ‘unlimited’ is a misnomer for a weight-limited category.)
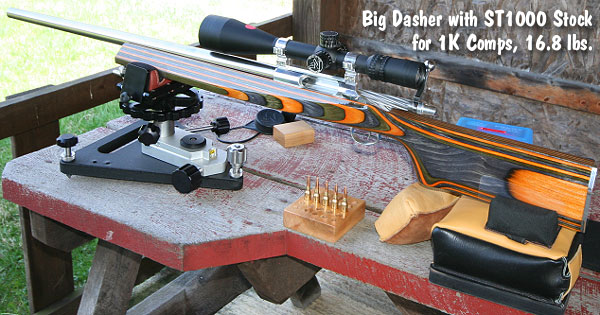
Chuck adds: “The Big Dasher with the heavy ST-1000 stock is set up for 1000-yard benchrest matches in Light Gun class. I hope to shoot a couple 1K matches with it at Reade Range in southwest Pennsylvania. I am still in load development for this rifle since it was just finished in January. One ironic thing is, it shoots the same load I’m shooting out of the lighter gun rather well. The only difference between the two chambers is the freebore is roughly thirty thousandths longer on the 1K gun (Large Dasher). I will also shoot this at Southfork in the ‘Heavy Unlimited’ class.”
Specifications for the Dasher Duo:
Small Dasher (13.5-pounder): Chambered for 6mm Dasher with approximately .104 freebore and a .264 NK. (No way of knowing exactly since it freebore was done in a separate operation by Kelbly.) Components are: Shehane Baby Tracker stock, Kelbly Panda RPLB action, Bartlein 1:8″ LV barrel at 26 ¾”, Kelbly Rings, Weaver T36, Jewell trigger. The barrel was chambered by Kelblys and the stock was bedded, glued and balanced by a shooting buddy (Forum Member johara1). I clear-coated the stock with auto urethane. Total weight is 13 lbs., 4 ounces.
Big Dasher (1K Light Gun, 17-pounder): Chambered for 6mm Dasher with a .136 freebore and .264 neck (PTG Reamer). Components are: Shehane ST-1000 stock, Kelbly Panda RPLB action, Bartlein 1:8″ HV 5R barrel at 28″, Shehane +20-MOA rings, Nightforce NXS 12-42x56mm, Jewell trigger. The barrel work, pillar installation, and bedding was done by Dave Bruno. The stock was clear-coated by Chuck with auto urethane. Chuck also made the rear butt plate and balanced the rifle. Total weight: 16 lbs., 13 ounces.
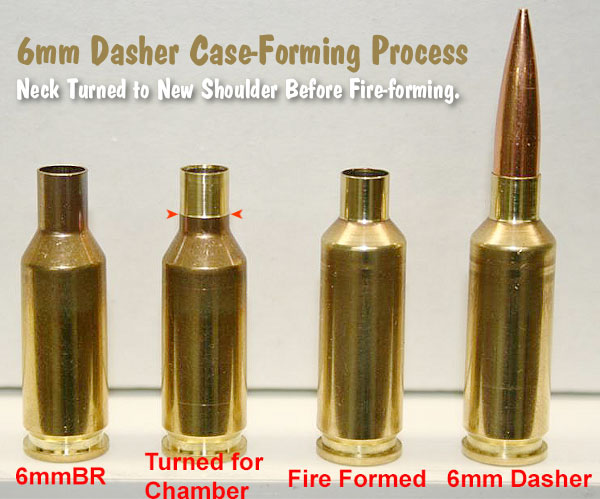
Dasher Case-Forming: Neck-Turn then Fire-form with Bullets Hard in Lands
To fireform, I turn my cases down to fit the chamber and stop where the false shoulder makes snug contact with the chamber. Fire-forming rounds are loaded up with a 29-grain charge of H4895 or Varget and a 108gr Berger bullet seated hard into the lands about 0.020″ past initial contact with the rifling. It takes about three firings to make a nice clean Dasher case with a sharp shoulder. I anneal about every 3-4 firings. I have many cases that have about 10+ firings on them and they are still shooting well. The primer pockets are a little looser, but still hold a primer.
Both Dashers Group in the Ones at 100 Yards
My main bullet for both rifles is the 107gr Sierra MK, loaded with Reloder 15 powder, Lapua cases and CCI 450 primers. My main load for the Small Dasher is 33.0 grains of Reloder 15. This load shoots in the ones at 100 yards. For the Big Dasher, I’m still working on a load, although the same 33.0 grain load shoots in the ones in the heavier gun as well. I’m still looking for more velocity and my ‘max’ node. So far, I’ve gone well above 33.0 grains of RL 15 without pressure signs, but that load produces vertical at 100 yards, so I’m going to tinker with the load until I see pressure or it starts to shoot.
Next time you have a barrel fitted, consider having your gunsmith create a “stub gauge” from a left-over piece of barrel steel (ideally taken from your new barrel blank). The outside diameter isn’t important — the key thing is that the stub gauge is created with the same reamer used to chamber your current barrel, and the stub must have the same bore diameter, with the same land/groove configuration, as the barrel on your rifle. When properly made, a stub gauge gives you an accurate three-dimensional model of the upper section of your chamber and throat. This comes in handy when you need to bump your case shoulders. Just slide a fired case (with spent primer removed) in the stub gauge and measure from base of case to the end of the gauge. Then, after bumping, re-measure to confirm how much you’ve moved the shoulder.
In addition, the stub gauge lets you measure the original length to lands and freebore when your barrel was new. This gives you a baseline to accurately assess how far your throat erodes with use. Of course, as the throat wears, to get true length-to-lands dimension, you need take your measurement using your actual barrel. The barrel stub gauge helps you set the initial bullet seating depth. Seating depth is then adjusted accordingly, based on observed throat erosion, or your preferred seating depth.
Forum member RussT explains: “My gunsmith [makes a stub gauge] for me on every barrel now. I order a barrel an inch longer and that gives him enough material when he cuts off the end to give me a nice case gauge. Though I don’t have him cut that nice-looking window in the side (as shown in photos). That’s a neat option. You can tell how much throat erosion you are getting from when it was new as well. For measuring initial seating depths, this is the most useful item on my loading bench next to calipers. Everyone should have a case gauge made by there smith if you have a new barrel put on.”
Forum member Lawrence H. has stub gauges made with his chamber reamers for each new barrel. He has his smith cut a port in the stub steel so Lawrence can actually see how the bullet engages the rifling in a newly-cut chamber. With this “view port”, one can also see how the case-neck fits in the chamber. Lawrence tells us: “My stub gauges are made from my barrels and cut with my chamber reamers. With them I can measure where my bullets are ‘touching the lands’ and shoulder bump dimensions. This is a very simple tool that provides accurate information.” To learn more about stub gauges, read this Forum Thread. The photos above and below show Lawrence’s stub gauges: