|
|
August 5th, 2020

Here is an article Glen Zediker wrote for the Midsouth Blog. In this article Glen gives important advice on selecting, handling, seating, and testing primers. The right primer choice can and will affect your load’s performance and accuracy. And proper primer handling is essential for safety.
Glen is the author of many excellent books on reloading. This article is adapted from Glen’s books, Handloading For Competition and Top-Grade Ammo, available at Midsouth HERE. For more information about other books by Glen, visit ZedikerPublishing.com.
RELOADERS CORNER: PRIMER TECH
by Glen Zediker
The primer is one component in the collection that might not get all the attention it warrants. That’s because it is the one thing, above all other components, that you don’t want to just swap and switch around. We’ve all heard cautions about testing new lots of every component, especially propellant, but primers not only change lot to lot, they vary greatly in their influence on any one load, brand to brand.
The difference in one brand to the next can equal a good deal more or less pressure, for instance. While there are “general” tendencies respecting the “power” of various-brand primers, always (always) reduce the load (propellant quantity) when switching primers.
This has become more of an issue over the past few years as we’ve faced component shortages. I can tell you without a doubt that going from a WW to a CCI, or from a Remington to a Federal, can have a major influence on a load. I establish that from chronograph readings. No doubt, it’s best to have a good supply of one primer brand and lot that produces good results, and when that’s not possible, it’s a hard sell to convince someone to stop loading ammo and get back to testing. But. It is important. I can tell you that from (bad) experience. How I, and we all, learn most things…
When I switch primers, whether as a test or a necessity, I reduce my load ONE FULL GRAIN. There can be that much effect.
The Elements of a Primer
A primer is made up of a brass cup filled with explosive compound (lead styphate). Lead styphate detonates on impact. Primers don’t burn – they explode! In the manufacturing process, this compound starts as a liquid. After it’s laid into the cup, and while it’s still wet, a triangular piece or metal (the “anvil”) is set in. When the cup surface is struck by the firing pin, the center collapses, squeezing the explosive compound between the interior of the cup and the anvil. That ignites the compound and sends a flame through the case flash hole, which in turn lights up the propellant. |
Primers Can be Dangerous — Particularly When Stacked
Don’t underestimate that. I’ve had one experience that fortunately only created a huge start, but I know others who have had bigger more startling mishaps. These (almost always) come from primer reservoirs, such fill-tubes. Pay close attention when charging up a tube and make sure all the primers are facing the right way, and that you’re not trying to put in “one more” when it’s full! That’s when “it” usually happens. What will happen, by the way, is akin to a small grenade. Static electricity has also been blamed, so keep that in mind.
Sizes and Types of Primers
Primers come in two sizes and four types. “Large” and “small”: for example, .223 Rem. takes small, .308 Win. takes large. Then there are pistol and rifle in each size.
Rifle primers and pistol primers are not the same, even though they share common diameters! Rifle primers [normally] have a tougher cup, and, usually, a hotter flash. Never swap rifle for pistol. Now, some practical-style competitive pistol shooters using their very high-pressure loads (like .38 Super Comp) sometimes substitute rifle primers because they’ll “handle” more pressure, but they’ve also tricked up striker power. That’s a specialized need.
Further, some primer brands are available with a “magnum” option. Some aren’t. My experience has been that depends on the “level” of their standard primer. A magnum primer, as you might guess, has a more intense, stouter flash that travels more “deeply” to ignite the larger and more dense powder column. It reaches further, faster.

Flash Consistency Counts
 Flash Consistency is very important, shot to shot. The consistency of every component is important: bullet weights, diameters, case wall thicknesses, and all the way down the list. We’re hoping to get more consistent behavior from a “match” or “benchrest” primer, and we’re paying more for it. I can tell you that some brands that aren’t touted as “match” are already consistent. That all comes from experience: try different primers, just respect the need to initially reduce the load for each test. Flash Consistency is very important, shot to shot. The consistency of every component is important: bullet weights, diameters, case wall thicknesses, and all the way down the list. We’re hoping to get more consistent behavior from a “match” or “benchrest” primer, and we’re paying more for it. I can tell you that some brands that aren’t touted as “match” are already consistent. That all comes from experience: try different primers, just respect the need to initially reduce the load for each test.
Primer Dimensional Differences and Primer Tools
One last thing — there are small variations in primer dimensions (heights, diameters) among various brands. These variations are not influential to performance. However — small diameter variations can influence feeding through priming tools. This can be a hitch especially in some progressive loading machines. Manufacturers usually offer insight (aka: “warnings”) as to which are or aren’t compatible, so find out.
 Get Midsouth products HERE Get Midsouth products HERE
Get Primer trays HERE
This article is adapted from Glen’s books, Handloading For Competition and Top-Grade Ammo, available at Midsouth HERE. Learn more about Glen’s books at ZedikerPublishing.com. |
Share the post "Primers 101 — What You Need to Know About Primers"
June 10th, 2020

The anvil is the tripod-shaped thin metal piece protruding above the bottom of the primer cup. Getting the primer sitting fully flush on the bottom of the case primer pocket, without crunching it too much, requires some keen feel for the progress of primer seating.
 In two informative Midsouth Blog articles, Glen Zediker offers helpful advice on priming. First he examines what happens to the primer itself as it is seated in the cup. Glen explains why some “crush” is important, and why you never want to leave a high primer. Glen also reviews a variety of priming tools, including his favorite — the Forster Co-Ax Bench Primer Seater. Then he offers some key safety tips. Glen provides some “rock-solid” advice about the priming operation. You’ll find more great reloading tips in Glen’s newest book, Top-Grade Ammo, which we recommend. In two informative Midsouth Blog articles, Glen Zediker offers helpful advice on priming. First he examines what happens to the primer itself as it is seated in the cup. Glen explains why some “crush” is important, and why you never want to leave a high primer. Glen also reviews a variety of priming tools, including his favorite — the Forster Co-Ax Bench Primer Seater. Then he offers some key safety tips. Glen provides some “rock-solid” advice about the priming operation. You’ll find more great reloading tips in Glen’s newest book, Top-Grade Ammo, which we recommend.
Priming Precision vs. Speed
Glen writes: “The better priming tools have less leverage. That is so we can feel the progress of that relatively very small span of depth between start and finish. There is also a balance between precision and speed in tool choices, as there so often is.”
Benchtop Priming Tools — The Forster Co-Ax
Glen thinks that the best choice among priming options, considering both “feel” and productivity, may be the benchtop stand-alone priming stations: “They are faster than hand tools, and can be had with more or less leverage engineered into them. I like the one shown below the best because its feeding is reliable and its feel is more than good enough to do a ‘perfect’ primer seat. It’s the best balance I’ve found between speed and precision.”


Load Tuning and Primers
Glen cautions that you should always reduce your load when you switch to a new, not-yet-tested primer type: “The primer is, in my experience, the greatest variable that can change the performance of a load combination, which is mostly to say ‘pressure’. Never (never ever) switch primer brands without backing off the propellant charge and proving to yourself how far to take it back up, or to even back it off more. I back off one full grain of propellant [when I] try a different primer brand.”

Priming Safety Tips by Zediker
1. Get a good primer “flip” tray for use in filling the feeding magazine tubes associated with some systems. Make double-damn sure each primer is fed right side up (or down, depending on your perspective). A common cause of unintentional detonation is attempting to overfill a stuffed feeding tube magazine, so count and watch your progress.
2. Don’t attempt to seat a high primer more deeply on a finished round. The pressure needed to overcome the inertia to re-initiate movement may be enough to detonate it.
3. Don’t punch out a live primer! That can result in an impressive fright. To kill a primer, squirt or spray a little light oil into its open end. That renders the compound inert.
4. Keep the priming tool cup clean. That’s the little piece that the primer sits down into. Any little shard of brass can become a firing pin! It’s happened!
These Tips on Priming come from Glen’s newest book, Top-Grade Ammo, available at Midsouth Shooters Supply. CLICK HERE to learn more about this and other publications from Zediker Publishing.
Share the post "Case Priming Procedures — Insights from Glen Zediker"
May 1st, 2020

 The February 2013 edition of Shooting Sports USA magazine has an interesting feature by Glen Zediker. In this Transporting Success, Part I article, Zediker explains the advantages of loading at the range when your are developing new loads or tuning existing loads. Glen, the author of the popular Handloading for Competition book, discusses the gear you’ll need to bring and he explains his load development procedure. In discussing reloading at the range, Glen focuses on throwing powder and seating bullets, because he normally brings enough sized-and-primed brass to the range with him, so he doesn’t need to de-prime, re-size, and then re-prime his cases. The February 2013 edition of Shooting Sports USA magazine has an interesting feature by Glen Zediker. In this Transporting Success, Part I article, Zediker explains the advantages of loading at the range when your are developing new loads or tuning existing loads. Glen, the author of the popular Handloading for Competition book, discusses the gear you’ll need to bring and he explains his load development procedure. In discussing reloading at the range, Glen focuses on throwing powder and seating bullets, because he normally brings enough sized-and-primed brass to the range with him, so he doesn’t need to de-prime, re-size, and then re-prime his cases.
Zediker writes: “Testing at the range provides the opportunity to be thorough and flexible. You also have the opportunity to do more testing under more similar conditions and, therefore, get results that are more telling. Once you are there, you can stay there until you get the results you want. No more waiting until next time.”
Zediker starts with three-shot groups: “I usually load and fire three samples [with] a new combination. I’ll then increase propellant charge… based on the results of those three rounds, and try three more. I know that three rounds is hardly a test, but if it looks bad on that few, it’s not going to get any better.”
Glen reminds readers to record their data: “Probably the most important piece of equipment is your notebook! No kidding. Write it down. Write it all down.”
 There’s More to the Story… There’s More to the Story…
Editor’s Note: In Zediker’s discussion of loading at the range, he only talks about throwing powder and seating bullets. In fact, Glen opines that: “there is little or no need for sizing.” Well, maybe. Presumably, for each subsequent load series, Zediker uses fresh brass that he has previously sized and primed. Thus he doesn’t need to de-prime or resize anything.
That’s one way to develop loads, but it may be more efficient to de-prime, re-size, and load the same cases. That way you don’t need to bring 50, 80, or even 100 primed-and-sized cases to the range. If you plan to reload your fired cases, you’ll need a system for de-priming (and re-priming) the brass, and either neck-sizing or full-length sizing (as you prefer). An arbor press can handle neck-sizing. But if you plan to do full-length sizing, you’ll need to bring a press that can handle case-sizing chores. Such a press need not be large or heavy. Many benchresters use the small but sturdy RCBS Partner Press, on sale now at Amazon for $77.99. You may even get by with the more basic Lee Precision Compact Reloading Press, shown in Zediker’s article. This little Lee press, Lee product #90045, retails for under $35.00.

Share the post "Reloading at the Range — Smart Option for Load Development"
February 8th, 2020

Looking to shoot an AR-platform rifle out past 500 yards? Then you should read two articles by AR guru Glen Zediker. Author of The New Competitive AR-15 and The Competitive AR15 Builders Guide, Zediker is an expert when it comes to AR-platform rifles. Glen believes ARs have excellent long-range capability, provided they are built to high standards, with good barrels.
Glen says: “a properly configured AR-15 is easily capable of good performance at 500+ yards. Good performance means it can hit a 1-foot-square target all the time. Competitive shooters can cut that standard in nearly half (the X-Ring on an MR1 600-yard NRA High Power Rifle target is 6 inches, and high X-counts are commonplace among more skilled shooters).”
Published in the Cheaper than Dirt Shooter’s Log, Zediker’s articles first cover the history of the AR-15, and then explain how AR-platform accuracy can be optimized. Part One reviews the AR’s development as an accurate firearm, tracing its evolution from a Vietnam-era combat weapon to what is now a favored target rifle of High Power competitors. READ PART ONE.

Part Two discusses the specifics that make an AR accurate at 500 yards and beyond. Zediker talks about barrel configuration (profile and twist rate), bullet selection, floating handguards, and proper mounting of optics or iron sights. READ PART TWO.

Here are some highlights from Long-Range AR-15 Part TWO:
Barrel Twist Rate
To stabilize anything longer than a 68- or 69-grain bullet, the barrel twist rate must be — at minimum– 1-in-8. Twist rates reflect how far the bullet travels along the lands or rifling to make one complete revolution. So, 1-in-8 (or 1-8, 1:8) means “one turn in eight inches.” I think it’s better to go a little faster in twist. There is nothing wrong with a 1:7 twist. The 90-grain bullets require a 1:6.5, and that is getting on the quick side. If you want to shoot Sierra 77s or equivalent, and certainly anything longer, 1:8 is necessary. By the way, it is bullet length, not weight, which constitutes the necessary twist rate to launch a stable bullet.
Optics Mounting
Correct optical sight positioning can be a challenge. With a flattop upper, I need a good inch additional forward extension at the muzzle side of the upper for the sight mount bases to avoid holding my head “back” to get the optimal view through the scope. A longer rail piece is necessary for my builds as a result.
Buttstock Length and Adjustment
An adjustable buttstock is valuable, and even more valuable if it’s well-designed. Mostly, a standard stock is too short, and the cheek area sits too low. Adding length helps a lot by itself. There are assemblies that replace the standard buttplate to allow for length and, usually, height and rotation adjustments for the buttpad. An elevation-adjustable cheekpiece is a big help to attain a solid position.

Share the post "Zediker Examines Long Range Shooting with AR-Platform Rifles"
January 21st, 2020

Diagram from SouthTexasShooting.org.
Mirage as a Wind Indicator
Read FULL ARTICLE in Midsouth Shooters Blog
by Glen Zediker
Most good shooters use mirage as their leading indicator to spot changes in the wind. With well-designed stand, the scope can be set it up where you can see the wind with the left eye and see the sight with the right without anything more than a visual focus shift. That gets the shooter back on the trigger with the least chance of missing another change. In the photo below e you can see 11-time National High Power Champion David Tubb using a spotting scope set up for his left eye.

David Tubb sets up his spotting scope so he can easily see through it with his LEFT eye, without shifting his head and body position.
There are resources that give clues or evidence of wind direction and strength: wind flags, observation of grass and trees, and mirage.
Almost always I use mirage as my leading indicator. Mirage (heat waves) is always present but you’ll need a scope to read it. For 600 yards I focus my scope about halfway to the target. Mirage flows just like water and the currents can be read with respect to wind speed as well, but it’s not clearly accurate beyond maybe a 15 mph speed. The thing is that mirage shows changes, increases or decreases, and also direction shifts, really well.
A couple more things about mirage flow: when mirage “boils,” that is appears to rise straight up, either there’s no wind or the scope is dead in-line with wind direction. And that’s a quick and accurate means to determine wind direction, by the way, move the scope until you see the boil and note the scope body angle. Here’s another tip — the boil can predict when a “fishtail” wind is about to change, a boil precedes a shift.

You don’t need to spend big bucks for an effective spotting scope to view mirage. You can get the Vortex 20-60x60mm Diamondback angled spotting scope for just $399.99 from Midsouth. That’s complete with 20-60X zoom eyepiece. Though inexpensive, the Vortex Diamondback is popular with many competitive shooters and hunters. No, it doesn’t offer the sharpness of an 80mm Kowa Prominar or Swarovski spotting scope, but you’ll pay $2400+ just for the body of those high-end optics.
Choice of EyePiece — Wide-Angle LERs Work Well
I use a long-eye-relief 20X to 25X wide-angle eyepiece. That setup shows the flow best. And pay attention to where the wind is coming from! See what’s headed your way, because what’s passed no longer matters. That’s true for any indicator. Right to left wind? Read off the right side of the range.
Once I get on target then all I am doing is watching for changes. It’s really uncommon to make a big adjustment between shots. The fewer condition changes you are enduring, the easier it is to keep everything on center. That’s why I shoot fast, and why I start at the low point in a wind cycle.
 Making Corrections with Limited Sighters Making Corrections with Limited Sighters
Here’s a Tip for NRA High Power matches where only two sighters are allowed: “Make a full correction off the first sighting shot location! Even if there are minor changes afoot, that’s how to know how well you assessed condition influence pre-shot. Don’t second-guess. After the second sighter you should be on target and then simply watching for changes. Pay attention, correlate visible cues to the results of prior shots, and if in doubt, click into the wind.”
Information in this article was adapted from material in several books published by Glen Zediker and Zediker Publishing. Glen is an NRA High Master who earned that classification in NRA High Power Rifle using an AR15 Service Rifle. For more information and articles visit ZedikerPublishing.com.
Share the post "“Mirage Is Your Friend” — How Mirage Can Reveal the Wind"
December 24th, 2019

It’s the holiday season — there’s no better time to get a good gun book. Amazon has hundreds of great gun titles, while Midsouth Shooters carries a good selection line of shooting and reloading books, many of which are ON SALE this week. Looking for reliable reference works on reloading, or a gift for a shooting buddy? Check out the recommended titles below. Match directors take note — books make great match prizes. Paperback books cost no more than wood plaques but they will provide valuable information for years instead of just gathering dust in a closet. If your club offers training programs, Amazon and Midsouth offer many titles that will help new shooters improve their skills.
Midsouth carries Glen Zediker’s excellent books, including Handloading For Competition, the recent Top-Grade Ammo and other titles.
Here Are Some Good Reloading Manuals and Practical Titles:
Share the post "Gun Books on Sale — Build Your Shooting Sports Library"
November 1st, 2019

Noted gun writer Glen Zediker (author of Top Grade Ammo), regularly contributes tech articles to the Midsouth Shooters Blog. One of Glen’s Midsouth Blog articles covers Bullet Design. We suggest you read the article — even seasoned hand-loaders will learn a few things about projectile properties (and how to choose the right bullet design for your needs). Glen also wrote a recent Blog article on cartridge pressure signs, linked below
Read Zediker Bullet Design Article | Read Zediker Pressure Signs Article
Glen explains: “A ‘match’ bullet’s job is to perforate a piece of paper. A bullet designed for varmint hunting, on the other hand, is designed to produce explosive impact, and one for larger game hunting strives to strike a balance between expansion and penetration. However! No matter how it’s built inside, there are universal elements of any bullet design, and those are found on the outside.”
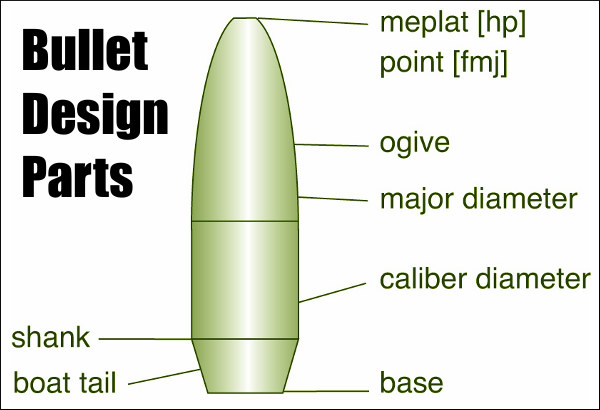
In his article, Glen identifies the key elements of a bullet and explains how they are defined: “Base, that’s the bottom; boat-tail, or not (flat-base); shank, portion of full-caliber diameter; ogive, the sloping ‘nosecone'; tip, either open or closed (open it’s called the ‘meplat’). The shape of the ogive and the first point of ‘major diameter’ are extremely influential elements. The first point of major diameter can vary from barrel brand to barrel brand because it’s the point on the bullet that coincides with land diameter in the barrel — the first point that will actually contact the barrel as the bullet moves forward. When there’s a cartridge sitting in the rifle chamber, the distance or gap between the first point of major diameter and the lands is called ‘jump’, and, usually, the less there is the better.”

Ogives Analyzed — Tangent vs. Secant Bullet Designs
Glen notes that bullet designs reflect secant or tangent profiles, or a combination of both: “The two essential profiles a bullet can take are ‘secant’ and ‘tangent’. This refers to the shape of the ogive. A tangent is a more rounded, gradual flow toward the tip, while a secant is a more radical step-in, more like a spike. Secants fly with less resistance (less aerodynamic drag), but tangents are [often] more tolerant of jump [or to put it another way, less sensitive to seating depth variations].”
Glen adds: “Ogives are measured in ‘calibers’. That’s pretty simple: an 8-caliber ogive describes an arc that’s 8 times caliber diameter; a 12-caliber is based on a circle that’s 12 times the caliber. The 8 will be a smaller circle than the 12, so, an 8-caliber ogive is more ‘blunt’ or rounded. Bullets with lower-caliber ogives are more tolerant of jump and (usually) shoot better, easier. Higher-caliber ogives [generally] fly better, farther. This is an important component in the ‘high-BC’ designs.”
Learn More in Zediker Books
Glen has authored a number of excellent books for hand-loaders and competitive shooters. Here are three of his most popular titles, including his latest book, Top Grade Ammo:
All these titles are available from Midsouth Shooters Supply. Click each cover above to purchase from Midsouth.
Share the post "Ogives, Meplats, Boat-Tails and Other Bullet Design Elements"
September 18th, 2019
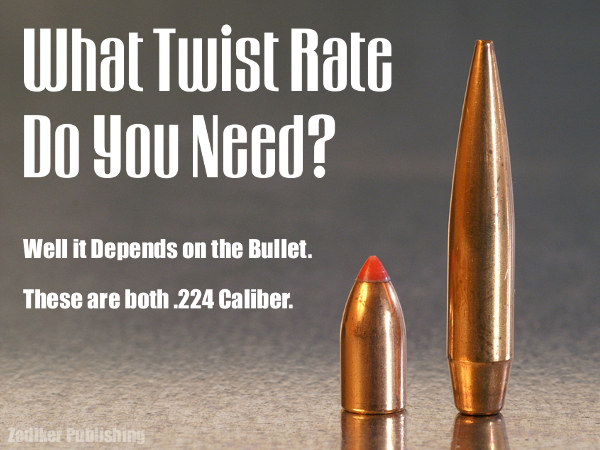
Here’s an extreme range of .224-Caliber bullets: 35gr varmint bullet and 90gr match bullet. Of course, along with bullet length/design, you need to consider MV when choosing twist rate.
Even with the same caliber (and same bullet weight), different bullet types may require different rates of spin to stabilize properly. The bullet’s initial spin rate (RPM) is a function of the bullet’s muzzle velocity and the spin imparted by the rifling in the barrel. You want to ensure your bullet is stable throughout flight. It is better to have too much spin than too little, according to many ballistics experts, including Bryan Litz of Applied Ballistics. Glen Zediker has some basic tips concerning barrel twist rates and bullet stability. These come from his latest book, Top Grade Ammo.
Choosing the Right Twist Rate
I’d always rather have a twist too fast than not fast enough. Generally… I recommend erring toward the faster side of a barrel twist decision. 1:8″ twist is becoming a “new standard” for .224 caliber, replacing 1:9″ in the process. The reason is that new bullets tend to be bigger rather than smaller. Don’t let a too-slow twist limit your capacity to [achieve] better long-range performance.
Base your next barrel twist rate decision on the longest, heaviest bullets you choose to use, and at the same time realize that the rate you choose will in turn limit your bullet choices. If the longest, heaviest bullet you’ll shoot (ever) is a 55-grain .224, then there’s honestly no reason not to use a 1:12″. Likewise true for .308-caliber: unless you’re going over 200-grain bullet weight, a 1:10″ will perform perfectly well.

Bullet Length is More Critical than Weight
Bullet length, not weight, [primarily] determines how much rotation is necessary for stability. Twist rate suggestions, though, are most usually given with respect to bullet weight, but that’s more of a generality for convenience’s sake, I think. The reason is that with the introduction of higher-ballistic-coefficient bullet designs, which are longer than conventional forms, it is easily possible to have two same-weight bullets that won’t both stabilize from the same twist rate.
Evidence of Instability
The tell-tale for an unstable (wobbling or tumbling) bullet is an oblong hole in the target paper, a “keyhole,” and that means the bullet contacted the target at some attitude other than nose-first.
 Increasing Barrel Length Can Deliver More Velocity, But That May Still Not Provide Enough Stability if the Twist Rate Is Too Slow Increasing Barrel Length Can Deliver More Velocity, But That May Still Not Provide Enough Stability if the Twist Rate Is Too Slow
Bullet speed and barrel length have an influence on bullet stability, and a higher muzzle velocity through a longer tube will bring on more effect from the twist, but it’s a little too edgy if a particular bullet stabilizes only when running maximum velocity.
My failed 90-grain .224 experiment is a good example of that: I could get them asleep in a 1:7″ twist, 25-inch barrel, which was chambered in .22 PPC, but could not get them stabilized in a 20-inch 1:7″ .223 Rem. The answer always is to get a twist that’s correct.
These tips were adapted from Glen’s newest book, Top-Grade Ammo, available at Midsouth. To learn more about this book and other Zediker titles, and read a host of downloadable articles, visit ZedikerPublishing.com.
Share the post "Too Fast or Too Slow — What’s Your Optimal Twist Rate?"
March 29th, 2019

Close-up view of a sectioned case. This one here was “fixin’ to pop”, says Glen Zediker.
Here are highlights from an article Glen Zediker wrote for the Midsouth Blog. In this article Glen focuses on cartridge brass. Glen discusses the most common failures that appear with brass that has been shot multiple times, or which has been fired at excessive pressures. Glen explains some simple ways to check your cartridge brass to detect “early warning signs” of case failure, particularly case head separation, which can be dangerous.
Glen is the author of many excellent books on reloading. This article is adapted from Glen’s books, Handloading For Competition and Top-Grade Ammo, available at Midsouth HERE. For more information about other books by Glen, visit ZedikerPublishing.com.
How Cases Degrade with Multiple Firings By Glen Zediker
This article explains when, and then how, to check after the progress of changes commencing with the firing on a new case. It’s the “progress of degeneration,” in a way of looking at it because the concern is getting a handle on when enough change in the brass has come about to require attention. Or abandonment. As said then, for me that’s 4 firings. That, as said last time, is when I might see changes that need attention. Also as said, that figure didn’t come out of a hat, but from my own notes in running my competition NRA High Power Rifle loads. [Editor’s Note: With Lapua brass, using moderate loads, in bolt-action rifles, we typically get about 10 good (match-worthy) firings. But if you anneal your Lapua brass, and run modest pressures, Lapua brass can perform well for 20 or more load cycles.]
The areas most affected are the case neck and case head area. Case neck walls get thicker [but] the case head area body walls get thinner. Primer pockets get shallower and larger diameter.

This case shows a cracked neck AND a crack (separation) above the case head. Zediker says it is “rare to see one case with both of the most common failures. [This case] was attacked by an M14.”
Case Head — Causes of Separation and Cracking
When a case is under pressure during firing, the brass, like water, flows where it can, where it’s more free to move. Of course, the chamber steel limits the amount it can expand. The case shoulder blows fully forward and the case base is slammed back against the bolt face. There is, therefore and in effect, a tug on both ends — it gets stretched. The shoulder area is relatively free to expand to conform to the chamber, but the other end, the case head area, is not. Since that’s the area of the case with the thickest walls, it doesn’t expand “out” much at all. What it does is stretch. The “case head area,” as I refer to it here, is the portion of the case above the web, which is just above the taper that leads in to the extractor groove. The “area” extends approximately an eighth-inch up the case body.

Here’s a “pressure ring.” You’ll see this after firing, if you see it. And, if you see it, that case is done. The bright ring indicates excessive stretching, which indicates excessive thinning. If you see a ring circling the case, noticeable because it’s lighter color than the case body, and it’s in this area, I’d say that case is done. And that’s right where a “head separation” occurs. It can crack and also blow slap in two, and that’s the “separation” part of case head separation.

Photo courtesy GS Arizona.
This is a spot to keep close watch on as cases age. It is also the area that is more “protected” by sizing with less case shoulder set-back. That is, pretty much, where the freedom for the stretching movement in this area comes from (the case shoulder creates a gap). If you’re seeing a sign that a head separation [might happen with relatively few firings], chances are the shoulder set-back is excessive, and also… the load pressure level.
Bent Paper Clip Case-Wall Gauge

Editor: You can use a bent paper clip to detect potential case wall problems. Slide the paper clip inside your case to check for thin spots. GS Arizona explains: “This simple little tool (bent paper clip) will let you check the inside of cases before you reload them. The thin spot will be immediately apparent as you run the clip up the inside of the case. If you’re seeing a shiny line on the outside and the clip is really hitting a thin spot inside, it’s time to retire the case.” Photo by GS Arizona.
Monitor Primer Pocket Dimensional Changes
Another case-head-area and pressure-related check is the primer pocket. As said, the primer pocket will get larger in diameter and shallower in depth each firing. As with many such things, the questions are “when” and “how much,” and the main thing, “how much?”
If the pocket gets excessively shallow, and that’s judged by a primer that seats fully but isn’t at least a tick below flush with the case base, there could be function issues. There’s a risk of a “slam-fire” with a semi-auto that uses a floating firing pin, and, if there is actual protrusion, that has the same effect as insufficient headspace. A primer pocket uniformer can reset the depth of a shallowed primer pocket to what it should be, but the real test for me is how easily the next primer seats into it. If it’s significantly less resistance, I’ll say that case is done. Shallower can be refurbished. That’s a primary function of a primer pocket uniformer. Larger diameter, though, can’t be fixed. I’ve mentioned in another article or two that, any more at least, my main gauge of load pressure has become how much primer pocket expansion there’s been.
 Glen’s books, Handloading For Competition and Top-Grade Ammo, are available at Midsouth HERE. For more information about other books by Glen, visit ZedikerPublishing.com Glen’s books, Handloading For Competition and Top-Grade Ammo, are available at Midsouth HERE. For more information about other books by Glen, visit ZedikerPublishing.com
Glen’s newest book, America’s Gun: The Practical AR15. Check it out HERE!
Share the post "Inspect Your Fired Brass to Avoid Catastrophic Case Failures"
February 8th, 2019
Here are highlights from an article Glen Zediker wrote for the Midsouth Blog. In this article Glen focuses on cartridge brass for semi-auto rifles, AR-platform guns in particular. Glen notes that semi-autos are tougher on brass than bolt-action rifles, so you need strong, durable brass, that has been full-length sized. And you need to be careful about neck tension, and primers. The article starts with Glen’s recommendations for tough, hard brass, and then includes the points outlined below.
Glen is the author of many excellent books on reloading. This article is adapted from Glen’s books, Handloading For Competition and Top-Grade Ammo, available at Midsouth HERE. For more information about other books by Glen, visit ZedikerPublishing.com.
ONE: Full Length-Size Cases with Adequate Shoulder Set-Back
This is a huge source of debate… amongst my readers, but, since now I’m strictly speaking of semi-auto needs I doubt there will be much dissent: full-length resize all cases! Most cases from most semi-autos will emerge with a pretty well-blown case shoulder [taming down an excessively functioning gas system can reduce this]. Make double-sure you’re sizing the cases down to at least 0.003 clearance. If you don’t there are safety and function problems ahead.
TWO: USE Sufficient Neck Tension
The case neck [must be] reduced an adequate amount to retain the bullet. There should be a minimum net difference of 0.003 inches (three-thousandths) between sized outside case neck diameter and loaded round outside case neck diameter. [Editor — that means at least three thou of “grip”.] Reason: don’t take a chance of inadvertent bullet movement during the recoil and feeding cycles. That movement can be back or forward! It’s easily possible for a bullet to jump ahead when the inertia from the bolt carrier assembly chambers the next round.

THREE: Use Tough Primers
Choose a tough primer! There’s a floating firing pin on an AR15 (M1A also) that is supposed to be held in check but that system doesn’t always work! If you load and extract a round and see a little dimple in the primer, that’s from the firing pin tapping off of it (again, created by inertia of bolt closing). A combination of a high primer and a sensitive primer cup assembly can create a “slam-fire”. Brands? CCI has some mil-spec primers that work well, and I’ve had great success with Remington 7-1/2. Some of the well-respected “match” primers are a little thin. The CCI and Remington also hold up well to the (sometimes) greater firing forces working on the primer (again, from the quick unlocking).
Here’s what I use from Midsouth.
FOUR: Be Sure to Seat Primers Below Flush
And, finally, make double-sure that each and every primer is seated to below flush with the case head! That’s true for any firearm (because it also means that the primer is fully seated) but imperative for safety in a semi-auto. This is especially an issue for those who use a progressive-type loading press.
Share the post "Cartridge Brass Wisdom for Semi-Auto Shooters by Zediker"
December 11th, 2018

Clearance Check — Remove the seating stem and drop a bullet into it. The farther down the ogive or nose-cone the step recess grips the bullet, the better. If it’s only pressing down against the bullet tip, a crooked seat is assured, along with inconsistent seating depth. — Glen Zediker
Some folks acquire a new seating die and then are surprised to find their hand-loads show crooked bullets and/or inconsistent seating depth. The problem could be a mis-match between the bullet and the die’s seating stem. In some case, particularly with long, streamlined bullets, the bullet tip can actually touch the bottom inside of the stem. This can cause a variety of problems, as Glen Zediker explains…
Invest in a Good Seating Die
Reloading Tip by Glen Zediker
The bullet seating operation is the “last thing” that happens and it’s also the one thing that can corrupt the care and treatment given to the quality of the loaded round prior. A sleeve-style seater, well-machined, goes a whopping long ways toward preserving alignment, and, therefore, concentricity. Also make sure that the stem in yours comes to rest well down onto the bullet ogive, and, above all else, is not contacting the bullet tip! That will wreck a round.
If you have this problem, you should contact the die maker — some will offer a different seating stem expressly designed for longer, pointier bullets. This “long bullet stem” will normally drop right into your existing die. If you plan to run long, VLD-style bullets you should request the special seating stem right from the get-go.
This tip comes from Glen’s newest book, Top-Grade Ammo, available at Midsouth Shooters Supply.
Share the post "Watch Out for Bullet Nose Contact in Short Seating Stems"
December 8th, 2018

Christmas is coming soon. Books have always been popular holiday gifts. If you haven’t completed your holiday shopping, here are some recommended titles that should please the serious shooters and firearms enthusiasts on your shopping list. For shooting clubs, books also make great end-of-season member awards. Most of us would rather have a useful book than one more piece of wood to toss in a box in the closet. Check out these twelve titles — for yourself or your shooting buddies.
Here Are TWELVE BOOKS Recommended for Serious Shooters:
|
 |
Modern Advancements in LR Shooting, Vol. II
by Bryan Litz, $27.99 (Kindle), $44.54 (Hardcover)
If you’re a serious long-range shooter, consider adding this book to your library. Relying on extensive ballistics testing, Modern Advancements Volume II is a great successor to Volume I that contains some fascinating research results. UK gun writer Laurie Holland notes: “Volume II of the Modern Advancements series is as fascinating as Volume I and if anything even more valuable given a series of ‘mythbusters’ tests including: case fill-ratio, primer flash-hole uniforming, neck tension, annealing, and much more. The work also addresses that perennial discussion of a bullet ‘going to sleep’ and shooting smaller groups (in MOA) at longer distances than 100 yards.” The amount of testing done for this Volume II work, with a staggering amount of rounds sent downrange, makes this book unique among shooting resources. There is a ton of “hard science” in this book — not just opinions. |
 |
Top-Grade Ammo
by Glen Zediker, $27.99 (Softcover — Sale at Midsouth)
Glen Zediker’s latest book, Top-Grade Ammo, is a great resource for all hand-loaders — beginners through advanced. This 314-page guide covers every aspect of the reloading process — component sorting, priming, sizing, bullet seating and more. With 430 photos, Top-Grade Ammo is a richly-illustrated, step-by-step guide to producing high-quality handloads. Unlike many reloading books, Top-Grade Ammo is current and up-to-date, so it covers modern practices and the latest precision reloading tools. While Zediker focuses on producing match-grade ammo for competition, this book will also help novice reloaders on a budget. This book features a special “lay-flat” binding so it’s easy to use as a benchtop reference. To view Chapter List and sample pages visit ZedikerPublishing.com. |
 |
Practical Shooter’s Guide
by Marcus Blanchard, $9.99 (Kindle), $19.99 (Softcover)
Thinking of getting started in the Practical/Tactical shooting game? Looking for ways to be more stable when shooting from unconventional positions? Then you may want to read Marcus Blanchard’s Practical Shooter’s Guide (A How-To Approach for Unconventional Firing Positions and Training). Unlike almost every “how to shoot” book on the market, Blanchard’s work focuses on the shooting skills and positions you need to succeed in PRS matches and similar tactical competitions. Blanchard provides clear advice on shooting from barricades, from roof-tops, from steep angles. Blanchard says you need to train for these types of challenges: “I believe the largest factor in the improvement of the average shooter isn’t necessarily the gear; it’s the way the shooter approaches obstacles and how they properly train for them.” |
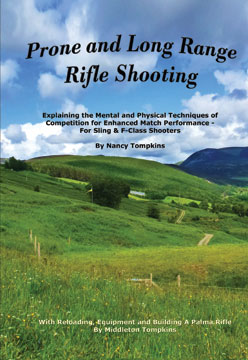 |
Prone and Long Range Rifle Shooting
by Nancy Tompkins, $45.00, (Hardcover, 2d Edition).
Nancy Tompkins is one of the greatest long-range shooters in American history. She has won five National Long-range Championships. Tompkins’ treatise is a must-read for serious Palma, F-Class, and High Power shooters. The revised Second edition includes F-Class equipment and techniques, and newly updated information. Color pictures. Topics include Mental & Physical training, Reading Wind & Mirage Shooting Fundamentals, International Competition, and Loading for Long Range. Nancy Tompkins is a 4-time winner of the National Long Range Championships, and has won countless other major events. Nancy has been on six Palma Teams (as both a shooter and a coach). |
 |
Long Range Shooting Handbook
by Ryan Cleckner, $2.99 (Kindle), $22.46 (Softcover),
Ryan Cleckner is noted for his ability to explain complex topics in an easy-to-comprehend manner. Now Cleckner has authored a book, the Long Range Shooting Handbook, which expands on the topics covered in Cleckner’s popular NSSF video series. The Long Range Shooting Handbook is divided into three main categories: What It Is/How It Works, Fundamentals, and How to Use It. “What It Is/How It Works” covers equipment, terminology, and basic principles. “Fundamentals” covers the theory of long range shooting. “How to Use It” gives practical advice on implementing what you’ve learned, so you can progress as a skilled, long range shooter. You can view Sample Chapters from Ryan’s Book on Amazon.com. |
 |
The Book of Rifle Accuracy
by Tony Boyer, $34.50 (Softcover); $42.50 (Hardcover).
Tony Boyer, the most successful shooter in the history of short-range benchrest competition, shares many of his match-winning tips in this 323-page book. The book covers all aspect of the benchrest discipline: loading, windflags, rest set-up, addressing the rifle, and match strategies. This is a high-quality publication, filled with valuable insights. Every serious benchrest shooter should read Tony’s book. Boyer has dominated registered benchrest in a fashion that will never be duplicated, having amassed 142 U.S. Benchrest Hall of Fame points. The next closest shooter, Allie Euber, has 47 Hall of Fame points. This handsome, full-color book is 323 pages long, with color photos or color illustrations on nearly every page. |
 |
Extreme Rifle Accuracy
by Mike Ratigan, $42.49 (Softcover)
This book should be on the shelf of every short-range benchrest shooter. (Shooters in other disciplines will find the book helpful as well.) Butch Lambert says Mike’s book is “far and away the best Benchrest book written. Very comprehensive, it touches on every aspect of our game.” Mike’s 368-page book is dedicated to getting the most from modern rifle accuracy equipment with an emphasis on shooting 100-200-300 yard group benchrest tournaments. This book covers the most popular hardware plus new equipment offerings are covered, including external mount scopes, actions, triggers, stocks, wind flags, and more. Also covered are rifle handling techniques, note taking, tuning, bullet selection, goals, and match strategies. Mike provides many tips that will help active competitors update their own competitive program. |
 |
The Rifle Shooter
by G. David Tubb, $34.95 (Softcover)
This book by 11-time National High Power Champion David Tubb focuses on position shooting and High Power disciplines. Section One covers fundamentals: position points, natural point of aim, breathing, triggering mechanics and follow-through, sling selection and use, getting started, getting better, avoiding obstacles. Section Two covers mechanics of offhand, sitting, and prone positions. Section Three covers shooting skills, including wind reading and mental preparation. Section Four covers the technical side of shooting, with extensive disuctions of rifle design, load development, reloading barrel maintenance, and rifle fitting. We consider this book a “must-read” for any sling shooter, and there is plenty of good advice for F-Class shooters too. |
 |
Rifle Accuracy Facts
by Harold R. Vaughn, (Softcover and Hardcover, Used Price Varies)
Decades after it was written, Vaughn’s work remains a seminal treatise on accuracy. Vaughn was a serious scientist, working for the Sandia National Laboratories. Many “gun writers” toss out hunches about rifle accuracy. Vaughn, by contrast, did serious empirical testing and statistical analysis. Vaughn wondered why some guns shot well while seemingly identical rifles did not. Rifle Accuracy Facts covers a wide variety of topics, including internal ballistics, chamber design, barrel vibration, bullet imbalance, external ballistics, scope design and more. Writer Boyd Allen notes: “If you are serious about precision shooting, Vaughn’s book belongs in your library.” |
 |
The Wind Book for Rifle Shooters
by Linda Miller & Keith Cunningham, $14.99 (Kindle), $21.99 (Hardback).
Many of our Forum members have recommended The Wind Book for Rifle Shooters by Linda Miller and Keith Cunningham. This 146-page book, first published in 2007, is a very informative resource. But you don’t have to take our word for it. If you click this link, you can read book excerpts on Amazon.com. This lets you preview the first few chapters, and see some illustrations. Other books cover wind reading in a broader discussion of ballistics or long-range shooting. But the Miller & Cunningham book is ALL about wind reading from cover to cover, and that is its strength. The book focuses on real world skills that can help you accurately gauge wind angle, wind velocity, and wind cycles. NOTE: The new Hardback Edition will release in February 2019, but you can pre-order now. |
 |
Bullseye Mind
(Mental Toughness for Sport Shooting)
by Dr. Raymond Prior, $14.00 (Softcover).
Having a Bullseye Mind means thinking in ways that create confidence and consistency, even under pressure. A “must-read” for competitive shooters, Bullseye Mind is a mental training book written specifically for the shooting sports. The book is well-organized, with handy highlighted lists and key “talking points”. Each chapter concludes with examples from a world-class shooters such as: Matt Emmons, 2004 Olympic Gold Medalist; Vincent Hancock, 2-time Olympic Gold Medalist; Jamie Corkish, 2012 Olympic Gold Medalist; Petra Zublasing, 2014 World Champion/ISSF Shooter of the Year; and Nicco Campriani, 2012 Olympic Gold Medalist, 2010 World Champion. This book has earned rave reviews from competitive shooters who found it really helped their “Mental Game”. One recent purchaser states: “This book is as though you had a coach in your back pocket…” |
 |
Cartridges of the World (15th Edition)
by W. Todd Woddard, $19.99 (Kindle), $33.54 (Softcover)
Cartridges of the World (15th Edition, 2016), belongs in every serious gun guy’s library. This massive 680-page reference contains illustrations and basic load data for over 1500 cartridges. If you load for a wide variety of cartridges, or are a cartridge collector, this book is a “must-have” resource. The latest edition includes 50 new cartridges and boasts 1500+ photos. The 15th Edition of Cartridges of the World includes cartridge specs, plus tech articles on Cartridge identification, SAAMI guidelines, wildcatting, and new cartridge design trends. In scope and level of detail, Cartridges of the World is the most complete cartridge reference guide in print. Cartridges of the World now includes a 64-page full-color section with feature articles. |
Share the post "Holiday Book Gift Guide — A Dozen GREAT GUN BOOKS"
|


 Flash Consistency is very important, shot to shot. The consistency of every component is important: bullet weights, diameters, case wall thicknesses, and all the way down the list. We’re hoping to get more consistent behavior from a “match” or “benchrest” primer, and we’re paying more for it. I can tell you that some brands that aren’t touted as “match” are already consistent. That all comes from experience: try different primers, just respect the need to initially reduce the load for each test.
 Get Midsouth products HERE


 There’s More to the Story…


 Making Corrections with Limited Sighters


 Glen’s books, Handloading For Competition and Top-Grade Ammo, are available at Midsouth


