Close-up view of a sectioned case. This one here was “fixin’ to pop”, observed Glen Zediker.
Here are highlights from an article Glen Zediker wrote for the Midsouth Blog. In that article Glen, who sadly passed away in 2020, focused on cartridge brass. Glen identified the most common failures that appear with brass that has been shot multiple times, or which has been fired at excessive pressures. Glen explained some simple ways to check your cartridge brass to detect “early warning signs” of case failure, particularly case head separation, which can be very dangerous.
How Cases Degrade with Multiple Firings By Glen Zediker
This article explains when, and then how, to check after the progress of changes commencing with the firing on a new case. It’s the “progress of degeneration,” in a way of looking at it because the concern is getting a handle on when enough change in the brass has come about to require attention. Or abandonment. As said then, for me that’s 4 firings. That, as said last time, is when I might see changes that need attention. Also as said, that figure didn’t come out of a hat, but from my own notes in running my competition NRA High Power Rifle loads. [Editor’s Note: With Lapua brass, using moderate loads, in bolt-action rifles, we typically get about 10 good (match-worthy) firings. But if you anneal your Lapua brass, and run modest pressures, Lapua brass can perform well for 20 or more load cycles.]
The areas most affected are the case neck and case head area. Case neck walls get thicker [but] the case head area body walls get thinner. Primer pockets get shallower and larger diameter.
This case shows a cracked neck AND a crack (separation) above the case head. Zediker says it is “rare to see one case with both of the most common failures. [This case] was attacked by an M14.”
Case Head — Causes of Separation and Cracking
When a case is under pressure during firing, the brass, like water, flows where it can, where it’s more free to move. Of course, the chamber steel limits the amount it can expand. The case shoulder blows fully forward and the case base is slammed back against the bolt face. There is, therefore and in effect, a tug on both ends — it gets stretched. The shoulder area is relatively free to expand to conform to the chamber, but the other end, the case head area, is not. Since that’s the area of the case with the thickest walls, it doesn’t expand “out” much at all. What it does is stretch. The “case head area,” as I refer to it here, is the portion of the case above the web, which is just above the taper that leads in to the extractor groove. The “area” extends approximately an eighth-inch up the case body.
Here’s a “pressure ring.” You’ll see this after firing, if you see it. And, if you see it, that case is done. The bright ring indicates excessive stretching, which indicates excessive thinning. If you see a ring circling the case, noticeable because it’s lighter color than the case body, and it’s in this area, I’d say that case is done. And that’s right where a “head separation” occurs. It can crack and also blow slap in two, and that’s the “separation” part of case head separation.
Photo courtesy GS Arizona.
This is a spot to keep close watch on as cases age. It is also the area that is more “protected” by sizing with less case shoulder set-back. That is, pretty much, where the freedom for the stretching movement in this area comes from (the case shoulder creates a gap). If you’re seeing a sign that a head separation [might happen with relatively few firings], chances are the shoulder set-back is excessive, and also… the load pressure level.
Bent Paper Clip Case-Wall Gauge
Editor: You can use a bent paper clip to detect potential case wall problems. Slide the paper clip inside your case to check for thin spots. GS Arizona explains: “This simple little tool (bent paper clip) will let you check the inside of cases before you reload them. The thin spot will be immediately apparent as you run the clip up the inside of the case. If you’re seeing a shiny line on the outside and the clip is really hitting a thin spot inside, it’s time to retire the case.” Photo by GS Arizona.
Monitor Primer Pocket Dimensional Changes
Another case-head-area and pressure-related check is the primer pocket. As said, the primer pocket will get larger in diameter and shallower in depth each firing. As with many such things, the questions are “when” and “how much,” and the main thing, “how much?”
If the pocket gets excessively shallow, and that’s judged by a primer that seats fully but isn’t at least a tick below flush with the case base, there could be function issues. There’s a risk of a “slam-fire” with a semi-auto that uses a floating firing pin, and, if there is actual protrusion, that has the same effect as insufficient headspace. A primer pocket uniformer can reset the depth of a shallowed primer pocket to what it should be, but the real test for me is how easily the next primer seats into it. If it’s significantly less resistance, I’ll say that case is done. Shallower can be refurbished. That’s a primary function of a primer pocket uniformer. Larger diameter, though, can’t be fixed. I’ve mentioned in another article or two that, any more at least, my main gauge of load pressure has become how much primer pocket expansion there’s been.
The anvil is the tripod-shaped thin metal piece protruding above the bottom of the primer cup. Getting the primer sitting fully flush on the bottom of the case primer pocket, without crunching it too much, requires some keen feel for the progress of primer seating.
Sadly, Glen Zediker passed away in October 2020. However, his insights live on through his written works. This feature is based on Glen’s popular reloading books and his articles for the Midsouth Blog.
In two informative Midsouth Blog articles, Glen Zediker offered helpful advice on priming. First he examines what happens to the primer itself as it is seated in the cup. Glen explains why some “crush” is important, and why you never want to leave a high primer. Glen also reviews a variety of priming tools, including his favorite — the Forster Co-Ax Bench Primer Seater. Then he offers some key safety tips. Glen provides some “rock-solid” advice about the priming operation. These reloading tips came from Glen Zediker’s popular book, Top-Grade Ammo.
Priming Precision vs. Speed
Glen writes: “The better priming tools have less leverage. That is so we can feel the progress of that relatively very small span of depth between start and finish. There is also a balance between precision and speed in tool choices, as there so often is.”
Benchtop Priming Tools — The Forster Co-Ax
Glen thinks that the best choice among priming options, considering both “feel” and productivity, may be the benchtop stand-alone priming stations: “They are faster than hand tools, and can be had with more or less leverage engineered into them. I like the one shown below the best because its feeding is reliable and its feel is more than good enough to do a ‘perfect’ primer seat. It’s the best balance I’ve found between speed and precision.”
Load Tuning and Primers
Glen cautions that you should always reduce your load when you switch to a new, not-yet-tested primer type: “The primer is, in my experience, the greatest variable that can change the performance of a load combination, which is mostly to say ‘pressure’. Never (never ever) switch primer brands without backing off the propellant charge and proving to yourself how far to take it back up, or to even back it off more. I back off one full grain of propellant [when I] try a different primer brand.”
Priming Safety Tips by Zediker
1. Get a good primer “flip” tray for use in filling the feeding magazine tubes associated with some systems. Make double-damn sure each primer is fed right side up (or down, depending on your perspective). A common cause of unintentional detonation is attempting to overfill a stuffed feeding tube magazine, so count and watch your progress.
2. Don’t attempt to seat a high primer more deeply on a finished round. The pressure needed to overcome the inertia to re-initiate movement may be enough to detonate it.
3. Don’t punch out a live primer! That can result in an impressive fright. To kill a primer, squirt or spray a little light oil into its open end. That renders the compound inert.
4. Keep the priming tool cup clean. That’s the little piece that the primer sits down into. Any little shard of brass can become a firing pin! It’s happened!
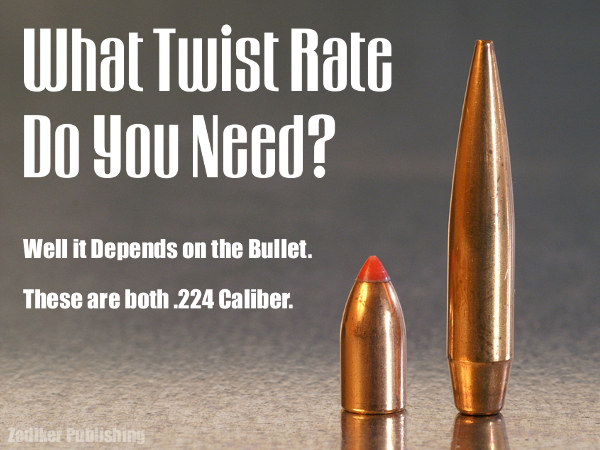
Here’s an extreme range of .224-Caliber bullets: 35gr varmint bullet and 90gr match bullet. Of course, along with bullet length/design, you need to consider MV when choosing twist rate.
Even with the same caliber (and same bullet weight), different bullet types may require different rates of spin to stabilize properly. The bullet’s initial spin rate (RPM) is a function of the bullet’s muzzle velocity and the spin imparted by the rifling in the barrel. You want to ensure your bullet is stable throughout flight. It is better to have too much spin than too little, according to many ballistics experts, including Bryan Litz of Applied Ballistics. The late Glen Zediker put together some basic tips concerning barrel twist rates and bullet stability. These come from Glen’s book, Top Grade Ammo.
Choosing the Right Twist Rate
I’d always rather have a twist too fast than not fast enough. Generally… I recommend erring toward the faster side of a barrel twist decision. 1:8″ twist is becoming a “new standard” for .224 caliber, replacing 1:9″ in the process. The reason is that new bullets tend to be bigger rather than smaller. Don’t let a too-slow twist limit your capacity to [achieve] better long-range performance.
Base your next barrel twist rate decision on the longest, heaviest bullets you choose to use, and at the same time realize that the rate you choose will in turn limit your bullet choices. If the longest, heaviest bullet you’ll shoot (ever) is a 55-grain .224, then there’s honestly no reason not to use a 1:12″. Likewise true for .308-caliber: unless you’re going over 200-grain bullet weight, a 1:10″ will perform perfectly well.
Bullet Length is More Critical than Weight
Bullet length, not weight, [primarily] determines how much rotation is necessary for stability. Twist rate suggestions, though, are most usually given with respect to bullet weight, but that’s more of a generality for convenience’s sake, I think. The reason is that with the introduction of higher-ballistic-coefficient bullet designs, which are longer than conventional forms, it is easily possible to have two same-weight bullets that won’t both stabilize from the same twist rate.
Evidence of Instability
The tell-tale for an unstable (wobbling or tumbling) bullet is an oblong hole in the target paper, a “keyhole,” and that means the bullet contacted the target at some attitude other than nose-first.
Increasing Barrel Length Can Deliver More Velocity, But That May Still Not Provide Enough Stability if the Twist Rate Is Too Slow
Bullet speed and barrel length have an influence on bullet stability, and a higher muzzle velocity through a longer tube will bring on more effect from the twist, but it’s a little too edgy if a particular bullet stabilizes only when running maximum velocity.
My failed 90-grain .224 experiment is a good example of that: I could get them asleep in a 1:7″ twist, 25-inch barrel, which was chambered in .22 PPC, but could not get them stabilized in a 20-inch 1:7″ .223 Rem. The answer always is to get a twist that’s correct.
These tips were adapted from Glen’s popular 2016 book, Top-Grade Ammo. That work, now getting harder to find, has numerous helpful articles on technical topics. Berger Bullets also has a FREE online Twist Rate Stability Calculator, developed by Applied Ballistics.
Clearance Check — Remove the seating stem and drop a bullet into it. The farther down the ogive or nose-cone the step recess grips the bullet, the better. If it’s only pressing down against the bullet tip, a crooked seat is assured, along with inconsistent seating depth. — Glen Zediker
Some folks acquire a new seating die and then are surprised to find their hand-loads show crooked bullets and/or inconsistent seating depth. The problem could be a mis-match between the bullet and the die’s seating stem. In some case, particularly with long, streamlined bullets, the bullet tip can actually touch the bottom inside of the stem. This can cause a variety of problems, as Glen Zediker explains…
Invest in a Good Seating Die Reloading Tip by Glen Zediker
The bullet seating operation is the “last thing” that happens and it’s also the one thing that can corrupt the care and treatment given to the quality of the loaded round prior. A sleeve-style seater, well-machined, goes a whopping long ways toward preserving alignment, and, therefore, concentricity. Also make sure that the stem in yours comes to rest well down onto the bullet ogive, and, above all else, is not contacting the bullet tip! That will wreck a round.
If you have this problem, you should contact the die maker — some will offer a different seating stem expressly designed for longer, pointier bullets. This “long bullet stem” will normally drop right into your existing die. If you plan to run long, VLD-style bullets you should request the special seating stem right from the get-go.
NOTE: Glen Zediker passed away in October 2020. He will be missed — his books were important additions to the gun world’s knowledge base. This tip comes from Glen’s book, Top-Grade Ammo, now out of print.
The anvil is the tripod-shaped thin metal piece protruding above the bottom of the primer cup. Getting the primer sitting fully flush on the bottom of the case primer pocket, without crunching it too much, requires some keen feel for the progress of primer seating.
In two informative Midsouth Blog articles, the late Glen Zediker* offered helpful advice on priming. First he examined what happens to the primer itself as it is seated in the cup. Glen explained why some “crush” is important, and why you never want to leave a high primer. Glen also reviewed a variety of priming tools, including his favorite — the Forster Co-Ax Bench Primer Seater. Then he offered some key safety tips. Glen provides some “rock-solid” advice about the priming operation. There are many other smart reloading tips in Glen’s excellent Top-Grade Ammo book (now out of print).
Priming Precision vs. Speed
Glen writes: “The better priming tools have less leverage. That is so we can feel the progress of that relatively very small span of depth between start and finish. There is also a balance between precision and speed in tool choices, as there so often is.”
Benchtop Priming Tools — The Forster Co-Ax
Glen thinks that the best choice among priming options, considering both “feel” and productivity, may be the benchtop stand-alone priming stations: “They are faster than hand tools, and can be had with more or less leverage engineered into them. I like the one shown below the best because its feeding is reliable and its feel is more than good enough to do a ‘perfect’ primer seat. It’s the best balance I’ve found between speed and precision.”
Load Tuning and Primers
Glen cautions that you should always reduce your load when you switch to a new, not-yet-tested primer type: “The primer is, in my experience, the greatest variable that can change the performance of a load combination, which is mostly to say ‘pressure’. Never (never ever) switch primer brands without backing off the propellant charge and proving to yourself how far to take it back up, or to even back it off more. I back off one full grain of propellant [when I] try a different primer brand.”
Priming Safety Tips by Zediker
1. Get a good primer “flip” tray for use in filling the feeding magazine tubes associated with some systems. Make double-damn sure each primer is fed right side up (or down, depending on your perspective). A common cause of unintentional detonation is attempting to overfill a stuffed feeding tube magazine, so count and watch your progress.
2. Don’t attempt to seat a high primer more deeply on a finished round. The pressure needed to overcome the inertia to re-initiate movement may be enough to detonate it.
3. Don’t punch out a live primer! That can result in an impressive fright. To kill a primer, squirt or spray a little light oil into its open end. That renders the compound inert.
4. Keep the priming tool cup clean. That’s the little piece that the primer sits down into. Any little shard of brass can become a firing pin! It’s happened!
* Glen Zediker — Sadly, in 2020 Glen Zediker passed away. We covered his career and his accomplishments as a marksman, reloading guru, and gun industry writer in this memorial article: Glen Zediker, 1959-2020, In Memoriam
Close-up view of a sectioned case. This one here was “fixin’ to pop”, observed Glen Zediker.
Here are highlights from an article Glen Zediker wrote for the Midsouth Blog. In that article Glen, who sadly passed away in 2020, focused on cartridge brass. Glen identified the most common failures that appear with brass that has been shot multiple times, or which has been fired at excessive pressures. Glen explained some simple ways to check your cartridge brass to detect “early warning signs” of case failure, particularly case head separation, which can be very dangerous.
How Cases Degrade with Multiple Firings By Glen Zediker
This article explains when, and then how, to check after the progress of changes commencing with the firing on a new case. It’s the “progress of degeneration,” in a way of looking at it because the concern is getting a handle on when enough change in the brass has come about to require attention. Or abandonment. As said then, for me that’s 4 firings. That, as said last time, is when I might see changes that need attention. Also as said, that figure didn’t come out of a hat, but from my own notes in running my competition NRA High Power Rifle loads. [Editor’s Note: With Lapua brass, using moderate loads, in bolt-action rifles, we typically get about 10 good (match-worthy) firings. But if you anneal your Lapua brass, and run modest pressures, Lapua brass can perform well for 20 or more load cycles.]
The areas most affected are the case neck and case head area. Case neck walls get thicker [but] the case head area body walls get thinner. Primer pockets get shallower and larger diameter.
This case shows a cracked neck AND a crack (separation) above the case head. Zediker says it is “rare to see one case with both of the most common failures. [This case] was attacked by an M14.”
Case Head — Causes of Separation and Cracking
When a case is under pressure during firing, the brass, like water, flows where it can, where it’s more free to move. Of course, the chamber steel limits the amount it can expand. The case shoulder blows fully forward and the case base is slammed back against the bolt face. There is, therefore and in effect, a tug on both ends — it gets stretched. The shoulder area is relatively free to expand to conform to the chamber, but the other end, the case head area, is not. Since that’s the area of the case with the thickest walls, it doesn’t expand “out” much at all. What it does is stretch. The “case head area,” as I refer to it here, is the portion of the case above the web, which is just above the taper that leads in to the extractor groove. The “area” extends approximately an eighth-inch up the case body.
Here’s a “pressure ring.” You’ll see this after firing, if you see it. And, if you see it, that case is done. The bright ring indicates excessive stretching, which indicates excessive thinning. If you see a ring circling the case, noticeable because it’s lighter color than the case body, and it’s in this area, I’d say that case is done. And that’s right where a “head separation” occurs. It can crack and also blow slap in two, and that’s the “separation” part of case head separation.
Photo courtesy GS Arizona.
This is a spot to keep close watch on as cases age. It is also the area that is more “protected” by sizing with less case shoulder set-back. That is, pretty much, where the freedom for the stretching movement in this area comes from (the case shoulder creates a gap). If you’re seeing a sign that a head separation [might happen with relatively few firings], chances are the shoulder set-back is excessive, and also… the load pressure level.
Bent Paper Clip Case-Wall Gauge
Editor: You can use a bent paper clip to detect potential case wall problems. Slide the paper clip inside your case to check for thin spots. GS Arizona explains: “This simple little tool (bent paper clip) will let you check the inside of cases before you reload them. The thin spot will be immediately apparent as you run the clip up the inside of the case. If you’re seeing a shiny line on the outside and the clip is really hitting a thin spot inside, it’s time to retire the case.” Photo by GS Arizona.
Monitor Primer Pocket Dimensional Changes
Another case-head-area and pressure-related check is the primer pocket. As said, the primer pocket will get larger in diameter and shallower in depth each firing. As with many such things, the questions are “when” and “how much,” and the main thing, “how much?”
If the pocket gets excessively shallow, and that’s judged by a primer that seats fully but isn’t at least a tick below flush with the case base, there could be function issues. There’s a risk of a “slam-fire” with a semi-auto that uses a floating firing pin, and, if there is actual protrusion, that has the same effect as insufficient headspace. A primer pocket uniformer can reset the depth of a shallowed primer pocket to what it should be, but the real test for me is how easily the next primer seats into it. If it’s significantly less resistance, I’ll say that case is done. Shallower can be refurbished. That’s a primary function of a primer pocket uniformer. Larger diameter, though, can’t be fixed. I’ve mentioned in another article or two that, any more at least, my main gauge of load pressure has become how much primer pocket expansion there’s been.
For this Sunday GunDay article we feature a “blast from the past” — David Tubb’s engineering tour de force, the Tubb 2000, or “T2K” for short. With the remarkable T2K, David earned multiple NRA High Power championships, and David shot the first-ever perfect score in the NRA Long-Range “any sights” championship two decades ago.
Our write-up this week focuses mostly on “hardware” because David’s performance with the rifle speaks for itself. He has won eleven High Power National Championships at Camp Perry, and in 2004 David mounted a scope to his rifle and captured the Long-Range “any sights” Championship with a 1450/1450, the first and only perfect score ever logged at Camp Perry. He did this all with his trusty 6XC-chambered T2K, shooting the DTAC 115gr bullet in a 1:7.5″-twist Schneider P5 barrel. For more information about this remarkable competition rifle, read on.
[Editor’s NOTE: Because this is an article from our older Archives, some technical details may have changed with time. For all specifications on current TUBB rifles visit DavidTubb.com.]
Mag-Feed Action with Unique Bi-Camming Bolt
The action is machined from 17-4 stainless steel to true benchrest quality standards. The design features a solid top with a loading port. This increases action stability, stiffness, and strength. The loading port is easily accessible and is angled to aid the shooter in single loading rounds. The Tubb 2000 is fed via 10- or 20-round box magazines.
“I prefer using 20-round magazines with the Tubb 2000 because it provides a secure hand hold when shooting off the bipod. For across the course competition, the 10-round magazines are the best choice as they do not encumber sling-supported shooting positions. There is no difference in the functioning or reliability of either capacity magazine.”
One-finger Bolt Operation
Low effort bolt operation was a key goal in the design of the Tubb 2000 action. The exclusive bi-camming design employs two cams that engage during bolt lift to radically reduce bolt lift effort. Bolt lift is 75 degrees. The cone-faced bolt has two locking lugs which are narrower and taller than on conventional actions. This design allows the magazine to be mounted higher in the action for smoother, more positive feeding. The bolt handle is designed for superior performance in sustained fire operation. Its ergonomic shape allows operation with a single finger, if desired. The bolt is machined from 8620 carbon steel and rides back into the butt extension, under the shooter’s face so the bolt can be operated without the shooter having to change his head position. This low center of gravity also improves the rifle’s feel and performance under recoil.
The action features a full-length Picatinny rail that will accept Weaver®-style mounts. The action’s adjustable sight mounting system allows the rail to be mounted at one of three pre-set mounting angles — 0, 5, and 10 degrees — to allow the shooter to level the sights to fit his shooting style. A custom base is available to mount match iron sights. All barrels have a small section at the muzzle turned down to accept a clamping-style front sight mount or cant indicator.
The T2K’s Lock Time is ONE millisecond — over three times faster than a Model 70 Winchester.
Barrel Configuration
Tubb 2000 rifles featured hand-lapped stainless steel match barrels with the exclusive “Tubb Contour.” This unique contour maximizes accuracy and minimizes weight — it’s the perfect balance. According to David: “It’s a contour where the barrel wouldn’t shoot one bit better if it was one bit bigger.” The Tubb 2000 was conceived as a “switch barrel” gun — it’s designed to be easily re-barreled by the customer. This feature means that the same rifle can support different calibers and shooting disciplines. Finished barrels in a variety of calibers were available for “do-it-yourself” installations. The gun shown here has a Schneider barrel.
The Tubb 2000 has, over the years, been offered in a variety of chamberings including: .22-250; .243 Winchester; 6mmBR Norma (6BR); 6XC; .260 Remington; 7mm-08; and .308 Winchester. Available accessories include finished barrels, extra 10- or 20-round magazines, cleaning rod guide, adjustable bipods, custom adjustable handstop, fore-end weight rail, and cant indicator.
Trigger, Stock Adjustment and Other Features
The Tubb 2000 uses the superb Anschütz® fully-adjustable two-stage trigger (with safety); one of the finest available to the precision rifleman. This trigger can also be adjusted to provide single-stage operation. The buttstock assembly, forend, buttstock clamping block, and magazine housing, trigger guard assembly are made from 60-series aluminum, hard anodized in the customer’s choice of 6 colors: light and dark teal, purple, red, forest green, and black. (The T2K Tactical (see below) comes in matte black only.) These four parts are each available in any of the listed colors, allowing the purchaser to design his own distinct rifle.
The buttstock is FULLY adjustable for length, height, cant (angle), and offset. The cheekpiece is adjustable for height. An easily accessible knurled wheel allows the shooter to adjust the cheekpiece from the shooting position. Shooter comfort is further augmented by an ergonomic pistol grip. All adjustment features on the Tubb 2000 were designed for easy shooter access. The butt extension, clamping block, shock housing, and buttplate all have index marks to allow the shooter to record and repeat adjustment settings. The tubular fore-end can be rotated and positioned to accommodate the shooter’s preference. An integral accessory rail accepts a custom adjustable handstop or bipod. The fore-end also incorporates a built-in barrel heat wave blocking system which eliminates optical distortion in the sighting plane.”
David Tubb Explains T2K Stock Adjustments
I advocate setting stock length a little longer than most people might. I am a firm believer that it is best to “reach” slightly for the pistol grip as this ensures a strong, secure hold on the rifle. I pull the rifle firmly into my shoulder pocket when shooting offhand, and also prefer to have what I would characterize as very firm contact between rifle butt and shoulder in the sitting and prone positions as well. When using a sling in prone or sitting, stock length (and sling tension) should be great enough so that, at the least, you have to push the buttpad forward with your hand in order to place the stock into the shoulder pocket. My buttstock is shortest offhand and longest prone. If my standing setting is “0”, I’m usually out about 1-1/2 inches for sitting and about another inch for prone. I have found that many people tend to shoot with a stock that’s too long in sitting and too short everywhere else.
I have found the cast off/on adjustment feature on the buttstock to be of great help to me in attaining the natural shooting positions I desire. For prone, I offset the clamping block so the buttplate moves outward [the index mark on the clamp is to the right of center on the scale on the receiver extension tube]. I swing it a little bit inward for offhand and slightly more inward for sitting. The amounts of cast on/off (in clock-face terms) are approximately 6:30 for standing, 4:30 for prone, and 8:00 o’clock for sitting.
Stock Length Adjustment Procedure
The buttstock is adjustable in length 4+ inches. This adjustment is accomplished by moving the buttplate tube in or out after loosening the four screws on the clamping block. Ensure that the buttstock tube is fully contained in the block. The extent of rearward (lengthening) movement is determined by the front of the buttstock tube fitting flush with the front of the block.
Stock Cast and Cant Adjustment Procedure
The buttstock is adjustable for cast or offset by loosening the four screws on the clamping block and swiveling the block on the receiver extension tube. The buttplate itself is adjustable for cant up to 360 degrees and after loosening the screw directly in the center of the rubber recoil pad is adjustable for height at approximately 1-1/2 inches. The cheekpiece is adjustable vertically approximately one inch. The vertical cheekpiece adjustment is accomplished via the top knurled ring. The lower knurled ring will then secure the setting.
About David Tubb — Tubb 2000 Designer
David Tubb is arguably the winningest centerfire rifleman in history. He has won a record eleven NRA National High Power Rifle Championship titles at Camp Perry, along with six NRA Long Range HP Championships. In addition, David is an NRA Silhouette Rifle legend, having won nearly 30 open, individual National Championship titles in all four rifle categories. David has also won seven Sportsmen’s Team Challenge Championships and multiple Wimbledon Cups. Another big win by David was the 2019 NRA ELR Championship in Heavy Gun Class.
For more information on the
Tubb 2000 Rifle contact:
David Tubb Accuracy
and Precision Gun Parts
800 N. 2nd Street
Canadian, TX 79014 DavidTubb.com
Phone: (806) 323-9488
Close-up view of a sectioned case. This one here was “fixin’ to pop”, observed Glen Zediker.
Here are highlights from an article Glen Zediker wrote for the Midsouth Blog. In that article Glen, who sadly passed away in 2020, focused on cartridge brass. Glen identified the most common failures that appear with brass that has been shot multiple times, or which has been fired at excessive pressures. Glen explained some simple ways to check your cartridge brass to detect “early warning signs” of case failure, particularly case head separation, which can be very dangerous.
How Cases Degrade with Multiple Firings By Glen Zediker
This article explains when, and then how, to check after the progress of changes commencing with the firing on a new case. It’s the “progress of degeneration,” in a way of looking at it because the concern is getting a handle on when enough change in the brass has come about to require attention. Or abandonment. As said then, for me that’s 4 firings. That, as said last time, is when I might see changes that need attention. Also as said, that figure didn’t come out of a hat, but from my own notes in running my competition NRA High Power Rifle loads. [Editor’s Note: With Lapua brass, using moderate loads, in bolt-action rifles, we typically get about 10 good (match-worthy) firings. But if you anneal your Lapua brass, and run modest pressures, Lapua brass can perform well for 20 or more load cycles.]
The areas most affected are the case neck and case head area. Case neck walls get thicker [but] the case head area body walls get thinner. Primer pockets get shallower and larger diameter.
This case shows a cracked neck AND a crack (separation) above the case head. Zediker says it is “rare to see one case with both of the most common failures. [This case] was attacked by an M14.”
Case Head — Causes of Separation and Cracking
When a case is under pressure during firing, the brass, like water, flows where it can, where it’s more free to move. Of course, the chamber steel limits the amount it can expand. The case shoulder blows fully forward and the case base is slammed back against the bolt face. There is, therefore and in effect, a tug on both ends — it gets stretched. The shoulder area is relatively free to expand to conform to the chamber, but the other end, the case head area, is not. Since that’s the area of the case with the thickest walls, it doesn’t expand “out” much at all. What it does is stretch. The “case head area,” as I refer to it here, is the portion of the case above the web, which is just above the taper that leads in to the extractor groove. The “area” extends approximately an eighth-inch up the case body.
Here’s a “pressure ring.” You’ll see this after firing, if you see it. And, if you see it, that case is done. The bright ring indicates excessive stretching, which indicates excessive thinning. If you see a ring circling the case, noticeable because it’s lighter color than the case body, and it’s in this area, I’d say that case is done. And that’s right where a “head separation” occurs. It can crack and also blow slap in two, and that’s the “separation” part of case head separation.
Photo courtesy GS Arizona.
This is a spot to keep close watch on as cases age. It is also the area that is more “protected” by sizing with less case shoulder set-back. That is, pretty much, where the freedom for the stretching movement in this area comes from (the case shoulder creates a gap). If you’re seeing a sign that a head separation [might happen with relatively few firings], chances are the shoulder set-back is excessive, and also… the load pressure level.
Bent Paper Clip Case-Wall Gauge
Editor: You can use a bent paper clip to detect potential case wall problems. Slide the paper clip inside your case to check for thin spots. GS Arizona explains: “This simple little tool (bent paper clip) will let you check the inside of cases before you reload them. The thin spot will be immediately apparent as you run the clip up the inside of the case. If you’re seeing a shiny line on the outside and the clip is really hitting a thin spot inside, it’s time to retire the case.” Photo by GS Arizona.
Monitor Primer Pocket Dimensional Changes
Another case-head-area and pressure-related check is the primer pocket. As said, the primer pocket will get larger in diameter and shallower in depth each firing. As with many such things, the questions are “when” and “how much,” and the main thing, “how much?”
If the pocket gets excessively shallow, and that’s judged by a primer that seats fully but isn’t at least a tick below flush with the case base, there could be function issues. There’s a risk of a “slam-fire” with a semi-auto that uses a floating firing pin, and, if there is actual protrusion, that has the same effect as insufficient headspace. A primer pocket uniformer can reset the depth of a shallowed primer pocket to what it should be, but the real test for me is how easily the next primer seats into it. If it’s significantly less resistance, I’ll say that case is done. Shallower can be refurbished. That’s a primary function of a primer pocket uniformer. Larger diameter, though, can’t be fixed. I’ve mentioned in another article or two that, any more at least, my main gauge of load pressure has become how much primer pocket expansion there’s been.
Here’s an extreme range of .224-Caliber bullets: 35gr varmint bullet and 90gr match bullet. Of course, along with bullet length/design, you need to consider MV when choosing twist rate.
Even with the same caliber (and same bullet weight), different bullet types may require different rates of spin to stabilize properly. The bullet’s initial spin rate (RPM) is a function of the bullet’s muzzle velocity and the spin imparted by the rifling in the barrel. You want to ensure your bullet is stable throughout flight. It is better to have too much spin than too little, according to many ballistics experts, including Bryan Litz of Applied Ballistics. The late Glen Zediker put together some basic tips concerning barrel twist rates and bullet stability. These come from Glen’s book, Top Grade Ammo.
Choosing the Right Twist Rate
I’d always rather have a twist too fast than not fast enough. Generally… I recommend erring toward the faster side of a barrel twist decision. 1:8″ twist is becoming a “new standard” for .224 caliber, replacing 1:9″ in the process. The reason is that new bullets tend to be bigger rather than smaller. Don’t let a too-slow twist limit your capacity to [achieve] better long-range performance.
Base your next barrel twist rate decision on the longest, heaviest bullets you choose to use, and at the same time realize that the rate you choose will in turn limit your bullet choices. If the longest, heaviest bullet you’ll shoot (ever) is a 55-grain .224, then there’s honestly no reason not to use a 1:12″. Likewise true for .308-caliber: unless you’re going over 200-grain bullet weight, a 1:10″ will perform perfectly well.
Bullet Length is More Critical than Weight
Bullet length, not weight, [primarily] determines how much rotation is necessary for stability. Twist rate suggestions, though, are most usually given with respect to bullet weight, but that’s more of a generality for convenience’s sake, I think. The reason is that with the introduction of higher-ballistic-coefficient bullet designs, which are longer than conventional forms, it is easily possible to have two same-weight bullets that won’t both stabilize from the same twist rate.
Evidence of Instability
The tell-tale for an unstable (wobbling or tumbling) bullet is an oblong hole in the target paper, a “keyhole,” and that means the bullet contacted the target at some attitude other than nose-first.
Increasing Barrel Length Can Deliver More Velocity, But That May Still Not Provide Enough Stability if the Twist Rate Is Too Slow
Bullet speed and barrel length have an influence on bullet stability, and a higher muzzle velocity through a longer tube will bring on more effect from the twist, but it’s a little too edgy if a particular bullet stabilizes only when running maximum velocity.
My failed 90-grain .224 experiment is a good example of that: I could get them asleep in a 1:7″ twist, 25-inch barrel, which was chambered in .22 PPC, but could not get them stabilized in a 20-inch 1:7″ .223 Rem. The answer always is to get a twist that’s correct.
These tips were adapted from Glen’s popular 2016 book, Top-Grade Ammo That work has numerous helpful articles on technical topics. Berger Bullets also has a FREE online Twist Rate Stability Calculator, developed by Applied Ballistics.


 In two informative Midsouth Blog articles, the late Glen Zediker* offered helpful advice on priming. First he examined what happens to the primer itself as it is seated in the cup. Glen explained why some “crush” is important, and why you never want to leave a high primer. Glen also reviewed a variety of priming tools, including his favorite — the


 Trigger, Stock Adjustment and Other Features


 Stock Cast and Cant Adjustment Procedure


