Close-up view of a sectioned case. This one here was “fixin’ to pop”, observed Glen Zediker.
Here are highlights from an article Glen Zediker wrote for the Midsouth Blog. In that article Glen, who sadly passed away in 2020, focused on cartridge brass. Glen identified the most common failures that appear with brass that has been shot multiple times, or which has been fired at excessive pressures. Glen explained some simple ways to check your cartridge brass to detect “early warning signs” of case failure, particularly case head separation, which can be very dangerous.
How Cases Degrade with Multiple Firings By Glen Zediker
This article explains when, and then how, to check after the progress of changes commencing with the firing on a new case. It’s the “progress of degeneration,” in a way of looking at it because the concern is getting a handle on when enough change in the brass has come about to require attention. Or abandonment. As said then, for me that’s 4 firings. That, as said last time, is when I might see changes that need attention. Also as said, that figure didn’t come out of a hat, but from my own notes in running my competition NRA High Power Rifle loads. [Editor’s Note: With Lapua brass, using moderate loads, in bolt-action rifles, we typically get about 10 good (match-worthy) firings. But if you anneal your Lapua brass, and run modest pressures, Lapua brass can perform well for 20 or more load cycles.]
The areas most affected are the case neck and case head area. Case neck walls get thicker [but] the case head area body walls get thinner. Primer pockets get shallower and larger diameter.
This case shows a cracked neck AND a crack (separation) above the case head. Zediker says it is “rare to see one case with both of the most common failures. [This case] was attacked by an M14.”
Case Head — Causes of Separation and Cracking
When a case is under pressure during firing, the brass, like water, flows where it can, where it’s more free to move. Of course, the chamber steel limits the amount it can expand. The case shoulder blows fully forward and the case base is slammed back against the bolt face. There is, therefore and in effect, a tug on both ends — it gets stretched. The shoulder area is relatively free to expand to conform to the chamber, but the other end, the case head area, is not. Since that’s the area of the case with the thickest walls, it doesn’t expand “out” much at all. What it does is stretch. The “case head area,” as I refer to it here, is the portion of the case above the web, which is just above the taper that leads in to the extractor groove. The “area” extends approximately an eighth-inch up the case body.
Here’s a “pressure ring.” You’ll see this after firing, if you see it. And, if you see it, that case is done. The bright ring indicates excessive stretching, which indicates excessive thinning. If you see a ring circling the case, noticeable because it’s lighter color than the case body, and it’s in this area, I’d say that case is done. And that’s right where a “head separation” occurs. It can crack and also blow slap in two, and that’s the “separation” part of case head separation.
Photo courtesy GS Arizona.
This is a spot to keep close watch on as cases age. It is also the area that is more “protected” by sizing with less case shoulder set-back. That is, pretty much, where the freedom for the stretching movement in this area comes from (the case shoulder creates a gap). If you’re seeing a sign that a head separation [might happen with relatively few firings], chances are the shoulder set-back is excessive, and also… the load pressure level.
Bent Paper Clip Case-Wall Gauge
Editor: You can use a bent paper clip to detect potential case wall problems. Slide the paper clip inside your case to check for thin spots. GS Arizona explains: “This simple little tool (bent paper clip) will let you check the inside of cases before you reload them. The thin spot will be immediately apparent as you run the clip up the inside of the case. If you’re seeing a shiny line on the outside and the clip is really hitting a thin spot inside, it’s time to retire the case.” Photo by GS Arizona.
Monitor Primer Pocket Dimensional Changes
Another case-head-area and pressure-related check is the primer pocket. As said, the primer pocket will get larger in diameter and shallower in depth each firing. As with many such things, the questions are “when” and “how much,” and the main thing, “how much?”
If the pocket gets excessively shallow, and that’s judged by a primer that seats fully but isn’t at least a tick below flush with the case base, there could be function issues. There’s a risk of a “slam-fire” with a semi-auto that uses a floating firing pin, and, if there is actual protrusion, that has the same effect as insufficient headspace. A primer pocket uniformer can reset the depth of a shallowed primer pocket to what it should be, but the real test for me is how easily the next primer seats into it. If it’s significantly less resistance, I’ll say that case is done. Shallower can be refurbished. That’s a primary function of a primer pocket uniformer. Larger diameter, though, can’t be fixed. I’ve mentioned in another article or two that, any more at least, my main gauge of load pressure has become how much primer pocket expansion there’s been.
In the wintertime, it’s common to encounter problems with static electricity when throwing your powder charges. The static can cause powder kernels to cling to the surface of reloading components, and can cause powder clumping. Clumped or sticky powder may make your measure bind or grab in the middle of the cycle, which can throw off your charge weight. Here are a couple simple ways you can minimize the effects of static electricity and improve the consistency of your powder measuring.
Ground Your Powder Measure — If you’re throwing powder charges in the fall or winter and have problems with bridging or sticking powder, use a ground wire. Bullet-smith Victor Johnson (Johnson Precision Bullets) tells us: “I have a 25-foot piece of real small wire with alligator clips on each end. It’s that long so I can run it down the hall to a water pipe. Use the wire tie from a bread bag to hold it in a small roll to put in the range box. When using it at the range use a 6″ nail from the co-op or Lowe’s / Home Depot and just push it into the ground.”
Use Bounce Dryer Sheets — A quick pass with the thin sheets used in dryers will eliminate “static cling” on your plastic reloading parts like powder throwers, powder funnels, and reloading press guides. Thanks to Doc76251 for this tip.
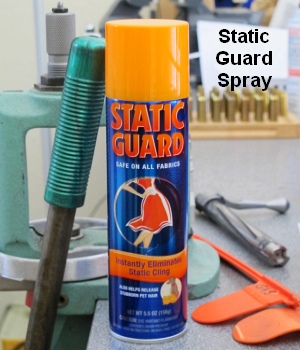
Reduce Electronic Scales’ Drift with Anti-Static Spray
Very sadly, GS Arizona, the creator of the Rifleman’s Journal website, passed away unexpectedly in June of 2022. Here is one of the many great tips he provided to handloaders through that website.
Apparently reducing static charges on and around electronic scales can reduce their propensity to drift, lessening the problem of “wandering zero”. Just how and why static charges interfere with scale performance is unclear, but many shooters have noticed that static electricity can cause electronic scales to behave strangely. So how do you reduce static charges around your digital balance? GS Arizona has found a very simple solution — an anti-static aerosol spray — that, by all indications, actually works. When this “spray-can solution” was suggested by a fellow shooter, GS was skeptical. However, he tried the stuff and he says that it really does help the scale maintain zero over time, with much less observed drift.
GS explains that the use of “Static Guard” spray helped mitigate the problem of a drifting zero on his Ohaus electronic scale: “My electronic scale… suffers from drifting zero (as they all seem to). I’ve read dozens of forum posts about drift and how to minimize its occurrence, so I know this problem isn’t limited to my scale or my workshop. Sometime last year, John Lowther mentioned the use of anti-static spray as a solution to the drift problem. John stated that the spray had virtually eliminated drift for him.”
GS found that the Static Guard actually worked: “The spray works great, just as John said it would. I spray all surfaces that I touch with my hands and arms as well as the pan (top and bottom), the metal tray on which the pan rests and the table under the scale. In six months or so of using the spray I’ve re-applied it about two or three times; it certainly isn’t something that you need to do each time you sit down to load. Before using the spray, it was not uncommon for me to re-zero the scale 10 times in the course of loading 72 rounds; now it might need it once during a session.”
Close-up view of a sectioned case. This one here was “fixin’ to pop”, observed Glen Zediker.
Here are highlights from an article Glen Zediker wrote for the Midsouth Blog. In that article Glen, who sadly passed away in 2020, focused on cartridge brass. Glen identified the most common failures that appear with brass that has been shot multiple times, or which has been fired at excessive pressures. Glen explained some simple ways to check your cartridge brass to detect “early warning signs” of case failure, particularly case head separation, which can be very dangerous.
How Cases Degrade with Multiple Firings By Glen Zediker
This article explains when, and then how, to check after the progress of changes commencing with the firing on a new case. It’s the “progress of degeneration,” in a way of looking at it because the concern is getting a handle on when enough change in the brass has come about to require attention. Or abandonment. As said then, for me that’s 4 firings. That, as said last time, is when I might see changes that need attention. Also as said, that figure didn’t come out of a hat, but from my own notes in running my competition NRA High Power Rifle loads. [Editor’s Note: With Lapua brass, using moderate loads, in bolt-action rifles, we typically get about 10 good (match-worthy) firings. But if you anneal your Lapua brass, and run modest pressures, Lapua brass can perform well for 20 or more load cycles.]
The areas most affected are the case neck and case head area. Case neck walls get thicker [but] the case head area body walls get thinner. Primer pockets get shallower and larger diameter.
This case shows a cracked neck AND a crack (separation) above the case head. Zediker says it is “rare to see one case with both of the most common failures. [This case] was attacked by an M14.”
Case Head — Causes of Separation and Cracking
When a case is under pressure during firing, the brass, like water, flows where it can, where it’s more free to move. Of course, the chamber steel limits the amount it can expand. The case shoulder blows fully forward and the case base is slammed back against the bolt face. There is, therefore and in effect, a tug on both ends — it gets stretched. The shoulder area is relatively free to expand to conform to the chamber, but the other end, the case head area, is not. Since that’s the area of the case with the thickest walls, it doesn’t expand “out” much at all. What it does is stretch. The “case head area,” as I refer to it here, is the portion of the case above the web, which is just above the taper that leads in to the extractor groove. The “area” extends approximately an eighth-inch up the case body.
Here’s a “pressure ring.” You’ll see this after firing, if you see it. And, if you see it, that case is done. The bright ring indicates excessive stretching, which indicates excessive thinning. If you see a ring circling the case, noticeable because it’s lighter color than the case body, and it’s in this area, I’d say that case is done. And that’s right where a “head separation” occurs. It can crack and also blow slap in two, and that’s the “separation” part of case head separation.
Photo courtesy GS Arizona.
This is a spot to keep close watch on as cases age. It is also the area that is more “protected” by sizing with less case shoulder set-back. That is, pretty much, where the freedom for the stretching movement in this area comes from (the case shoulder creates a gap). If you’re seeing a sign that a head separation [might happen with relatively few firings], chances are the shoulder set-back is excessive, and also… the load pressure level.
Bent Paper Clip Case-Wall Gauge
Editor: You can use a bent paper clip to detect potential case wall problems. Slide the paper clip inside your case to check for thin spots. GS Arizona explains: “This simple little tool (bent paper clip) will let you check the inside of cases before you reload them. The thin spot will be immediately apparent as you run the clip up the inside of the case. If you’re seeing a shiny line on the outside and the clip is really hitting a thin spot inside, it’s time to retire the case.” Photo by GS Arizona.
Monitor Primer Pocket Dimensional Changes
Another case-head-area and pressure-related check is the primer pocket. As said, the primer pocket will get larger in diameter and shallower in depth each firing. As with many such things, the questions are “when” and “how much,” and the main thing, “how much?”
If the pocket gets excessively shallow, and that’s judged by a primer that seats fully but isn’t at least a tick below flush with the case base, there could be function issues. There’s a risk of a “slam-fire” with a semi-auto that uses a floating firing pin, and, if there is actual protrusion, that has the same effect as insufficient headspace. A primer pocket uniformer can reset the depth of a shallowed primer pocket to what it should be, but the real test for me is how easily the next primer seats into it. If it’s significantly less resistance, I’ll say that case is done. Shallower can be refurbished. That’s a primary function of a primer pocket uniformer. Larger diameter, though, can’t be fixed. I’ve mentioned in another article or two that, any more at least, my main gauge of load pressure has become how much primer pocket expansion there’s been.
On our main AccurateShooter.com site, you’ll find a good article by GS Arizona on the Basics of Neck Turning. If you’re new to the neck-turning game, or are just looking for good tips on improving your neck-turning procedures, you should read that article. Below we offer some highlights and photos from the article, but you’ll need to read the whole story to view all the illustrations and follow all the procedures step by step.
Why Should You Consider Neck Turning?
Let’s assume that your rifle doesn’t have a tight neck chamber that requires neck turning; if you have a tight neck chamber, of course, the answer to the question is “because you have to”. For the rest of us, and that includes the vast majority of Highpower shooters, neck turning isn’t a requirement, but it can be a useful way to bring your ammunition a small but meaningful step closer to that pot of gold at the end of the rainbow: perfection. I’m not talking about a theoretical improvement, but a real one, an improvement that lies in equalizing and optimizing the neck tension of your loaded rounds. Inconsistent neck tension is a real contributor to increased muzzle velocity variance which itself is a significant factor in increased elevation dispersion at long range. So there’s our basic reason for neck turning: to equalize and optimize neck tension in order to reduce elevation dispersion.
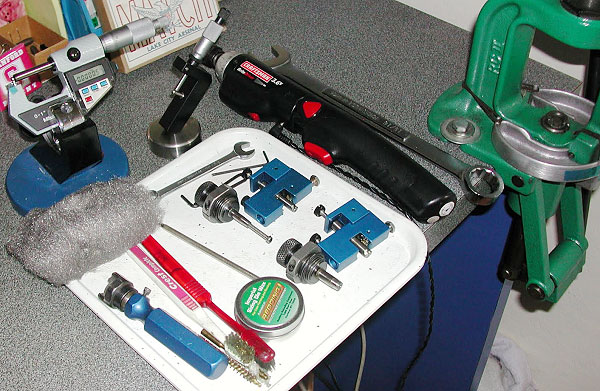
The Tools of the Trade
Here you see everything I use and a bit more. The press, a cordless screwdriver (always plugged in, turning is tough on the old battery), a couple of K&M neck turners (one set up for 6mm, the other for .30 caliber) an expander for each size, some Imperial lube, an old toothbrush or two to keep the cutter clean, a handle with a caseholder (for those emergencies when the screwdriver dies and there’s just one more case to go!), steel wool and a tubing micrometer finish the list of tools. Hey, I left the dial calipers out of the picture! They’re always handy, keep them around, but they are useless for measuring neck thickness, so don’t try. I usually use an Optivisor magnifier while I turn necks, very handy for a clear view of what’s happening on the neck.
Expanding the Neck
Put some lube on the inside of the case neck and run it into the expander. Really, this isn’t hard. I prefer to expand each case immediately before turning it as opposed to expanding all the cases and then turning them. Brass is somewhat springy and will tend to go back toward its original size; therefore, by expanding and turning immediately, you are more likely to have all cases fit the mandrel with the same degree of tightness and to get a more consistent depth of cut.
Cutter Adjustment for Cut Depth and Length
All the tools I’ve seen have pretty good adjustment instructions. The only thing they don’t tell you is that you should have five to ten spare cases to get it right initially. Anything of the right diameter will do while you learn, for instance, just use that cheap surplus .308 brass to do initial setup and save the precious .30-06 for when you know what you’re doing. Be patient and make your adjustments slowly; you’ll need to set the cutter for thickness as well as length of cut (just into the shoulder). The depth of cut (brass thickness) takes a bit of fiddling, the length of the cut is generally easy to set.
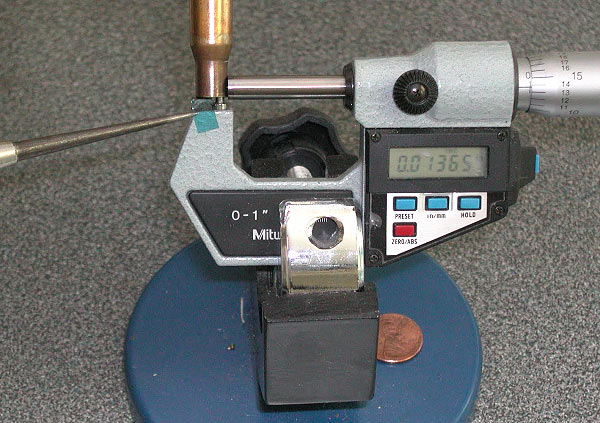
The Finished Product — A Perfectly Uniform Neck
If you read the whole article, and follow the procedures using quality tools, you should get very good results — with a little practice. To demonstrate, here’s an example of my finished, neck-turned brass. You’ll see there is a perfect, 0.0125″ thick neck. It’s very uniform around the circumference, usually I only see 1 or 2 ten-thousandths variance. Now, with the necks uniformed like this, we can select the bushing size that will give us our preferred neck tension and experiment with various levels of tension, secure in the knowledge that all of the cases will actually have the desired neck tension.
About the author — “GS Arizona” was the writing handle for German Salazar, a top-tier rifleman and gun writer. Sadly, German passed from a medical condition in 2022. German was instrumental in helping this website and our Forum get started, and we remember him as a very dear, valued friend.
German was a great individual, and a great asset to the sport. An attorney by trade, with an engineering background, German was one of the very best gun writers, who had high master shooting skills to match his writing abilities.
On our main AccurateShooter.com site, you’ll find a good article by GS Arizona on the Basics of Neck Turning. If you’re new to the neck-turning game, or are just looking for good tips on improving your neck-turning procedures, you should read that article. Below we offer some highlights and photos from the article, but you’ll need to read the whole story to view all the illustrations and follow all the procedures step by step.
Why Should You Consider Neck Turning?
Let’s assume that your rifle doesn’t have a tight neck chamber that requires neck turning; if you have a tight neck chamber, of course, the answer to the question is “because you have to”. For the rest of us, and that includes the vast majority of Highpower shooters, neck turning isn’t a requirement, but it can be a useful way to bring your ammunition a small but meaningful step closer to that pot of gold at the end of the rainbow: perfection. I’m not talking about a theoretical improvement, but a real one, an improvement that lies in equalizing and optimizing the neck tension of your loaded rounds. Inconsistent neck tension is a real contributor to increased muzzle velocity variance which itself is a significant factor in increased elevation dispersion at long range. So there’s our basic reason for neck turning: to equalize and optimize neck tension in order to reduce elevation dispersion.
The Tools of the Trade
Here you see everything I use and a bit more. The press, a cordless screwdriver (always plugged in, turning is tough on the old battery), a couple of K&M neck turners (one set up for 6mm, the other for .30 caliber) an expander for each size, some Imperial lube, an old toothbrush or two to keep the cutter clean, a handle with a caseholder (for those emergencies when the screwdriver dies and there’s just one more case to go!), steel wool and a tubing micrometer finish the list of tools. Hey, I left the dial calipers out of the picture! They’re always handy, keep them around, but they are useless for measuring neck thickness, so don’t try. I usually use an Optivisor magnifier while I turn necks, very handy for a clear view of what’s happening on the neck.
Expanding the Neck
Put some lube on the inside of the case neck and run it into the expander. Really, this isn’t hard. I prefer to expand each case immediately before turning it as opposed to expanding all the cases and then turning them. Brass is somewhat springy and will tend to go back toward its original size; therefore, by expanding and turning immediately, you are more likely to have all cases fit the mandrel with the same degree of tightness and to get a more consistent depth of cut.
Cutter Adjustment for Cut Depth and Length
All the tools I’ve seen have pretty good adjustment instructions. The only thing they don’t tell you is that you should have five to ten spare cases to get it right initially. Anything of the right diameter will do while you learn, for instance, just use that cheap surplus .308 brass to do initial setup and save the precious .30-06 for when you know what you’re doing. Be patient and make your adjustments slowly; you’ll need to set the cutter for thickness as well as length of cut (just into the shoulder). The depth of cut (brass thickness) takes a bit of fiddling, the length of the cut is generally easy to set.
The Finished Product — A Perfectly Uniform Neck
If you read the whole article, and follow the procedures using quality tools, you should get very good results — with a little practice. To demonstrate, here’s an example of my finished, neck-turned brass. You’ll see there is a perfect, 0.0125″ thick neck. It’s very uniform around the circumference, usually I only see 1 or 2 ten-thousandths variance. Now, with the necks uniformed like this, we can select the bushing size that will give us our preferred neck tension and experiment with various levels of tension, secure in the knowledge that all of the cases will actually have the desired neck tension.
About the author — “GS Arizona” was the writing handle for German Salazar, a top-tier rifleman and gun writer. Sadly, German passed from a medical condition in 2022. German was instrumental in helping this website and our Forum get started, and we remember him as a very dear, valued friend.
German was a great individual, and a great asset to the sport. An attorney by trade, with an engineering background, German was one of the very best gun writers, who had high master shooting skills to match his writing abilities.
Close-up view of a sectioned case. This one here was “fixin’ to pop”, observed Glen Zediker.
Here are highlights from an article Glen Zediker wrote for the Midsouth Blog. In that article Glen, who sadly passed away in 2020, focused on cartridge brass. Glen identified the most common failures that appear with brass that has been shot multiple times, or which has been fired at excessive pressures. Glen explained some simple ways to check your cartridge brass to detect “early warning signs” of case failure, particularly case head separation, which can be very dangerous.
How Cases Degrade with Multiple Firings By Glen Zediker
This article explains when, and then how, to check after the progress of changes commencing with the firing on a new case. It’s the “progress of degeneration,” in a way of looking at it because the concern is getting a handle on when enough change in the brass has come about to require attention. Or abandonment. As said then, for me that’s 4 firings. That, as said last time, is when I might see changes that need attention. Also as said, that figure didn’t come out of a hat, but from my own notes in running my competition NRA High Power Rifle loads. [Editor’s Note: With Lapua brass, using moderate loads, in bolt-action rifles, we typically get about 10 good (match-worthy) firings. But if you anneal your Lapua brass, and run modest pressures, Lapua brass can perform well for 20 or more load cycles.]
The areas most affected are the case neck and case head area. Case neck walls get thicker [but] the case head area body walls get thinner. Primer pockets get shallower and larger diameter.
This case shows a cracked neck AND a crack (separation) above the case head. Zediker says it is “rare to see one case with both of the most common failures. [This case] was attacked by an M14.”
Case Head — Causes of Separation and Cracking
When a case is under pressure during firing, the brass, like water, flows where it can, where it’s more free to move. Of course, the chamber steel limits the amount it can expand. The case shoulder blows fully forward and the case base is slammed back against the bolt face. There is, therefore and in effect, a tug on both ends — it gets stretched. The shoulder area is relatively free to expand to conform to the chamber, but the other end, the case head area, is not. Since that’s the area of the case with the thickest walls, it doesn’t expand “out” much at all. What it does is stretch. The “case head area,” as I refer to it here, is the portion of the case above the web, which is just above the taper that leads in to the extractor groove. The “area” extends approximately an eighth-inch up the case body.
Here’s a “pressure ring.” You’ll see this after firing, if you see it. And, if you see it, that case is done. The bright ring indicates excessive stretching, which indicates excessive thinning. If you see a ring circling the case, noticeable because it’s lighter color than the case body, and it’s in this area, I’d say that case is done. And that’s right where a “head separation” occurs. It can crack and also blow slap in two, and that’s the “separation” part of case head separation.
Photo courtesy GS Arizona.
This is a spot to keep close watch on as cases age. It is also the area that is more “protected” by sizing with less case shoulder set-back. That is, pretty much, where the freedom for the stretching movement in this area comes from (the case shoulder creates a gap). If you’re seeing a sign that a head separation [might happen with relatively few firings], chances are the shoulder set-back is excessive, and also… the load pressure level.
Bent Paper Clip Case-Wall Gauge
Editor: You can use a bent paper clip to detect potential case wall problems. Slide the paper clip inside your case to check for thin spots. GS Arizona explains: “This simple little tool (bent paper clip) will let you check the inside of cases before you reload them. The thin spot will be immediately apparent as you run the clip up the inside of the case. If you’re seeing a shiny line on the outside and the clip is really hitting a thin spot inside, it’s time to retire the case.” Photo by GS Arizona.
Monitor Primer Pocket Dimensional Changes
Another case-head-area and pressure-related check is the primer pocket. As said, the primer pocket will get larger in diameter and shallower in depth each firing. As with many such things, the questions are “when” and “how much,” and the main thing, “how much?”
If the pocket gets excessively shallow, and that’s judged by a primer that seats fully but isn’t at least a tick below flush with the case base, there could be function issues. There’s a risk of a “slam-fire” with a semi-auto that uses a floating firing pin, and, if there is actual protrusion, that has the same effect as insufficient headspace. A primer pocket uniformer can reset the depth of a shallowed primer pocket to what it should be, but the real test for me is how easily the next primer seats into it. If it’s significantly less resistance, I’ll say that case is done. Shallower can be refurbished. That’s a primary function of a primer pocket uniformer. Larger diameter, though, can’t be fixed. I’ve mentioned in another article or two that, any more at least, my main gauge of load pressure has become how much primer pocket expansion there’s been.
In the wintertime, it’s common to encounter problems with static electricity when throwing your powder charges. The static can cause powder kernels to cling to the surface of reloading components, and can cause powder clumping. Clumped or sticky powder may make your measure bind or grab in the middle of the cycle, which can throw off your charge weight. Here are a couple simple ways you can minimize the effects of static electricity and improve the consistency of your powder measuring.
Ground Your Powder Measure — If you’re throwing powder charges in the fall or winter and have problems with bridging or sticking powder, use a ground wire. Bullet-smith Victor Johnson (Johnson Precision Bullets) tells us: “I have a 25-foot piece of real small wire with alligator clips on each end. It’s that long so I can run it down the hall to a water pipe. Use the wire tie from a bread bag to hold it in a small roll to put in the range box. When using it at the range use a 6″ nail from the co-op or Lowe’s / Home Depot and just push it into the ground.”
Use Bounce Dryer Sheets — A quick pass with the thin sheets used in dryers will eliminate “static cling” on your plastic reloading parts like powder throwers, powder funnels, and reloading press guides. Thanks to Doc76251 for this tip.
Reduce Electronic Scales’ Drift with Anti-Static Spray
Reloading Tip by GS Arizona from Riflemans Journal
Apparently reducing static charges on and around electronic scales can reduce their propensity to drift, lessening the problem of “wandering zero”. Just how and why static charges interfere with scale performance is unclear, but many shooters have noticed that static electricity can cause electronic scales to behave strangely. So how do you reduce static charges around your digital balance? GS Arizona has found a very simple solution — an anti-static aerosol spray — that, by all indications, actually works. When this “spray-can solution” was suggested by a fellow shooter, GS was skeptical. However, he tried the stuff and he says that it really does help the scale maintain zero over time, with much less observed drift.
GS explains that the use of “Static Guard” spray helped mitigate the problem of a drifting zero on his Ohaus electronic scale: “My electronic scale… suffers from drifting zero (as they all seem to). I’ve read dozens of forum posts about drift and how to minimize its occurrence, so I know this problem isn’t limited to my scale or my workshop. Sometime last year, John Lowther mentioned the use of anti-static spray as a solution to the drift problem. John stated that the spray had virtually eliminated drift for him.”
GS found that the Static Guard actually worked: “The spray works great, just as John said it would. I spray all surfaces that I touch with my hands and arms as well as the pan (top and bottom), the metal tray on which the pan rests and the table under the scale. In six months or so of using the spray I’ve re-applied it about two or three times; it certainly isn’t something that you need to do each time you sit down to load. Before using the spray, it was not uncommon for me to re-zero the scale 10 times in the course of loading 72 rounds; now it might need it once during a session.”
The new generation Berger LRHT Match bullets come with Meplat Reduction Technology™ (MRT) for more consistent BCs. Essentially they are “pointed” at the factory. Likewise, many of Sierra’s most popular MatchKing bullets are now factory-pointed in a final production stage. However, for most other bullet types, you can benefit from using a bullet pointing system to make the meplats more consistent.
Gear Review by GS Arizona
This article originally appeared in the Rifleman’s Journal website.
Many of you have doubtlessly read Bryan Litz’s articles in our Daily Bulletin and on his Applied Ballistics website about various current long-range bullets. Bryan’s work carries a great deal of weight in the world of ballistics, so his comments (and mathematical proofs) regarding the benefits of bullet pointing certainly caught my attention. Bullet pointing, like meplat trimming, is an effort to reduce the ballistic inconsistency created by the somewhat jagged tip of the jacket where the bullet forming dies bring it to a point in the manufacturing process. Of course, we could eliminate this problem altogether by shooting closed-tip, open-base bullets like the Lapua D46, but that merely shifts the jacket problem to the other end of the bullet.
In any event, hollow point bullets rule the accuracy world today, so John Whidden, multi-time National Long Range Champion and a talented gunsmith to boot, came up with a very handy tool to let us make those hollow points pointier. Let’s have a look at John’s tool and see how it works.
The Whidden Bullet Pointing Die System uses a Forster bullet seating die body as its basic structure and that’s a good choice given the quality machining Forster does on these. The real heart of the tool comes in two parts: the caliber sleeve and the pointing die that fits inside the sleeve. In fact, to point up different caliber bullets, you only need to change the caliber sleeve, everything else remains the same. The last item is the bullet base that slips into a standard .308 shellholder and supports the bullet as it goes into the die body.
It took me less than five minutes to get everything set up, including changing the caliber sleeve from 6mm to .30 caliber. John’s instruction sheets are well illustrated and clearly written; you should have no problem getting up and running.
Pointing the bullets is as easy as sizing a piece of brass. You can see in the second photo above the difference between a few pointed bullets and a few un-pointed ones. The innermost pointed bullet in the picture was my first attempt and I adjusted the die a little after that, you can see that the others are closed a little more. John even includes a couple of sample bullets so that you can see one done right and one done wrong. That is a nice addition that can help you achieve the desired results.
This YouTube Video Shows the Whidden Bullet Pointing Die in Action
I think Bryan’s work supports the validity of this concept and John’s tool puts it into practice in a simple-to-use manner that makes it just about impossible to do any damage to the bullet. I have shot pointed bullets in various calibers at many matches now. Pointing is not a “miracle cure”, but I believe that pointing bullet tips can produce long-range accuracy gains, through reduced vertical dispersion, for many popular types of match bullets. The Whidden Bullet Pointing Die System retails for $220.00 (with one insert). Additional die inserts are $42.00 each. Extra caliber sleeves are also $42.00. You can purchase directly from Whidden Gunworks, or from Sinclair International.
We are re-publishing this article at the request of Forum members who found the information very valuable. If you haven’t read this Safety Tip before, take a moment to learn how you can inspect your fired brass to determine if there may be a potential for case separation. A case separation can be dangerous, potentially causing serious injury.
On the respected Riflemans’ Journal blog there was an excellent article about Cartridge Case-Head Separation. In this important article, Journal Editor GS Arizona examined the causes of this serious problem and explained the ways you can inspect your brass to minimize the risk of a case-head separation. As cases get fired multiple times and then resized during reloading, the cases can stretch. Typically, there is a point in the lower section of the case where the case-walls thin out. This is your “danger zone” and you need to watch for tell-tale signs of weakening.
The photo below shows a case sectioned so that you can see where the case wall becomes thinner near the web. You can see a little arrow into the soot inside the case pointing to the thinned area. This case hadn’t split yet, but it most likely would do so after one or two more firings.
Paper Clip Hack for Detecting Problems
The article provided a great, easy tip for detecting potential problems. You can use a bent paper clip to detect potential case wall problems. Slide the paper clip inside your case to check for thin spots. GS Arizona explains: “This simple little tool (bent paper clip) will let you check the inside of cases before you reload them. The thin spot will be immediately apparent as you run the clip up the inside of the case. If you’re seeing a shiny line on the outside and the clip is really hitting a thin spot inside, it’s time to retire the case. If you do this every time you reload, on at least 15% of your cases, you’ll develop a good feel for what the thin spot feels like and how it gets worse as the case is reloaded more times. And if you’re loading the night before a match and feel pressured for time — don’t skip this step!”


 Apparently reducing static charges on and around electronic scales can reduce their propensity to drift, lessening the problem of “wandering zero”. Just how and why static charges interfere with scale performance is unclear, but many shooters have noticed that static electricity can cause electronic scales to behave strangely. So how do you reduce static charges around your digital balance? GS Arizona has found a very simple solution — an anti-static aerosol spray — that, by all indications, actually works. When this “spray-can solution” was suggested by a fellow shooter, GS was skeptical. However, he tried the stuff and he says that it really does help the scale maintain zero over time, with much less observed drift.


 Apparently reducing static charges on and around electronic scales can reduce their propensity to drift, lessening the problem of “wandering zero”. Just how and why static charges interfere with scale performance is unclear, but many shooters have noticed that static electricity can cause electronic scales to behave strangely. So how do you reduce static charges around your digital balance? GS Arizona has found a very simple solution — an anti-static aerosol spray — that, by all indications, actually works. When this “spray-can solution” was suggested by a fellow shooter, GS was skeptical. However, he tried the stuff and he says that it really does help the scale maintain zero over time, with much less observed drift.


 On the respected Riflemans’ Journal blog there was an excellent article about Cartridge Case-Head Separation. In this important article, Journal Editor GS Arizona examined the causes of this serious problem and explained the ways you can inspect your brass to minimize the risk of a case-head separation. As cases get fired multiple times and then resized during reloading, the cases can stretch. Typically, there is a point in the lower section of the case where the case-walls thin out. This is your “danger zone” and you need to watch for tell-tale signs of weakening.


