Top to bottom: Remington firing pin assembly with ISS, Tubb SpeedLock alloy-composite system without ISS (current versions have dual, opposite-wound springs), and Remington short action firing pin assembly without ISS.
The U.S. Army Marksmanship Unit regularly publishes technical articles on the USAMU Facebook page. One informative USAMU article covered mechanical issues and related ignition irregularities that can cause vertical fliers even with good ammunition in an otherwise excellent rifle. We highly recommend you read this article, which offers some important tech tips.
Vertical Dispersion: Mechanical/Ignition Issues?
Poor or inconsistent ignition has long been known to be one of the “usual suspects” when one encounters vertical fliers that just shouldn’t be there. By having a sense of some of the basic principles involved, and a few basic areas to check, the shooter may avoid colsiderable frustration, not to mention time, expensive loading components and barrel wear.
Is your well-built rifle of high-quality components plagued with vertical fliers across more than 1-3 handload combinations? Consider the bedding, crown and scope/sight mounts. Are they correct? If so, then you might check for ignition issues before boldly undertaking an extensive, expensive, and quite possibly fruitless quest for the “magic handload”.
SEEING IS BELIEVING: While the author had been aware for many years that poor ignition should be considered and ruled out when dealing with vertical fliers in an otherwise-excellent rifle, actually seeing the problem and its almost instantaneous cure really drove the lesson home.
He was working with a “dot” rifle – a .22 LR match rifle that really stacked bullets into little piles at 50 yards and beyond. With one lot of ELEY Tenex, it produced consistent “bughole” groups at 50, but with another, selected lot of Tenex, similar groups were regularly ruined by single, vertical fliers that did not appear in other rifles. Rather than spending days burning up expensive, select ammunition looking for “magic lots”, he contacted a well-respected rimfire gunsmith and explained the situation.
Without so much as batting an eye, the highly-experienced ‘smith tore into the rifle’s action, and quickly found the cause(s) of the problem. He discovered a demonstrably weak firing pin spring, plus a chip out of the face of the firing pin where it contacted the cartridge rim.
After replacing and tuning the offending parts, the rifle immediately began shooting tiny, bughole groups with the previously “unacceptable” lot of Tenex. Centerfire rifles can also benefit from ensuring positive, consistent ignition. A wise riflesmith is literally worth his weight in gold!
So, what are some issues we as shooters can inspect in our rifles to help determine if ignition woes could be part of our problem? At the club level, ask yourself if that “experienced” Remington, Winchester 70, or even Springfield-based match bolt gun you’re using is still running its’ original 40-80 year-old factory striker spring? If so, a new replacement is cheap insurance against current or future problems. (And BTW, it might be best to stick to the normal, factory-spec spring weight. A super-powerful spring can cause vertical, just as a weak one one can.) Along with that, a routine check for proper firing-pin protrusion is a quick preventive measure that can rule out potential issues.
Other areas to consider are the centering and consistency of the firing pin’s operation in the bolt. Admittedly, with the increasing use of precision-machined custom actions, this is becoming less an issue every day. Below is the firing pin assembly from a custom BAT action:
However, particularly with factory actions, a very quick and easy check is to remove the bolt, let the firing pin go forward, and look at the firing pin tip through the firing pin hole. Is the tip off-center in the hole, and possibly striking it as it moves forward? Is the hole out-of-round or burred from being struck repeatedly? If so, a trip to the riflesmith is likely in order.
Similarly, machining issues in the bolt/firing pin system can lead to rough and erratic firing pin movement, in which the firing pin drags against an internal surface of the bolt. In high-quality rifles these issues are relatively rare, but not unheard-of, and it takes mere minutes to rule them out. It may be worthwhile to remove the cocking piece/firing pin/spring assembly and look for any unusual gouges, dings, peening, burrs or signs of abnormal wear.
This task is especially easy with Winchester 70s, Springfields, and the similar Mauser 98s, involving little more than the push of a button and unscrewing the cocking piece assembly. This is just one of the many reasons these tried-and-true actions have earned such a loyal following in the field, among hunters who must maintain their rifles away from a shop.
Particularly with older rifles, watch for and remove excess grease (or even Cosmoline!) from both the firing pin assembly and inside the bolt. This can help improve firing pin speed and consistency. Other bolt-action designs may need a take-down tool or other measures.
As part of this inspection, AFTER ENSURING THE RIFLE IS UNLOADED, slowly cock the rifle, dry-fire, and repeat several times. Listen carefully near the action for inconsistency in the sounds it generates. Does the striker falling make the same sound each time? Do you hear or feel grinding upon operation? If so, where?
Be sure to check the operation of the cocking piece (bolt shroud), firing pin within the bolt shroud, the cocking piece cam and the rear of the bolt body where the cocking piece cam operates. As with our examination for abnormal wear marks discussed above, look for marks indicating roughness or a possible need for light polishing. Then, clean and lightly grease the bearing surfaces while you’re at it.
Remington 700 bolt shroud and cocking cam
These are relatively easy checks that shooters can undertake to perform a preliminary inspection on their own. Other mechanical issues can also cause ignition issues, chiefly centered around the action of the trigger, sear and sear spring. If these are suspected, a trip to an experienced, qualified riflesmith for diagnosis is recommended. We hope you find this information helpful! Join us again next week, and in the meantime, enjoy the shooting sports safely!
Kevin Muramatsu’s black rifle book, the Gun Digest Guide to Customizing Your AR-15, is a great resource for fans of AR-platform rifles. All the AR options you can imagine are covered: suppressors, premium barrels, adjustable stocks, free-float handguards, ergonomic grips, buffer systems, tactical lights and much more. Those planning an AR rifle build will find application-specific suggestions for 3-Gun, Service Rifle, High Power (Space Gun), Hunting, and Self-Defense use.
Firearms expert Muramatsu offers advice on choosing the right stock/barrel/optics configuration for your particular game. He also discusses the wide variety of options for slings, grips, magazines and other accessories. With over 520 photos, the book includes a large photo gallery of customized ARs, and includes bonus coverage of the FAL and other “tactical” firearms. The Gun Digest Guide to Customizing Your AR-15 is available from Amazon.com (#ad) for $35.95, and a Kindle eBook version is offered for $14.99. The book is also sold by Barnes & Noble, and most other major booksellers.
As an Amazon Associate, this site earns from qualifying purchases.
They say that a man can never have too much money or too much time. Darrell Jones would add that a man can never have too many BR-based rifles. Darrell had a fleet of BRs, in 22 BR, 6mm BR, 6.5 BR, 7 BR, and 30 BR. But he was intrigued by the potential of a rifle in the .257 caliber. Could it shoot as well as a 6mm BR? Could it challenge the more popular calibers in the highly competitive 600-yard benchrest game? Through careful research and component selection, Darrell created a 25 BR rifle that proves the viability of the 25 BR as a competition round. Pushing 115gr high-BC Berger bullets at 2837 fps, Darrell’s 25 BR “Peppermint” won first place in its very first match.
The Barely Bigger BR — Exploring the .25 Caliber Option
Rifle Report by Darrell Jones
I decided to build a 25 BR after several weeks of deliberation and ruling out a .257 Ackley Improved. Part of my dilemma was that I wanted to shoot F-Class competition at 600 yards, and I was unsure about the accuracy potential of the 25 BR. However, I currently have several BRs chambered in 22 BR, 6BR, 6.5 BR, 7 BR, and 30 BR and they all shoot exceptionally well at 600 yards. This lead me to believe a 25 BR should deliver fine accuracy, just like its other BR siblings. Why wouldn’t a 25 BR shoot accurately provided that I built it with the right components? The feasibility saga began. I began searching diligently for custom 25-caliber bullets. Unfortunately, there are not many 25-caliber custom bullet makers. I actually found only two custom bulletsmiths who produce the 25s. I did look at Fowlers and then looked at Bergers. Both Jeff Fowler and Berger made 110-grain flat-base bullets when I was looking. [Editor — this 110gr bullet is no longer listed by Berger]. The Berger 110gr FB bullets (.414 ballistic coefficient) shot very well out of my 12-twist 25-06 Ackley. However, I wanted to shoot a heavier bullet if possible. Berger makes a 25-caliber 115gr VLD boat-tail with a high ballistic coefficient. This needs a 10-twist barrel.
Panda Action, McMillan Stock, Weaver T-36
As you can see, I went with a Panda polished action and a weighted McMillan BR stock painted metallic silver with red candy cane stripes thus the name “Peppermint”. This gun actually does double duty now as a 25 BR and 6 PPC switch barrel. When I want to run the gun as a 6 PPC for short range, I simply screw on the PPC barrel, then swap in a bolt (fitting the PPC bolt face) from another Panda action I own. That’s one advantage of owning custom Kelbly actions! Don’t even think about exchanging bolts between factory guns. Kelbly rings and a Weaver T-36 fixed-power scope handle the optical duties while a Jewell trigger set at one ounce takes care of the firing mechanism.
Chambering for the .25 Caliber BR Wildcat
I wanted a chamber that would let me shoot both the 110s and the 115s. I took some time surfing the net looking for rental reamers that had suitable throat dimensions. I found that Elk Ridge Reamer Rentals had a 25 BR pilot reamer available. I called and Elk Ridge faxed me a reamer diagram that indicated it was designed to tight SAMMI specs. I asked how often was the reamer used and was told “not very often”.
I did want a minimum no-turn neck optimized for Lapua brass. The drawing indicated that the reamer would cut a .281″ neck and a throat of 1.0315″. This was very close to ideal, though I did have to turn two thousandths off the necks of Lapua 6BR brass after I necked it up. I resized using a .277″ bushing and the loaded rounds came out to be .279″. Realizing that this was in the ball park, I decided to go with the Elk Ridge Reamer and build a 25 BR that could shoot 110gr or 115gr bullets. Now the question was where to get a match-grade 25-caliber barrel. I called quite a few of the custom barrel-makers, including BlackStar Barrels in Texas (no longer operating). I have had wonderful success with the BlackStar barrel on my 6BR “Chantilly” — it delivered great accuracy and impressive velocities. Since the 25 BR was so similar, I went with another BlackStar. I ordered a 10-twist, 6-groove, 1.250″-diameter straight-contour tube.
After chambering, the barrel finished at 1.245″ diameter and 27.5″ inches with an 11° crown. I actually had the throat lengthened to accept both Berger 110gr and 115gr bullets. The bases of the FB 110-grainers sit flush with the neck-shoulder junction, when they are seated .010″ into the lands. With the longer 115gr VLDs, the bottom of the bearing surface (i.e. start of boat-tail) is just about even with the neck-shoulder junction.
Accurate Load Development
The barrel broke in easily with just 10 shots, using a “shoot one and clean” process. The load I started with was 31.5 grains of Varget with CCI 450 primers. The Berger 110s and Berger 115s had the same Point of Impact (POI) at 100 yards. However, the 115s impacted two inches higher at 600 yards with the same load. That shows the benefits of a higher BC. Pushed by the CCI 450s and 31.5 grains of Varget, the 115-grainers were running about 2837 FPS. I boosted the load up to 32.0 grains but I noticed primer cratering, so I backed off, settling on 31.5 grains for the 115gr Berger VLD.
Peppermint Wins at 600 Yards
For her debut in competition, I took “Peppermint” to our local 600 yard F-class match. Shooting the Berger 115s with 31.5 grains Varget, she won with a perfect score of 200 with 14 Xs. At my club, we use a SR3 target. The X-Ring measures 3″ in diameter and the 10-Ring measures 7″. At the match there were some very good shooters with top-flight custom rifles in accurate calibers such as 6.5-284 and 22 Dasher. I was very fortunate to come out on top, but I give the credit to Peppermint’s good bench manners and outstanding accuracy.
As you can see from the target, “Peppermint” is a very accurate rifle that has proven herself in competition. It takes a good gun to finish “on top” in her very first match. So far, I’m very happy with the project, and more than satisfied with the accuracy of the 25 BR. This is definitely a worthy cartridge for Egg Shoots, 500m varmint matches, and the 600-yard F-Class game.
BR-Based Cartridge Comparison
CALIBER
22 BR
6mm BR
25 BR
6.5 BR
7 BR
30 BR
Bullet
80gr SMK
107gr SMK
115gr Berger
107gr SMK
130gr SMK
118gr BIB
BC
.420
.527
.522
.420
.391
na
Load Grains
31.0 H4350
30.0 Varget
31.5 Varget
32.0 Varget
34.0 AA2460
34.0 H4198
Barrel Length
27″
27″
27.5″
27.5″
28″
24″
Velocity
3100 fps
2880 fps
2837 fps
2851 fps
2719 fps
2970 fps
Comparing the BR-Based Variants
Now that I have several calibers in the BR cartridge family, (22 BR, 6mm BR, 6.5 BR, 7 BR, and a 30 BR), it is my humble opinion that they each have their own place. A varmint hunter’s dream, the 22 BR can push a bullet faster and more accurately than the 22-250. With an 8-Twist barrel, the 22 BR can send an 80gr SMK to 600 yards with extreme accuracy.
The 6 BR can do it all. The 6mm caliber offers a wide variety of quality bullets suitable for any shooting situation. All the major custom barrel makers produce outstanding 6mm barrels in a full range of twists. Moreover, since the 6 BR cartridge is so popular, there is a great store of knowledge about reloading for the 6 BR. It is easy to find a load that will shoot superbly in any bullet weight.
The 25 BR has proved to be easily tuneable, proficient and not fickle. You can obtain extreme accuracy without great effort in load development. The 115gr Berger offers a good high-BC projectile for this caliber, making the 25 BR a viable alternative to the 6 BR. As I’ve shown, it is competitive with a 6 BR in head to head competition.
Compared to the 25 BR, the 6.5 BR has a small edge in ballistics. However, there are not many light bullet choices available, especially from custom makers. The 123gr Lapua Scenar is an excellent bullet with a .547 stated BC, but it may be a bit heavy for the case capacity.
The 7 BR was designed for silhouette shooting, and it excels at that task. The 7 BR can push a 130 grain bullet fast enough to knock over the steel silhouettes at 500 meters with real consistency.
The 30 BR is nothing less than outstanding. The 30 BR is now the dominant cartridge on the benchrest Score-shooting circuit. It is also highly accurate for group shooting at 200 yards and very capable of winning a 600-yard F-Class match. Barrel life of over 6,000 rounds is realistic.
I like all the “flavors” of BR derived from the 6mm BR Norma case. However, if I could only have one BR in my safe, give me my 8-Twist, 6 BR “Chantilly” and I will be a happy camper. The final point I would make is if a cartridge is stamped BR on the case, it will shoot extremely accurately if you can.
Want to see new-born Pandas? No, not the furry kind — rather Stolle Panda actions produced with state-of-the-art CNC machinery. If you’ve ever wondered how precision benchrest, long-range, and tactical rifles are built, check out video from Kelbly’s. You’ll see actions finished, barrels chambered and crowned, pillars installed in stocks, barreled actions bedded, plus a host of other services performed by Kelbly’s gunsmiths and machinists.
If you’re a fan of fine machine-work, this video should be both informative and entertaining. You can see how precision gun work is done with 21st-Century technology. Tip of the hat to Ian Kelbly and crew for producing this excellent video visit to the Kelbly’s production center.
Click Volume Control to Activate Sound for Kelbly’s Video:
Top to bottom – Remington firing pin assembly with ISS, Tubb SpeedLock alloy-composite system without ISS (current versions have dual, opposite-wound springs), and Remington short action firing pin assembly without ISS.
The U.S. Army Marksmanship Unit regularly publishes technical articles on the USAMU Facebook page. One informative USAMU article covered mechanical issues and related ignition irregularities that can cause vertical fliers even with good ammunition in an otherwise excellent rifle. We highly recommend you read this article, which offers some important tech tips.
Vertical Dispersion: Mechanical/Ignition Issues?
Poor or inconsistent ignition has long been known to be one of the “usual suspects” when one encounters vertical fliers that just shouldn’t be there. By having a sense of some of the basic principles involved, and a few basic areas to check, the shooter may avoid colsiderable frustration, not to mention time, expensive loading components and barrel wear.
Is your well-built rifle of high-quality components plagued with vertical fliers across more than 1-3 handload combinations? Consider the bedding, crown and scope/sight mounts. Are they correct? If so, then you might check for ignition issues before boldly undertaking an extensive, expensive, and quite possibly fruitless quest for the “magic handload”.
SEEING IS BELIEVING: While the author had been aware for many years that poor ignition should be considered and ruled out when dealing with vertical fliers in an otherwise-excellent rifle, actually seeing the problem and its almost instantaneous cure really drove the lesson home.
He was working with a “dot” rifle – a .22 LR match rifle that really stacked bullets into little piles at 50 yards and beyond. With one lot of ELEY Tenex, it produced consistent “bughole” groups at 50, but with another, selected lot of Tenex, similar groups were regularly ruined by single, vertical fliers that did not appear in other rifles. Rather than spending days burning up expensive, select ammunition looking for “magic lots”, he contacted a well-respected rimfire gunsmith and explained the situation.
Without so much as batting an eye, the highly-experienced ‘smith tore into the rifle’s action, and quickly found the cause(s) of the problem. He discovered a demonstrably weak firing pin spring, plus a chip out of the face of the firing pin where it contacted the cartridge rim.
After replacing and tuning the offending parts, the rifle immediately began shooting tiny, bughole groups with the previously “unacceptable” lot of Tenex. Centerfire rifles can also benefit from ensuring positive, consistent ignition. A wise riflesmith is literally worth his weight in gold!
So, what are some issues we as shooters can inspect in our rifles to help determine if ignition woes could be part of our problem? At the club level, ask yourself if that “experienced” Remington, Winchester 70, or even Springfield-based match bolt gun you’re using is still running its’ original 40-80 year-old factory striker spring? If so, a new replacement is cheap insurance against current or future problems. (And BTW, it might be best to stick to the normal, factory-spec spring weight. A super-powerful spring can cause vertical, just as a weak one one can.) Along with that, a routine check for proper firing-pin protrusion is a quick preventive measure that can rule out potential issues.
Other areas to consider are the centering and consistency of the firing pin’s operation in the bolt. Admittedly, with the increasing use of precision-machined custom actions, this is becoming less an issue every day. Below is the firing pin assembly from a custom BAT action:
However, particularly with factory actions, a very quick and easy check is to remove the bolt, let the firing pin go forward, and look at the firing pin tip through the firing pin hole. Is the tip off-center in the hole, and possibly striking it as it moves forward? Is the hole out-of-round or burred from being struck repeatedly? If so, a trip to the riflesmith is likely in order.
Similarly, machining issues in the bolt/firing pin system can lead to rough and erratic firing pin movement, in which the firing pin drags against an internal surface of the bolt. In high-quality rifles these issues are relatively rare, but not unheard-of, and it takes mere minutes to rule them out. It may be worthwhile to remove the cocking piece/firing pin/spring assembly and look for any unusual gouges, dings, peening, burrs or signs of abnormal wear.
This task is especially easy with Winchester 70s, Springfields, and the similar Mauser 98s, involving little more than the push of a button and unscrewing the cocking piece assembly. This is just one of the many reasons these tried-and-true actions have earned such a loyal following in the field, among hunters who must maintain their rifles away from a shop.
Particularly with older rifles, watch for and remove excess grease (or even Cosmoline!) from both the firing pin assembly and inside the bolt. This can help improve firing pin speed and consistency. Other bolt-action designs may need a take-down tool or other measures.
As part of this inspection, AFTER ENSURING THE RIFLE IS UNLOADED, slowly cock the rifle, dry-fire, and repeat several times. Listen carefully near the action for inconsistency in the sounds it generates. Does the striker falling make the same sound each time? Do you hear or feel grinding upon operation? If so, where?
Be sure to check the operation of the cocking piece (bolt shroud), firing pin within the bolt shroud, the cocking piece cam and the rear of the bolt body where the cocking piece cam operates. As with our examination for abnormal wear marks discussed above, look for marks indicating roughness or a possible need for light polishing. Then, clean and lightly grease the bearing surfaces while you’re at it.
Remington 700 bolt shroud and cocking cam
These are relatively easy checks that shooters can undertake to perform a preliminary inspection on their own. Other mechanical issues can also cause ignition issues, chiefly centered around the action of the trigger, sear and sear spring. If these are suspected, a trip to an experienced, qualified riflesmith for diagnosis is recommended. We hope you find this information helpful! Join us again next week, and in the meantime, enjoy the shooting sports safely!
You may have heard the phrase “blueprinting an action”, but do you know what that really means? Do you know what operations are done to an action during the blueprinting process? To help you understand, gunsmith Bill Marr of RifleShooter.com has created a helpful article showing a Rem 700 blueprinting job start to finish. This article spotlights how the procedures can be done with manual tools. Bill, who runs 782 Custom Gunworks Ltd., can also perform many of these operations with modern automated machinery. In fact, Bill has written a follow-up article on Truing a Rem 700 receiver with a Lathe.
Bill explains: “Blue-printing, or truing a rifle action, ensures the receiver face, threads, lugs, bolt lugs, and bolt face are square to the center line of the receiver.” In Bill’s informative article, Bill shows how he blueprints a Remington 700 short action receiver with .308 Win bolt face. He covers the following procedures step by step:
Action Disassembly
Ream Minor Diameter of Receiver Threads
Square the Receiver Lugs
Square the Face of the Receiver
Lap the Bolt Lugs
Square the Bolt Face
We use the bushings to guide the receiver tap. This chases the threads and ensures they are square.
2. Truing the Receiver Face
Using the receiver facing tool, the front of the receiver is trued. The tool is placed over the tap and turned by hand. We used Do Drill to lubricate it.
3. Lapping the Lugs
The bolt lapping tool screws into the front of the action and applies rearward pressure on the bolt face. A little bit of lapping compound is placed on the front of the receiver lugs. The bolt handle is then raised and lowered repeatedly. Note — it is critical that we do not get any lapping compound on any other surfaces.
4. Truing the Bolt Face
On this bolt, the central part of the bolt face was low. After the truing operation, this Rem 700 bolt face is now completely square to the action.
IMPORTANT: Rifleshooter.com states: “This article highlights our project and is presented for information purposes only. This provides an overview of the process and should not be attempted without the guidance and supervision of an experienced gunsmith“.
Here’s a really great video about firearms crafting produced by Beretta, a legendary Italian gun-maker founded in 1526 — nearly 500 years ago. This movie, entitled “Human Technology”, is one of most impressive videos we’ve ever featured on this site. It’s that good. You’ll see an amazing blend of modern technology along with old-world artisanship — “a mesmerizing meld of the high-tech and the traditional”. (Daniel Xu, Outdoor Hub.)
“Human Technology is a singular and symbolic movie, its cast entirely made up of Beretta workmen, thus illustrating the perfect synthesis between craftsmanship and technology,” Beretta writes. This artistic movie by Ancarani Studio illustrates all the aspects of the manufacturing of a high-end Beretta shotgun. This video is a study in contrast. The movements of robotic assembly machines are juxtaposed with the centuries-old craftsmanship of stock carvers. Beautifully filmed and edited, this video should amaze and entertain anyone who loves fine firearms. (Full-screen HD Recommended.)
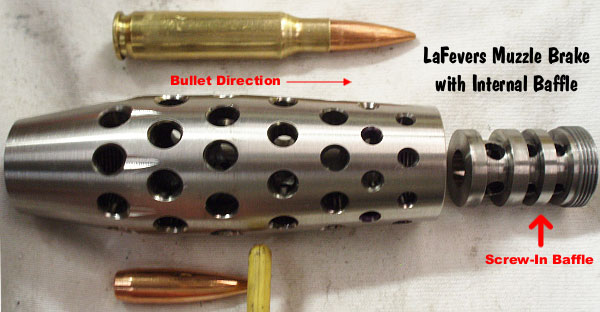
This article features an impressive .308 Winchester tubegun, crafted with an Eliseo (Competition Machine) RTS chassis, Borden action, and 30″ Krieger medium Palma Contour barrel. Owner Mark LaFevers chambered and fitted the barrel and assembled the rifle himself. What’s more, Mark even crafted his own muzzle brake, front/rear bag-riders, and his own, innovative “big-foot” bipod! Mark’s Do-It-Yourself (DIY) tubegun has proven as accurate as it is multi-faceted. Optimized to shoot the 155-grain-class match projectiles, this gun is a tack-driver. This Editor has witnessed the gun repeatedly put 3-round groups into one ragged hole at 100 yards. At 600 yards, the gun has held under 1″ of vertical in competition.
When it comes to versatility, it’s hard to beat a tubegun chambered in .308 Winchester. This rifle system can be used in High Power (Palma) competition, F-TR matches, Long Range Steel Matches, and Tactical Competitions. With the addition of a front sled, a modern tubegun can even be competitive in 600-yard benchrest matches, as demonstrated by Jerry Tierney, who, some years back, won the NBRSA 600-yard Nationals with an Eliseo (Competition Machine) tubegun.
Do-It-All Multi-Discipline .308 Win Tubegun for F-TR, Benchrest, Varmint Matches, Palma, and Tactical Competitions
by Mark LaFevers
The Concept — a ‘Do-It-All .308 Win’
This project began with a wish list developed after shooting in a precision tactical match in 2009. From that experience I knew I wanted a magazine-fed precision bolt gun sporting a high-quality, variable-power scope. I wanted a rifle that could be competitive in a broad range of gun games including tac comps and long-range prone events. If the gun could also double as a medium-range benchrest rig, that would satisfy the needs of the monthly club matches I shoot — a varmint steel silhouette match (shot from the bench), and an F-Class style prone event. I also wanted a gun that could shoot Palma matches someday (when I get around to learning to shoot with iron sights).
Because I like to build things, I’m always looking for projects that offer opportunities to customize and innovate to suit my needs. And because I’m interested in trying different shooting disciplines, I hoped to craft a rifle that could be reconfigured fairly easily to fit various needs. To maximize the gun’s potential, I chose to use only the highest-quality components for every aspect of this project. I planned on building as much of this rifle as I possibly could myself — and that would include chambering and fitting a barrel for the first time. Having much to learn, I would be relying heavily on the expert advice and goodwill of others for the gun’s success.
The Do-It-Yourself Approach — The Appeal of Building Your Own Rifle
Not everyone understands the DIY (do-it-yourself) approach to life. Why would anyone try to smith his own rifle, when he could have it done by competent professionals? There is the imagined prospect of cost savings. However, a home gunsmith may find that, at least initially, it costs more money to do it yourself when all the costs of tooling etc. are calculated. But doing it yourself is not just about saving money. There is a special satisfaction derived from building something with your own hands. For me the relationship between practiced hands, tools, materials, and knowledge of craft is important. The DIY approach surely means different things to different people. For me it’s about the quest for improvement, and an appreciation of the importance of craftmanship in history, and trying to do my part.
Whatever our craft, the fit and function of the things we care about ultimately define us. In this project I felt a responsibility to uphold certain standards. I also was motivated by the desire to give ‘homage’ to my distant relative Daniel M. LeFever, a gun-maker who left his mark on the firearms industry in the 1870s. “Uncle Dan” LeFever crafted high-grade double guns that rivaled the finest European doubles.*
Choosing Components for the .308 Win Tubegun
Looking over the range of suitable equipment, it did not take long to come across Gary Eliseo’s Competition Machine tubegun chassis kit. Initially intrigued by the beauty of the machine work in this aluminum stock, the more I looked the better this platform seemed. Gary’s RTS kit for Remington 700 and Rem clones accepts the proven AICS magazines and offers great stock adjustment flexibility. For more on that subject read German Salazar’s excellent article on Configuring the Eliseo Tubegun Stock.
When I learned that Jim Borden, BordenRifles.com, was building an action designed specifically for the Eliseo tubegun stock, the decision to go this route was made even easier. I had previously had the opportunity to admire close up the Borden action used by our top Club benchrest record holder, and I knew I couldn’t go wrong there. In selecting a trigger group, I knew I wanted a fully adjustable two-stage trigger that could be set for different pull weights for various shooting disciplines. At first glance Jewell seemed to be the obvious choices, but I asked if there were any products that might be better than the Jewell for my purposes. It was suggested that an American-made trigger by CG Jackson might do the trick, so I talked with Tom Myers of X-Treme Shooting Products. Tom’s company offered a fully-adjustable, 2-stage Mod 22 Tactical trigger that fits Remington 700 actions and their clones. It is offered with a fixed or moveable shoe, with or without a safety. I chose the fixed trigger shoe with no safety.
Choosing a Scope
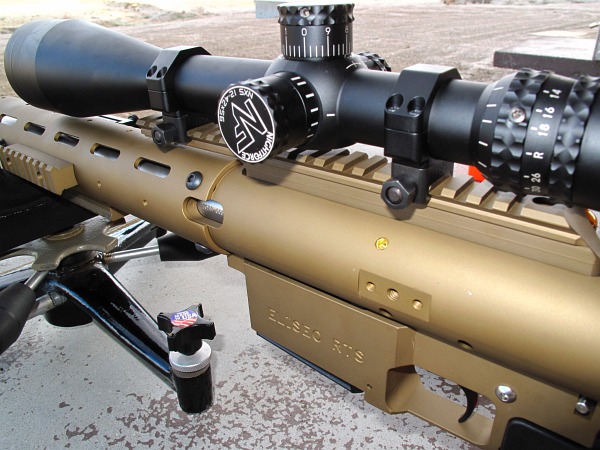
Given my prior positive experiences with Nightforce products, a Nightforce scope was my first choice in optics. But I needed to select between the NXS (side-focus) and BR (front focus) models, and chose a magnification range. Because I wanted to play a variety of gun games from Tactical to Benchrest, it seemed to me that the NXS, with its faster side focus parallax adjustment, would be the more versatile choice. I went with the 12-42x56mm version so that I had plenty of magnification on tap for long-range precision work. I can still dial it back to 12 power for a wider field of view, as needed.
Mark bench-testing the gun during Load Development. The front rest is the superb SEB Neo Co-Axial.
Caliber Choice and Load Development
Choice of Caliber — .308 Win Offers Accuracy, Versatility, Long Barrel Life
Rather than agonize over the many caliber choices, I chose to step back and consider what I thought, in my experience, made winning shooters. Was it the caliber they were shooting or their training, skill and intelligence, that made them winners? While it is true that various calibers do have their specific merits, it is also true that an individual with five times as much training as you is likely to beat you with whatever caliber he or she is using. Case in point being the tactical match that got me started on this project, won by a young Marine shooting a .308 Win. While many other competitors had rifles with “faster, flatter, superior ballistics”, the Marine topped the field through his superior training, natural ability, and the keen edge of youth. With the right trigger puller, .308 Win was clearly still good enough to win this kind of match.
Among the arguments in favor of the .308 Win caliber for this project were:
I had positive previous experience with the .308 and was already set up to reload for it.
Very wide selection of performance-proven bullets.
Some popular disciplines, such as F-TR and International Fullbore, specify .308 Win (7.62×51) as one of the “permitted” chamberings.
Top shooters could provide guidance on .308 load development, and effective shooting techniques.
.308 Win offers long barrel life.
Weighing against the .308 Win were higher component costs and heavier recoil compared to many popular, smaller, mid-distance calibers, such as the 6mmBR, 6 Dasher, 6XC, and 6.5×47 Lapua.
Selecting the Optimal Barrel Configuration for my Bullet Selection
One way of narrowing the field of .308 bullet options is to choose a specific bullet that has performed well for winning shooters, and design the gun around the bullet. The weight of the bullet and its preference for a specific seating depth dictate the twist rate of the barrel and the depth of the chamber, which is also dependent upon whether you choose to single feed or magazine feed. Because I have had very positive experiences with Berger bullets, and becasue Berger Ballistician Bryan Litz was very positive about Berger’s 155.5gr Palma bullet, that was my starting bullet choice for this gun. Because Bryan had great 1000-yard success with a 1:13 twist barrel with the 155.5 bullet, but thought he might go with a 1:12 twist next time, I felt it would be interesting to try a 1:12.5″ twist. Krieger Barrels was able to privde this specific twist rate, and we hoped Krieger’s 5R rifling with a 30″ length would yield a fast barrel. Some extra velocity would help offset the velocity loss I might suffer by being limited to a mag-length COAL. (If I could load longer than mag length I could stuff in more powder and get more velocity.) The Krieger 5R proved a very good choice. From the start the barrel has cleaned up easily, it has delivered awesome accuracy, and it holds very tight elevation at long range. I’ve also been able to achieve very low ES/SD with this Krieger.
Gun Set-Up and Initial Testing
The first break-in of the rifle was done at 100 yards on home turf at the Ojai Valley Gun Club in California. Your Editor and I put 40 rounds through it using Krieger’s recommended break-in procedure. Our impression was that in less than 10 rounds the barrel was ready for competition. I shot the second 10 rounds looking at the performance of the variable muzzle brake I had built. Firing initially with only the one built-in baffle in place, a tremendous amount of gas was still blowing forward, made visually more pronounced by the frosty 29° air. Maximum recoil reduction was achieved adding the front baffle spool, so this is how the brake will be used. On disassembly after firing the forward faces of the baffle spool show descending amounts of powder residue from the gas entry to exit end, with almost no residue at the final baffle wall, showing most of the gas has exited to the side by that point. Attention to precision alignment shows the brake having no adverse effect on accuracy, as the last 20 rounds seated to various depths yielded a couple three-shot, one-hole groups at 100. At the end of the session I was pleased to find that the Krieger barrel cleaned extremely easily. Two wet patches cleared the powder residue and just a little copper showed up at the muzzle end by visual inspection.
The Jim Borden action has a really nice feel when single round loading, and good consistency feeding from the magazine with an authoritative hand. The ejector is very aggressive and will pitch the brass off the bench if it isn’t blocked from escaping. This action cycles very smoothly, and the beautiful workmanship shows even with the tubegun chassis mostly surrounding it.
Mark crafted two front sleds for the gun, one from metal, another from wood (which worked a bit better). Mark notes: “With the wood bag-rider in place the gun became quite stable, and you didn’t notice the high center of gravity so much.” Mark also made his own rear Bag-Rider.
Tubegun Wins First Fun Match
Shortly after breaking in the barrel, I took the gun down to a nearby range to compete in an informal 300- and 400-yard paper competition. I thought it would be fun to test loads while shooting in a club-level fun match. I was getting the best grouping at 44.5 grains of Varget, hotter loads were not doing so well, leading me to believe I needed to work up loads from 44.0 to 44.5 by tenths to find the sweet spot. In the 10-competitor match I squeaked out a win by 1 point. Still, a win is a win!
Load Development
I took the rifle up to the Ojai range at daybreak to run some load variations at 600 yards in still 26° air. I printed targets (sourced from AccurateShooter.com’s FREE Target Page) that had a 1″ red dot within a 5″ grid box. The dot made an excellent aim point at 600 yards. Here the capabilities of the Nightforce 12-42 NXS optic really became apparent. In the exceptionally clear, early morning conditions, I could see the dot AND the bullet holes — all at 600 yards downrange! I had set up my 72-power Meade spotting scope but didn’t use it as the Nightforce scope had more clarity and sharpness. There was no need to go downrange to check the targets, as bullet holes were clearly visible on the targets. This is great because I can make better use of the narrow window of perfect air in the morning, before the sun stirs thermals and mirage.
In this rifle, the Berger 155.5gr Fullbore bullet likes to be seated .010″ off what I’m calling “Max Jam”, using a Hornady OAL length gauge pressing the bullet softly into the lands, so the bullet just barely sticks there when the tool is removed. [Editor’s Note: At his optimal seating depth, Mark’s bullets are still in the lands, just .010″ shy of the max length he can load them without set-back.] The rounds are loaded to 2.850″ OAL to magazine feed. Even though I cut a “no-turn” chamber, I do lightly turn the outside of the case necks to uniform them. I like to look at bullet bearing surface length variations, using a Sinclair comparator body and two .30-cal inserts, one on the nose and the other on the tail of the bullet. With very uniform bullets like the Bergers this method is really only attempting to spot that random outlier bullet that varies in length enough to separate from the group. This is no knock on Berger, just a nod to the challenges of maintaining incredibly tight manufacturing tolerances.
Today’s five shot groups of Varget, jumping by tenths of a grain from 44.0 to 44.5 grains, showed the best grouping to be at 44.1 grains. The hotter loads were breaking the 2900 fps level, but the groups were not as tight as they were at the lower end. At 44.1 grains of Varget the five-shot group had a vertical dispersion of 1.9″ and a horizontal dispersion of 1.25″ at 600 yards, making that a keeper load.
Competition Load Selection and Performance
With a NBRSA 600-yard match fast approaching, I realized that with all the focus on testing I didn’t have enough Lapua brass to shoot the entire match. My solution was to fall back on once-fired Hornady Match brass, with which I have also had excellent luck. So, the day before the NBRSA match, I loaded up the best combinations of the Berger 155.5s with Hornady/Varget, Lapua/Varget, and Hornady/8208 for a final trial, and headed out to a 1000-yard range that’s a two-hour drive from home. Expecting to see the faster IMR 8208 edge out the Varget at this range, I was surprised to see the performance basically identical. With this last minute perspective I decided to shoot the six target NBRSA match using Berger/Hornady/Varget for the first three matches, then Berger/Hornady/8208 for the last three matches when the extra speed might help in a rising afternoon wind.
Match Results
Best results were in Match 1 using 44.0 grains of Varget to push the Berger 155.5 from the Hornady Match brass. Fortunately four bullets flew to a 1.44” group in the blue, unfortunately it was a five-shot match and one bullet flew high left. Excellent promise also showed in Match 6 with the IMR 8208 XBR powder yielding less than an inch of vertical at 600 yards. The lesson I learned from the event was that operator consistency was a much bigger factor than the technical limitations of the hardware or the ammunition. The gun can definitely shoot better than I can hold. I had the opportunity to shoot off a beautiful SEB NEO front rest in this competition. Although I am not a fan yet of joystick controls, this rest performed flawlessly and definitely had a positive effect on performance.
My Overall Impressions of the Project
For use as a benchrest rig, the tubegun provides an interesting challenge, because the pistol grip seems to make the gun much more sensitive to steering errors than a typical low-profile benchrest stock. You have to focus on consistency of grip. A light grip and firm cheek weld combination seems to work well at the bench, but the gun also responds well to a very firm grip and heavy shoulder pressure when fired in the prone position. Building an Eliseo tubegun is a great project and the finished product is a very versatile, fun-to-shoot gun! To encourage others with similar interests, let me just say that the products and components used in this project all get my five-star endorsement, without exception or hesitation.
The biggest challenge with this rifle lies in my own skill development — particularly for tactical matches. If you only have experience with known-distance shooting matches, you’ll need a whole new set of skills to be successful in unknown-distance (UKD) tactical competitions. These UKD matches require high levels of shooting intelligence and training. However, now that I have a rifle that instills confidence, I can work to improve my skills. Overall, I am very happy with the results of this project — the gun has certainly lived up to my expectations. It is rugged, accurate and very adept at “multi-tasking.”
DIY Machining — Chambering My First Barrel
One of my main objectives with this project was to do my own barrel chamber reaming and fit-up work. I had been studying and working from John Hinnants’s excellent book on Precision Rifle Barrel Making, building tools and working with the concepts, and felt myself to be ready to tackle the machining aspects of the project. Having local ace gunsmith Mac Tilton to talk to really helped me understand what would be needed. Greg Tannel’s excellent GreTan DVDs on how to set up a high pressure thru-the-barrel reamer flushing system and align the lathe tailstock properly for precision chamber reaming were invaluable. Greg’s off-the-shelf, hardware-store flow control layout makes the flushing system easy to regulate for other purposes as well. I built the reamer holder Greg describes in his DVD, and it too works well.
I began at everyone’s recommended starting point, which was to recheck the level of my lathe, a Jet 1340 gearhead belt-driven model. To accomplish this I used a precision 12” machinist level from Grizzly Tools. I can’t say the tool was easy to use because the leveling process is tedious as hell, but the level worked very well.
Dave Manson Shares His Reamer Knowledge
In researching which reamer maker to use to create the custom reamer for the Berger 155.5 fullbore bullet, which seems to like about .015″ jump to the lands, I was drawn by name recognition to Dave Manson’s products. In my years of thumbing through Brownells catalogs I was impressed with the thought Dave had put into the development of so many of his tools. During several phone conversations, I greatly benefited from Dave’s experience with chamber tolerances, cutting fluids and reamer modifications specific to thru-the-barrel flushing. To help spec the reamer, I sent Dave a couple dummy rounds built to magazine length so he could make a custom reamer to yield .015” jump and a no-turn neck. In no time I was using the Dave Manson reamer to practice with the flushing system on pieces cut from a take-off barrel, then checking dimensions using Cerrosafe castings. The dimensions were exactly as we had discussed, and I do mean EXACTLY! From the way Dave’s reamer worked in practice chambers, I knew this tool would produce a superior chamber.
Chambering Process with Tailstock DRO
For this project I set up a lathe tailstock digital readout from Grizzly, part # T10118, to help keep track of boring depth. Unlike relying on counting revolutions of the tailstock handwheel, with the DRO you are looking at the total travel measurement on a digital display, which is equally precise to the alternate dial indicator method. The chamber was cut in the stainless Krieger barrel at 60 RPM, using Mobilmet 744 heavy cutting oil diluted with mineral spirits, flushing chips from the reamer flutes at 100 PSI. For the last few thousandths of cut, lathe power was shut off and the cut completed by turning the reamer holder by hand while in-feeding with the lathe tailstock handwheel for precise depth and chamber dimension control.
To shorten this article up a bit and keep it on point for those interested in the rifle and not the process, let me just mention that details of some of the additional parts I made can be seen at my website: LaFeversFabricating.wordpress.com. Those parts include a muzzle brake of my design, my fast attach bipod design, a drop-leg level, wood grip, and wooden as well as metal front and rear bag riders for benchrest work.
Acknowledgements
For their participation and patience in supporting this project, and their tolerance of my myriad questions about parts and processes, I would like to thank, in alphabetical order:
Berger Bullets — Bergerbullets.com — Berger 155.5gr Fullbore Match bullets.
Jim Borden — BordenRifles.com — Stainless Rem. Clone action for Eliseo tubegun.
Gary Eliseo — CompetitionShootingStuff.com — RTS tubegun stock kit.
Grizzly Industrial — Grizzly.com
Krieger Barrels — KriegerBarrels.com — 30″ Medium Palma, 1:12.5″ twist 5R rifling, tight bore.
Dave Manson — MansonReamers.com — Custom .308 Win finish reamer for Berger 155.5 fullbore bullet.
Tom Myers — X-tremeShooting XTSP — CG Jackson Mod 22 Tactical 2-Stage Trigger.
Nightforce Optics — NightforceOptics.com — 12-42×56 NXS Scope with NP-R1 ranging reticle.
Greg Tannel — GreTanRifles.com — Lathe set-up and chambering DVDs.
*According to Chuck Hawks: “‘Uncle’ Dan Lefever was one of the greatest gun designers of his, or any, time. He founded several companies….The largest and best known of these, Lefever Arms Co., was eventually acquired by the Ithaca Gun Company around the time of the First World War. In the hey day of the classic American double there were guns galore and many different grades and price points, from plain field grade guns to masterpieces rivaling the best European guns. The Lefever Arms guns, for example, won medals at an International Arms Exhibition for ‘Best American’ and ‘World’s Best’ shotgun.”
Many of our readers use AR-type rifles for Service Rifle matches, varmint hunting, 3-Gun competition, or defensive use. AR-platform rifles can be configured in a multitude of ways to suit the application. But if you plan to put together your own purpose-built AR rifle, how do you get started?
For AR Do-It-Yourselfers, we suggest reading the late Glen Zediker’s book, the Competitive AR-15 Builders Guide. Following on Zediker’s The Competitive AR15: Ultimate Technical Guide, the Builders Guide provides step-by-step instructions that will help non-professional “home builders” assemble a competitive match or varmint rifle. This book isn’t for everyone — you need some basic gun assembly experience and an aptitude for tools. But the Competitive AR-15 Builders’ Guide provides a complete list of the tools you’ll need for the job, and Zediker outlines all the procedures to build an AR-15 from start to finish.
One of our Forum members who purchased the AR-15 Builders Guide confirms it is a great resource: “Much like any of the books Mr. Zediker puts out this one is well thought-out and is a no nonsense approach to AR building. I can not stress how helpful this book is from beginner to expert level.”
Along with assembly methods, this book covers parts selection and preparation, not just hammers and pins. Creedmoor Sports explains: “Knowing how to get what you want, and be happy with the result, is truly the focus of this book. Doing it yourself gives you a huge advantage. The build will honestly have been done right, and you’ll know it! Little problems will have been fixed, function and performance enhancements will have been made, and the result is you’ll have a custom-grade rifle without paying custom-builder prices.” Other good resources for AR projects is Gunsmithing the AR: The Bench Manual, and the Building Your AR from Scratch DVD.
Brownells’ Do-It-Yourself (DIY) video series provides logical, step-by-step installation help for triggers, stocks, and springs. Nine separate videos cover Brownells various DIY Kits. Not sure if you’re up to the project? Just watch each video to see what’s involved. The nine DIY kits are:
This video shows Remington 700 after-market trigger installation:
In the Do-It-Yourself videos, Brownells’ Gun Techs proceed step-by-step, showing you exactly how to install the parts on your gun. Each kit also comes with complete, illustrated instructions you can take to the bench. To learn more, click the links above, or CLICK HERE to visit Brownells’ DIY Kit online page.


 Is your well-built rifle of high-quality components plagued with vertical fliers across more than 1-3 handload combinations? Consider the bedding, crown and scope/sight mounts. Are they correct? If so, then you might check for ignition issues before boldly undertaking an extensive, expensive, and quite possibly fruitless quest for the “magic handload”.


 I did want a minimum no-turn neck optimized for Lapua brass. The drawing indicated that the reamer would cut a .281″ neck and a throat of 1.0315″. This was very close to ideal, though I did have to turn two thousandths off the necks of Lapua 6BR brass after I necked it up. I resized using a .277″ bushing and the loaded rounds came out to be .279″. Realizing that this was in the ball park, I decided to go with the Elk Ridge Reamer and build a 25 BR that could shoot 110gr or 115gr bullets. Now the question was where to get a match-grade 25-caliber barrel. I called quite a few of the custom barrel-makers, including BlackStar Barrels in Texas (no longer operating). I have had wonderful success with the BlackStar barrel on my 6BR “Chantilly” — it delivered great accuracy and impressive velocities. Since the 25 BR was so similar, I went with another BlackStar. I ordered a 10-twist, 6-groove, 1.250″-diameter straight-contour tube.
 After chambering, the barrel finished at 1.245″ diameter and 27.5″ inches with an 11° crown. I actually had the throat lengthened to accept both Berger 110gr and 115gr bullets. The bases of the FB 110-grainers sit flush with the neck-shoulder junction, when they are seated .010″ into the lands. With the longer 115gr VLDs, the bottom of the bearing surface (i.e. start of boat-tail) is just about even with the neck-shoulder junction.
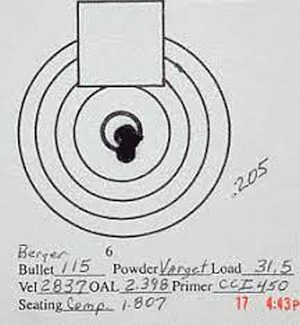 For her debut in competition, I took “Peppermint” to our local 600 yard F-class match. Shooting the Berger 115s with 31.5 grains Varget, she won with a perfect score of 200 with 14 Xs. At my club, we use a SR3 target. The X-Ring measures 3″ in diameter and the 10-Ring measures 7″. At the match there were some very good shooters with top-flight custom rifles in accurate calibers such as 6.5-284 and 22 Dasher. I was very fortunate to come out on top, but I give the credit to Peppermint’s good bench manners and outstanding accuracy.
 Now that I have several calibers in the BR cartridge family, (22 BR, 6mm BR, 6.5 BR, 7 BR, and a 30 BR), it is my humble opinion that they each have their own place. A varmint hunter’s dream, the 22 BR can push a bullet faster and more accurately than the 22-250. With an 8-Twist barrel, the 22 BR can send an 80gr SMK to 600 yards with extreme accuracy.


 Is your well-built rifle of high-quality components plagued with vertical fliers across more than 1-3 handload combinations? Consider the bedding, crown and scope/sight mounts. Are they correct? If so, then you might check for ignition issues before boldly undertaking an extensive, expensive, and quite possibly fruitless quest for the “magic handload”.


 The Concept — a ‘Do-It-All .308 Win’


 Many of our readers use AR-type rifles for Service Rifle matches, varmint hunting, 3-Gun competition, or defensive use. AR-platform rifles can be configured in a multitude of ways to suit the application. But if you plan to put together your own purpose-built AR rifle, how do you get started?


