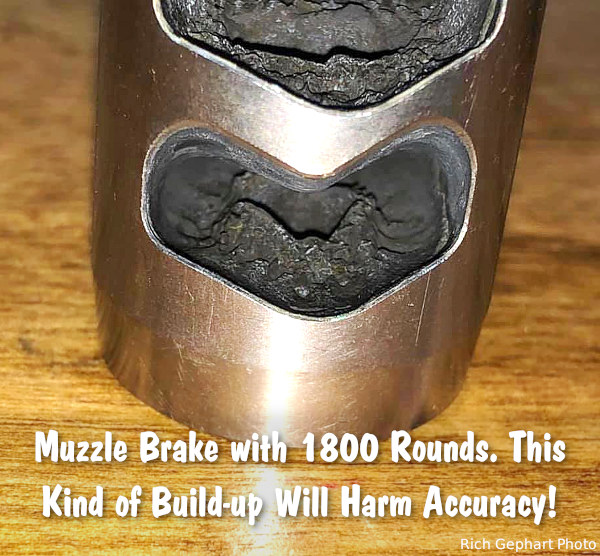
Many hunters and precision rifle competitors use muzzle brakes because these ported devices reduce felt recoil significantly. That makes a real difference getting back on target for quick follow-up shots. While many rifle owners appreciate the benefits of muzzle brakes, they may also neglect their brakes, allowing hard carbon and powder residue to build up. Not good. You should regularly clean your muzzle brake to remove fouling and carbon build-up.
As Mark Edgreen posted: “Carbon build up on the crown and in the brake is a recipe for poor accuracy.” And another gunsmith reported that customers complained about guns that “shot out way too early” but they only needed to have the brakes cleaned.
Gunsmith and PRS/NRL competitor Jim See recently reminded his Facebook Fans about the importance of cleaning muzzle brakes: “How many times do I have to say it? You need to maintain your rifles. Clean your muzzle brakes people!”. Jim, who runs Elite Accuracy LLC, notes that hard carbon build-up in brakes can definitely harm accuracy. Look at this example:
Muzzle Brake Cleaning Methods
There are various methods for cleaning a brake, we list a variety of techniques, but we would start with NON-corrosive ultrasound. You’ll want to remove the muzzle device before doing these tasks.
1. Use Ultrasonic Cleaning Machine with cleaning solution. This may be the most efficient method: “I place my brake in the ultrasonic cleaner. Shiney as new.” (Jim Moseley).
2. Spray with commercial Carb Cleaner and brush. Then apply anti-corrosion coating.
3. Soak in half hydrogen peroxide and half vinegar. Suggestion: “Let sit over night and carbon melts off. Brush remaining carbon off, rinse and put the brake back on.” Apply anti-corrosive before mounting.
4. Soak in 50/50 solution of water and white vinegar and brush. (Be sure to apply anti-corrosion coating, such as Eezox, after soaking).
5. Tumble in liquid solution with stainless pins. Comment: “Comes out slightly faded, but perfectly clean on stainless, non-painted brakes though.” Warning — do NOT do this with threaded brakes — tumbling could affect threads of screw-on brakes. Also, tumbling can harm painted or Cerakote finishes.
Gunsmithing Tip: By fitting the muzzle brake so that the barrel crown is slightly forward, it is easier to wipe carbon fouling off the end of the barrel. See photo:
Rimfire Varmint Adventure
Can you shoot prairie dogs with a .22 LR Rifle? The answer is yes, if you have an accurate rifle, know your drops, and keep your targets within a reasonable distance (inside 240 yards). While the .17 HMR and .17 WSM are much more potent, flat-shooting, and effective P-dog slayers, a talented marksman CAN get good results with a .22 LR rimfire rifle, as ace PRS shooter and gunsmith Jim See recently proved.
Posting on his Facebook Page on 7/9/2020, Jim wrote: “Took out the .22 LR for some LR prairie poodles, there were not many in this town, but it gave me a chance to get some impressive hits. Norma TAC-22 ammo put the smack down on a first-round hit, called head shots at 189 yards. The body-shot dog was a first-round kill at 240 yards. I had one more head shot with a second round hit at 163. The nice part about using the .22 Long Rifle ammo is the [critters] don’t spook too bad, so a follow-up shot with a correction is usually available to get a better wind hold.” Even unsuppressed, a .22 LR rimfire shot makes much less noise than a centerfire round.
NOTE: The Norma TAC-22 .22 LR ammo used by Jim See offers great bang for the buck. It is quite affordable — a 50rd box is just $4.99 at MidwayUSA. Some lots have show outstanding accuracy. These target photos (below) come from Champion Shooters Supply which may have gotten an exceptional lot. This vendor tells us: “We have found this to run very well in Ruger rifles, handguns, and target pistols. These are 5-shot groups at 50 yards with an Anschutz 1913 rifle. This is an incredible value.” Jim says the TAC-22 ammo delivers 1″ groups at 100 yards in his rifle.
Sierra Bullets has introduced a new line of loaded centerfire varmint ammunition, the Prairie Enemy series of cartridges. Sierra currently offers Prairie Enemy ammo for six cartridge types: .204 Ruger, .223 Rem, .224 Valkyrie, .22-250 Rem, .243 Win, and 6.5 Creedmoor. To celebrate this new ammo line, Sierra created a colorful Prairie Enemy P-Dog target. Click the image below to download the PDF target.
Editor: Many new barrels will deliver higher velocities with the same load after 100-150 rounds through the bore. The exact reasons for this speed-up are not 100% certain, and velocity increases (if any) will vary from one barrel to the next. But this “speeding up” phenomenon is common, so be prepared if this happens with your next barrel. If you do experience a significant velocity increase you should probably re-tune your load AFTER the velocity stabilizes at the higher level.
From the Sierra Bullets Blog Article by Mark Walker, Sierra New Product Development Director
In a previous post, I discussed a couple of methods to tune a load to your barrel to help achieve the best accuracy possible. People most often work on load tuning if they get a new rifle or have a different barrel installed. In both instances, the barrel is new and has not been fired very much. According to most competitive shooters, this is the most accurate your barrel will ever be, so getting it tuned and shooting accurately is a priority.
The Speed Up Phenomenon After 100-150 Rounds
Even though after you work up a load and your new barrel is shooting great, a lot of shooters notice that at around 100 to 150 rounds their rifle may stop shooting as accurately. I had this happen to a rifle and I was confused as to why something that worked so well to begin with would all of a sudden quit shooting. I decided to break out the chronograph to do another load work up to see what was going on. To my surprise, the velocity had increased around 80 fps over the original velocity! After performing another ladder test and adjusting the seating depth, the rifle was once again shooting well.
There are several thoughts on why this may happen, however, you can rest assured that it does happen. One thought is that as the barrel breaks in, the tooling marks in the throat of the chamber smooth out and allow less resistance to the bullet as it exits the bore thereby increasing speed. Another idea is that the throat area starts to get a little rough which in turn causes more resistance which increases pressure and therefore more velocity. I’m sure there are some out there who have a better understanding as to why this happens, but it can definitely affect the accuracy of your rifle. So be aware and never be afraid to rework a load to keep your rifle in tune.
Experts Confirm That Barrel Speed-Up Is Common Two respected shooters have observed an increase in velocity with new barrels, typically after 100 rounds. Gunsmith and Hall-of-Fame benchrest shooter Thomas “Speedy” Gonzalez has documented barrel speed-up with testing. Moreover, Speedy’s bore-scope barrel inspections revealed a smoothing of the barrel lands. Jim See, a top PRS competitor, has encountered barrel speed-up many times. Accordingly, he re-tunes his load at 150 rounds.
“Alex Lipworth and I documented this phenomenon about four years ago and I have told all my customers about this. My son Mikee would shoot 100 rounds through all new barrels we planned on shooting before we would begin to do load development. We had a shooting snail that caught all the bullets set up in front of an indoor bench. We called it a wear-in process because upon careful examination of the bore when the ‘Speed Up’ takes place the cut-rifled bore resembles that more of a button-rifled barrels with the lands taking on more the softer look of a buttoned bore.” — Speedy Gonzalez
“Seen it [barrel velocity increase] too many times to count. All my match barrels get a ‘generic round’ loaded for them, which has worked well in barrels historically. After I hit 150 rounds I fine-tune the load and never look back, until the tube starts to slow down at it’s life end.” — Jim See
Rimfire Varmint Adventure
Can you shoot prairie dogs with a .22 LR Rifle? The answer is yes, if you have an accurate rifle, know your drops, and keep your targets within a reasonable distance (inside 240 yards). While the .17 HMR and .17 WSM are much more potent, flat-shooting, and effective P-dog slayers, a talented marksman CAN get good results with a .22 LR rimfire rifle, as ace PRS shooter and gunsmith Jim See recently proved.
Posting on his Facebook Page on 7/9/2020, Jim wrote: “Took out the .22 LR for some LR prairie poodles, there were not many in this town, but it gave me a chance to get some impressive hits. Norma TAC-22 ammo put the smack down on a first-round hit, called head shots at 189 yards. The body-shot dog was a first-round kill at 240 yards. I had one more head shot with a second round hit at 163. The nice part about using the .22 Long Rifle ammo is the [critters] don’t spook too bad, so a follow-up shot with a correction is usually available to get a better wind hold.” Even unsuppressed, a .22 LR rimfire shot makes much less noise than a centerfire round.
NOTE: The Norma TAC-22 .22 LR ammo used by Jim See offers great bang for the buck. It is quite affordable — a 50rd box is just $4.50 at Palmetto State Armory. Some lots have show outstanding accuracy. These target photos (below) come from Champion Shooters Supply which may have gotten an exceptional lot. This vendor tells us: “We have found this to run very well in Ruger rifles, handguns, and target pistols. These are 5-shot groups at 50 yards with an Anschutz 1913 rifle. This is an incredible value.” Jim says the TAC-22 ammo delivers 1″ groups at 100 yards in his rifle.
Sierra Bullets has introduced a new line of loaded centerfire varmint ammunition, the Prairie Enemy series of cartridges. Sierra currently offers Prairie Enemy ammo for six cartridge types: .204 Ruger, .223 Rem, .224 Valkyrie, .22-250 Rem, .243 Win, and 6.5 Creedmoor. To celebrate this new ammo line, Sierra created a colorful Prairie Enemy P-Dog target. Click the image below to download the PDF target.
ZEISS has introduced a new LRP S5 series of First Focal Plane (FFP) optics. There are two new FFP scopes with high zoom ratios, the LRP S5 318-50 and LRP S5 525-56. These are impressive scopes, with excellent glass, precise controls, and a ton of elevation. Both models boast a 34mm main tube, European-style fast-focus eyepiece, Ballistic Stop elevation turret (with 40.7 MRAD or 140 MOA of total elevation travel), and an external locking windage turret.
Gunsmith Jim See of Elite Accuracy LLC has been testing the LRP S5 525-56 which offers 25X max power. Jim had the Milrad version with the ZF-MRi Reticle and 40.7 Mils of elevation. Jim, an active PRS/NRL competitor, knows what features are important in tactical competitions. He understands that a good PRS/NRL scope must be tough, precise, and repeatable. Jim was impressed with the new 5-25x56mm ZEISS scope. Jim really liked the bright, clear markings on the turrets, and the positive clicks. He also praised the lever-equipped zoom control, the positive zero-stop on the elevation knob, and he believed the lockable windage turret can have definite benefits in the field.
Jim told us: “The scope operates well, it tracks well, and the turrets are accurate in their movements. All the functions work well — elevation, windage, parallax. This LRP scope has a quality feel — similar to other ZEISS products I have used.” Overall, Jim believed this ZEISS 5-25x56mm optic “will fit well in its intended market”, namely PRS/NRL and long range hunting.
I recently reviewed ZEISS’s latest scope offering for the precision rifle shooter. ZEISS is a very recognizable name in the optics industry, and the LRP S5 line of optics is there first big attempt to attract the attention of PRS/tactical/competition enthusiasts.
ZEISS LRP S5 accessories include a power throw lever, a sunshade, and a set of precision rings with integral bubble level, which I found to be very well-made. I fitted my test scope with these items.
For the review I was sent the 5-25x56mm version in MRAD configuration. This optic has a 34mm main tube and is a first focal plane scope. My initial impressions of the optic when I first handled it were favorable. It had the typical look and finish of other ZEISS optics I was familiar with, the robust and solid feeling construction, and well thought-out turrets clearly numbered and easy to read.
Jim had high praise for the highly visible numbers on the dials: “With my (older) eyes, I can’t read the numbers on most scopes, but with this ZEISS LRP S5 scope I CAN read the numbers.”
I mounted the ZEISS to a very accurate 6mmBR rifle and headed out to the range to zero the optic and set the zero stop. This operation only took minutes. I fired a shot, dialed the scope to the bullet impact and sent another round, with a little fine-tuning over the next three shots I had my zero. I consulted the Owner’s Manual, and quickly reviewed the procedure for zeroing out the elevation turret and setting the zero stop. Simply loosen the two turret set screws, push the turret down and spin it to the zero indication mark on the turret until it stops, then retighten the two set screws. It’s a very easy process which I appreciated.
The turrets on this scope have clearly identifiable clicks with a slightly deeper detent at the full One Mil indicator marks. So as you rotate the turret and hit the full mill values, you can clearly feel the resistance of the heavier detent.
My next objective was to test the accuracy of the turret and the reticle sub-tensions. In any long range matches we compensate for bullet drop and wind deflection by accurately calculating our corrections via a ballistic calculator or collected data. It is very important that an elevation turret tracks true. I set up a tall target test with marks at 36″ and an exact range of 100 yards. I shot a 3-shot group at my aim point and then dialed up 10 Mils. I then repeated the 3-shot group using the same Point of Aim. The results were near perfect with a 36″ spread between the two groups. All groups were at or under .25 MOA which is representative of this rifle. The scope repeated on aim impacts, fresh off a +10 Mil “up” dial. I then dialed the turret back to zero and repeated the test with a +10 Mil aim-point change using the reticle subtensions only. There was a small variance on impact height using the subtension lines, without clicking up 10 Mils, but using the reticle hold lines only.*
Note that the view through the scope is bright and clear all the way to the very edge of the viewable image. Lesser scopes may show shadowing or distortion at the periphery.
A few days later I was able to get to a range with some steel targets out to distance, on this day I was looking at optical performance and the “feel” of the optic. It just so happens that the sun was low in the sky and I thought what a great time to check for optical flare. No good comparison happens without something to compare against. So with me was another rifle with a flagship optic [another brand] I was very familiar with. I fitted both optics with their sun shades, and looked at a picnic table on a pond dike, directly in line with the sun. The ZEISS in this test showed considerably less optical flare, to the point that flare was almost nonexistent. The ZEISS offered a clear and usable image with no eye strain. The other brand scope did not perform nearly as well in this comparison.
I proceeded with some longer distant shooting with the main purpose of seeing exactly what I could see. In the game of precision-style rifle matches one of the keys to success is managing recoil through the application of solid fundamentals. The goal here is to identify independently where each bullet goes. We accomplish that by staying in the scope and watching down range. Bullet trace, dirt impacts, target reaction, target impacts, and occasionally seeing the actual bullet in flight, are feedbacks we look for. With the sun low and sitting at about 1:30 from my line to the target, it turned out to be a great day for actually seeing the bullet in flight. The reflection of the light off the side/rear of the 105 grain Berger bullet was clearly visible to me. This is not something everyone sees because you have to know how to look for it, it is best to run in a midrange power of 10-15x to pick up these subtleties. In this case I knew I was holding about one Mil of right wind and 4.3 Mils of dialed elevation. So as I broke the shot I let my eye look up and right of the target. Each time I could catch the arching streak of the bullet as it headed to and impacted the target. The lighting in combination with the wind, on this day, was not very conducive to seeing bullet trace, again something we look for but do not always see depending on conditions.
After beating up the already shot-up plate, I was able to turn up the magnification on the ZEISS and identify both old impacts and the newer impacts that were shinier on the steel plate, typically seen as brighter smears before the lead and steel has a chance to oxidize. I then ranged and dialed plates at different distances, then shot, dialed, and shot some more. Everything in the ZEISS worked well and tracked well, causing no concerns whatsoever.
I concluded the session with some side-by-side comparisons with my control optic. I studied impacts on the same steel plate, and then did a side by side on farm buildings about 2400 yards away. Both of these optics clearly resolved the images studied. What I took away from this was that the ZEISS had a more sensitive eye box when your eye placement shifted from left to right. Not substantial but something I only noticed with a constant evaluation [in direct comparison]. Your eye placement behind the ZEISS optic front to back was forgiving and pretty normal for scopes of similar design. I noted to myself that this was worth another assessment day to better judge the optic.
In this video, on a snowy day, Jim shows how easy it is to set the Zero Stops on the turrets of the ZEISS LRP S5 5-25x56mm scope.
I was able to look through the optics again on a day with pretty flat light. We were now snow-covered and cloudy in north east Iowa. The goal today was to set up the optics in my BOG Deathgrip tripod and study the town I lived in. I set up and focused the optic onto a multi-story brick building at 1500 yards. With some fine tuning, both optics allowed me to clearly see the mortar lines between the bricks at this distance, with the flat lighting brightness and contrast were very similar in these scopes. I then looked for some color. I found my local Casey’s gas station at about 800 yards and started my comparison. My color perception in both optics seemed very similar to the point of being uneventful in even trying to compare the two, now I wished I had a bright sunny day to look over these optics again.
I spent a third evening behind glass, the goal was to get an idea of how the ZEISS performed as light was fading, again we had another cloudy evening in Iowa. I added another high-end tactical optic of similar power rating and dimensions to the evaluation, that model being a few years old but still in the manufacturer’s line-up. What I took away from this three-optic evaluation was that, on similar power settings, the ZEISS low light performance was exceptional. The white snow was still nice and white, resolution was very good and the images were easily identifiable. The first competitive comparison optic also performed very well, the second optic added to the mix showed a tint of yellowing in the image, something that I had not noticed with that optic in previous daylight use.
Overall I think ZEISS has developed an optic that will fit in with the market it was intended for. It is a solid optic that feels very robust and repeatable. The ZEISS LRP S5 525-56’s functions and repeatability performed as they should in my testing. The optical quality is very good and offers a bright, clear image. Those shooters looking for a new top-level optic should give the ZEISS LRP S5 525-56 an honest look.
Installation in Zeiss Rings
Jim placed the scope in high-quality ZEISS rings with integral bubble level. He then took the rig out into the field and completed an initial Tall Target test. That test confirmed the precision and repeatability of the 0.1 MRAD elevation and windage click values.
Jim also liked how positive the clicks felt with both elevation and windage knobs. Jim told us: “The scope operates well, it tracks well, and the turrets are accurate in their movements. All the functions work well — elevation, windage, parallax. This LRP scope has a quality feel — similar to other ZEISS products I have used.” Jim also noted that the ZEISS LRP S5 scope resisted solar flare very well: “This is important in PRS matches where we get that low sun in the afternoons”.
Scope mounted in ZEISS rings with bubble level. Optional sunshade is attached in front.
To test ruggedness and weatherproofing, Jim is putting the ZEISS LRP through its paces in harsh winter conditions. He’s using a tripod here to keep off the snowy ground. The tripod mount also allows smooth traversing to view a wide selection of terrain and objects near and far.
Advanced Optical Technology — ZEISS LRP S5 Features
The ZEISS LRP S5 525-56 has many notable features, including a lockable windage turret, adjustable reticle illumination, and a HUGE amount of elevation travel — 40.7 Mils in the MIL model and 140 MOA in the MOA version. That gives this optic the ability to shoot at extreme range without requiring holdovers.
* In this test I could see immediately that the reticle showed a measured gap between my previous two groups of 9.8 Mils (not 10), though those groups were actually a true 36″ apart (ten Mils is 36″ at 100). The shooting results, using the reticle lines only, confirmed what I saw, and I now had two groups that measured 36.6″ apart. The “take-away” is that if I have to hold with the reticle only, I can calculate the error at a minimal 0.1 mil for every 5 mils held in the reticle. Will this error cause problems? Some may think so, but in competitions we rarely hold over 5 mils while shooting stages. At 100 yards, a 0.1 Mil click is 0.36 inch, a full Mil is 3.6 inches, and ten Mils is 36″.
Ace tactical shooter and gunsmith Jim See of Elite Accuracy LLC recently tested a Frankford Arsenal rotary brass tumbler. Like the older Thumbler’s Tumblers, this can tumble your cases in a liquid solution. The wet-tumbling process worked very well Jim reports. Posting on Facebook, Jim noted: “I was super impressed with the Frankford Arsenal rotary tumbler and cleaning packs they sent me. I ran 350 pieces of brass for one hour. They now look great.” Jim appreciated not having to deal with dry tumbling media, such as crushed walnut shells. Dry media produces dust and can leave residues or clog flash-holes.
Interestingly, Jim recommends you try wet-tumbling WITHOUT using stainless media. At least give it a try. Tumbling without media simplifies the process and you don’t have to worry about pins stuck in flash-holes or case-necks*. Jim reports: “Stainless steel pins come with the Frankford kit, but mine hit the trash right out of the box. There is no need to clean the inside of your cases 100% and that’s all the pins add to the equation. The brass bumping brass with hot water and Frankford’s liquid cleaner works great all by itself.” One wag stated: “That’s great to hear. Stainless steel pins are a PITA.”
Other Facebook posters concurred with Jim’s evaluation of the Frankford Arsenal Rotary Tumbler:
“I’ve had one for a couple years, and it works well. I usually run about 250-300 Dasher cases at once in it. But I use the pins because I’m OCD about clean brass.” — David W.
“I’ve had one for a year and a half and it definitely works with or without pins.” — Luke C.
“I got one about six months ago and have yet to use any SS media. I just use some dawn, distilled water, and Lemi Shine®. Turns nasty 5.56 range brass bright and shiny.” — Brian D.
“I don’t use the pins either and use a combination of Dawn soap and Lemi Shine.” — Jon N.G.
This video shows how to assemble and operate the Frankford rotary tumbler. But note, Jim See does NOT feel that it is necessary to use stainless media.
How to Dry Your Brass — Hair Dryer Vs. Machine
The downside of wet tumbling is that you end up with a pile of wet brass at the end of the cleaning cycle. There are many ways to dry brass, from drying in the sun to using a kitchen oven (be careful not to “overcook” your brass). One Facebook poster asked Jim: “What is your drying method for wet brass, and how long does it take?”
Jim See replied: “To start I just drain off the dirty water, and rinse the brass with clean hot water. Then I roll the brass on a towel for 30 seconds and put the brass in a one-gallon bucket. Next I insert a hair dryer in the bucket (with the brass) and let it run for about 5 minutes. With this procedure, the drying process for me is done in less than 10 minutes.”
Jack Lanhart has another method: “I use a food dehydrator. It takes 30 to 45 minutes.”
For those who don’t want to mess with towels and hair dryers, Frankford Arsenal offers a matching Platinum Series Case Dryer that simplifies the process of drying brass. Lyman also makes an excellent Cyclone Case Dryer. These drying machines each cost about $65.00 and both have multiple levels so you can separate different types of cartridge brass. Lyman states that “The forced heated air circulation of the Cyclone will dry your brass inside and out within an hour or two, with no unsightly water spots.” The Lyman dryer can also be used for ultrasonically-cleaned gun parts.
*The Frankford Rotary tumbler does include media separators if you choose to use the provided pins or other media. CLICK HERE for diagram showing how to use media separators.
Ace tactical shooter and gunsmith Jim See of Elite Accuracy LLC recently tested a Frankford Arsenal rotary brass tumbler. Like the older Thumbler’s Tumblers, this can tumble your cases in a liquid solution. The wet-tumbling process worked very well Jim reports. Posting on Facebook, Jim noted: “I was super impressed with the Frankford Arsenal rotary tumbler and cleaning packs they sent me. I ran 350 pieces of brass for one hour. They now look great.” Jim appreciated not having to deal with dry tumbling media, such as crushed walnut shells. Dry media produces dust and can leave residues or clog flash-holes.
Interestingly, Jim recommends you try wet-tumbling WITHOUT using stainless media. At least give it a try. Tumbling without media simplifies the process and you don’t have to worry about pins stuck in flash-holes or case-necks*. Jim reports: “Stainless steel pins come with the Frankford kit, but mine hit the trash right out of the box. There is no need to clean the inside of your cases 100% and that’s all the pins add to the equation. The brass bumping brass with hot water and Frankford’s liquid cleaner works great all by itself.” One wag stated: “That’s great to hear. Stainless steel pins are a PITA.”
Other Facebook posters concurred with Jim’s evaluation of the Frankford Arsenal Rotary Tumbler:
“I’ve had one for a couple years, and it works well. I usually run about 250-300 Dasher cases at once in it. But I use the pins because I’m OCD about clean brass.” — David W.
“I’ve had one for a year and a half and it definitely works with or without pins.” — Luke C.
“I got one about six months ago and have yet to use any SS media. I just use some dawn, distilled water, and Lemi Shine®. Turns nasty 5.56 range brass bright and shiny.” — Brian D.
“I don’t use the pins either and use a combination of Dawn soap and Lemi Shine.” — Jon N.G.
This video shows how to assemble and operate the Frankford rotary tumbler. NOTE That Jim See does NOT feel that it is necessary to use stainless media.
How to Dry Your Brass — Hair Dryer Vs. Machine
The downside of wet tumbling is that you end up with a pile of wet brass at the end of the cleaning cycle. There are many ways to dry brass, from drying in the sun to using a kitchen oven (be careful not to “overcook” your brass). One Facebook poster asked Jim: “What is your drying method for wet brass, and how long does it take?”
Jim See replied: “To start I just drain off the dirty water, and rinse the brass with clean hot water. Then I roll the brass on a towel for 30 seconds and put the brass in a one-gallon bucket. Next I insert a hair dryer in the bucket (with the brass) and let it run for about 5 minutes. With this procedure, the drying process for me is done in less than 10 minutes.”
Jack Lanhart has another method: “I use a food dehydrator. It takes 30 to 45 minutes.”
For those who don’t want to mess with towels and hair dryers, Frankford Arsenal offers a matching Platinum Series Case Dryer that simplifies the process of drying brass. Lyman also makes an excellent Cyclone Case Dryer. Both drying machines cost about $60.00 and both have multiple levels so you can separate different types of cartridge brass. Lyman states that “The forced heated air circulation of the Cyclone will dry your brass inside and out within an hour or two, with no unsightly water spots.” The Lyman dryer can also be used for ultrasonically-cleaned gun parts.
*The Frankford Rotary tumbler does include media separators if you choose to use the provided pins or other media. CLICK HERE for diagram showing how to use media separators.
Rimfire Varmint Adventure
Can you shoot prairie dogs with a .22 LR Rifle? The answer is yes, if you have an accurate rifle, know your drops, and keep your targets within a reasonable distance (inside 240 yards). While the .17 HMR and .17 WSM are much more potent, flat-shooting, and effective P-dog slayers, a talented marksman CAN get good results with a .22 LR rimfire rifle, as ace PRS shooter and gunsmith Jim See recently proved.
Posting on his Facebook Page on 7/9/2020, Jim wrote: “Took out the .22 LR for some LR prairie poodles, there were not many in this town, but it gave me a chance to get some impressive hits. Norma TAC-22 ammo put the smack down on a first-round hit, called head shots at 189 yards. The body-shot dog was a first-round kill at 240 yards. I had one more head shot with a second round hit at 163. The nice part about using the .22 Long Rifle ammo is the [critters] don’t spook too bad, so a follow-up shot with a correction is usually available to get a better wind hold.” Even unsuppressed, a .22 LR rimfire shot makes much less noise than a centerfire round.
NOTE: The Norma TAC-22 .22 LR ammo used by Jim See offers great bang for the buck. It is quite affordable — a 50rd box is just $4.41 at Midsouth Shooters. Some lots have show outstanding accuracy. These target photos (below) come from Champion Shooters Supply which may have gotten an exceptional lot. This vendor tells us: “We have found this to run very well in Ruger rifles, handguns, and target pistols. These are 5-shot groups at 50 yards with an Anschutz 1913 rifle. This is an incredible value.” Jim says the TAC-22 delivers 1″ groups at 100 yards in his rifle.
Free Sierra Varmint Target — Prairie Enemy
Sierra Bullets has introduced a new line of loaded centerfire varmint ammunition, the Prairie Enemy series of cartridges. Sierra currently offers Prairie Enemy ammo for six cartridge types: .204 Ruger, .223 Rem, .224 Valkyrie, .22-250 Rem, .243 Win, and 6.5 Creedmoor. To celebrate this new ammo line, Sierra created a colorful Prairie Enemy P-Dog target. Click the image below to download the PDF target.
This impressive 15-round group was shot by Jim See of Elite Accuracy.
Different Shooting Disciplines Demand Different Levels of Precision/Accuracy
In the rapid-fire 3-Gun game, you could probably “clean” most stages with a 2-MOA rifle. By contrast, in the short-range group benchrest game, to compete with the best, you’ll need a rifle that shoots in the “ones” (i.e. 0.1-0.19 MOA) in perfect conditions. In 1000-yard F-Class competition, the top shooters want a rifle that will hold one-third-MOA of vertical at that distance.
What is your standard of accuracy? How good is “good enough”. Jim See, a skilled gunsmith and successful PRS competitor, recently answered that question for his tactical discipline. For the kind of matches Jim shoots, he likes to have a rifle that will hold half-MOA for five (5) shots, 3/4-MOA for 15 shots, and 1 MOA for twenty shots. Remarkably, Jim’s rifle can do that with factory ammo. Above is an impressive 15-shot group shot with .260 Remington Federal Premium Ammo.
“I say it all the time, my loads need to print 5 under 1/2″, 10 under 3/4″, and 20 under 1″. It’s simple, if a hot barrel will keep 20 rounds fired in succession under my standard it will be a good barrel and load for Precision Match Shooting. Federal Premium Gold Metal Match .260 with Sierra bullets made the cut for me today. 15 consecutive shots under 3/4 MOA.” –Jim See
It’s said that you “can never have too much accuracy”, but there are acceptable standards for each discipline, and they’re not the same. A 100/200 yard Benchrest shooter will be sorely disappointed with a rifle/ammo set-up that can only deliver half-MOA. On the other hand, a PRS competitor like Jim See can achieve great success with a lesser degree of precision. This means you can save time and money. You can run your barrels longer between cleanings, and you don’t have to go “full OCD” when loading your ammo. The PRS shooter does not need to weigh-sort primers, or load powder to single-kernel standards. Proof is the performance. Jim See recently took third place at the Spearpoint Shootout, and he has been a podium finisher at other events. Learn more about Jim’s gunsmithing and training operations at EliteAccuracy.com.
Download This Load Development Target
Jim’s target seemed a bit familiar. AccurateShooter.com created this Diamond and Dot Target a few years back. On each aiming point, there are high-contrast black horizontal and vertical lines for aligning your cross-hairs. The gray circle lets you see the bullet impacts above, without obliterating the red diamond, which is quite useful for precise aiming (we put fine cross-hairs on the points of the diamond). This target sheet includes data entry tables below each of the three aim points. There are many other free targets out there, but this format is very popular. We’re pleased to see Jim using it. You can download this and dozens of other FREE Targets from the AccurateShooter.com Target Page.
Here’s our friend Jim See, who won the 2015 Heatstroke Open, topping 120 other shooters.
The 2019 Heatstroke Open will be held July 19-21 near Camargo in NW Oklahoma. This major PRS match should attract 120+ competitors. The event schedule includes check-in and sight-in beginning at noon on Friday, July 19, followed by side matches. The two-day match begins on Saturday and concludes at the end of the shooting session on Sunday. An awards ceremony in town will conclude the event.
The Heatstroke Open is one of the longest-running Practical Precision matches in the country. This match venue is a natural terrain field with just a few man-made props. Many targets are tough while other are more-than-generous. Stage time-limits are enough to get all rounds off on each stage. No matter what the shooter’s experience level, this match should be challenging and rewarding. But note, wind reading is critical — conditions have been known to be pretty brutal. Here are three videos covering the last three Heatstroke Open Events in Oklahoma:
2017 Heatstroke Open
2016 Heatstroke Open
2015 Heatstroke Open
McMillan — Heatstroke Open Key Sponsor McMillan Fiberglass Stocks is sponsoring this year’s Heatstroke Open as well as other events on the National Rifle League’s event roster. Through sponsorship, McMillan works to promote the NRL’s mission to encourage the growth and education of precision rifle shooting. CLICK HERE for complete listing of 2019 NRL-sanctioned matches.
Remaining Major 2019 NRL matches, and Match Directors: Heatstroke Open – Camargo, Oklahoma, July 20-21, 2019 | Matt Clem, B.J. Bailey Rock Lake NRL Steel Challenge – Cheney, Washington. Aug. 31-Sept. 1, 2019 | Doug Glorfield Monster Lake Mayhem – Cody, Wyoming, September 27-28, 2019 | Phillip Velayo, Caylen Wojcik West Coast Showdown – Pala, California, October 19-20, 2019 | Jorge Ortiz, Scott Satterlee 2019 NRL Championship – Navasota, Texas December 6 – 8, 2019 | Dave Ferguson, Prentice Wink


 Rimfire Varmint Adventure


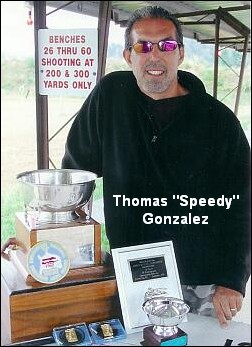 Two respected shooters have observed an increase in velocity with new barrels, typically after 100 rounds. Gunsmith and Hall-of-Fame benchrest shooter Thomas “Speedy” Gonzalez has documented barrel speed-up with testing. Moreover, Speedy’s bore-scope barrel inspections revealed a smoothing of the barrel lands. Jim See, a top PRS competitor, has encountered barrel speed-up many times. Accordingly, he re-tunes his load at 150 rounds.


 Installation in Zeiss Rings


