Many hunters and precision rifle competitors use muzzle brakes because these ported devices reduce felt recoil significantly. That makes a real difference getting back on target for quick follow-up shots. While many rifle owners appreciate the benefits of muzzle brakes, they may also neglect their brakes, allowing hard carbon and powder residue to build up. Not good. You should regularly clean your muzzle brake to remove fouling and carbon build-up.
As Mark Edgreen posted: “Carbon build up on the crown and in the brake is a recipe for poor accuracy.” And another gunsmith reported that customers complained about guns that “shot out way too early” but they only needed to have the brakes cleaned.
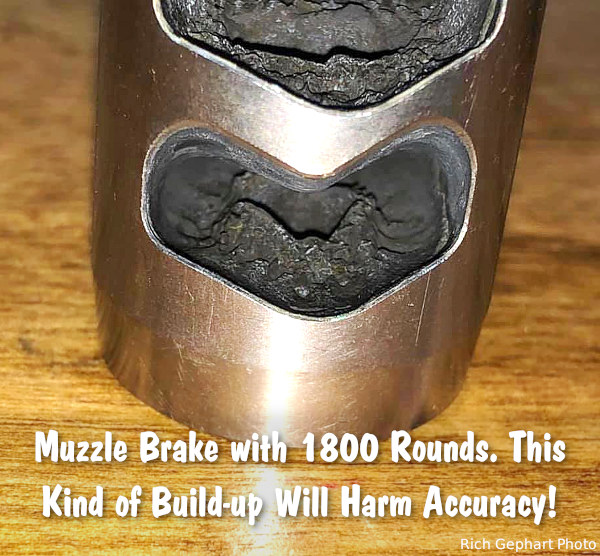
Gunsmith and PRS/NRL competitor Jim See recently reminded his Facebook Fans about the importance of cleaning muzzle brakes: “How many times do I have to say it? You need to maintain your rifles. Clean your muzzle brakes people!”. Jim, who runs Elite Accuracy LLC, notes that hard carbon build-up in brakes can definitely harm accuracy. Look at this example:
Muzzle Brake Cleaning Methods
There are various methods for cleaning a brake, we list a variety of techniques, but we would start with NON-corrosive ultrasound. You’ll want to remove the muzzle device before doing these tasks.
1. Use Ultrasonic Cleaning Machine with cleaning solution. This may be the most efficient method: “I place my brake in the ultrasonic cleaner. Shiney as new.” (Jim Moseley).
2. Spray with commercial Carb Cleaner and brush. Then apply anti-corrosion coating.
3. Soak in half hydrogen peroxide and half vinegar. Suggestion: “Let sit over night and carbon melts off. Brush remaining carbon off, rinse and put the brake back on.” Apply anti-corrosive before mounting.
4. Soak in 50/50 solution of water and white vinegar and brush. (Be sure to apply anti-corrosion coating, such as Eezox, after soaking).
5. Tumble in liquid solution with stainless pins. Comment: “Comes out slightly faded, but perfectly clean on stainless, non-painted brakes though.” Warning — do NOT do this with threaded brakes — tumbling could affect threads of screw-on brakes. Also, tumbling can harm painted or Cerakote finishes.
Gunsmithing Tip: By fitting the muzzle brake so that the barrel crown is slightly forward, it is easier to wipe carbon fouling off the end of the barrel. See photo:
Editor: Many new barrels will deliver higher velocities with the same load after 100-150 rounds through the bore. The exact reasons for this speed-up are not 100% certain, and velocity increases (if any) will vary from one barrel to the next. But this “speeding up” phenomenon is common, so be prepared if this happens with your next barrel. If you do experience a significant velocity increase you should probably re-tune your load AFTER the velocity stabilizes at the higher level.
From the Sierra Bullets Blog Article by Mark Walker, Sierra New Product Development Director
In a previous post, I discussed a couple of methods to tune a load to your barrel to help achieve the best accuracy possible. People most often work on load tuning if they get a new rifle or have a different barrel installed. In both instances, the barrel is new and has not been fired very much. According to most competitive shooters, this is the most accurate your barrel will ever be, so getting it tuned and shooting accurately is a priority.
The Speed Up Phenomenon After 100-150 Rounds
Even though after you work up a load and your new barrel is shooting great, a lot of shooters notice that at around 100 to 150 rounds their rifle may stop shooting as accurately. I had this happen to a rifle and I was confused as to why something that worked so well to begin with would all of a sudden quit shooting. I decided to break out the chronograph to do another load work up to see what was going on. To my surprise, the velocity had increased around 80 fps over the original velocity! After performing another ladder test and adjusting the seating depth, the rifle was once again shooting well.
There are several thoughts on why this may happen, however, you can rest assured that it does happen. One thought is that as the barrel breaks in, the tooling marks in the throat of the chamber smooth out and allow less resistance to the bullet as it exits the bore thereby increasing speed. Another idea is that the throat area starts to get a little rough which in turn causes more resistance which increases pressure and therefore more velocity. I’m sure there are some out there who have a better understanding as to why this happens, but it can definitely affect the accuracy of your rifle. So be aware and never be afraid to rework a load to keep your rifle in tune.
Experts Confirm That Barrel Speed-Up Is Common Two respected shooters have observed an increase in velocity with new barrels, typically after 100 rounds. Gunsmith and Hall-of-Fame benchrest shooter Thomas “Speedy” Gonzalez has documented barrel speed-up with testing. Moreover, Speedy’s bore-scope barrel inspections revealed a smoothing of the barrel lands. Jim See, a top PRS competitor, has encountered barrel speed-up many times. Accordingly, he re-tunes his load at 150 rounds.
“Alex Lipworth and I documented this phenomenon about four years ago and I have told all my customers about this. My son Mikee would shoot 100 rounds through all new barrels we planned on shooting before we would begin to do load development. We had a shooting snail that caught all the bullets set up in front of an indoor bench. We called it a wear-in process because upon careful examination of the bore when the ‘Speed Up’ takes place the cut-rifled bore resembles that more of a button-rifled barrels with the lands taking on more the softer look of a buttoned bore.” — Speedy Gonzalez
“Seen it [barrel velocity increase] too many times to count. All my match barrels get a ‘generic round’ loaded for them, which has worked well in barrels historically. After I hit 150 rounds I fine-tune the load and never look back, until the tube starts to slow down at it’s life end.” — Jim See
This impressive 15-round group was shot by Jim See of Elite Accuracy.
Different Shooting Disciplines Demand Different Levels of Precision/Accuracy
In the rapid-fire 3-Gun game, you could probably “clean” most stages with a 2-MOA rifle. By contrast, in the short-range group benchrest game, to compete with the best, you’ll need a rifle that shoots in the “ones” (i.e. 0.1-0.19 MOA) in perfect conditions. In 1000-yard F-Class competition, the top shooters want a rifle that will hold one-third-MOA of vertical at that distance.
What is your standard of accuracy? How good is “good enough”. Jim See, a skilled gunsmith and successful PRS competitor, recently answered that question for his tactical discipline. For the kind of matches Jim shoots, he likes to have a rifle that will hold half-MOA for five (5) shots, 3/4-MOA for 15 shots, and 1 MOA for twenty shots. Remarkably, Jim’s rifle can do that with factory ammo. Above is an impressive 15-shot group shot with .260 Remington Federal Premium Ammo.
“I say it all the time, my loads need to print 5 under 1/2″, 10 under 3/4″, and 20 under 1″. It’s simple, if a hot barrel will keep 20 rounds fired in succession under my standard it will be a good barrel and load for Precision Match Shooting. Federal Premium Gold Metal Match .260 with Sierra bullets made the cut for me today. 15 consecutive shots under 3/4 MOA.” –Jim See
It’s said that you “can never have too much accuracy”, but there are acceptable standards for each discipline, and they’re not the same. A 100/200 yard Benchrest shooter will be sorely disappointed with a rifle/ammo set-up that can only deliver half-MOA. On the other hand, a PRS competitor like Jim See can achieve great success with a lesser degree of precision. This means you can save time and money. You can run your barrels longer between cleanings, and you don’t have to go “full OCD” when loading your ammo. The PRS shooter does not need to weigh-sort primers, or load powder to single-kernel standards. Proof is the performance. Jim See has been a podium finisher at many PRS and tactical events. Learn more about Jim’s gunsmithing and training operations at Jim’s Facebook Page.
Download This Load Development Target
Jim’s target seemed a bit familiar. AccurateShooter.com created this Diamond and Dot Target a few years back. On each aiming point, there are high-contrast black horizontal and vertical lines for aligning your cross-hairs. The gray circle lets you see the bullet impacts above, without obliterating the red diamond, which is quite useful for precise aiming (we put fine cross-hairs on the points of the diamond). This target sheet includes data entry tables below each of the three aim points. There are many other free targets out there, but this format is very popular. We’re pleased to see Jim using it. You can download this and dozens of other FREE Targets from the AccurateShooter.com Target Page.
Ace tactical shooter and gunsmith Jim See of Elite Accuracy LLC has tested a Frankford Arsenal rotary brass tumbler. Like the older Thumbler’s Tumblers, this can tumble your cases in a liquid solution. The wet-tumbling process worked very well Jim reports. Posting on Facebook, Jim noted: “I was super impressed with the Frankford Arsenal rotary tumbler and cleaning packs they sent me. I ran 350 pieces of brass for one hour. They now look great.” Jim appreciated not having to deal with dry tumbling media, such as crushed walnut shells. Dry media produces dust and can leave residues or clog flash-holes.
Interestingly, Jim recommends you try wet-tumbling WITHOUT using stainless media. At least give it a try. Tumbling without media simplifies the process and you don’t have to worry about pins stuck in flash-holes or case-necks*. Jim reports: “Stainless steel pins come with the Frankford kit, but mine hit the trash right out of the box. There is no need to clean the inside of your cases 100% and that’s all the pins add to the equation. The brass bumping brass with hot water and Frankford’s liquid cleaner works great all by itself.” One wag stated: “That’s great to hear. Stainless steel pins are a PITA.”
Other Facebook posters concurred with Jim’s evaluation of the Frankford Arsenal Rotary Tumbler:
“I’ve had one for a couple years, and it works well. I usually run about 250-300 Dasher cases at once in it. But I use the pins because I’m OCD about clean brass.” — David W.
“I’ve had one for a year and a half and it definitely works with or without pins.” — Luke C.
“I got one about six months ago and have yet to use any stainless steel media [pins]. I just use some dawn, distilled water, and Lemi Shine®. Turns nasty 5.56 range brass bright and shiny.” — Brian D.
“I don’t use the pins either and use a combination of Dawn soap and Lemi Shine.” — Jon N.G.
This video shows how to assemble and operate the Frankford rotary tumbler. But note, Jim See does NOT feel that it is necessary to use stainless media.
How to Dry Your Brass — Hair Dryer Vs. Machine
The downside of wet tumbling is that you end up with a pile of wet brass at the end of the cleaning cycle. There are many ways to dry brass, from drying in the sun to using a kitchen oven (be careful not to “overcook” your brass). One Facebook poster asked Jim: “What is your drying method for wet brass, and how long does it take?”
Jim See replied: “To start I just drain off the dirty water, and rinse the brass with clean hot water. Then I roll the brass on a towel for 30 seconds and put the brass in a one-gallon bucket. Next I insert a hair dryer in the bucket (with the brass) and let it run for about 5 minutes. With this procedure, the drying process for me is done in less than 10 minutes.”
Jack Lanhart has another method: “I use a food dehydrator. It takes 30 to 45 minutes.”
For those who don’t want to mess with towels and hair dryers, Frankford Arsenal offers a matching Platinum Series Case Dryer that simplifies the process of drying brass. Lyman also makes an excellent Cyclone Case Dryer. These drying machines each cost about $65.00 and both have multiple levels so you can separate different types of cartridge brass. Lyman states that “The forced heated air circulation of the Cyclone will dry your brass inside and out within an hour or two, with no unsightly water spots.” The Lyman dryer can also be used for ultrasonically-cleaned gun parts.
*The Frankford Rotary tumbler does include media separators if you choose to use the provided pins or other media. CLICK HERE for diagram showing how to use media separators.
Many hunters and precision rifle competitors use muzzle brakes because these ported devices reduce felt recoil significantly. That make s real difference getting back on target for quick follow-up shots. While many rifle owners appreciate the benefits of muzzle brakes, they may also neglect their brakes, allowing hard carbon and powder residue to build up. Not good. You should regularly clean your muzzle brake to remove fouling and carbon build-up.
As Mark Edgreen posted: “Carbon build up on the crown and in the brake is a recipe for poor accuracy.” And another gunsmith reported that customers complained about guns that “shot out way too early” but they only needed to have the brakes cleaned.
Gunsmith and PRS/NRL competitor Jim See recently reminded his Facebook Fans about the importance of cleaning muzzle brakes: “How many times do I have to say it? You need to maintain your rifles. Clean your muzzle brakes people!”. Jim, who runs Elite Accuracy LLC, notes that hard carbon build-up in brakes can definitely harm accuracy. Look at this example:
Muzzle Brake Cleaning Methods
There are various methods for cleaning a brake, we list a variety of techniques, but we would start with NON-corrosive ultrasound. You’ll want to remove the muzzle device before doing these tasks.
1. Use Ultrasonic Cleaning Machine with cleaning solution. This may be the most efficient method: “I place my brake in the ultrasonic cleaner. Shiney as new.” (Jim Moseley).
2. Spray with commercial Carb Cleaner and brush. Then apply anti-corrosion coating.
3. Soak in half hydrogen peroxide and half vinegar. Suggestion: “Let sit over night and carbon melts off. Brush remaining carbon off, rinse and put the brake back on.” Apply anti-corrosive before mounting.
4. Soak in 50/50 solution of water and white vinegar and brush. (Be sure to apply anti-corrosion coating, such as Eezox, after soaking).
5. Tumble in liquid solution with stainless pins. Comment: “Comes out slightly faded, but perfectly clean on stainless, non-painted brakes though.” Warning — do NOT do this with threaded brakes — tumbling could affect threads of screw-on brakes. Also, tumbling can harm painted or Cerakote finishes.
Gunsmithing Tip: By fitting the muzzle brake so that the barrel crown is slightly forward, it is easier to wipe carbon fouling off the end of the barrel. See photo:
Our friend Jim See of Elite Accuracy LLC tested the depth-adjustable hand priming tool from Frankford Arsenal. This product, called the Platinum Series Perfect Seat Hand Primer has some unique features. Primer seating depth can be adjusted with a handy wheel in the tool’s center handgrip. Each “click” of the wheel moves the primer post .001″ (one one-thousandth of an inch). Additionally, the design of the case-holder allows quick and easy removal of a primed case. The unit ships with a full set of shell-holders to match all types of cases. Like many other hand priming units, the primers are loaded into a flip tray that attaches to the head of the tool.
Here is Jim See’s quick review of the Frankford priming tool:
“The Frankford Arsenal perfect hand-priming tool is legit. The tool is built heavy and strong. The only plastic parts in it are the tray and lid. The [primer] seating depth adjustment… is simple and accurate. Easy to operate. I primed 1000 cases, averaging 23 per minute. I adjusted the depth of seating between two different lots of brass in seconds. The system seats primers easily with one hand operation. The cases slide out on their own after seating. Insert, seat, reach for a new case at the same time as you are operating the lever, case slides out and you are inserting the next piece.”
Overall, Jim was “Super impressed with the quality and the results. This thing is super smooth — way less pressure needed than my Lee or RCBS. It’s a lot faster too.” Jim add that one can switch from small to large primer posts in 10-15 seconds.
This Video Shows the Frankford Priming Tool in Operation:
Even with premium brass you may want to adjust your primer seating depth: “Every thing has a tolerance that is acceptable in manufacturing. If primer pocket depth has a .005″ tolerance and the primers themselves have a .002″ tolerance you can see why adjustments would be needed. In this case the two lots were manufactured on year apart. Could you expect them to be identical?”
Editor: Many new barrels will deliver higher velocities with the same load after 100-150 rounds through the bore. The exact reasons for this speed-up are not 100% certain, and velocity increases (if any) will vary from one barrel to the next. But this “speeding up” phenomenon is common, so be prepared if this happens with your next barrel. If you do experience a significant velocity increase you should probably re-tune your load AFTER the velocity stabilizes at the higher level.
From the Sierra Bullets Newsletter Article by Mark Walker, Sierra New Product Development Director
In a previous post, I discussed a couple of methods to tune a load to your barrel to help achieve the best accuracy possible. People most often work on load tuning if they get a new rifle or have a different barrel installed. In both instances, the barrel is new and has not been fired very much. According to most competitive shooters, this is the most accurate your barrel will ever be, so getting it tuned and shooting accurately is a priority.
The Speed Up Phenomenon After 100-150 Rounds
Even though after you work up a load and your new barrel is shooting great, a lot of shooters notice that at around 100 to 150 rounds their rifle may stop shooting as accurately. I had this happen to a rifle and I was confused as to why something that worked so well to begin with would all of a sudden quit shooting. I decided to break out the chronograph to do another load work up to see what was going on. To my surprise, the velocity had increased around 80 fps over the original velocity! After performing another ladder test and adjusting the seating depth, the rifle was once again shooting well.
There are several thoughts on why this may happen, however, you can rest assured that it does happen. One thought is that as the barrel breaks in, the tooling marks in the throat of the chamber smooth out and allow less resistance to the bullet as it exits the bore thereby increasing speed. Another idea is that the throat area starts to get a little rough which in turn causes more resistance which increases pressure and therefore more velocity. I’m sure there are some out there who have a better understanding as to why this happens, but it can definitely affect the accuracy of your rifle. So be aware and never be afraid to rework a load to keep your rifle in tune.
Experts Confirm That Barrel Speed-Up Is Common Two respected shooters have observed an increase in velocity with new barrels, typically after 100 rounds. Gunsmith and Hall-of-Fame benchrest shooter Thomas “Speedy” Gonzalez has documented barrel speed-up with testing. Moreover, Speedy’s bore-scope barrel inspections revealed a smoothing of the barrel lands. Jim See, a top PRS competitor, has encountered barrel speed-up many times. Accordingly, he re-tunes his load at 150 rounds.
“Alex Lipworth and I documented this phenomenon about four years ago and I have told all my customers about this. My son Mikee would shoot 100 rounds through all new barrels we planned on shooting before we would begin to do load development. We had a shooting snail that caught all the bullets set up in front of an indoor bench. We called it a wear-in process because upon careful examination of the bore when the ‘Speed Up’ takes place the cut-rifled bore resembles that more of a button-rifled barrels with the lands taking on more the softer look of a buttoned bore.” — Speedy Gonzalez
“Seen it [barrel velocity increase] too many times to count. All my match barrels get a ‘generic round’ loaded for them, which has worked well in barrels historically. After I hit 150 rounds I fine-tune the load and never look back, until the tube starts to slow down at it’s life end.” — Jim See
This impressive 15-round group was shot by Jim See of Elite Accuracy.
Different Shooting Disciplines Demand Different Levels of Precision/Accuracy
In the rapid-fire 3-Gun game, you could probably “clean” most stages with a 2-MOA rifle. By contrast, in the short-range group benchrest game, to compete with the best, you’ll need a rifle that shoots in the “ones” (i.e. 0.1-0.19 MOA) in perfect conditions. In 1000-yard F-Class competition, the top shooters want a rifle that will hold one-third-MOA of vertical at that distance.
What is your standard of accuracy? How good is “good enough”. Jim See, a skilled gunsmith and successful PRS competitor, recently answered that question for his tactical discipline. For the kind of matches Jim shoots, he likes to have a rifle that will hold half-MOA for five (5) shots, 3/4-MOA for 15 shots, and 1 MOA for twenty shots. Remarkably, Jim’s rifle can do that with factory ammo. Above is an impressive 15-shot group shot with .260 Remington Federal Premium Ammo.
“I say it all the time, my loads need to print 5 under 1/2″, 10 under 3/4″, and 20 under 1″. It’s simple, if a hot barrel will keep 20 rounds fired in succession under my standard it will be a good barrel and load for Precision Match Shooting. Federal Premium Gold Metal Match .260 with Sierra bullets made the cut for me today. 15 consecutive shots under 3/4 MOA.” –Jim See
It’s said that you “can never have too much accuracy”, but there are acceptable standards for each discipline, and they’re not the same. A 100/200 yard Benchrest shooter will be sorely disappointed with a rifle/ammo set-up that can only deliver half-MOA. On the other hand, a PRS competitor like Jim See can achieve great success with a lesser degree of precision. This means you can save time and money. You can run your barrels longer between cleanings, and you don’t have to go “full OCD” when loading your ammo. The PRS shooter does not need to weigh-sort primers, or load powder to single-kernel standards. Proof is the performance. Jim See recently took third place at the Spearpoint Shootout, and he has been a podium finisher at other events. Learn more about Jim’s gunsmithing and training operations at EliteAccuracy.com.
Download This Load Development Target
Jim’s target seemed a bit familiar. AccurateShooter.com created this Diamond and Dot Target a few years back. On each aiming point, there are high-contrast black horizontal and vertical lines for aligning your cross-hairs. The gray circle lets you see the bullet impacts above, without obliterating the red diamond, which is quite useful for precise aiming (we put fine cross-hairs on the points of the diamond). This target sheet includes data entry tables below each of the three aim points. There are many other free targets out there, but this format is very popular. We’re pleased to see Jim using it. You can download this and dozens of other FREE Targets from the AccurateShooter.com Target Page.
Many hunters and precision rifle competitors use muzzle brakes because these ported devices reduce felt recoil significantly. That makes a real difference getting back on target for quick follow-up shots. While many rifle owners appreciate the benefits of muzzle brakes, they may also neglect their brakes, allowing hard carbon and powder residue to build up. Not good. You should regularly clean your muzzle brake to remove fouling and carbon build-up.
As Mark Edgreen posted: “Carbon build up on the crown and in the brake is a recipe for poor accuracy.” And another gunsmith reported that customers complained about guns that “shot out way too early” but they only needed to have the brakes cleaned.
Gunsmith and PRS/NRL competitor Jim See recently reminded his Facebook Fans about the importance of cleaning muzzle brakes: “How many times do I have to say it? You need to maintain your rifles. Clean your muzzle brakes people!”. Jim, who runs Elite Accuracy LLC, notes that hard carbon build-up in brakes can definitely harm accuracy. Look at this example:
Muzzle Brake Cleaning Methods
There are various methods for cleaning a brake, we list a variety of techniques, but we would start with NON-corrosive ultrasound. You’ll want to remove the muzzle device before doing these tasks.
1. Use Ultrasonic Cleaning Machine with cleaning solution. This may be the most efficient method: “I place my brake in the ultrasonic cleaner. Shiney as new.” (Jim Moseley).
2. Spray with commercial Carb Cleaner and brush. Then apply anti-corrosion coating.
3. Soak in half hydrogen peroxide and half vinegar. Suggestion: “Let sit over night and carbon melts off. Brush remaining carbon off, rinse and put the brake back on.” Apply anti-corrosive before mounting.
4. Soak in 50/50 solution of water and white vinegar and brush. (Be sure to apply anti-corrosion coating, such as Eezox, after soaking).
5. Tumble in liquid solution with stainless pins. Comment: “Comes out slightly faded, but perfectly clean on stainless, non-painted brakes though.” Warning — do NOT do this with threaded brakes — tumbling could affect threads of screw-on brakes. Also, tumbling can harm painted or Cerakote finishes.
Gunsmithing Tip: By fitting the muzzle brake so that the barrel crown is slightly forward, it is easier to wipe carbon fouling off the end of the barrel. See photo:
Editor: Many new barrels will deliver higher velocities with the same load after 100-150 rounds through the bore. The exact reasons for this speed-up are not 100% certain, and velocity increases (if any) will vary from one barrel to the next. But this “speeding up” phenomenon is common, so be prepared if this happens with your next barrel. If you do experience a significant velocity increase you should probably re-tune your load AFTER the velocity stabilizes at the higher level.
From the Sierra Bullets Blog Article by Mark Walker, Sierra New Product Development Director
In a previous post, I discussed a couple of methods to tune a load to your barrel to help achieve the best accuracy possible. People most often work on load tuning if they get a new rifle or have a different barrel installed. In both instances, the barrel is new and has not been fired very much. According to most competitive shooters, this is the most accurate your barrel will ever be, so getting it tuned and shooting accurately is a priority.
The Speed Up Phenomenon After 100-150 Rounds
Even though after you work up a load and your new barrel is shooting great, a lot of shooters notice that at around 100 to 150 rounds their rifle may stop shooting as accurately. I had this happen to a rifle and I was confused as to why something that worked so well to begin with would all of a sudden quit shooting. I decided to break out the chronograph to do another load work up to see what was going on. To my surprise, the velocity had increased around 80 fps over the original velocity! After performing another ladder test and adjusting the seating depth, the rifle was once again shooting well.
There are several thoughts on why this may happen, however, you can rest assured that it does happen. One thought is that as the barrel breaks in, the tooling marks in the throat of the chamber smooth out and allow less resistance to the bullet as it exits the bore thereby increasing speed. Another idea is that the throat area starts to get a little rough which in turn causes more resistance which increases pressure and therefore more velocity. I’m sure there are some out there who have a better understanding as to why this happens, but it can definitely affect the accuracy of your rifle. So be aware and never be afraid to rework a load to keep your rifle in tune.
Experts Confirm That Barrel Speed-Up Is Common Two respected shooters have observed an increase in velocity with new barrels, typically after 100 rounds. Gunsmith and Hall-of-Fame benchrest shooter Thomas “Speedy” Gonzalez has documented barrel speed-up with testing. Moreover, Speedy’s bore-scope barrel inspections revealed a smoothing of the barrel lands. Jim See, a top PRS competitor, has encountered barrel speed-up many times. Accordingly, he re-tunes his load at 150 rounds.
“Alex Lipworth and I documented this phenomenon about four years ago and I have told all my customers about this. My son Mikee would shoot 100 rounds through all new barrels we planned on shooting before we would begin to do load development. We had a shooting snail that caught all the bullets set up in front of an indoor bench. We called it a wear-in process because upon careful examination of the bore when the ‘Speed Up’ takes place the cut-rifled bore resembles that more of a button-rifled barrels with the lands taking on more the softer look of a buttoned bore.” — Speedy Gonzalez
“Seen it [barrel velocity increase] too many times to count. All my match barrels get a ‘generic round’ loaded for them, which has worked well in barrels historically. After I hit 150 rounds I fine-tune the load and never look back, until the tube starts to slow down at it’s life end.” — Jim See


 Two respected shooters have observed an increase in velocity with new barrels, typically after 100 rounds. Gunsmith and Hall-of-Fame benchrest shooter Thomas “Speedy” Gonzalez has documented barrel speed-up with testing. Moreover, Speedy’s bore-scope barrel inspections revealed a smoothing of the barrel lands. Jim See, a top PRS competitor, has encountered barrel speed-up many times. Accordingly, he re-tunes his load at 150 rounds.


