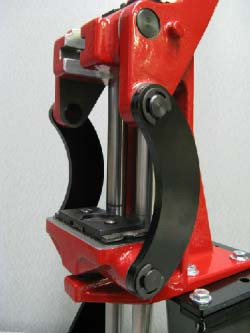
Forum member Erik Cortina has produced a series of YouTube videos about reloading hardware and precision hand-loading. Here we feature Erik’s video review of the Forster Co-Ax® reloading press. The red-framed Co-Ax is unique in both design and operation. It boasts dual guide rods and a central handle. You don’t screw in dies — you slide the die lock ring into a slot. This allows dies to float during operation.
Erik does a good job of demonstrating the Co-Ax’s unique features. At 1:00 he shows how to slide the dies into the press. It’s slick and easy. At the two-minute mark, Erik shows how sliding jaws clasp the case rim (rather than a conventional shell-holder). The jaws close as the ram is raised, then open as it is lowered. This makes it easy to place and remove your cases.
At the 5:20 mark, Erik shows how spent primers run straight down into a capture cup. This smart system helps keep your press and bench area clean of primer debris and residues.
While many Co-Ax users prime their cases by hand, the Co-Ax can prime cases very reliably. The priming station is on top of the press. Erik demonstrates the priming operation starting at 4:20.
Smart Accessories for the Co-Ax from Inline Fabrications
Forum member Kevin Thomas also owns a Co-Ax press, which he has hot-rodded with accessories from Inline Fabrication. Kevin tells us: “Check out the add-ons available from Inline Fabrication for the Co-Ax. I recently picked up a riser mount and a set of linkages for mine and love the results. The linkages are curved. When you replace the original straight links with these, the work area opens up substantially and the the press becomes much easier to feed.” CLICK HERE for Co-Ax Accessories.
Inline Fabrications Forster Co-Ax Accessories
Forster Co-Ax Curved Side Linkage (For Better Access)
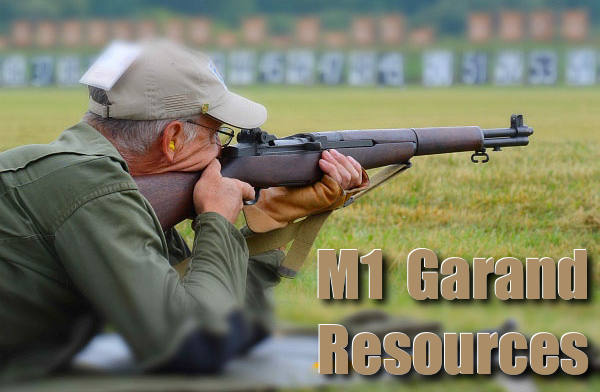
Take a look at that unusual target below. We bet you’ve never seen one of these before. It’s a 50-Yard Sighting Target for the M1 Garand (and other .30-06 Springfield vintage military rifles). It’s designed to allow a rifleman to confirm his zeros for multiple yardages all the way out to 1000 yards. But importantly, he can establish those zeros at a very “short” shooting facility, since the target is positioned at a mere 50 yards.
Here’s how it works. The target is placed at fifty (50) yards. You start at the bottom, aiming at the black circle. Then check your come-up table and work your way up, clicking step-by-step to the various horizontal lines set for 200, 300, 500, 600 and 1000 yards. This is NOT “spray and pray” — you need to have a pretty good idea of the clicks you need, based on your ammo’s ballistics. This target is calibrated for the U.S. Military M72 Ball Ammo. The targets are available from Champion’s Choice ($0.75 each) or from Creedmoor Sports (12 for $5.95).
Kevin Thomas used this target to get zeroed for a D-Day Anniversary Match at the Talladega Marksmanship Park a few seasons back. Kevin used the target for both his M1 Garand as well as his M1903A1 Springfield, both chambered for the .30-06 Springfield cartridge.
Zeroing at a Short Distance — How to Use the 50-Yard Sighting Target, by Kevin Thomas
As part of my preparation for the Garand Match at the CMP’s Talladega Marksmanship Park, I needed to zero my new M1 Garand, but I was crunched for time. I didn’t have time to get to my normal range and confirm zeros at actual yardages. But a 50-yard zero target came to the rescue. Made for M1s using the M72 National Match ammo, the target allows the shooter to establish fairly good zeros at 200, 300, 500, 600 and 1,000 yards if you’ve got access to a 50-yard range.
I have no idea when these 50-yard Sighting Targets were first developed, but they’ve been around for at least as long as I’ve been involved in this game (longer than I care to admit). It consists of a tall target, with a smallish black bullseye located at the bottom center. The bullseye is an aiming point only. Extending through the top of the target is a vertical line that runs directly up the center, to nearly the top of the paper. Across this, there are intersecting horizontal lines that are marked 200, 300, 500, 600 and 1,000.
The target was designed for the M1 Garand rifle using then-issued M72 National Match ammunition. This ammo launched a 173gr FMJBT bullet at approximately 2,640 FPS. It was a good load in its day, supersonic out to the 1,000-yard line. While that ammo is fairly scarce these days, this isn’t a problem for the handloader. My standard match load for the M1 Garand utilizes the 175gr Lapua Scenar HPBT, and delivers remarkably similar ballistic performance. Thus my normal Garand load translates nicely to this 50-yard target. Yes, this is by design. No point in reinventing the wheel when Lake City has already established what works!
In use, the shooter sets the target up at a measured 50 yards, and (this is critical) checks the vertical line with a plumb bob or a carpenter’s level, to ensure that it is absolutely vertical. Once the target is set, the rifle is fired and the group noted. From there, it is a simple matter of zeroing it normally to bring the groups into alignment with the vertical line, at the elevation needed for a particular range. Once your group is hammering the intersection of the vertical line and the horizontal line marked “200”, you have established your 200-yard zero for that rifle. Record the number of clicks, and you’re good to go. Raise the impacts up to coincide with the line marked “300” and you now have a 300-yard zero as well. And so on, right up the target. Record those settings in your data book, and you’re ready to go to the range at the full distances. If done carefully, you may be in the X-Ring, but at the very least, you’ll be well-centered and ready to get some hard dope recorded for future shoots.
The same target can also be used with an M14/M1A, at least at the shorter distances. The ballistics of the M118 and the current M118LR are similar enough that this will get you on target at the full distances, probably requiring just a half MOA or so change from the 50 yard zero you recorded. Same bullets, moving at a slightly more sedate 2,550 fps, you’ll be in the ballpark at least.
Forum member Erik Cortina has produced a series of YouTube videos about reloading hardware and precision hand-loading. Here we feature Erik’s video review of the Forster Co-Ax® reloading press. The red-framed Co-Ax is unique in both design and operation. It boasts dual guide rods and a central handle. You don’t screw in dies — you slide the die lock ring into a slot. This allows dies to float during operation.
Erik does a good job of demonstrating the Co-Ax’s unique features. At 1:00 he shows how to slide the dies into the press. It’s slick and easy. At the two-minute mark, Erik shows how sliding jaws clasp the case rim (rather than a conventional shell-holder). The jaws close as the ram is raised, then open as it is lowered. This makes it easy to place and remove your cases.
At the 5:20 mark, Erik shows how spent primers run straight down into a capture cup. This smart system helps keep your press and bench area clean of primer debris and residues.
While many Co-Ax users prime their cases by hand, the Co-Ax can prime cases very reliably. The priming station is on top of the press. Erik demonstrates the priming operation starting at 4:20.
Smart Accessories for the Co-Ax from Inline Fabrications
Forum member Kevin Thomas also owns a Co-Ax press, which he has hot-rodded with accessories from Inline Fabrications. Kevin tells us: “Check out the add-ons available from Inline Fabrications for the Co-Ax. I recently picked up a riser mount and a set of linkages for mine and love the results. The linkages are curved. When you replace the original straight links with these, the work area opens up substantially and the the press becomes much easier to feed.” CLICK HERE for Co-Ax Accessories.
Inline Fabrications Forster Co-Ax Accessories
Forster Co-Ax Curved Side Linkage (For Better Access)
A few season back, our friend Kevin Thomas acquired a bit of living history — a reproduction Model 1873 Trapdoor Springfield. Here is Kevin’s story of his new rifle and the legacy it carries.
Today marks the 143rd Anniversary of Lt.Col. George Armstrong Custer’s historic ride into the valley of the Little Big Horn, along with 200+ men of the U.S. Seventh Cavalry. June 25, 1876 did not go well, as Custer and his men became a well-known, sad footnote in U.S. history. [Editor: Well it was sad for Custer fans. Native Americans have a different perspective.]
For years now, I’ve wanted one of the rifles Custer and his men carried that day, a Model 1873 Trapdoor Springfield, chambered for the 45/70 cartridge. I finally acquired one, when I walked into a gunstore a while back and saw a handsome repro Trapdoor sitting peacefully on the shelf. It called to me.
Somewhere in the distance, I could hear the bugle calls, the Sioux and Cheyenne war cries and the thundering of cavalry across the plain. It simply had to go home with me, and so it did. It seemed an especially insistent demand with this being the 138th anniversary and all, so I took it along to our regular Wednesday night practice session. All I can say is, I’m glad we don’t have to do rapid-fire with one of these in our matches today, because they do have a mule-like kick to them!
The Trapdoors were a cost saving measure that the Armory came up with at the end of the Civil War, to convert muzzle-loading Springfield muskets into breech-loading cartridge arms. A quick look will give several dead giveaways that many of the parts on the “new” rifle were actually interchangeable with the old 1861 and 1863 Springfield muskets. The parts that were altered or newly fabricated were relatively minor changes.
Above, you can see where these rifles got their name. Loading was done by flipping a lever which opened up a trap door that provided access to the chamber. Flipping that same lever and opening the trap door then ejected the case after firing.
Here is the opposite side, trapdoor open. The ring and slide on the side of the stock was to facilitate an attachment point for a lanyard that the troopers wore over their shoulders. Remember, they often used these while at a full gallop, not an easy feat!
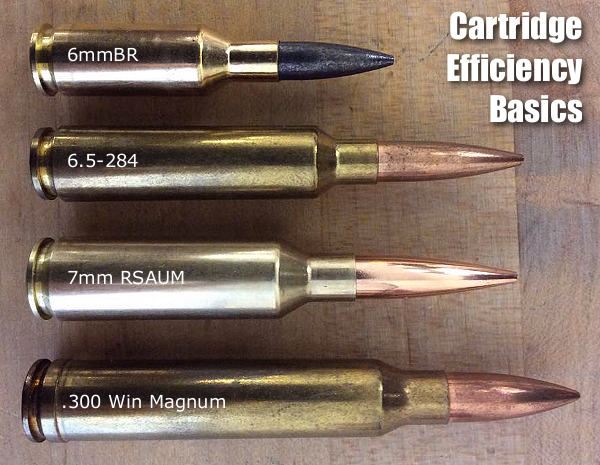
Efficient cartridges make excellent use of their available powder and case/bore capacity. They yield good ballistic performance with relatively little recoil and throat erosion.
Cartridge Efficiency: A Primer (pun intended!)by USAMU Staff
Each week, the U.S. Army Marksmanship Unit (USAMU) publishes a reloading article on its Facebook Page. In this week’s article, the USAMU discusses cartridge case efficiency and its benefits. While this is oriented primarily toward NRA High Power Rifle and Long Range (1000-yard) competition, these factors also apply to medium/big game hunters. Assuming one’s rifle and ammunition are accurate, key considerations include ballistic performance (i.e., resistance to wind effects, plus trajectory), recoil, and throat erosion/barrel life.
Efficient cartridges make excellent use of their available powder and case/bore capacity. They yield good ballistic performance with relatively little recoil and throat erosion. A classic example in the author’s experience involved a featherweight 7x57mm hunting/silhouette rifle. When loaded to modern-rifle pressures, just 43-44 grains of powder pushed a 139gr bullet at 2900 fps from its 22” barrel. Recoil in this light rifle was mild; it was very easy to shoot well, and its performance was superb.
An acquaintance chose a “do everything” 7mm Remington Magnum for use on medium game at short ranges. A larger, heavier rifle, it used ~65 grains of powder to achieve ~3200 fps with similar bullets — from its 26″ barrel. Recoil was higher, and he was sensitive to it, which hampered his shooting ability.
Similarly efficient calibers include the 6mm BR [Norma], and others. Today’s highly-efficient calibers, such as 6mm BR and a host of newer developments might use 28-30 grains of powder to launch a 105-107gr match bullet at speeds approaching the .243 Winchester. The .243 Win needs 40-45 grain charges at the same velocity.
Champion-level Long Range shooters need every ballistic edge feasible. They compete at a level where 1″ more or less drift in a wind change could make the difference between winning and losing. Shooters recognized this early on — the then-new .300 H&H Magnum quickly supplanted the .30-06 at the Wimbledon winner’s circle in the early days.
The .300 Winchester Magnum became popular, but its 190-220gr bullets had their work cut out for them once the 6.5-284 and its streamlined 140-142gr bullets arrived on the scene. The 6.5-284 gives superb accuracy and wind performance with about half the recoil of the big .30 magnums – albeit it is a known barrel-burner.
Currently, the 7mm Remington Short Action Ultra-Magnum (aka 7mm RSAUM), is giving stellar accuracy with cutting-edge, ~180 grain bullets, powder charges in the mid-50 grain range and velocities about 2800+ fps in long barrels. Beyond pure efficiency, the RSAUM’s modern, “short and fat” design helps ensure fine accuracy relative to older, longer cartridge designs of similar performance.
Recent design advances are yielding bullets with here-to-fore unheard-of ballistic efficiency; depending on the cartridge, they can make or break ones decision. Ballistic coefficients (“BC” — a numerical expression of a bullet’s ballistic efficiency) are soaring to new heights, and there are many exciting new avenues to explore.
The ideal choice [involves a careful] balancing act between bullet BCs, case capacity, velocity, barrel life, and recoil. But, as with new-car decisions, choosing can be half the fun!
Factors to Consider When Evaluating Cartridges
For competitive shooters… pristine accuracy and ballistic performance in the wind are critical. Flat trajectory benefits the hunter who may shoot at long, unknown distances (nowadays, range-finders help). However, this is of much less importance to competitors firing at known distances.
Recoil is an issue, particularly when one fires long strings during competition, and/or multiple strings in a day. Its effects are cumulative; cartridges with medium/heavy recoil can lead to shooter fatigue, disturbance of the shooting position and lower scores.
For hunters, who may only fire a few shots a year, recoil that does not induce flinching during sight-in, practice and hunting is a deciding factor. Depending on their game and ranges, etc., they may accept more recoil than the high-volume High Power or Long Range competitor.
Likewise, throat erosion/barrel life is important to competitive shooters, who fire thousands of rounds in practice and matches, vs. the medium/big game hunter. A cartridge that performs well ballistically with great accuracy, has long barrel life and low recoil is the competitive shooter’s ideal. For the hunter, other factors may weigh more heavily.
Cartridge Efficiency and Energy — Another Perspective
Lapua staffer Kevin Thomas explains that efficiency can be evaluated in terms of energy:
“Cartridge efficiency is pretty straight forward — energy in vs. energy out. Most modern single-based propellants run around 178-215 ft/lbs of energy per grain. These figures give the energy potential that you’re loading into the rifle. The resulting kinetic energy transferred to the bullet will give you the efficiency of the round. Most cases operate at around 20-25% efficiency. This is just another way to evaluate the potential of a given cartridge. There’s a big difference between this and simply looking at max velocities produced by various cartridges.”
Take a look at that unusual target below. We bet you’ve never seen one of these before. It’s a 50-Yard Sighting Target for the M1 Garand. It’s designed to allow a rifleman to confirm his zeros for multiple yardages all the way out to 1000 yards. But importantly, he can establish those zeros at a very “short” shooting facility, since the target is positioned at a mere 50 yards.
Here’s how it works. The target is placed at fifty (50) yards. You start at the bottom, aiming at the black circle. Then check your come-up table and work your way up, clicking step-by-step to the various horizontal lines set for 200, 300, 500, 600 and 1000 yards. This is NOT “spray and pray” — you need to have a pretty good idea of the clicks you need, based on your ammo’s ballistics. This target is calibrated for the U.S. Military M72 Ball Ammo. The targets are available from Champion’s Choice ($0.75 each) or from Creedmoor Sports (12 for $5.95).
Lapua’s Kevin Thomas used this target to get zeroed for the recent D-Day Anniversary Match at the Talladega Marksmanship Park. Kevin used the target for both his M1 Garand as well as his M1903A1 Springfield, both chambered for the .30-06 Springfield cartridge.
Zeroing at a Short Distance — How to Use the 50-Yard Sighting Target, by Kevin Thomas
As part of my preparation for the Garand Match at the CMP’s Talladega Marksmanship Park, I needed to zero my new M1 Garand, but I was crunched for time. I didn’t have time to get to my normal range and confirm zeros at actual yardages. But a 50-yard zero target came to the rescue. Made for M1s using the M72 National Match ammo, the target allows the shooter to establish fairly good zeros at 200, 300, 500, 600 and 1,000 yards if you’ve got access to a 50-yard range.
I have no idea when these 50-yard Sighting Targets were first developed, but they’ve been around for at least as long as I’ve been involved in this game (longer than I care to admit). It consists of a tall target, with a smallish black bullseye located at the bottom center. The bullseye is an aiming point only. Extending through the top of the target is a vertical line that runs directly up the center, to nearly the top of the paper. Across this, there are intersecting horizontal lines that are marked 200, 300, 500, 600 and 1,000.
The target was designed for the M1 rifle using then-issued M72 National Match ammunition. This ammo launched a 173gr FMJBT bullet at approximately 2,640 fps. It was a good load in its day, supersonic out to the 1,000-yard line. While that ammo is fairly scarce these days, this isn’t a problem for the handloader. My standard match load for the M1 Garand utilizes the 175gr Lapua Scenar HPBT, and delivers remarkably similar ballistic performance. Thus my normal Garand load translates nicely to this 50-yard target. Yes, this is by design. No point in reinventing the wheel when Lake City has already established what works!
In use, the shooter sets the target up at a measured 50 yards, and (this is critical) checks the vertical line with a plumb bob or a carpenter’s level, to ensure that it is absolutely vertical. Once the target is set, the rifle is fired and the group noted. From there, it is a simple matter of zeroing it normally to bring the groups into alignment with the vertical line, at the elevation needed for a particular range. Once your group is hammering the intersection of the vertical line and the horizontal line marked “200”, you have established your 200-yard zero for that rifle. Record the number of clicks, and you’re good to go. Raise the impacts up to coincide with the line marked “300” and you now have a 300-yard zero as well. And so on, right up the target. Record those settings in your data book, and you’re ready to go to the range at the full distances. If done carefully, you may be in the X-Ring, but at the very least, you’ll be well-centered and ready to get some hard dope recorded for future shoots.
The same target can also be used with an M14/M1A, at least at the shorter distances. The ballistics of the M118 and the current M118LR are similar enough that this will get you on target at the full distances, probably requiring just a half MOA or so change from the 50 yard zero you recorded. Same bullets, moving at a slightly more sedate 2,550 fps, you’ll be in the ballpark at least.
Bryan Litz has recently popularized the short-range zeroing methods once again, reintroducing it to a new generation of shooters that may not have been aware of the old M72 short-range zero target. The same principles apply, and with the advent of the myriad computer ballistics programs and chronographs on the market today, any shooter can rapidly develop his own zero targets to accomplish the same result. But in the meantime, especially with the M1’s resurgent popularity, it’s nice to know that there’s an easy way to do things without a trip to a full-length range. The modestly-priced 50-Yard Sighting Targets can be ordered through Champion’s Choice or Creedmoor Sports.
Oh, and when I arrived in Talladega, yes, my zeros were good! All’s well that ends well. Safe Shooting! — Kevin Thomas
The NBRSA short-range Group Benchrest Nationals commenced this week at the St. Louis Benchrest Club Range in Wright City, Missouri. This will be followed, next week, by the World Benchrest Shooting Federation (WBSF) Championships at the same venue. Lapua staffer (and Forum member) Kevin Thomas trekked to Missouri for this combined National/International event. Kevin reports: “The best benchrest shooters [on the planet] will fight it out over the next two weeks to see who can shoot the smallest groups possible. And I’ve got to say, many of these shooters are truly amazing. It doesn’t hurt a bit that virtually all of them are shooting Lapua brass, either.”
The WBSF event has attracted shooters from around the world. Benchrest aces from Australia, Canada, Great Britain, and South Africa are already in St. Louis, with other international competitors set to arrive next week. On Monday, Day One of the NBRSA Nationals, the Unlimited Class rigs showed off their capabilities. As shown below, these heavy rail guns represent the pinnacle of precision in the 100/200-yard benchrest game.
Here’s living legend Walt Berger, founder of Berger Bullets. Now in his late 80s, Walt is still competing at a very high level. Walt is proof that Benchrest shooting is truly a “sport for a lifetime”.
Here’s a beautiful Missouri sunrise captured as Kevin Thomas drove to St. Louis for the 2015 NBRSA Benchrest Championships.
At SHOT Show 2013, Lapua announced it was expanding its line-up of Scenar L projectiles to include two new 6.5mm bullets and three new .30-caliber Scenar Ls. We applaud this news. This Editor has tested 6mm Scenar L bullets in his own rifles, and they have proven to be some of the most consistent bullets we have ever measured. The Scenar Ls also shot great in 8-twist barrels from Brux, Krieger, and PacNor.
Two New 6.5mm Scenar Ls
Guys with .260 Rem, 6.5×47, 6.5 Creedmoor, and 6.5-284 rifles have been eagerly awaiting the new 6.5mm Scenar Ls. These will be offered in two weights: 120 grains and 136 grains.
Scenar Ls in .30 Caliber
Lapua will release three new .30-Caliber Scenar L bullets. Along with a new 155gr Palma bullet (GB 552), Lapua will offer a 175gr Scenar L (GB 550), plus a 220gr heavy-weight Scenar L (GB 551). In magnum and short magnum chamberings, the 220-grainers should prove very effective in Long Range comps.
What Makes the Scenar Ls So Good
While all Lapua Scenar bullets are made to exacting standards, Lapua “raised the bar” with its Scanar L series. Scenar L bullets feature closer weight tolerances, tighter jacket wall concentricity standards, and greater uniformity in every dimension. Building bullets this good isn’t easy — you have to get everything right — from the gilding metal cup, to the lead wire and jacket forming, core-jacket assembly, and finally boat-tail pressing and nose-tipping. To build L-series bullets to such high standards, Lapua had to adopt new manufacturing procedures, and install proprietary new machines and advanced instrumentation never seen before in bullet production. Lapua also took its already high quality control standards and kicked them up a notch.
New 6.5mm Scenar Ls — First Look
At SHOT Show, Lapua unveiled its much-awaited new 6.5mm (.264 caliber) Lapua Scenar L bullets. There are two (2) new 6.5mm Scenar Ls: a 120gr tangent ogive design and a 136gr multi-ogive design. These are both all-new bullets, though the new 120gr Scenar L bears a “family resemblance” to the current (and very accurate) 123gr standard Scenar. One look at the new 136-grainer, and you can see that this is NOT just a “tweak” of the popular 139gr standard Scenar. The new 136gr Scenar L has a streamlined secant-ogive shape that blends into a more conventional tangent ogive as the bullet approaches full diameter. This dual-ogive design enhances the bullet’s BC, making it more slippery. That should translate to less drop and less drift at long range.
These new 6.5-caliber Scenar Ls should hit the market very soon. Check with Grafs.com for availability. As soon as we can get our hands on Lapua’s new 120s and 136s we will test them in a 6.5×47 Lapua bench gun and see how they perform. The .30-Cal 175gr and 220gr Scenar-Ls should arrive by late spring according to Kevin Thomas of Lapua. Kevin is a member of our Forum and he can answer your questions about the entire line-up of Lapua projectiles, along with Lapua cartridge brass.


 A few season back, our friend Kevin Thomas acquired a bit of living history — a reproduction Model 1873 Trapdoor Springfield. Here is Kevin’s story of his new rifle and the legacy it carries.


 At SHOT Show 2013,
  New 6.5mm Scenar Ls — First Look


