On our main AccurateShooter.com site, you’ll find a good article by GS Arizona on the Basics of Neck Turning. If you’re new to the neck-turning game, or are just looking for good tips on improving your neck-turning procedures, you should read that article. Below we offer some highlights and photos from the article, but you’ll need to read the whole story to view all the illustrations and follow all the procedures step by step.
Why Should You Consider Neck Turning?
Let’s assume that your rifle doesn’t have a tight neck chamber that requires neck turning; if you have a tight neck chamber, of course, the answer to the question is “because you have to”. For the rest of us, and that includes the vast majority of Highpower shooters, neck turning isn’t a requirement, but it can be a useful way to bring your ammunition a small but meaningful step closer to that pot of gold at the end of the rainbow: perfection. I’m not talking about a theoretical improvement, but a real one, an improvement that lies in equalizing and optimizing the neck tension of your loaded rounds. Inconsistent neck tension is a real contributor to increased muzzle velocity variance which itself is a significant factor in increased elevation dispersion at long range. So there’s our basic reason for neck turning: to equalize and optimize neck tension in order to reduce elevation dispersion.
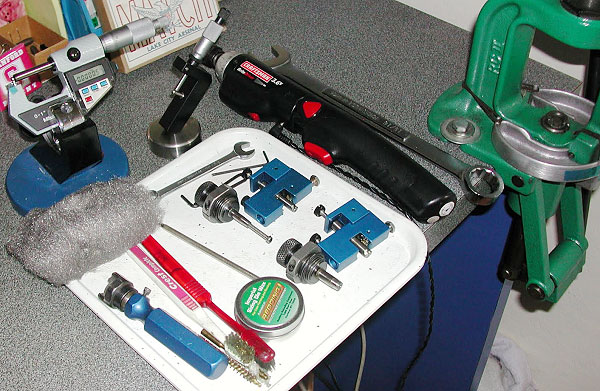
The Tools of the Trade
Here you see everything I use and a bit more. The press, a cordless screwdriver (always plugged in, turning is tough on the old battery), a couple of K&M neck turners (one set up for 6mm, the other for .30 caliber) an expander for each size, some Imperial lube, an old toothbrush or two to keep the cutter clean, a handle with a caseholder (for those emergencies when the screwdriver dies and there’s just one more case to go!), steel wool and a tubing micrometer finish the list of tools. Hey, I left the dial calipers out of the picture! They’re always handy, keep them around, but they are useless for measuring neck thickness, so don’t try. I usually use an Optivisor magnifier while I turn necks, very handy for a clear view of what’s happening on the neck.
Expanding the Neck
Put some lube on the inside of the case neck and run it into the expander. Really, this isn’t hard. I prefer to expand each case immediately before turning it as opposed to expanding all the cases and then turning them. Brass is somewhat springy and will tend to go back toward its original size; therefore, by expanding and turning immediately, you are more likely to have all cases fit the mandrel with the same degree of tightness and to get a more consistent depth of cut.
Cutter Adjustment for Cut Depth and Length
All the tools I’ve seen have pretty good adjustment instructions. The only thing they don’t tell you is that you should have five to ten spare cases to get it right initially. Anything of the right diameter will do while you learn, for instance, just use that cheap surplus .308 brass to do initial setup and save the precious .30-06 for when you know what you’re doing. Be patient and make your adjustments slowly; you’ll need to set the cutter for thickness as well as length of cut (just into the shoulder). The depth of cut (brass thickness) takes a bit of fiddling, the length of the cut is generally easy to set.
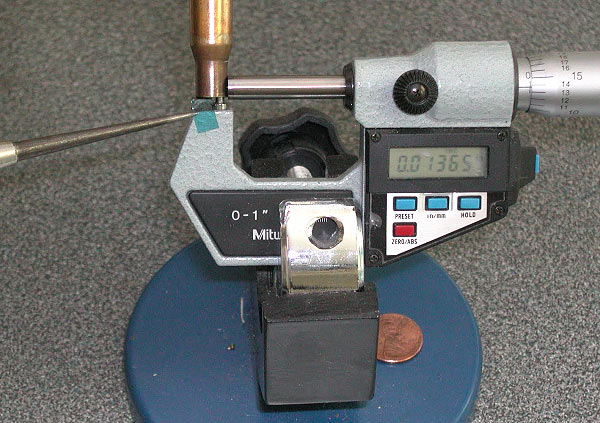
The Finished Product — A Perfectly Uniform Neck
If you read the whole article, and follow the procedures using quality tools, you should get very good results — with a little practice. To demonstrate, here’s an example of my finished, neck-turned brass. You’ll see there is a perfect, 0.0125″ thick neck. It’s very uniform around the circumference, usually I only see 1 or 2 ten-thousandths variance. Now, with the necks uniformed like this, we can select the bushing size that will give us our preferred neck tension and experiment with various levels of tension, secure in the knowledge that all of the cases will actually have the desired neck tension.
About the author — “GS Arizona” was the writing handle for German Salazar, a top-tier rifleman and gun writer. Sadly, German passed from a medical condition in 2022. German was instrumental in helping this website and our Forum get started, and we remember him as a very dear, valued friend.
German was a great individual, and a great asset to the sport. An attorney by trade, with an engineering background, German was one of the very best gun writers, who had high master shooting skills to match his writing abilities.
On our main AccurateShooter.com site, you’ll find a good article by GS Arizona on the Basics of Neck Turning. If you’re new to the neck-turning game, or are just looking for good tips on improving your neck-turning procedures, you should read that article. Below we offer some highlights and photos from the article, but you’ll need to read the whole story to view all the illustrations and follow all the procedures step by step.
Why Should You Consider Neck Turning?
Let’s assume that your rifle doesn’t have a tight neck chamber that requires neck turning; if you have a tight neck chamber, of course, the answer to the question is “because you have to”. For the rest of us, and that includes the vast majority of Highpower shooters, neck turning isn’t a requirement, but it can be a useful way to bring your ammunition a small but meaningful step closer to that pot of gold at the end of the rainbow: perfection. I’m not talking about a theoretical improvement, but a real one, an improvement that lies in equalizing and optimizing the neck tension of your loaded rounds. Inconsistent neck tension is a real contributor to increased muzzle velocity variance which itself is a significant factor in increased elevation dispersion at long range. So there’s our basic reason for neck turning: to equalize and optimize neck tension in order to reduce elevation dispersion.
The Tools of the Trade
Here you see everything I use and a bit more. The press, a cordless screwdriver (always plugged in, turning is tough on the old battery), a couple of K&M neck turners (one set up for 6mm, the other for .30 caliber) an expander for each size, some Imperial lube, an old toothbrush or two to keep the cutter clean, a handle with a caseholder (for those emergencies when the screwdriver dies and there’s just one more case to go!), steel wool and a tubing micrometer finish the list of tools. Hey, I left the dial calipers out of the picture! They’re always handy, keep them around, but they are useless for measuring neck thickness, so don’t try. I usually use an Optivisor magnifier while I turn necks, very handy for a clear view of what’s happening on the neck.
Expanding the Neck
Put some lube on the inside of the case neck and run it into the expander. Really, this isn’t hard. I prefer to expand each case immediately before turning it as opposed to expanding all the cases and then turning them. Brass is somewhat springy and will tend to go back toward its original size; therefore, by expanding and turning immediately, you are more likely to have all cases fit the mandrel with the same degree of tightness and to get a more consistent depth of cut.
Cutter Adjustment for Cut Depth and Length
All the tools I’ve seen have pretty good adjustment instructions. The only thing they don’t tell you is that you should have five to ten spare cases to get it right initially. Anything of the right diameter will do while you learn, for instance, just use that cheap surplus .308 brass to do initial setup and save the precious .30-06 for when you know what you’re doing. Be patient and make your adjustments slowly; you’ll need to set the cutter for thickness as well as length of cut (just into the shoulder). The depth of cut (brass thickness) takes a bit of fiddling, the length of the cut is generally easy to set.
The Finished Product — A Perfectly Uniform Neck
If you read the whole article, and follow the procedures using quality tools, you should get very good results — with a little practice. To demonstrate, here’s an example of my finished, neck-turned brass. You’ll see there is a perfect, 0.0125″ thick neck. It’s very uniform around the circumference, usually I only see 1 or 2 ten-thousandths variance. Now, with the necks uniformed like this, we can select the bushing size that will give us our preferred neck tension and experiment with various levels of tension, secure in the knowledge that all of the cases will actually have the desired neck tension.
About the author — “GS Arizona” was the writing handle for German Salazar, a top-tier rifleman and gun writer. Sadly, German passed from a medical condition in 2022. German was instrumental in helping this website and our Forum get started, and we remember him as a very dear, valued friend.
German was a great individual, and a great asset to the sport. An attorney by trade, with an engineering background, German was one of the very best gun writers, who had high master shooting skills to match his writing abilities.
At the request of our readers, we provide select “Deals of the Week”. Every Sunday afternoon or Monday morning we offer our Best Bargain selections. Here are some of the best deals on firearms, hardware, reloading components, optics, and shooting accessories. Be aware that sale prices are subject to change, and once clearance inventory is sold, it’s gone for good. You snooze you lose.
1. K&M Precision Shooting Products — 21% Off Labor Day Sale
⏺ Save 21% on high-quality K&M tools with Discount Code KMLBRDAY21
K&M Precision Shooting Products makes outstanding tools for handloaders. Right now, you can save a whopping 21% on purchases $50 or more. To get the 21% discount, use Code KMLBRDAY21 during checkout. But don’t delay — this special 21% discount expires at 11:59 pm on Tuesday September 7, 2021. NOTE: A few items, such as Benchtop Machines and Mitutoyo tools, are excluded.
2. MidwayUSA — Camo Tuesday Sale — HUGE Savings 9/7/2021
⏺ Great deals on hunting gear — Right in time for hunting season
MidwayUSA’s Camo Tuesday is a huge hunting SALE marking the start of the fall hunting season. You’ll find killer deals on optics, camo gear, rangefinders, GPS units, hunting boots, ammunition, and more. But don’t hesitate. Camo Tuesday only happens once a year. Many of the best deals will expire at 11:59 PM Eastern time on the evening of 8/7/2021. Along with the discounts, MidwayUSA is offering a Camo Tuesday sweepstakes package worth $4998.82.
3. Savage — $50 Factory Rebate Through 9/8/2021
⏺ Save $50 on versatile, affordable Savage hunting rifles
Hunting season is commencing soon. If you need a good affordable deer rifle, consider a Savage. There are many models under $400. Cabela’s has a Savage Axis XP with camo stock and 3-9x40mm Weaver scope for just $309.97. Plus, right now, you can get a $50 Factory REBATE with the purchase of any Savage Axis, Trophy, Apex, or Engage Hunter. Rifle must be purchased between 8/15/2021 through 9/8/2021.
⏺ Fast, programmable, accurate dispenser at great price
The Frankford Arsenal Intellidropper is a high-quality powder scale dispenser. It’s accurate to +/- one-tenth of a grain, dispenses in seconds, and can be controlled by a handy mobile App that can store various charges weights for different cartridges. This unit has a 7000-grain capacity with both Auto and manual trickle capability. IMPORTANT: Act quickly to secure the Intellidropper for $199.95 on Sale.
5. Brownells — Leupold 3-9x40mm VX-Freedom CDS with FREE onX Hunting APP and one-piece mount, $349.99
⏺ Scope can take Custom Knobs from Leupold, FREE onX hunting App
Here’s a good basic 3-9x40mm Leupold scope for hunting. Plus, with the CDS option, Leupold can provide custom turrets* for your cartridge’s ballistics. This scope also comes with a one-piece AR IMS mount. BONUS: When you buy any Leupold riflescope you get a FREE 3-month subscription to onX Hunt App. The #1 hunting GPS App, onX tracks your route and adds property boundaries and way-points to GPS/Satellite maps. OnX is a important tool for hunters, helping them find game more efficiently.
If you want a solid, reliable, American-made defensive shotgun, look no further. Locked & Loaded Ltd. has the 12ga Winchester SXP Defender FDE (flat dark earth color) scattergun on sale now for just $279.99. NOTE: you must add the Winchester SXP shotgun to the online cart to see the $279.99 fully-discounted price (see right).
⏺ Sophisticated, sturdy, versatile gun vise great for many tasks
Having a stable rifle vise is critical for doing any kind of work, especially mounting optics. One of our favorites is the Tipton Ultra Vise . It features different modules that can be quickly moved, rearranged or removed anywhere along the rail. Leveling feet are situated on all corners making leveling easier, and dual clamp technology rigidly holds any gun shape into place. NOTE: This package includes a FREE Wheeler Scope Leveling System.
The Tipton Ultra Gun Vise’s modular, interchangeable design can hold nearly any type of long gun. Ball and socket articulating clamp pads adapt to any surface. The front and rear clamps are both height and length adjustable with fast-turn knobs for quick clamping.
8. Amazon — Frankford Arsenal Hand Deprimer Tool, $29.79
⏺ Deprime fired cartridge brass anywhere — no press needed
Decapping brass can be a tedious, time-consuming, and messy chore. Simplify the task (and avoid messing up your reloading area) with the Frankford Arsenal Platinum Series Hand Deprimer Tool. This device lets you remove spent primers anywhere — no press needed and all the mess (cups/anvils/residue) stays in the capture chamber. You can deprime cases while watching TV. This tool features a Universal Collet that works with all case types. With good leverage, this tool is easy on the hands too.
9. Amazon — Jialitte Scope Bubble Level, $9.99
⏺ Effective and affordable — works for both 30mm and 1″ tubes
All serious rifle shooters need a scope level. This nicely-designed Jialitte Scope Bubble Level features a 30mm milled inside diameter, plus an inner insert ring so it will also fit 1″-diameter main tubes. That dual-diameter versatility is great. We also like the way the unit is nicely radiused, and has a low profile in the middle. Price is just $9.99 with free shipping. User reviews have been very positive. You could easily pay $30.00 or more for a 30mm scope level.
10. Amazon — Motion-Sensor LED Interior Light, $12.99
⏺ Activates when door opens, Rechargeable, 3 LED Light Levels
Here’s a great accessory for your Gun Safe or closet. This rechargeable LED Lamp turns itself on when you open the door, and then turns itself off when you close the door. With the supplied 3M adhesive magnetic strip you can easily attach the light to the inner walls of your gun safe. The unit can be quickly charged with a standard USB cord (no batteries to replace!). It works, it’s handy, and it’s inexpensive — just $12.99 on Amazon. These motion-sensor LED lamps can also be used in stairwells.
* To order a customized Leupold VX-Freedom 3-9x40mm CDS riflescope, provide the company with the specific ballistics you want in your turrets. The company will then create a custom turret system that works with your rifle system. Simply range your target, dial for the distance, and nail it in one perfect shot.
On our main AccurateShooter.com site, you’ll find a good article by GS Arizona on the Basics of Neck Turning. If you’re new to the neck-turning game, or are just looking for good tips on improving your neck-turning procedures, you should read that article. Below we offer some highlights and photos from the article, but you’ll need to read the whole story to view all the illustrations and follow all the procedures step by step.
Why Should You Consider Neck Turning?
Let’s assume that your rifle doesn’t have a tight neck chamber that requires neck turning; if you have a tight neck chamber, of course, the answer to the question is “because you have to”. For the rest of us, and that includes the vast majority of Highpower shooters, neck turning isn’t a requirement, but it can be a useful way to bring your ammunition a small but meaningful step closer to that pot of gold at the end of the rainbow: perfection. I’m not talking about a theoretical improvement, but a real one, an improvement that lies in equalizing and optimizing the neck tension of your loaded rounds. Inconsistent neck tension is a real contributor to increased muzzle velocity variance which itself is a significant factor in increased elevation dispersion at long range. So there’s our basic reason for neck turning: to equalize and optimize neck tension in order to reduce elevation dispersion.
The Tools of the Trade
Here you see everything I use and a bit more. The press, a cordless screwdriver (always plugged in, turning is tough on the old battery), a couple of K&M neck turners (one set up for 6mm, the other for .30 caliber) an expander for each size, some Imperial lube, an old toothbrush or two to keep the cutter clean, a handle with a caseholder (for those emergencies when the screwdriver dies and there’s just one more case to go!), steel wool and a tubing micrometer finish the list of tools. Hey, I left the dial calipers out of the picture! They’re always handy, keep them around, but they are useless for measuring neck thickness, so don’t try. I usually use an Optivisor magnifier while I turn necks, very handy for a clear view of what’s happening on the neck.
Expanding the Neck
Put some lube on the inside of the case neck and run it into the expander. Really, this isn’t hard. I prefer to expand each case immediately before turning it as opposed to expanding all the cases and then turning them. Brass is somewhat springy and will tend to go back toward its original size; therefore, by expanding and turning immediately, you are more likely to have all cases fit the mandrel with the same degree of tightness and to get a more consistent depth of cut.
Cutter Adjustment for Cut Depth and Length
All the tools I’ve seen have pretty good adjustment instructions. The only thing they don’t tell you is that you should have five to ten spare cases to get it right initially. Anything of the right diameter will do while you learn, for instance, just use that cheap surplus .308 brass to do initial setup and save the precious .30-06 for when you know what you’re doing. Be patient and make your adjustments slowly; you’ll need to set the cutter for thickness as well as length of cut (just into the shoulder). The depth of cut (brass thickness) takes a bit of fiddling, the length of the cut is generally easy to set.
The Finished Product — A Perfectly Uniform Neck
If you read the whole article, and follow the procedures using quality tools, you should get very good results — with a little practice. To demonstrate, here’s an example of my finished, neck-turned brass. You’ll see there is a perfect, 0.0125″ thick neck. It’s very uniform around the circumference, usually I only see 1 or 2 ten-thousandths variance. Now, with the necks uniformed like this, we can select the bushing size that will give us our preferred neck tension and experiment with various levels of tension, secure in the knowledge that all of the cases will actually have the desired neck tension.
When it comes to reloading hardware, some guys have to have the best of the best, regardless of cost. For those guys, K&M Precision has introduced an impressive new variable-speed, multi-station case prep center. This is quite a step up from other variable-speed case prep devices.*
K&M offers two versions, one with a single spindle (tool driver) running 50-200 rpm, and another modular design that can have up to six (6) spindles, running from 50 to 533 rpm. This Ferrari of case prep centers costs $2395.00 with all six spindles, with lesser prices for fewer spindles (e.g. $1795 with three spindles). The basic 50-200 rpm one-spindle machine costs $695.00. That’s still a pretty sizable investment. But for some guys, price is no object.
Watch Video to see six-spindle machine in action. Being able to adjust the speed within a broad rpm range really is a big deal. You can go slow when needed, then instantly bump up the rpm when you need to do other tasks at a higher rate. Cutting vs. brushing work best at different speeds.
The K&M Benchtop Case Prep Machine is an industrial-grade unit that features an industrial DC brushless motor for constant torque control over a speed range from 50 to 533 rpm (or 50-200 rpm for basic model). The speed can be quickly changed by simply rotating the dial switch and pressing to enter the speed. Watch the video to see the speed control in action. Models are available from one- to six-spindle configurations. The driven spindles feature a unique collet design that accepts ¼” hex shank tools that are oriented horizontally for natural ergonomics. Collet and idler spindles ride on oil-impregnated bronze bearings for smooth operation. You can use K&M-made tools or drive other types of tools using a ¼” hex tool shank adapter with either 8-32 or 3/8-24 threads. Each model has a spring-loaded spindle lock pin to hold the spindle position while setting tools or loading/unloading cartridges into the power adapter.
All machines come with quality hard case with foam, chip pan, chip brush, 1/4” hex drive adapter for 8-32 and 1/4” hex drive adapter for 3/8-24.
Product tip from EdLongRange. We welcome reader submissions.
* Lyman will soon introduce the Case Trim Xpress a single-head case trimmer with speed control for the trimmer head. RCBS offers a 6-station Case Prep Center, with variable speeds, controlled by a rheostat. Four of the six heads run up to 350 rpm, while the two high-speed heads run up to 550 rpm.
The GAP Grind is one of the most popular tactical matches on the planet. So popular, in fact, that this 3-day Pro-Am event will likely “sell out” this year — with more interested shooters than available slots. To ensure you get a spot at the 2018 GAP Grind, which runs October 5-7, 2018, register early. GAP Grind Registration opens June 1st, 2018 at 9:00 am CST. The 2018 Grind will take place at the K&M Precision Rifle Training Shooting Complex in Finger, Tennessee.
If you haven’t experienced major PRS Pro-Am event like the Grind, with hundreds of talented shooters, check out this video from ShootingUSA. Show host John Scoutten provides a competitor’s perspective.
Lots of Action, with 20+ Stages
The GAP Grind is a notoriously challenging, “high tempo” match with minimal down-time between stages. Over the course of 20+ stages, competitors will fire 200+ shots at a variety of steel, paper, moving, and reactive targets out to 1,200 yards. Targets vary in size/difficulty based on the shooter’s position, distance, and time allotted. Most stages include “stressors” — i.e. time limits or required movement(s).
Josh Temnnen Facebook photo
The GAP Grind is held at the impressive K&M Shooting Complex in Tennessee:
GAP Grind Hardware Shelley Giddings, a skilled shooter of both firearms and cameras, snapped these images of state-of-the-art tactical rifles at the 2014 GAP Grind. See more firearms images on Shelley’s Facebook Page.
This Wednesday (January 10, 2018), Shooting USA TV features the GAP Grind Pro-Am held at the K&M Shooting Complex in Finger, Tennessee. Conducted in association with the Precision Rifle Series (PRS), the GAP Grind features a Pro/Am format with professional and amateur competitors vying for individual glory and team honors. If you are a PRS shooter or are interested in practical, multi-position shooting you should definitely watch this episode.
More Features in January 10, 2018 Hour-Long Episode: 1. CMP Western Games in Arizona. The Western Games feature High Power, Vintage Military Rifle, M1 Carbine, and Rimfire Sporter Matches. Held at the Ben Avery Range in Phoenix, this is one of America’s biggest matches each year. 2. Savage 6.5 Creedmoor Rifles. This week Shooting USA also spotlights two new 6.5 Creedmoor Savage rifles, a bolt action and an AR-platform MSR. 3. Pistol Training with Lasers. Ace shooter Julie Golob uses on-gun lasers to help diagnose and correct common pistol shooting mistakes.
New Broadcast Times for 2018: Wednesday 9:00 pm Eastern and Pacific, 8:00 pm Central
GAP Grind Feature on Shooting USA
Lots of Action, with 20+ Stages
The GAP Grind is a notoriously challenging, “high tempo” match with minimal down-time between stages. Over the course of 20+ stages, competitors will fire 200+ shots at a variety of steel, paper, moving, and reactive targets out to 1,200 yards. Targets vary in size/difficulty based on the shooter’s position, distance, and time allotted. Most stages include “stressors” — i.e. time limits or required movement(s).
Shooting USA Host John Scoutten (in Blue/White shirt) at a past GRIND
Lots of Action, with 20+ Stages
The GAP Grind is a notoriously challenging, “high tempo” match with minimal down-time between stages. Over the course of 20+ stages, competitors will fire 200+ shots at a variety of steel, paper, moving, and reactive targets out to 1,200 yards. Targets vary in size/difficulty based on the shooter’s position, distance, and time allotted. Most stages include “stressors” — i.e. time limits or required movement(s).
Josh Temnnen Facebook photo.
The GAP Grind is held at the impressive K&M Shooting Complex:
GAP Grind Hardware Shelley Giddings, a skilled shooter of both firearms and cameras, snapped these images of state-of-the-art tactical rifles at the 2014 GAP Grind. See more firearms images on Shelley’s Facebook Page.
Shown is the Redding Model 15-P Competition Piloted Inside Chamfering Tool with pilot rod that centers in the case flash hole. Also shown is a Forster 45° Rocket Tool.
There are a wide variety of reloading tools designed to cut a slight chamfer in case necks and deburr the edge of the case mouth. You don’t need to spend a lot of money for an effective tool. A basic “rocket-style” 45° chamfering tool, such as the Forster, actually does a pretty good job taking the sharp edge off case mouths, particularly if you use a little scotch-pad (or steel wool) to smooth the edge of the cut. The Forster chamfer tool, shown below, is a nicely-made product, with sharper cutting blades than you’ll find on most other 45° chamferers. It costs $17.99 at Brownells.com.
Redding sells a handy piloted chamfering tool with a 15° inside cutting angle and removable accessory handle. This Redding Model 15-P chamferer works really well, so long as you have consistent case OALs. The pilot rod (which indexes in the flash hole) is adjustable for different cartridge types (from very short to very long). This ensures the concentricity of the inside neck chamfer to the case mouth. This quality tool works with cases from .22 to .45 Caliber.
Sinclair International offers a 28° carbide chamferer with many handy features (and sharp blades). The $29.99 Sinclair Carbide VLD Case Mouth Chamfering Tool will chamfer cases from .14 through .45 caliber. This tool features a removable 28° carbide cutter mounted in the green plastic Sinclair handle. NOTE: A hex-shaft cutter head power adapter can be purchased separately for $14.99 (Sinclair item 749-002-488WS). This can be chucked in a power screwdriver or used with the Sinclair Case Prep Power Center when doing large volumes of cases.
Many folks feel they can get smoother bullet seating by using a tool that cuts at a steeper angle. We like the 22° cutter sold by Lyman. It has a comfortable handle, and costs just $10.75 at MidsouthShooterssupply.com. The Lyman tool is an excellent value, though we’ve seen examples that needed sharpening even when new. Blade-sharpening is easily done, however.
K&M makes a depth-adjustable, inside-neck chamferer (“Controlled Depth Tapered Reaper”) with ultra-sharp cutting flutes. The latest version, which costs $47.00 at KMShooting.com, features a central pin that indexes via the flash hole to keep the cutter centered. In addition, the tool has a newly-designed handle, improved depth-stop fingers, plus a new set-screw adjustment for precise cutter depth control. We caution, even with all the depth-control features, if you are not careful, it is easy to over-cut, slicing away too much brass and basically ruining your neck. We think that most reloaders will get better results using a more conventional chamfer tool, such as the Forster or Redding 15-P.
One last thing to note — tools like the K&M and the Sinclair chamferer are often described as VLD chamferers. That is really a misnomer, as bullets with long boat-tails actually seat easily with very minimal chamfering. In reality, these high-angle chamferers may be most valuable when preparing brass for flat-base bullets and bullets with pressure rings. Using a 22° or 28° chamferer can reduce the risk of cutting a jacket when using VLD bullets though — so long as you make a smooth cut.
The prestigious GAP Grind tactical match took place 16-18 October, at the K&M Shooting Complex in Finger, Tennessee. Here’s a “sizzle reel” video showing highlights from this year’s match, which drew talented competitors from across the nation. Held in association with the Precision Rifle Series (PRS), this year’s Grind features a Pro/Am format with professional and amateur competitors aiming for individual and team honors.
Watch GAP Grind 2015 Video (Loud Soundtrack):
Lots of Action, with 20+ Stages
The GAP Grind is a challenging, “high tempo” match with minimal down-time between stages. This year, over the course of 20+ stages, competitors each fired 200+ shots at a variety of steel, paper, moving, and reactive targets out to 1,200 yards. Targets varied in size and difficulty based on distance and time allotted. Most stages included “stressors” — i.e. time limits or required movement(s).
K&M Precision Shooting Products has a very handy tool few hand-loaders know about. This brilliantly simple device lets you actually SEE your case necks as you expand them. This tool can benefit anyone who necks-up brass or who uses an expander to smooth out necks (or reduce tension) before loading.
K&M Expand Mandrel Window Riser
This is a simple threaded extension placed between your expander die body (K&M Expand Iron) and the top of your press. It carries the expander mandrel higher, above the press, and has a cut-out view port so you can see the mandrel as it passes through the neck. Smart, eh? This provides visual feedback during the process of expanding your brass. The patent-pending view riser costs $20.00. Will it expand necks faster, or reduce run-out? We doubt it, but we still would like to have one, if only to eyeball the mandrel to control the neck-entry rate more consistently from case to case.
Installation: Thread the Expand Mandrel Window Riser into the top of your loading press, then thread the K&M Expand-Iron (Expander Die Body) fully into the top of the window riser and adjust each so you can stroke out the press completely without driving the case mouth into the press adapter. This allows you to view the expanding operation which is typically blind under the press. The riser also eliminates the need for the stop screw in the expander mandrel. LINK: Expand Window Riser Instructions (PDF).


 On our main AccurateShooter.com site, you’ll find a good article by GS Arizona on the Basics of Neck Turning. If you’re new to the neck-turning game, or are just looking for good tips on improving your neck-turning procedures, you should read that article. Below we offer some highlights and photos from the article, but you’ll need to read the whole story to view all the illustrations and follow all the procedures step by step.