On our main AccurateShooter.com site, you’ll find a good article by GS Arizona on the Basics of Neck Turning. If you’re new to the neck-turning game, or are just looking for good tips on improving your neck-turning procedures, you should read that article. Below we offer some highlights and photos from the article, but you’ll need to read the whole story to view all the illustrations and follow all the procedures step by step.
Why Should You Consider Neck Turning?
Let’s assume that your rifle doesn’t have a tight neck chamber that requires neck turning; if you have a tight neck chamber, of course, the answer to the question is “because you have to”. For the rest of us, and that includes the vast majority of Highpower shooters, neck turning isn’t a requirement, but it can be a useful way to bring your ammunition a small but meaningful step closer to that pot of gold at the end of the rainbow: perfection. I’m not talking about a theoretical improvement, but a real one, an improvement that lies in equalizing and optimizing the neck tension of your loaded rounds. Inconsistent neck tension is a real contributor to increased muzzle velocity variance which itself is a significant factor in increased elevation dispersion at long range. So there’s our basic reason for neck turning: to equalize and optimize neck tension in order to reduce elevation dispersion.
The Tools of the Trade
Here you see everything I use and a bit more. The press, a cordless screwdriver (always plugged in, turning is tough on the old battery), a couple of K&M neck turners (one set up for 6mm, the other for .30 caliber) an expander for each size, some Imperial lube, an old toothbrush or two to keep the cutter clean, a handle with a caseholder (for those emergencies when the screwdriver dies and there’s just one more case to go!), steel wool and a tubing micrometer finish the list of tools. Hey, I left the dial calipers out of the picture! They’re always handy, keep them around, but they are useless for measuring neck thickness, so don’t try. I usually use an Optivisor magnifier while I turn necks, very handy for a clear view of what’s happening on the neck.
Expanding the Neck
Put some lube on the inside of the case neck and run it into the expander. Really, this isn’t hard. I prefer to expand each case immediately before turning it as opposed to expanding all the cases and then turning them. Brass is somewhat springy and will tend to go back toward its original size; therefore, by expanding and turning immediately, you are more likely to have all cases fit the mandrel with the same degree of tightness and to get a more consistent depth of cut.
Cutter Adjustment for Cut Depth and Length
All the tools I’ve seen have pretty good adjustment instructions. The only thing they don’t tell you is that you should have five to ten spare cases to get it right initially. Anything of the right diameter will do while you learn, for instance, just use that cheap surplus .308 brass to do initial setup and save the precious .30-06 for when you know what you’re doing. Be patient and make your adjustments slowly; you’ll need to set the cutter for thickness as well as length of cut (just into the shoulder). The depth of cut (brass thickness) takes a bit of fiddling, the length of the cut is generally easy to set.
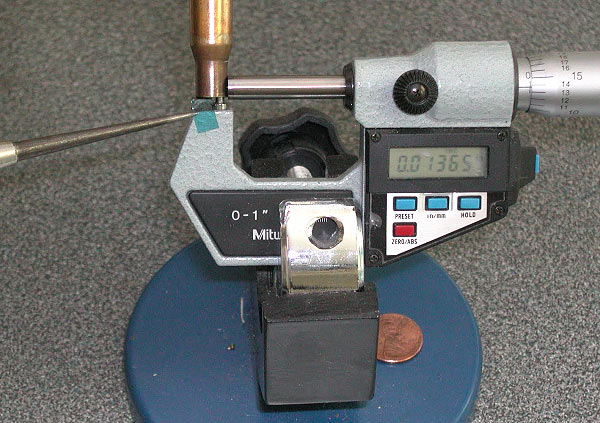
The Finished Product — A Perfectly Uniform Neck
If you read the whole article, and follow the procedures using quality tools, you should get very good results — with a little practice. To demonstrate, here’s an example of my finished, neck-turned brass. You’ll see there is a perfect, 0.0125″ thick neck. It’s very uniform around the circumference, usually I only see 1 or 2 ten-thousandths variance. Now, with the necks uniformed like this, we can select the bushing size that will give us our preferred neck tension and experiment with various levels of tension, secure in the knowledge that all of the cases will actually have the desired neck tension.
Bryan Blake, a very clever machinist and gunsmith, has created an ultra-precise and speedy neck-turning machine. Bryan, who runs Blake Machine, Blake Barrel, and F-Class Products has created a system that uses twin precision cutter tips to turn case necks inside and out quickly and efficiently, with superior precision. This advanced IDOD Neck Turning Machine holds cases securely in a precision-machined spindle attached to an electric motor. Twin blades move precisely during the cutting process, milling the necks inside and out. The turned necks come out perfect every time, with the shoulders trimmed exactly (with doughnut removed) as well. If you turn hundreds of cases during a shooting season, you may want to consider getting an IDOD from F-Class Products. Bryan was able to turn 30 cases in just 6 minutes. And there is an even more advanced version, called the AUTODOD, shown in the last video below.
Our friend Erik Cortina recently visited Bryan Blake in Phoenix. Erik saw the IDOD in action and was impressed. Erik notes: “For a very long time, we have been turning brass the exact same way. Use a mandrel as a pilot and have a cutter with a specified gap go around the perimeter and turn the necks to specified thickness. The IDOD uses a technique called ‘pinch turning’ to turn the ID and the OD (IDOD) at the same time.” You can watch how it works in Erik’s video below (action starts at 7:55 time-mark):
The secret to the efficiency of the Blake IDOD is a vibration-free motor, high-mass case-holder, precision OD/ID-adjustable cutter, along with an advanced tracking system that moves the cutter heads towards the case neck (and back again) with absolute, 100% repeatable precision. Watch the video from 8:30 to 10:10 to see Bryan explain how to adjust the system for a perfect result.
This shows how to set up the IDOD Neck-turning machine for a particular cartridge type:
This video shows a close-up of a neck being with perfect neck-wall consistency:
This latest video from Blake Machine shows the new AUTODOD machine with power controls. This speeds up and simplifies neck-turning process.
When neck-turning cases, it’s a good idea to extend the cut slightly below the neck-shoulder junction. This helps keep neck tension more uniform after repeated firings, by preventing a build-up of brass where the neck meets the shoulder. One of our Forum members, Craig from Ireland, a self-declared “neck-turning novice”, was having some problems turning brass for his 20 Tactical cases. He was correctly attempting to continue the cut slightly past the neck-shoulder junction, but he was concerned that brass was being removed too far down the shoulder.
Craig writes: “Everywhere I have read about neck turning, [it says] you need to cut slightly into the neck/shoulder junction to stop doughnutting. I completely understand this but I cant seem to get my neck-turning tool set-up to just touch the neck/shoulder junction. It either just doesn’t touch [the shoulder] or cuts nearly the whole shoulder and that just looks very messy. No matter how I adjust the mandrel to set how far down the neck it cuts, it either doesn’t touch it or it cuts far too much. I think it may relate to the bevel on the cutter in my neck-turning tool…”
Looking at Craig’s pictures, we’d agree that he didn’t need to cut so far down into the shoulder. There is a simple solution for this situation. Craig is using a neck-turning tool with a rather shallow cutter bevel angle. This 20-degree angle is set up as “universal geometry” that will work with any shoulder angle. Unfortunately, as you work the cutter down the neck, a shallow angled-cutter tip such as this will remove brass fairly far down. You only want to extend the cut about 1/32 of an inch past the neck-shoulder junction. This is enough to eliminate brass build-up at the base of the neck that can cause doughnuts to form.
The answer here is simply to use a cutter tip with a wider angle — 30 to 40 degrees. The cutter for the K&M neck-turning tool (above) has a shorter bevel that better matches a 30° shoulder. There is also a 40° tip available. PMA Tool and 21st Century Shooting also offer carbide cutters with a variety of bevel angles to exactly match your case shoulder angle*. WalkerTexasRanger reports: “I went to a 40-degree cutter head just to address this same issue, and I have been much happier with the results. The 40-degree heads are available from Sinclair Int’l for $15 or so.” Forum Member CBonner concurs: “I had the same problem with my 7WSM… The 40-degree cutter was the answer.” Below is Sinclair’s 40° Cutter for its NT-series neck-turning tools. Item NT3140, this 40° Cutter sells for $14.99. For the same price, Sinclair also sells the conventional 30° Cutter, item NT3100.
Al Nyhus has another clever solution: “The best way I’ve found to get around this problem is to get an extra shell holder and face it off .020-.025 and then run the cases into the sizing die. This will push the shoulder back .020-.025. Then you neck turn down to the ‘new’ neck/shoulder junction and simply stop there. Fireforming the cases by seating the bullets hard into the lands will blow the shoulder forward and the extra neck length you turned by having the shoulder set back will now be blended perfectly into the shoulder. The results are a case that perfectly fits the chamber and zero donuts.”
* 21st Century sells carbide cutters in: 15, 17, 20, 21.5, 23, 25, 28, 30, 35, 40, and 46 degrees. PMA Tool sells carbide cutters in: 17.5, 20, 21.5, 23, 25, 28, 30, and 40 degrees, plus special short-neck cutters.
Here’s the super-speedy way to turn case-necks. Our friend Erik Cortina figured out how to turn his match cartridge case-necks using his milling machine. Erik told us: “While in Raton [a while back], Mid Tompkins told me that he turns his brass on milling machine. He said he could do about 500 in two hours, so I decided to try it.”
Erik fitted a Don Nielson “Pumpkin” neck-turner to the mill, and he used a modified 21st Century case holder to secure the brass. As you can see from this video, Erik was very successful with the process. The tool spins at 1500 rpm, turning Lapua 6.5-284 cases that have been necked up to 7mm.
Video Shows Eric Cortina Neck-Turning Cases with Milling Machine:
Cartridge Brass: Lapua 6.5-284 necked up to 7mm
Lubricant: Lithium grease inside and outside of neck
Neck-Turner: Nielson Pumpkin running at 1500 RPM
It’s hard to argue with Erik’s results. Here are his turned Lapua cases, which have neck-wall thickness consistent to two ten-thousandths of an inch. Think you could do better turning manually?
Some of Erik’s Facebook friends had questions about this process:
Q: Who makes the shell-holder?
Erik Cortina: I did! The shell-holder you can get from 21st Century. I Tig-welded a punch as a handle.
Q: I love the idea of working smarter not harder! Any galling issues? What are your mitigation techniques?
Erik Cortina: No issues. I use lithium grease in spray can. Makes a foam that I dip necks into.
Q: Shouldn’t either the case or the cutter be floating to allow most precise neck turning?
Erik Cortina: Up until [I tried this] I believed the same thing. I was going to build a floating case holder but decided to try rigid setup on a few cases before I built it. Results were great. Neck thickness doesn’t vary more than .0002″, which is same as when I was doing it with floating case holder on the lathe.
Q: Any problems with the Pumpkin changing the cut as it heats up?
Erik Cortina: No — there were no issues with that.
NOTE: Erik Cortina is a very skilled machinist who custom-crafted fittings used for this process. This kind of neck-turning with a milling machine may not be for the everyday hand-loader!
Nielson “Pumpkin” Neck-Turner
The circular orange cutting fixture on Erik’s Milling Machine is a Don Nielson “Pumpkin” neck-turning tool. Don designed this tool to be used by hand or with power. The Pumpkin boasts an eccentric mandrel that allows the cut to be adjusted easily in precise .0001″ increments. Benchresters like this as it allows for very precise control of cut depth and neck-wall thickness.
Nielson Neck Turner with carbide mandrel. Photo Courtesy Butch’s Reloading.
He who dies with the most toys wins — right? Well Sinclair has another interesting gadget you can add to your reloading bench. The Sinclair Case Neck Sorting Tool lets you quickly sort brass by neck-wall thickness. For those who shoot “no-turn” brass, this can improve neck-tension consistency. Large variances in neck-wall thickness can cause inconsistent neck “grip” on the bullet. Generally, we’ve found that more consistent neck tension will lower ES and (usually) improve accuracy. We know some guys who shoot no-turn 6mmBR brass in competition with considerable success — but their secret is pre-sorting their brass by neck-wall thickness. Cases that are out-of-spec are set aside for sighters (or are later skim-turned).
Watch Case Neck Sorting Tool Operation in Video
How the Case Neck Sorting Tool Works
Here’s how the Sinclair tool works. Cases are rotated under an indicator tip while they are supported on a case-neck pilot and a support pin through the flash hole. The unit has a nice, wide base and low profile so it is stable in use. The tool works for .22 through .45 caliber cases and can be used on .17- and .20-caliber cases with the optional carbide alignment rod. The MIC-4 pin fits both .060 (PPC size) and .080 (standard size) flash holes. Sinclair’s Case Neck Sorting Tool can be ordered with or without a dial indicator. The basic unit without dial indicator (item 749-006-612WB) is $59.99. The tool complete with dial indicator (item 749-007-129WB) for $89.99. IMPORTANT: This tool requires caliber-specific Sinclair Case Neck Pilots which must be ordered separately.
Editor’s Comment: The purpose of this Sinclair tool is rapid, high-quantity sorting of cartridge brass to ascertain significant case-neck-wall thickness variations. Consider this a rapid culling/sorting tool. If you are turning your necks, you will still need a quality ball micrometer tool to measure neck-wall thickness (to .0005) before and after neck-turning operations.
Report by Andrew Murtagh
I’ve been a long range shooter for the past 17 years. Like most shooters in this game I’ve built, bought, and sold numerous rifles during my tenure. Here’s my tale of two special rifles, a Heavy Gun and a Light Gun, both sporting Patriotic stock graphics. I shoot both of these rifles in competition at Reade Range and The Original Pennsylvania 1000-Yard Club, aka “Williamsport”, where I serve as Club Vice-President.
My two Patriots were both acquired second-hand from a fellow shooter, Mike Bonchack. As purchased, they were very different from what they are now. I first decided to rechamber them using my reamers. The Light Gun (LG) is now chambered in 6×47 Lapua with 0.267″ neck, while the Heavy Gun (HG) is a 6mm Dasher with 0.266″ neck. After re-chambering the barrels, next I decided to get both guns up to maximum weight. The LG already had an adjustable weight system so it was easy to get it to 17 pounds. For the HG, I added an additional 25 pounds of lead/epoxy fill which was milled into the barrel channel and butt stock.
The Story Behind the Patriotic Graphics
I was initially going to have the LG painted until a close friend and fellow shooter, Tom Murtiff, suggested hydrographics. I landed on the patriotic theme because I’m a right-wing leaning Constitutionalist who still believes in the principles upon which our Founding Fathers built this nation. I wanted to express my support of our country’s Constitution and its Amendments. The search for the perfect patriot print was on.
This was my first hydrographic print experience and I was overwhelmed with the sheer number and variety of prints available. I spent a few days searching when I found the Amendment print. I then contacted Rick Schuh, owner of Boyzhid Hydrographics. He then prepped, hydro-dipped, and clear-coated the LG. Late in 2017 I purchased the HG and through a lengthy process in 2018 the metal work and stock additions were completed. I was now back in search of the perfect print. This was also lengthy, and I couldn’t find anything that spoke to me except for a suggestion to have “twin” rifles. I liked the idea — a pair of “Patriots!”
Rick was again employed to dip the Heavy Gun. That became a real undertaking because the stock alone (no metal attached) now weighed 35 pounds. He had to manufacture reinforced hangers to apply the graphics without flaw. The stock came out perfect to my eye, but not to his. On the bottom, which is rarely seen on any HG, he airbrushed a small flag to cover an area that stretched the print. Rick also made a jeweled plate for the toe of the butt.
I’m including this image so everyone can see Rick’s extra effort to make the HG perfect. I often joke with him about the added work no one would see. Well now the world can view his workmanship.
1000-Yard Heavy Gun Specifications:
Kelbly Stolle F-Class Panda dual-port, right eject with Kelbly Picatinny rail
Modified Ryan Miller HG stock bedded/pillared/weighted by David Powley
Bartlein 1:8.5-8″ gain-twist 0.236″ bore barrel
— chambered in 6mm Dasher 0.266″ neck by David Powley
Ryan Miller barrel-block fitted with nylon bushing by David Powley
Harrell’s muzzle brake
Jewell trigger
Optic One: NightForce 12-42x56mm NXS in Vortex rings
Optic Two: Leupold 7-35x56mm Mark 5 HD in Leupold rings
1000-Yard Light Gun Specifications:
BAT Machine B Action RB/LP/RE
McMillan MBR stock bedded by David Powley
Bartlein 1:8″-twist 0.237″ bore 30″ barrel
— chambered in 6×47 Lapua 0.267″ neck by David Powley
Harrell’s radial muzzle brake
Jewell trigger
NightForce 15-55x52mm Competition Scope in Harrell’s rings
Stock Graphics: Both rifles share a Patriot Constitution Hydrographic print (and clear-coat) by Rick Schuh of BoyzHid Hygrogaphics.
How to Succeed in the 1K Benchrest Games — Q & A with Andrew
Q: How Do You Choose a Chambering/Cartridge for a particular Match or Relay?
Andrew: Cartridge choice depends on the wind forecast. I always have several rifles with particular cartridge/loads for each depending on the forecast. If it’s a light wind day, say 4 to 8 mph with light gusts, I’ll be shooting either a 6×47 Lapua or a 6mm Dasher. If it’s blowing around 10 to 12 mph, I’ll campaign a 6×47 on its high node to get it down range flat. But if it’s really blowing or constantly changing direction, I shoot a big .300 WSM with either 200gr or 210gr bullet.
Q: What Is Your Load Development Method?
Andrew: Initial load development is always done over the chronograph at 100 yards until I get low ES/SD for 5 shots utilizing the same 10 pieces of absolutely perfect brass. Once I’m satisfied with the raw data I move to 1000 yards with a set of match brass and shoot 5-shot strings to find the best-performing exact powder charge. I have found this is usually within 0.20 grains of what performs well over the chronograph.
Q: What Brass, Primers, Powders, and Bullets Do You Use?
Andrew: I use Lapua brass for all things 6mm and Norma brass for my big .30 Cal stuff. I never change primers and shoot CCI BR2s or BR4s. I’m a Varget and H4350 fan. I’ve tried other powders, but they never were fruitful at 1K. Currently the only bullets I shoot are Sierra Match Kings. In the 6mm Dasher and 6×47 Lapua I use the 6mm 107gr SMK. In my .300 WSM I use .308-cal 200gr and 210gr SMKs.
Q: What Advice Do You Have for Novice 1000-Yard Competitors?
Andrew: Leave your ego at home and be willing to learn each and every time you come to the range. The discipline evolves rapidly and so must the shooter. It won’t take long to get left behind and become extremely frustrated with the game if you are not willing to learn and adapt. Find a tutor who is a great shooter and who is willing to mentor you. John Hoover and Tom Murtiff helped me and are very dear friends and great 1000-yard shooters. Believe me, having a good mentor takes years off the learning curve. Lastly, enroll in the Benchrest Shooting School offered by The Original Pennsylvania 1000 Yard Benchrest Club. I’m an instructor there and I, along with all the cadre, will help new shooters rapidly advance their skills.
Q: What’s the Secret to Judging the Wind? (In this discipline there are no target markers after each shot.)
Andrew: That’s the million-dollar question. What I do is find the condition that seems to hold. Once I’m committed into the record string, I follow it to the end. At Williamsport the wind flags can change at every distance so you simply need to pick one flag and hope it’s the one that remains truthful.
Long Range Competition Advice from a Leading 1K Benchrest Competitor
FIVE Key points to remember when shooting 1000-Yard benchrest
1. Be positive and have a clear state of mind when competing.
2. Bench set-up and shooting mechanics must always be the same — every shot. Then follow the shot through your optic.
3. Shoot two (2) shots before making a scope adjustment unless you’re under a minute of the sighter period.
4. Trust yourself and your equipment. You never want to second guess anything you put on the line.
5. Once you commit to shooting your record string, DO NOT STOP.
Invitation to Join Andrew at Williamsport in Pennsylvania
I currently serve as Vice President of The Original Pennsylvania 1000 Yard Benchrest Club, PA1000yard.com. Situated near the municipality of Williamsport, Pennsylvania, it has become known as the “Williamsport Club”. We would like to invite any shooting enthusiast to come out and visit our club during a match weekend. My rifles are only a sampling of the beauty and craftsmanship that is often on display at Williamsport’s 1000-yard line. Please stop by and visit with us.
Here are UPCOMING EVENTS at our club this summer and in 2021:
Light Gun and Heavy Gun Match #5, August 22/23, 2020
Light Gun and Heavy Gun Match Match #6, September 12/13, 2020
Light Gun and Heavy Gun Match Match #7, September 26/27, 2020
Long Range Benchrest School June, 2021
Annual 1000-Yard World Open Match July, 2021
Andrew wanted to give credit to the many talented guys who have helped with his rifle builds and his reloading equipment. In alphabetical order, these are Mike Bonchack, John Hoover, Tom Murtiff, David Powley, and Rich Schuh (Boyzhid Hydrographics).
He who dies with the most toys wins — right? Well Sinclair has another interesting gadget you can add to your reloading bench. The Sinclair Case Neck Sorting Tool lets you quickly sort brass by neck-wall thickness. For those who shoot “no-turn” brass, this can improve neck-tension consistency. Large variances in neck-wall thickness can cause inconsistent neck “grip” on the bullet. Generally, we’ve found that more consistent neck tension will lower ES and (usually) improve accuracy. We know some guys who shoot no-turn 6mmBR brass in competition with considerable success — but their secret is pre-sorting their brass by neck-wall thickness. Cases that are out-of-spec are set aside for sighters (or are later skim-turned).
Watch Case Neck Sorting Tool Operation in Video
How the Case Neck Sorting Tool Works
Here’s how the Sinclair tool works. Cases are rotated under an indicator tip while they are supported on a case-neck pilot and a support pin through the flash hole. The unit has a nice, wide base and low profile so it is stable in use. The tool works for .22 through .45 caliber cases and can be used on .17- and .20-caliber cases with the optional carbide alignment rod. The MIC-4 pin fits both .060 (PPC size) and .080 (standard size) flash holes. Sinclair’s Case Neck Sorting Tool can be ordered with or without a dial indicator. The basic unit without dial indicator (item 749-006-612WB) is priced at $59.99. You can also buy the tool complete with dial indicator (item 749-007-129WB) for $89.99. IMPORTANT: This sorting tool requires caliber-specific Case Neck Pilots which must be ordered separately.
Editor’s Comment: The purpose of this Sinclair tool is rapid, high-quantity sorting of cartridge brass to ascertain significant case-neck-wall thickness variations. Consider this a rapid culling/sorting tool. If you are turning your necks, you will still need a quality ball micrometer tool to measure neck-wall thickness (to .0005) before and after neck-turning operations.
Here’s the super-speedy way to turn case-necks. Our friend Erik Cortina figured out how to turn his match cartridge case-necks using his milling machine. Erik told us: “While in Raton, Mid Tompkins told me that he turns his brass on milling machine. He said he could do about 500 in two hours, so I decided to try it.”
Erik fitted a Don Nielson “Pumpkin” neck-turner to the mill, and he used a modified 21st Century case holder to secure the brass. As you can see from this video, Erik was very successful with the process. The tool spins at 1500 rpm, turning Lapua 6.5-284 cases that have been necked up to 7mm.
Video Shows Erik Cortina Neck-Turning Cases with Milling Machine:
Cartridge Brass: Lapua 6.5-284 necked up to 7mm
Lubricant: Lithium grease inside and outside of neck
Neck-Turner: Nielson Pumpkin running at 1500 RPM
It’s hard to argue with Erik’s results. Here are his turned Lapua cases, which have neck-wall thickness consistent to two ten-thousandths of an inch. Think you could do better turning manually?
Some of Erik’s Facebook friends had questions about this process:
Q: Who makes the shell-holder?
Erik Cortina: I did! The shell-holder you can get from 21st Century. I Tig-welded a punch as a handle.
Q: I love the idea of working smarter not harder! Any galling issues? What are your mitigation techniques?
Erik Cortina: No issues. I use lithium grease in spray can. Makes a foam that I dip necks into.
Q: Shouldn’t either the case or the cutter be floating to allow most precise neck turning?
Erik Cortina: Up until [I tried this] I believed the same thing. I was going to build a floating case holder but decided to try rigid setup on a few cases before I built it. Results were great. Neck thickness doesn’t vary more than .0002″, which is same as when I was doing it with floating case holder on the lathe.
Q: Any problems with the Pumpkin changing the cut as it heats up?
Erik Cortina: No — there were no issues with that.
NOTE: Erik Cortina is a very skilled machinist who custom-crafted fittings used for this process. This kind of neck-turning with a milling machine may not be for the everyday hand-loader!
Nielson “Pumpkin” Neck-Turner
The circular orange cutting fixture on Erik’s Milling Machine is a Don Nielson “Pumpkin” neck-turning tool. Don designed this tool to be used by hand or with power. The Pumpkin boasts an eccentric mandrel that allows the cut to be adjusted easily in precise .0001″ increments. Benchresters like this as it allows for very precise control of cut depth and neck-wall thickness.
Jason C., commenting on Erik’s YouTube video stated: “I have a couple of those too. Nothing cuts like a Pumpkin. [Don Nielson] made the best cutter tool ever.” These are still available if you ask around. The photo shows Don with a case-holder mounted to a power assembly. A talented machinist and tool-maker, Don has also been a successful short- and long-range benchrest shooter, who has won NBRSA 600-Yard Championships. CLICK HERE to read about Don’s success with the 6.5×47 Lapua.
Nielson Neck Turner with carbide mandrel. Photo Courtesy Butch’s Reloading.
Don’t have time to neck-turn hundreds of cases? Don’t want to invest in your own annealer? Want to try a Dasher or 6 BRA but don’t like the hassle of fire-forming? Then give Darrell Jones at DJ’s Brass a call at 205-461-4680. He can handle all the difficult brass forming/brass restoration chores efficiently and affordably. And Darrell’s turn-around time is typically very fast.
Hydro-Forming News — .284 Shehane, 6 PPC, 6 BRA, 6 Dasher and More
NEW for 2019! Darrell also just got a custom hydro die for the .284 Shehane, a wildcat based on the .284 Winchester. This is a very popular option for F-Open Shooters. He is also doing a ton of fire-forming for the 100/200 benchrest crowd, hydro-forming 220 Russian into 6 PPC. And he tells us “Those guys in Montana are keeping me very busying hydro-forming the 6BR Ackley (6 BRA). NOTE: Darrell offers Free Annealing with hydro-forming services, which starts at $60 per 100 cases.
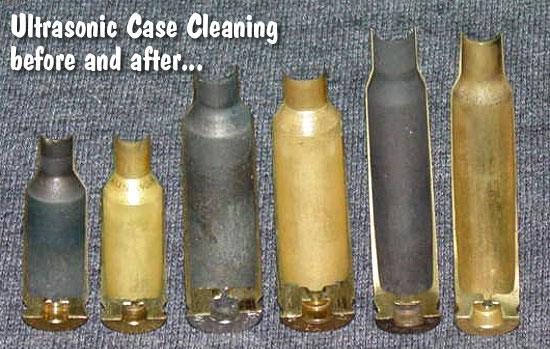
With the price of premium brass topping $1.00 per case for popular match cartridges, it makes sense to consider annealing your brass to extend its useful life. You don’t want to chuck out brass that costs a buck a case (or more)! Forum member Darrell Jones offers a full range of brass prep, brass forming, and brass restoration (annealing, ultra-sonic cleaning) at very affordable prices. Starting at just $20 per 100 cases ($25/100 for magnum cases), Darrell’s company, DJ’s Brass, will anneal your used brass using the impressive Bench-Source annealing machines. Annealing plus ultrasonic cleaning starts at $35 per 100 cases ($45 for magnum cases). For a bit more money Darrell can also uniform the primer pockets and chamfer the case necks.
Custom Neck-Turning Services
Another great service DJ’s Brass provides is precision neck-turning. Darrell can neck-turn any size case to your specified neck-wall thickness. The price starts at $60.00 per hundred for standard cases or $75.00/100 for magnum size. And if you’ve got a bucket of brass to neck-turn, that’s fine with Darrell — he recently neck-turned 1500 pieces of brass for one customer!
DJ’s Brass can process everything from .17 Fireball all the way up to the big magnum cases. And the job gets done quickly. Darrell normally offers a 10-day turn-around. For most jobs, Darrell tells us, he gets the processed brass to the Post Office within three business days. For more info, visit DJsBrass.com or call Darrell Jones at 205-461-4680. IMPORTANT: Contact Darrell for shipping instructions BEFORE sending any brass for processing. ALL BRASS MUST BE DE-PRIMED before you send it.
• Anneal Case Necks Only ($20.00/100 normal or $25.00/100 magnum)
• Ultrasonic Cleaning, Check Necks, and Annealing ($35.00/100 normal or $45.00/100 magnum)
• Full Service: Uniform primer pockets, Chamfer case mouths, Ultrasonic cleaning, Anneal case necks (Starting at $60.00/100 call for quote)
• Neck Turning or trim-to-length Custom Order Service (Starting at $60.00/100 for standard cases and $75.00/100 for magnums)
• Hydro-Form Specialty cases (such as Dasher) $0.60 (sixty cents) each minimum of 100 pieces plus actual return shipping cost
• Expand Case Necks and Anneal brass (Call for Price)
• Create False Shoulder for Fire-Forming (Call for Price)
Hydro-Forming Cartridge Brass
Hydro-forming by Darrell costs $0.60 per case with 100-ct minimum. All hydro-formed cases are annealed at no extra charge after the forming process. After hydro-forming, Darrell can also neck-turn the case for an additional charge (call for combined quote). In addition to the 6mmBR-based cases shown below, Darrell can now hydro-form 6PPC cases from .220 Russian brass, and he also offers .284 Shehane.
With Darrell’s hydro-forming service you don’t have to buy any special dies or other equipment. Darrell says: “Simply send me the brass you need or have it dropped-shipped to me along with a fired case that has not been sized. If you need formed brass for a new build (gun not yet fired), let me know and I will size the brass to fit within .001″ of a PT&G GO gauge.”
DJ’s Brass Offers Specialized Custom Services
Darrell tells us: “At DJ’s Brass, we can handle all your brass refurbishing needs. From ultrasonic cleaning to custom annealing for specific wildcat cartridges. We can expand your necks from .22 caliber to .30 caliber and anneal shoulders for consistent bump-back. We can turn your case-necks and trim the brass to your specs. For some cartridge types, I can pre-form cases to assist in fire-forming a wildcat cartridge. We also remove the carbon build-up in muzzle brakes. Don’t lose your accuracy by having carbon build up and close off the clearance required for the most accurate bullet release through a muzzle brake.” Note: Extra charges apply for neck-turning and neck expansion operations, or specialized cartridge-forming operations. Please call Darrell at 205-461-4680 for special services pricing.
by Sierra Bullets Ballistic Technician Paul Box
One thing that plays a major role in building an accuracy load is neck tension. I think a lot of reloaders pretty much take this for granted and don’t give that enough thought.
So, how much neck tension is enough?
Thru the years and shooting both a wide variety of calibers and burn rates of powder, I’ve had the best accuracy overall with .002″ of neck tension. Naturally you will run into a rifle now and then that will do its best with something different like .001″ or even .003″, but .002″ has worked very well for me. So how do we control the neck tension? Let’s take a look at that.
First of all, if you’re running a standard sizing die with an expander ball, just pull your decapping rod assembly out of your die and measure the expander ball. What I prefer is to have an expander ball that is .003″ smaller than bullet diameter. So for example in a .224 caliber, run an expander ball of .221″. This allows for .001″ spring back in in your brass after sizing, and still gives you .002″ in neck tension. If you want to take the expander ball down in diameter, just chuck up your decapping rod assembly in a drill and turn it down with some emery cloth. When you have the diameter you need, polish it with three ought or four ought steel wool. This will give it a mirror finish and less drag coming through your case neck after sizing.
Tips for Dies With Interchangeable Neck Bushings
If you’re using a bushing die, I measure across the neck of eight or ten loaded rounds, then take an average on these and go .003″ under that measurement. There are other methods to determine bushing size, but this system has worked well for me.
Proper Annealing Can Deliver More Uniform Neck Tension
Another thing I want to mention is annealing. When brass is the correct softness, it will take a “set” coming out of the sizing die far better than brass that has become to hard. When brass has been work hardened to a point, it will be more springy when it comes out of a sizing die and neck tension will vary. Have you ever noticed how some bullets seated harder than others? That is why.
Paying closer attention to neck tension will give you both better accuracy and more consistent groups.


 On our main AccurateShooter.com site, you’ll find a good article by GS Arizona on the Basics of Neck Turning. If you’re new to the neck-turning game, or are just looking for good tips on improving your neck-turning procedures, you should read that article. Below we offer some highlights and photos from the article, but you’ll need to read the whole story to view all the illustrations and follow all the procedures step by step.
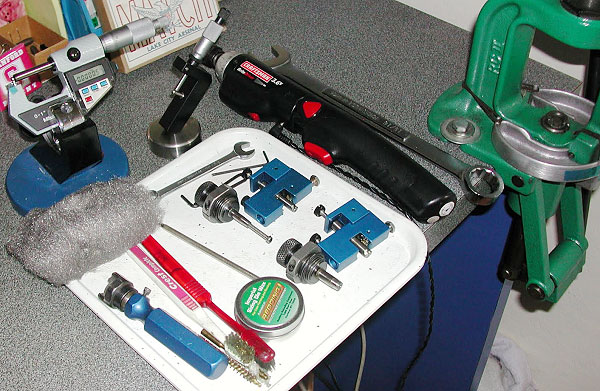


 When neck-turning cases, it’s a good idea to extend the cut slightly below the neck-shoulder junction. This helps keep neck tension more uniform after repeated firings, by preventing a build-up of brass where the neck meets the shoulder. One of our Forum members, Craig from Ireland, a self-declared “neck-turning novice”, was having some problems turning brass for his 20 Tactical cases. He was correctly attempting to continue the cut slightly past the neck-shoulder junction, but he was concerned that brass was being removed too far down the shoulder.


 How the Case Neck Sorting Tool Works


 The circular orange cutting fixture on Erik’s Milling Machine is a Don Nielson “Pumpkin” neck-turning tool. Don designed this tool to be used by hand or with power. The Pumpkin boasts an eccentric mandrel that allows the cut to be adjusted easily in precise .0001″ increments. Benchresters like this as it allows for very precise control of cut depth and neck-wall thickness.
 With the price of premium brass topping $1.00 per case for popular match cartridges, it makes sense to consider annealing your brass to extend its useful life. You don’t want to chuck out brass that costs a buck a case (or more)! Forum member