Some folks say you haven’t really mastered marksmanship unless you can hit a target when standing tall ‘on your own hind legs’. Of all the shooting positions, standing can be the most challenging because you have no horizontally-solid resting point for your forward arm/elbow. Here 10-time National High Power Champ Carl Bernosky explains how to make the standing shot.
Carl Bernosky is one of the greatest marksmen in history. A multi-time National High Power Champion, Carl has won ten (10) National High Power Championships in his storied shooting career, most recently in 2012. In this article, Carl provides step-by-step strategies to help High Power shooters improve their standing scores. When Carl talks about standing techniques, shooters should listen. Among his peers, Carl is regard as one of the very best standing shooters in the history of High Power shooting. Carl rarely puts pen to paper, but he was kind enough to share his techniques with AccurateShooter.com’s readers.
If you are position shooter, or aspire to be one some day, read this article word for word, and then read it again. We guarantee you’ll learn some techniques (and strategies) that can improve your shooting and boost your scores. This stuff is gold folks, read and learn…
How to Shoot Standing by Carl Bernosky
Shooting consistently good standing stages is a matter of getting rounds down range, with thoughtfully-executed goals. But first, your hold will determine the success you will have.
1. Your hold has to be 10 Ring to shoot 10s. This means that there should be a reasonable amount of time (enough to get a shot off) that your sights are within your best hold. No attention should be paid to the sights when they are not in the middle — that’s wasted energy. My best hold is within 5 seconds after I first look though my sights. I’m ready to shoot the shot at that time. If the gun doesn’t stop, I don’t shoot. I start over.
2. The shot has to be executed with the gun sitting still within your hold. If the gun is moving, it’s most likely moving out, and you’ve missed the best part of your hold.
3. Recognizing that the gun is sitting still and within your hold will initiate you firing the shot. Lots of dry fire or live fire training will help you acquire awareness of the gun sitting still. It’s not subconscious to me, but it’s close.
4. Don’t disturb the gun when you shoot the shot. That being said, I don’t believe in using ball or dummy rounds with the object of being surprised when the shot goes off. I consciously shoot every shot. Sometimes there is a mistake and I over-hold. But the more I train the less of these I get. If I get a dud round my gun will dip.* I don’t believe you can learn to ignore recoil. You must be consistent in your reaction to it.
5. Know your hold and shoot within it. The best part of my hold is about 4 inches. When I get things rolling, I recognize a still gun within my hold and execute the shot. I train to do this every shot. Close 10s are acceptable. Mid-ring 10s are not. If my hold was 8 inches I would train the same way. Shoot the shot when it is still within the hold, and accept the occasional 9. But don’t accept the shots out of the hold.
6. Practice makes perfect. The number of rounds you put down range matter. I shudder to think the amount of rounds I’ve fired standing in my life, and it still takes a month of shooting standing before Perry to be in my comfort zone. That month before Perry I shoot about 2000 rounds standing, 22 shots at a time. It peaks me at just about the right time.
This summarizes what I believe it takes to shoot good standing stages. I hope it provides some insight, understanding, and a roadmap to your own success shooting standing.
— Good Shooting, Carl
* This is very noticeable to me when shooting pistol. I can shoot bullet holes at 25 yards, but if I’ve miscounted the rounds I’ve fired out of my magazine, my pistol will dip noticeably. So do the pistols of the best pistol shooters I’ve watched and shot with. One might call this a “jerk”, I call it “controlled aggressive execution”, executed consistently.
Rio 2016 World Cup Photo Courtesy ISSF and Team USA
Would you like to try smallbore position shooting? Here are some tips from one of the best 3P shooters on the planet, Olympian Matt Emmons.
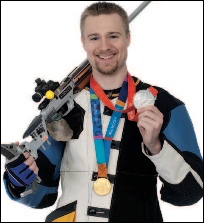
Matt Emmons competed in the Three-Position Event at the Rio Olympics, his fourth Olympic appearance. Matt has competed on the U.S. National Team since 1997, medaling in three Olympic games: Gold in 2004 in Men’s 50m Prone; Silver in 2008 in Men’s 50m Prone; and Bronze in 2012 in Men’s 50m 3X40. Although his specialty is Men’s 3-Position rifle, Emmons’ World Championship and Olympic Gold are in Men’s 50m Prone. He usually shoots an Anschütz or Bleiker .22LR rifle, with Eley Tenex ammo.
Winning Gold with a Borrowed Rifle
There is a fascinating story behind Matt’s 2004 Gold Medal, won with a “loaner” rifle. In April 2004, just prior to the Olympic Team Trials, Emmons discovered his rifle had been severely sabotaged in the supposedly secure locker room at the United States Olympic Training Center. The precisely tuned barrel and action were heavily damaged. “I unpacked my gun and I noticed that something wasn’t right,” Emmons said. “Sure enough, somebody had done something to it. I shot it and I couldn’t get the shell out. Emmons said it could not have been an accident: “Oh no, no,” Emmons said. “Somebody took a screwdriver and went in.” Emmons went on to the 2004 Summer Olympics using a rifle belonging to using his former University of Alaska Fairbanks teammate, Amber Darland. With that borrowed rifle he won the Gold Medal in 50m prone. Emmons never found out who the saboteur was, but said “I’d like to know so I could shake their hand and say thanks.”
In this Olympic Channel Video, Matt explains 50m 3-Position Shooting.
Here are shooting tips from Matt, courtesy Anschütz. Click image below to launch a full-screen PDF file.
CLICK Photo to Load Large PDF File
Here Matt Shows the Kneeling Position. The other two positions are Standing and Prone.
Three Sets of Hardware for Three Positions
You may be surprised to find that Matt often totes three complete sets of rifle parts to important matches — three buttplates, three cheekpieces, and three Centra sights with adjustable irises. Matt told Shooting Sports USA that he travels with “three sets for three positions. Our final is so fast that I need three sets of everything to allow a fast change-over between positions.” Matt carries his gear in an an Anschütz sport bag: “It’s similar to the big Ogio duffels with wheels, but lighter. I’ve worked with AHG/Anschütz for many years and I like their bag because all of my junk fits in it.”
For hunters in a tree stand, SFC McPhail recommends a position with your weakside leg pulled up and firmly braced on the front rail of the treestand. You can then rest your support arm on your leg. This provides a rock-solid position when shooting from a stand.
Team USA Olympian and ISSF World Cup Winner SFC Michael McPhail is one of the world’s best smallbore rifle shooters. He is also an avid hunter, who enjoys harvesting game with centerfire rifles. In a USAMU video, McPhail shows how competition shooting positions can be adapted for hunters. McPhail shows how well-established positions can provide a more stable platform for hunters in the field. That can help ensure a successful hunt. McPhail demonstrates three positions: kneeling, supported prone, and sitting in a tree-stand.
Watch SFC McPhail Demonstrate Positions for Hunters (Good Video):
McPhail first demonstrates the kneeling position. Michael notes: “I like kneeling. It’s a little bit of an under-utilized position, but it’s almost as stable as prone. It allows you get up off the ground a little bit higher to [compensate for] vegetation. For kneeling start by taking your non-dominant foot and put that towards the target, while at the same time dropping down to a knee on the dominant leg. At the same time … wrap the sling around wrist and fore-arm, lean slightly into the target and take the shot.”
McPhail shows a nice “field expedient” use of your backpack. He shows how the basic prone position can be adapted, using the pack as a front rifle support. McPhail recommends pulling your dominant (strongside) leg forward, bent at the knee. According to Michael, this takes pressure off the abdomen, helps minimizes heart beat effects, and helps with breathing.
Have you ever wondered how Olympic-class position shooters hold their aim so steady? Those bulky shooting coats help, but there is a lot of bio-mechanics involved also. Top shooters employ their body structure to help support the weight of their rifles, and to steady their aim. This interesting video, produced by GOnra Media, demonstrates rifle hold and body alignment for prone, standing, sitting, and kneeling positions. Olympic Gold Medalist Jamie Corkish (formerly Jamie Gray) demonstrates the proper stance and position of arms and legs for each of the positions.
Ideally, in all of the shooting positions, the shooter takes advantage of skeletal support. The shooter should align the bones of his/her arms and legs to provide a solid foundation. A shooter’s legs and arms form vertical planes helping the body remain stable in the shooting position.
Jamie Corkish, London 2012 Gold Medalist in Women’s 3 X 20, has retired from top-level competitive shooting. However, Jamie remains involved in the shooting sports as a Public Relations/Marketing representative for ELEY, a leading maker of rimfire ammunition. Jamie also works with shooting clubs and educational institutions to promote smallbore target shooting.
Images are stills from GOnraMedia video linked above.
Shooting Sports USA (SSUSA) offers a wide selection of informative articles on marksmanship techniques. If you shoot prone, “hard-holding”, you know how important proper positioning and technique can be. There is a SSUSA article that every prone shooter should read — whether you shoot air rifle, smallbore, or High Power. Compiled wtih the help of some of the country’s best prone marksmen, this article, How to Master Prone Shooting, provides a step-by-step guide to perfecting your prone position technique.
How to Master Prone Shooting — SSUSA by NRA Staff
The prone position is the most precise of the rifle shooting positions. It is used in many different shooting events at distances as close as 5 meters and as far away as 1,000 yards, and beyond that in long-range disciplines such as PRS and NRL. Prone shooting is very popular among shooters whose training time is limited, because it does not require as much practice. Age has little effect on a shooter’s ability to do well in prone; many older shooters are able to continue competing successfully in prone matches.
Here is a sample, listing STEP ONE, the basics of the prone position:
Step One: Study the Position
The prone position is steady because it is low, which gives a wide base of support to help keep the rifle still. Below are the key features of the prone position.
1. Straight line form left hand through left arm, side and leg.
2. Head tipped down comfortably.
3. Right hand grips rifle lightly.
4. Body lies behind rifle. Angle to rifle is 10 to 20 degrees.
5. Right knee bent slightly, toe pointing out.
6. Rifle lies on heel of left hand, fingers relaxed.
7. Left elbow rests to left of rifle.
8. Sling (if present) supports weight of rifle. Left arm relaxed.
9. Body rests slightly more on left side.
10. Left leg straight, toe pointing inward or straight back.
There are FIVE MORE STEPS described in detail with specific actions to perform, in the FULL Article. For example, in STEP FOUR (Sling Adjustment), the article explains: “Put the sling high on the arm and tighten the sling keeper. Wrap the arm around the sling so that the sling comes across the left hand and forearm.”
Talented sharpshooter Kirsten Joy Weiss is featured in an episode of NRA All Access. The show covers Kirsten’s development as a competitive shooter, and her success as a trick-shot artist with her own popular YouTube channel. Here’s the All Access segment featuring many of Kirsten’s most famous trick shots.
During the video Kirsten also talks about her background in shooting and how she wants to be a good ambassador for the shooting sports, “spreading the positive reality of shooting”. Kirsten explains: “The fun challenge and joy of shooting is important to me because I really wanted to be a positive example. So when the media says the ‘guns are a bad thing and nobody does anything good with guns’, they can say ‘Well, what about her [Kirsten]’?”
Kirsten: “I think that it’s important for young girls to have somebody that they can look up to… I feel responsibility to show young shooters coming up, especially females, that you can respect yourself and shoot a gun as well.”
A gifted “natural” shooter, Kirsten started shooting fairly late — at age 16. Despite her relatively late start, she learned very quickly, and managed to earn a place on the University of Nebraska shooting team. That literally opened up a new world for Kirsten: “During the course of my career, I’ve had a lot of success. I’ve gone to World Cups… in Zagreb, Croatia, in Munich, Germany. I’ve won National Championships, and got on to the U.S. Olympic short list, so it’s been a good career.”
Proper Cheek Weld
No matter what your discipline — smallbore, silhouette, High Power, F-Class, or even PRS — it’s vital to have a consistent cheek weld for every shot. You want your head to be in the same position on the stock each time. This helps ensure proper eye-to-sights/optic alignment and consistent rifle balance.
In this video, Kirsten explains how to find the best position for your head on the stock, which may require adjusting the cheekpiece and/or length of pull. Then Kirsten demonstrates how to maintain consistent cheek weld shot after shot.
Kirsten tells us: “A lot of people don’t think of shooting as a sport, but it absolutely is, and I would even go so far as to say that it is an art form.” We don’t know if this is art, sport, or magic, but very few shooters have the skill or flexibility to make this upside-down shot…
Some folks say you haven’t really mastered marksmanship unless you can hit a target when standing tall ‘on your own hind legs’. Of all the shooting positions, standing can be the most challenging because you have no horizontally-solid resting point for your forward arm/elbow. Here 10-time National High Power Champion Carl Bernosky explains how to make the standing shot.
Carl Bernosky is one of the greatest marksmen in history. A multi-time National High Power Champion, Carl has won ten (10) National High Power Championships in his storied shooting career, most recently in 2012. In this article, Carl provides step-by-step strategies to help High Power shooters improve their standing scores. When Carl talks about standing techniques, shooters should listen. Among his peers, Carl is regard as one of the very best standing shooters in the history of High Power shooting. Carl rarely puts pen to paper, but he was kind enough to share his techniques with AccurateShooter.com’s readers.
If you are position shooter, or aspire to be one some day, read this article word for word, and then read it again. We guarantee you’ll learn some techniques (and strategies) that can improve your shooting and boost your scores. This stuff is gold folks, read and learn…
How to Shoot Standing by Carl Bernosky
Shooting consistently good standing stages is a matter of getting rounds down range, with thoughtfully-executed goals. But first, your hold will determine the success you will have.
1. Your hold has to be 10 Ring to shoot 10s. This means that there should be a reasonable amount of time (enough to get a shot off) that your sights are within your best hold. No attention should be paid to the sights when they are not in the middle — that’s wasted energy. My best hold is within 5 seconds after I first look though my sights. I’m ready to shoot the shot at that time. If the gun doesn’t stop, I don’t shoot. I start over.
2. The shot has to be executed with the gun sitting still within your hold. If the gun is moving, it’s most likely moving out, and you’ve missed the best part of your hold.
3. Recognizing that the gun is sitting still and within your hold will initiate you firing the shot. Lots of dry fire or live fire training will help you acquire awareness of the gun sitting still. It’s not subconscious to me, but it’s close.
4. Don’t disturb the gun when you shoot the shot. That being said, I don’t believe in using ball or dummy rounds with the object of being surprised when the shot goes off. I consciously shoot every shot. Sometimes there is a mistake and I over-hold. But the more I train the less of these I get. If I get a dud round my gun will dip.* I don’t believe you can learn to ignore recoil. You must be consistent in your reaction to it.
5. Know your hold and shoot within it. The best part of my hold is about 4 inches. When I get things rolling, I recognize a still gun within my hold and execute the shot. I train to do this every shot. Close 10s are acceptable. Mid-ring 10s are not. If my hold was 8 inches I would train the same way. Shoot the shot when it is still within the hold, and accept the occasional 9. But don’t accept the shots out of the hold.
6. Practice makes perfect. The number of rounds you put down range matter. I shudder to think the amount of rounds I’ve fired standing in my life, and it still takes a month of shooting standing before Perry to be in my comfort zone. That month before Perry I shoot about 2000 rounds standing, 22 shots at a time. It peaks me at just about the right time.
This summarizes what I believe it takes to shoot good standing stages. I hope it provides some insight, understanding, and a roadmap to your own success shooting standing.
* This is very noticeable to me when shooting pistol. I can shoot bullet holes at 25 yards, but if I’ve miscounted the rounds I’ve fired out of my magazine, my pistol will dip noticeably. So do the pistols of the best pistol shooters I’ve watched and shot with. One might call this a “jerk”, I call it “controlled aggressive execution”, executed consistently.
NRA Media offers a series of informative videos about the Science of Shooting, covering a wide range of topics, from eye dominance to long-range ballistics. These videos feature high production values, with super-slow motion segments, as well as helpful computer graphics to illustrate the principles covered.
The videos are narrated by Jessie Harrison, a top action pistol shooter (and the first women ever to achieve USPSA Grand Master status). Jessie is assisted by talented shooters such as Top Shot Season 4 Champion Chris Cheng. There are 40 videos in the Firearm Science Video Series. Here are seven good NRA science videos, with links to others below.
Olympic Gold Medalist Jamie Gray demonstrates the four positions used by competition shooters: Prone, Standing, Sitting, and Kneeling. Helpful overlay graphics show how the human skeleton aligns in each of these positions. This video should help hunters as well as competitive position shooters. If you shoot silhouette, definitely watch this video!
BULLET TRAJECTORY — Factors at Play and Zeroing Strategies
Host Jessie Harrison (formerly Jessie Duff) and Veteran Air Force Sniper and Long Range Expert George Reinas help us understand the factors behind bullet trajectory. NOTE: There are some exaggerations in the graphics in the videos, and inconsistent terminology use, but it’s still a helpful basic primer on the subject of trajectories. This popular video has over 1 million YouTube views.
INTERNAL Ballistics — Cartridge Ignition and Bullet in Barrel
What happens inside the barrel of your gun when you pull the trigger? In this edition of Firearm Science, Jessie Harrison goes over internal ballistics, which studies the combustion of propellant, the pressure developed, and the motion of the bullet along the bore of the barrel. There are some good 3D animations showing how the powder charge ignites and the bullet moves through the barrel.
CHOKE TUBES and Shot Patterns — Shotgun Science
With over 2.2 million YouTube views, this shotgun-centric video is the most popular of all the NRA Firearms Science series videos. Here Olympic trap shooter Corey Cogdell explains how choke tubes affect a shotgun’s shot pattern in this edition of Firearm Science. We recommend that all Shotgun hunters watch this video — it explains the effect of choke tubes very well.
ZEROING RIFLES for Long Range — Tech Tips
The process of zeroing rifles for long range is covered in this Firearm Science video featuring George Reinas, a veteran Air Force sniper. George demonstrates how to adjust his scope to compensate for bullet drop at long range. Our friend Dennis Santiago was involved in the making of this video, which was filmed at the Burbank Rifle & Revolver Club in Southern California.
EYE DOMINANCE — How to Determine Which Eye is Dominant
Host Jessie Duff and longtime shooter Krystie Messenger demonstrate how eye dominance affects aim and teach you how to determine your dominant eye in this edition of Firearm Science. There are very simple tests you can do to determine your eye dominance. This Editor is right-handed but left-eye dominant. All competitive shooters should check for eye dominance. If you are cross-dominant, you can alter your head position or put a paper patch on one frame of your shooting glasses.
Talented sharpshooter Kirsten Joy Weiss is featured in an episode of NRA All Access. The show covers Kirsten’s development as a competitive shooter, and her success as a trick-shot artist with her own popular YouTube channel. Here’s the All Access segment featuring many of Kirsten’s most famous trick shots.
During the video Kirsten also talks about her background in shooting and how she wants to be a good ambassador for the shooting sports, “spreading the positive reality of shooting”. Kirsten explains: “The fun challenge and joy of shooting is important to me because I really wanted to be a positive example. So when the media says the ‘guns are a bad thing and nobody does anything good with guns’, they can say ‘Well, what about her [Kirsten]’?”
Kirsten: “I think that it’s important for young girls to have somebody that they can look up to… I feel responsibility to show young shooters coming up, especially females, that you can respect yourself and shoot a gun as well.”
A gifted “natural” shooter, Kirsten started shooting fairly late — at age 16. Despite her relatively late start, she learned very quickly, and managed to earn a place on the University of Nebraska shooting team. That literally opened up a new world for Kirsten: “During the course of my career, I’ve had a lot of success. I’ve gone to World Cups… in Zagreb, Croatia, in Munich, Germany. I’ve won National Championships, and got on to the U.S. Olympic short list, so it’s been a good career.”
Proper Cheek Weld
No matter what your discipline — smallbore, silhouette, High Power, F-Class, or even PRS — it’s vital to have a consistent cheek weld for every shot. You want your head to be in the same position on the stock each time. This helps ensure proper eye-to-sights/optic alignment and consistent rifle balance.
In this video, Kirsten explains how to find the best position for your head on the stock, which may require adjusting the cheekpiece and/or length of pull. Then Kirsten demonstrates how to maintain consistent cheek weld shot after shot.
Kirsten tells us: “A lot of people don’t think of shooting as a sport, but it absolutely is, and I would even go so far as to say that it is an art form.” We don’t know if this is art, sport, or magic, but very few shooters have the skill or flexibility to make this upside-down shot…


 How to Shoot Standing
 5. Know your hold and shoot within it. The best part of my hold is about 4 inches. When I get things rolling, I recognize a still gun within my hold and execute the shot. I train to do this every shot. Close 10s are acceptable. Mid-ring 10s are not. If my hold was 8 inches I would train the same way. Shoot the shot when it is still within the hold, and accept the occasional 9. But don’t accept the shots out of the hold.
 Matt Emmons competed in the Three-Position Event at the Rio Olympics, his fourth Olympic appearance. Matt has competed on the U.S. National Team since 1997, medaling in three Olympic games: Gold in 2004 in Men’s 50m Prone; Silver in 2008 in Men’s 50m Prone; and Bronze in 2012 in Men’s 50m 3X40. Although his specialty is Men’s 3-Position rifle, Emmons’ World Championship and Olympic Gold are in Men’s 50m Prone. He usually shoots an Anschütz or Bleiker .22LR rifle, with Eley Tenex ammo.
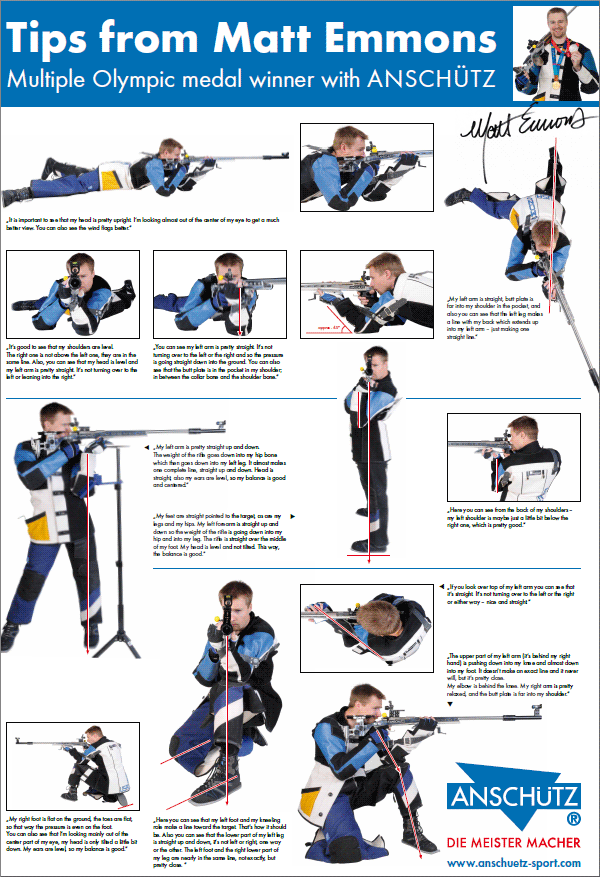

 Team USA Olympian and


 A gifted “natural” shooter, Kirsten started shooting fairly late — at age 16. Despite her relatively late start, she learned very quickly, and managed to earn a place on the University of Nebraska shooting team. That literally opened up a new world for Kirsten: “During the course of my career, I’ve had a lot of success. I’ve gone to World Cups… in Zagreb, Croatia, in Munich, Germany. I’ve won National Championships, and got on to the U.S. Olympic short list, so it’s been a good career.”


