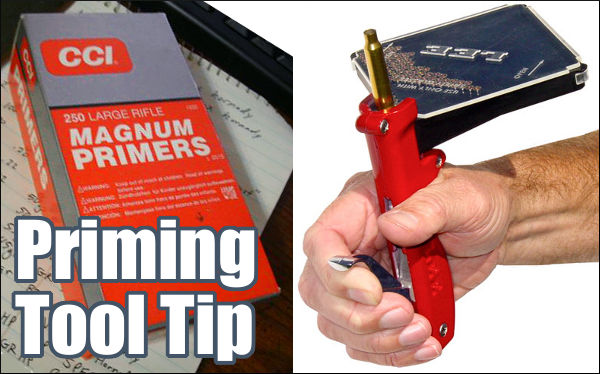
What can happen when the bottom-most primer in a primer feed tube goes off? A big bang, that’s what. Some or all of the primers in the vertical feeding tube can go off in a chain detonation. That’s exactly what happened to Dustin Ellermann, Top Shot Season 3 Champion. Scary experience, but thankfully Dustin was not injured. He writes: “Super thankful that I was wearing my Wiley X eye protection this weekend when I was reloading some .223 rounds. My press detonated nearly 100 small rifle primers. Shown here is the magazine feed tube. Not fun but it could have been much worse. Stay safe!”
When working with progressive reloading presses, you should definitely wear eye protection. Dustin’s chain detonation experience proves that — without a doubt. Remember you only have one set of eyes!
RCBS APS Strips — Alternative to Primer Tubes When you stack a column of primers in a single metal tube, you’re asking for trouble. As Dustin Ellermann learned, when one primer fires, the entire column can follow suit in a chain detonation. Thankfully, you do have options when it comes to primer feeding on a progressive press. RCBS developed an innovative, smart system with primers in horizontal plastic strips. Instead of being stored in a vertical tube, primers are placed in flat, plastic “APS” strips, with a ring of plastic separating each primer. Moving horizontally, primers are never stacked, so the chance of a chain detonation is reduced dramatically. The re-usable APS strips are color-coded for different primer types. You can buy CCI “pre-loaded” primer strips, or you can insert any brand of primers into strips using an RCBS strip-loader tool.
RCBS APS Strip Priming System This video shows how to use APS primer strips wiht a bench-mounted priming system.
AccurateShooter.com Editor Uses Strip Primers
This Editor owns an RCBS Pro-2000 progressive press. The RCBS strip-priming system was one key reason I selected the RCBS Pro-2000 over similar-priced progressives from Dillon and Hornady. I believe the strip primer system is safer, more positive, and easier to use. Before I purchased my RCBS progressive, I “road-tested” the competition. I loaded hundreds of rounds on each of four different progressives: Dillon 550B, Dillon 650, Hornady Lock-N-Load, and RCBS 2000. I was concerned about the primer feed tubes on the Dillons, and I found the RCBS rotary powder measure was much more precise (and easier to adjust) than the sliding bar system on the Dillon machines. The RCBS priming system was definitely more fool-proof than the system on the Hornady press (a first-generation L-N-L that had issues with primer feeding). After “test-driving” blue, red, and green brand progressives extensively, I settled on the RCBS Pro-2000. A decade later, I still think I made the right choice. I like the APS strips for big jobs, and I can also use them in the RCBS hand-priming tool (shown below). With the strips, it’s easy to prime 20 or 40 cases at a time, and then switch to another type of primer for comparison testing.
The APS priming system also works with press-mounted priming tool, bench-mounted tool, and APS hand-tool. EdLongRange uses the press-mounted tool: “I also like the APS approach but use the press-mounted unit (saves your hands/wrists — and I haven’t had a need for a progressive press in over 20 years). Loading the primers in the strips is a bit of a PITA but very manageable. As with all tools there is a learning curve.” CLICK HERE for video showing strip-loading tool and press-mounted APS tool. The RCBS press-mounted tool is no longer in production by RCBS, but you can still find it in some stores or via eBay.
The anvil is the tripod-shaped thin metal piece protruding above the bottom of the primer cup. Getting the primer sitting fully flush on the bottom of the case primer pocket, without crunching it too much, requires some keen feel for the progress of primer seating.
In two informative Midsouth Blog articles, Glen Zediker offers helpful advice on priming. First he examines what happens to the primer itself as it is seated in the cup. Glen explains why some “crush” is important, and why you never want to leave a high primer. Glen also reviews a variety of priming tools, including his favorite — the Forster Co-Ax Bench Primer Seater. Then he offers some key safety tips. Glen provides some “rock-solid” advice about the priming operation. You’ll find more great reloading tips in Glen’s newest book, Top-Grade Ammo, which we recommend.
Priming Precision vs. Speed
Glen writes: “The better priming tools have less leverage. That is so we can feel the progress of that relatively very small span of depth between start and finish. There is also a balance between precision and speed in tool choices, as there so often is.”
Benchtop Priming Tools — The Forster Co-Ax
Glen thinks that the best choice among priming options, considering both “feel” and productivity, may be the benchtop stand-alone priming stations: “They are faster than hand tools, and can be had with more or less leverage engineered into them. I like the one shown below the best because its feeding is reliable and its feel is more than good enough to do a ‘perfect’ primer seat. It’s the best balance I’ve found between speed and precision.”
Load Tuning and Primers
Glen cautions that you should always reduce your load when you switch to a new, not-yet-tested primer type: “The primer is, in my experience, the greatest variable that can change the performance of a load combination, which is mostly to say ‘pressure’. Never (never ever) switch primer brands without backing off the propellant charge and proving to yourself how far to take it back up, or to even back it off more. I back off one full grain of propellant [when I] try a different primer brand.”
Priming Safety Tips by Zediker
1. Get a good primer “flip” tray for use in filling the feeding magazine tubes associated with some systems. Make double-damn sure each primer is fed right side up (or down, depending on your perspective). A common cause of unintentional detonation is attempting to overfill a stuffed feeding tube magazine, so count and watch your progress.
2. Don’t attempt to seat a high primer more deeply on a finished round. The pressure needed to overcome the inertia to re-initiate movement may be enough to detonate it.
3. Don’t punch out a live primer! That can result in an impressive fright. To kill a primer, squirt or spray a little light oil into its open end. That renders the compound inert.
4. Keep the priming tool cup clean. That’s the little piece that the primer sits down into. Any little shard of brass can become a firing pin! It’s happened!
There is an excellent article about primers on the Shooting Times website. We strongly recommend you read Mysteries And Misconceptions Of The All-Important Primer, written by Allan Jones. Mr. Jones is a bona fide expert — he served as the manager of technical publications for CCI Ammunition and Speer Bullets and Jones authored three editions of the Speer Reloading Manual.
This authoritative Shooting Times article explains the fine points of primer design and construction. Jones also reveals some little-known facts about primers and he corrects common misconceptions. Here are some highlights from the article:
Size Matters
Useful Trivia — even though Small Rifle and Small Pistol primer pockets share the same depth specification, Large Rifle and Large Pistol primers do not. The standard pocket for a Large Pistol primer is somewhat shallower than its Large Rifle counterpart, specifically, 0.008 to 0.009 inch less.
Magnum Primers
There are two ways to make a Magnum primer — either use more of the standard chemical mix to provide a longer-burning flame or change the mix to one with more aggressive burn characteristics. Prior to 1989, CCI used the first option in Magnum Rifle primers. After that, we switched to a mix optimized for spherical propellants that produced a 24% increase in flame temperature and a 16% boost in gas volume.
Foiled Again
Most component primers have a little disk of paper between the anvil and the priming mix. It is called “foil paper” not because it’s made of foil but because it replaces the true metal foil used to seal early percussion caps. The reason this little disk exists is strictly a manufacturing convenience. Wet primer pellets are smaller than the inside diameter of the cup when inserted and must be compacted to achieve their proper diameter and height. Without the foil paper, the wet mix would stick to the compaction pins and jam up the assembly process.
One side of this gauge is the “go” side which quickly tells you the depth of a primer pocket, whether any crimp is properly removed, and whether the primer pocket is loose. If it feels loose on the “go” side, use the other end of the tool, the “no go” side, to test to see if the primer pocket is too loose to hold a primer. If the no-go slides into the pocket, then you know to junk that brass.
Primer Pocket Growth and Useful Case Life
Repeated firings at stout pressures can cause primer pockets to grow in diameter. This can create an unsafe condition if your primers are not seating properly. Are your primer pockets “good to go”, or have they been pushed to the point of no return? Do you really know? Many guys try to gauge primer pocket tightness by “feel”, as they seat the primer. But that method isn’t precise. Now there’s a better way…
The folks at Ballistictools.com have created a handy set of precision-machined gauges that let you quickly and accurately check your primer pockets. These gauges (aka “gages”) are offered in two sizes — for large and small primer pockets. A two-piece set of both large and small gauges costs just $19.99. These gauges let you quickly measure the depth of a primer pocket, and check if the crimp has been removed properly. Most importantly, the gauge tells you if the primer pocket has opened up too much. One side of the gauge has an enlarged diameter plug. If that “No-Go” side fits in the primer pocket, you should ditch the case — it’s toast.
Precision ground from O-1 tool steel, The Ballistic Tools primer pocket gauges serve multiple functions. The inventor of these tools explains: “I created the prototype of this tool for my own use in brass processing. I needed a way to quickly and easily measure primer pockets that was reliable and did not require wasting a primer. This tool has been indispensable for me and I would never go back to the old method of uncertainty and guessing.”
Product tip from Boyd Allen. We welcome reader submissions.
Here is an article Glen Zediker wrote for the Midsouth Blog. In this article Glen gives important advice on selecting, handling, seating, and testing primers. The right primer choice can and will affect your load’s performance and accuracy. And proper primer handling is essential for safety.
by Glen Zediker
The primer is one component in the collection that might not get all the attention it warrants. That’s because it is the one thing, above all other components, that you don’t want to just swap and switch around. We’ve all heard cautions about testing new lots of every component, especially propellant, but primers not only change lot to lot, they vary greatly in their influence on any one load, brand to brand.
The difference in one brand to the next can equal a good deal more or less pressure, for instance. While there are “general” tendencies respecting the “power” of various-brand primers, always (always) reduce the load (propellant quantity) when switching primers.
This has become more of an issue over the past few years as we’ve faced component shortages. I can tell you without a doubt that going from a WW to a CCI, or from a Remington to a Federal, can have a major influence on a load. I establish that from chronograph readings. No doubt, it’s best to have a good supply of one primer brand and lot that produces good results, and when that’s not possible, it’s a hard sell to convince someone to stop loading ammo and get back to testing. But. It is important. I can tell you that from (bad) experience. How I, and we all, learn most things…
When I switch primers, whether as a test or a necessity, I reduce my load ONE FULL GRAIN. There can be that much effect.
The Elements of a Primer
A primer is made up of a brass cup filled with explosive compound (lead styphate). Lead styphate detonates on impact. Primers don’t burn – they explode! In the manufacturing process, this compound starts as a liquid. After it’s laid into the cup, and while it’s still wet, a triangular piece or metal (the “anvil”) is set in. When the cup surface is struck by the firing pin, the center collapses, squeezing the explosive compound between the interior of the cup and the anvil. That ignites the compound and sends a flame through the case flash hole, which in turn lights up the propellant.
Primers Can be Dangerous — Particularly When Stacked
Don’t underestimate that. I’ve had one experience that fortunately only created a huge start, but I know others who have had bigger more startling mishaps. These (almost always) come from primer reservoirs, such fill-tubes. Pay close attention when charging up a tube and make sure all the primers are facing the right way, and that you’re not trying to put in “one more” when it’s full! That’s when “it” usually happens. What will happen, by the way, is akin to a small grenade. Static electricity has also been blamed, so keep that in mind.
Sizes and Types of Primers
Primers come in two sizes and four types. “Large” and “small”: for example, .223 Rem. takes small, .308 Win. takes large. Then there are pistol and rifle in each size.
Rifle primers and pistol primers are not the same, even though they share common diameters! Rifle primers [normally] have a tougher cup, and, usually, a hotter flash. Never swap rifle for pistol. Now, some practical-style competitive pistol shooters using their very high-pressure loads (like .38 Super Comp) sometimes substitute rifle primers because they’ll “handle” more pressure, but they’ve also tricked up striker power. That’s a specialized need.
Further, some primer brands are available with a “magnum” option. Some aren’t. My experience has been that depends on the “level” of their standard primer. A magnum primer, as you might guess, has a more intense, stouter flash that travels more “deeply” to ignite the larger and more dense powder column. It reaches further, faster.
Flash Consistency Counts Flash Consistency is very important, shot to shot. The consistency of every component is important: bullet weights, diameters, case wall thicknesses, and all the way down the list. We’re hoping to get more consistent behavior from a “match” or “benchrest” primer, and we’re paying more for it. I can tell you that some brands that aren’t touted as “match” are already consistent. That all comes from experience: try different primers, just respect the need to initially reduce the load for each test. I can also tell you that my notes tell me that the primer has a whopping lot to do with how high or low my velocity deviations plot out.
Primer Dimensional Differences and Primer Tools
One last thing — there are small variations in primer dimensions (heights, diameters) among various brands. These variations are not influential to performance. However — small diameter variations can influence feeding through priming tools. This can be a hitch especially in some progressive loading machines. Manufacturers usually offer insight (aka: “warnings”) as to which are or aren’t compatible, so find out.
This article is adapted from Glen’s books, Handloading For Competition and Top-Grade Ammo, available at Midsouth HERE. Learn more about Glen’s books at ZedikerPublishing.com.
Here’s a very cool 3D Animation showing pistol rounds being fired. Computer-generated graphics provide a look inside the cartridge at the moment of ignition as the primer fires and the flame front moves through the ignited powder. It’s really kind of mesmerizing. If you’ve every wondered just what happens inside your cartridges the moment that firing pin strikes, then watch this video…
Watch Video to See Handgun Ammo Being Chambered and Fired:
Mute Enabled — Click Speaker Icon to Hear Audio. Firing Sequence Starts at 1:28.
This animated video from German ammo-maker GECO (part of the Swiss RUAG group of companies) reveals the inside of a pistol cartridge, showing jacket, lead core, case, powder and primer. Employing advanced 3D rendering and computer graphics, the video shows an X-ray view of ammo being loaded in a handgun, feeding from a magazine.
Then it really gets interesting. At 1:28 – 1:50 you’ll see the firing pin strike the primer cup, the primer’s hot jet streaming through the flash-hole, and the powder igniting. Finally you can see the bullet as it moves down the barrel and spins its way to a target. This is a very nicely-produced video. If you’ve ever wondered what happens inside a cartridge when you pull the trigger, this video shows all. They say “a picture’s worth a thousand words”… well a 3D video is even better.
For centerfire rounds, consistent ignition (and low ES/SD) all begins with the primer in the base of the cartridge. When the firing pin strikes the primer, it sets off a small flame/spark which lights the powder in the case. Energy from that burning powder pushes the bullet out of the cartridge, down the barrel, and out to the target. It’s fair to say, then, that accurate shooting all begins with the primer.
When seating primers, consistency counts. You want to make sure the primer is fully seated in the primer pocket in the base of the case. You want to ensure a slight bit of crush (flattening) for proper seating, and it doesn’t hurt to have very consistent primer seating depths. That’s why guys use tools to uniform their primer pockets.
Here’s a new tool that lets you measure the consistency of primer seating depths. We haven’t used this device yet, but Forum members have reported it works well — measurements are quick and repeatable. Will this tool lower your ES/SD or improve accuracy? That’s hard to say. However, it will definitely help you detect when a primer in a loaded round is seated too high or too low — that’s important. In addition, it can give you precise measurements for comparison testing with different types of primers.
Accuracy One Precision Primer Gauge
The Accuracy One Precision Primer Gauge will precisely measure primer pocket depth and the depth of seated primers in relationship to the face of the case head. The Precision Primer Gauge can also be used to measure the thickness of an unseated primer, allowing you to calculate the optimum seating depth for the particular primers and cases you are loading.
Precision Primer Gauge Features:
Digital Indicator with 0.01mm/0.0005″ resolution
Gauge Body is machined from 303 stainless steel
Small Primer Stem and Large Primer Stem
Both .223 Rem and .308 Win zeroing block
Magnum and .338 Lapua zeroing block
Case Compatibility: The Precision Primer Gauge works with 300 Win. Mag case head diameter (.532”) cartridges, .308 Win. case head diameter (.473”) cartridges, and .223 Rem case head diameter (.378”) cartridges using either large or small primers.
Precision Primer Gauge Pricing:
PPG Without Indicator: $100.00
PPG With Indicator: $150.00
PPG Main Body Only: $40.00
Phone Orders: Call (814) 684-5322
How to Order the Precision Primer Gauge:
The Precision Primer Gauge can be ordered via phone, or by sending in the PDF ORDER FORM form via mail or email.
Assembly Tips: Nylon screw is provided for securing the gauge body to the indicator. The contact point of the indicator must be removed to provide proper function. Also, please note that the standard gauge body is not compatible with cartridges that share the .338 Lapua case head diameter unless the diameter of the magnum step is machined to .595” to accept the larger diameter case head. This modification of the gauge body is available upon request.
Product Tip from EdLongRange. We welcome reader submissions.
There is an excellent article about primers on the Shooting Times website. We strongly recommend you read Mysteries And Misconceptions Of The All-Important Primer, written by Allan Jones. Mr. Jones is a bona fide expert — he served as the manager of technical publications for CCI Ammunition and Speer Bullets and Jones authored three editions of the Speer Reloading Manual.
This authoritative Shooting Times article explains the fine points of primer design and construction. Jones also reveals some little-known facts about primers and he corrects common misconceptions. Here are some highlights from the article:
Size Matters
Useful Trivia — even though Small Rifle and Small Pistol primer pockets share the same depth specification, Large Rifle and Large Pistol primers do not. The standard pocket for a Large Pistol primer is somewhat shallower than its Large Rifle counterpart, specifically, 0.008 to 0.009 inch less.
Magnum Primers
There are two ways to make a Magnum primer — either use more of the standard chemical mix to provide a longer-burning flame or change the mix to one with more aggressive burn characteristics. Prior to 1989, CCI used the first option in Magnum Rifle primers. After that, we switched to a mix optimized for spherical propellants that produced a 24% increase in flame temperature and a 16% boost in gas volume.
Foiled Again
Most component primers have a little disk of paper between the anvil and the priming mix. It is called “foil paper” not because it’s made of foil but because it replaces the true metal foil used to seal early percussion caps. The reason this little disk exists is strictly a manufacturing convenience. Wet primer pellets are smaller than the inside diameter of the cup when inserted and must be compacted to achieve their proper diameter and height. Without the foil paper, the wet mix would stick to the compaction pins and jam up the assembly process.
Repeated firings at stout pressures can cause primer pockets to grow in diameter. This can create an unsafe condition if your primers are not seating properly. Are your primer pockets “good to go”, or have they been pushed to the point of no return? Do you really know? Many guys try to gauge primer pocket tightness by “feel”, as they seat the primer. But that method isn’t precise. Now there’s a better way…
The folks at Ballistictools.com have created a handy set of precision-machined gauges that let you quickly and accurately check your primer pockets. These gauges are offered in two sizes — for large and small primer pockets. A two-piece set of both large and small gauges costs just $19.99. These gauges let you quickly measure the depth of a primer pocket, and check if the crimp has been removed properly. Most importantly, the gauge tells you if the primer pocket has opened up too much. One side of the gauge has an enlarged diameter plug. If that “No-Go” side fits in the primer pocket, you should ditch the case — it’s toast.
Precision ground from O-1 tool steel, these primer pocket gauges serve multiple functions. The inventor of these tools explains:
I created the prototype of this tool for my own use in brass processing. I needed a way to quickly and easily measure primer pockets that was reliable and did not require wasting a primer. This tool has been indispensable for me and I would never go back to the old method of uncertainty and guessing.
One side of this gauge is the “go” side which quickly tells you the depth of a primer pocket, whether any crimp is properly removed, and whether the primer pocket is loose. If it feels loose on the “go” side, use the other end of the tool, the “no go” side, to test to see if the primer pocket is too loose to hold a primer. If the no-go slides into the pocket, then you know to junk that brass.
Product tip from Boyd Allen. We welcome reader submissions.
From time to time, we all encounter a primer that doesn’t go off. It’s normal to attribute the problem to a bad primer. But sometimes there are other explanations. George S., one of our Forum members, experienced a couple failures to fire, but he learned that the issue was his priming TOOL, not his primers. Here’s what George told us. There’s a lesson to be learned:
“I had issues with CCI 450s when I had my first 6BR barreled. I had probably three or four out of 20 rounds that failed to fire. the primers were dented but didn’t fire. I called CCI since I had bought a case of them. The tech was decent enough but had the audacity to tell me I was not seating the primers all the way in the pocket. I proceeded to let him know I had been reloading longer than he had been alive and I knew how to seat a primer.
Turns out that I did and I didn’t! I was using the RCBS primer tool I had used for years and the primers felt just fine to me. I finally decided to check the tool and since I had a new one I took the seating pins out and measured them. The seating pin on the tool I had been using for years was shorter by a few thousandths! I then used the pin from the new primer tool and darned if the primers that didn’t seat down to the bottom of the cup.
I switched to a K&M primer tool for seating the CCI primers and have not had a problem since. It was the combination of harder cup and lack of proper seating. I did call the CCI tech back and apologized for being an idiot.”
Another Forum member witnessed a problem cause by misuse of a priming tool: “I did … see a failure to fire on a Rem 9 1/2 primer only a week ago. That was in the new Rem muzzleloader that uses a primed case to ignite the pellets. After watching the muzzleloader’s owner seat his primers, I believe that it was operator error not the primer. He was seating the primer and then squeezing the priming tool so hard that his hands hurt after a few. We got that corrected.”


 When you stack a column of primers in a single metal tube, you’re asking for trouble. As Dustin Ellermann learned, when one primer fires, the entire column can follow suit in a chain detonation. Thankfully, you do have options when it comes to primer feeding on a progressive press. RCBS developed an innovative, smart system with primers in horizontal plastic strips. Instead of being stored in a vertical tube, primers are placed in flat, plastic “APS” strips, with a ring of plastic separating each primer. Moving horizontally, primers are never stacked, so the chance of a chain detonation is reduced dramatically. The re-usable APS strips are color-coded for different primer types. You can buy CCI “pre-loaded” primer strips, or you can insert any brand of primers into strips using an RCBS strip-loader tool.
 The APS priming system also works with press-mounted priming tool, bench-mounted tool, and APS hand-tool. EdLongRange uses the press-mounted tool: “I also like the APS approach but use the press-mounted unit (saves your hands/wrists — and I haven’t had a need for a progressive press in over 20 years). Loading the primers in the strips is a bit of a PITA but very manageable. As with all tools there is a learning curve.” CLICK HERE for video showing strip-loading tool and press-mounted APS tool. The RCBS press-mounted tool is no longer in production by RCBS, but you can still find it in some stores or via eBay.


 The folks at


 Flash Consistency is very important, shot to shot. The consistency of every component is important: bullet weights, diameters, case wall thicknesses, and all the way down the list. We’re hoping to get more consistent behavior from a “match” or “benchrest” primer, and we’re paying more for it. I can tell you that some brands that aren’t touted as “match” are already consistent. That all comes from experience: try different primers, just respect the need to initially reduce the load for each test. I can also tell you that my notes tell me that the primer has a whopping lot to do with how high or low my velocity deviations plot out.
 Get Midsouth products
 This animated video from German ammo-maker