Gavin Gear of UltimateReloader.com recently reviewed Lee Precision’s new lever-operated, bench-mounted priming tool. The Lee Auto Bench Prime features a hopper-style primer feeder set at an angle. Gavin likes the tool, reporting that primers feed well and seat fully with very little effort. And switching from large to small primer size (or vice-versa) is quick and easy. Overall, Gavin says the Lee Auto Bench Prime has earned a place in his reloading room: “This is now my tool of choice for off-press priming. The Lee Auto Bench Prime is easier to use than a hand priming tool, and more efficient.”
Watch UltimateReloader.com’s Lee Auto Bench Prime Gear Review
Gavin tells us that the system worked well: “All in all, I’m really liking the LEE Auto Bench Prime. In the video, I prime both small primer .223 Rem brass and large primer .308 Win cases. I was impressed with how easy it was to seat the primers, and how quickly the process goes.”
How the Lee Auto Bench Prime Performs
Gavin had three important “take-aways” from his initial loading sessions with the Lee Auto Bench Prime:
1. I was surprised by the low effort needed to prime cases — it’s pretty amazing.
2. You can quickly and easily install shellholders and change primer sizes.
3. The folding primer tray works very well. It’s a great setup from my testing so far.
Are there any negatives with the tool? Gavin noted that, in the course of loading 100+ rounds, once or twice he had to tap the triangular tray to get the primer to feed: “That’s not a big deal, and may smooth out with time”.
Tool Costs Under $30.00
Available at Grafs.com for just $28.59, the Lee Auto Bench Prime tool is very affordable. It costs much less than competitive bench-mounted priming tools from Forster and RCBS.
NOTE: this tool requires dedicated Auto Prime shell holders (sold separately), but that’s a relatively small added expense. A set of Lee shell-holders (shown at right) costs less than $20.00 (street price).
Think you can “get by” without protective eyewear? This story provides yet another example of why you should wear safety glasses every time you go shooting. You only have one set of eyes — they are much too precious to risk.”
Bad Primer Blasts Gas Through Side of Casehead
Our friend Grant Guess recently had a “close encounter” with a bad primer. An apparently defective primer caused part of the casehead on one of his rounds to blow out. This, in turn, allowed high pressure gas to vent through the damaged primer pocket. Take a good look, boys and girls. This is yet another very good reason to wear safety glasses. The cartridge was a 6.5-06, hand-loaded in necked-down Winchester-headstamp .270 Win brass. Grant reports:
“I had a blow-through between the primer and the primer pocket today. The action was really smoking and I got a face full of gas. This was a reasonably light charge. Thank God for safety glasses.
I should also mention that it appears there is a 3/64 hole that is halfway between the primer and the primer pocket. Like it burned a small jet hole through both of them.”
Could this happen to you? It just might. On seeing this damaged case, one of Grant’s Facebook friends, Chris D., observed: “Search the internet, you will see a lot of these pin hole ‘in the corner’ failures. Obviously Winchester has some issues with the LR primers.”
Careful Examination Reveals Apparent Primer Defect
After this incident, Grant examined the damaged case: “I pinned the flash hole and it is not over-sized or under-sized. The primer clearly has an area where it had a defect. At [50,000 CUP], it doesn’t take much of a defect to cause issues. There was a slight bit of pucker-factor on the next shot….”
One of our Forum members complained that he wasn’t able to set his primers flush to the rim. He tried a variety of primer tools, yet no matter what he used, the primers still didn’t seat deep enough. He measured his primers, and they were the right thickness, but it seemed like his primer pockets just weren’t deep enough. He was mystified as to the cause of the problem.
Well, our friend Boyd Allen diagnosed the problem. It was the decapping rod. If the rod is adjusted too low (screwed in too far), the base of the full-diameter rod shaft (just above the pin) will contact the inside of the case. That shaft is steel whereas your case is brass, a softer, weaker metal. So, when you run the case up into the die, the shaft can actually stretch the base of the primer pocket outward. Most presses have enough leverage to do this. If you bell the base of the primer pocket outwards, you’ve essentially ruined your case, and there is no way a primer can seat correctly.
The fix is simple. Just make sure to adjust the decapping rod so that the base of the rod shaft does NOT bottom out on the inside of the case. The pin only needs to extend through the flash hole far enough to knock the primer out. The photo shows a Lyman Universal decapping die. But the same thing can happen with any die that has a decapping rod, such as bushing neck-sizing dies, and full-length sizing dies.
Whenever you use a die with a decapping pin for the first time, OR when you move the die to a different press, make sure to check the decapping rod length. And it’s a good idea, with full-length sizing dies, to always re-check the height setting when changing presses.
Lee Universal Decapping Die on SALE for $9.89
Speaking of decapping tools, MidwayUSA has the Lee Universal Decapping Die on sale this month (June, 2010), for just $9.89 (item 136543). There are many situations when you may want to remove primers from fired brass as a separate operation (prior to case sizing). For example, if your rifle brass is dirty, you may want to de-cap before sizing. Or, if you load on a progressive press, things will run much more smoothly if you decap you brass first, in a separate operation. The Lee Universal Decapping Die will work with cartridges from 17 Fireball all the way up to 45-70. However, NOTE that the decapping pin supplied with this Lee die is TOO LARGE for LAPUA 6.5×47, 6BR, 220 Russian, and Norma 6 PPC flash holes. Because the pin diameter is too large for these brass types, you must either turn down the pin, or decap with a different tool for cases with .059″ flash-holes. Otherwise, the Lee Decapping Die works well and it’s a bargain.
Craters may look interesting on the moon, but you don’t want to see them on your primers. Certain mechanical issues that cause primer craters can also cause primer piercing — a serious safety problem that needs to be addressed. If you have a gun that is cratering primers (even at moderate pressure levels), there is a solution that works with many rifles — send your bolt to Greg Tannel to have the firing pin hole bushed.
Shooters who convert factory actions to run 6BRs, 6PPCs or other high-pressure cartridges should consider having the firing pin bushed. These modern cartridges like to run at high pressures. When running stout loads, you can get cratering caused by primer flow around the firing pin hole in the bolt face. The reason is a little complicated, but basically the larger the hole, the less hydraulic pressure is required to crater the primer. A limited amount of cratering is normally not a big issue, but you can reduce the problem significantly by having a smith fit a bushing in the firing pin hole. In addition to reduced cratering, bushing the firing pin often produces more consistent ignition.
This is a highly recommended procedure that our editors have had done to their own rifles. Greg Tannel (Gre-Tan Rifles) is an expert at this procedure, and he does excellent work on a wide variety of bolts. Current price for a bushing job, which includes turning the firing pin to .062″, is $80.00, or $88.00 with USPS Priority Mail return shipping.
If you have a factory rifle, a bushed firing pin is the way to go if you are shooting the high-pressure cartridges such as 6PPC, 6BR, 6-6.5×47 and 6.5×47. This is one of the most cost-effective and beneficial upgrades you can do to your factory rifle. For more info on the Firing Pin Bushing process, visit GreTanRifles.com, or email greg [at] gretanrifles.com. (After clicking the link for GreTanRifles.com, Click on “Services” > “Shop Services” > “Bolt Work”, and you’ll see a listing for “Bush Firing Pin Hole & Turn Pin”. Select “View Details”.)
Firing Pin Hole Bushing by Greg Tannel
Work Done: Bush firing pin hole and turn pin.
Functions: Fixes your cratering and piercing problems.
Price: $80.00 + $8.00 return shipping Total Price: $88.00
Actions for which Bushing is Offered: Remington, Winchester, Savage multi-piece pin, Sako, Kimber, Nesika, Stiller, BAT Machine, Kelbly, Lawton, Surgeon, Borden, Wichita, Hall, Ruger, Howa, Weatherby, Dakota, Pacific Tool, Phoenix, and Defiant bolt action rifle or pistol.
Actions for which Bushing is NOT Available: Case hardened receivers, ARs, Accuracy International (AI), Barnard, Big Horn, Cooper, Desert Tactical Arms, Kimber, Rosenthal, New Savage single piece pin, Rim fires, Falling block, Break open, Lever, Pump rifles, 1903-A3, CZ, Mauser.
How to send your bolt in to be bushed:
You can send your bolt snail mail, priority mail, or UPS (Please do not use FEDEX as it sometimes has delivery delays). Pack your bolt carefully and ship to: Gre’-Tan Rifles, 24005 Hwy. 13, Rifle CO 81650. Please include your name, phone number, and return shipping address.
Due to the high volume of work, turn around is 5 to 8 weeks on bushing a bolt. Three or more bolts will be sent back to you UPS and we will have to calculate shipping. We can overnight them at your expense. You can pay by check, money order, or credit card. For more information visit GretanRifles.com.
At SHOT Show 2016 we visited the Sellier & Bellot pavilion. You may not have heard of this company, but it is one of Europe’s older ammunition manufacturers. The video below shows ammunition being made from start to finish, starting with raw materials. This is a fascinating video that is well worth watching. It shows some amazing machines in operation:
Based in in Vlašim, Czech Republic, Sellier & Bellot was founded in August 5, 1825 by a German businessman of French origins called Louis Sellier. His family were royalists who fled France during the French Revolution. Louis Sellier began manufacturing percussion caps for infantry firearms in a factory in Prague, Bohemia on the request of Francis I, the Emperor of Austria. Sellier was joined by his countryman Jean Maria Nicolaus Bellot.
At the S&B booth, we also saw an interesting CGI video that shows what happens inside a rifle chamber and barrel when a cartridge fires can’t be seen by the naked eye (unless you are a Super-Hero with X-Ray vision). But now, with the help of 3D-style computer animation, you can see every stage in the process of a rifle round being fired.
In this X-Ray-style 3D animation illustrates the primer igniting, the propellant burning, and the bullet moving through the barrel. The video then shows how the bullet spins as it flies along its trajectory. Finally, this animation shows the bullet impacting ballistic gelatin. Watch the bullet mushroom and deform as it creates a “wound channel” in the gelatin.
Watch Video – Cartridge Ignition Sequence Starts at 1:45 Time-Mark
Each Wednesday, the U.S. Army Marksmanship Unit publishes a reloading “how-to” article on the USAMU Facebook page. Yesterday’s post covered primer seating depth. This article offers many useful tips — including a clever way to measure primer seating depth with ordinary jaw-type calipers. Visit the USAMU Facebook page next Wednesday for the next installment.
Primer Seating Depth — Why Uniformity is Important
The first concern is for safety: for that reason, primers should be seated below flush with the case head. One primary cause of “slam fires” (which includes catastrophic failures from firing out of battery) is “high,” or protruding primers. These stand above the case head, are readily felt with simple finger-tip inspection, and may fire when slammed by the bolt face and/or a floating firing pin in feeding.
Here at the USAMU, we ensure our rifle primers generally run -0.003″ to -0.005″ below the case head. Maximum primer depth is -0.006″ and minimum is -0.002″. Upon inspection, any cases with high primers will be corrected before loading. Aside from improving ballistic uniformity, ensuring the primers have proper compression upon seating also helps reduce possible misfires. These can be caused by the firing pin’s expending part of its energy either seating the primer or having to deform the primer cup enough to reach the anvil.
SMART TIP: How to Measure Primer Seating Depth with a Set of Calipers
A zeroed, precision set of standard calipers will also measure primer seating depth. (You don’t really need a custom tool.) Merely close the jaws and place the calipers’ narrow end squarely across the center of the case head/primer pocket. Keeping the narrow end in full contact with the case head, gently open the jaws, and the center bar will extend until it reaches the primer face. Voilà! Primer depth is read on the dial. Taking a few measurements to ensure accuracy and repeatability is recommended until one is familiar with this technique.
Brass and Primer Defects Can Cause Seating-Depth Variances
Factors affecting variance of primer seating depth include brass maker and lot number — all primer pockets are not created equal! Another factor is the primer manufacturer and individual primer lot. We’ve encountered occasional primer lots by top-quality makers that included some primers with slight defects affecting seating. While finely accurate, these primers were out-of-round or had small slivers of cup material protruding which affected primer feeding or seating depth.
Has one’s brass been fired previously? If so, how many times and the pressures involved also affect future primer seating. Obviously, this is another factor in favor of segregating one’s high-accuracy brass by maker, lot number, and number of times fired, if possible.
Measuring Primer Seating Depth with Purpose-Built Gauge
The next question, “How do we measure primer depth?” happily can be answered using tools already owned by most handloaders. [See tip above on how to measure depth with calipers.] At the USAMU, we have the luxury of purpose-built gauges made by the talented machinists of the Custom Firearms Shop. One places the primed case into the gauge, and the dial indicator reads the depth quickly and easily. The indicator is calibrated using a squarely-machined plug that simulates a case head with a perfectly flush-seated primer, easily giving meaningful “minus” or “plus” readings. The gauge is usable with a variety of case head sizes.
Primer Seating with Progressive Presses
Methods of primer seating include hand-seating using either hand held or bench-mounted tools, vs. progressive-press seating. Progressive presses may either seat by “feel,” subjective to each operator, or by using a mechanical “stop” that positively locates primers nearly identically every time. Testing here has shown that we get more uniform seating with the latter type progressive press, than we do with a high-quality bench-mounted tool lacking a positive stop.
Primer stop depth adjustments on our main progressive presses involve turning a punch screw in and out. While the screw is not calibrated, fine “tick” marks added to the top of the press help users gauge/repeat settings by “eye” efficiently with practice. Then, once a sample of primed cases is run to confirm the range and accuracy of depths, the identifying lot number and maker is noted on the press for reference. When it’s necessary to switch brass/primer lots, changes are easy to make and settings are easily repeated when it’s time to switch back.
You can see scores of new-for-2016 products in the free January digital edition of Shooting Industry magazine. The new product offerings are found in a 28-page feature article starting on page 76 and ending on page 104. In those pages you’ll find new items from leading companies such as: Alliant, Browning, Hodgdon, Hornady, Lyman, Nikon, Ruger, Vortex, and Weaver Optics.
Important New Products
You can also see the new products in Shooting Industry magazine’s regular website, on the New Product Showcase Page. As a teaser, here are three new products from that page — new Alliant Reloder 16 powder, a new Bench-top primer tool from Lee, and a handy Lyman maintenance mat. We are VERY interested in new Reloder 16 propellant. Alliant says RL16 has a burn rate similar to H4350/IMR4350, which would make RL16 ideal for many popular match cartridges.
NEW Product — Alliant Reloder 16 Powder
Alliant Powder Reloder 16 is a propellant that performs consistently across temperature extremes. Its burn rate is slightly faster than Reloder 17’s — well within the 4350 burn speed band. This makes it ideal for traditional hunting cartridges as the .30-06 and .270 Win. It will work as well with 6.5mm target loads and tactical applications where temperature stability is required. The Alliant Powder Reloder 16 contains a de-coppering additive but no toxic DNT or DBP.
NEW Product — Lee Auto Bench Prime
The new Auto Bench Prime from Lee Precision is an easy-to-use bench-mounted priming tool with a large lever that provides good “feel” with plenty of mechanical advantage. The symmetrical design allows for right- or left-hand operation. The Auto Bench Prime includes priming assemblies for large and small primers and a folding tray with a built-in primer-flipping feature. This allows direct filling from large primer boxes. The unit uses special, but inexpensive priming tool shell holders.
NEW Product — Lyman Maintenance Mat
The new Essential Rifle Maintenance Mat from Lyman Products is a smart item that any gun-owner can use. This 10″ x 36″ cleaning/assembly mat features small compartments for tools, parts, and cleaning item. The mat’s firm yet cushioned synthetic rubber surface protects your firearms. The Mainteance Mat’s molded-in compartments keep small parts and screws handy, yet out of the way. The Lyman mat is chemically resistant and cleans up easily.
It may seem obvious, but you need to be careful when changing primer types for a pet load. Testing with a .308 Win rifle and Varget powder has confirmed that a primer change alone can result in noteworthy changes in muzzle velocity. To get more MV, you’ll need a more energy at some point in the process — and that potentially means more pressure. So exercise caution when changing primer types
We are often asked “Can I get more velocity by switching primer types?” The answer is “maybe”. The important thing to know is that changing primer types can alter your load’s performance in many ways — velocity average, velocity variance (ES/SD), accuracy, and pressure. Because there are so many variables involved you can’t really predict whether one primer type is going to be better or worse than another. This will depend on your cartridge, your powder, your barrel, and even the mechanics of your firing pin system.
Interestingly, however, a shooter on another forum did a test with his .308 Win semi-auto. Using Hodgdon Varget powder and Sierra 155gr Palma MatchKing (item 2156) bullets, he found that Wolf Large Rifle primers gave slightly higher velocities than did CCI-BR2s. Interestingly, the amount of extra speed (provided by the Wolfs) increased as charge weight went up, though the middle value had the largest speed variance. The shooter observed: “The Wolf primers seemed to be obviously hotter and they had about the same or possibly better ES average.” See table:
Varget .308 load
45.5 grains
46.0 grains
46.5 grains
CCI BR2 Primers
2751 fps
2761 fps
2783 fps
Wolf LR Primers
2757 fps
2780 fps
2798 fps
Speed Delta
6 fps
19 fps
15 fps
You can’t extrapolate too much from the table above. This describes just one gun, one powder, and one bullet. Your Mileage May Vary (YMMV) as they say. However, this illustration does show that by substituting one component you may see significant changes. Provided it can be repeated in multiple chrono runs, an increase of 19 fps (with the 46.0 grain powder load) is meaningful. An extra 20 fps or so may yield a more optimal accuracy node or “sweet spot” that produces better groups. (Though faster is certainly NOT always better for accuracy — you have to test to find out.)
WARNING: When switching primers, you should exercise caution. More speed may be attractive, but you have to consider that the “speedier” primer choice may also produce more pressure. Therefore, you must carefully monitor pressure signs whenever changing ANY component in a load.
Our friend Grant Guess recently had a “close encounter” with a bad primer. An apparently defective primer caused part of the casehead on one of his rounds to blow out. This, in turn, allowed high pressure gas to vent through the damaged primer pocket. Take a good look, boys and girls. This is yet another very good reason to wear safety glasses. The cartridge was a 6.5-06, handloaded in necked-down Winchester-headstamp .270 Win brass. Grant reports:
“I had a blow through between the primer and the primer pocket today. The action was really smoking and I got a face full of gas. This was a reasonably light charge. Thank God for safety glasses.
I should also mention that it appears there is a 3/64 hole that is halfway between the primer and the primer pocket. Like it burned a small jet hole through both of them.”
Could this happen to you? It just might. On seeing this damaged case, one of Grant’s Facebook friends, Chris D., observed: “Search the internet, you will see a lot of these pin hole ‘in the corner’ failures. Obviously Winchester has some issues with the LR primers.”
Careful Examination Reveals Apparent Primer Defect
After this incident, Grant examined the damaged case: “I pinned the flash hole and it is not over-sized or under-sized. The primer clearly has an area where it had a defect. At [50,000 CUP], it doesn’t take much of a defect to cause issues. There was a slight bit of pucker-factor on the next shot….”
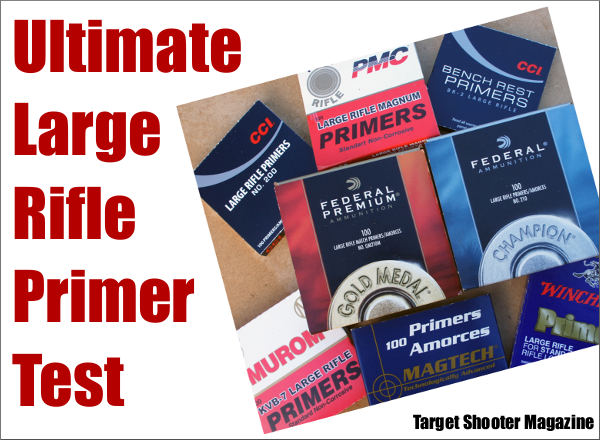
If you shoot a .308 Win, or any cartridge that uses a Large Rifle (LR) primer, you should read an important new article by Laurie Holland in Target Shooter Magazine. Holland, a talented shooter from the UK, tested no less than sixteen (16) different large primer types using a custom F-TR target rifle shot from the bench. Laurie loaded .308 Win ammo* with 16 LR primer varieties and then tested for average velocity, ES/SD, and group size. This may be the most comprehensive and thorough LR primer test ever done. Here are the primer types tested:
CBC Magtech 9½
CCI 200 LR
CCI BR2 Match
CCI 250 Magnum
Federal 210
Federal 210M Match
Federal 215M Magnum Match
Fiocchi Large Rifle
Kynoch Large Rifle
Murom KVB-7 (PMC LR)
Norma Superflash LR
PMC LR Magnum
Remington 9½ LR
Remington 9½ M Magnum
Sellier & Bellot LR
Winchester WLR
Test Rig: Osprey Rifles-built F-TR rifle with Savage PTA action, 32″ Bartlein 1:12″-twist ‘Heavy Palma’ barrel, and Dolphin Gun Company modular stock with an F-Open/Benchrest fore-end.
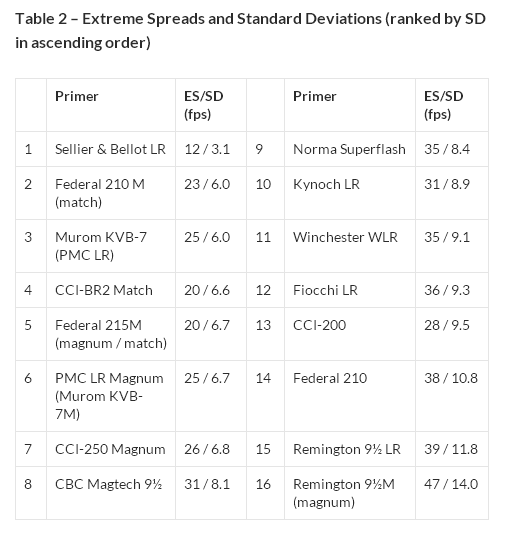
Some of Laurie’s results may surprise you. For example, would you guess that Sellier & Bellot primers had the lowest ES, by a significant margin? And get this, among ALL the primers tested, Rem 9½M Magnum primers produced the lowest velocity, while Rem 9½ LR (non-magnum) primers yielded the highest velocity. (The total velocity spread for all primers was 35 fps). That’s counter-intuitive and it’s odd that Rems were at opposite ends of the speed spectrum among ALL primers tested.
“The rationale for doing side-by-side tests is to see what effect primer choice has on ballistics, i.e. average velocities and MV consistency. There are a great many views on the subject, a few based on tests (including primer flame photography) but most apparently hearsay.” — Laurie Holland
Every serious hand-loader should definitely read the full test results to understand Laurie’s methodology and get all the details. This is an important test, with significant findings. But if you can’t spare the time right now, here are some highlights below:
Primer with Lowest Velocity: Remington 9½ M Magnum (2780 fps)
Primer with Highest Velocity: Remington 9½ LR (2815 fps)
Primer with Lowest ES/SD: Sellier & Bellot LR (12/3.1 fps)
Primer with Highest ES/SD: Remington 9½ M Magnum (47/14.0 fps)
Primer with Smallest Group Size: Remington 9½ LR (0.43″ average, three 5-shot groups)
Primer with Biggest Group Size: CBC Magtech 9½ (0.7″ average, three 5-shot groups)
Editor’s Comment: Laurie shot three, 5-shot groups at 100 yards with each primer type. The average group size for the top six primers varied by only 0.10″ (0.43″ to 0.53″), so one can’t conclude that one type is much better than another. Total group size variance (from best to worst) was 0.27″.
“The biggest surprise to me … came from an elderly (at least 10 years) lot of Czech Sellier & Bellot standard caps with an ES of 12 and SD of 3.1 fps, way below those of the nearest competitor. By contrast to the Fiocchis, they were an almost slack fit in the cases and this may have contributed to their consistent performance.” — Laurie Holland
NOTE: Values in chart are based on 15-Shot strings. The ES/SD numbers will therefore be higher than is typical with five-shot strings.
Testing 16 primer types was a huge task — we commend Laurie for his hard work and thoroughness. This extensive test is an important contribution to the “knowledge base” of precision shooting. Laurie’s findings will doubtless influence many hand-loaders who hope to produce more consistent ammunition, or achieve better accuracy. Credit should also be given to Target Shooter Magazine for publishing the results. Well done gentlemen…
*Reloading method for Test Ammo: “Test batches consisted of 16 or 17 rounds for each primer, charges thrown by an RCBS ChargeMaster and checked on lab-quality electronic scales, adjusted if necessary to within ± 0.04gn, so any charge weight variation would be under 0.1 grain which equates here to 5 fps.”


 Craters may look interesting on the moon, but you don’t want to see them on your primers. Certain mechanical issues that cause primer craters can also cause primer piercing — a serious safety problem that needs to be addressed. If you have a gun that is cratering primers (even at moderate pressure levels), there is a solution that works with many rifles — send your bolt to
  Firing Pin Hole Bushing by Greg Tannel