|
|
November 3rd, 2015
Do you own an RCBS electronic powder dispenser? If you do, take the time to watch this ChargeMaster Tuning video from 8541 Tactical. This nine-minute video demonstrates how to re-program your Chargemaster to “tune” the dispensing process. The video shows the exact programming procedures to follow, step-by-step. Some folks want a faster powder flow — others tune their machines for a more reliable drop (with fewer over-runs). One cheap and popular modification is to insert a 1″-long section of a McDonald’s straw in the ChargeMaster’s silver dispensing tube. This works surprisingly well to smooth kernel drop and prevent “clumping” that can cause an over-charge. The McDonald’s straw MOD is demonstrated in this video, starting at the 6:22 mark.
Large-Diameter Dispensing Tube Mod
Many folks have had success with the McDonald’s straw modification demonstrated in the above video. However, some folks would like to get even better flow performance (with virtually no clumping). Forum Member Frank B. has come up with a new option using a brass hose fitting with a large outside diameter. The hose fitting (with tape wrapped around the barbed nose section) is placed inside the RCBS dispensing tube (be sure to have some kind of wrap — you don’t want metal-on-metal). Here’s how the unit looks installed:

Frank tells us: “I have found a cure for the over-throw problem. It is a simple 1/4″ barbed hose nipple. I wrapped a couple layers of tape around the barbed end for a snug fit. With this in place, I have thrown 100+ charges of Varget without a single overthrow. The ID of the barbed end needs to be approximately 3/16″ to feed a steady flow. This works because of the larger ID at the drop.”
Frank adds: “You can see in the photo that the powder is not stacking up. You can watch it drop one grain at a time. Hope this will take the aggravation out of your case charging.” For best performance with this brass fitting MOD, we recommend de-burring and smoothing out the front edge of the brass fitting over which the kernels drop.
Brass fitting mod suggested by Boyd Allen. We welcome reader submissions.
November 1st, 2015

21st Century Shooting produces a high quality powder funnel, that is very “user-friendly”. The top section is precision ground and polished for a smooth flow. The center has a see-through tube so you can watch the progress of your powder dropping into the case. At the bottom of each funnel is a black case adapter that seats securely yet won’t get stuck on the case. There are five different adapter sizes — the smallest fits .17 Rem to .223 Rem, while the largest fits big magnum calibers. We use the mid-sized, #3 adapter most often. This fits 6mmBR, 6.5×47 Lapua, and .308 Win family of cases (.243 Win, .260 Rem, 7mm-08, .308 Win). Additional adapters are $5.99 each. There are three tube lengths available: 3″, 6″, and 10″. So, if you need an extra-long drop tube (to help fill PPC and other small cases), 21st Century has you covered.
 The 21st Century funnels are priced by size. The 3″-long model is $29.99, the 6″-long model is $31.99, and the big 10″-long model is $34.99. Prices include one (1) adapter. These high-grade funnels will help you load faster and easier, with fewer spilled kernels. We use these funnels and they do work well. The appropriate collars fit your .223 Rem, 6PPC, 6mmBR, Dasher, 6XC, .260 Rem, .284 Win, and .308 case necks just right — not too loose, not too tight. Kernels flow smoothly through the tube without sticking to the sides. The aluminum top section does not seem to attract a static charge so you don’t have to waste time brushing kernels off the funnel after use. We like this product. For high-volume precision reloaders, these funnels are worth the money. The 21st Century funnels are priced by size. The 3″-long model is $29.99, the 6″-long model is $31.99, and the big 10″-long model is $34.99. Prices include one (1) adapter. These high-grade funnels will help you load faster and easier, with fewer spilled kernels. We use these funnels and they do work well. The appropriate collars fit your .223 Rem, 6PPC, 6mmBR, Dasher, 6XC, .260 Rem, .284 Win, and .308 case necks just right — not too loose, not too tight. Kernels flow smoothly through the tube without sticking to the sides. The aluminum top section does not seem to attract a static charge so you don’t have to waste time brushing kernels off the funnel after use. We like this product. For high-volume precision reloaders, these funnels are worth the money.
October 6th, 2015

When your cases become hard to extract, or you feel a stiff bolt lift when removing a cartridge, it’s probably time to full-length size your cases, and “bump” the shoulder back. With a hunting load, shoulder bumping may only be required every 4-5 loading cycles. Short-range benchrest shooters, running higher pressures, typically full-length size every load cycle, bumping the shoulder .001-.002″. High Power shooters with gas guns generally full-length size every time, and may need to bump the shoulders .003″ or more to ensure reliable feeding and extraction.
Use Shims for Precise Control of Shoulder Bump
Some shooters like to set the “default” position for their full-length die to have an “ample” .003″ or .004″ shoulder bump. When they need less bump, a simple way to reduce the amount of shoulder movement is to use precision shims in .001″ (one-thousandth) increments.
Here are reports from Forum members who use the shims:
“Great product. I have my die lock ring(s) adjusted for the shortest headspace length on my multiple chambers 6BRs and 6PPCs. When needing a longer headspace, I just refer to my notes and add the appropriate shim under the lock ring. Keep it simple.” — F.D. Shuster
Mats Johansson writes: “I’ve been using [shims] since Skip Otto (of BR fame) came out with them. I set up my dies with the .006″ shim, giving me the option of bumping the shoulder a bit more when the brass gets old and hardens while still having room to adjust up for zero headspace, should I have missed the original setup by a thou or two. Hunting rounds can easily be bumped an extra .002-.003″ for positive, no-crush feeding. Being a safety-oriented cheapskate, I couldn’t live without them — they let me reload my cases a gazillion times without dangerous web-stretching. Shims are a must-have, as simple as that.” — Mats Johansson
 Sinclair Int’l offers a seven-piece set of Sizing Die Shims that let you adjust the height of your die (and thereby the amount of bump and sizing) in precise .001″ increments. Sinclair explains: “Some handloaders will set their die up to achieve maximum sizing and then progressively use Sinclair Die Shims between the lock ring and the press head to move the die away from the shellholder. Doing this allows you to leave the lock ring in the same position. These shims are usually available in increments of .001″ and work very well.” Sinclair Int’l offers a seven-piece set of Sizing Die Shims that let you adjust the height of your die (and thereby the amount of bump and sizing) in precise .001″ increments. Sinclair explains: “Some handloaders will set their die up to achieve maximum sizing and then progressively use Sinclair Die Shims between the lock ring and the press head to move the die away from the shellholder. Doing this allows you to leave the lock ring in the same position. These shims are usually available in increments of .001″ and work very well.”
Seven Shims from .003″ to .010″
Sinclair’s $12.49 Die Shim Kit (item 22400) includes seven shims in thicknesses of .003, .004, .005, .006, .007, .008, and .010. For ease of use, shim thickness is indicated by the number of notches cut in the outer edge of each shim. Even without looking you can “count” the notches by feel.
September 27th, 2015

Image by ModernArms, Creative Common License.
by Philip Mahin, Sierra Bullets Ballistic Technician
This article first appeared in the Sierra Bullets Blog
The ANSI / SAAMI group, short for “American National Standard Institute” and “Sporting Arms and Ammunition Manufacturers’ Institute”, have made available some time back the voluntary industry performance standards for pressure and velocity of centerfire rifle sporting ammunition for the use of commercial manufacturers. [These standards for] individual cartridges [include] the velocity on the basis of the nominal mean velocity from each, the maximum average pressure (MAP) for each, and cartridge and chamber drawings with dimensions included. The cartridge drawings can be seen by searching the internet and using the phrase ‘308 SAAMI’ will get you the .308 Winchester in PDF form. What I really wanted to discuss today was the differences between the two accepted methods of obtaining pressure listings. The Pounds per Square Inch (PSI) and the older Copper Units of Pressure (CUP) version can both be found in the PDF pamphlet.
 CUP Pressure Measurement CUP Pressure Measurement
The CUP system uses a copper crush cylinder which is compressed by a piston fitted to a piston hole into the chamber of the test barrel. Pressure generated by the burning propellant causes the piston to move and compress the copper cylinder. This will give it a specific measurable size that can be compared to a set standard. At right is a photo of a case that was used in this method and you can see the ring left by the piston hole.
PSI Pressure Measurement
What the book lists as the preferred method is the PSI (pounds per square inch or, more accurately, pound-force per square inch) version using a piezoelectric transducer system with the transducer flush mounted in the chamber of the test barrel. Pressure developed by the burning propellant pushes on the transducer through the case wall causing it to deflect and make a measurable electric charge.
Q: Is there a standardized correlation or mathematical conversion ratio between CUP and PSI values?
Mahin: As far as I can tell (and anyone else can tell me) … there is no [standard conversion ratio or] correlation between them. An example of this is the .223 Remington cartridge that lists a MAP of 52,000 CUP / 55,000 PSI but a .308 Winchester lists a 52,000 CUP / 62,000 PSI and a 30-30 lists a 38,000 CUP / 42,000 PSI. It leaves me scratching my head also but it is what it is. The two different methods will show up in listed powder data[.]
So the question on most of your minds is what does my favorite pet load give for pressure? The truth is the only way to know for sure is to get the specialized equipment and test your own components but this is going to be way out of reach for the average shooter, myself included. The reality is that as long as you are using printed data and working up from a safe start load within it, you should be under the listed MAP and have no reason for concern. Being specific in your components and going to the load data representing the bullet from a specific cartridge will help get you safe accuracy. [With a .308 Winchester] if you are to use the 1% rule and work up [from a starting load] in 0.4 grain increments, you should be able to find an accuracy load that will suit your needs without seeing pressure signs doing it. This is a key to component longevity and is the same thing we advise [via our customer service lines] every day. Till next time, be safe and enjoy your shooting.

September 12th, 2015

Each Wednesday, the U.S. Army Marksmanship Unit publishes a reloading “how-to” article on the USAMU Facebook page. This week’s “Handloading Hump Day” post covers an important safety issue — why you should never assume that a stated “book” load for a particular bullet will be safe with an equal-weight bullet of different shape/design. The shape and bearing surface of the bullet will affect the pressure generated inside the barrel. Visit the USAMU Facebook page next Wednesday for the next installment.
Beginning Handloading, Part 13:
Extrapolating Beyond Your Data, or … “I Don’t Know, What I Don’t Know!”
Last week, we addressed several key facets of Service Rifle reloading. Today, we continue our Handloading Safety theme, focusing on not inadvertently exceeding the boundaries of known, safe data. Bullet manufacturers’ loading manuals often display three, four, or more similar-weight bullets grouped together with one set of load recipes. The manufacturer has tested these bullets and developed safe data for that group. However, seeing data in this format can tempt loaders — especially new ones — to think that ALL bullets of a given weight and caliber can interchangeably use the same load data. Actually, not so much.
The researchers ensure their data is safe with the bullet yielding the highest pressure. Thus, all others in that group should produce equal or less pressure, and they are safe using this data.
However, bullet designs include many variables such as different bearing surface lengths, hardness, and even slight variations in diameter. These can occasionally range up to 0.001” by design. Thus, choosing untested bullets of the same weight and caliber, and using them with data not developed for them can yield excess pressures.
This is only one of the countless reasons not to begin at or very near the highest pressure loads during load development. Always begin at the starting load and look for pressure signs as one increases powder charges.
Bullet bearing surface length (BSL) is often overlooked when considering maximum safe powder charges and pressures. In photo 1 (below), note the differences in the bullets’ appearance. All three are 7mm, and their maximum weight difference is just five grains. Yet, the traditional round nose, flat base design on the left appears to have much more BSL than the sleeker match bullets. All things being equal, based on appearance, the RN/FB bullet seems likely to reach maximum pressure with significantly less powder than the other two designs.
Photo 1: Three Near-Equal-Weight 7mm Bullets with Different Shapes

Due to time constraints, the writer used an approximate, direct measurement approach to assess the bullets’ different BSLs. While fairly repeatable, the results were far from ballistics engineer-grade. Still, they are adequate for this example.
Bullet 1 (L-R), the RN/FB, has a very slight taper and only reaches its full diameter (0.284”) very near the cannelure. This taper is often seen on similar bullets — it helps reduce pressures with good accuracy. The calculated BSL of Bullet 1 was ~0.324”. The BSL of Bullet 2, in the center, was ~0.430”, and Bullet 3’s was ~ 0.463”. Obviously, bullets can be visually deceiving as to BSL!
Some might be tempted to use a bullet ogive comparator (or two) to measure bullets’ true BSL for comparison’s sake. Unfortunately, comparators don’t typically measure maximum bullet diameter and this approach can be deceiving.
Photo 2: The Perils of Measuring Bearing Surface Length with Comparators

In Photo 2, two 7mm comparators have been installed on a dial caliper in an attempt to measure BSL. Using this approach, the BSLs differed sharply from the original [measurements]. The comparator-measured Bullet 1 BSL was 0.694” vs. 0.324” (original), Bullet 2 was 0.601” (comparator) vs. 0.430” (original), and Bullet 3 (shown in Photo 2) was 0.602” (comparator) vs. 0.463” (original). [Editor’s comment — Note the very large difference for Bullet 1, masking the fact that the true full diameter on this bullet starts very far back.]
Please join us again next week as we examine other lesser-discussed variables that affect pressure and velocity during handload development. In the meantime, stay safe, and favor center!
September 5th, 2015

German Salazar has written a very thorough guide to measuring nearly all the critical dimensions of cartridge brass. In his Measuring the Case article, on his Rifleman’s Journal website, German reviews the tools and techniques required to measure everything from case overall length to case neck concentricity. Step-by-step, German shows how to measure: Case Length, Case Body length (below neck), Neck Diameter, Headspace, Base Diameter, Neck Thickness, and Case Neck Concentricity.

If you are an “advanced reloader” or want to be, you should read German’s article. Not only does German explain the most common measuring procedures, he highlights some alternative methods you might not have tried yet. The article also links to related discussions of more complex measurement tasts, such as determining case body wall thickness variation.
Even if you’re not a competitive shooter, measuring your brass can provide important safety benefits. As German explains in the conclusion of his article: “There are obviously a lot of measurements that can be taken on the cartridge case and in some cases, more than one way to take them. However, the first two that any new reloader must learn are case length and neck clearance, these two are safety concerns and if overlooked can results in serious damage to the rifle and injury to you.”
German’s article first appeared in RiflemansJournal.com in 2010.
August 10th, 2015
 Harrell’s Precision sells “semi-custom” full-length bushing dies for the PPC and 6BR chamberings. While the Harrell brothers do not cut the die to spec, they carry a large selection of dies made with slightly different internal dimensions. When you send in your fired brass, the Harrells choose a die from inventory with just the right amount of sizing (diameter reduction) at the top and bottom of the case. Given the quality, and precise fit, Harrell’s full-length dies are a good value at $70.00 plus shipping. Harrell’s Precision sells “semi-custom” full-length bushing dies for the PPC and 6BR chamberings. While the Harrell brothers do not cut the die to spec, they carry a large selection of dies made with slightly different internal dimensions. When you send in your fired brass, the Harrells choose a die from inventory with just the right amount of sizing (diameter reduction) at the top and bottom of the case. Given the quality, and precise fit, Harrell’s full-length dies are a good value at $70.00 plus shipping.
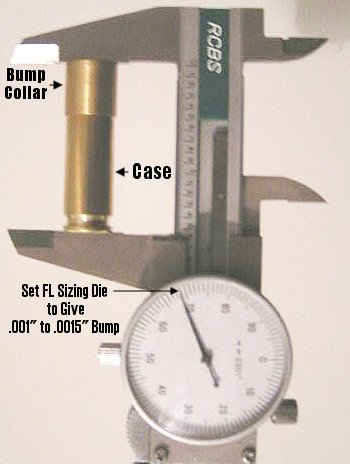
 Bump Measuring Collar Bump Measuring Collar
The Harrell brothers provide a nice bonus item with each full-length die — a neat, little shoulder bump measuring device as shown in the photo at right. Hornady/Stoney Point sells a stand-alone tool that does the same job, but the Harrell’s bump collar is simpler and faster. To measure your shoulder bump, simply place the Harrell’s bump collar over the front of your deprimed case (before sizing) and measure the OAL with your calipers. Then size the case in your full-length die, replace the collar and repeat the measurement. You want to set your die so the shoulder moves back about .001″ to .0015″ for most applications. (With semi-auto guns you may want more bump.)
July 2nd, 2015

 Forum member Rich DeSimone uses a handy “Stub Gauge” for setting shoulder “bump” and seating depth. The gauge is made from a section of barrel lopped off when the muzzle is crowned. The chambering reamer is run in about 1/4 of the way, enough to capture the neck and shoulder area of the case. Rich then uses his full-length die to “bump” a master case with the ideal amount of headspace for easy feeding and extraction. He takes that case and sets it in this Stub Gauge, and measures from the front of the gauge to the rim. He can then quickly compare any fired case to a his “master” case with optimal headspace. Since the gauge measures off the shoulder datum, this tells him how much to bump his fired brass. Forum member Rich DeSimone uses a handy “Stub Gauge” for setting shoulder “bump” and seating depth. The gauge is made from a section of barrel lopped off when the muzzle is crowned. The chambering reamer is run in about 1/4 of the way, enough to capture the neck and shoulder area of the case. Rich then uses his full-length die to “bump” a master case with the ideal amount of headspace for easy feeding and extraction. He takes that case and sets it in this Stub Gauge, and measures from the front of the gauge to the rim. He can then quickly compare any fired case to a his “master” case with optimal headspace. Since the gauge measures off the shoulder datum, this tells him how much to bump his fired brass.
In addition, the Stub Gauge can be used to set bullet seating-depth. Rich has a channel cut transversely on one side of the gauge, exposing the throat area. Since the interior of the gauge is identical to the chamber in his gun, this lets him see where a seated bullet engages the rifling. He can tinker with bullet seating length until he gets just the right amount of land contact on the bullet, confirmed visually. Then he measures the case OAL and sets his seating dies accordingly. This is much handier than using a Stoney Point Tool to measure distance to the lands. As your barrel’s throat wears, you may seat your bullets out further to “chase the lands”, but the gauge provides a constant land engagement point, in the barrel’s “as new” condition. By measuring the difference between the land contact point on the gauge and the actual contact point on your barrel, you can determine throat “migration”.
June 22nd, 2015

AccurateShooter.com has released the most complete discussion of the 6.5×47 Lapua cartridge ever published. Our new 6.5×47 Cartridge Guide is packed with information. If you own a 6.5×47 rifle, or are thinking of building a rifle with this chambering, definitely read this Cartridge Guide from start to finish. Our comprehensive, 5000-word article was researched and written by the 6.5 Guys, Ed Mobley and Steve Lawrence. Both Ed and Steve shoot the 6.5×47 Lapua in competition and they are experts on this accurate and efficient mid-sized cartridge.
You’ll find everything you need to know about the 6.5×47 Lapua in our new Cartridge Guide. We cover ballistics, reloading, die selection, and we provide an extensive list of recommended loads, for bullets from 120 to 140 grains. You can read interviews with respected experts who’ve built and tested many 6.5×47 rifles. The Guide includes helpful tech tips such as how to maximize the powder fill in your cases. This Cartridge Guide can put you on the “fast track” — helping you develop accurate, reliable loads with minimal development time.
 6.5×47 Lapua Cartridge Guide Highlights: 6.5×47 Lapua Cartridge Guide Highlights:
- Cartridge Specifications
- Comprehensive Load Data
- Best Bullets and Primers for 6.5×47
- Ballistics Comparison Charts
- Sizing and Seating Die Options
- 6mm-6.5×47 (Necked-Down) Options
- Ask the Experts Section
- Tips for Accurate Reloading
- Brass Life and Annealing
- Chambering and Gunsmithing Tips
- 6.5×47 Lapua for Hunting
- 6.5×47 Lapua for Tactical Competition
- 6.5×47 Factory-Loaded Ammo

Here is a sample from the 6.5×47 Cartridge Guide’s Ask the Experts Section. This is an interview with Rich Emmons, one of the founders of the Precision Rifle Series:


June 11th, 2015

This week, the U.S. Army Marksmanship Unit is pleased to host pistol teams from the various U.S. Armed Services in the 56th Annual Interservice Pistol Championship. Our Handloading Shop members have enjoyed discussing pistol accuracy and enjoying the camaraderie of competitive shooters from all over. In that spirit, this week’s topic will focus on handloading for best pistol accuracy, rather than our usual rifle-oriented information.
Optimize the Taper Crimp
One often-overlooked aspect of handloading highly-accurate pistol ammunition is the amount of crimp and its effect on accuracy. Different amounts of taper crimp are used with various handloads to obtain best accuracy. The amount is based on bullet weight, powder burn rate and charge, plus other factors. It is not unusual for our Shop to vary a load’s crimp in degrees of 0.001″ and re-test for finest accuracy.
|


