At SHOT Show we checked out a versatile and well-designed new tool from Forster Products — the new Datum Dial Ammunition Measurement System. This handy device measures a variety of important dimensions: 1) cartridge headspace from base of case to shoulder datum; 2) cartridge length from base of case to bullet ogive; 3) bullet base to bullet ogive; and 4) bullet bearing surface (requires two tools).
The complete Datum Dial Kit consists of a dial-holder mount and three precision machined dials. The mount clamps to your sliding-jaw calipers. The mount holds a black ring or one of two supplied gold rings. The black ring has 5 precision-diameter holes that let you check headspace (on shoulder datum) for nearly all modern cartridge types.
Swap in one of two available gold rings to measure to bullet ogive index points. The two gold dials (five holes each) give you 10 different bullet diameter choices, covering the vast majority of common pistol and rifle bullet sizes. This lets you measure both base of bullet to ogive and base of cartridge case to bullet ogive. We really like this dual functionality, as it allows you to quickly sort bullets, plus you can measure your loaded rounds as they come out of the seating die. I have found that accuracy is enhanced when you maintain close base-to-ogive tolerances on your loaded rounds.
Watch Video to See Datum Dial Features and Functions
Replace a Bin Full of Comparator Inserts
It is important to understand that the Datum Dial system replaces a comparator body and a complete set of caliber-specific comparator inserts. You no longer need a box full of inserts, with one for each caliber that you load. The Datum Dial Complete Kit includes: One dial-holder mount (which clamps on your calipers), one black headspace dial, two (2) gold bullet diameter dials, and a plastic storage box. The Datum Dial Kit is available right now. MSRP is $157.00, and “street price” should be $20 or so lower. Additional dials or caliper jaw mounts are sold separately.
On his Riflemans’ Journal blog, German Salazar wrote an excellent article about cartridge Case-Head Separation. We strongly recommend that you read this article. German examines the causes of this serious problem and he explains the ways you can inspect your brass to minimize the risk of a case-head separation. As cases get fired multiple times and then resized during reloading, the cases can stretch. Typically, there is a point in the lower section of the case where the case-walls thin out. This is your “danger zone” and you need to watch for tell-tale signs of weakening.
The photo below shows a case sectioned so that you can see where the case wall becomes thinner near the web. German scribed a little arrow into the soot inside the case pointing to the thinned area. This case hadn’t split yet, but it most likely would do so after one or two more firings.
One great tip offered by German Salazar involves using a bent paper clip to detect potential case wall problems. Slide the paper clip inside your case to check for thin spots. German explains: “This simple little tool (bent paper clip) will let you check the inside of cases before you reload them. The thin spot will be immediately apparent as you run the clip up the inside of the case. If you’re seeing a shiny line on the outside and the clip is really hitting a thin spot inside, it’s time to retire the case. If you do this every time you reload, on at least 15% of your cases, you’ll develop a good feel for what the thin spot feels like and how it gets worse as the case is reloaded more times. And if you’re loading the night before a match and feel pressured for time — don’t skip this step!”
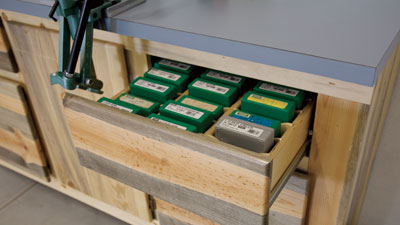
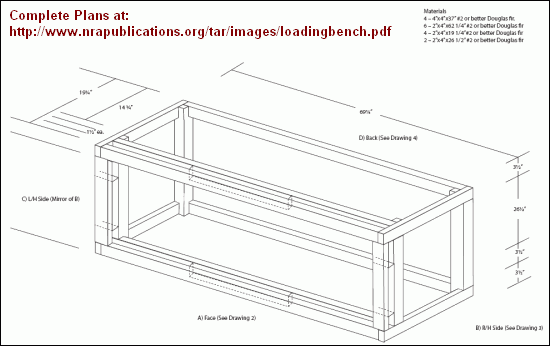
The NRA’s American Rifleman Online website has an excellent article showing how to construct a rock-solid Reloading Bench. There are plenty of photos, and a detailed set of Bench Blueprints showing all dimensions and listing all needed materials. This bench is very well designed, with many deluxe features, such as an upper drawer with fitted slots for die boxes, and large lower drawers with 100-lb rated slides to store heavy materials or tools. If you have good wood-working skills this would be an excellent project.
The author, Dave Campbell, offers good advice on building the bench top: “I ripped a sheet of 3/4″ AC plywood into two 24″ wide pieces and cut them to 72″ long. Then I glued them together to form a 72″ long, 1 1/24″ thick top. The trick here is to keep the edges smooth and flat so that the laminate will adhere properly and without voids. I chose a light grey laminate finish for the top because it’s easier to see what I am working on and keep clean. If you have never worked with laminate, remember it’s prudent to glue and rout the edges flush before gluing on the top. The top was attached to the carcass with eight steel L-shaped angle brackets and No. 10×1 1/4″ wood screws.”
How to Set Up Your Full Length Sizing Die
by Ron Dague, Sinclair International Technician
From Sinclair’s Reloading Press Blog
At Sinclair International, we are often asked for a fool-proof method to set up a full-length sizing die, and begin reloading our fired cases. The method used by many target shooters today is to set up your full length die to closely match your rifle chamber and minimally full-length size your cases –as little as .001″ for bolt-action rifles. I prefer to use this method for all of my bolt-action cartridges.
STEP ONE
I like to de-prime five (5) cases (de-prime only, do not full length resize) and measure from the base of the case to the shoulder with our Sinclair Comparator Body (09-1000) and Bump Gage Insert(09-10200). We refer to this as our headspace measurement. Our Electronic Caliper (#MIC-14) works well and may be pre-set at .000” making this headspace measurement easy to capture. The Sinclair Comparator/Gauge Body and Bump Gage Inserts make this task fairly simple. L.E. Wilson Tools & Gages, Hornady Manufacturing, and RCBS all make similar units to achieve your headspace measurement.
STEP TWO
With your full-length die threaded into your reloading press, loosen the lock ring and run the press ram up toward the full length die with a shell holder in place (with no case). Then, screw the die toward the shell holder until it stops. Back the die out of the press and away from the shell holder one full turn and set the lock ring finger tight.
STEP THREE
Lubricate each of the cases with your favorite sizing lube (my favorite is Imperial Sizing Die Wax) and resize a case. Again, take a headspace measurement from base to shoulder. [When running the case up into the die, be sure the press ram moves the full limit of its upward travel.] If there’s no change in the measurement from the fired dimension, loosen the die lock ring and turn the full length sizing die downward 1/8 of a turn. [Editor’s Note: You’ll need to use smaller turn amounts as you get close to the desired amount of bump. We suggest moving just a few degrees of die rotation at a time once you’ve reached the point where the die hits the shoulder without moving it back.] Now repeat the sizing process with a second lubricated case and take the measurement again. Keep rotating the die downward gradually (in small increments) and repeat the case sizing process until you see approx-imately .001”-.002” reduction to your fired headspace measurement. We prefer a headspace reduction of approximately .001″ – .002″ for bolt action rifles and .003″ – .005″ for semi-auto rifles. You can adjust to your rifle as to what works best. Don’t forget to load 10 rounds or so and try them from the rifle’s magazine to make sure they function properly.
Full-length Sizing vs. Neck-Sizing
Just a quick word on neck sizing…..I have personally never been a big fan of neck sizing. Often times when I put neck sized cases back in the rifle, the bolt would close with some drag, or it would be a bit “snug”. This was mostly recognized with factory rifles. I didn’t have any problems with accuracy, just with cycling the action for a follow up shot. If your rifle is custom chambered with the action straightened and trued, neck sizing will work well on 4-5 firing’s and then you will need to full length size or use a body die to set the shoulders back when the cases begin to “stick”. Hope these tips help make the use of a headspace gauge and full length die set up much easier.
Ron Dague
Sinclair Tech and Reloading Instructor
800-717-8211
rond@sinclairintl.com
Reloading Tip Courtesy Sinclair Int’l; Story Sourced by Edlongrange
Most of us assume that if we weigh our powder carefully (down to the tenth of a grain or less) we can achieve a uniform powder fill from case to case in our handloads. Weighing does ensure that the weight of the propellant in each case is the same, but is the column of powder the same by volume each time? “Not necessarily” is the answer. An interesting experiment by our friend Boyd Allen demonstrates that the manner in which you place kernels in the case can make a significant difference in the height of the powder column within the brass case.
Using a Gempro 250 scale, Boyd measured exactly 30.6 grains of Vihtavuori N-133 powder. He then inserted this powder in the same cartridge case multiple times. (The case has a fired primer in place.) But here is the key — Boyd used various filling techniques. He did a slow fill, and a fast fill, and he also experimented with tapping and drop tubes. What Boyd discovered was that you can start with the exact same weight of powder (in fact the very same set of kernels), yet end up with vary different fill heights, depending on how you drop the kernels into the case. Look at the photos. Despite variations in lighting, the photos show the same 30.6 grains of powder, placed in the same cartridge, with four different methods.
Boyd Explains the Procedure Used for his Experiment.
EDITOR’s NOTE: So there is no misunderstanding, Boyd started with a weighed 30.6 grain charge. This identical charge was used for ALL four fills. After a fill the powder was dumped from the case into a pan which was then used for the next fill technique to be tried. So, the powder weight was constant. Indeed the exact same kernels (of constant weight and number) were used for each fill.
Boyd writes: “I used the same powder for all fills, 30.6 gr. on a GemPro 250 checked more than once. All fills employed the same RCBS green transparent plastic funnel. The fast drop with the funnel only overflowed when it was removed from the case neck, and 15 granules of powder fell on the white paper that the case was sitting on. The fast-funnel-only drop with tapping, was done with the funnel in place and the case and funnel in one hand, while tapping the case body with the index finger hard, many times (about 20 fast double taps). My idea here was to “max out” the potential of this tapping technique.
The slow drop with the funnel and 10″-long .22 cal. Harrell’s Precision drop tube, was done by holding the scale pan over the funnel and tapping the spout of the pan repeatedly on the inside of the funnel about 1/3 down from the top, with the scale pan tilted just enough so that the powder will just flow. Many taps were involved, again, to max out the technique.
Again, to be clear, after each case filling, the powder was poured from the case back into the scale pan carefully. You may notice the similarity between the fast drop with the drop tube, and the funnel only with tapping. Although I did not photograph it, fast tube drop and tapping (combined) improved on tapping alone, but only to about half as far down the neck as the slow with drop tube. Due to the endless possible permutations, I picked four and left it at that.
I believe that I can make the rough judgment that the scale pan funnel and drop tube technique, which involved a longer drop period, and probably less velocity at the top of the tube, left more room in the top of the case neck than the slow drop from the measure with the same drop tube. You have both pictures, so you can make the comparison.” — Boyd
Does Powder Column Height Variance Make a Difference?
Boyd’s experiment proves pretty conclusively that the method of dropping a given weight of powder can affect the height of the powder column in the case and the degree of powder compression (when a bullet is seated). He showed this to be true even when the exact same set of kernels (of constant weight) was used in repetitive loadings. This raises some interesting questions:
1. Will subsequent cartridge transport and handling cause the powder to settle so the variances in powder column height are diminished?
2. If significant inconsistencies in powder column height remain at time of firing, will the difference in fill level hurt accuracy, or result in a higher extreme spread in velocity?
3. Is there any advantage (beyond increased effective case capacity) for a tight (low level) fill vs. a loose (high level) fill?
We don’t know the answer to these follow up questions. This Editor guesses that, if we tested low-fill-height rounds vs. high-fill-height rounds (all with same true fill quantity by weight), we might see meaningful differences in average velocity. I would also guess that if you fired 10 rounds that exhibited quite a difference in powder column heights, you might see a higher ES/SD than if you shot 10 rounds loaded with a very consistent powder column height (either high or low). But further testing is needed to determine if these predictions are true.
Only 13 more shopping days before Xmas, boys and girls. If you’re getting desperate, as time runs out for buying, packing, and shipping, consider giving an Electronic Gift Card from Sinclair Int’l or Brownells. eGift Cards can be sent at the last minute, and they are as good as cash for shopping with Sinclair Int’l or Brownells. If you prefer the hands-on approach, you can purchase a conventional Sinclair Int’l Gift Card and have it mailed to you or directly to the lucky recipient. CLICK HERE for more details.
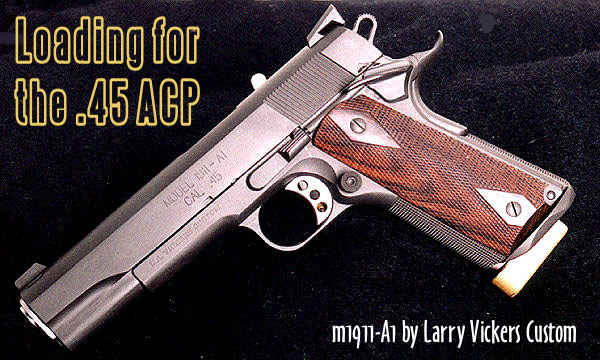
Man does not live by long-guns alone. We know that many of our readers own .45 ACP handguns and load for this extremely accurate “classic” cartridge. When selecting a powder for the .45 ACP, there are many good options. All the major powder manufacturers make propellants with appropriate density and burn rate characteristics for the .45 ACP. Popular choices include: AA #5 (Accurate Powder); Bullseye (Alliant); Clays, HP-38, and Titegroup (Hodgdon); VV N310 and N320 (Vihtavuori); and WW 231 and WST (Winchester). We’ve tried all those powders in a variety of .45 ACP handguns. When we consider all the factors that make for a good pistol powder, we think N320 is one of the best available propellants for the .45 ACP. Vihtavuori N320 is very accurate, it meters well, and it burns clean, with minimal smoke and flash. If you haven’t tried VV N320 yet, you should.
Pros and Cons of Different Powders for the .45 ACP
This Editor has personally tried out eight or more different powders for the .45 ACP. Bullseye works but it is very dirty (both smoke out the barrel and sooty powder fouling on case). Though it otherwise burns clean, Titegroup leaves a singular (and nasty) high-temp flame streak on your brass that is hard to remove. AA #5 is a good choice for progressive press newbies as you use more powder so a double charge will (usually) be obvious. I like AA #5 but N320 was more accurate. Clays burns clean but some powder measures struggle with flake powders like this. WW 231 offered excellent accuracy and metered well, but it kicked out sparks with little pieces of debris that would hit me in the face. Who wants that?
I personally tried all the powders listed above with lead, plated, and jacketed bullets. After testing for accuracy, consistency, and ease of metering, I selected VV N320 as the best overall performer.
Vihtavuori N320
No powder tested was more accurate (WW 231 was equally accurate).
Meters very well in all kinds of powder measures.
Produces very little smoke from muzzle.
Does not put nasty burn streak on brass like Tite-Group does.
Low Flash — you don’t get particles and sparks flying out like WW 231.
Cases come out from gun very clean — so you can tumble less often.
Forum member and gunsmith Michael Ezell agrees that N320 is a good choice for the .45 ACP. Mike has also found that WW 231, while accurate, produces sparks and a large flash. Mike writes: “I first started using N320 after my first night shoot, while shooting IDPA/IPSC matches. It was astonishing how much of a fireball the WW 231 created. I was literally blinded by the flash while trying to shoot a match. As you can imagine, that didn’t work out very well. I went from WW 231 to N320 and never looked back…and the flash from it was a fraction of what a kid’s sparkler would give off. I have nothing but good things to say about [N320] after using both. Night shoots are a real eye-opener! When it comes to a personal protection… there is, statistically, a very high chance that if you ever have to use a gun to protect yourself or your family, it’ll be in the darkness[.] Being blinded by muzzle flash (and deafened by the noise) are things that should be considered, IMO.”
This Editor owns a full-size, all-stainless S&W 1911. After trying numerous powders, I found VV N320 delivered the best combination of accuracy, easy metering, consistency, clean burning qualities, and low muzzle flash. My gun has proven exceptionally accurate using N320 with bullets from 180 grains to 230 grains — it will shoot as accurately as some expensive customs I’ve tried. At right is 5-round group I shot offhand at 10 yards with my 5″ S&W 1911. The bullet hole edges are sharp because I was using semi-wad-cutters. Rounds were loaded with Vihtavuori N320 and 200-grain SWCs from Precision Bullets in Texas.
This article originally appeared in Sinclair International’s Blog, The Reloading Press.
In the August 2012 Reloading Press, Bill Gravatt, President of Sinclair International, shared his experience using the Thumler’s Tumbler and stainless steel pin media to clean some .308 brass just before the National Matches. He discovered that combo is really great for cleaning brass.
This month, I want to share the results of a test I performed with stainless steel pin media, and give you some tips on how to best use this media to get cases as clean as you can. I’ve been using tumblers of some sort for more than 30 years. I got started with a sealed rotary tumber that my father and I made out of an old rock polisher we hooked up to a washing machine motor. While not as nice as a new Thumler’s Tumbler, the one-gallon capacity on that old tumbler means it’s still good for cleaning brass.
The Brass: Good, Bad and Downright Ugly To really test the stainless steel media’s cleaning power, I mixed three kinds of pistol brass that offered different challenges. First was some very old Amron headstamped .357 Magnum brass. The late Ken Lomont of Lomont Precision Bullets gave me the Amron brass as partial payment back when I was still in high school and working for him. I’ve been shooting it for years, so it’s obviously very durable. But it’s also very hard to clean, which made it great for the test.
I threw in some once-fired nickel-plated .357 SIG brass from Federal that had a lot of soot inside. I wanted to see just how well the stainless steel media could handle really grimy jobs. Finally, I added in the worst brass — some very corroded 9mm range pick-up brass with spots of verdigris all over them and dirt down inside them. They were terrible, which made them perfect for the test.
Case Prep For Cleaning Before I ran the cases through the tumbler, I knocked out all of the fired primers so that the stainless steel media would be able to get into the primer pockets and run through the flash holes. The media that we have at Sinclair is only .040″ in diameter, so it will easily go through the .080″ diameter flash hole on most domestic-produced brass, as well as the smaller .060″ flash holes found on some other cases. Once I knocked out the primers, I poured the brass and the media into the tumbler drum together.
Mixing The Solution Then I mixed up the cleaning solution. I poured ¾ of a gallon of water into the unit, and then put in four tablespoons of Dawn dishwashing detergent. I also added one teaspoon of lemon juice to keep the brass from spotting when it dried.
With everything ready, I sealed up the drum and started the unit and let it run for three or four hours. When I opened the drum, I could tell the media had done a very good job of removing all of the crud from the brass. The water was black, as you would expect from all the carbon inside the cases. After pouring off the solution, I separated the brass from the stainless media and rinsed it off. It took three rinses in clear water to make sure the brass was free of all the carbon the media scrubbed off.
Then I rinsed the media, too. Rinsing the media is important: if you don’t do it, the media will be dirty when you use it next time. The media is easier to rinse while it’s still damp, and it cleans easily with clear water. As you can see, the brass cleaned up very well and showed no evidence of water spotting because of the lemon juice. The range pick-up brass came out fully usable, showing no signs of corrosion. The nickel brass looked as if it were brand new and unfired. The Amron cases looked the best that I can ever remember seeing them. Some of them still had a light amount of carbon just behind the case mouth, but a quick twist with 0000 steel wool took care of this easily during inspection of these cases before loading. All of the primer pockets were clean and clear of carbon. Impressive!
Based on what I have seen, I will definitely use stainless steel media a whole lot in the future, even though I will still keep some of the treated organic media around for when I want a very bright shine on the brass. Several of the other Sinclair International Reloading Techs plan on trying the stainless media as well, so they might come up with some other tips for you in the future.
As always, if you have questions, please do not hesitate to call on any of us on the Sinclair Tech staff to assist you.
Bob Blaine, Sinclair International Tech
NRA Certified Reloading Instructor and RSO
TECH TIPS — Avoiding Problems with Stainless Media
Do Not Use Stainless Media Dry — I have had customers call and ask if stainless steel media can be used dry. The answer is that you will not like the results. Everything will go to the media, but it will still leave the brass dirty. If you use stainless steel media dry, you have to run it through a cleaning solution to clean the media. Then, it’s good to go again.
Do NOT Use Stainless Media in a Vibratory Tumbler — When using stainless media, you need a rotary-style, liquid-containing tumbler. You want to use stainless steel media ONLY in a rotary tumbler. Do not use stainless steel media in a vibratory type cleaner.
One of our readers has been shooting his 6BR with considerable success in tactical/practical matches. Thus far he’s been using Lapua factory-loaded 105gr ammo. The factory ammo has delivered superb accuracy for him — under 1/4 MOA at 100 yards. Now, he is making the jump into reloading. He asked for some tips on working up a good load for an 8-twist 6BR with a no-turn neck, and selecting reloading tools. Since other readers may be 6BR novices as well, here are some helpful hints…
Accurate Reloading Tips for the 6mmBR Cartridge
▪ Brass Prep — You need to look at the flash-holes to make sure they’re not occluded. A few lots of Lapua brass came with a little sliver/flake of brass in the hole, sort of like a quarter moon. You can clean that up with an inexpensive pin vise. Otherwise, there is no need to ream flash holes or uniform primer pockets.
▪ Neck Chamfering — You want to develop a good feel for neck chamfering. You don’t want/need to remove a lot of brass — just knock off the sharp edge. I use a Forster 45 deg “rocket” tool. It works fine. After a couple light turns, spin backwards to smooth the cut and then finish with a twist with a green scotch pad. If you use a deep-angle chamferer, be very careful not to overcut and remove too much brass.
▪ Neck Tension — On brand new, unfired Lapua 6BR brass, neck tension is excessive. You should run an expander mandrel down the case necks before the first firing. This will reduce the neck tension while it fixes necks that may be dented or out of round. After the first firing, we suggest sizing the necks so that, after they come out of your sizing die, the neck outside diameter (OD) is .002″ less than the neck diameter of a loaded round with bullet seated. If that doesn’t work, try the next size up bushing for .001″ tension. Many top shooters like low neck tension, but we’ve also seen heavy tension work. The .002″ under loaded OD is a good starting point with the 6BR. (But note — if you have thin-walled turned necks, you may need to use a smaller bushing, running your sized necks .003 or .0035 under the OD of a loaded round.)
▪ Primers — A lot of guys like the CCI 450 primers. They’re a lot cheaper than the Federal and CCI BR primers and may give a little more velocity. The cups are also hard, which lets you run faster loads with less concern about cratering. Wolf/Tula primers also have hard cups, but you must make sure to seat them deep enough.
▪ Load Development and Bullet Choice — With the 6BR and 100-108gr bullets, load development should be relatively easy. With Varget, Reloder 15, Norma 203B, or VV N150, between 30.0 and 30.7 grains should work as your final load. My match load is 30.3 Varget and that has shot under 2.0″ at 600 yards. Start at 29.0 grains and and work up in 0.2 grain increments, checking for pressure. DO weigh every load… twice. If possible, use a chronograph during your load work-up. 2880-2920 fps is a nice “sweet spot” for the 6BR, but slower can be very accurate too. (With custom actions, tight chambers, and long barrels, some guys are going even faster — but that’s hard on brass.)
If you have a barrel on the slow side, consider shooting the Berger 100gr ‘Match Target’ BTs. These bullets are very accurate, and we’ve found that you can drive them 75-100 fps faster than the Berger 108s or Sierra 107s at similar pressure levels. With the 100-grainers, you may find that you can hit a superior velocity/accuracy node, so they may shoot better overall than the 105-108 class bullets. Varget, RL15, and IMR 8208 all work great with this 100gr bullet.
For shooting from 300-500 yards, you should consider the lighter-weight bullets: Sierra 95gr MK, Lapua 90gr Scenar, Berger 95gr and 87gr VLD. The Sierra and Lapua bullets are very accurate and not sensitive to seating depth. In addition to the powders mentioned above, H4895 and IMR 8208 XBR work very well with the 90-grain-class bullets. One note about the smaller Berger VLDs — the Berger 95gr VLD and 87gr VLD both have very short bearing surfaces, so they work best in a chamber with a short-to-moderate Freebore. We had the best luck with the 95gr VLD about .010″ into the lands. We could achieve that with an 0.075″ Freebore chamber. But you won’t be able to hit the rifling with the 95s in a long-throated chamber. With this bullet we recommend sorting bullets by base to ogive.
For guys with 10-twist barrels, try out the new Berger 87gr VLD. It was expressly designed to work great in the 1:10″ twist barrels. Forum member Mark Schronce reports that this bullet is extremely accurate and can be driven fast. It has an 0.412 G1 BC. Note: The new 87gr VLD, product #24524, is hard to find on the Berger website, but it IS available. Berger calls it a “hunting bullet”, but it works great on paper also. MidwayUSA has the 87-grainers in stock as item #77854.
▪ Pure Accuracy — If you are looking for bughole accuracy out of your 6BR, try the Berger 80gr FBHP ‘Match Varmint’ bullets (item #24321). Many folks have reported these bullets will shoot in the ones and low twos, even in 8-twist barrels. For 100- to 200-yard distances, these bullets are hard to beat for pure accuracy. Beyond those distances, you’ll want something with a higher BC. We’ve had good luck with the Berger 80s pushed by Vihtavuori N135, and IMR 8208 XBR.
▪ C.O.A.L. — Bullet seating depth is very important. You should get the Hornady (Stoney Point) O.A.L. Gauge (shown below). This will let you discern the OAL at which the bullets just contact the rifling. The trick is tapping gently on the stick. (Get a wood dowel as the bullet can get stuck if you tap a little too aggressively.) With some practice, measuring is quick and you can get repeatable measurements of your distance to lands within .001-.002″.
A good starting point for the Berger and Lapua 105s is about .010-.015 IN the lands and then work back. Each barrel is different, but about .010″ in the lands works for many folks. One guy I know started at .012″ in the lands with Berger 105s, adjusted his load up from 30.0 to 30.4 Varget, and within an hour he was done with load dev — the gun was shooting in the low 2s. He went out and won his first match with that load the next day! With the Sierra 107s you might want to start .020″ out of the lands.
▪ Seating Die — We recommend the Wilson Micrometer Seating Die. The adjustable top makes it really easy to play with seating depths. Keep in mind, however, that moving 5 hash marks on the die may not give you exactly .005″ seating depth change — it will be close, but you should measure and write down the actual base to ogive length. FYI, I measure base to ogive of every loaded round. Occasionally you’ll find a bullet that ends up seated a little long or short.
NOTE: The fit of the 6BR Wilson seating die is very tight. You may have difficulty getting a fired case into the die if you do not full-length size the case first. Even with FL-sized cases, there may be a vacuum fit that makes the loaded round a little hard to remove. If you can’t easily extract your loaded round, try lifting the entire micrometer head and attached stem. This can release the vacuum so the case can slide out easily (unless there is a really tight fit). If that doesn’t work, here’s another trick — use the end of a Popsicle stick placed under the cartridge rim to lever the case out. I’ve found that the “working” end of a metal spoon works well too, but be careful not to nick the bottom of the die.
A while back, we featured a portable reloading bench built on a Black & Decker Workmate. That proved a VERY popular do-it-yourself project so we’re showing it again, in case you missed it the first time.
Texan Robert Lewis made himself a great portable reloading bench from plywood mounted to a Black & Decker Workmate. The bench, roughly 22″ x 19″ on top, folds up to fit easily in your car’s trunk or behind the seats in a pick-up truck cab. Four recessed bolts hold the wood top section to the collapsible B&D Workmate.The sides and back of the unit are attached to the base with small nails. There is a small shelf (also nailed in place) which can be used to clamp a powder measure or hold a scale. Shown in the photo is a Harrell’s Benchrest measure and Harrell’s single-stage “C” press.
The whole unit can be built for about $65.00 with pine, or $80.00 with oak (as shown). Robert explained: “The Workmate was $40. If someone bought a 2’x4′ sheet of 3/4″ oak plywood, I think it is around $30. Using pine plywood would be about half that. Fasteners were $3. Spar Urethane would be $5.”
Robert told us: “I used a couple ideas I found on the web. The Larry Willis website gave me the idea to use the Black and Decker Workmate as a base. I found the Workmate on sale for $40 and the top is made from oak plywood I had in my shop. I sealed the wood with three coats of Spar Urethane. The whole thing folds into a nice package for transportation to and from the range.”
Editor’s NOTE: In the time that’s transpired since we first ran this story, the price of a Black & Decker workmate has gone up. However you can still pick a WM225 Workmate for under $60.00. Target is currently selling WM225 Workmates for $59.99.


 The complete Datum Dial Kit consists of a dial-holder mount and three precision machined dials. The mount clamps to your sliding-jaw calipers. The mount holds a black ring or one of two supplied gold rings. The black ring has 5 precision-diameter holes that let you check headspace (on shoulder datum) for nearly all modern cartridge types.
 On his


 STEP TWO


 Man does not live by long-guns alone. We know that many of our readers own .45 ACP handguns and load for this extremely accurate “classic” cartridge. When selecting a powder for the .45 ACP, there are many good options. All the major powder manufacturers make propellants with appropriate density and burn rate characteristics for the .45 ACP. Popular choices include: AA #5 (Accurate Powder); Bullseye (Alliant); Clays, HP-38, and Titegroup (Hodgdon); VV N310 and N320 (Vihtavuori); and WW 231 and WST (Winchester). We’ve tried all those powders in a variety of .45 ACP handguns. When we consider all the factors that make for a good pistol powder, we think N320 is one of the best available propellants for the .45 ACP.
  This Editor owns a full-size, all-stainless S&W 1911. After trying numerous powders, I found VV N320 delivered the best combination of accuracy, easy metering, consistency, clean burning qualities, and low muzzle flash. My gun has proven exceptionally accurate using N320 with bullets from 180 grains to 230 grains — it will shoot as accurately as some expensive customs I’ve tried. At right is 5-round group I shot offhand at 10 yards with my 5″ S&W 1911. The bullet hole edges are sharp because I was using semi-wad-cutters. Rounds were loaded with Vihtavuori N320 and 200-grain SWCs from
  To really test the stainless steel media’s cleaning power, I mixed three kinds of pistol brass that offered different challenges. First was some very old Amron headstamped .357 Magnum brass. The late Ken Lomont of Lomont Precision Bullets gave me the Amron brass as partial payment back when I was still in high school and working for him. I’ve been shooting it for years, so it’s obviously very durable. But it’s also very hard to clean, which made it great for the test.
 Before I ran the cases through the tumbler, I knocked out all of the fired primers so that the stainless steel media would be able to get into the primer pockets and run through the flash holes. The media that we have at Sinclair is only .040″ in diameter, so it will easily go through the .080″ diameter flash hole on most domestic-produced brass, as well as the smaller .060″ flash holes found on some other cases. Once I knocked out the primers, I poured the brass and the media into the tumbler drum together.
 Then I mixed up the cleaning solution. I poured ¾ of a gallon of water into the unit, and then put in four tablespoons of Dawn dishwashing detergent. I also added one teaspoon of lemon juice to keep the brass from spotting when it dried.
 Then I rinsed the media, too. Rinsing the media is important: if you don’t do it, the media will be dirty when you use it next time. The media is easier to rinse while it’s still damp, and it cleans easily with clear water. As you can see, the brass cleaned up very well and showed no evidence of water spotting because of the lemon juice. The range pick-up brass came out fully usable, showing no signs of corrosion. The nickel brass looked as if it were brand new and unfired. The Amron cases looked the best that I can ever remember seeing them. Some of them still had a light amount of carbon just behind the case mouth, but a quick twist with 0000 steel wool took care of this easily during inspection of these cases before loading. All of the primer pockets were clean and clear of carbon. Impressive!
 Based on what I have seen, I will definitely use stainless steel media a whole lot in the future, even though I will still keep some of the
 ▪ Brass Prep — You need to look at the flash-holes to make sure they’re not occluded. A few lots of Lapua brass came with a little
  For guys with 10-twist barrels, try out the new Berger 87gr VLD. It was expressly designed to work great in the 1:10″ twist barrels. Forum member Mark Schronce reports that this bullet is extremely accurate and can be driven fast. It has an 0.412 G1 BC. Note: The new 87gr VLD, product #24524, is hard to find on the Berger website, but it IS available. Berger calls it a “hunting bullet”, but it works great on paper also.

 A while back, we featured a portable reloading bench built on a Black & Decker Workmate. That proved a VERY popular do-it-yourself project so we’re showing it again, in case you missed it the first time.


