We have used NO-LEAD Cleaner in rimfire benchrest rifles similar to this modified Suhl 150-1. It helped restore accuracy with minimal brushing.
Made by the same smart folks that created Wipe-Out™, and Carb-Out™, NO-LEAD Brushless Lead Remover™ really works. Honest. If you are an active rimfire shooter, or if you shoot cast lead-alloy bullets in centerfire rifles and pistols, you should try this product. We now use NO-LEAD in our rimfire benchrest rifles, and in some centerfire guns that receive a steady diet of soft-alloy cast bullets (90%+ lead). (With rimfire guns, you don’t need to use NO-LEAD very often — maybe every 300-400 rounds unless you have a real fouler of a barrel.)
If you’ve got stubborn lead fouling in a rimfire barrel, or on a pistol’s muzzle brake/compensator, you should definitely give this stuff a try. We don’t know how but it does soften lead deposits. The manufacturer says you don’t need brushes, but we found that a bit of brushing (after NO-LEAD application) can help remove more serious lead build-up.
Yes we were surprised to find a lead remover that really works. We tried a half-dozen other lead “cleaners” that promised to dissolve lead and most of them, we discovered, are nearly useless. There’s a reason for that, as the lead alloys used in bullets don’t react to typical petrochemical-based solvents. It took the Wipe-Out chemists over five years to perfect this water-based solution that really does dissolve lead.
NO-LEAD Cleaning Procedure — Read Carefully NO-LEAD Lead Remover is a clear, red gel that is easy to apply. Just swab it in your bore (or on muzzle brakes) with wet patches or bore mop and let it sit for a few minutes. (The manufacturer says you can leave the NO-LEAD for up to 20 minutes, but that long of a dwell time does not seem necessary with our rimfire barrels.) When it contacts lead it will start to foam and you’ll see that the NO-LEAD solvent turns a pastel pink when it dissolves lead. The pink comes from the formation of lead oxide. After the recommended dwell time, simply patch out the dissolved lead deposits (you can also use a nylon brush for stubborn lead build-up).
NOTE: After cleaning, it is very important that you get all the NO-LEAD out of your barrel, and neutralize it. We recommend following the application of NO-Lead with Wipe-out or Patch-Out to neutralize the NO-LEAD, clear the bore, and remove residual carbon and copper fouling. If you don’t have Wipe-Out or Patch-out, flush the barrel thoroughly with Rubbing Alcohol or even a solution of Dawn dish detergent — then re-oil the bore.
Be Sure to Neutralize NO-LEAD After Use
Remember that N0-LEAD is a strong, slightly acidic chemical that needs to be neutralized after use. If you leave it on a nice, blued barrel for too long, it can harm the bluing. NO-LEAD will remove all the surface oils from the barrel bore. For this reason it is recommended that you neutralize NO-LEAD with Wipe-Out, or Patch-Out, which both contain effective corrosion inhibitors. If you don’t have those products, once you’ve flushed the NO-LEAD with something like rubbing alcohol, then follow with a gun oil. Caution: A petroleum-based gun oil will NOT, by itself, neutralize NO-LEAD. You need to neutralize first, then apply the corrosion inhibitor (or do it all in one step with Wipe-Out or Patch-Out).
Where to Buy NO-LEAD Lead Remover
NO-LEAD Lead Remover costs $18.55 for an 8 oz. squeeze bottle with a flip-top spout. This product is sold directly by Sharp Shoot-R Precision Products through Sharpshootr.com, or you can purchase NO-LEAD through many other online vendors. For more information, send an email via the Sharp Shoot-R Contact Form or or contact SharpShoot-R at (785) 883-4444. You can ask for Terry Paul, Sharp Shoot-R’s owner and the master chemist who developed the NO-LEAD formula.
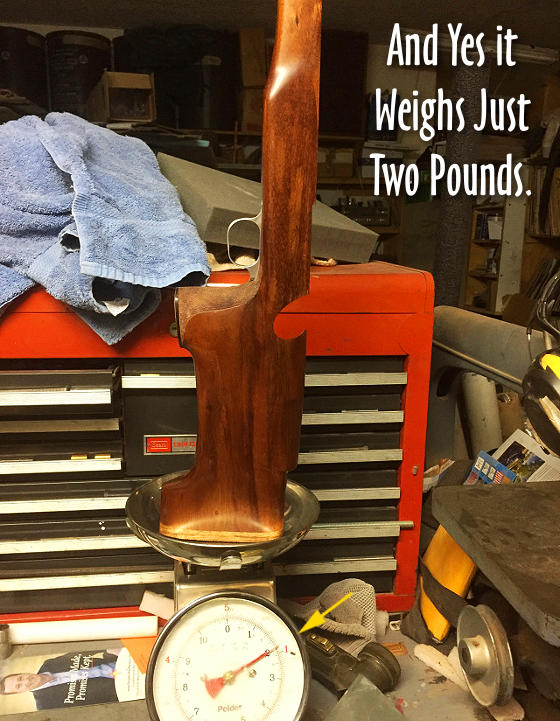
Gunsmith/stockmaker Doan Trevor created a lovely, one-of-a-kind silhouette stock for an Anschutz rimfire action. Built as a true custom design, this stock combines ideal standing position ergonomics with light weight — the entire stock weighs a mere two pounds. This project really showcases Doan’s remarkable skills with wood. Read the full story about this project (with more photos) at DoanTrever.com.
Doan explains his design process: “A customer came to me wanting to know if I could build a silhouette stock that was 2 pounds or less. I used the Koa wood because it is a lower specific gravity than Walnut (which makes it lighter) and stronger. I was still able to use pillar bedding and keep the weight down. The fore-end could be shortened to reduce the weight even more.
Since the drops on a silhouette rifle are different than a prone rifle, I kept the pistol grip from the prone rifle which is comfortable and tried to come up with a higher cheek piece and more drop to the buttplate. All of this required lots of hand carving.”
Registration is open for the Civilian Marksmanship Program (CMP) 2024 National Smallbore and Air Gun events. These will be part of the 2024 National Matches held at the Camp Perry National Guard Training Base in Clinton, Ohio. Review the 2024 National Matches schedule and event info on the CMP website.
Smallbore (Rimfire) Events at Petrarca Range
The National Smallbore lineup includes iron sights and any sights prone events as well as 3×20 (three-position) individual and team matches. Smallbore events are fired on the covered outdoor electronic target line of Camp Perry’s Petrarca Range.
This video covers the Smallbore competition at the 2021 CMP National Matches at Camp Perry.
National Air Gun Matches at Gary Anderson Competition Center
Air rifle and/or air pistol competitors can participate in the National Air Gun Matches, held on the electronic target range at the Gary Anderson CMP Competition Center. The air rifle and air pistol programs feature training, followed by two days of 60-shot competitions.
Schedule Allows Competitors to Shoot Both Smallbore AND Air Rifle Events
The National Smallbore and National Air Gun phases have been arranged in tandem to allow athletes the option of competing in both disciplines, with an aggregate event included for those firing in air rifle and three-position smallbore competitions. Challenging elimination team matches will also be part of the Air Gun and Smallbore schedules.
About the National Matches:
The National Matches event is comprised of the CMP National Trophy Pistol and Rifle Matches, National Games Matches, National Smallbore Matches, National Air Gun Championships, and the National Mid-Range and Long Range Matches. The month-long series also includes a variety of educational clinics for all experience levels. All events are open to the public, with spectators welcome.
Guest Article By Michelle Gallagher, Berger Bullets
Let’s face it. In the world of firearms, there is something for everyone. Do you like to compete? Are you a hunter? Are you more of a shotgun shooter or rifle shooter? Do you enjoy running around between stages of a timed course, or does the thought of shooting one-hole groups appeal to you more? Even though many of us shoot several different firearms and disciplines, chances are very good that we all have a favorite. Are we spreading ourselves too thin by shooting different disciplines, or is it actually beneficial? I have found that participating in multiple disciplines can actually improve your performance. Every style of shooting is different; therefore, they each develop different skills that benefit each other.
How can cross-training in other disciplines help you? For example, I am most familiar with long-range prone shooting, so let’s start there. To be a successful long-range shooter, you must have a stable position, accurate ammunition, and good wind-reading skills. You can improve all of these areas through time and effort, but there are other ways to improve more efficiently. Spend some time practicing smallbore. Smallbore rifles and targets are much less forgiving when it comes to position and shot execution. Long-range targets are very large, so you can get away with accepting less than perfect shots. Shooting smallbore will make you focus more on shooting perfectly center shots every time. Another way to do this with your High Power rifle is to shoot on reduced targets at long ranges. This will also force you to accept nothing less than perfect. Shoot at an F-Class target with your iron sights. At 1000 yards, the X-Ring on a long range target is 10 inches; it is 5 inches on an F-Class target. Because of this, you will have to focus harder on sight alignment to hit a center shot. When you go back to the conventional target, you will be amazed at how large the ten ring looks.
Also, most prone rifles can be fitted with a bipod. Put a bipod and scope on your rifle, and shoot F-TR. Shooting with a scope and bipod eliminates position and eyesight factors, and will allow you to concentrate on learning how to more accurately read the wind. The smaller target will force you to be more aggressive on your wind calls. It will also help encourage you to use better loading techniques. Nothing is more frustrating than making a correct wind call on that tiny target, only to lose the point out the top or bottom due to inferior ammunition. If you put in the effort to shoot good scores on the F-Class target, you will be amazed how much easier the long-range target looks when you return to your sling and iron sights. By the same token, F-Class shooters sometimes prefer to shoot fast and chase the spotter. Shooting prone can help teach patience in choosing a wind condition to shoot in, and waiting for that condition to return if it changes.
Benchrest shooters are arguably among the most knowledgeable about reloading. If you want to learn better techniques about loading ammunition, you might want to spend some time at benchrest matches. You might not be in contention to win, but you will certainly learn a lot about reloading and gun handling. Shooting F-Open can also teach you these skills, as it is closely related to benchrest. Benchrest shooters may learn new wind-reading techniques by shooting mid- or long-range F-Class matches.
Position shooters can also improve their skills by shooting different disciplines. High Power Across-the-Course shooters benefit from shooting smallbore and air rifle. Again, these targets are very small, which will encourage competitors to be more critical of their shot placement. Hunters may benefit from shooting silhouette matches, which will give them practice when shooting standing with a scoped rifle. Tactical matches may also be good, as tactical matches involve improvising shots from various positions and distances. [Editor: Many tactical matches also involve hiking or moving from position to position — this can motivate a shooter to maintain a good level of general fitness.]
These are just a few ways that you can benefit from branching out into other shooting disciplines. Talk to the other shooters. There is a wealth of knowledge in every discipline, and the other shooters will be more than happy to share what they have learned. Try something new. You may be surprised what you get out of it. You will certainly learn new skills and improve the ones you already have. You might develop a deeper appreciation for the discipline you started off with, or you may just discover a new passion.
This article originally appeared in the Berger Blog. The Berger Blog contains the latest info on Berger products, along with informative articles on target shooting and hunting.
2023 Smallbore and Air Rifle Champion: Cecelia Ossi
Story based on article by CMP’s Sheri Trusty
At the 2023 National Matches at Camp Perry this summer, 21-year-old competitor Cecelia Ossi achieved a remarkable double-discipline victory. Ossi placed first in the new Three-position (3P) Smallbore and Air Rifle Aggregate combo event. She did this shooting both outdoors and indoors. This was a great “twin win” by a very talented young lady. A member of the rifle team at the University of Nebraska, Ossi recorded a historically great performance at Camp Perry this summer. Cecelia won the 3P Smallbore and Air Rifle Aggregate with a score of 2421-60X.
For 2023, the CMP created a Three-Position Smallbore and Air Rifle Aggregate Championship for those who competed in both disciplines. Earning the inaugural win in the match was the talented Cecelia Ossi, who shoots for the University of Nebraska rifle team. The CMP had modified the match schedule to allow shooters to compete in Smallbore matches on Camp Perry’s outdoor Petrarca Range as well as in Air Gun events at the Gary Anderson CMP Competition Center located just next door — all during the same day.
The 2023 National Matches marked the first time Ossi shot outdoors at Camp Perry. The unique environment gave her the opportunity to test her skills: “Shooting outdoors created a lot of challenges, which is why I loved Camp Perry. You have to figure out how the wind is affecting your shooting, and it’s very rewarding when you get it right.”
Ossi has one more year at the University of Nebraska-Lincoln, and then she plans to join the Army Marksmanship Unit (USAMU) in Georgia. “I trained with [the USAMU] for a week this summer. I’m really excited about joining them in 2024″, she said. Ossi labels herself a perfectionist, and marksmanship provides a venue to be the best she can be (as the Army would say).
“Marksmanship gives me the opportunity to be a perfectionist. It’s very interesting and mentally challenging to figure out position and challenge myself to be perfect in everything I’m doing.” — Cecelia Ossi
A former gymnastics competitor, Ossi transitioned to marksmanship in her junior year of high school. She is now at the University of Nebraska, where she competes with the rifle team. Ossi is now heading into her senior year at Nebraska. “Marksmanship taught me a lot about the mental side of competing. I think I would have done better in gymnastics had I known all that. The mental side can outweigh the physical side. That’s something that’s overlooked in a lot of sports.”
Ossi said her coaches played a big role in her early, rapid success: “I had phenomenal coaches that helped me progress quickly. They knew my goals and how to help me meet them. They were a huge part of this.” Ossi trained with coaches Tom Fister, Tab Rhode, and Bill Burkert in Pennsylvania and with Peter Fiori (Senior) in New Jersey. Mindy Miles is head coach and J.T. Schneiring is assistant coach at University of Nebraska-Lincoln.
Cecelia Competes with both Air Rifles and Smallbore (.22 LR) Rifles
Ossi shot the air rifle competitions with a Walther Monotec rifle, and she shot smallbore with a Walther KK500 equipped with custom modifications. “My parts are mostly custom built by Peter Fiori, Sr. He played a big part in my marksmanship”, Ossi explained. Both her rifles have very sophisticated stocks that allow precise adjustment of cheekpiece height and buttstock height/length/angle to suit the three different positions that she shoots: standing, kneeling, and prone.
Camp Perry — Shooting Outdoors with Electronic Targets
Camp Perry’s unique shooting environment drew Ossi to the 2023 National Matches. “Camp Perry is the only place I’ve had the chance to shoot team matches. I had never shot team smallbore before. That was very fun. It’s fun to bring the team aspect into shooting and work together”, she said. “Each person shot a different position, so it highlighted each person’s strengths. I was nominated to shoot standing, which is my strength, so that was fun.”
Camp Perry employed electronic targets for the National smallbore matches for the first time this year. Ossi enjoyed this modern technology: “The electronic targets were a big reason why I decided to shoot smallbore at the National Matches. The electronic targets brought a bigger crowd overall for the matches and made the whole experience really great. The staff did really well making the matches run smoothly.”
Path to Success — How Young Shooters Can Win a Spot on College Teams
Ossi’s rushed entrance into competitive marksmanship gives her a unique view into the challenges young college hopefuls face, and she is open to advising young recruits as they maneuver through the college process: “I talk to a lot of recruits and young rifle shooters. The biggest thing, when you’re looking to get into college, is putting yourself out there and introducing yourself. It says a lot about you, and the coaches remember that.”
Ossi said college recruiting rules limit the connections between college hopefuls and coaches, so she encourages young marksmen to talk to college athletes like herself: “Don’t hesitate to reach out to college shooters. I’m always open to answer questions. You can always talk to collegiate shooters when you can’t always talk to coaches.”
From Gymnastics to Competitive Shooting After years of training as a high-level gymnast in her early teens, Cecelia transitioned to marksmanship competition in her junior year of high school. She had little time to perfect the skills necessary to earn a spot on a collegiate team, but she applied the discipline she learned as a gymnast to her new sport and achieved success. Her high school rifle match performances earned Ossie an invitation to join the University of Nebraska-Lincoln rifle team.
“In my junior year of high school, I had to retire from gymnastics due to injuries, and I felt a little lost,” she said. “I had done a lot with 4-H shooting sports — muzzleloader, shotgun, you name it. I did a lot of different disciplines, so I had a little bit of shooting experience.”
When Ossi learned a friend’s sister was a member of a collegiate rifle team, it opened her mind to new possibilities: “I dove right in. The coaches were amazing, and it brought me to the college 1 ½ years later. It was a quick transition from gymnastics to shooting.”
Ossi applied her gymnastics training to marksmanship: “I think all that training as a high-level gymnast played a part. I knew how to train for long hours every day, and I knew how to set goals. Having physical discipline and mental discipline helped. It was just a different sport.”
CMP Online Resources for Junior Competitors and Parents
The CMP has good resources for junior competitors on the CMP Website. There you will find information on youth shooting programs, along with College Connect and Guide to College Recruiting. These are excellent resources for parents and juniors.
Gunsmith/stockmaker Doan Trevor created a lovely, one-of-a-kind silhouette stock for an Anschutz rimfire action. Built as a true custom design, this stock combines ideal standing position ergonomics with light weight — the entire stock weighs a mere two pounds. This project really showcases Doan’s remarkable skills with wood. Read the full story about this project (with more photos) at DoanTrever.com.
Doan explains his design process: “A customer came to me wanting to know if I could build a silhouette stock that was 2 pounds or less. I used the Koa wood because it is a lower specific gravity than Walnut (which makes it lighter) and stronger. I was still able to use pillar bedding and keep the weight down. The fore-end could be shortened to reduce the weight even more.
Since the drops on a silhouette rifle are different than a prone rifle, I kept the pistol grip from the prone rifle which is comfortable and tried to come up with a higher cheek piece and more drop to the buttplate. All of this required lots of hand carving.”
For centerfire ammo, you can choose from dozens of flip-top boxes, storage bins, or milsurp-style ammo cans. For rimfire ammo, there are not so many good choices. Our preferred rimfire ammo carrier is the MTM SB-200 Small-Bore Fitted Ammo Box. This flip-top plastic box holds 100 rimfire rounds in black grids on the left and right. Each side has five rows left to right, holding ten rounds per row front to back (for 50 rounds per side). In the center is a storage area that will hold another 100 rounds in factory boxes. Current price is $13.15 on Amazon.
Versatility for ALL Types of Rimfire Ammo
MTM’s SB-200 box is not just for .22 LR ammunition. This handy carrier will hold .17 HMR rounds, as well as .17 Mach 2, .22 Short, .22 Win Mag Rimfire, and of course .22 Long Rifle (.22 LR). This box is a winner — it has a low profile, holds rounds securely, and the center storage feature is smart.
MTM Case-Gard 200 Round Smallbore Box
This is really the only product of its kind on the market. It allows you to conveniently and securely hold 200 rimfire rounds, and also segregate your ammo by brand or bullet type. These boxes fit all types of popular rimfire ammunition. The vertical clearance of the lid is sufficient to hold the longer .22 WMR Rounds, and 17 HMR (as well as .22 LR naturally). The lid fits securely so you don’t have to worry about your rimfire ammo spilling out on the way to the range.
If you don’t have one of these boxes yet, we recommend you order one or two. They cost less than $15.00 and are available in Blue or “Rust” (a brick color).
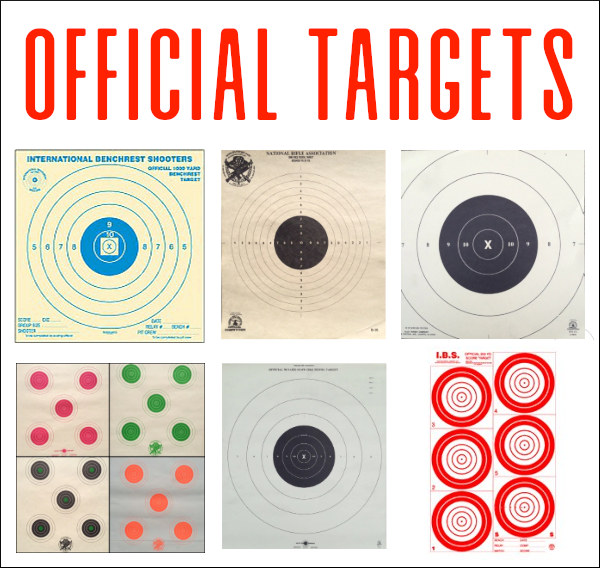
Do you need targets — not just any old targets, but the correctly-sized targets for specific shooting disciplines (such as NRA Smallbore, F-Class, and 1K Benchrest)? Well you won’t find them at your neighborhood gun store. Precise, dimensionally-correct competition targets are produced by a half-dozen specialty printers. In this article we provide links to the leading target sellers, with a chart showing “who’s got what”. Look for your particular discipline and the vendors will be specified.
Sources for Official Shooting Competition Targets:
AccurateShooter.com offers dozens of FREE, printable targets for target practice, load development, and fun shooting. We also offer a few of the most popular NRA Bullseye targets. One or more of these printable targets should work for most training purposes. However, some readers have asked: “Where can we get the real targets… exactly like the ones used in NRA, IBS, and NBRSA shooting matches?”
All these vendors carry nearly all the NRA High Power and Smallbore targets, including the smaller F-Class targets. National Target has the F-Class and High Power targets, including 100-yard reductions of the 200, 300, and 600-yard military targets.
Orrville Printing currently sells IBS targets for rimfire (50 yard) benchrest, short-range centerfire Benchrest (100, 200, 300 yards), Hunter BR Rifle (100, 200, 300 yards), plus the official 600-yard and 1000-yard IBS targets. National Target Company also has most of the IBS targets. NBRSA short-range, 600-yard, and 1000-yard benchrest targets are available directly from the NBRSA Business Office. Send an email to nbrsa@icloud.com or call (434) 993-9201.
Need Steel, Cardboard Silhouettes or specialty targets? ALCO Target Company in Duarte, California is the USA’s leading producer of the full spectrum of shooting targets including paper targets, cardboard targets, steel targets, and target stands.
The late Bill Myers was recognized as one of greatest rimfire smiths who ever lived. Myers crafted many match-winning, record-setting rimfire benchrest rigs. Here we feature one of Bill’s most interesting creations — a clamping action that allows a rimfire barrel to be indexed (rotated) around the bore axis.
Bill was a creative thinker, and his own exhaustive testing has convinced him that barrel indexing can enhance accuracy in rimfire benchrest guns. Myers did acknowledge that, particularly with a very good barrel, the advantages of indexing may be subtle, and extensive testing may be required. Nonetheless, Myers believed that indexing could improve rimfire accuracy.
Indexing with the Myers’ Clamping Action
To index the barrel, Myers simply loosens the three clamping-bolts and rotates the barrel in the action. Because there is no thread to pull the barrel in or out, the headspace stays the same no matter how much the barrel is rotated. In other words you can rotate the barrel to any position on the clockface and the headspace remains unchanged.
The Challenge of Barrel Indexing With a conventional barrel installation, employing a shoulder with a threaded tenon, it is difficult to index the barrel. Even with a cone breech (photo right) that eliminates the problem of extractor cuts, you’d have to use shims to alter the barrel index position, or otherwise re-set the shoulder each time you screwed the barrel in further.
Clamping Action Allows Barrel to Be Rotated to Any Position
Bill has come up with a masterful solution to barrel indexing. He designed and built his own prototype custom action that clamps the barrel rather than holding it with threads. The front section of the action is sliced lengthways, and then clamped down with three bolts. A special bushing (the gold-color piece in photos) fits between the barrel and the action. By using bushings of different inside diameters, Bill can fit any barrel up to an inch or so diameter, so long as it has a straight contour at the breech end. To mount the barrel, Bill simply places the fitted bushing over the barrel end-shank, then slips the “sleeved” barrel into the front end of the action. Tighten three bolts, and the barrel is secure.
Guest Article By Michelle Gallagher, Berger Bullets
Let’s face it. In the world of firearms, there is something for everyone. Do you like to compete? Are you a hunter? Are you more of a shotgun shooter or rifle shooter? Do you enjoy running around between stages of a timed course, or does the thought of shooting one-hole groups appeal to you more? Even though many of us shoot several different firearms and disciplines, chances are very good that we all have a favorite. Are we spreading ourselves too thin by shooting different disciplines, or is it actually beneficial? I have found that participating in multiple disciplines can actually improve your performance. Every style of shooting is different; therefore, they each develop different skills that benefit each other.
How can cross-training in other disciplines help you? For example, I am most familiar with long-range prone shooting, so let’s start there. To be a successful long-range shooter, you must have a stable position, accurate ammunition, and good wind-reading skills. You can improve all of these areas through time and effort, but there are other ways to improve more efficiently. Spend some time practicing smallbore. Smallbore rifles and targets are much less forgiving when it comes to position and shot execution. Long-range targets are very large, so you can get away with accepting less than perfect shots. Shooting smallbore will make you focus more on shooting perfectly center shots every time. Another way to do this with your High Power rifle is to shoot on reduced targets at long ranges. This will also force you to accept nothing less than perfect. Shoot at an F-Class target with your iron sights. At 1000 yards, the X-Ring on a long range target is 10 inches; it is 5 inches on an F-Class target. Because of this, you will have to focus harder on sight alignment to hit a center shot. When you go back to the conventional target, you will be amazed at how large the ten ring looks.
Also, most prone rifles can be fitted with a bipod. Put a bipod and scope on your rifle, and shoot F-TR. Shooting with a scope and bipod eliminates position and eyesight factors, and will allow you to concentrate on learning how to more accurately read the wind. The smaller target will force you to be more aggressive on your wind calls. It will also help encourage you to use better loading techniques. Nothing is more frustrating than making a correct wind call on that tiny target, only to lose the point out the top or bottom due to inferior ammunition. If you put in the effort to shoot good scores on the F-Class target, you will be amazed how much easier the long-range target looks when you return to your sling and iron sights. By the same token, F-Class shooters sometimes prefer to shoot fast and chase the spotter. Shooting prone can help teach patience in choosing a wind condition to shoot in, and waiting for that condition to return if it changes.
Benchrest shooters are arguably among the most knowledgeable about reloading. If you want to learn better techniques about loading ammunition, you might want to spend some time at benchrest matches. You might not be in contention to win, but you will certainly learn a lot about reloading and gun handling. Shooting F-Open can also teach you these skills, as it is closely related to benchrest. Benchrest shooters may learn new wind-reading techniques by shooting mid- or long-range F-Class matches.
Position shooters can also improve their skills by shooting different disciplines. High Power Across-the-Course shooters benefit from shooting smallbore and air rifle. Again, these targets are very small, which will encourage competitors to be more critical of their shot placement. Hunters may benefit from shooting silhouette matches, which will give them practice when shooting standing with a scoped rifle. Tactical matches may also be good, as tactical matches involve improvising shots from various positions and distances. [Editor: Many tactical matches also involve hiking or moving from position to position — this can motivate a shooter to maintain a good level of general fitness.]
These are just a few ways that you can benefit from branching out into other shooting disciplines. Talk to the other shooters. There is a wealth of knowledge in every discipline, and the other shooters will be more than happy to share what they have learned. Try something new. You may be surprised what you get out of it. You will certainly learn new skills and improve the ones you already have. You might develop a deeper appreciation for the discipline you started off with, or you may just discover a new passion.
This article originally appeared in the Berger Blog. The Berger Blog contains the latest info on Berger products, along with informative articles on target shooting and hunting.


 Made by the same smart folks that created Wipe-Out™, and Carb-Out™, NO-LEAD Brushless Lead Remover™ really works. Honest. If you are an active rimfire shooter, or if you shoot cast lead-alloy bullets in centerfire rifles and pistols, you should try this product. We now use NO-LEAD in our rimfire benchrest rifles, and in some centerfire guns that receive a steady diet of soft-alloy cast bullets (90%+ lead). (With rimfire guns, you don’t need to use NO-LEAD very often — maybe every 300-400 rounds unless you have a real fouler of a barrel.)
 Where to Buy NO-LEAD Lead Remover


 Position shooters can also improve their skills by shooting different disciplines. High Power Across-the-Course shooters benefit from shooting smallbore and air rifle. Again, these targets are very small, which will encourage competitors to be more critical of their shot placement. Hunters may benefit from shooting silhouette matches, which will give them practice when shooting standing with a scoped rifle. Tactical matches may also be good, as tactical matches involve improvising shots from various positions and distances. [Editor: Many tactical matches also involve hiking or moving from position to position — this can motivate a shooter to maintain a good level of general fitness.]


 After years of training as a high-level gymnast in her early teens, Cecelia transitioned to marksmanship competition in her junior year of high school. She had little time to perfect the skills necessary to earn a spot on a collegiate team, but she applied the discipline she learned as a gymnast to her new sport and achieved success. Her high school rifle match performances earned Ossie an invitation to join the University of Nebraska-Lincoln rifle team.


 With a conventional barrel installation, employing a shoulder with a threaded tenon, it is difficult to index the barrel. Even with a cone breech (photo right) that eliminates the problem of extractor cuts, you’d have to use shims to alter the barrel index position, or otherwise re-set the shoulder each time you screwed the barrel in further.


 Position shooters can also improve their skills by shooting different disciplines. High Power Across-the-Course shooters benefit from shooting smallbore and air rifle. Again, these targets are very small, which will encourage competitors to be more critical of their shot placement. Hunters may benefit from shooting silhouette matches, which will give them practice when shooting standing with a scoped rifle. Tactical matches may also be good, as tactical matches involve improvising shots from various positions and distances. [Editor: Many tactical matches also involve hiking or moving from position to position — this can motivate a shooter to maintain a good level of general fitness.]


