The new .224 Valkyrie for AR15-platform rifles has garnered lots of attention lately. That new cartridge has gotten people thinking about the options for an AR shooter beyond the venerable .223 Remington (and 5.56x39mm NATO). While the .224 Valkyrie is good for shooting long heavy bullets (such as Sierra’s new 95gr SMK), there is a simpler, cheaper option for folks who favor “fast and light” — smaller, lower-mass bullets traveling at very high velocities. That option is the 20 Practical, which is simply a .223 Remington necked down to 20 caliber. This little cartridge can launch 40-grainers at over 3900 fps. That’s bookin’. This makes the 20 Practical a great choice for an AR-based varmint rifle.
20 Practical Ultimate Varminter
A decade ago, as a “proof-of-concept”, AccurateShooter.com created a 20 Practical AR15 Ultimate Varminter with a custom 20-caliber upper from Robert Whitley of AR-X Enterprises, LLC. That project rifle was ultra-accurate — every 5-shot group out of the gun was less than the size of a dime. That gun was auctioned off, but Robert Whitley continues to produce custom 20 Practical AR15 uppers. (The 20 Practical cartridge is simply the .223 Rem necked down to 20 caliber — you can use standard .223 brass and load with standard.223 Rem dies. Just swap in a smaller expander and use smaller neck bushings.)
Robert reports that the accuracy of the first 20 Practical AR15 was no fluke. After building six (6) more 20 Practical uppers, he tested them for accuracy and they all shot great. These uppers feature DPMS low-pro receivers with side charging handles. They are fitted with PacNor 1:11″ twist, three-groove stainless barrels.
Robert reports: “We have been making more 20 Practical AR15 uppers and I have to say I am astounded by the accuracy of these things. For shooting little tiny groups out of an AR15 with bullets going 3500+ fps, it’s hard to beat the 20 Practical. Today I test-fired six more uppers, all with 11-twist barrels. Three of the uppers had 24″ barrels, two had 20″ barrels, and one had an 18″ barrel (we call it ‘Stubby’).
In four of these uppers I shot re-sized Winchester brass using 25.3 grains of WC844 powder with Berger 40gr BTHP bullets loaded at 2.225″ OAL (about .015″ off the lands). WC844 is inexpensive military surplus powder that is nearly identical to H335. I tried three different primers and the choice did not seem to matter (CCI BR4, Rem 7 1/2s and Win Small Rifle — the old silver ones). All these four uppers shot great. Here is an animated GIF with targets from uppers #6, 10, and 11. All groups are mag-fed, 5-shot groups shot at 100 yards using a front rest and rear bag.”
Targets Shot with Three Different 20 Practical AR Uppers
For more information visit www.6mmAR.com, or contact Robert Whitley via email: rcw3 [at] erols.com.
With all the buzz about the 6.5 Creedmoor and its 6mm Creedmoor little brother, some folks forget that we’ve had an outstanding mid-sized, Across-the-Course cartridge for a long time — the 6XC. Pioneered by 11-time National High Power champion David Tubb, the 6XC has won national High Power championships, excelled in mid-range prone matches, and performed great in the varmint fields. It has also been used successfully by many Precision Rifle Series competitors. It’s no wonder — the 6XC has less recoil than a 6.5mm Creedmoor, there is a great selection of superb 6mm bullets, and Norma-made 6XC brass is high-quality and reasonably priced from DavidTubb.com.
PRS Rifle with Modern 6XC II Chamber
Forum member Grimstod posted this new 6XC II rifle in our long-running Pride and Joy Rifle Thread. Grimstod notes: “These 6XC Gen IIs seam to be a hot commodity lately. This one is for PRS. It features a Premier Accuracy Atlas action made by Kelbly. The bolt and heavy-taper, fluted barrel are Ceracoted to match. I really like the ejectors on these Atlas actions. The stock is a KRG X-Ray painted in Premier Accuracy exclusive colors. The Kelbly Atlas action does not have any modifications. So far every Kelbly action we have tried has had perfect timing and trigger fall. We have been supper pleased with them. I look forward to using a lot more of these excellent actions.”
What is the 6XC II you may ask? That designates a 6XC with a chamber dimension optimized for Norma brass. It turns out that Norma brass is a bit bigger at the bottom than the 22-250 brass from which the 6XC originated. Robert Whitley of 6mmAR.com has created two new JGS reamer specs that fit the Norma brass perfectly, improving feeding and extraction. Here is Robert’s Report:
The 6XC II Chamber — Upgraded for Today’s Norma 6XC Brass
by Robert Whitley of 6mmAR.com
The 6XC II Chamber works perfectly with the Norma 6XC brass and resolves the “sticky bolt lift” issue. The original 6XC chambering was designed based off the usage of 22-250 brass which typically has a web diameter in the range of .461″-.463″. The area of the chamber just forward of the web on the original 6XC chambering was .4695″ which left plenty of clearance.
When Norma 6XC brass became available Norma appears to have developed the base of the case from the .308 Winchester line of cases which have a larger web diameter. The web diameter of the Norma brass typically measures right around .4685″ which leaves almost no diameter clearance.
As shooters would use Norma 6XC brass in an original 6XC chamber they typically would experience “sticky bolt lift” due to the lack of clearance and the fact that the large web diameter of the brass prohibited the re-size dies (no matter how small the base diameter was) from squeezing the brass down enough to create sufficient clearance. The 6XC II chamber resolves this issue. You can order 6XC II sizing dies from 6mmAR.com that work perfectly with this re-designed chambering. 6XC II die sets are in stock now — call (215) 348-8789 to order.
6XC II Long Range Reamer (Throated long for 105-115gr Bullets):
The 6XC II-LT reamer below is throated long to keep the full bearing surface of 110-115gr bullets forward of the neck/shoulder junction of the case. Note, 6mmAR.com has also developed a shorter-freebore version for 6mm bullets with shorter bearing surface. SEE shorter 6XC II Reamer Print.
6XC II Chamber and Sizing Die Combo:
– Resolves the “sticky bolt lift” problem shooters experienced using the Norma 6XC Brass in the original 6XC chambers.
– Chamber accepts all 6XC brass or ammo with no modification. Take your existing 6XC brass or ammo and use it without issues.
– Works well with existing Norma 6XC brass, or 6XC brass made from re-formed Winchester and Remington 22-250 brass.
– 6XC II Sizing dies and die sets are available from 6mmAR.com and in stock.
If you are looking for someone to chamber your rifle or re-barrel an existing rifle in the 6XC II chamber, Fred at Sabreco, Inc. in Skippack, PA, (610) 584-8228 can help you. He has the reamers for the cartridge as well as the head space gauges for the cartridge, and has had extensive experience chambering many barrels and rifles.
The new .224 Valkyrie for AR15-platform rifles has garnered lots of attention lately. That new cartridge has gotten people thinking about the options for an AR shooter beyond the venerable .223 Remington (and 5.56x39mm NATO). While the .224 Valkyrie is good for shooting long heavy bullets (such as Sierra’s new 95gr SMK), there is a simpler, cheaper option for folks who favor “fast and light” — smaller, lower-mass bullets traveling at very high velocities. That option is the 20 Practical, which is simply a .223 Remington necked down to 20 caliber. This little cartridge can launch 40-grainers at over 3900 fps. That’s bookin’. This makes the 20 Practical a great choice for an AR-based varmint rifle.
20 Practical Ultimate Varminter
A decade ago, as a “proof-of-concept”, AccurateShooter.com created a 20 Practical AR15 Ultimate Varminter with a custom 20-caliber upper from Robert Whitley of AR-X Enterprises, LLC. That project rifle was ultra-accurate — every 5-shot group out of the gun was less than the size of a dime. That gun was auctioned off, but Robert Whitley continues to produce custom 20 Practical AR15 uppers. (The 20 Practical cartridge is simply the .223 Rem necked down to 20 caliber — you can use standard .223 brass and load with standard.223 Rem dies. Just swap in a smaller expander and use smaller neck bushings.)
Robert reports that the accuracy of the first 20 Practical AR15 was no fluke. After building six (6) more 20 Practical uppers, he tested them for accuracy and they all shot great. These uppers feature DPMS low-pro receivers with side charging handles. They are fitted with PacNor 1:11″ twist, three-groove stainless barrels.
Robert reports: “We have been making more 20 Practical AR15 uppers and I have to say I am astounded by the accuracy of these things. For shooting little tiny groups out of an AR15 with bullets going 3500+ fps, it’s hard to beat the 20 Practical. Today I test-fired six more uppers, all with 11-twist barrels. Three of the uppers had 24″ barrels, two had 20″ barrels, and one had an 18″ barrel (we call it ‘Stubby’).
In four of these uppers I shot re-sized Winchester brass using 25.3 grains of WC844 powder with Berger 40gr BTHP bullets loaded at 2.225″ OAL (about .015″ off the lands). WC844 is inexpensive military surplus powder that is nearly identical to H335. I tried three different primers and the choice did not seem to matter (CCI BR4, Rem 7 1/2s and Win Small Rifle — the old silver ones). All these four uppers shot great. Here is an animated GIF with targets from uppers #6, 10, and 11. All groups are mag-fed, 5-shot groups shot at 100 yards using a front rest and rear bag.”
Targets Shot with Three Different 20 Practical AR Uppers
For more information visit www.6mmAR.com, or contact Robert Whitley via email: rcw3 [at] erols.com.
This story is about safety — how you must be extra careful when shooting on public lands. Don’t assume that other people will hear your firearms or respect the posted boundaries of a shooting range. To drive this point home, we feature a video that should send chills up and down your spine. This scarey movie about two-legged creatures that appear out of nowhere… while you’re shooting. Watch this video carefully. Something happens at 0.38″ that will make your heart race. Warning: Adult language — Not suitable for playback at work.
Why You Must Always, Always Be Careful When Shooting on Public Lands…
LESSON Learned: Always be aware of your backstop and beyond. If there is any possibility of someone venturing into the “danger zone”, mark off the target area, and designate a person to watch the area around the target. That designated spotter should instantly call a halt to shooting if any person or vehicle appears. It is also a good idea to place warning signs, but don’t count on these to be headed.
This video was filmed on BLM land out in the Nevada desert. In such public areas, one must be very careful about shooting. There may be hikers, bikers, explorers, and horse-riders nearby. An offroad motorcyclist might be moving at 65 miles an hour. At that speed he’ll cover 32 yards in just one second! With that possibility, you really have to be ultra-careful. To be forewarned of potential risks, you need to watch way out to the left and right, not just focus on the backstop and the bullet’s flight path.
The shooting area shown above is located on BLM land. All BLM rules and regulations apply. Remember it is everyone’s desert so always think “safety first”. The video-maker, JFComfort (aka “Joe”), explains: “We do the majority of our shooting on BLM land surrounding the Las Vegas Valley. We have found shooting in small groups in the desert works well for us. We have spent a lot of time out there in the past. I advise you not to shoot alone and be very mindful of off-road enthusiasts. Guys on quads, dirt bikes, and Rhinos seem to pop out of nowhere. Also keep a close eye out for other shooters, not everyone is safe, respectful and courteous.”
Safety Risks Can Occur Anywhere
This kind of safety risk can appear at any shooting venue. Robert Whitley, reports a similar incident on the East Coast: “Had a situation like that happen years ago. I was shooting at 400 yards on a 500 meter range that was completely fenced. Unbeknownst to me some guys on ATVs broke through the fence so they could get across the range to a path on the other side. Heard some engine noise and held up firing and about a second later a guy on an ATV went by right in front of my target — very unnerving. The guy on the ATV was … completely oblivious to the peril he placed himself into by breaking through the fence.”
A lot of claims are made about accuracy for AR-platform rifles, but much of that is just “sales talk”. But if you want a truly accurate black rifle, there are some key upgrades that, collectively, can transform a plain jane AR into a true tack-driver. Here’s an article by a genuine AR expert that will help you identify those components that really make a difference — the parts that can deliver true “match-grade” accuracy. Built right, a modern AR can deliver half-MOA accuracy with handloads. In this article, Robert Whitley of AR-X Enterprises explains how that’s done.
In our Shooters’ Forum, one member recently asked: “What makes an AR accurate? What parts on an AR can really affect accuracy — such as free-floating handguards, barrels, bolts, bolt carriers?” Robert Whitley posted a very comprehensive answer to this question, based on his experience building and testing dozens of AR-platform rifles. Robert runs AR-X Enterprises, which produces match-grade uppers for High Power competitors, tactical shooters, and varminters.
Building an Accurate AR — What is Most Important
by Robert Whitley
There are a lot of things that can be done to an AR to enhance consistent accuracy, and I use the words “consistent accuracy” because consistency is a part of it (i.e. plenty of guns will give a couple great 5-shot groups, but won’t do a very good 10- or 20-shot groups, and some guns will shoot great one day and not so good on others).
Here are 14 key things we think are important to accuracy.
1. Great Barrel: You’ll want a premium match-grade barrel, well-machined with a good crown and a match-type chambering, true to the bore and well cut. The extension threads must also be cut true to the bore, with everything true and in proper alignment.
2. Rigid Upper: A rigid, heavy-walled upper receiver aids accuracy. The typical AR upper receiver was made for a lightweight carry rifle and they stripped all the metal they could off it to make it light to carry (which is advantageous for the military). The net result are upper receivers that are so thin you can flex them with your bare hands. These flexible uppers are “strong enough” for general use, but they are not ideal for accuracy. Accuracy improves with a more rigid upper receiver.
3. True Receiver Face: We’ve found that truing the receiver face is valuable. Some may argue this point but it is always best to keep everything related to the barrel and the bore in complete alignment with the bore (i.e. barrel extension, bolt, upper receiver, carrier, etc.).
4. Barrel Extension: You should Loctite or glue the barrel extension into the upper receiver. This holds it in place all the way front to back in the upper receiver. Otherwise if there is any play (and there typically is) it just hangs on the face of the upper receiver completely dependent on the face of the upper receiver as the sole source of support for the barrel as opposed to being made more an integral part of the upper receiver by being glued-in.
5. Gas Block: You want a gas block that does not impose pointed stress on the barrel. Clamp-on types that grab all the way around the barrel are excellent. The blocks that are pinned on with tapered pins that wedge against the barrel or the slip on type of block with set screws that push up from underneath (or directly on the barrel) can deform the bore inside of the barrel and can wreck the accuracy of an otherwise great barrel.
6. Free-Float Handguard: A rigid, free-float handguard (and I emphasize the word rigid) really makes a difference. There are many types of free-float handguards and a free-float handguard is, in and of itself, a huge improvement over a non-free-float set up, but best is a rigid set-up. Some of the ones on the market are small diameter, thin and/or flexible and if you are shooting off any type of rest, bipod, front bag, etc., a rigid fore-end is best since ARs want to jump, bounce and twist when you let a shot go, as the carrier starts to begin its cycle before the bullet exits the bore.
7. Barrel Contour: You want some meat on the barrel. Between the upper receiver and the gas block don’t go real thin with a barrel (we like 1″ diameter if it’s workable weight-wise). When you touch off a round and the bullet passes the gas port, the gas system immediately starts pressuring up with a gas impulse that provides vibrations and stress on the barrel, especially between the gas block back to the receiver. A heavier barrel here dampens that. Staying a little heavier with barrel contour through the gas block area and out to the muzzle is good for the same reasons. ARs have a lot going on when you touch off a round and the gas system pressures up and the carrier starts moving (all before the bullet exits the bore) so the more things are made heavier and rigid to counteract that the better — within reason (I’m not advocating a 12-lb barrel).
8. Gas Tube Routing Clearance: You want a gas tube that runs freely through the barrel nut, through the front of the upper receiver, and through the gas key in the carrier. Ensure the gas tube is not impinged by any of them, so that it does not load the carrier in a stressed orientation. You don’t want the gas tube bound up so that when the gas tube pressures up it immediately wants to transmit more force and impulse to the barrel than would normally occur. We sometimes spend a lot of time moving the gas block with gas tube on and off new build uppers and tweaking gas tubes to get proper clearance and alignment. Most gas tubes do need a little “tweaking” to get them right — factory tubes may work OK but they typically do not function optimally without hand-fitting.
9. Gas Port Tuning: You want to avoid over-porting the gas port. Being over-gassed makes the gas system pressure up earlier and more aggressively. This causes more impulse, and increases forces and vibration affecting the top end and the barrel. Tune the gas port to give the amount of pressure needed to function properly and adequately but no more.
10. Front/Back Bolt Play: If accuracy is the game, don’t leave a lot of front/back bolt play (keep it .003″ but no more than .005″). We’ve seen factory rifles run .012″ to .015″ play, which is OK if you need to leave room for dirt and grime in a military application. However, that amount of play is not ideal for a high-accuracy AR build. A lot of front/back bolt play allows rounds to be hammered into the chamber and actually re-formed in a non-consistent way, as they are loaded into the chamber.
11. Component Quality: Use good parts from a reputable source and be wary of “gun show specials”. All parts are NOT the same. Some are good, some are not so good, and some aftermarket parts are simply bad. Don’t be afraid to use mil-spec-type carriers; by and large they are excellent for an accuracy build. Also, remember that just because a carrier says “National Match” or something else on it does not necessarily mean it’s any better. Be wary of chrome-plated parts as the chrome plating can change the parts dimensionally and can also make it hard to do hand-fitting for fit and function.
12. Upper to Lower Fit: A good upper/lower fit is helpful. For quick and dirty fit enhancement, an Accu-Wedge in the rear helps a lot. The ultimate solution is to bed the upper to a specific lower so that the upper and lower, when together, are more like one integral unit. For the upper receivers we produce, we try to get the specs as close as we can, but still fit the various lowers in the market place.
13. Muzzle Attachments: Don’t screw up the muzzle (literally). Leave as much metal on the barrel at the muzzle as you can. People like to thread the muzzle for a flash hider, suppressor, muzzle brake, or some other attachment, but if you really want accuracy, leave as much metal as you can there. And, if you have something that screws on, set it up so that it can be put on and have it stay there without putting a lot of torque and stress on it right where the bullet exits the bore. If you are going to thread the end of the barrel, make it concentric with the bore and make sure what you screw on there is as well. For all muzzle attachments, also ensure that the holes through which the bullet passes through are dead true to the bore. Many aftermarket screw-on things are not so good that way. Anything that vents gas should vent symmetrically (i.e. if it vents left, it should vent equally right, and likewise, if it vents up, it should vent down equally). Uneven venting of gas can wreck accuracy.
14. Quality Ammunition: Ammo is a whole story by itself, but loads that are too hot typically shoot poorly in an AR-15. If you want accuracy out of an AR-15, avoid overly hot loads. Shown below are test groups shot with four (4) different uppers, all with moderate loads. These four uppers all pretty much had the same features and things done to them as explained in this article, and they all shot great.
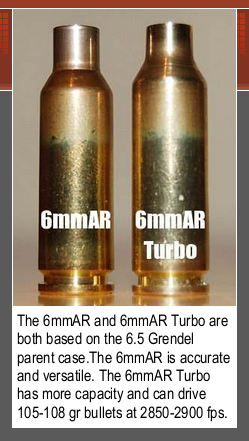
With the increased interest in the 6.5 Grendel cartridge and Grendel-based wildcats (such as the 6mmAR and 30 Major), today we’ve re-released a review by Robert Whitley.
Robert Whitley of AR-X Enterprises, LLC builds match-grade uppers for AR-platform rifles. Many of Robert’s favorite chamberings are based on the 6.5 Grendel case necked-down to 6mm. Until 2011, Lapua was the only source for 6.5 Grendel brass. As you’d expect, Lapua’s Grendel brass is truly excellent, but it is also pricey, and sometimes hard to find. Now Hornady is producing USA-made 6.5 Grendel brass. Robert Whitley has worked with the Hornady 6.5 Grendel brass for over a year now and he is able to assess its performance compared to the original Lapua version. Writing in our Shooters’ Forum, Robert reveals: “It’s decent brass but hot loads will loosen the primer pockets fast. With moderate loads you will get good case life and service from the brass and it can deliver excellent accuracy as well. Not Lapua but not bad either.”
Robert reports: “I was able to get my hands on some of Hornady’s 6.5 Grendel brass. My big question was how it would measure up, particularly the loaded necks, and whether it would be compatible with our existing 6mmAR and Turbo 40 die sets. As it turns out, this brass looks like a perfect fit for our existing die sets (and obviously 6.5 Grendel die sets too). Accordingly, folks with existing die sets will be able to use the Hornady brass without any issues.” However, as the loaded neck on the Hornady brass is .001″ (one-thousandth) slimmer than Lapua brass, you may want to try a smaller bushing when sizing Hornady Grendel brass.
The Hornady 6.5 Grendel brass has a LARGE Flash Hole, about .078″ versus .0591″ for Lapua brass. Dimensionally, the biggest difference is the shoulder diameter, with the Hornady brass measuring 0.428″ vs. 0.424″ for the Lapua brass. The Hornady is actually a better fit for 6mmAR chambers which are about 0.432″ at the shoulder. Interestingly, case H20 capacity is virtually identical. Water capacity of new, unfired Hornady 6.5 Grendel brass is 35.1 grains, while new, unfired Lapua Grendel brass holds 35.0 grains of H20. Both brands of Grendel brass increase to about 36.0 grains H20 capacity after firing and full-length sizing.
Here are some of the particulars of the Hornady cases:
Hornady 6.5 Grendel Brass
Lapua 6.5 Grendel Brass
Flash hole diameter: ~ .078″
OAL of brass: Average 1.515″
Weight of cases: 111.7 to 113.0 grains
Web diameter, unfired: 0.4375″
Shoulder diameter, unfired: 0.428″
Loaded neck diameter: 0.2895″
6mmAR loaded neck: 0.270″
Flash hole diameter: 1.5mm (0.0591″)
OAL of brass: Average 1.515″
Weight of cases: 111.0 to 112.5 grains
Web diameter, unfired: 0.4385″
Shoulder diameter, unfired: 0.424″
Loaded neck diameter: 0.290″
6mmAR loaded neck: 0.271″
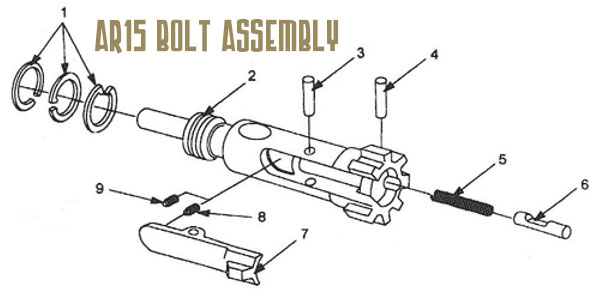
AR-platform rifles can be maintenance-intensive beasts. But some AR owners make the situation worse by not regularly cleaning important small parts, or by using too much oily/greasy lubricants in the wrong places. A properly maintained and lubricated AR15 can shoot hundreds of rounds (between cleanings) without a problem. If you learn where (and where not) to apply lubricant, you’ll find that your AR will run more reliably and the task of cleaning the bolt and bolt carrier will be less of a burden.
Here is a good video that explains AR-15 Cleaning and Maintenance. In this 30-minute NSSF video, Gunsite Academy instructor and gunsmith Cory Trapp discusses the proper way to clean and maintain the AR-15 carbine. Very knowledgeable, Trapp provides rock-solid advice for AR owners. Along with cleaning producedures, this video explains how to inspect key components and how to function-test your AR before each shooting session.
We’ve all heard the old adage: “Keep your powder dry.” Well, tests by Norma have demonstrated that even normal environmental differences in humidity can affect the way powders burn, at least over the long term. In the Norma Reloading Manual, Sven-Eric Johansson, head of ballistics at Nexplo/Bofors, presents a very important discussion of water vapor absorption by powder. Johansson demonstrates that the same powder will burn at different rates depending on water content.
Powders Leave the Factory with 0.5 to 1.0% Water Content
Johansson explains that, as manufactured, most powders contain 0.5 to 1% of water by weight. (The relative humidity is “equilibrated” at 40-50% during the manufacturing process to maintain this 0.5-1% moisture content). Importantly, Johansson notes that powder exposed to moist air for a long time will absorb water, causing it to burn at a slower rate. On the other hand, long-term storage in a very dry environment reduces powder moisture content, so the powder burns at a faster rate. In addition, Johansson found that single-base powders are MORE sensitive to relative humidity than are double-base powders (which contain nitroglycerine).
Tests Show Burn Rates Vary with Water Content
In his review of the Norma Manual, Fred Barker notes: “Johansson gives twelve (eye-opening) plots of the velocities and pressures obtained on firing several popular cartridges with dehydrated, normal and hydrated Norma powders (from #200 to MRP). He also gives results on loaded .30-06 and .38 Special cartridges stored for 663 to 683 days in relative humidities of 20% and 86%. So Johansson’s advice is to keep powders tightly capped in their factory containers, and to minimize their exposure to dry or humid air.”
Confirming Johansson’s findings that storage conditions can alter burn rates, Barker observes: “I have about 10 pounds of WWII 4831 powder that has been stored in dry (about 20% RH) Colorado air for more than 60 years. It now burns about like IMR 3031.”
What does this teach us? First, all powders start out with a small, but chemically important, amount of water content. Second, a powder’s water content can change over time, depending on where and how the powder is stored. Third, the water content of your powder DOES make a difference in how it burns, particularly for single-base powders. For example, over a period of time, a powder used (and then recapped) in the hot, dry Southwest will probably behave differently than the same powder used in the humid Southeast.
Reloaders are advised to keep these things in mind. If you want to maintain your powders’ “as manufactured” burn rate, it is wise to head Johannson’s recommendation to keep your powders tightly capped when you’re not actually dispensing charges and avoid exposing your powder to very dry or very humid conditions. The Norma Reloading Manual is available from Amazon.com.
Real-World Example — “Dry” H4831sc Runs Hotter
Robert Whitley agrees that the burn rate of the powder varies with the humidity it absorbs. Robert writes: “I had an 8-lb. jug of H4831SC I kept in my detached garage (it can be humid there). 43.5-44.0 gr of this was superbly accurate with the 115 Bergers out of my 6mm Super X. I got tired of bringing it in and out of the garage to my house for reloading so I brought and kept the jug in my reloading room (a dehumidified room in my house) and after a few weeks I loaded up 43.5 gr, went to a match and it shot awful. I could not figure out what was going on until I put that load back over the chronograph and figured out it was going a good bit faster than before and the load was out of the “sweet spot” (42.5 – 43.0 gr was the max I could load and keep it accurate when it was stored in less humid air). I put the jug back in the garage for a few weeks and I now am back to loading 43.5 – 44.0 gr and it shoots great again. I have seen this with other powders too.”
If you have two jugs of the same powder, one kept in a room in your house and one somewhere else where it is drier or more humid, don’t expect the two jugs of the same lot of powder to chrono the same with the same charge weights unless and until they are both stored long enough in the same place to equalize again.
In our Shooters’ Forum, one member recently asked: “What makes an AR accurate? What parts on an AR can really affect accuracy — such as free-floating handguards, barrels, bolts, bolt carriers?” He wanted an honest, well-informed answer, not just sales pitches. Robert Whitley posted a very comprehensive answer to this question, based on his experience building and testing dozens of AR-platform rifles. Robert runs AR-X Enterprises, which produces match-grade uppers for High Power competitors, tactical shooters, and varminters.
Building an Accurate AR — What is Most Important
by Robert Whitley
There are a lot of things that can be done to an AR to enhance consistent accuracy, and I use the words “consistent accuracy” because consistency is a part of it (i.e. plenty of guns will give a couple great 5-shot groups, but won’t do a very good 10- or 20-shot groups, and some guns will shoot great one day and not so good on others).
Here are 14 key things we think are important to accuracy.
1. Great Barrel: You’ll want a premium match-grade barrel, well-machined with a good crown and a match-type chambering, true to the bore and well cut. The extension threads must also be cut true to the bore, with everything true and in proper alignment.
2. Rigid Upper: A rigid, heavy-walled upper receiver aids accuracy. The typical AR upper receiver was made for a lightweight carry rifle and they stripped all the metal they could off it to make it light to carry (which is advantageous for the military). The net result are upper receivers that are so thin you can flex them with your bare hands. These flexible uppers are “strong enough” for general use, but they are not ideal for accuracy. Accuracy improves with a more rigid upper receiver.
Our friend Robert Whitley of ARX Enterprises LLC has learned, through careful measurement and testing, that some barrels threaded 5/8″ x 24 tpi at the muzzle may not deliver optimal accuracy. The reason is that the end of the barrel can bell out slightly, like a trombone, because too much steel has been removed. This is particularly true with .30-caliber barrels, but it can also be a problem with smaller caliber barrels (even 6mm). Robert demonstrates this phenomenon in the video below. All gunsmiths, and anyone considering threading a barrel, should watch the video. At 1:00 – 1:30 Robert gauges a 5/8″ x 24-threaded .30-Caliber barrel. You can see the belling effect clear as day.
“When setting up a commercial barrel in the lathe, we noticed that the maximum-sized bushing that would fit in the bore at the chamber end was almost .0015” smaller [than what would fit] at the muzzle. That precipitated my pin-gauging of a number of different commercial barrels that were threaded for 5/8” x 24 tpi. What I found is what’s shown on the video.” – R. Whitley
Solve Problem with a Larger Thread Diameter
If 5/8″ x 24 threading is potentially harmful to accuracy, is there a solution? Yes, you simply need to leave a little more steel on the barrel. (See Video starting at 02:40.) Frank Green of Bartlein barrels states: “We get these questions all the time. I say run the largest thread diameter that is possible.” Robert Whitley has found that a 3/4″ x 28 tpi threading does not cause the “belling effect”. Accordingly Robert recommends 3/4″ x 28 if you need to thread your barrel for a muzzle brake or suppressor. Robert explains: “We only make 3/4” x 28 tpi muzzle brakes and that’s what we recommend to customers.”
“See how much meatier the 3/4″ threading is vs. the 5/8″. The 3/4″ threading offers a lot more metal around the bore. There’s a lot less opportunity for the bore to become bell-mouthed…” – Robert Whitley
Barrel Threading Diameter — What’s Important to Know By Robert Whitley
In truth, the 5/8” x 24 tpi threading never came out of any accuracy-based think tank or set-up, it’s a military .30-Cal threading for barrels that someone has to carry around (they needed to keep the barrel weight down so it was smaller in diameter and the threading had to work with that situation). People have somehow assumed because the military uses that threading for certain things that it must mean that it’s also fine for a highly accurate rifle too, but that’s not really correct.
I don’t think there is any better and realistic option than the 3/4” muzzle threading, and we also do it so there is no relief cut behind the threads on the barrel (i.e. put the relief cut on the brake or jam nut, don’t chop down on the muzzle of the barrel). For some reason many have a hard time grasping that the metal at the muzzle end of a rifle is “sacred” and you should not cut it down any more than absolutely necessary. A little threaded pencil diameter nub on the end of a barrel is not ideal for accuracy especially if it’s threaded and you need to torque on it. I cringe when I see a barrel with something like an MTU or Heavy Varmint contour, only to have an itty-bitty pencil thin threaded nub right at the muzzle so someone can “screw on a can” or a muzzle brake.
Lessons Learned Over the Years
A number of years ago I did a 30BR rifle project with Craig Kostyshyn who was big in the 30BR game and he made some of the best 30BR rifle barrels for benchrest competition. When I did the project I wanted a medium-heavy Palma type contour barrel I could use and also have a muzzle turndown for a front sight band. When he found out I was going to have the muzzle turned down he said “whoa, I need to provide for that when I make the barrel because if you turn the front down later you’ll be shooting a trombone” (i.e. the muzzle bore dimension would open up).
What he did was rough contour the barrel with the turndown (about .010” oversize) before he lapped the barrel, then when he lapped the barrel he took it easy in the muzzle area and worked the back of the barrel more. I thought he was a little bit excessive in his concerns but the barrel shot great and I wasn’t going to argue with him, after all he was shooting groups in the ones. I kind of just filed that away and never thought about it until recently when I went to have Fred from Sabreco do some chamber re-work on a commercial .30-caliber barrel I had. When setting up the barrel in the lathe and indicating things Fred noticed that the maximum-sized bushing that would fit in the bore at the chamber end was almost .0015” smaller [than what would fit] at the muzzle and he mentioned it to me. That precipitated my pin- gauging of a number of different commercial barrels I had that were threaded for 5/8” x 24 tpi. What I found is what’s shown on the video.
NOTE: This is a copyrighted article. Do not reproduce or re-link more than 75 words without written permission from AccurateShooter.com.


 20 Practical Ultimate Varminter


 5. Gas Block: You want a gas block that does not impose pointed stress on the barrel. Clamp-on types that grab all the way around the barrel are excellent. The blocks that are pinned on with tapered pins that wedge against the barrel or the slip on type of block with set screws that push up from underneath (or directly on the barrel) can deform the bore inside of the barrel and can wreck the accuracy of an otherwise great barrel.


 Robert reports: “I was able to get my hands on some of Hornady’s 6.5 Grendel brass. My big question was how it would measure up, particularly the loaded necks, and whether it would be compatible with our existing 6mmAR and Turbo 40 die sets. As it turns out, this brass looks like a perfect fit for our existing die sets (and obviously 6.5 Grendel die sets too). Accordingly, folks with existing die sets will be able to use the Hornady brass without any issues.” However, as the loaded neck on the Hornady brass is .001″ (one-thousandth) slimmer than Lapua brass, you may want to try a smaller bushing when sizing Hornady Grendel brass.


 Tests Show Burn Rates Vary with Water Content


