Eurooptic vortex burris nightforce sale


teslong borescope digital camera barrel monitor


As an Amazon Associate, this site earns a commission from Amazon sales.


September 27th, 2014

Great Resource for Firearms History and Technical Information

Forum Member Roy B. has found a website with scores of well-researched articles about guns and shooting. The Firearms History Blog features a wide variety of posts on myriad subjects, from early black powder firearms to modern match rifles. You’ll find tons of information on gun design, barrel-making, action types, and firearms testing equipment. To access hundreds of articles, click on the Firearm History Blog Archive Menu on the left side. Click the navigation arrows to access monthly collections one by one. Some of the best articles are from 2010, so be sure to check those archives too! Here are some of our favorites:

Testing Firearms: Measuring Chamber Pressure
(Comment: Crusher Gauges were used through until the 1960s, when cheap Piezo-electric tranducers became available.)

Crusher Gauge Pressure Test

Barrel Making: Making a Modern Steel Barrel (Two Parts)
(Comment: Barrel drilling process explained — interesting process.)

Metal Treatments: Ferritic Nitrocarburizing/Melonite/Tenifer
(Comment: Meloniting creates a super-hard surface layer; this has been used to extend barrel life.)

Barrel Making: Forming Rifling with Electric Discharge Machining (EDM)
(Comment: This advanced EDM method can also be used to cut chambers.)

History of Gun Cleaning Methods/Solvents
(Comment: Old-timers used some pretty weird concoctions such as “Rangoon Oil”.)

History and Engineering of Sound Suppressors (Two Parts)
(Comment: Interesting cut-away illustrations of suppressor baffles.)

Utility Firearms: Powder-Activated Tools
(Comment: There are construction tools that use gunpowder to drive fasteners into steel and concrete.)

Testing Firearms: History of Proof Testing (Two Parts)
(Comment: Fascinating article, worth a read.)

Proof Test

More Interesting Articles on RVB Precision Website
These and other articles on the Firearms History Blog will give you many interesting hours of reading — Enjoy! And while you’re cruising the web, definitely check out Roy’s own RVB Precision website. It features many interesting DIY gun and reloading projects, such as Fabricating a 17 HMR Bore Guide, Building a Swivel-Top Varminting Bench, and Fabricating a Unertl-type Scope Mount.

Permalink - Articles, News 1 Comment »
November 23rd, 2013

Build a Swivel-Top Shooting Bench

Roy Bertalotto is an author, precision shooter, varmint hunter and part-time gunsmith. On his website, RVBPrecision.com, you’ll find many interesting feature stories, including “how-to” articles. One project that caught our eye was Roy’s clever rotating-top shooting bench. Simple to build from low-cost components, Roy’s bench design features a raised center section that traverses on rollers. This allows you to move your rifle through a wide arc without having to move your front rest or rear sand bag. Roy’s bench can be built for a fraction of the cost of the big, heavy carousel-style varmint benches. This would make a nice, winter project for anyone handy with simple tools. For a set of plans and list of materials, send email to Robert: RVB100 [at] comcast.net.

This picture shows a conventional front pedestal rest used with a benchrest type rifle. As you can see, the top swivels, allowing a tremendous sweep of the varmint fields.

Bertalotto varmint bench

CLICK HERE to see MORE PHOTOS (16 total.)

The swiveling top moves on metal rollers. These roller devices are available from Trend Lines, or Woodworkers warehouse. Two are required at the front of the movable top.

Bertalotto varmint bench

Below is a close-up of the pivot point.

Bertalotto varmint bench

A conventional folding table leg (from Woodworkers Warehouse) is used in the front. In the rear, Roy’s table uses a single leg fabricated from tubing and aluminum angle iron. This creates a tripod. The three-legged design provides more room for the shooter, and is easier to set up on uneven ground.

Bertalotto varmint bench

Photos courtesy Roy Bertalotto.

Permalink Hunting/Varminting 3 Comments »
September 29th, 2012

CMP Kimber Benchrest Conversion by Roy Bertalotto

Last year, our friend Roy Bertalotto acquired a budget-priced Kimber 82G rimfire target rifle from the CMP. The Kimber comes with an oiled-wood stock that works fine for three-position training, but Roy wanted to shoot the gun for the bench. The original Kimber stock, with its narrow, radiused forearm, was not ideal for this purpose. Roy wanted a wide, flat fore-end, which is much more stable in the bags. Rather that spend hundreds on a new benchrest stock, Roy modified his Kimber’s original stock by slicing a section off the bottom of the stock and then replacing this with a 3/4″ X 2 3/4″ X 15″ piece of walnut. The finished product is in the second photo below.

Roy explains: “The modification I did on my Kimber 82G stock was done using a milling machine, hand planes, files, die grinder and sand paper. It can also be done with simple hand tools — it will just take longer. The first step is removing the wood on the bottom of the fore-end. This was accomplished in the milling machine. A scrap piece of 2X8 was mounted to the milling machine’s table and the surface milled to be perfectly flat. The Kimber stock was screwed to this 2X8 with two large screws and the bottom of the stock was milled flat. Once this was done, a piece of 3/4″ X 2 3/4″ X 15″ walnut was glued using West System epoxy to the cut out area. I use West System epoxy in boat building, but any good wood glue will work.” WATCH project stages in Slide-Show below:

After gluing the new bottom piece in place, Roy milled the sides to provide side flats with a radius to transition from the wider lower section to the narrower upper part of the fore-end. As a added enhancement, Roy contoured the rear of the fore-end to blend with the rear of the stock, adding what he calls “1965 Ford Mustang side scoops”. Roy then used a Die Grinder with a 1.5″ sanding wheel to modify the wrist area to provide more thumb relief.

Following the cutting, milling, gluing, and shaping, Roy sanded with 150 grit and 300 grit sandpaper before applying multiple coats of Tung Oil. Once the main stock was completed, Roy completed the project by crafting an extended buttplate from a couple pieces of 1/8″ aluminum and two 1.5″ aluminum tubes, “all polished to a slightly less than mirror finish”. NOTE: This metal buttplate assembly was made from scratch (other than the pad). This is not an aftermarket extension kit.

Overall the gun turned out very nicely. Log on to Roy’s RVB Precision webpage to learn more about this Kimber stock modification project, and view more photos of the building process.

Permalink - Articles, Gunsmithing No Comments »
August 10th, 2012

RVB Precision Cleaning Rod Bore Guide for 17 HMR Rifles

When Hornady (and CCI) developed the 17 HMR cartridge, they really hit a homerun. And the rifle manufacturers quickly marketed some nice rifles to chamber this 17-cal rimfire round. But unlike .22 LR rifles which, typically, require very little cleaning, 17 HMRs demand frequent bore cleaning to maintain good accuracy. That’s because 17 HMRs shoot copper-jacketed bullets at 2550 fps velocities.

17-Cal Bore Guides — The Challenge
The problem is, it’s hard to find a well-designed, quality bore guide for 17-caliber rimfire rifles. With many 17 HMR (and 17 Mach 2) rifles, you encounter mechanical interference when you try to use a standard bore guide to protect the delicate chamber edge and the bottle neck area of the chamber. A fixed ejector is in the way. On many 17 HMR rifles, this little “shark fin” ejector is right in line with the chamber and is fixed — it doesn’t retract. Therefore the kind of bore guide you might use for centerfire rifles won’t work in 17 HMRs — it will hang up on the ejector.

Polymer bore guides exist for this type of action, but they are typically open-bottom designs that do not enter and seal the chamber. These open-bottom designs don’t protect the delicate chamber edge or the bottleneck area of the chamber, and they also allow some seepage of solvents out of the chamber. That’s why Roy Bertalotto created his RVB Precision Bore Guide for 17 HMR rifles. The 7075 aluminum tube on his Bore Guide is thin enough to pass by the ejector, yet it is extremely rigid. (Photos below.)

Roy explains: “My bore guide is made of 7075 anodized aluminum tubing, which is totally unaffected by any type of cleaning solution. One end is swagged down to fit completely into the chamber of a 17 HMR rifle. This guides your cleaning rod perfectly to the bore without touching the chamber walls or front edge of the chamber. The tight fit of the bore guide in the chamber also stops cleaning solvents from getting into the action, magazine, and trigger housing.” (Editor: Solvent seepage can do damage. We had a 17 Mach 2 rifle that rusted internally because solvents leaked past an open-bottom bore guide.)

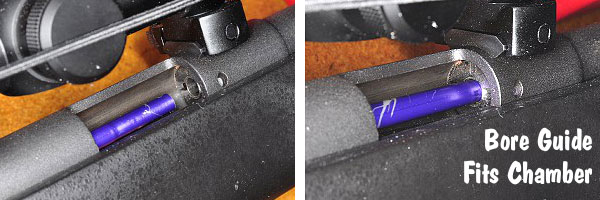
Using the RVB 17 HMR Guide – Once the bore guide is in place, slide the supplied aluminum bushing over the tube, and gently push the bushing into the rear of the action. This centers the guide rod in the action to keep the guide rod tube aligned. Once the guide rod and bushing are in place, you can use a 17-caliber cleaning rod* with patches and/or brushes to clean the barrel. Use the rod normally, but make sure your patches are quite small and don’t apply too much pressure as these small-diameter rods can kink if you try to force over-size patches down the bore.

The RVB Precision 17 HMR Bore Guide costs $19.95 plus $5.00 shipping. To order, email Roy Bertalotto via rvb100 [at] comcast.net. Roy will then send you shipping/payment details.

* NOTE: You really do need a dedicated .17-cal cleaning rod for this job. Most other rods are too fat to pass through the barrel. Dewey Mfg. makes a decent 17-caliber cleaning rod that is reasonably stiff and doesn’t kink too readily. It is available sizes from 7″ to 36″, either bare stainless or with a nylon coating. We prefer the nylon-coated version, in either 26″ or 36″ lengths, depending on barrel length.

Dewey 17 cal caliber bore guide

If you have a high comb on your rifle, you may need extra length to avoid interference with the rod handle. Use this formula to determine correct rod length: Length of barrel + action or breech rod guide length + 2-3″ clearance + high comb if applicable = total rod length needed.

There are other quality 17-cal cleaning rods, but we’ve used the Dewey and it functioned well. The nylon coating cleaned easily and was gentle on the throat and crown. You should clean the coating before and after each use to ensure it does not embed grit or other contaminants.

Permalink Gear Review, New Product 5 Comments »