Have you recently purchased a new scope? Then you should verify the actual click value of the turrets before you use the optic in competition (or on a long-range hunt). While a scope may have listed click values of 1/4-MOA, 1/8-MOA or 0.1 Mils, the reality may be slightly different. Many scopes have actual click values that are slightly higher or lower than the value claimed by the manufacturer. The small variance adds up when you click through a wide range of elevation.
In this video, Bryan Litz of Applied Ballistics shows how to verify your true click values using a “Tall Target Test”. The idea is to start at the bottom end of a vertical line, and then click up 30 MOA or so. Multiply the number of clicked MOA by 1.047 to get the claimed value in inches. For example, at 100 yards, 30 MOA is exactly 31.41 inches. Then measure the difference in your actual point of impact. If, for example, your point of impact is 33 inches, then you are getting more than the stated MOA with each click (assuming the target is positioned at exactly 100 yards).
How to Perform the Tall Target Test
The objective of the tall target test is to insure that your scope is giving you the proper amount of adjustment. For example, when you dial 30 MOA, are you really getting 30 MOA, or are you getting 28.5 or 31.2 MOA? The only way to be sure is to verify, don’t take it for granted! Knowing your scopes true click values insures that you can accurately apply a ballistic solution. In fact, many perceived inaccuracies of long range ballistics solutions are actually caused by the scopes not applying the intended adjustment. In order to verify your scope’s true movement and calculate a correction factor, follow the steps in the Tall Target Worksheet. This worksheet takes you thru the ‘calibration process’ including measuring true range to target and actual POI shift for a given scope adjustment. The goal is to calculate a correction factor that you can apply to a ballistic solution which accounts for the tracking error of your scope. For example, if you find your scope moves 7% more than it should, then you have to apply 7% less than the ballistic solution calls for to hit your target.
NOTE: When doing this test, don’t go for the maximum possible elevation. You don’t want to max out the elevation knob, running it to the top stop. Bryan Litz explains: “It’s good to avoid the extremes of adjustment when doing the tall target test.I don’t know how much different the clicks would be at the edges, but they’re not the same.”
Should You Perform a WIDE Target Test Too?
What about testing your windage clicks the same way, with a WIDE target test? Bryan Litz says that’s not really necessary: “The wide target test isn’t as important for a couple reasons. First, you typically don’t dial nearly as much wind as you do elevation. Second, your dialed windage is a guess to begin with; a moving average that’s different for every shot. Whereas you stand to gain a lot by nailing vertical down to the click, the same is not true of windage. If there’s a 5% error in your scope’s windage tracking, you’d never know it.”
Verifying Scope Level With Tall Target Test
Bryan says: “While setting up your Tall Target Test, you should also verify that your scope level is mounted and aligned properly. This is critical to insuring that you’ll have a long range horizontal zero when you dial on a bunch of elevation for long range shots. This is a requirement for all kinds of long range shooting. Without a properly-mounted scope level (verified on a Tall Target), you really can’t guarantee your horizontal zero at long range.”
NOTE: For ‘known-distance’ competition, this is the only mandatory part of the tall target test, since slight variations in elevation click-values are not that important once you’re centered “on target” at a known distance.
Every serious shooter should have some kind of anti-cant device fitted to his or her rifle. When you tilt your rifle to one side or the other from shot to shot, even a little bit, this can alter your point of impact. Unless the direction and angle of tilt (or cant) is exactly the same for each shot, canting your rifle will open up your groups. And the effects of inconsistent cant* become more extreme the farther you shoot. READ MORE about rifle canting.
Jackson Hole Shooting Experience Instructional Video features scope-mounted Wheeler level.
In this video, Bryce Bergen of Long Range Shooters of Utah explains the key reasons you should fit a bubble level (anti-cant device, ACI) to your rifle. Bergen explains why inconsistent canting alters impact at long range. Bergen also offers tips on mounting your anti-cant device and working with bipods.
You don’t need to spend a lot of money on your bubble level. While there are fancy levels that cost more than $130.00, you can get a functional level for a tenth that cost. This Discovery scope level is CNC-machined to close tolerances for a good fit. It is available with three diameters to fit scopes with 1″, 30mm, or 34mm main tubes. The 1″ version is just $12.99 while the 30mm model is $13.95 and the large 34mm version is $15.95. This unit will do the job, and user reviews are very positive.
Scope-Mount Vs. Rail-Mounted Levels
Some “experts” recommend a scope-mounted bubble level rather than a rail-mounted level. The reason is that you can easily orient the position of a scope-mounted level. With the scope’s vertical cross-hair aligned with a plumb line, simply rotate the bubble level mount until the bubble is centered. It’s not so easy to adjust a rail-mounted level. If your rail is slightly off, or if the rail-mounted anti-cant device doesn’t sit perfectly horizontal when clamped on the rail, the bubble may not center in the view port.
Combo Anti-Cant + Angle Degree Indicator System Flatline Ops sells a smart, scope-mounted leveling device with an optional vertical Strong Arm™ accessory for mounting an Angle-Degree-Indicator (ADI), which allows the shooter to make quick “true range” corrections for up-angle and down-angle shots.
As a combined unit, the Accu/Level™ (fitted with Strong Arm and ADI) is a great set-up for the tactical shooter or long-range hunter. The bubble level rotates inward for protection, then kicks out to the left for easy visibility. The ADI is held in plain view on the left, under the bubble level. On LongRangeHunting.com, Jim See explains how the Accu/Level works in the field and how he employed the ACI during a hunt. CLICK HERE for Accu/Level™ Field Test.
We like the combined Level + ADI system that Flatline Ops has developed. But it is very expensive: The 30mm Accu/Level™ costs $139.99 and the Strong Arm (for ADI mounting) is $58.99. So you’ve got two hundred bucks invested before adding the $110.00 ADI. That’s a significant chunk of change that could be invested in your scope instead.
* By itself, canting the rifle does not hurt accuracy as long as the angle is exactly the same for every shot. Many sling/irons shooters, including David Tubb, cant their rifles. With scoped rifles, if you do prefer a cant, you should mount the scope so that the cross-hairs are plumb with your rifle at your preferred cant angle. You want that vertical cross-hair straight up and down always. The key is to never change the cant of your rifle from shot to shot.
Sean Murphy, Nightforce Optics Marketing Manager, shoots what he sells. Sean recently competed at the inaugural PRS Gas Gun match held February 17-19, 2017 at the CORE Shooting Solutions range in Baker, Florida. Here is Sean’s report:
PRS Gas Gun Match at CORE by Sean Murphy
The series-opening PRS Gas Gun match is in the books. Ryan Castle put on a fun match to help set the tone for what this series will become. There were plenty of challenges for both the PRS and 3-Gun competitor. The best way I can explain it is to go as fast as you can because time matters, and then don’t miss because the penalties for leaving targets are harsh. I am looking forward to shooting more of these matches and would encourage any of my PRS and 3-Gun friends to give one a try.
Congratulations to the USAMU’s Tyler Payne (right) for the exhibition on how to shoot this and a very commanding overall win. [Payne won overall and high military with a score that was 25% higher than the next-best finisher.] Also congrats to Rhett Walters and Terry Cross for their first-place and second-place finishes in Tac Lite (and 2nd/3rd overall). I was fortunate to place third in Tac Lite and 4th overall for the match. Thank you to FALKOR Defense for the prize table contribution.
Squad 4 was a lot of fun and I was fortunate to shoot with some of our nation’s finest warriors and competitors. It was great to see various military guys in attendance refining their craft. It was great as always to see all of my friends at the match and make new ones. While I love shooting, the people are why I keep coming back.
Gas guns to 800 yards, yep there are targets down there somewhere… Jeff Cramblit Facebook photo
Gas Gun Match Loads — Short Range vs. Long Range The .223/5.56 guns had some lag time waiting on shot impacts. I believe the long-term solution may be to find a light and fast load for closer stages for near-instant reaction time and use a heavy load for the long shots to see splash and get the target to move a little more. — Sean Murphy
GEAR Selections for PRS Gas Gun Matches
OPTICS for the PRS Gas Gun Series
I was proud to see Nightforce Optics well represented on guns, with the ATACR 4-16×42 F1 seeming to be a solid choice for many competitors. My optic of choice is an ATACR 16x F1 with a Horus H59 reticle. For this style match the magnification range, Zero-Hold adjustment and wide field of view are a perfect combination. We had some smoke roll in from area fires on Sunday, and the ED glass was an aid in finding the targets in deep haze and shadows. Because of the time component [stages are “on the clock”], being able to shoot with holdovers is key, as well as being able to make fast corrections on follow-up shots. The H59 or TReMoR 3 will be strong contenders for this.
BARREL Choice — Proof Carbon-Wrapped
I shot a 20″ PROOF Research carbon fiber-wrapped barrel that was expertly installed by Greg Hamilton himself. It shot lights out while keeping the gun light and handy for movement and getting in/out of multiple positions.
TRIGGER Choice
While I like the Geissele Automatics, LLC Super 3-Gun (S3G) trigger for carbines as it’s really fast, I went with their DMR trigger for a more refined break that helped on the 600-800 yard shots.
The preferred rifle color choice at the first PRS “Gasser” Match was definitely black…
AMMUNITION Choice (.223 Rem/5.56x45mm)
My ammunition of choice for this match was Black Hills 77gr .223 Rem. The ammo shot outstanding, especially at longer ranges. I believe the long-term solution may be to find a light and fast load for closer stages for near instant reaction time and use a heavy load for the long shots to see splash and get the target to move a little more. The .223/5.56 guns had some lag time waiting on shot impacts, so finding a way to speed that up over 20 or so shots might save a few seconds per stage.
BALLISTICS Solver and Wind Meter
I continue to love my Kestrel 5700 AB. It was very confidence inspiring to show up at the range, get my atmospherics and run accurate data to get first round hits all the way to 800 yards.
BAGS and Gear
The precision rifle game seems to require an assortment of bags and other gear for the various shooting positions to conquer. My Armageddon Gear and Wiebad bags and gear continue to deliver and hold up to much abuse.
PRS Gas Gun Series Rules
For the new PRS “Gasser” Competition, the PRS developed rules on gun types, scoring, match timing, penalties, safety and other key topics. CLICK HERE for Full PRS Gas Gun Series Rules.
Scoring and Penalties
The Gas Gun Series utilizes a time plus penalty-based scoring system for all match scoring. This means the score is the shooter’s total combined time on all stages plus any penalties accrued.
Penalties are as follows:
30 seconds for any rifle targets not engaged or neutralized.
15 seconds for any pistol targets not engaged or neutralized.
15 seconds for hitting a “No Shoot” target.
No more than 50% of the stages at a match can utilize an unlimited round count. At least 25% of the targets in Gas Gun Series match must be 2 MOA or smaller. Max distance is 800 yards.
Open Division: The Open Division rifles will not exceed a caliber of .30 or a velocity of 3,200 fps. A match DQ will result any rounds over the speed limit of 3,200 fps (+/- 32 fps for environmental factors and equipment discrepancies). Match Officials may request at any point during a match that a competitor fire their rifle through chronograph. If the bullet exceeds the 3,200 fps speed limit, the shooter will receive an automatic match DQ.
Tactical Light Division: Intended to allow competitors the opportunity to compete using traditional military and law enforcement caliber. This promotes Active Duty military and law enforcement competitors use of their Service and Department-issued rifles. Tactical Light Division rifles are restricted to 5.56 NATO/.223 Remington calibers only. Bullet weight cannot exceed 77 grains and muzzle velocity cannot exceed 3,000 fps.
When shopping for a new riflescope or spotting scope it’s easy to get confused by all the technical terminology. Do you wish you had a better way to compare scopes — beyond just size, weight, and price? Well Swarovski Optik can help. The Swarovski Hunting Blog offers a helpful guide to technical terms used when comparing scope specifications. Here are some important definitions, expressed in layman’s language:
Objective Lens Diameter
The objective lens diameter determines the size of the optical system’s entrance pupil. The bigger the objective lens diameter, the more light the system can capture. However, the size of the objective lens does not determine the size of the field of view.
Exit Pupil
The size of the Exit Pupil is determined by the objective lens diameter and the magnification. If you look at the eyepiece from a distance of around 30 cm (11.8 in), the Exit Pupil appears as a bright disc.
For calculating the Exit Pupil the formula is:
Exit Pupil = objective lens diameter ÷ magnification (expressed in power number).
The larger the Exit Pupil, the more light will reach the eye.
Field of View
The Field of View is the size of the circular section of the area which can be observed when you look through a long-range optical device. In the case of rifle scopes, it is specified at a distance of 100 meters or 100 yards. For example, 42.5 m at 100 m or 127.5″ at 100 yards. As an alternative, the Field of View can also be stated in degrees (e.g. 6.6°).
NOTE: The technically-feasible size for the Field of View is essentially determined by the magnification. The higher the magnification the smaller the Field of View.
Twilight Factor
The Twilight Factor defines the optical system’s performance in poor light. The statement “the greater the twilight factor, the better the suitability for twilight” only applies if the exit pupil is larger than or at least as big as the eye’s pupil. The pupil in the human eye can only open to around 8 mm. As we get older, our eyes become less flexible, which limits our ability to see things in twilight or at night. Therefore [an optic’s] exit pupil cannot always be fully utilized.
For calculating the Twilight Factor the formula is:
Twilight Factor = root of ( magnification x objective lens diameter ).
NOTE: Spotting scopes have extremely high twilight factors because of their high magnification and large objective lens diameter. But [when used at high magnification] their small exit pupil can make them [somewhat difficult] to use in twilight.
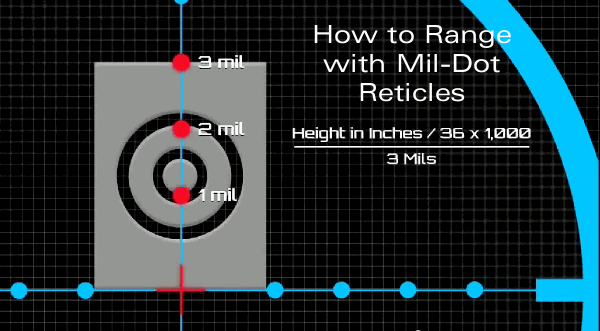
MIL-system scopes are popular with tactical shooters. One advantage of MIL scopes is that the mil-dot divisions in the reticle can be used to estimate range to a target. If you know the actual size of a target, you can calculate the distance to the target relatively easily with a mil-based ranging reticle. Watch this helpful NRA video to see how this is done:
Let’s say you’ve purchased a new scope, and the spec-sheet indicates it is calibrated for quarter-MOA clicks. One MOA is 1.047″ inches at 100 yards, so you figure that’s how far your point of impact (POI) will move with four clicks. Well, unfortunately, you may be wrong. You can’t necessarily rely on what the manufacturer says. Production tolerances being what they are, you should test your scope to determine how much movement it actually delivers with each click of the turret. It may move a quarter-MOA, or maybe a quarter-inch, or maybe something else entirely. (Likewise scopes advertised as having 1/8-MOA clicks may deliver more or less than 1 actual MOA for 8 clicks.)
Reader Lindy explains how to check your clicks: “First, make sure the rifle is not loaded. Take a 40″ or longer carpenter’s ruler, and put a very visible mark (such as the center of an orange Shoot’N’C dot), at 37.7 inches. (On mine, I placed two dots side by side every 5 inches, so I could quickly count the dots.) Mount the ruler vertically (zero at top) exactly 100 yards away, carefully measured.
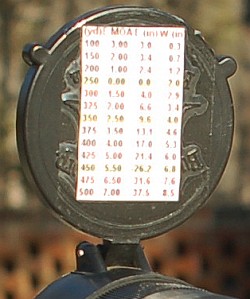
Tactical ace Zak Smith of Thunder Beast Arms employs a simple, handy means to store his elevation and wind dift data — a laminated data card. To make one, first generate a come-up table, using one of the free online ballistics programs such as JBM Ballistics. You can also put the information in an Excel spreadsheet or MS Word table and print it out. You want to keep it pretty small.
Above is a sample of a data card. For each distance, the card includes drop in inches, drop in MOA, drop in mils. It also shows drift for a 10-mph cross wind, expressed three ways–inches, MOA, and mils. Zak explained that “to save space… I printed data every 50 yards. For an actual data-card, I recommend printing data every 20 or 25 yards.” But Zak also advised that you’ll want to customize the card format to keep things simple: “The sample card has multiple sets of data to be more universal. But if you make your own data card, you can reduce the chance of a mistake by keeping it simple. Because I use scopes with MILS, my own card (photo below left) just has three items: range, wind, drop in MILS only.”
Once you have the card you can fold it in half and then have it laminated at a local office store or Kinko’s. You can keep this in your pocket, tape it to your stock, or tie the laminated card to your rifle. If you regularly shoot at both low and high elevations, you may want to create multiple cards (since your ballistics change with altitude). To learn more about ballistic tables and data cards, check out the excellent Practical Long-Range Rifle Shooting–Part 1 article on Zak’s website. This article offers many other insights as well–including valuable tips on caliber and rifle selection.
Scope-Cover Mounted Ballistics Table
Another option is to place your ballistics card on the back of the front flip-up scope cover. This set-up is used by Forum member Greg C. (aka “Rem40X”). With your ‘come-up’ table on the flip-up cover you can check your windage and elevation drops easily without having to move out of shooting position.
Greg tells us: “Placing my trajectory table on the front scope cover has worked well for me for a couple of years and thought I’d share. It’s in plain view and not under my armpit. And the table is far enough away that my aging eyes can read it easily. To apply, just use clear tape on the front objective cover.”
Need a high-magnification scope for long-range competition? Among quality scopes with 40+ power, we think the Sightron SIII 10-50x60mm scope may be the best value on the market right now. For a limited time, these scopes are available through Amazon.com for under $980.00. That’s less than half the price of a Leupold 7-42x56mm VX-6, and about 42% of the cost of a Nightforce 15-55X competition model. The Sightron is a good product with a lifetime manufacturer’s warranty.
Half the Cost of Leupold 7-42x56mm
Proceeds from Each Sale Help Support Shooter’s Forum
MOA-2 Reticle
Target Dot Reticle
Fine X-Hair Reticle
Mil-Dot Reticle
NOTE: There are a variety of reticle options and both 1/4-MOA and 1/8-MOA click versions are offered. Read the product description carefully when ordering to be sure you’ve selected your preferred reticle type and click value.
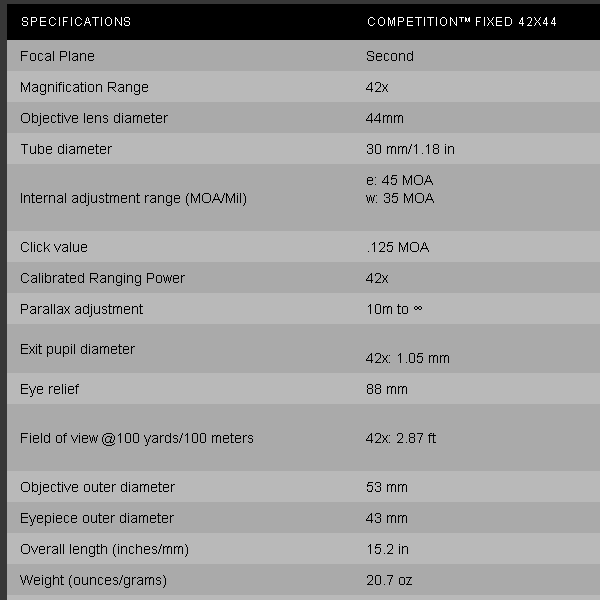
Nightforce’s 42x44mm fixed-power Benchrest scope mounted on James Mock’s 6mm Dasher.
Nightforce 42x44mm Comp Scope for Benchrest Shooters, by James Mock
Among long range shooters the name Nightforce has long commanded respect because of NF’s great optics and durability. However, the Benchrest disciplines that require either a 10-lb or 10.5-lb rifle had to forego the use of the Nightforce scopes because of their two+ pounds of weight. Some used the Benchrest model in the Heavy Varmint category (13.5-lb max weight) but not many in the Light Varmint, Sporter, or Hunter categories. That may change thanks to a new scope from Nightforce.
The folks at Nightforce Optics listened to benchrest shooters in the lighter classes and developed a new, light weight 42x44mm Competition Scope that weighs just 20.7 ounces. This scope comes as a fixed-power 42X and is without some of the “bells and whistles” of its larger cousins.
Key features of this scope important to Benchrest shooters are: ED glass, 42X power, 44mm objective lens, 88mm eye relief (~3.5 inches), 45 MOA elevation adjustment, 35 MOA windage, 10 MOA per revolution, 2.87-foot field of view at 100 yards, quick focus, click value of .125 inch, parallax adjustment from 10 meters (~33 ft.) to infinity, and an overall length of 15.2 inches. Also, you can set a “zero” easily. After obtaining conventional zero simply loosen one set screw per turret and set the dial at zero.
I received this scope on Monday, February 15th and mounted it on my BAT-action 6mm Dasher and zeroed it for a 600-yard match on Saturday, February 20th. My first impression of this scope was the amazing image produced by the ED glass. Although it is made with a 44mm objective lens (to save weight), one cannot say that the image is not clear. The image is outstanding from edge to edge and the image color is true. Nightforce offers two reticle options: the CTR-2 and CTR-3. Both reticles feature .016″ MOA vertical and horizontal lines, but the CTR-2 includes a .095 MOA center dot.
It took a small amount of faith to shoot the scope in a 600-yard match a few days after receiving it. Although I had shot only a few rounds with the scope mounted on my BAT Dasher, I knew that the Nightforce reputation was solid and my results would depend on the “nut” at the end of the rifle.
At the match, I fired a few shots to confirm zero and really appreciated the scope’s crisp 1/8th-MOA clicks. The adjustments were spot on at the 600-yard range and there was no problem getting my zero at the 600-yard distance. Remember, I had not shot at 600 yards with this scope, but I dialed in 11.5 MOA from my 100 yard zero and the resulting impact was correct. Each eight clicks delivered a precise one-MOA movement (about 6 inches) on the 600-yard target. The picture below is at the range as I was preparing for the first relay.
Our 600-yard match (non-registered) features 20 record rounds fired on the IBS target with steel gongs for sighters. The winter mirage can be brutal in this part of the country, but the Nightforce handled it without problems. Before the match was over, the left to right wind caused me to dial in two minutes (~12 inches) of windage and the scope was precise and I posted my 3rd best score with 191/200. The very fine .095″ dot allows for great precision in aiming.
Actual target shot by James Mock at 300 yards using Nightforce 42x44mm scope. James won the match.
My next match to use the scope was a 300-yard score match on March 5th. I had one chance to zero my rifle for this match and again I had no trouble changing the zero with the crisp, repeatable adjustments of this fine scope. The day was cool with bright sunshine and switchy tail winds. The new Nightforce handled the conditions very well, even with the horrible mirage. We shot two, 10-shot targets on the IBS 300-yard target. I shot 99-3X on the first and 99-3X on the second to win the match by one point over Mitch Young. Above is my second target, and the new scope let me see every shot through the mirage. There were many others who said that they could not see their bullet holes.
Summary of Nightforce 42x44mm Review
This 42x44mm optic is everything that I want in a scope. The 1/8th-MOA adjustments are crisp and repeatable. The center dot is small (.095 MOA). The image is sharp and clear all the way to the edges, and the ED glass provides a sensational image. The turret markings are distinct and there are 10 MOA per revolution. And you get all this in a scope that weighs 20.7 ounces with a 44mm objective lens. The low weight makes this scope viable for all benchrest classes. I believe the short range Benchrest shooters will welcome this scope and pay the sales price of $1742.00 (MSRP is $1795.00). Good shooting — James Mock
Recently the CMP adopted new rules that allow the use of magnified optics, up to 4.5X power, in Service Rifle competition. The Nightforce NXS 1-4x24mm Compact Riflescope, while not designed specifically for Service Rifle competition, complies fully with the new Service Rifle optics rules and works very well. In fact, our correspondent Johnny Fisher used this scope to take third place in the recent California State Service Rifle Championship. Here’s a run down of the scope’s features and performance. Johnny says this is a “great scope” and “results are extremely promising” so far.
Gear Review: Nightforce NXS 1-4x24mm as Considered for Service Rifles by Johnny Fisher
2016 has brought with it a long anticipated rule change that allows for the use of optics in Service Rifle competition. The rule allows scopes (fixed or variable) up to 4.5 power with an objective lens no greater than 34mm. Given the strict limits on max magnification and objective size for Service Rifle optics, there are somewhat limited options on the market at this time. Service Rifle competitors are now challenged with selecting an optic that fits the rules while offering high-end performance. Thus far, it seems the biggest concerns that Service Rifle shooters have when considering an optic are: quality, repeatability, parallax, reticle choices, and durability.
Click Image for Full-screen Version.
PARALLAX Considerations
The vast majority of Service Rifle Rule-compliant scopes currently on the market have a fixed parallax. That means there is no separate focus knob to adjust parallax to target distance. Accordingly, there has been much concern about the potential for parallax error over the three different distances in Across-The-Course competition. It is possible that the repeatably-indexed head position maintained while shooting a Service Rifle, along with a little extra emphasis on sight alignment to ensure that the shooter’s eye is directly behind the scope, can greatly mitigate the potential effects of parallax error.
The Nightforce NXS 1-4x24mm comes with the parallax factory-set at 75 yards. Combined with the right amount of eye-relief and low-enough rings to ensure an easy-to-maintain and clear/full sight picture, it seems like the fixed parallax is not really the problem some folks think it may be. Below are two, 10-round test strings shot at 300 yards (each with a magazine change). Note that I didn’t drop a point, even with the non-adjustable parallax.
The Fixed Parallax is not a “deal-breaker”. Witness 20 shots at 300 yards — all 10s or Xs.
RETICLE Options
For the NXS 1-4x24mm scope, Nightforce offers two reticle types: the International Hunting Reticle (IHR) and the FC-3G (with 5.56 NATO or .308 NATO BDC hold-over features). My scope has the IHR Reticle, which provides a very clear, unobstructed and simple sight picture. The IHR reticle for the NXS 1-4x24mm boasts an illuminated center cross-hair. Unfortunately, the red-color illumination is really only intended for low-light situations and is not bright enough to offer any aid to National Match shooters competing in broad daylight at stationary targets.
ZERO-STOP (Optional)
For Service Rifle shooters accustomed to keeping track of their sight settings as “clicks from bottom”, the optional Zero-Stop might be welcome. After loosening the turret and establishing the desired Zero-stop location, tightening the set screw blocks rotation below this point. NOTE: Once set, the Zero-Stop turret only allows for one full revolution of elevation adjustment. However, the Nightforce NXS 1-4x24mm offers 20 minutes of elevation adjustment per revolution. That should be more than enough elevation adjustment for come-ups to 600 yards (even with a 100-yard zero established near bottom).
PRICE and DURABILITY
The Nightforce NXS 1-4x24mm carries a price tag of just over $1500.00. The scope just feels solid –nothing plastic — especially when compared to some of the other consumer- or recreational-grade options on the market. All touchable tolerances feel extremely tight. There was quite an amount of attention given to every little detail, as you would expect from an optic at this price point. It is hoped that the scope’s mil-spec robustness will assure continued excellent performance — even after seasons of the kind of abuse that High Power shooters put on their equipment. More will be revealed as I use the scope at future competitions, but initial results are very good. This is a quality optic. I have high hopes that it will prove a good investment.


 Verifying Scope Level With Tall Target Test


 Congratulations to the USAMU’s Tyler Payne (right) for the exhibition on how to shoot this and a very commanding overall win. [Payne won overall and high military with a score that was 25% higher than the next-best finisher.] Also congrats to Rhett Walters and Terry Cross for their first-place and second-place finishes in Tac Lite (and 2nd/3rd overall). I was fortunate to place third in Tac Lite and 4th overall for the match. Thank you to FALKOR Defense for the prize table contribution.


 When shopping for a new riflescope or spotting scope it’s easy to get confused by all the technical terminology. Do you wish you had a better way to compare scopes — beyond just size, weight, and price? Well

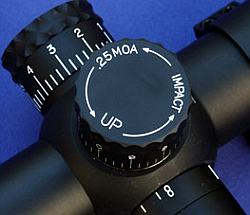 Let’s say you’ve purchased a new scope, and the spec-sheet indicates it is calibrated for quarter-MOA clicks. One MOA is 1.047″ inches at 100 yards, so you figure that’s how far your point of impact (POI) will move with four clicks. Well, unfortunately, you may be wrong. You can’t necessarily rely on what the manufacturer says. Production tolerances being what they are, you should test your scope to determine how much movement it actually delivers with each click of the turret. It may move a quarter-MOA, or maybe a quarter-inch, or maybe something else entirely. (Likewise scopes advertised as having 1/8-MOA clicks may deliver more or less than 1 actual MOA for 8 clicks.)
 Scope-Cover Mounted Ballistics Table