Eurooptic vortex burris nightforce sale


teslong borescope digital camera barrel monitor


As an Amazon Associate, this site earns a commission from Amazon sales.


August 8th, 2019

FREE Shooting Bench Plans — 14 Build Your Own Bench Designs

Free shooting bench plansFREE shooting Bench Plans
Do you like the Chris Byrne bench at left? For more details, CLICK HERE.

FREE Bench Plans on the Web

Building your own portable shooting bench is a great do-it-yourself project. You can build a sturdy bench for well under $100 in materials. Compare that to some deluxe factory-built benches which may cost $600.00 or more. You’ll find a wide assortment of home-built shooting bench designs (both portable and fixed) on the internet. Renovation Headquarters has links to FREE Plans and building instructions for fourteen (14) different shooting benches. There are all-wood shooting bench designs as well as benches that combine a wood top with a metal sub-frame or legs.

CLICK HERE for Shooting Bench FREE Plans Webpage »

Among Renovation HQ’s fourteen featured shooting benches, here are five designs we liked:

Larry Willis Shooting Bench

Sandwiched Plywood top, 1.5″ Galvanized Pipe Legs

Manuel Ferran’s
Steel Shooting Bench

Steel (welded) legs and frame, painted plywood top. Folds flat.

eHow Permanent All-Wood
Shooting Bench

Heavy-duty, very solid and sturdy, but easy to build. Good for right- or left-handed shooters.

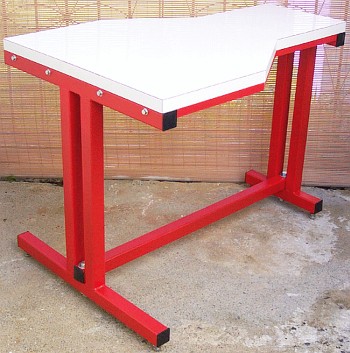
Bill Clarke’s
Basic Shooting Bench

Restaurant table Cast Metal Pedestal Base, plywood top.

Missouri Hillbilly’s
All-Wood Bench

3/4″ ACX Plywood with 4×6 Beams and Legs

Heavy Wood Bench That Converts to Three Sections for Transport
In addition to the fourteen benches mentioned above, here is an interesting break-down bench design. Call it a “semi-portable” bench. The legs and frame are made from stout 4×4 post segments so the bench is fairly heavy. However, this bench can break down into three (3) sections for easier transport to and from the range. Dado-cut channels assure proper top alignment. This might be a good choice if you plan a multi-day excursion to a location without fixed benches. This three-leg bench design can be made from easy-to-locate materials. Note: The dimensions of this bench are are larger than typical fixed benches to accommodate 50 BMGs and other big rifles. CLICK HERE for more details.

FREE shooting Bench Plans

(more…)

Permalink Gear Review, Tech Tip 1 Comment »
February 2nd, 2018

F-TR TIP — Make a More Stable, Lower-Friction Front Bipod Pad

F-Class F-TR bipod front support pad platform

The Berger Southwest Nationals (SWN) is coming up next week at Ben Avery in Phoenix. Many of the nation’s top F-Class shooters will be there. Here are some tips that can help F-TR shooters competing at the SWN. These suggestions will also benefit any F-TR shooter who is looking for a more stable set-up under his bipod, and easier adjustment of the vertical when using a Phoenix-style (non-joystick) bipod.

How to Set up a Stable Front Pad for Your F-TR Bipod

To get peak performance from your F-TR rig, you need good support under the bipod. You want the base to be firm, but you also want a smooth, low-friction surface so the bipod feet can slide properly. Some guys just shoot off a carpet or a slab of wood with some rubber on top. There is a better way.

Forum member PBike shows how a three-element front set-up offers the best of both worlds — a firm platform with low-friction top. PBike’s set-up has three elements. Layer 1 is a thick rubber mat. Layer 2 is a steel plate with thin neoprene glued top and bottom. Layer 3, on which the bipod feet rest, is a thin neoprene door-mat with a low-friction surface, like the top of a MousePad. The video below shows how the three layers are arranged.

Pbike explains that, under F-TR rules, “You can use any series of pads or plates, so long as they are flat and do not include [tracking channels/slots] for the bipod feet”. The plate can be 12″ fore and aft, and the overall width may not extend more than 2″ beyond the bipod feet on either side.

F-Class F-TR bipod front support pad platform

F-Class F-TR bipod front support pad platform

F-TR Bipod Support Components (Bottom to Top)
LAYER ONE (bottom): Thick Rubber Pad, such as a heavy doormat
LAYER TWO (middle) Steel Plate, approximately 12″ x 24″, with attached neoprene
LAYER THREE (top): Neoprene Upper pad (slick upper surface like a MousePad)

NOTE, if the surface is not level, you can use wood shims to level the surface both left to right and front to back. The shims slide under the lowest pad. With a small saw, these can be trimmed so they don’t extend past the pad’s dimensions, maintaining compliance with F-Class rules.

The Phoenix bipod is an excellent product, but some folks like to run their rifles lower for better tracking and less hop. This can be accomplished with the PBike Aetkinz Engineering Lowering Kit. That Kit lowers the entire assembly 1.7 inches. For more information contact Pbike257 [at] gmail.com.

Phoenix Bipod “Rear Drive” and Steering Kit

F-TR rifle stock fore-ends are getting longer, allowing competitors to mount their bipods further forward. This longer “wheelbase” can deliver more stability, less hop, and better tracking. There’s a problem, however — if the bipod is attached way out front, it can be difficult to reach the bipod’s elevation controls. Some shooters grab the back end of the ski foot to adjust the rifle’s lateral position, but that doesn’t help with vertical.

F-Class F-TR bipod front support pad platform

PBike has developed a new accessory that lets you adjust the Bipod’s Mariner wheel easily and precisely. Basically this is a rotating, anodized aluminum tube that extends rearward. It has a 90° gear drive that replaces the Mariner wheel, allowing vertical adjustment by rotating the tube clockwise or counter-clockwise. See how it works in this video, starting at 1:40:

Pbike explains: “This is a really comfortable way to shoot. With this handle I can adjust for elevation and I can also steer the rifle fore and aft, left/right — anywhere I need to. I can make minute adjustments up and down, as needed, with the knurled handle.”

Video Suggestion by Boyd Allen. We welcome reader submissions
Permalink - Videos, Competition, Gear Review, New Product 3 Comments »