Hunting season is starting soon. We know many readers have acquired a new hunting rifles, or perhaps are using new ammo or a new optic. If you’ve got new gear, you’ll want to sight-in and zero your hunting rig properly. Here’s how…
Here’s a simple procedure that lets you get a solid zero in just four shots. Of course you probably want to fire a few more rounds to confirm your zero before you head off to your hunting grounds, but this will let you get on-target with a minimum amount of time and ammo expended. (This assumes your scope is securely mounted, and the bases are not drastically out of alignment.)
QUICK-TIP: The Key to this procedure is Dialing to Shot One Point of Impact (POI). Re-aim at center of target after SHOT ONE. Then with the rifle motionless, use the turrets to put the middle of the cross-hair (reticle) on the first shot location. Be sure NOT to move your rifle while clicking.
1. First, remove the bolt and boresight the rifle. Adjust the position of the rifle so that, looking through the bore, you can see the center of the target with your eyes. Secure the rifle in the rests to maintain its position as boresighted. Then, without moving the rifle, center the reticle. That should get you on paper. With the rifle solidly secured in front and rear rests or sandbags, aim at the center of a target placed at your zeroing distance (50 or 100 yards). Confirm there are no obstructions in the barrel! Then load and fire SHOT ONE. Then, return the gun to the exact position it was when you pulled the trigger, with the cross-hair centered on the target as before.
2. Locate, in the scope, where your first bullet landed on the target. Now, while you grip the rifle firmly so it doesn’t move, have a friend adjust the turrets on your scope. While you look through the scope, have your friend turn the windage and elevation turrets until the cross-hairs, as viewed through the scope, bisect the first bullet hole on the target. Use the turrets to move the center of the reticle to the actual position of shot number one. IMPORTANT: Dial the crosshairs to the hole — don’t move the rifle.
3. After you’ve adjusted the turrets, now re-aim the rifle so the cross-hairs are, once again, positioned on the target center. Keep the rifle firmly supported by your rest or sandbag. Take the SECOND SHOT. You should find that the bullet now strikes in the center of the target.
4. Take a THIRD SHOT with the cross-hairs aligned in the center of the target to confirm your zero. Make minor modifications to the windage and elevation as necessary.
5. Finally, shoot the rifle from a field rest (shooting sticks, bipod, or rucksack) as you would use when actually hunting. Confirm, with SHOT FOUR, that your zero is unchanged. You may need to make slight adjustments. Some rifles, particularly those with flexy fore-arms, exhibit a different POI (point of impact) when fired from a bipod or ruck vs. a sandbag rest.
Don’t Rush the Process
One more important point comes from reader Bruce: “DO NOT rush the procedure. Hunting rifles need a cold zero. When you go for a walk in the weeds for that freezer-filler with a hat-rack your FIRST (and likely ONLY) shot will be from a COLD barrel. Bambi is not going to hang around while you fire warming shots”.
This Video Shows the Process Described Above:
Fouling Shots and Cold Bore Condition
If you recently cleaned your rifle, you may want to fire two or three fouling shots before you start this procedure. But keep in mind that you want to duplicate the typical cold bore conditions that you’ll experience during the hunt. If you set your zero after three fouling shots, then make sure the bore is in a similar condition when you actually go out hunting.
Hunting season is right around the corner. We know many readers have acquired a new hunting rifles, or perhaps are using new ammo or a new optic. If you’ve got new gear, you’ll want to sight-in and zero your hunting rig properly. Here’s how…
Here’s a simple procedure that lets you get a solid zero in just four shots. Of course you probably want to fire a few more rounds to confirm your zero before you head off to your hunting grounds, but this will let you get on-target with a minimum amount of time and ammo expended. (This assumes your scope is securely mounted, and the bases are not drastically out of alignment.)
QUICK-TIP: The Key to this procedure is Dialing to Shot One Point of Impact (POI). Re-aim at center of target after SHOT ONE. Then with the rifle motionless, use the turrets to put the middle of the cross-hair (reticle) on the first shot location. Be sure NOT to move your rifle while clicking.
1. First, remove the bolt and boresight the rifle. Adjust the position of the rifle so that, looking through the bore, you can see the center of the target with your eyes. Secure the rifle in the rests to maintain its position as boresighted. Then, without moving the rifle, center the reticle. That should get you on paper. With the rifle solidly secured in front and rear rests or sandbags, aim at the center of a target placed at your zeroing distance (50 or 100 yards). Confirm there are no obstructions in the barrel! Then load and fire SHOT ONE. Then, return the gun to the exact position it was when you pulled the trigger, with the cross-hair centered on the target as before.
2. Locate, in the scope, where your first bullet landed on the target. Now, while you grip the rifle firmly so it doesn’t move, have a friend adjust the turrets on your scope. While you look through the scope, have your friend turn the windage and elevation turrets until the cross-hairs, as viewed through the scope, bisect the first bullet hole on the target. Use the turrets to move the center of the reticle to the actual position of shot number one. IMPORTANT: Dial the crosshairs to the hole — don’t move the rifle.
3. After you’ve adjusted the turrets, now re-aim the rifle so the cross-hairs are, once again, positioned on the target center. Keep the rifle firmly supported by your rest or sandbag. Take the SECOND SHOT. You should find that the bullet now strikes in the center of the target.
4. Take a THIRD SHOT with the cross-hairs aligned in the center of the target to confirm your zero. Make minor modifications to the windage and elevation as necessary.
5. Finally, shoot the rifle from a field rest (shooting sticks, bipod, or rucksack) as you would use when actually hunting. Confirm, with SHOT FOUR, that your zero is unchanged. You may need to make slight adjustments. Some rifles, particularly those with flexy fore-arms, exhibit a different POI (point of impact) when fired from a bipod or ruck vs. a sandbag rest.
This Video Shows the Process Described Above:
Fouling Shots and Cold Bore Condition
If you recently cleaned your rifle, you may want to fire two or three fouling shots before you start this procedure. But keep in mind that you want to duplicate the typical cold bore conditions that you’ll experience during the hunt. If you set your zero after three fouling shots, then make sure the bore is in a similar condition when you actually go out hunting.
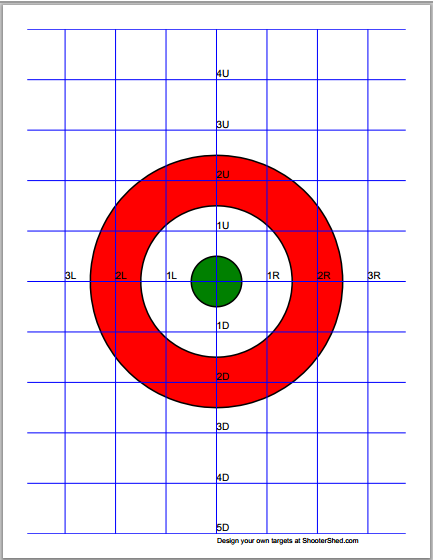
Are you creative? Do you like to design and customize things? Then you’ll love the Target Generator from the folks at ShooterShed.com. This free, interactive webpage allows you to design a variety of fun targets, including grids, benchrest-type Score Shooting targets, sight-in targets, and even playing card targets. Choose the paper size and orientation (vertical or horizontal), then select the number of target elements on the page. For example, you could have four (4) bulls or 52 playing cards. You can include a grid on the target, or tell the program to include load information blocks. For bullseye targets, you can control the number, color, and spacing (diameter) of the rings. LINK to TARGET GENERATOR.
The program provides a preview of each target you generate. If you like a particular design, save the file, and then print as many targets as you want. Check it out, this program is fun and handy to use. Here are five (5) targets your Editor created this morning just for this article. With a bit of practice, you can be generating your own custom targets in minutes. Have fun.
About the Creator of the Target Generator
The excellent Target Generator program was created by Rod Brown of Sheridan, Wyoming. Rod tells us: “I build custom rifles and coach shooters. I’ve got a 100-yard range out my back door. I shoot short- and long-range benchrest competitively around the country. I’m a full-time software development consultant and an FFL holder. When I’m not developing custom software for my clients, I’m usually fiddling in the shop, building a custom benchrest rifle, traveling to a match, chambering a barrel, or reloading some ammunition.
Story tip from Boyd Allen. We welcome reader submissions.
Here’s a new target that should be very useful at long range (500 yards and beyond). The new 12″ square Birchwood Casey white background Sight-In Target displays a black “halo” around each hit (like the yellow circle on a conventional Shoot-N-C). Larger than bullet diameter, the “halos” can be easily seen with a high-magnification scope at long range. The self-adhesive target features four diamonds with contrasting red box centers. For precise aiming, you can position your cross-hairs to align with the corners of the boxes. Or, you can put a target dot sticker in the middle.
While we envision using this target with optics at long range, Birchwood Casey says that open sights show up well against the white background, making these targets well-suited for indoor ranges or use in low light conditions.
The new sight-in target has five aiming points and a 1-inch grid overlay for quick and easy sight adjustments. It comes with target pasters that allow shooters to cover up bullet holes and continue using the target for added value. The new White/Black Shoot-N-C 12″ Sight-In Targets come in packs of five with 75 target pasters for a suggested retail price of $12.70.
If you prefer a target that displays yellow/green “halos”, Birchwood Casey also makes a 12″ grid target with four yellow-edged diamonds. Red circles provide precise aiming points in the middle of each box. You can quickly estimate group size or dial-in your zero using the hi-viz yellow 1″ grid lines.
Many folks struggle when they sight-in a scoped rifle for the first time. A very common mistake is clicking the turrets in the wrong direction. That’s frustrating and it wastes ammo. Another common problem occurs when people sight-in at a distance other than 100 yards. People sometimes struggle to figure out how many clicks they need to correct point of impact if they’re zeroing at 200, 250, or 300 yards.
To make the sight-in process more fool-proof, AccuScope has released two handy Apps for smart phone users. Whether used for initial sight-in or in-the-field adjustments, these smartphone Apps can get you zeroed quickly and reliably.
Using the Apps is easy. First, boresight the gun to get on paper. After the gun is fouled-in (so it is shooting normally) shoot a carefully aimed 3-shot group. Then go to the target and measure the vertical and horizontal distance from the 3-shot group center to your aiming point. Input those numbers into the App, along with your sight-in distance (from muzzle to target). The App then calculates exactly how many elevation and/or windage clicks you must crank into your scope to move point-of-impact to point of aim. Put in the specified clicks and then take a fourth shot to confirm your zero. The fourth shot should impact right on your point of aim (within the limits of the gun’s inherent accuracy.)
Given Murphy’s Law, a shooter can still mess things up if he inputs left clicks when the App calls for right clicks, or inputs down clicks when he needs up clicks. But as long as you look at the “R/L” and “Up/Down” labels on your turrets before spinning the knobs, you shouldn’t have any problems.
AccuScope is available in two versions, Standard and Premium. The $4.99 Standard version works for 1/4 MOA-click-value scopes. The $9.99 Premium version works with all scopes and any click values. The Premium version works with 1/8 MOA clicks, 1/4 MOA clicks, Metric clicks, or Milrad segment click values. So, if you have a scope with 1/8 MOA clicks, you’ll need the Premium version.
AccuScope iPhone Apps are available through Apple’s App Store: Standard | Premium
AccuScope Android Apps are available through the AppBrain Store: Standard and Premium
Editor’s Comment: Does this App really provide a solution you can’t figure out yourself with simple arithmetic? No, but some math-challenged guys may find that the App prevents errors. Additionally, following the step-by-step process used by the App will probably help some shooters avoid confusion, and avoid wasting ammo clicking in the wrong directions.
Note however, that there is an even simpler way to zero, if you have a very solid front and rear rest that will hold the gun absolutely steady while you click. After bore-sighting, fire a couple rounds (with the same point of aim). Then place the rifle so the center of the cross-hairs is exactly on your original point of aim. Next, without disturbing the gun in any way, dial your turrets so that the center of the cross-hair moves over the center of your group. That’s it. You’re now zeroed (though you may want to repeat the process for confirmation). Again, this only works if the gun doesn’t shift one bit when you’re clicking. Having a helper steady the gun as you click the turrets will make this “no-math” method work more effectively.
Click-to-Initial POI Zeroing Method Demonstrated
Product Tip by EdLongrange. We welcome reader submissions.
Here’s a simple device that can help you zero your rifle in two or three shots. The new Click Stick Pro Tool is an L-Shaped ruler marked with scales corresponding to 1/8 MOA, 1/4 MOA, and 1/2 MOA clicks at 100 yards. To zero your rifle at 100 yards, take one shot, then position the tool so the bullet hole is at the elbow of the unit (for 1/8 MOA clicks) or at the slotted elbow (for 1/4 MOA clicks). Then square the tool so it aligns with the vertical and horizontal lines on the target. Finally, read the needed click movement off the tool’s scales. Get the horizontal correction from the horizontal scale and the vertical correction off the vertical scale. This device works great, and is inexpensive. The patent-pending Click Stick Pro Tool is sold in a kit for $19.95, bundled with 10 sight-in targets (red center with heavy black lines — see below).
Sighting-In at 25 Yards or 50 Yards
With a brand-new rifle and scope combination, you may want to sight-in at 50 or even 25 yards. You can still do this with the Click Stick Pro Tool. For a 50-yard sight-in follow the same procedure, but multiply the scales’ click value by two (2X). At 25 yards, multiply the scales’ click value by four (4X).
Tool-less, Simple Sight-In Procedure
While we like the Click Stick Pro Tool, you don’t really need the tool at all if you can hold your gun steady while you click the windage and elevation knobs. First, put the center of your crosshair on the target and take one shot. Then, before you touch the scope knobs reposition the rifle in your bags (or on your rest) so the center of the reticle is on the center of the target. Make sure the rifle is secure in this position (have a friend hold the rifle if necessary).
Now, using your elevation and windage controls (while looking through the scope), simply dial the center of the crosshair to the center of the bullet hole — without moving the rifle. You are moving the reticle on to the bullet hole. Take a second shot. The second bullet hole should now be in the center of the target. Repeat the process if needed with a third shot to confirm your zero. This procedure works at any distance. See our explanation of the Simple Zeroing Procedure.
Here’s a simple procedure that lets you get a solid zero for a hunting rifle in just four shots. Of course you probably want to fire a few more rounds to confirm your zero before you head off to your hunting grounds, but this will let you get on-target with a minimum amount of time and ammo expended. (This assumes your scope is securely mounted, and the bases are not drastically out of alignment.)
1. First, remove the bolt and boresight the rifle. Adjust the position of the rifle so that, looking through the bore, you can see the center of the target with your eyes. Secure the rifle in the rests to maintain its position as boresighted. Then, without moving the rifle, center the reticle. That should get you on paper. With the rifle solidly secured in front and rear rests or sandbags, aim at the center of a target placed at your zeroing distance (50 or 100 yards). Confirm there are no obstructions in the barrel! Then load and fire one shot. Then, return the gun to the exact position it was when you pulled the trigger, with the cross-hair centered on the target as before.
2. Locate, in the scope, where your first bullet landed on the target. Now, while you grip the rifle firmly so it doesn’t move, have a friend adjust the turrets on your scope. While you look through the scope, have your friend turn the windage and elevation turrets until the cross-hairs, as viewed through the scope, bisect the first bullet hole on the target. In other words, you use the turrets to move the center of the reticle to the actual position of shot number one. Dial the crosshairs to the hole — don’t move the rifle.
3. After you’ve adjusted the turrets, now re-aim the rifle so the cross-hairs are, once again, positioned on the target center. Keep the rifle firmly supported by your rest or sandbag. Take the second shot. You should find that the bullet now strikes in the center of the target.
4. Take a third shot with the cross-hairs aligned in the center of the target to confirm your zero. Make minor modifications to the windage and elevation as necessary.
5. Now shoot the rifle from a field rest (shooting sticks, bipod, or rucksack) as you would use when actually hunting. Confirm that your zero is unchanged. You may need to make slight adjustments. Some rifles, particularly those with flexy fore-arms, exhibit a different POI (point of impact) when fired from a bipod or ruck vs. a sandbag rest.
If you recently cleaned your rifle, you may want to fire two or three fouling shots before you start this procedure. But keep in mind that you want to duplicate the typical cold bore conditions that you’ll experience during the hunt. If you set your zero after three fouling shots, then make sure the bore is in a similar condition when you actually go out hunting.


 Many folks struggle when they sight-in a scoped rifle for the first time. A very common mistake is clicking the turrets in the wrong direction. That’s frustrating and it wastes ammo. Another common problem occurs when people sight-in at a distance other than 100 yards. People sometimes struggle to figure out how many clicks they need to correct point of impact if they’re zeroing at 200, 250, or 300 yards.


