Available for under $200.00 including front bag, the Caldwell Fire Control front rest is a remarkable value. It makes the co-axial, joystick design more affordable than ever. We used the Fire Control front rest when testing our Ultimate Varminter 20 Practical AR. Once we removed some sand from the tri-lobe front bag, the rest worked quite well.
Get a Fire Control Rest for $197.99 Precision Reloading is running a sale this week on Caldwell products. Now through May 23rd you can get the Caldwell Fire Control Front Rest for just $197.99. That’s a great deal for guys on a tight budget who want a modern joystick-style front rest. With the conversion described in this article, you can put together a system that works pretty darn well, and is more than adequate for many applications, including prairie-dog hunting (from a bench).
Upgrading Fire Control Front Rest with Sinclair Top
While most Fire Control owners are happy with the product, many have wanted to replace the tri-lobe front bag with a more conventional front bag from Protektor or Edgewood. This isn’t as easy as it looks because the width of the Fire Control top is too narrow for most standard 3″-wide front bags. On a “special order” basis, Protektor has crafted some narrower leather front bags that fit pretty well, but some shooters have decided to “upgrade” the entire front assembly.
Forum member Doug M. (aka DrJeckyl), has come up with an elegant solution that allows a Sinclair Int’l Benchrest Rest Top to be fitted to the Fire Control Rest. Doug notes: “The Caldwell Fire Control is a nice rest for the money, but it comes up short in the rest top department. The Sinclair RT-3 [or its replacement, the Gen II B/R top] fits perfect with minor modifications.” Shown below are the main components:
To adapt the Sinclair RT-3 or Gen II B/R top, Doug merely had to drill a couple holes in the RT-3 baseplate, and adapt a spacer to get the height correct: “The Caldwell factory top has a raised mounting portion so a 1/8″ piece of stock will be needed as a spacer to the flat-bottom RT-3. The spacer needs to be cut to the same length as the movable portion on the rest. And you should plan the mounting accordingly so the left thumbscrew clears the vertical height column at full left position (there is a cutaway in the rest under the thumbscrew that allows for easy access to the screw).” We have labeled the photo with dimensions, but Doug cautions you should measure your own original plate to insure the drill locations are correct for your unit.
The completed installation, with the RT-3 installed on the Fire Control rest is shown at the top of this article. Doug says it works very well. To learn more about this conversion, with Doug’s measurments for the hole-spacing and his specs on the fasteners, go to the original thread in our Shooter’s Forum. NOTE: Sinclair no longer sells the RT-3 top, but Sinclair’s $75.99 Gen II B/R top can be converted just as easily. LINK to Fire Control Rest Top Conversion Forum Thread.
Most competitive shooters are pretty good about bore cleaning (some may even clean their bores too aggressively). However, we’ve found that many shooters neglect the chamber area and the bolt lug recesses. It’s too easy to clean the bore, slip out the guide rod and say “I’m done.” Sinclair Int’l explains why it’s important to clean the action interior: “Shooters use a lot of grease and oil on their bolts to reduce friction and to prevent wear[.] Unfortunately, both of these compounds attract grit, powder and primer residues. Cleaning your receiver is especially critical [with] custom actions where the fit between the action and bolt is held to very tight tolerances. Routine cleaning of the action will prevent unnecessary wear on the bolt body, locking lugs, and the action raceways/guide rails. Frequent action cleaning is also essential to keeping the trigger area free of debris which can cause trigger hang-ups and failures.” Below, we present action cleaning advice from Sinclair’s Reloading Press Newsletter.
Cleaning the Chamber
Combustion by-products, lubricants, and solvent residues can collect in your chamber. Severe build-up of grease and carbon can interfere with chambering. Also some solvents will promote corrosion. You need to keep your chambers clean.
1) Install a clean cotton mop of the correct size on the end of a chamber rod and insert the mop into the chamber. Rotate the mop several times to remove any brush bristles left behind and any excess solvent that was between the rod guide snout and the end of the chamber. Make sure the chamber is dry. Prior to storing a rifle you can oil the chamber but make sure the oil is removed prior to firing the rifle.
2) Alternatively, install an old bore brush on a chamber rod, overlap a couple of patches on the brush bristles, and wrap them around the brush completely. Then insert the patch-covered brush into the chamber while rotating it to remove the excess solvent and debris. Push it firmly into the neck area of the chamber. A similar method is to pierce a large patch on the end of the brush loop and insert it into the action, again rotating the brush as you push the patch up against the breech.
Cleaning the Lug Recess Area
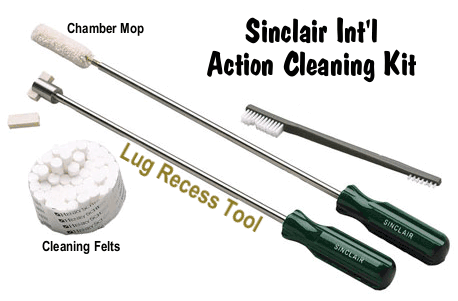
The action lug recess area is one of the dirtiest places on a bolt-action rifle. To properly clean this area, always use a tool designed for the task, such as the $21.50 Sinclair Action Cleaning Tool (part # ACT1) which is part of the Sinclair Action Cleaning Tool Kit (now on sale for $29.99, part #ACT2).
1) Insert a cotton roll or cleaning felt into your lug recess cleaning tool and wet both ends and the face of the cotton roll/felt with solvent.
2) Insert the tool into the action and push it forward until it is positioned fully in the lug recess area and rotate the tool head several times. Then reverse the rotation for another few turns. While rotating the tool move it slightly in and out to cover the entire recess area and to also clean the breech face.
3) Remove the tool from the action and inspect the surface of the felt or cotton roll. If there is quite a bit of residue on both sides of the felt/roll, then repeat with another wet felt/roll.
4) When you feel the recess area is completely clean, insert a dry cotton roll into the tool and rotate the tool head to remove any remaining solvent and debris. If necessary, use a second dry cotton roll.
5) You can follow this step up with another pass of a mop or patches into the chamber to get any debris or solvent that pushed forward out of the lug recess area.
Cleaning Tips from The Reloading Press, used courtesy Sinclair Int’l, All Rights Reserved.
Great news for shooters –Bill Gravatt (former owner and President of Sinclair International) has joined the team at Creedmoor Sports. Bill will work with Creedmoor on product development, customer service, and other key tasks, bringing his decades of experience to Creedmoor’s operations. Creedmoor Sports is a company on the rise — it now offers a full line of ammunition, and in recent years Creedmoor has launched its own successful “brick and mortar” retail stores.
Bill has worked in the shooting and reloading industry for over 25 years. His vast knowledge of “all things shooting and reloading” will help Creedmoor expand its product line and serve hand-loaders. Bill Gravatt commented: “The folks at Creedmoor Sports remind me of the great team I had at Sinclair International. They are all driven in pursuit of exemplary customer service, they create well-made products, love to shoot, and just enjoy the daily satisfaction that comes from helping fellow shooters enjoy their sport.”
Greg Kantorovich, owner and President of Creedmoor Sports, tells us: “We are excited to have Bill working with us in many areas including product innovation, content production, reloading expansion, and consulting with our management team.”
“Bill brings a passion for people, product, and process that is second to none. In the short time we have been working together he has helped us raise the bar on becoming a better company to serve our customers. Myself and my team are excited for the future of precision rifle shooting and what Creedmoor will continue to bring to market.”
About Creedmoor Sports, Inc.
Creedmoor Sports produces rugged, well-built equipment for precision-driven rifle shooters. Creedmoor offers products for centerfire, smallbore and air rifle/pistol disciplines, as well as hunting and recreational shooters. For more information, visit CreedmoorSports.com.
Sinclair International offers a handy tool assembly that lets you sort bullets by base to ogive length. Yes you can do this with a comparator tool attached to calipers, but the Sinclair tool really speed up the process when you’re sorting large quantities of bullets.
The $79.99 Sinclair Bullet Sorting Stand with Dial Indicator (item 749-011-469WS) comes with a heavy black granite base that stays put on your loading bench. The included analog dial indicator has a quick-release lever allowing easy placement and removal of bullets into the comparator. This lever allow the spring-loaded indicator shaft to pop up out of the way.
In the video below, Sinclair shows how to use the Bullet Sorting device. Sinclair recommend sorting in batches with variance no greater than .005 (five-thousandths) in base-to-ogive length. We like to hold tolerances even tighter, trying to hold spreads to .003. The special base comparators used with this tool are offered for $10.99 in .22 caliber, 6mm, 6.5mm, 7mm, .30 caliber, and .338 caliber. The sorting stand can also be used with Sinclair’s handy multi-caliber hex-style comparators (items 749-002-942WS, or 748-002-833WS, $19.99).
Sinclair International has a helpful, three-part video series on Full-Length Sizing. The full-length sizing die performs multiple important functions: it resizes the case body, resizes the neck, and adjusts the headspace relative to the chamber (it can also eject the spent primer if that was not done previously).
While neck-sizing-only can work with moderate loads (for a couple firings), after repeated firings the case can stretch, becoming too tight to chamber easily. If you shoot cases with high-pressure, near-max loads, you will probably benefit from full-length sizing your cases each reloading cycle. When full-length sizing, you will want to move the shoulder back (i.e. “bump” the shoulder) to provide proper clearance in the chamber. A case that has grown too much will exhibit stiff bolt lift after firing and be hard to chamber if it is not FL-sized during the reloading process.
Sinclair recommends bumping cases .001-.002″ (one to two thousandths) for cases used in bolt-action target-shooting rifles, or .003-.005″ (three to five thousandths) for hunting rifles or semi-auto rifles. To move the shoulder back you screw the FL-sizing die downwards in the press once you’ve determined “just touching” on the shoulder. You don’t have to screw the die down very far! With a normal 14-pitch die, 1/8th turn (45° rotation) yields approximately 0.009″ of downward movement. So it doesn’t take much to add a few thousandths of bump.
Case Sizing Part One — Why We Full-Length Resize
Case Sizing Part Two — How to Set Up Your Sizing Die
Case Sizing Part Three — How to Use a Bump Gauge
NOTE: These FLASH videos may not display on some mobile devices.
For decades, shooters have depended on Brownells to provide tools, parts and accessories for nearly all kinds of modern sporting and hunting firearms. Starting this month, gun owners can now purchase rifles, shotguns, and pistols from Brownells, which has opened a web-based, gun sales division. The company’s entry into selling firearms online makes Brownells a true, one-stop-shop for gun owners and shooting sports enthusiasts.
“We’ve been a gun company from the beginning,” said Pete Brownell, CEO of Brownells. “For 77 years, we’ve serviced all corners of the firearms market – new shooters to gunsmiths. This is just one example of many upcoming programs we’ll be launching to serve every portion of the gun industry.”
Brownells’ new Firearms Sales Center features more than 3,500 production firearms from over 30 popular gun manufacturers, including Remington, Ruger, Browning, CZ-USA, Smith & Wesson, Sig Sauer, Beretta, Benelli, Glock and more.
Customers can order guns online using the simple, step-by-step instructions. The quickest, easiest method for completing an online gun purchase will be to choose a Brownells Featured Dealer from the online list of FFL dealers who have already agreed to perform transfers on guns bought from Brownells.
News Tip from EdLongrange. We welcome reader submissions.
We’ve done some bullet casting in the past, both for handgun bullets, and the large, heavy (400gr+) projectiles used with Black Powder Cartridge Rifles. We can say, unequivocally, that newbies should seek out the assistance of a skilled, experienced mentor, who is familiar with the important safety procedures that must be employed. Working with molten lead can be dangerous. And it also takes some skill to get good results (without visible casting flaws), particularly with very large bullets.
That said, there are valuable resources that can help you get started with the casting process. Wolfe Publishing offers two DVDs that cover the bullet casting process from start to finish. Bullet Casting 101 takes you through the basics: showing you how to choose the correct alloy for your application, prep molds, maintain the optimal temperatures, and lube and size bullets. The important steps are laid out clearly. In addition, Bullet Casting 101 helps you select the right equipment and preferred molds for your particular application. (To create uniform rifle bullets that shoot accurately, you really do need high-quality molds.)
Wolfe Publishing offers a companion DVD, Casting Premium Bullets for Handguns, that covers more advanced techniques for high-volume pistol bullet production. This DVD covers both single-cavity molds and multiple-cavity “gang” molds. (Gang molds can be frustrating at first; it is harder to maintain perfect temp control and mold separation is more complex). The DVD also reveals the sources of most common casting flaws, and explains how to detect cracks, voids and other problems.
You’ll save considerable time and effort if you really understand how to avoid common mistakes before you start pouring lead. And you’ll get the best results if you learn how to “blend” the optimal alloy for the job. Maintaining the right mold temperature is also critical for good results. These topics and more are covered in these two DVDs, priced at $16.99 each from Sinclair International.
If you have ever turned a large quantity of case-necks using power assist, you know that a carbide mandrel can make the job go easier, with better end results. In our experience, when using carbide mandrels (as opposed to ordinary steel), the cases move more smoothly with less heat build-up. Pat Reagin of PMA Tool explains why carbide neck-turning mandrels work better:
Carbide offers several advantages over conventional steel and stainless steel when making any tooling, specifically neck-turning mandrels:
Dimensional Stability — Carbide maintains its dimensions indefinitely during heating and cooling. This eliminates the need to allow the mandrel time to cool every few cases.
Coefficient of Friction and Wear-Resistance — Carbide exhibits a low coefficient of friction value as compared to all steels and wears up to 100 times longer. This reduces (but does not eliminate) the amount of lubricant required.
Galling Resistance — Carbide has exceptional resistance to galling and welding at the surface. This basically eliminates the chance of getting a case stuck on a mandrel due to insufficient lubrication.
Given the benefits of carbide neck-turner mandrels, you may be asking “where can I get one?” Sinclair Int’l offers carbide mandrels for Sinclair neck-turners for $49.99, in a full range of calibers: 17, 20, 22, 6mm, 25, 6.5mm, 270, 30, and 338.
$49.95 Carbide Mandrels from PMA Tool
PMA Tools now also offers carbide mandrels in a full variety of sizes. At $49.95 each, PMA’s carbide mandrels are priced competitively with Sinclair’s mandrels. PMA offers carbide mandrels in .17, .20, .22, 6mm, 6.5mm, 7mm and .30-caliber. These will work with Sinclair Int’l and 21st Century neck-turners, as well as PMA neck-turners. PMA tells us: “We now have carbide neck-turning mandrels in stock. These mandrels are made with high-tech CNC grinding-machinery, and should give you excellent results. We hope to be add other larger-caliber carbide mandrels to our lineup in the future.”
When your cases become hard to extract, or you feel a stiff bolt lift when removing a cartridge, it’s probably time to full-length size your cases, and “bump” the shoulder back. With a hunting load, shoulder bumping may only be required every 4-5 loading cycles. Short-range benchrest shooters, running higher pressures, typically full-length size every load cycle, bumping the shoulder .001-.002″. High Power shooters with gas guns generally full-length size every time, and may need to bump the shoulders .003″ or more to ensure reliable feeding and extraction.
Use Shims for Precise Control of Shoulder Bump
Some shooters like to set the “default” position for their full-length die to have an “ample” .003″ or .004″ shoulder bump. When they need less bump, a simple way to reduce the amount of shoulder movement is to use precision shims in .001″ (one-thousandth) increments.
Here are reports from Forum members who use the shims:
“Great product. I have my die lock ring(s) adjusted for the shortest headspace length on my multiple chambers 6BRs and 6PPCs. When needing a longer headspace, I just refer to my notes and add the appropriate shim under the lock ring. Keep it simple.” — F.D. Shuster
Mats Johansson writes: “I’ve been using [shims] since Skip Otto (of BR fame) came out with them. I set up my dies with the .006″ shim, giving me the option of bumping the shoulder a bit more when the brass gets old and hardens while still having room to adjust up for zero headspace, should I have missed the original setup by a thou or two. Hunting rounds can easily be bumped an extra .002-.003″ for positive, no-crush feeding. Being a safety-oriented cheapskate, I couldn’t live without them — they let me reload my cases a gazillion times without dangerous web-stretching. Shims are a must-have, as simple as that.” — Mats Johansson
Sinclair Int’l offers a seven-piece set of Sizing Die Shims that let you adjust the height of your die (and thereby the amount of bump and sizing) in precise .001″ increments. Sinclair explains: “Some handloaders will set their die up to achieve maximum sizing and then progressively use Sinclair Die Shims between the lock ring and the press head to move the die away from the shellholder. Doing this allows you to leave the lock ring in the same position. These shims are usually available in increments of .001″ and work very well.”
Seven Shims from .003″ to .010″
Sinclair’s $12.49 Die Shim Kit (item 22400) includes seven shims in thicknesses of .003, .004, .005, .006, .007, .008, and .010. For ease of use, shim thickness is indicated by the number of notches cut in the outer edge of each shim. Even without looking you can “count” the notches by feel.
Derek Rodgers is a member of the Team Sinclair F-TR squad. This talented group of shooters hasn’t lost a team match in years. What’s the secret of Team Sinclair’s success? Well there is not one single factor. These guys have very accurate rifles, work hard on load development, and practice in all conditions. In this interview, Derek Rodgers talks about long range competition, reviewing the hardware (and skill set) it takes to win. He offers some great tips on developing loads. You’ll find a longer version of this interview on the Sinclair Int’l website. CLICK HERE to Read Full Interview.
Derek Rodgers BIOGRAPHY
Derek Rodgers (Albuquerque, NM), is the only shooter to have won BOTH the F-Open and F-TR National Championships. Derek shot his first NRA sanctioned-match in 2007, and just three years later Derek won the 2010 F-Open Nationals. He also won the 2013 F-TR Nationals, making him the only person to win both divisions. He has won other major F-TR matches, including the 2013 Sinclair East Coast Nationals and the 2015 Berger SW Nationals. Derek holds the current 1000-yard, 20-shot, National F-TR Record (200-12X). Derek enjoys spending his time outdoors with his wife and two daughters, ages 12 and 7. He is blessed by his faith and supported by his family. Derek’s goal is to pass on what he has learned to the next generation.
Q: What is your favorite reloading product?
I really like my BenchSource Case Annealer. There is something about watching fire that I find relaxing. I can watch those shells go around the wheel for hours.
Q: What’s your preferred front rest or bipod?
I’m currently using a Duplin bipod. At 17.2 ounces it allows me a solid platform to shoot from and the extra wiggle room to make weight with a heavy barrel and Nightforce NXS scope. Also, I can’t do without my board under the bipod. We shoot off sand at my local range and in most cases the feet will tend to dig holes if not supported. The board is necessary gear for me.
Q: What rear bag do you use?
I have an Edgewood bag that I’ve used for years. Recently, I got a SEB Bigfoot and like how it supports the gun and stays put under recoil.
Q: Explain your load development process. What’s your methodology?
I have two log books that have many combinations that work with 308s. I have tried to keep detailed notes in these books. Now I am reaping the rewards, as I can go back to a particular twist and barrel length and find something very close. I usually start with 3-shot groups and check the chamber behavior. If something looks promising I will go back to the range and load up 6-shot groups. If those shoot well, I take it to a match to verify it in a 20-shot string. If it passes that test it is either good to go or I table it and try another. I tend to pick mild loads that the cartridge shoots well — consistently.
Q: What piece of shooting gear helps your load development?
I use a MagnetoSpeed Chronograph to record velocities. Then I can slow down or speed up my loads to reach an accuracy node. It is amazing that most barrels will shoot very accurately when fired at certain known velocity nodes.
Q: What do you carry in your range bag on Match days?
Multi-piece Brownells tool set, RX Glasses, Sunglasses, Range Rod, Towel, Empty Chamber Indicators, Jacket, Sunscreen, Foam Ear Protection, Ear Muffs, Data Book, Plot Sheets, Pen, Clip Board, iPod with ballistic data, and chewing gum.
Q: How did you get started shooting?
I was raised in New Mexico where outdoor activities are abundant. Once my father introduced me to a Crossman pellet gun, all I wanted to do was shoot and refine my skills. Shooting evolved into hunting and then into perfecting my skills in off-season matches. Shooting local F-Class matches made me better as a marksman. Now I feel like I am competitive with anyone. However, I will never forget that my roots started with hunting and still cherish the opportunity to hunt…
Q: What do you find most challenging? How do you learn from mistakes?
What I find most challenging about precision shooting sports is how great shooters are able to reflect on what was learned — both positively and negatively. It is important to slow down and perform this step. Stopping to reflect and learn from mistakes I’ve made on the firing line is challenging. Not many people enjoy accurately critiquing themselves. Also the wind usually blows here in New Mexico and choosing the right time to shoot and to stop is important. It’s often tempting to try to finish out a string of fire. But sometimes challenging yourself to quit and wait out some wind will pay off[.]
Q: What advice do you have for selecting a gunsmith?
The best recommendation I can give is for a person to get to know a gunsmith. If you can find a local gunsmith that is available — even better! If you run into a snag along the way, it is so nice to be able to work it out without sending things back and forth. Be honest, realistic with your expectations and tell the gunsmith what you want. If he only wants to do things his way, or takes extra or excessive time in meeting the goals, you may want to consider someone else.
Q: Who would you recommend for stock work on your rifle?
Alex Sitman from Master Class Stocks and Doan Trevor can build or fix most anything.
Q: What do you do to mentally prepare before a shooting competition?
I relax and try to remember I do this for fun. I anticipate what game plan I want to go to the line with. I also try to take small snapshots of the conditions. I do not like getting overloaded with staring down a spotting scope for long periods of time. I try not to get overwhelmed with the match and just shoot my game. My approach is “One shot at a time — good or bad”. I will usually tell my scorer what I’m going to do so he or she is ready as well.
Q: What advice would you give to novice competitors?
Partner up with an experienced shooter that is ranked nationally. Mentoring under a veteran shooter would be the best way to help save time learning instead of experimenting. Chances are an experienced shooter has already tried what you are considering. As a new shooter, do not get sucked into reading all of the opinionated blogs on the internet. Stick to good information. AccurateShooter.com | 6mmBR.com is a great resource with a wealth of information from knowledgeable writers. That site has articles that are based from facts and/or industry news and information.
Q: What is something you would NOT recommend before a shoot?
I do not recommend coming unprepared. If you are late, scrambling around, or do not have your gear in order, you will not perform at your best.
Q: How many rounds do you shoot in a year and how often do you practice?
I shoot 3000+ rounds a year. I try to shoot 1 x a week if I can get away in the evening or on the weekend. If I am close to finding a load I may try to get out more until I exhaust that load as an option. So there may be occasions that I will try to shoot three times a week. Fortunately, the winters are mild in New Mexico and it allows me to shoot year round. I actually shoot more when it is colder. The summer sun here can create mirage that makes it nearly impossible to learn anything.



 Sinclair International offers a handy tool assembly that lets you sort bullets by base to ogive length. Yes you can do this with a comparator tool attached to calipers, but the Sinclair tool really speed up the process when you’re sorting large quantities of bullets.




 Wolfe Publishing offers a companion DVD,
  $49.95 Carbide Mandrels from PMA Tool


 Derek Rodgers is a member of the Team Sinclair F-TR squad. This talented group of shooters hasn’t lost a team match in years. What’s the secret of Team Sinclair’s success? Well there is not one single factor. These guys have very accurate rifles, work hard on load development, and practice in all conditions. In this interview, Derek Rodgers talks about long range competition, reviewing the hardware (and skill set) it takes to win. He offers some great tips on developing loads. You’ll find a longer version of this interview on the


