At the request of our readers, we provide select “Deals of the Week”. Every Sunday afternoon or Monday morning we offer our Best Bargain selections. Here are some of the best deals on firearms, hardware, reloading components, optics, and shooting accessories. Be aware that sale prices are subject to change, and once clearance inventory is sold, it’s gone for good. You snooze you lose.
⏺ With 2 stocks and 2 barrels, this is like having two different 12ga shotguns
Tactical shotguns have been hot sellers in 2020, given the social unrest and need to safeguard home and business. Here is a great shotgun deal. The Black Aces Tactical Pro Series X package features 2 barrels, 2 stocks, and multiple choke tubes. You even get a special fitted carry case. This Pro Series shotgun’s components include: 18.5″ and 24″ Barrels (with 3 chokes included); Standard Full Stock; Additional 6-Position, Side-Folding Tactical Stock; 4+1 standard capacity, +2 extension, and +6 extension. The receiver features Hi-Viz sights and Picatinny rail.
⏺ Good value for everything you need, hard to find right now
With the high price of ammo, more people than ever are loading their own ammo. A good basic package is the RCBS Rebel Master Reloading Kit. On sale for $394.99 at Natchez, this RCBS Package features pretty much all you need to load rifle and pistol ammo: Rebel single-stage Press, Uniflow-III Powder Measure, digital scale, hand priming tool, powder funnel, powder trickler, hex key set, accessory handle with case neck brushes, primer pocket brushes, deburring tool, loading block, and case lube. You even get a Speer Reloading Manual. NOTE: You can buy this same Rebel Master Kit for $399.99 at Cabelas.com.
⏺ These powders deliver winning ammo in many disciplines
Popular powders remain in high demand and hard to find. But Precision Reloading has the excellent Vihtavuori line of powders in stock right now for immediate shipping. You can find nearly every VihtaVuori powder in stock including the harder-to-find N133, N150, and N165 and lots of others. We use clean-burning VV for our pistol loads, and N133 remains the #1 choice of short-range benchrest competitors. Grab some VV powder now while supplies last.
4. Midway USA — Walker Razor Muffs with Walkie-Talkie, $59.99
⏺ Dual-function electronic muffs — great for range communications
Electronic earmuffs protect your hearing while allowing you to hear range commands. With these special Walker Walkit-Talkie muffs you also get long-range communication capabilities. That’s great as you can talk to folks in the pits or friends on a different section of your shooting club. The Walker Razor Slim Low Profile Electronic Earmuffs (NRR 23dB) with Free Walkie Talkie comes with a walkie talkie function that allows you to communicate with other FRS radios. That lets you give range commands or talk with friends without the need for a second radio. You get two-for-one functionality all for just $59.99. This is a GREAT deal.
5. EuroOptic — Bushnell Tactical Scope Sale, Up To 54% off
⏺ Huge Discounts for excellent Tactical scopes for ARs, PRS, Hunting
Picking up a great scope for a steal of a price isn’t always easy but we have one of those deals for you. Check out the Bushnell Tactical Scope Sale over at EuroOptic where there’s a small but mighty selection of scopes at prices up to 54% off. These are great scopes at very attracive prices (up to $750 off) so grab one now before they’re gone.
6. Amazon — Large Digital Display Timer, $12.95
⏺ Use in Matches — Count-Down or Count-UP, handy big buttons
If you shoot in a discipline with time limits, or you time your firing strings during practice, having a reliable and easy-to-read timer is critical. One of our favorite timers is this very affordable Digital Display Timer with both count-up and count-down functions. It boasts an easy-to-read display and LARGE buttons making it perfect for F-Class, Palma, and other matches. This timer comes with both a built-in stand AND a strong magnet so you can position the timer conveniently.
7. Amazon — Tactical Shooting Bags, $23.99
⏺ Versatile 2-Bag Combo set, ready for your choice of filling
To shoot accurately, you want good front and rear support for your rifle. Sandbags offer an affordable support solution that is also easy to transport. Front sandbags are good for sighting in hunting rifles and they are very handy for tactical matches. Check out this Tactical Shooting Bag Set from East TN. Outfitters. For a bargain $23.99 price, you get BOTH front and rear bags. The front bag features handy bullet loops and Molle Web straps. These bags come ready to fill with anything from sand to plastic BBs.
⏺ Great Deal PLUS nice hunting knife with 5 blades
The Bushnell Nitro 2.5-10×44 SFP 30mm Rifle Scope is a solid, reliable optic. And right now if you purchase this riflescope for just $189.99 you get a FREE Havalon hunting knife. This Bushnell Nitro optic features good light transmission and EXO Barrier lens coating that repels water, oil, dust, debris and scratches. Buyers have given this scope very good reviews: “This [scope] is way better than I expected for the money. I liked it so well I ordered another one.” Not only do you get the scope at nearly half off but you also get a free set of Havalon knives with FIVE replaceable blades.
9. Amazon — Tipton Carbon Fiber Cleaning Rods, From $23.99
⏺ Buy 2 or 3 at this price — durable and nice handles
Rifle shooters all need good cleaning rods with appropriate dimensions for their barrel length(s). If you need a new cleaning rod, check out the Tipton 1-Piece Deluxe Cleaning Rods. We own and use these rods, which feature a carbon fiber shaft and multiple bearings for smooth operation. Available in multiple lengths and calibers, you’ll certainly find one that fits your long guns. When shopping on Amazon, use the “SELECT” button to choose your preferred length, from 12″ to 50″. We like the 44″ version for barrels up to 30″. NOTE: Some sizes are cheaper at MidwayUSA.com so check both vendors before you order.
Share the post "Bargain Finder 268: Accurateshooter’s Deals of the Week"
Do you shoot a magnum cartridge? Here are two modern-formulation powders you may want to try: Reloder 23 and 26. We have been particularly impressed with Reloder 23. It has worked well in competition for target cartridges such as the 7mm RSAUM. Reloder 23 is like a slower version of Reloder 16 — a very temp-stable powder which has proven a worthy rival to H4350.
Ever heard of Alliant Reloder 23? Or Reloder 26? These two relatively new European-produced Reloder propellants were introduced in 2014. Most folks haven’t tried these Reloder powders because it took quite a while for the first shipments of RL 23 and RL 26 to arrive in the USA. But now these two new propellants are available in the USA, with substantial inventories in stock at some larger vendors. For example, Powder Valley has both RL 23 and RL 26 in stock now at $23.50 per pound. Many other vendors have ample RL 23, but RL 26 is a bit harder to find.
From our Forum members who shoot large magnum cartridge types with heavy bullets, we have heard good things about both RL 23 and RL 26. Reports from the field indicate that both these powders are delivering impressive velocities with low velocity ES/SD.
What are the characteristics of RL 23 and RL 26? That question was answered by Paul Furrier who works for ATK, the parent company of Alliant Powders. Posting in our Shooters’ Forum, Paul writes:
“Let me provide some factual info about these products. Some of the stuff that gets propagated is not correct. Reloder 23 is produced by our Swedish partner Bofors, and Reloder 26 is produced in Switzerland by our extremely capable partner Nitrochemie. I have seen it stated that they are both made by Bofors, so that is incorrect.
I have also noticed people are equating Reloder 23 to Reloder 22, and Reloder 26 to Reloder 25. Both of those statements are definitely incorrect. We do state that the performance of Reloder 23 is similar to Reloder 22, and it is, in general burn speed terms, but they are most certainly not the same. We have worked quite a lot of recipes for Reloder 23, and they are not the same as Reloder 22. Reloder 26 is definitely slower burning than Reloder 25, so there shouldn’t be any confusion there either.”
Furrier says that RL 23 is NOT sensitive to temperature shifts: “Reloder 23 was developed to bring a truly temp-stable powder to the Reloder 22 burn-speed range using Bofors new process technology. This is the second product developed for us with this TZ® process, the first being AR-Comp™. We see terrific efficiencies, SDs, accuracy and flat temp response from these powders. Please try them, I think you will be impressed.”
This Sunday we mark the passing of a prolific writer, High Master marksman, good father, respected colleague, and reloading guru. Glen Zediker, author of many leading treatises on reloading, gun maintenance, and shooting skills, passed away on October 1, 2020, one month ago today. We mourn this loss. Glen helped this website with advice many times and Glen’s classic Handloading for Competition remains one of our favorite reloading resources. Glen was a “leading light” in the shooting sports world for decades. His books and technical articles have helped countless shooters and hand-loaders. His knowledge of the AR15 platform was unrivaled. He will be missed. Rest in Peace Glen.
In 2015 Glen started a series of articles for the Midsouth Shooters Blog, the Reloaders Corner. Here is a section from his introduction to that series:
Glen Zediker — Author and High Master Marksman Glen posted this in 2015…
“I’ve been ‘at this’ for over 40 years now, and ‘this’ is shooting, handloading, and writing about it for the past 25. My background is competitive shooting, primarily NRA High Power Rifle. From that followed my exploration of handloading and education therein. As an NRA High Power Rifle competitor, I earned a High Master classification, and I did it competing in Service Rifle division.
The whole reason I started writing about all this came about because I couldn’t find anything to read that put the pieces together — all the pieces that all the better shooters knew. I wanted to learn more, and I spent a lot of time and effort doing so. I continually got answers from winners and those who built rifles for winners. Unfortunately, those answers were not the same as I had been reading, and none of the authors of the other material I had read had won any championships. I thought there must be others who would appreciate some short cuts, and that’s how I started my publications career.
I think I’ve helped a few folks along the way.”
From Glen Zediker’s Reloaders Corner
Here is Glen’s advice about loading from his first “Reloaders Corner” Blog article in 2015:
“So, the advice that accompanies this first installment is to consider or reconsider your standards, and your evaluation of what is a good load. When I’m testing I choose the best group out of whatever it was I was testing. However, when it’s decision time, I choose the best, worst group. Let me explain. I really don’t consider what the very best any combination can show me is, but rather what is the worst the combination has shown me. Exceedingly tight groups are all too often a combination of luck and a little more luck. We got lucky in our judgment to choose the combination and the bullet fairy tipped her tiara. The more rounds anyone shoots, the bigger the groups are going to get. That’s just math. However, if three or four 10-shot groups are showing X-Ring accuracy, I’m going to ignore the group measurement, pay more attention to the chronograph, and pay very close attention to any over-pressure indicators. I don’t want to see anything outside a golf-ball sized circle at 300 yards, and I’m hoping to keep it that way.
Speaking of which — years ago, I was a golf pro… a legendary golf instructor, Percy Boomer (real name) had a line, ‘The difference between the amateur and professional is not in the quality of their best shots, but in their worst.’ That’s it. The difference between a good load and one that’s almost a good load is that also. The good load stays tight, throughout. A ‘flyer’ is grounds for disqualification. That’s a shot that strays from the herd. Don’t ignore it.”
Glen Dwight Zediker Obituary
June 17, 1959 – October 1, 2020
Glen Dwight Zediker, died on October 1, 2020, at home in Oxford, Mississippi, with his sons at his side.
Glen was born on June 17, in Rifle, Colorado, to Lloyd and Marie Zediker (both deceased) of Grand Valley (now Parachute), Colorado. He attended K-12 in Grand Valley, studied at the University of Colorado, Boulder, and graduated from the University of Mississippi with a B.A. in English.
Glen spent most of his professional career combining his expertise in target shooting with his skill at writing. He became an NRA High Master known for pinpoint accuracy. He wrote and published several books on target shooting and reloading which are highly respected in the precision shooting community.
Glen spent many years in Mississippi and embraced southern culture from the food to Faulkner, but at his core, he remained a Westerner. He loved nothing more than riding over red dirt hills and hiking in the Southwest.
Glen’s two sons, Matthew and Charlie, were the center of his life. In addition to his sons, he is survived by his sister, Diane Zediker-Pastore (Victor) and his former wife, Kris Kunkler Zediker. See more life history and photos on Glen’s Memorial tribute site.
Read Glen Zediker’s Articles on Reloading and Gun Tech
If you haven’t read any of Glen’s works, you will find a selection of shorter articles on the Midsouth Shooters Blog. This is a good way to sample the scope of Glen’s knowledge of reloading, AR15 technical matters, and service rifle shooting. We’ve enjoyed reading Glen’s articles and we know you will too.
In addition, Glen’s website, Zediker.com, has 20 older articles which you can read in PDF format for free. You can find these at Zediker.com/articles/articles.html. Here are three examples:
By Glen Zediker. Folks who read Handloading For Competition know most of this material, but here it is encapsulated for those who want. It’s the run down on how to load at the range, on the spot, and radically improve your success in working up an ammo recipe.
By Glen Zediker. A lot has changed since the original MKII, but then some things really haven’t. There are new triggers on the market and this article will run down what they are and what I think of them. Drop-ins, pins, and lock-time get their spaces too.
By Glen Zediker. There are three articles on this topic that are separated into barrel cleaning, cleaning and lubrication of the rest of the rifle, and a full component on how to run an AR15 as well as store it unharmed.
Royalties from Glen Zediker’s Books go to his surviving sons/family members. Consider purchasing one now:
NOTE: Most of these books are also available from Midsouth Shooters, some at lower cost.
Share the post "Sunday GunDay: Glen Zediker 1959 – 2020, In Memoriam"
Area 419 has just introduced the all-new ZERO reloading press, a 9-station turret press with some very unique features. This press was designed to be the most precise turret ever created. As tested by Gavin Gear of UltimateReloader.com, the new ZERO turret press delivered very impressive shoulder-bump consistency and ultra-low seated bullet run-out (about +/- 0.0005″). The numbers were as good as you can get from a quality single-stage press, so Area 419 did some impressive engineering. We would expect that, as this is an expensive product — MSRP is $1200.00. SEE FULL REVIEW on UltimateReloader.com.
The ZERO turret press lets you install up to nine (9) different reloading dies in the large top turret, which revolves around a central axis. But unlike most turret presses, the ZERO doesn’t have flex or wobble when you’re loading. This is because Area 419 includes a clever system for locking the turret in position after you’ve selected the die from your array. Area 419 also uses a unique system for securing shell-holders (see video at 12:00). This, likewise, adds to the precision of the press.
In the video above, you can see how the turret is secured with a “wedge clamp”. By loosening the wedge clamp you can index the press easily to any station. Then, when you have selected your die, you tighten the wedge clamp again. You can see this important procedure at 13:20 – 13:35 timemark in the video.
ZERO Turret Press Has Very Smooth Operation
Gavin observed that this ZERO turret is both smooth and very precise, thanks to smart engineering and the use of multiple bearings. Area 419 describes the design features:
— Turret (zero-slop) eliminates variability induced when removing and resetting dies
— The turret head holds nine 7/8×14-threaded dies (1-1/4 thread in future)
— Available ram-stroke here is 4.4″, allowing use of very tall cartridge types.
— Adjustable/interchangeable handle setup for maximizing leverage/feel based on operation
— Internally contained primer-catch system, slide-out drawer
Important Features of ZERO Turret Press
1. Press frame: 6061 Aluminum, clear anodized
2. Wedge clamp (locks turret into indexed position)
3. Turret (7075 aluminum and steel construction)
4. Adjustable handle with roller knob (set either left- or right-handed operation)
5. Bearings: Ball bearing plus roller thrust bearings for side plates
6. Ram riding in self-lubricated linear bearing
7. Spent primer catcher drawer
Milled from American billet aluminum and stainless steel, this press employs 14 bearings, including a self-lubricating linear sleeve bearing for the precision-ground 1.25″ ram. The linkage system also glides on bearings providing smooth operation with near-ZERO slop. The oversized ram features a 0.75″-diameter steel arm and ZERO-friction knob. The turret system is located with an oversized ball-detent system and secured using an over-sized, custom-made ZERO-point pull-stud. Locking the turret after indexing require only a half-turn of the supplied T-handle (see photo above). When indexing the turret, repeatability variance of the system should be less than .0005″.
The opening in the press will allow for sizing and seating of cases up to.338 Lapua Magnum, and will accept standard 7/8″ dies and standard shellholders. NOTE: Area 419 will be making and selling shellholders specifically fit to the system later in 2020.
SUMMARY — Impressive Press Delivers Precise Results
Gavin Gear was very impressed with Area 419’s new Zero Press, which he said offers the precision of a quality single-stage with the versatility of a turret: “There will always be people that prefer a traditional single-stage. Where the ZERO will be compelling is to those who want the precision of a single-stage without the need to screw dies in and out. Leaving your dies set can have benefits for precision as well — everything comes back to the ‘same place’ when dies are indexed into position. Screwing dies in and out can impose variation, and variation is the enemy of the ‘white lab coat shooter’. I plan on testing the ZERO press with ultra-high-end dies, and custom dies that I ream to my own specifications. I’m thinking that will show the true potential of this press!”
Area 419 ZERO Press Video with Operation Instructions
Share the post "Advanced New Area 419 ZERO 9-Station Turret Press"
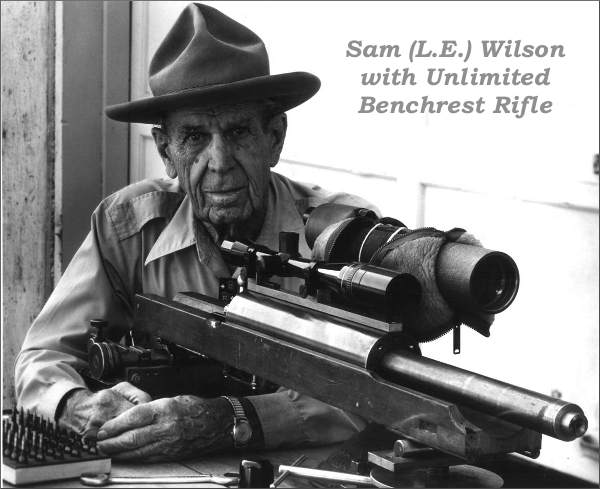
Sam (L.E.) Wilson actively competed in benchrest matches until he passed. He’s shown here with an Unlimited benchrest rifle of his own design.
If you’ve used hand dies with an arbor press, chances are you’ve seen the L.E. Wilson company name. You may not know that the founder of L.E. Wilson Inc. was an avid benchrest competitor who pioneered many of the precision reloading methods we used today. Known as “Sam” to his friends, L.E. Wilson was one of the great accuracy pioneers who collected many trophies for match victories during his long shooting career. His company continues to innovate — bringing out new products such as the Case Gage Depth Micrometer tool we recently reviewed.
The photo above shows Sam (foreground) with all of his children at a shoot. Behind Sam are Jim, Jack and Mary, shooting in the Unlimited Class. What do they say — “the family that plays together stays together”? Note the long, externally-adjusted scopes being used. Learn more about Sam (L.E.) Wilson and his company on the L.E. Wilson Inc. Facebook Page.
Unlimited Class was Sam’s favorite discipline, because in the “good old days” top competitors normally would craft both the rifle and the front/rear rests. This rewarded Sam’s ingenuity and machining/fabrication skills. In the “build-it-yourself” era, one couldn’t just order up an unlimited rail gun on the internet. How times have changed…
Share the post "Pioneers of Precision Shooting — Legendary L.E. “Sam” Wilson"
L.E. Wilson Case Gage Depth Micrometer Tool Hands-On Tool Review by F-Class John
Are you looking for a better way to measure shoulder bump when sizing brass? When it comes to measuring your shoulder bump there has traditionally been just one way to do it and that’s with a set of calipers and some type of tool attached to a calipers jaw which contacts the case shoulder. While this method has worked well for decades there’s always been some inherent lack of consistency and repeatability. While a minor issue, the inability to get the exact number in completely dependent on the user’s pressure applied and the angle at which the jaws push on the brass.
Enter the L.E. Wilson Case Gage Depth Micrometer with its simple but effective use of Wilson case gauges to ensure a perfect measure of shoulder bump every time. The unit comes with the micrometer top as well as a check gauge which allows you to easily calibrate the micrometer whenever needed. On top of the micrometer unit, you’ll also need to purchase the appropriate case gauges for each of your cartridge types and then you’re ready to go. No other measuring instruments are needed (yep, no calipers are required).
Using the Wilson Depth Micrometer (perhaps a better name is Shoulder Bump Micrometer) is a straightforward process. Simply take your fired brass and insert it into the case gauge and place the micrometer top onto the primer side of the gauge. While holding the micrometer top firmly against the case gauge in one hand, slowly turn the micrometer until you feel it stop. You can back off and turn it again to verify the stop point and once you have it, look at the measurement on the micrometer. Now insert a sized piece of brass and repeat the procedure. Take note of the new number and subtract it from the fired brass number and you now have an exact amount of shoulder bump. Continue to adjust your sizing die until you have the correct amount of shoulder bump and you’re ready to size all your brass.
Watch Video to See how Shoulder-Bump Measuring Micrometer Tool Works
Guys, in this case a VIDEO is worth more than a thousand words. In may not be obvious from the photos how this system works. In fact, it is fast and easy. Drop brass into cartridge-specific case gauge, then put the Micrometer unit on top, and dial to touch. The video shows how this works.
SUMMARY — Tool is Fast, Precise, Repeatable, and Easy to Use — We Like It
The beauty of this tool is the simplicity with which it works. It uses a very accurate micrometer to simply measure how much further your brass is sitting forward inside the case gauge. After a couple uses, you’ll find that this tool is fast, accurate and incredibly repeatable. That gives you confidence that your brass is being sized properly. Ultimately, I found that using the micrometer top really became a joy as I set up a new set of dies and as I sized my brass, I could easily check the consistency as brass came off my press. If you’re looking to improve your sizing game, give the L.E. Wilson Case Gage Depth Micrometer a try. MSRP is $110.00.
Share the post "L.E. Wilson Case Gage Depth Micrometer Product Review"
The U.S. Army Marksmanship Unit (USAMU) regularly publishes a weekly reloading article on its Facebook Page. In this article, the second in a 3-part series, the USAMU covers the process of loading competition pistol ammunition. The authors focus on two key elements — the taper crimp and the quality/uniformity of the original brass. If you shoot pistol competitively, or just want to maximize the accuracy of your handguns, read this article. The taper crimp tips are very important.
Loading Accurate Competition Pistol Ammunition — Part 2 of 3
Today, we resume our series on factors affecting accuracy in pistol handloads. Readers who missed Part One can visit our USAMU Facebook Page. Scroll down to March 28, 2018 to find that first installment which is worth reading.
One often-overlooked aspect of handloading highly-accurate pistol ammunition is the amount of taper crimp used, and its effect on accuracy. (NOTE: this article pertains to loading for semi-autos – revolver crimp techniques involve some quite different issues.) Briefly, different amounts of taper crimp are used with various handloads to obtain best accuracy. The amount is based on bullet weight, powder burn rate and charge, plus other factors such as case neck tension. During machine-rest testing of experimental Service Pistol ammunition, many variables are examined. Among these, our Shop often varies a load’s crimp in degrees of 0.001″ when re-testing for finest accuracy.
How to Measure Taper Crimp on Pistol Cartridges
One question that often arises is, “How do I measure the taper crimp I’m putting on my cartridges?” Using the narrow part of one’s dial caliper jaws, carefully measure the case diameter at the exact edge of the case mouth on a loaded cartridge. It’s important to take several measurements to ensure consistency. Also, be sure to measure at several places around the case mouth, as case wall thickness can vary. After measuring 2-3 cartridges with a given crimp setting, one can be confident of the true dimension and that it can be repeated later, if needed.
However, for good results, one must use brass from one maker due to variances in case wall thickness. For example, the same degree of crimp that imparts a measurement of 0.471″ with Brand X brass may result in 0.469″ with Brand Y. Thus, for best accuracy, using brass from the same manufacturer is important — particularly for 50-yard Slow Fire. In a perfect world, it is better still to use brass from one lot number if possible. With the popularity of progressive presses using interchangeable tool heads, keeping separate tool heads adjusted for each load helps maximize uniformity between ammunition lots.
Brass Uniformity and Accuracy
Brass is important to pistol accuracy. While accurate ammunition can be loaded using brass of mixed parentage, that is not conducive to finest results, particularly at 50 yards. It is important for the serious competitor to pay attention to his brass – even if only for the 50-yard “Slow Fire” portions of “Bullseye” matches and practice. By segregating brass as described above, and additionally keeping track of the number of times a given batch of cases has been fired, one can ensure case neck tension and case length are at their most uniform.
Given the large volumes of ammunition consumed by active pistol competitors, using inexpensive, mixed surplus brass for practice, particularly at the “short line” (25 yards), is understandable. In NRA Outdoor Pistol (“Bullseye”), the 10-ring is relatively generous — especially for a well-trained shooter with an accurate pistol and load. However, for the “long line” (50 yards), purchasing and segregating a lot of high-quality brass to be used strictly for slow-fire is a wise idea. To keep track of your brass on the line, use a unique headstamp marking with 1 or 2 colors of marking pen ink.
Uniform Cartridge Overall Length is Important
Cartridge case Overall Length (OAL) uniformity as it comes from the factory is important to achieving utmost accuracy. More uniform case lengths (best measured after sizing) contribute to greater consistency of crimp, neck tension, ignition/burn of powder charge, headspace (rimless cartridges), etc. Cartridge case-length consistency varies noticeably by maker and, with lesser manufacturers, also from lot to lot. Some manufacturers are more consistent in their dimensions than others, and also in the hardness/ductility of their brass. Similarly, pay attention to primer brands, powder lot numbers, etc.
Consider Using a Lock-Out Die with Progressive Presses
When reloading pistol ammo with a Progressive press, we strongly recommend the use of a lock-out die, or other system that can detect double charges or low charges. If your progressive is manually advanced, the possibility of a double charge is very real — and that can have disastrous consequences.
On UltimateReloader.com website you’ll find an excellent two-part series on the function and set-up of the RCBS Lock-Out Die. This die prevents loading if a high or low powder charge is detected. The video below shows setup of the RCBS Lock-Out Die on the Dillon XL-650 progressive press.
Share the post "Loading Accurate Pistol Ammo for Competition — USAMU Tips"
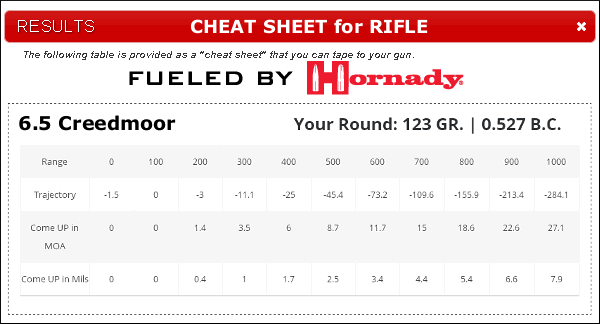
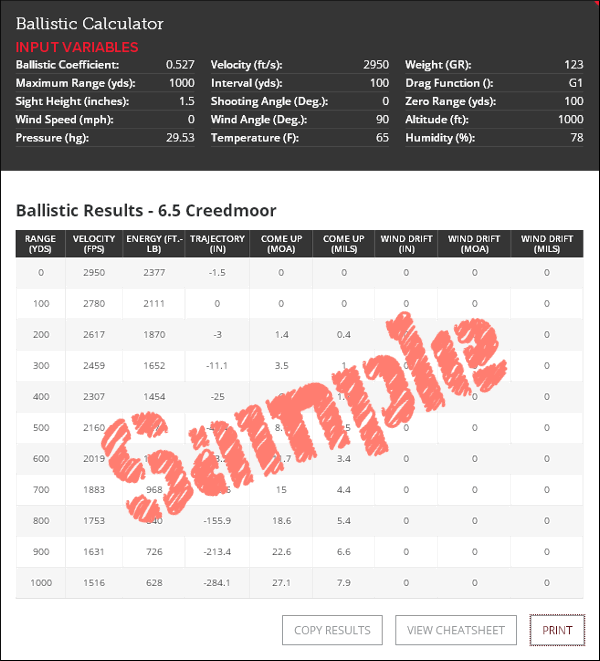
Need a simple, easy-to-use drop chart for your rifle? Something you can tape right to the buttstock? Then check out Hornady’s handy Online Ballistics Calculator. This user-friendly calculator will compute your drops accurately, and output a handy “Cheat Sheet” you can print and attach to your rifle.
Here’s how it works. From the Ballistics Calculator Page, simply input G1 or G7 BC values, muzzle velocity, bullet weight, zero range, and a few other variables.
Click “Calculate” to view the full chart (shown below). Then click “View Cheatsheet” and the simpler, 4-line Drop Chart (shown above) appears. Click “Print” and you’re done!
The online ballistics caculator is easy to use. You can select the basic version, or an advanced version with more data fields for environmental variables (altitude, temperature, air pressure, and humidity). You can also get wind drift numbers by inputing wind speed and wind angle.
Conveniently, on the trajectory output, come-ups are listed in both MOA and Mils — so this will work with either MOA clicks or Mil-based clicks. There are more sophisticated ballistics solvers available on the web (such as the outstanding Applied Ballistics Online Calculator), but the Hornady Calculator is very simple and easy to use. If you just want a basic drop chart, you may want to check this out.
Share the post "“Cheat Sheet” — Print Handy Drop Chart for Your Rifle"
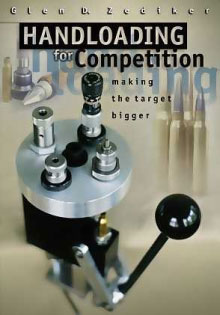
Forum member Danny Reever and this Editor have discussed how novice reloaders can struggle with the fine points of reloading, making errors in seating depth, neck-bushing choice, or sizing their cases. We agreed that a good resource covering more than “Reloading Basics” is sorely needed. Danny reminded me that Glen Zediker’s excellent Handloading for Competition book has been available since 2002. Danny says this may still be the best guide in print for those getting started in precision reloading, though the book is not without flaws.
Danny observed: “I consider this still the best book out there on the subject. I’ve bought a lot of other books only to be sorely disappointed after spending $30-$40 of my hard-earned cash. This book is not one of those! I’ve read and re-read Zediker’s treatise at least four times and refer to it often for advice while reloading. My number one suggestion for those who buy the book is to sit down with a highlighter and read it cover to cover. It’s well-written with a bit of humor and it is not boring.”
Extremely comprehensive, Zediker’s book covers nearly all of the key factors involved in accurate reloading: case sorting, brass prep, load development, neck-sizing, full-length sizing, bushing selection/use, tool selection, priming, powder measurement, and bullet seating. The book also explains how to test and evaluate your ammo, and how to monitor and interpret pressure signs.
There are many “must-read” sections in Zediker’s book, according to Danny: “The section beginning on page 161 dealing with concentricity (and how to achieve it) is excellent. Likewise the Load Limits section discussing pressures offers very valuable advice and info. You should also read Zediker’s commentaries about load testing, powders (burn characteristics etc.), and the effects of temperature.”
Zediker has conveniently provided a detailed summary of his book on the web, complete with table of contents, sample pages (PDF format), and dozens of illustrations. Shown above is just one small section that covers ejectors.
Overall, we recommend Glen Zediker’s Handloading for Competition, though the book definitely could use some updating. Danny says: “Plunk down the [money] and buy this book, you won’t be sorry.” Zediker’s book is available from Amazon.com ($34.99), Midsouth Shooters ($33.49), and Zediker Publishing ($36.95).
Share the post "Good Resource for Handloaders Who Want to Make Better Ammo"
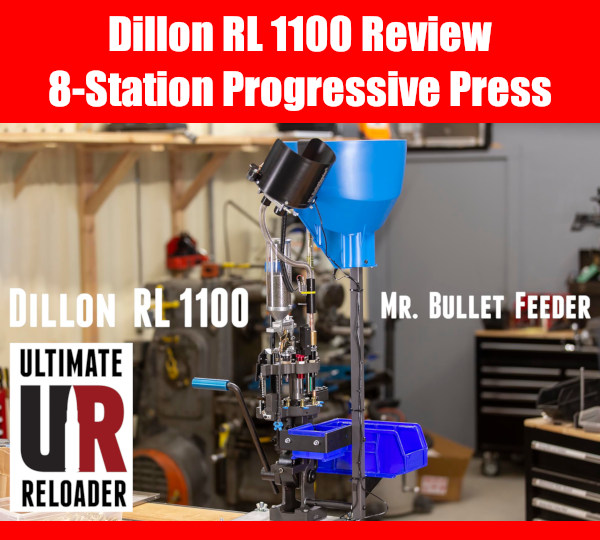
Factory-loaded ammunition has become very hard to find, particularly pistol ammo. Concerns over social unrest, personal security, and the upcoming election have spiked demand for loaded ammo. Everyone is asking “where has all the ammo gone?”
Pistol Ammo Hard to Find
In particular, 9mm pistol ammo flies off the shelves as soon as it arrives, and even major online vendors such as Midsouth Shooters, MidwayUSA, and Natchez have very limited supplies.
Need Ammo? Load Your Own…
One answer to the ammo shortage is to load your own. And if you want to produce a large quantity of ammo in a short amount of time, the progressive press is the answer. There are many progressive press systems, from modest Lee progressives to high-end, automated systems from Mark 7 (Lyman). In this article we feature the “latest and greatest” progressive press from Dillon — the new eight-station RL 1100 Press with Case-Feeder.
Our friend Gavin Gear of UltimateReloader.com got his hands on Dillon’s impressive new RL 1100. In two videos, Gavin shows how to set up the RL 1100 and then he demonstrates how to produce 9mm pistol ammo with this impressive 8-station press.
Gavin says: “My Dillon RL-1100 is cranking out the 9mm, and in this video we bring it up to ‘full tilt’ speed” [with the MR. Bullet Feeder and the Dillon Case-Feeder]. If you watch the video, you’ll see Gavin produce 9mm ammo at a rate of nearly 50 rounds per MINUTE!
Gavin equipped his new RL 1100 with two cool products from Double Alpha Academy (DAA) — the Mr.Bulletfeeder® as well as an advanced, Magnetic Powder Check. When loading ammo you can never be too safe, so we definitely recommend the use of powder-check dies (we use a conventional RCBS powder-check die on our progressives). The DAA bullet feeding system is an important add-on that significantly increases output rates when used in concert with the Dillon Case-Feeder (blue funnel).
RL 1100 Reloading Stations with Powder Check and Bullet Feeder
RL 1100 Stations shown above:
1. Case inserter
2. Sizer/De-Primer
3. Swager (with hold-down)
4. Priming (no die)
5. Powder charge and expansion (expansion for pistol cartridges only)
6. Double Alpha Magnetic Powder Check
7. Mr. Bullet Feeder bullet feed die
8. Bullet seating and Crimping
Note: In order to accommodate the magnetic powder check die AND the bullet feed die, bullet seating and crimping were combined at the last station.
The RL 1100 has some very impressive features that allow faster and easier ammo production. An Eccentric Roller Bearing Drive System reduces friction. The RL 1100’s heavier frame provides greater rigidity for more efficient cranking. The RL 1100 also boasts an improved shellplate indexing system. Priming is enhanced through a spring-loaded Priming Station Locator and Upgraded Primer Pocket Swager.
Dillon RL-1100 Set-Up Video:
Loading with the “Turbocharged” Dillon RL-1100
Gavin was very impressed with his RL-1100: “This reloading setup is [great]. Every crank of the lever yields a completed cartridge, and the attainable speeds are AMAZING. The case feeder and bullet feeder had no trouble keeping up with my quick pace using this setup. And it is great to know that every powder charge is being checked.
This press is very reliable and smooth, bridging the gap between lower cost home set-ups and six-figure commercial loading equipment packages. What’s next? I’ll be performing a caliber changeover to .308 Winchester.”
The DAA Magnetic Powder Check can be used on a variety of Progressive Presses.
Share the post "Powerful Progressive — Dillon RL-1100 with 8 Stations"
When neck-turning cases, it’s a good idea to extend the cut slightly below the neck-shoulder junction. This helps keep neck tension more uniform after repeated firings, by preventing a build-up of brass where the neck meets the shoulder. One of our Forum members, Craig from Ireland, a self-declared “neck-turning novice”, was having some problems turning brass for his 20 Tactical cases. He was correctly attempting to continue the cut slightly past the neck-shoulder junction, but he was concerned that brass was being removed too far down the shoulder.
Craig writes: “Everywhere I have read about neck turning, [it says] you need to cut slightly into the neck/shoulder junction to stop doughnutting. I completely understand this but I cant seem to get my neck-turning tool set-up to just touch the neck/shoulder junction. It either just doesn’t touch [the shoulder] or cuts nearly the whole shoulder and that just looks very messy. No matter how I adjust the mandrel to set how far down the neck it cuts, it either doesn’t touch it or it cuts far too much. I think it may relate to the bevel on the cutter in my neck-turning tool…”
Looking at Craig’s pictures, we’d agree that he didn’t need to cut so far down into the shoulder. There is a simple solution for this situation. Craig is using a neck-turning tool with a rather shallow cutter bevel angle. This 20-degree angle is set up as “universal geometry” that will work with any shoulder angle. Unfortunately, as you work the cutter down the neck, a shallow angled-cutter tip such as this will remove brass fairly far down. You only want to extend the cut about 1/32 of an inch past the neck-shoulder junction. This is enough to eliminate brass build-up at the base of the neck that can cause doughnuts to form.
The answer here is simply to use a cutter tip with a wider angle — 30 to 40 degrees. The cutter for the K&M neck-turning tool (above) has a shorter bevel that better matches a 30° shoulder. There is also a 40° tip available. PMA Tool and 21st Century Shooting also offer carbide cutters with a variety of bevel angles to exactly match your case shoulder angle*. WalkerTexasRanger reports: “I went to a 40-degree cutter head just to address this same issue, and I have been much happier with the results. The 40-degree heads are available from Sinclair Int’l for $15 or so.” Forum Member CBonner concurs: “I had the same problem with my 7WSM… The 40-degree cutter was the answer.” Below is Sinclair’s 40° Cutter for its NT-series neck-turning tools. Item NT3140, this 40° Cutter sells for $14.99. For the same price, Sinclair also sells the conventional 30° Cutter, item NT3100.
Al Nyhus has another clever solution: “The best way I’ve found to get around this problem is to get an extra shell holder and face it off .020-.025 and then run the cases into the sizing die. This will push the shoulder back .020-.025. Then you neck turn down to the ‘new’ neck/shoulder junction and simply stop there. Fireforming the cases by seating the bullets hard into the lands will blow the shoulder forward and the extra neck length you turned by having the shoulder set back will now be blended perfectly into the shoulder. The results are a case that perfectly fits the chamber and zero donuts.”
* 21st Century sells carbide cutters in: 15, 17, 20, 21.5, 23, 25, 28, 30, 35, 40, and 46 degrees. PMA Tool sells carbide cutters in: 17.5, 20, 21.5, 23, 25, 28, 30, and 40 degrees, plus special short-neck cutters.
Share the post "TECH TIP: Turn Case-Necks Better with Optimal Cutter Angle"
Forum member Nodak7mm has discovered an ideal way to store your rifle cleaning rods in your garage or loading room. Using inexpensive Berkley Horizontal Fishing Rod Racks, Nodak7mm has secured a half-dozen Dewey rods on the back of a door. You could also mount the racks along a wall or on the side of a storage cabinet. This installation takes up minimal space and the Berkley Racks cost just $11.96 at Amazon (select “6 Rod Rack”) or $16.50 per set at Walmart. If you prefer wood, Amazon also sells a pine 6-rod wall rack for $22.45.
Nodak7mm explains: “I was moving some fishing poles around and ended up with an extra pair of Fishing Rod wall racks. I said to myself, ‘I bet this would hold my Dewey cleaning rods’. I mounted the pair on the inside of a closet door in my man cave and put my cleaning rods in it. It works like a charm and is far cheaper than a specially-made rack that only lets the rods hang. One can even slam the door with the rods mounted and they stay put. This rod rack set… is made by a nationally recognized name and does a great job of holding the cleaning rods securely and safely.” These are inexpensive and are easy to mount to a door or wood cabinet.
Stow Your Cleaning Rods on Your Gun Safe
Another option is to make a rod set with a magnetic backing strip. This can be affixed to the sides of your gun safe or steel storage cabinet. Here is a home-made, magnet-affixed cleaning rod holder made by Forum Member “BobM”. This smart installation works great. CLICK HERE for more information.
Share the post "Hang Your Cleaning Rods with Fishing Rod Racks"


 Tactical shotguns have been hot sellers in 2020, given the social unrest and need to safeguard home and business. Here is a great shotgun deal. The Black Aces Tactical Pro Series X package features 2 barrels, 2 stocks, and multiple choke tubes. You even get a special fitted carry case. This Pro Series shotgun’s components include: 18.5″ and 24″ Barrels (with 3 chokes included); Standard Full Stock; Additional 6-Position, Side-Folding Tactical Stock; 4+1 standard capacity, +2 extension, and +6 extension. The receiver features Hi-Viz sights and Picatinny rail.


 “I’ve been ‘at this’ for over 40 years now, and ‘this’ is shooting, handloading, and writing about it for the past 25. My background is competitive shooting, primarily NRA High Power Rifle. From that followed my exploration of handloading and education therein. As an NRA High Power Rifle competitor, I earned a High Master classification, and I did it competing in Service Rifle division.
 “So, the advice that accompanies this first installment is to consider or reconsider your standards, and your evaluation of what is a good load. When I’m testing I choose the best group out of whatever it was I was testing. However, when it’s decision time, I choose the best, worst group. Let me explain. I really don’t consider what the very best any combination can show me is, but rather what is the worst the combination has shown me. Exceedingly tight groups are all too often a combination of luck and a little more luck. We got lucky in our judgment to choose the combination and the bullet fairy tipped her tiara. The more rounds anyone shoots, the bigger the groups are going to get. That’s just math. However, if three or four 10-shot groups are showing X-Ring accuracy, I’m going to ignore the group measurement, pay more attention to the chronograph, and pay very close attention to any over-pressure indicators. I don’t want to see anything outside a golf-ball sized circle at 300 yards, and I’m hoping to keep it that way.


 Forum member Danny Reever and this Editor have discussed how novice reloaders can struggle with the fine points of reloading, making errors in seating depth, neck-bushing choice, or sizing their cases. We agreed that a good resource covering more than “Reloading Basics” is sorely needed. Danny reminded me that Glen Zediker’s excellent
 Pistol Ammo Hard to Find

 When neck-turning cases, it’s a good idea to extend the cut slightly below the neck-shoulder junction. This helps keep neck tension more uniform after repeated firings, by preventing a build-up of brass where the neck meets the shoulder. One of our Forum members, Craig from Ireland, a self-declared “neck-turning novice”, was having some problems turning brass for his 20 Tactical cases. He was correctly attempting to continue the cut slightly past the neck-shoulder junction, but he was concerned that brass was being removed too far down the shoulder.


 Forum member Nodak7mm has discovered an ideal way to store your rifle cleaning rods in your garage or loading room. Using inexpensive


