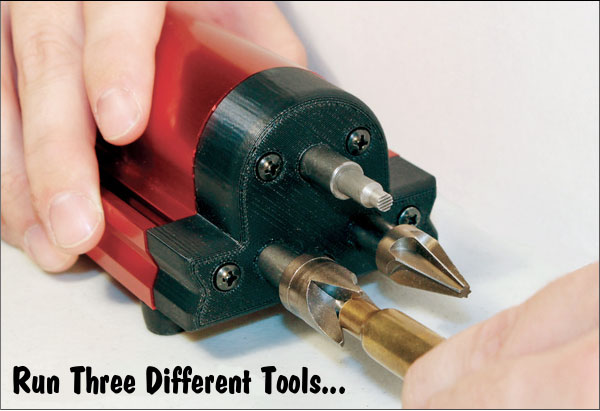
Hornady offers a handy power case prep tool driver (item 050160) with three power stations. Hornady basically took its previous single-drive Power Case Prep Assistant (item 050155) and added gearing to run three different heads. It took some clever engineering to accomplish this while maintaining the small footprint of the original one-head machine. MSRP for the new Case Prep Trio (item 050160) is $129.39. If you can live with a single power take-off, the older one-head Case Prep Assistant is still offered on “close-out” at some vendors. If you look around you may find one for as little as $79.99.
Hornady calls its updated machine, with 3-tool capacity, the Lock-N-Load® Case Prep Trio. With three active stations, you can chamfer, deburr and clean primer pockets without having to change tools. The Case Prep Trio ships with inside chamfer, outside chamfer, and deburr tools. You can also use the machine with other optional 8/32 threaded accessories such as primer pocket reamers and case neck brushes. Conveniently, the Case Prep Trio has on-board storage for your tool-heads.
Story tip by EdLongrange. We welcome reader submissions.
Only 13 more shopping days before Xmas, boys and girls. If you’re getting desperate, as time runs out for buying, packing, and shipping, consider giving an Electronic Gift Card from Sinclair Int’l or Brownells. eGift Cards can be sent at the last minute, and they are as good as cash for shopping with Sinclair Int’l or Brownells. If you prefer the hands-on approach, you can purchase a conventional Sinclair Int’l Gift Card and have it mailed to you or directly to the lucky recipient. CLICK HERE for more details.
Yamil Sued provides expert photography tips in Capturing the Action, an instructional DVD from Panteao Productions. In this new DVD, Yamil reviews camera options, camera settings, which lens to use, support gear, range etiquette, positioning and composition, shooting in low light, shooting staged shots, post-production, and much more. Yamil, who also competes in action shooting matches, explains how to get great action photos and memorable images of your fellow shooters. Yamil knows his stuff — he regularly works for Smith & Wesson, Dillon Precision and other top-tier gun industry companies.
Though Yamil is probably best known for his action photography, Yamil is also a gifted studio photographer — you’ve seen his work on numerous magazine and catalog covers.
Watch Preview Trailer for Yamil Sued Photography DVD
Yamil Sued has been a working professional photographer for 27 years. He is a graduate of Brooks Institute of Photography in Santa Barbara, California, with a Major in Illustration Photography and Color Technology.
If you’re looking to achieve pro-quality results when photographing action shooting matches, this video is worth getting. Right now, as a holiday promo good through December 26th, you can pre-order the DVD for $37.49 — that’s 25% off the regular $49.99 price. Order direct from PanteaoProductions.com.
Our friend and product tester Joe Friedrich is the proud owner of a spectacular front rest from James Pappas. This rest is used for both air rifle and rimfire benchrest matches. The fancy Pappas front rest is a shortened, front-support-only version of the Pappas one-piece rest, which is popular with rimfire benchresters. Pappas engineered this rest to comply with air rifle benchrest rules which do not allow use of integrated (one-piece) front and rear rests. The end result was a 30.8-lb masterpiece of machining.
The workmanship on this Pappas front rest is astounding. Accurately described as a “work of art” by Joe Friedrich, this rest, crafted of aircraft-grade aluminum, sets new standards for “Benchrest BLING”. It looks like it should be on display in an art museum. Nearly all components of this rest, including the adjustment controls, have been polished to a mirror finish.
Convenient Rear Windage and Elevation Controls
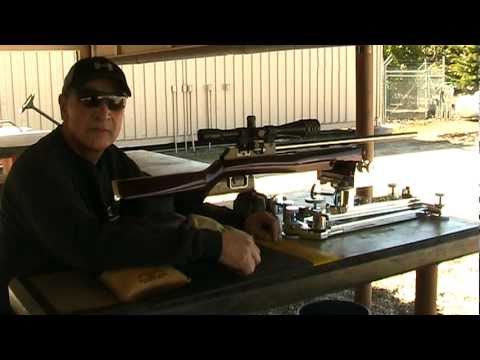
The Pappas front rest features separate fine-tuning controls for windage and elevation, plus a central gross-elevation control. Normally, once the rest is centered-up on the target, you can make all needed elevation and windage adjustments with the rear (fine-adjustment) controls. In the video below, Joe explains how the controls work as he practices with his modified Theoben Rapid MFR air rifle. Joe hopes to use this new Pappas rest in the upcoming Air Rifle Benchrest Worlds to be held in South Carolina this summer. (Note: In the last minute of the video, the back-lighting was so intensely bright that we lost detail in the foreground. We apologize for that flaw, but you can still hear the audio.)
Price for this Masterpiece? Don’t Ask…
If you are interested in getting a similar rest, visit PappasRimfireProducts.com, or call James Pappas directly at (817) 735-9883. Be forewarned — James said “If you need to ask about the price, you probably can’t afford it.” This is truly the “Rolls-Royce” of front rests, and it will be priced accordingly.
For decades shooters have used brass jags attached to brass-tipped cleaning rods. These work effectively. But there is one problem. Many bore solvents will react with the brass metal to give “false positives”. You can get bluish-green patches even when there is no copper fouling in your bore.
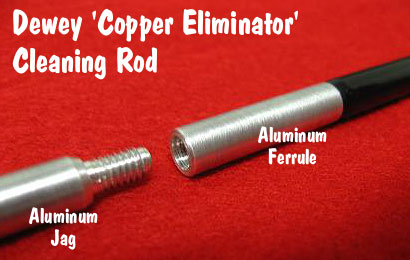
To solve this problem DeweyRods.com offers a full line of aluminum jags, aluminum brush adapters, and nylon-coated cleaning rods with aluminum tips. Dewey explains: “Ammonia-based solvents attack copper & brass but also leave your patches a blue-green color so you are never sure if your bore is truly clean of copper. Our aircraft-grade aluminum has the same hardness of brass, it will not embed impurities or harm your bore, and ammonia will not attack it.” As shown below, along with caliber-specific aluminum jags (center), Dewey now offers aluminum thread adaptors (left) and aluminum-shaft brushes (right).
New Dewey ‘Copper Eliminator’ Cleaning Rods
These new rods have the same nylon coating and handle assembly as Dewey’s standard coated rods, but they feature a chemical-resistant, 8/32 female-threaded, aluminum ferrule. No brush adapters are required. Each rod is supplied with a male-threaded aluminum jag. Dewey charges $39.95 for these rods, but you may find them slightly cheaper at other vendors.
Copper Eliminator Rods are currently offered in two diameters (.22-.26 Cal, or .27+ Cal), and three lengths: 36″, 40″, 44″. Listed rod lengths do NOT include handle assembly. One last note: Dewey cautions users to avoid TM Solution, because this solvent may harm Dewey’s nylon rod-coatings.
Bryan Litz, Ballistican for Berger Bullets, is actually a trained rocket scientist, not to mention a skilled long-range shooter. Bryan’s books on Ballistics and Precision Long Range Shooting have been recognized as the leading resources of their kind in print. Now you can save money on Bryan’s highly-regarded books through a special holiday promotion.
Bryan tells us: “For a limited time, we are taking an additional $5 off the retail price of our titles Applied Ballistics for Long Range Shooting 2nd Ed. (regularly $49.95, $44.95 on sale) and Accuracy and Precision for Long Range Shooting (regularly $34.95, $29.95 on sale). And, by purchasing direct from Applied Ballistics you can get your copy autographed by the author”.
Here are what others are saying about these books.
“Got my copy of Accuracy and Precision for Long Range Shooting and can’t put it down! Exceptionally well done! Both this and Applied Ballistics for Long-Range Shooting” are definite requirements for all long range shooters!” — Eric K.
“Thanks, Brian. You have opened up a whole new ‘world’ in shooting, for those of us who love shooting and hunting, but don’t have the academic background to really appreciate the intricacies of science.” — Terje N.
After concluding its 2012 Board Meeting, the NBRSA has issued some announcements for its membership. The Fee structure has changed, and Match Directors are requested to submit info on upcoming 2013 Matches. In addition, the NBRSA noted that Long Range Rule Books are now on sale for $5.00. Call (307) 655-7415 to order these Rule Books.
NBRSA Fee Schedule for 2013
Dues and match fees will change beginning January 1, 2013. The new fee structure is designed “to be equitable to everyone”, with adjustments reflecting shipping costs. Normal match fees change to $3 per shooter per day. Annual Fees will be:
USA Domestic Annual Members & Clubs: $60
CANADIAN Annual Members: $60 + $25 shipping — Total US $85
INTERNATIONAL Annual Members: $60 + $60 shipping — Total US $120
2013 Match Schedules and Forms
The NBRSA requests that match directors send in their 2013 match schedules to Regional Directors as soon as possible. This will allow the NBRSA to post schedules online and in Precision Rifleman magazine. Match Directors who require Forms should click the links below.
Stan Pate is the Captain of Savage’s National Championship F-TR Team. In this article, Stan explains how to adjust the action-screw tension on a three-screw Savage target action to achieve the best accuracy. The procedure described here can be used for any Savage action, including the two-action-screw models. However, the optimal settings for each particular rifle may vary slightly.
Match shooters need to get that extra accuracy edge from our ammunition and firearm. It is easy to get one of the Savage rifles to shoot accurately — even to match standards. If you are looking for that little bit more from your rifle, then please read a method that I have found that works for me. For those of you that are familiar with tuning a receiver (such as a match rimfire action), this article will be nothing new. For the rest of you, this might be new material. The goal here is to find the “sweet spot” for the rifle in relation to the torque settings used on the receiver screws. The proper torque settings [can vary] from rifle to rifle, but they will usually have a noticeable effect on consistent group sizes. A properly-torqued rifle will optimize the “harmonics” of the barreled action using the receiver screws so that the gun delivers peak consistency.
Here is the process I have found that works for me in tuning a Savage rifle receiver to peak accuracy. To use my process you first must already have a load that shoots accurately and consistently in your rifle, and I always use a fouled barrel like I’d be shooting in a match. This process works for me in both the model 10 (two receiver screws), and the model 12 (three receiver screws).
Seat Recoil Lug and Start with Front Action Screw(s)
On the model 12, I will first ensure that the recoil lug is seated securely against the stock by just lightly tightening up the front receiver screw then gently but firmly bumping the butt pad against the floor. Next I will tighten up the front two receiver screws to 30 inch-pounds starting at 20 inch-pounds and working up to the 30 inch-pounds in 5 inch-pound increments, and always tightening the front screw first and then the second screw. Once the front two receiver screws are torqued to the final torque setting, I will set the rear receiver screw to 5 inch-pounds and shoot a 5-shot group [to evaluate accuracy].
Increase Torque Incrementally on Rear Action Screw
After the group is shot and I am satisfied that I called all of the shots as good shots I will allow the rifle to cool off to about the temperature that the fist group was shot at. I will then add 5 inch-pounds to the rear receiver screw and shoot another five-shot group and allow the rifle to cool again. I repeat this process until I have tightened the rear receiver screw to 40 inch-pounds or have seen the groups get smaller and then start getting larger again. Once you have seen the groups decrease and then start to increase in size then you will have found the area of torque to work in. You can then can fine tune this to the exact inch-pound torque settings.
Tuning a Model 10 with Two Receiver Screws
The Savage model 10 action, which has two receiver screws, uses the same process as the three-screw model 12. Measure your group sizes and place the measurements in front of you so that you can see the bell curve showing where your best groups were achieved. NOTE — there may be a better way of doing this and if you should have one, I’d be very interested in hearing it. Good shooting and I hope to see you all on the range. – Stan Pate
This is on the Palma rifle using the torque settings of 30 inch pounds on the front two reciever screws, and 15 inch pounds on the tang screw, it is approximately 1/2″ center to center.
This is my second torque setting which for this rifle and this load is the optimal setting of 30 inch pounds on the front two reciever screws and 25 inch pounds on the tang screw, this group is approximately .180″ center to center.
This is the third torque setting which for this rifle is moving away from the optimal torque setting towards the heavy side of the scale. This torque setting results shows that you will usually see a “bell curve” of accuracy as you move into the optimal torque setting. This group is almost .7″ and the torque setting was 40 inch pounds.
This article was edited for length to appear in the Daily Bulletin.
Here’s a clever, easy modification for your RCBS ChargeMaster electronic powder dispenser. Many folks use a McDonald’s straw to smooth kernel flow out of the dispensing tube. Forum member Mike S. (aka in2deep) found that, even with a straw in place, he sometimes got clumps, which dropped 5-6 kernels at once, throwing off his dispensed weight.
Mike looked at the situation and ingeniously decided to trim the straw into little v-shaped arms or prongs. This helps to break up the clumps, so the kernels flow out the end of the tube more consistently during the dispense cycle. Mike writes:
Soda Straw Modification
This is a further tweak of the popular soda straw modification as the original mod would still allow Varget powder to collect in the straw and dump sometimes as many as 6 or 8 or even more extra kernels in the pan. It would sometimes signal an overcharge, but even when it didn’t there could be as many as 6+ kernels too high or too low (total spread of 12+).
The little arms (prongs) on the straw tend to separate the kernels into groups of 1 or 2 or 3 and prevents piling and many times the throw is now within 1 or 2 kernels of the desired weight.
Straw Cutting Tips — Mike found the shape/angle of the “arms” is very important. If the cuts are too fine or too course it allows the kernels to collect almost like before but the illustrated angle seems to allow an average of only 2 or 3 kernels per trickle input from the machine. This means that more charges are much closer to the actual desired weight and max kernel variances will be cut in less than half and there will be almost no overthrows.
While many of us now favor digital photography over “old-fashioned” 35mm film, don’t toss those old 35mm film canisters, especially the clear Fuji-type with secure snap-in lids. Small plastic film canisters have a multitude of uses for the shooter and reloader.
Here Are Some of the Things You Can Do with Film Canisters:
1. If you weigh powder charges after throwing them with a manual powder dispenser, throw the charges first into a film canister and then use that to drop the powder into the measuring pan on your scale. The canister will catch every kernel of powder. If you throw charges directly into a weighing pan, powder can sometimes bounce out. Using the film canister will help keep spilled powder off your loading bench and floor.
2. Store extra sets of foam ear-plugs in the canister. You never want to be without ear protection. This editor has four film canisters filled with plugs. Two go in the range kit, one goes in the car’s glove compartment, and a second stays in a lock box I use to transport pistols. This way I never find myself at the range without ear protection.
3. Place your smaller cotton patches in film canisters, marked by caliber. If you use the water-tight Fuji-style canisters, you can even pre-soak the patches with solvent. You can have one canister for wet patches, another for dry patches. That saves time when you’re at the range, and avoids spillage. One caution–some solvents may react with plastic, so test this first before you put a solvent-filled canister in your range kit.
4. Use film canisters to hold your neck bushings, sorted by caliber. With a permanent marking pen, you can mark the side or top of the canister with the bushing sizes, or caliber.
5. Store your favorite Bolt Grease (for rifles) or anti-seize compound (good for pistol slide rails), in the canister. You don’t need to fill it all the way up — a little dab will do ya. We only recommend this with the snap-top Fuji canisters.
6. During transport, Protect your muzzle with canisters. When shipping a rifle or barrel, slip the film canister over the muzzle, then secure it with electrical tape. This will protect the precious crown of a match barrel from dings or damage.
There are countless other uses for 35mm film canisters. We invite readers to respond with their own tips on using these handy containers. If you don’t have some stashed in your workshop already, you can get empties for free at most film processing centers. The clear plastic Fuji canisters are the best — you can see what’s inside and the lids are watertight.


 Hornady offers a handy power case prep tool driver (item 050160) with three power stations. Hornady basically took its previous single-drive Power Case Prep Assistant (item 050155) and added gearing to run three different heads. It took some clever engineering to accomplish this while maintaining the small footprint of the original one-head machine. MSRP for the new Case Prep Trio (item 050160) is $129.39. If you can live with a single power take-off, the older one-head Case Prep Assistant is still offered on “close-out” at some vendors. If you look around you may find one for as little as $79.99.


 Yamil Sued provides expert photography tips in

 Yamil Sued has been a working professional photographer for 27 years. He is a graduate of Brooks Institute of Photography in Santa Barbara, California, with a Major in Illustration Photography and Color Technology.


 After concluding its 2012 Board Meeting, the NBRSA has issued some announcements for its membership. The Fee structure has changed, and Match Directors are requested to submit info on upcoming 2013 Matches. In addition, the NBRSA noted that Long Range Rule Books are now on sale for $5.00. Call (307) 655-7415 to order these Rule Books.
 Match shooters need to get that extra accuracy edge from our ammunition and firearm. It is easy to get one of the Savage rifles to shoot accurately — even to match standards. If you are looking for that little bit more from your rifle, then please read a method that I have found that works for me. For those of you that are familiar with tuning a receiver (such as a match rimfire action), this article will be nothing new. For the rest of you, this might be new material. The goal here is to find the “sweet spot” for the rifle in relation to the torque settings used on the receiver screws. The proper torque settings [can vary] from rifle to rifle, but they will usually have a noticeable effect on consistent group sizes. A properly-torqued rifle will optimize the “harmonics” of the barreled action using the receiver screws so that the gun delivers peak consistency.


 Here’s a clever, easy modification for your RCBS ChargeMaster electronic powder dispenser. Many folks use a McDonald’s straw to smooth kernel flow out of the dispensing tube. Forum member Mike S. (aka in2deep) found that, even with a straw in place, he sometimes got clumps, which dropped 5-6 kernels at once, throwing off his dispensed weight.


