Eurooptic vortex burris nightforce sale


teslong borescope digital camera barrel monitor


As an Amazon Associate, this site earns a commission from Amazon sales.


September 9th, 2015

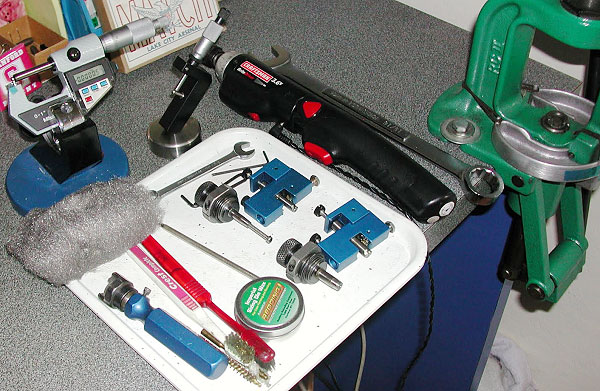
New CADEX Two-Stage Trigger from Canada

Cadex two-stage trigger remington adjustable tactical

There’s a new two-stage trigger for Remington and Rem-clone actions from CADEX Defense of Canada. The new CADEX DX2 double-stage trigger adjusts from 1.5 to 5.0 lbs pull weight. Both stages can be adjusted separately through allen-head screws located on the front of the trigger body. The trigger shoe also adjusts fore and aft. The CADEX DX2 is offered in both a standard version (no safety or bolt release) and a version with integral safety and bolt release. The cost of the standard DX2 is 267.95 Canadian dollars, or $202.62 U.S. Dollars at current exchange rates. Add forty dollars (Canadian) for the version with safety and bolt release.

Cadex two-stage trigger remington adjustable tactical
DX2 Dimensions: 7.21cm x 4.42cm x 1.22cm | With Safety/Bolt Release: 7.65cm x 5.23cm x 3.35cm
DX2 Weight: 37.5 grams | With Safety/Bolt Release: 52 grams

Frank Green Tries the CADEX Two-Stage
Frank Green of Bartlein Barrels recently acquired one of the CADEX two-stage triggers and he likes it. Here is his report:

“My CADEX two-stage trigger arrived[.] I installed it into my Badger M2008 action/rifle in 6 Creedmoor. Initial impression is that it’s very nice. You can adjust each stage for pull of weight. You can adjust the position of the trigger shoe and [adjust] for over-travel as well. I think the pricing on the trigger is going to be very competitive and it will be a nice option out there for another two-stage trigger.

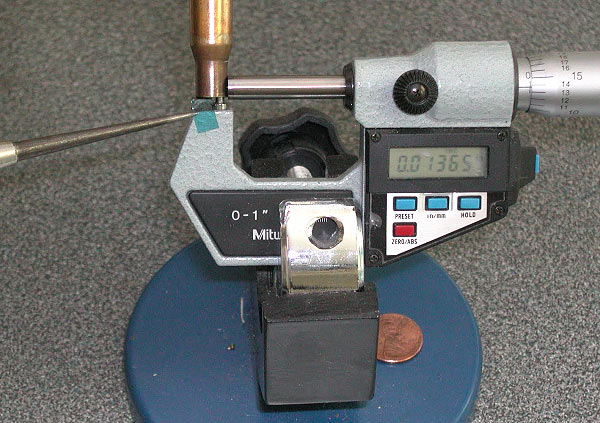
I installed it and made no adjustments. Checked it for function and measured some pull weights while the barreled action was out of the stock. Reassembled the whole rifle and again made some pull weight measurements. I recorded the last five and they came in at 2.09, 2.15, 2.15, 2.1 and 2.12 pounds. The little variance I’m going to chalk it up to me and how I pulled on the trigger scale …but it broke clean.”

Cadex two-stage trigger remington adjustable tactical

Cadex two-stage trigger remington adjustable tacticalInstallation Considerations
Frank Green said there may be some clearance issues with some trigger guards: “The CADEX trigger shoe assembly is a tad longer than a stock Remington. In my trigger guard it barely bottomed out/touched in the guard but functioned just fine but to give it a little room I milled .010″ off the bottom of the shoe. My trigger guard is a Defiance. I’d have to throw the trigger onto a Remington rifle/trigger guard assembly and a Badger bottom metal to see if it does the same thing but [this] is minor in my opinion.

You need a T6 Allen wrench to adjust the trigger shoe location. I had to move my shoe forward just a tad from how it came out of the package. When pulling the trigger it would just touch the back of the trigger guard.”

Permalink Gear Review, New Product No Comments »
September 9th, 2015

How to Turn Case Necks — Step by Step

neck-turning basics reloading salazar

On our main AccurateShooter.com site, you’ll find a good article by G. Salazar on the Basics of Neck Turning. If you’re new to the neck-turning game, or are just looking for good tips on improving your neck-turning procedures, you should read German’s article. Below we offer some highlights and photos from the article, but you’ll need to read the whole story to view all the illustrations and follow all the procedures step by step.

Why Should You Consider Neck Turning?
Let’s assume that your rifle doesn’t have a tight neck chamber that requires neck turning; if you have a tight neck chamber, of course, the answer to the question is “because you have to”. For the rest of us, and that includes the vast majority of Highpower shooters, neck turning isn’t a requirement, but it can be a useful way to bring your ammunition a small but meaningful step closer to that pot of gold at the end of the rainbow: perfection. I’m not talking about a theoretical improvement, but a real one, an improvement that lies in equalizing and optimizing the neck tension of your loaded rounds. Inconsistent neck tension is a real contributor to increased muzzle velocity variance which itself is a significant factor in increased elevation dispersion at long range. So there’s our basic reason for neck turning: to equalize and optimize neck tension in order to reduce elevation dispersion.

The Tools of the Trade
Here you see everything I use and a bit more. The press, a cordless screwdriver (always plugged in, turning is tough on the old battery), a couple of K&M neck turners (one set up for 6mm, the other for .30 caliber) an expander for each size, some Imperial lube, an old toothbrush or two to keep the cutter clean, a handle with a caseholder (for those emergencies when the screwdriver dies and there’s just one more case to go!), steel wool and a tubing micrometer finish the list of tools. Hey, I left the dial calipers out of the picture! They’re always handy, keep them around, but they are useless for measuring neck thickness, so don’t try. I usually use an Optivisor magnifier while I turn necks, very handy for a clear view of what’s happening on the neck.

neck-turning basics reloading salazar

Expanding the Neck
Put some lube on the inside of the case neck and run it into the expander. Really, this isn’t hard. I prefer to expand each case immediately before turning it as opposed to expanding all the cases and then turning them. Brass is somewhat springy and will tend to go back toward its original size; therefore, by expanding and turning immediately, you are more likely to have all cases fit the mandrel with the same degree of tightness and to get a more consistent depth of cut.

Cutter Adjustment for Cut Depth and Length
All the tools I’ve seen have pretty good adjustment instructions. The only thing they don’t tell you is that you should have five to ten spare cases to get it right initially. Anything of the right diameter will do while you learn, for instance, just use that cheap surplus .308 brass to do initial setup and save the precious .30-06 for when you know what you’re doing. Be patient and make your adjustments slowly; you’ll need to set the cutter for thickness as well as length of cut (just into the shoulder). The depth of cut (brass thickness) takes a bit of fiddling, the length of the cut is generally easy to set.

The Finished Product — A Perfectly Uniform Neck
If you read the whole article, and follow the procedures using quality tools, you should get very good results — with a little practice. To demonstrate, here’s an example of my finished, neck-turned brass. You’ll see there is a perfect, 0.0125″ thick neck. It’s very uniform around the circumference, usually I only see 1 or 2 ten-thousandths variance. Now, with the necks uniformed like this, we can select the bushing size that will give us our preferred neck tension and experiment with various levels of tension, secure in the knowledge that all of the cases will actually have the desired neck tension.

neck-turning basics reloading salazar

Permalink Bullets, Brass, Ammo, Reloading 1 Comment »
September 9th, 2015

USA Veterans Team Wins Gold at World Championships

USA U.S. Palma Veterans Team Fullbore Camp Perry Gold Medal 2015

Report by Tom Whitaker, Captain of USA Veterans Team
Much has been said about the fantastic performance of the Great Britain Palma Rifle Team setting a new World Record for the Palma Team course of fire, as well as the strong second place showing of our USA Palma squad. However, little to nothing has been published about the only team World Championship that the United States won at the World Championships this year at Camp Perry.

Before all the pomp and circumstance of the World Individual Championship and the Palma Team Match got underway, a dedicated group of shooters made their way to the firing line. These were the members of the 2015 USA Veterans Rifle Team. To qualify for this team one of the requirements is to have reached your 60th birthday by the first day of the World Championships. This usually means you’ve “been there and done that” for many years and still love the sport. The team consists of a maximum of 17 people, a captain, adjutant, three coaches, 10 firing members, and two reserve members. Each team has two targets so the firing members are separated into two squads of five, each with a line coach. The third coach or main coach coordinates the two squads to optimize their performance. The course of fire is two convertible sighting shots and 10 shots for score per shooter at 300, 600, 900, and 1000 yards on the ICFRA 5V Targets.

When I was child my family raced horses. My father was once asked “how do you win a horse race?” His answer was “Break out of the starting gate in first place and keep improving your position.” That is exactly what the USA Veterans Team did, as the Americans won the 300-yard stage and each stage thereafter to beat the British Team by 12 points 1919-152V (USA) to 1907-172V (GB). Canada was third with 1896-131V, Australia fourth with 1878-140V. Of special note, Wayne Forshee (maker of the famous “Rightsight”) was high score on the entire line with 196-24V!

Message from Tom Whitaker:
As Captain I would like to congratulate my team again. No captain could be more proud of a team than I am of these “oldies”. They worked very hard to accomplish their quest for the Gold, a feat that hasn’t been done since 1999. Team members are:

Captain: Tom Whitaker; Adjutant: Leo Cebula; Coaches: Steve Hardin, Jim O’Connell, Gary Rasmussen; Shooters: David Crandall, Peter Church, Gerard DeCosta, Wayne Forshee, Charles Kemp, Randall Gregory, Marty Mayo, Noma Mayo, Steve McGee, Bob Steketee; Reserves: Michel Dunia, J.P. Young.

In the World Individual Championships there were three U.S. shooters who qualified for the final “top ten” shoot-off at 1000 yards, they, too, were all Veterans. I have heard it said that old eyes can’t be counted on to get the job done, but it looks like old age and treachery won out over youth and enthusiasm this time. Many thanks to all who supported our team. We could not have done this without your help, especially Sierra Bullets, Lapua, and The Bald Eagles Rifle Club.

Permalink News No Comments »