Eurooptic vortex burris nightforce sale


teslong borescope digital camera barrel monitor


As an Amazon Associate, this site earns a commission from Amazon sales.


February 2nd, 2018

F-TR TIP — Make a More Stable, Lower-Friction Front Bipod Pad

F-Class F-TR bipod front support pad platform

The Berger Southwest Nationals (SWN) is coming up next week at Ben Avery in Phoenix. Many of the nation’s top F-Class shooters will be there. Here are some tips that can help F-TR shooters competing at the SWN. These suggestions will also benefit any F-TR shooter who is looking for a more stable set-up under his bipod, and easier adjustment of the vertical when using a Phoenix-style (non-joystick) bipod.

How to Set up a Stable Front Pad for Your F-TR Bipod

To get peak performance from your F-TR rig, you need good support under the bipod. You want the base to be firm, but you also want a smooth, low-friction surface so the bipod feet can slide properly. Some guys just shoot off a carpet or a slab of wood with some rubber on top. There is a better way.

Forum member PBike shows how a three-element front set-up offers the best of both worlds — a firm platform with low-friction top. PBike’s set-up has three elements. Layer 1 is a thick rubber mat. Layer 2 is a steel plate with thin neoprene glued top and bottom. Layer 3, on which the bipod feet rest, is a thin neoprene door-mat with a low-friction surface, like the top of a MousePad. The video below shows how the three layers are arranged.

Pbike explains that, under F-TR rules, “You can use any series of pads or plates, so long as they are flat and do not include [tracking channels/slots] for the bipod feet”. The plate can be 12″ fore and aft, and the overall width may not extend more than 2″ beyond the bipod feet on either side.

F-Class F-TR bipod front support pad platform

F-Class F-TR bipod front support pad platform

F-TR Bipod Support Components (Bottom to Top)
LAYER ONE (bottom): Thick Rubber Pad, such as a heavy doormat
LAYER TWO (middle) Steel Plate, approximately 12″ x 24″, with attached neoprene
LAYER THREE (top): Neoprene Upper pad (slick upper surface like a MousePad)

NOTE, if the surface is not level, you can use wood shims to level the surface both left to right and front to back. The shims slide under the lowest pad. With a small saw, these can be trimmed so they don’t extend past the pad’s dimensions, maintaining compliance with F-Class rules.

The Phoenix bipod is an excellent product, but some folks like to run their rifles lower for better tracking and less hop. This can be accomplished with the PBike Aetkinz Engineering Lowering Kit. That Kit lowers the entire assembly 1.7 inches. For more information contact Pbike257 [at] gmail.com.

Phoenix Bipod “Rear Drive” and Steering Kit

F-TR rifle stock fore-ends are getting longer, allowing competitors to mount their bipods further forward. This longer “wheelbase” can deliver more stability, less hop, and better tracking. There’s a problem, however — if the bipod is attached way out front, it can be difficult to reach the bipod’s elevation controls. Some shooters grab the back end of the ski foot to adjust the rifle’s lateral position, but that doesn’t help with vertical.

F-Class F-TR bipod front support pad platform

PBike has developed a new accessory that lets you adjust the Bipod’s Mariner wheel easily and precisely. Basically this is a rotating, anodized aluminum tube that extends rearward. It has a 90° gear drive that replaces the Mariner wheel, allowing vertical adjustment by rotating the tube clockwise or counter-clockwise. See how it works in this video, starting at 1:40:

Pbike explains: “This is a really comfortable way to shoot. With this handle I can adjust for elevation and I can also steer the rifle fore and aft, left/right — anywhere I need to. I can make minute adjustments up and down, as needed, with the knurled handle.”

Video Suggestion by Boyd Allen. We welcome reader submissions
Permalink - Videos, Competition, Gear Review, New Product 3 Comments »
February 2nd, 2018

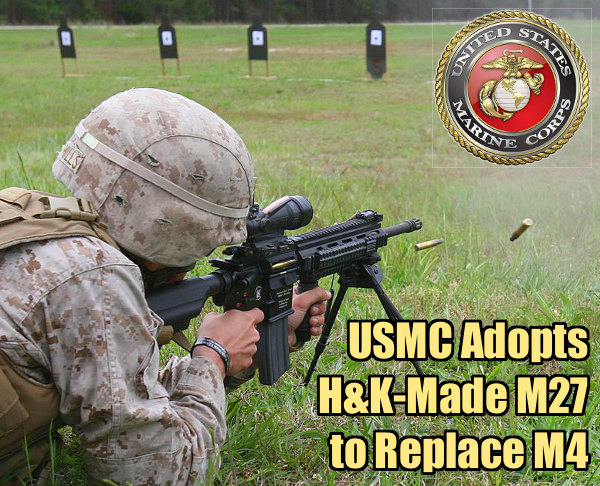
No More M4 — USMC Adopts H&K M27 Infantry Automatic Rifle

USMC Marine Corps M27 IAR heckler koch
Photo by USMC, public domain.

The U.S. Marine Corps will be adopting a new rifle to replace the M4 select-fire carbine. Designated the M27 IAR (Infantry Automatic Rifle), the new rifle is based on Heckler & Koch’s HK416, which looks like an AR, but runs with an internal gas piston system. The HK416 has been used by the German Army and some USA Special Operations units. This change-over has been in the works for some time, but the “protest period” has concluded, so now it is official.

The adoption of the M27 was announced at SHOT Show 2018. GunsAmerica reports: “H&K has officially received the contract for the USMC to replace the M4 carbines. The H&K model selected is the M27 Infantry Automatic Rifle, a derivative of the famous H&K 416″. The U.S. Marine Corps initially planned to purchase 6,500 M27s to replace a portion of the M249 light machine guns employed by automatic riflemen within Infantry and Light Armored Reconnaissance Battalions. In December 2017, the Marine Corps revealed a decision to equip every Marine in an infantry squad with the M27, so this is a major change. (Source: Wikipedia.com.)

According to Wikipedia: “The M27 is a lightweight, magazine-fed 5.56mm, select-fire weapon based on the Heckler & Koch HK416. It features a gas-operated, short-stroke piston action with a rotating bolt and a free-floating barrel. The handguard has four MIL-STD-1913 Picatinny rails for use with accessories and optics. The simpler gas-piston rifle system reduces the amount of time it takes to resolve malfunctions on the IAR compared with the M249 light machine gun.”

USMC Marine Corps M27 IAR heckler koch
CLICK HERE for full-screen M27 Photo by Heckler & Koch.

As deployed, early versions of the IAR have done well in combat: “The IAR was initially fielded in December 2010. 1st Battalion 3rd Marines were deployed to Afghanistan in April 2011 with 84 IARs. Former SAW gunners initially did not like the M27, but appreciated it as time went on. It weighed 9 lb. loaded, compared to 22 lb. for an M249 — a significant difference when on 5-hour long missions. It also blended in with standard M16-style service rifles, making it difficult for enemy forces to identify the machine gunner. Marines issued with the M27 [report] it is friendlier to troops [than the M249] due to its cleaner, lightweight system having fewer moving parts and jams. IAR gunners consider the rifle-grade accuracy to be a huge improvement over the SAW, despite the loss of sustained firing.” (Source: Wikipedia.com.)

Heckler & Koch Expands American Production Center in Georgia
Heckler & Koch operates a production center in the state of Georgia, not far from Fort Benning. A $28.5 million expansion, started in 2017, is adding a new 50,000-square-foot factory in the Corporate Ridge Business Park. “HK’s new U.S. factory will make use of advanced manufacturing technologies and will be staffed by German and American engineers and technicians,” said Francisco Hidalgo, CEO of HK USA. GunsAmerica notes: “H&K USA will be designing and building guns directly for the U.S. market in the USA now. Now, we can look forward to weapons built specific to the U.S. market. [We] can’t wait to see the first one stamped ‘Made in Georgia’.” It is unknown when H&K will start delivering American-made M27s to the USMC.

Permalink New Product, News 15 Comments »
February 2nd, 2018

Scope Dope — Make Your Own Laminated Ballistics Card

laminated ballistics Card print-out

Tactical competitor Zak Smith stores his elevation and wind drift data on a handy laminated data card. To make one, first generate a come-up table, using one of the free online ballistics programs such as JBM Ballistics. You can also put the info in an Excel spreadsheet or MS Word table and print it out.

Above is a sample of a data card. For each distance, the card includes drop in inches, drop in MOA, drop in Mils. It also shows drift for a 10-mph cross wind, expressed in inches, MOA, and mils. Zak explained that “to save space… I printed data every 50 yards. For an actual data-card, I recommend printing data every 20 or 25 yards.” But Zak also advised that you’ll want to customize the card format to keep things simple: “The sample card has multiple sets of data to be more universal. But if you make your own data card, you can reduce the chance of a mistake by keeping it simple.”

Once you have the card you can fold it in half and then have it laminated at a local office store or Kinko’s. Keep this in your pocket, tape it to your stock, or tie the laminated card to your rifle. If you regularly shoot at both low and high elevations, you may want to create multiple cards (since your ballistics change with altitude). To learn more about ballistic tables and data cards, check out the excellent “Practical Long-Range Rifle Shooting–Part 1″ article on Zak’s website.

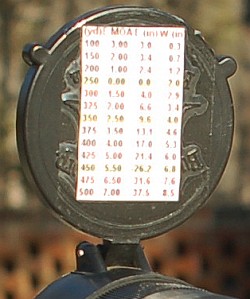
ballistics data scope coverScope-Cover Mounted Ballistics Table
Another option is to place your ballistics card on the back of the front flip-up scope cover. This set-up is used by Forum member Greg C. (aka “Rem40X”). With your ‘come-up’ table on the flip-up cover you can check your windage and elevation drops easily without having to move out of shooting position.

Greg tells us: “Placing my trajectory table on the front scope cover has worked well for me for a couple of years and thought I’d share. It’s in plain view and not under my armpit. And the table is far enough away that my aging eyes can read it easily. To apply, just use clear tape on the front objective cover.”

Links for JBM Ballistics Program

JBM Calculations Entry Page: www.jbmballistics.com/ballistics/calculators/calculators.shtml.

JBM Advanced Trajectory Calculator: www.jbmballistics.com/cgi-bin/jbmtraj-5.1.cgi.

JBM Simple Trajectory Calculator: www.jbmballistics.com/cgi-bin/jbmtraj_simp-5.1.cgi.

JBM Trajectory Cards (Come-up Table): http://www.jbmballistics.com/cgi-bin/jbmcard-5.1.cgi.

Permalink News 2 Comments »