Mark your calendars, marksmen. Here is the official schedule for next year’s 2019 NRA National High Power Rifle Championships. The Across-the-Course Championship, Mid-Range Championship, and Long Range Championship will all take place in August at Camp Atterbury, near Edinburgh, Indiana.
Day By Day Planner for 2019 Nationals at Camp Atterbury
Monday, August 5 will be the First Shot Ceremony, and squadded practice will also begin.
Tuesday, August 6 marks the beginning of the Team Matches. They will conclude on August 7.
Thursday, August 8 is the start of High Power Across the Course competition. They last until August 11.
Monday, August 12 is the Mid Range Team Championship, lasting until August 13.
Tuesday, August 13 is the first day of the Mid Range Individual Championship. They last until August 16.
Saturday, August 17 will be the Palma Team Match day.
Sunday, August 18 begins the Long Range Championship which continues through August 21.
Wednesday, August 21 is the registration day for the NRA Extreme Long Range Championship. The match will be fired over the next two days, finishing on August 23.
Lodging at Camp Atterbury and Nearby
There is on-base lodging — rooms and cabins will be available to all competitors 18 and over. Camp Atterbury lodging includes suites and standard rooms as well as the MWR Campground and the MWR Cabins. Lodging is controlled by the Camp Atterbury Lodging Office, not by the NRA. Entry fees DO NOT include lodging costs. There are also a number of hotels nearby, including Charwood Suites. Nearby campground Johnson County Park also offers special rates for High Power competitors.
With the CMP hosting important matches next year at Camp Perry, many rifle competitors will be “commuting” between the two venues this summers, driving 4.5 hours from Indiana to Ohio.
One side of this gauge is the “go” side which quickly tells you the depth of a primer pocket, whether any crimp is properly removed, and whether the primer pocket is loose. If it feels loose on the “go” side, use the other end of the tool, the “no go” side, to test to see if the primer pocket is too loose to hold a primer. If the no-go slides into the pocket, then you know to junk that brass.
Primer Pocket Growth and Useful Case Life
Repeated firings at stout pressures can cause primer pockets to grow in diameter. This can create an unsafe condition if your primers are not seating properly. Are your primer pockets “good to go”, or have they been pushed to the point of no return? Do you really know? Many guys try to gauge primer pocket tightness by “feel”, as they seat the primer. But that method isn’t precise. Now there’s a better way…
The folks at Ballistictools.com have created a handy set of precision-machined gauges that let you quickly and accurately check your primer pockets. These gauges (aka “gages”) are offered in two sizes — for large and small primer pockets. A two-piece set of both large and small gauges costs just $19.99. These gauges let you quickly measure the depth of a primer pocket, and check if the crimp has been removed properly. Most importantly, the gauge tells you if the primer pocket has opened up too much. One side of the gauge has an enlarged diameter plug. If that “No-Go” side fits in the primer pocket, you should ditch the case — it’s toast.
Precision ground from O-1 tool steel, The Ballistic Tools primer pocket gauges serve multiple functions. The inventor of these tools explains: “I created the prototype of this tool for my own use in brass processing. I needed a way to quickly and easily measure primer pockets that was reliable and did not require wasting a primer. This tool has been indispensable for me and I would never go back to the old method of uncertainty and guessing.”
Product tip from Boyd Allen. We welcome reader submissions.
If you’re planning a build with a Remington or Rem-clone action, take heed. Here’s a trigger upgrade worth considering for an F-Class or Long-Range rig. David Tubb offers an excellent two-stage trigger for Remington 700 rifles, the Model T7T. Priced at $349.00, the Tubb T7T Trigger is a true two-stage design: first and second stages are independently adjustable for both weight and feel. Overall (combined stage) trigger pull weight can be adjusted from just under 1 pound to slightly over 3.5 pounds.
If you are interested in the T7T, watch these two videos. The first shows how to adjust pull-weights for both stages. The second video shows how to modify your stock to provide clearance for the T7T.
This video shows how to adjust the new Tubb T7T two-stage trigger for Remington 700s:
The new T7T is a quality product. We’ve received good feedback from “early adopters” who tell us the two-stage function works well. While installation of the T7T may require minor modifications to your action, most gun owners with basic mechanical skills can install the T7T by themselves. The T7T is made using stainless steel and aluminum for maximum corrosion resistance. Note, a full installation of the T7T trigger (either Right-Hand or Left-Hand) also requires a companion T7T bolt release, offered by DavidTubb.com for $10.00.
This video shows how to modify your stock to fit the T7T trigger:
Mirage shields are useful for all shooters, not just hard-core competitors. A mirage shield helps you see your target better, without distortion caused by heat waves coming off your barrel. This isn’t rocket science — it’s a simple, inexpensive way to see better and shoot more accurately. We’ve advocated that varmint shooters give mirage bands a try on those hot summer groundhog and prairie dog expeditions. And we observed that practically every F-Class shooter at the recent Berger SW Nationals was using a mirage shield of some kind.
Make Your Own Mirage Shiels from Venetian Blind
Criterion Barrels shows how you can make your own mirage shield from an ordinary Venetion blind.
A mirage shield is an extremely cost-effective way to eliminate a commonly-encountered problem. Making your own mirage shield is easy. Using old venetian blind strips and common household materials and tools, you can construct your own mirage shield for under one dollar. READ FULL Article
Materials Required:
1. Vertical PVC Venetian blind panel
2. Three 1”x1” pieces adhesive-backed Velcro
3. Ruler or tape measure
4. Scissors or box cutter
5. Pencil or marker
Make Your Own Mirage Shield from X-Ray Film
Forum member Fabian from Germany, whose Sako 6BR rifle was featured as a Gun of the Week, has devised a clever and inexpensive mirage band option. Fabian is a radiologist by trade. He notes that many X-ray machines require a daily test film for calibration. These are normally just discarded in the trash, so you can get them for free.
Fabian explains: “I’m a radiologist, so I handle medical x-ray films every day. Modern X-ray machines use laser-based printers and they need to print a test-film every day. One x-ray film is about 43×35 cm (16.9″ x 13.7″). Made from polyester, the films are very stable and only 0.007″ inches thick. They are light-weight, semi-transparent, and very stable. Using normal scissors, you can easily cut four mirage shields from a single sheet of film. Then glue on some velcro to attach to your barrel. Try it, you will not be disappointed.”
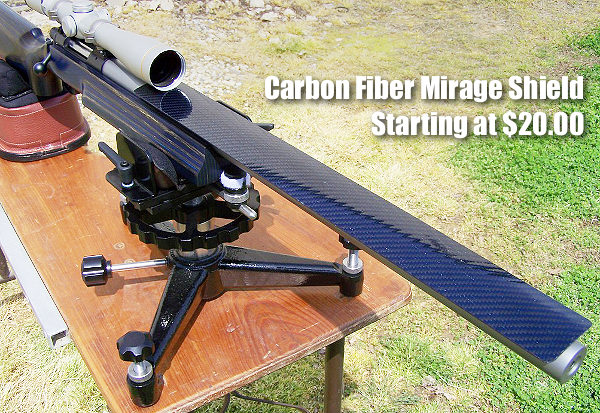
High-Tech Carbon Fiber Mirage Shield
If you’re not into making your own mirage shield, aka “mirage band” or “mirage shade”, you can also purchase a cool carbon fiber mirage shield from Accurateshooter Forum member Mark Nagel. These custom Carbon-Fiber Mirage Shields start at $20.00. GET More INFO HERE.
Today is election day. Make sure you get out and vote. Let your voice be heard. These are challenging times for firearms owners. There are many groups and politicians in this country who want to ban all handguns, ban all semi-automatic rifles, and yes, even repeal the Second Amendment. If you believe in the Constitution, believe in the Second Amendment, it is vital that you get to the polls and cast your vote.
There are many other important issues at stake in this election — control of Congress, infrastructure spending, foreign policy, immigration policy, Federal Lands policies, and that’s just on the national level. State and local elections are important too. So be an involved citizen and exercise your right to vote.
Your Vote Is Your Voice
The NRA Institute for Legislative Action states: “Our Second Amendment rights are being threatened by the anti-gun forces like never before. If you have been following the news, more than likely you have seen the fervor with which our opponents are pushing their agenda.
We need America’s Second Amendment supporters to speak out by using their vote on Election Day to reject this anti-freedom agenda and elect lawmakers to office who support the Second Amendment.”
Readers who have just recently discovered the Daily Bulletin may not realize that AccurateShooter.com has hundreds of reference articles in our archives. These authoritative articles are divided into mutiple categories, so you can easily view stories by topic (such as competition, tactical, rimfire, optics, shooting skills etc.). One of the most popular categories is our Technical Articles Collection. On a handy index page (with thumbnails for every story), you’ll find over 120 articles covering technical and gunsmithing topics. These articles can help you with major projects (such as stock painting), and they can also help you build more accurate ammo. Here are five popular selections from our Technical Articles archive.
Stress-Free Pillar Bedding. Richard Franklin explains how to do a top-quality bedding job, start to finish.
OnTarget Software Review. Our Editors test free software that measures shot groups with great precision. We explain how to use the program and configure advanced features.
Savage Action Tuning. Top F-TR shooter Stan Pate explains how to enhance the performance of your Savage rifle by optimizing the torque settings of the action screws.
Complete Precision Case Prep. Jake Gottfredson covers the complete case prep process, including brass weight sorting, case trimming, primer pocket uniforming, neck-sizing, and, case-neck turning.
Stock Painting Instructions. Step-by-step guide for stock painting by expert Mike Ricklefs. Mike shows both simple coverage and fancy effects.
At the request of our readers, we provide select “Deals of the Week”. Every Monday morning we offer our Best Bargain selections. Here are some of the best deals on firearms, hardware, reloading components, optics, and shooting accessories. Be aware that sale prices are subject to change, and once clearance inventory is sold, it’s gone for good. You snooze you lose.
1. RCBS — Save 25% on Select Dispenser/Scales, Progressive Presses, Prep Centers, and Ultrasonic Machines
RCBS wants you to “buy green” in November. Now through November 30, 2018 you can get 25% Instant Savings on a variety of RCBS’s most popular products, including the ChargeMaster Lite, ProChucker Progressive Presses, and both the Trim Mate and Universal Case Prep Centers. Ultrasonic cleaning machines are also discounted. This is easy-peasy — no forms to fill out and no waiting on rebates. Just shop at your favorite retailer, and you’ll find qualifying products 25% cheaper than last month.
Looking for an out of the box sub-MOA rifle for under $1000? CDNN has the Weatherby Vanguard Chassis Rifle on sale for $899.99. This features a Vanguard action affixed to a CNC-machined, 6061 aluminum chassis with a black, hard-anodized finish in two great calibers for only $899.99. You can also pick up the .223 Rem version $899.99 as well. This price probably won’t last long so grab it while you can.
Need a practical mid-power, milrad scope at 60% off? Here’s a deal you don’t want to pass up. Natchez has the Burris MTAC 4.5-14x42mm tactical scope for just $219.99. The scope’s Ballistic Milling Reticle is a milrad-based reticle with .5 mil and 1 mil hash marks on the horizontal crosshair and top half of the vertical crosshair. These hash marks allow for precise distance measurement, and assist in proper hold-off for wind. At a savings of nearly $330, this is a steller optics bargain for anyone looking for a milrad scope.
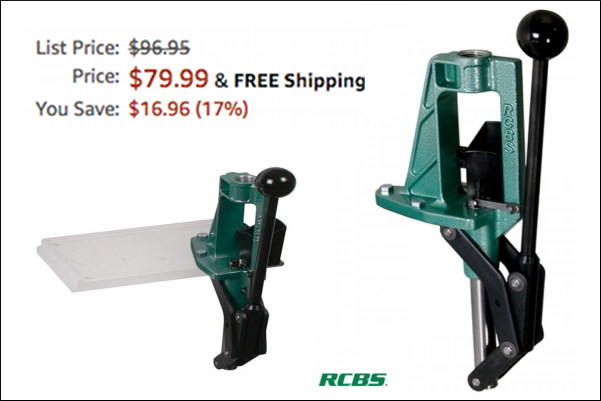
4. Amazon — RCBS Partner Press, $79.99
Wish you had a partner when you reload? Now you do when you pick up this RCBS Partner Press from Amazon for just $79.99. The Partner Press is easy to use and incredibly durable, yet is the most affordable press in the RCBS line. It’s perfect as a second press for different operations or a portable press for use at the range. You can also pick up an entire RCBS Master Reloading Kit on Amazon for $319.49
5. Bruno’s — CCI BR-4 Small Rifle Benchrest Primers, $47.95
Screaming deal? Well, no. But when you need them you’ll wish you had stocked up at this price. Bruno’s has the hard-to-find CCI BR-4 small rifle primers marked down to $47.95. An independent researcher identified the use of CCI Benchrest primers as one of two factors that were the most significant contributors to tiny groups. If you’re not using these already and are looking to tighten your groups this just might be the answer. While not on sale you can also find the CCI BR-2 Large Rifle Primers for $54.60.
6. EuroOptic — Leica CRF 2000-B, $399.00
This may be the best deal we’ve seen on the vaunted Leica 2000-B Laser Rangefinder (LRF) with 7-power optic. This unit is rated out to 2000 yards on reflective objects (in real-world use it will laze a deer well past 800 if you can hold steady). The Leica 2000-B features air pressure and temperature sensors, plus on-board inclinometer. Angle correction works out to 1200 horizontal yards equivalent, with the true hold-over displayed in both MILs and MOA. The compact Leica CRF 2000-B weighs just 6.5 ounces and measures 4.5″ L x 2.25″ H x 1.25″ W. It has a waterproof outer shell.
7. Brownells — RCBS Trim Mate Case Prep Center, $93.99
Case prep can take forever, so why not save time and your hands with the Trim Mate Case Prep Center. Five gear-driven rotating heads turn the tasks of chamfering, deburring, primer pocket cleaning, military crimp removal, and flash hole deburring into a much easier job. Brownells now has the Trim Mate Case Prep Center on sale for just $93.99 marked down from $124.99, a 25% savings. A power case prep center speeds up tedious tasks dramatically, and your brass will probably come out more consistent. IMPORTANT: This savings is part of an RCBS November Promotion.
8. Midsouth — SALE on Nosler Bullets and Brass
We like Nosler products. The brass is good, the hunting bullets are legendary, and Nosler match bullets display impressive performance for the price. Right now at Midsouth there are substantial discounts on a wide variety of Nosler brass and bullets. Hey 6.5 Creedmoor shooters — take note: 6.5 Creedmoor brass and the excellent 130gr and 140gr 6.5mm RDF HPBT bullets are on sale now.
9. Amazon — Neiko Digital Calipers, $17.85
Even if you have a good set of calipers, you may want to get one of these Neiko 01407A Digital Calipers. The #1 best-selling digital caliper on Amazon.com, this Neiko tool features a large LCD Screen and measures up to 6.0 inches. With over 3000 customer reviews, this product has earned an overall rating of 4.4 out of 5 stars. It’s hard to go wrong for $17.85, even if you just use these as a spare set for measuring group sizes and case trim lengths.
10. Midsouth — 250 Adhesive Precision Targets on Roll, $12.49
Midsouth offers 250 self-adhesive Benchrest Targets on a convenient roll. These stick-on targets work great for load development. The aiming diamond helps align the cross hairs of your scope for consistent shot placement. If you set your Point of Impact to the 1/4″ grid pattern at the top it’s easy to eyeball your group size. At the bottom are fields for your load info. Each Target sticker measures 6″ x 4″ with a 4.5″ x 2.5″ printed area. Midsouth sells the 250-target roll for $12.49, discounted this week from $14.99.
Credit our Bargain Hunter, Forum member F-Class John, who found most of the deals this week.
The First Shot, the CMP’s online magazine, features a well-written article on Prone Shooting Technique by SPC Matthew Sigrist of the U.S. Army Marksmanship Unit (USAMU). The article covers all the major points of gun hold and body position: hand position, elbow position, stock weld, buttstock placement, and sling position/tension.
Keep it Steady — The Elements of a Good Prone Position
Part 1 — Building the Position By SPC Matthew Sigrist
Imagine the following scenario: You are at the last stage of fire in the National Trophy Individual Match, firing at the 600 yard line in the prone position and every point matters. What should you reflect on as you prepare to shoot this final string? As your eyes cloud from sweat, you realize that all you have to rely on is your experience and knowledge of the fundamentals.
During the National Trophy Individual Match, you will fire 60 percent of your shots from the prone position. This article will address the fundamentals of a good prone position and help you learn the techniques required to be successful in both the slow and rapid-fire stages of National Match competition.
This article will be divided into two parts. In part one, we will discuss the elements of a good prone position. In part two, we will cover the techniques you will in the rapid-fire and slow-fire stages.
The Fundamentals
The fundamentals are the building blocks of a position. Much like the framework of a house, a correct application of the fundamentals ensures a solid and stable structure. Since each person’s position will depend on their particular body build and shape, there is no “perfect position” that applies to everyone. Experience, practice and knowledge of the correct fundamentals will dictate the best position for you.
There are six key elements of any position. The purpose for these six points is to achieve a solid platform that allows for consistent sight alignment using the least amount of muscle tension.
1. Placement of the Firing Hand (the hand that pulls the trigger)
The firing hand needs to be placed high on the pistol grip. This high hand position will give you better control of the rifle. Combined with a firm grip there will be a reduced amount of hand movement when pulling the trigger. Wrap your thumb over the three fingers on the pistol grip (excluding the trigger finger). This will help isolate the movement of the trigger finger.
2. Placement of the Non-firing Hand (the hand supporting the rifle).
The non-firing hand should grip the handguard or stock in the flat portion of the hand between the thumb and forefinger. The fingers should curl naturally around the stock, but they should not grip it tightly. The position of the hand on the stock will depend on the physical size of the shooter. Generally speaking, taller shooters with longer arms will grip the rifle further out, near the sling swivel, while shorter shooters will need to pull their hand rearward. This is sometimes referred to as “short-stocking” the rifle.
3. Stock Weld
Stock weld is the contact that the face makes with the stock. It is important because it directly effects your sight alignment. Consistent head placement will help you achieve consistent sight alignment. The human head weighs an average of 8 to 10 pounds. The full weight of the head must rest on the stock. In doing this you achieve two things, a relaxed neck and reduced recoil because of the pressure of the head.
4. Placement of the Rifle (the contact that is made in the firing shoulder)
The rifle butt placement needs to be consistent. If this changes between shots, it effects your sight alignment and the effect of recoil. In the prone position the rifle will sit lower in the shoulder compared to other shooting positions. This allows for a more forward head and a lower position as a whole.
5. Position of the Sling
The sling should be high on the arm, above the bicep. This way the sling will have less leverage on the arm so it doesn’t cut off the circulation.
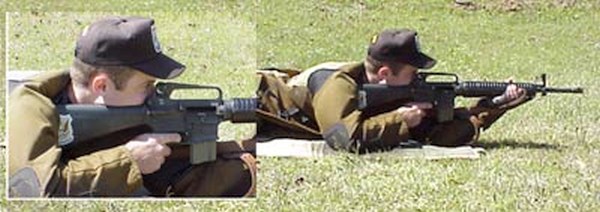
Demonstration of the placement of the firing elbow (left) and non-firing elbows (right).
6. Placement of both the firing, and non-firing elbows
A guideline for non-firing elbow placement is that there should be 1 ½’’ to 2’’ gap between your non-firing arm and the rifle’s magazine. (NOTE: this references the AR-15 service rifle) Your arm should be almost straight up and down; this will transfer the weight directly down the arm and not to the side (see picture above). Think of the firing arm as only a kind of kickstand, it doesn’t support weight it only holds the firing hand in position.
Variations of the Prone Position
There are two main variations of the prone position; open/spread legged, and bent-legged. The two types will be discussed below.
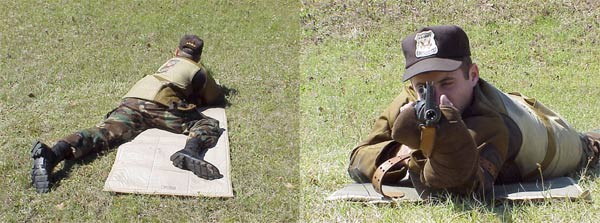
Open/Spread Leg Position
Demonstration of the Open/Spread Leg Position.
The first position is the open/spread legged position. This is when the shooter spreads their legs shoulder width or more apart. This allows for a more forward pressure on the sling and elbows. This position requires a tighter sling and solid elbow placement. The rifle should sit tight in the shoulder. With this position, your body will be farther behind the rifle compared to the bent leg position, allowing for minimum disturbance from recoil.
Bent Leg Position
Demonstration of the Bent Leg Position.
The bent leg position is when the shooter bends the firing side leg up towards the firing hand making the knee at a rough 90 degree angle to the body. The non-firing leg will remain straight and inline with the body. This will take pressure off the lungs and heart minimizing the pulse from the chest as well as easing the pressure on the lungs which will allow for easy breathing and control.
Summary
You now know the fundamentals of a good prone position, as well as the two types most commonly used. Extensive dry-firing will reveal which is the best position for you. If possible, have a friend take pictures of you in position. This will enable you to better diagnose and correct your errors. Remember, a position must be both fundamentally sound and comfortable. Practice frequently to learn your new position and to develop the conditioning required to endure long days on the range.
Here at AccurateShooter.com, we’re more about rifles than pistols. But we know that the majority of our regular readers own handguns, and many also have concealed carry (CCW) permits. Our editors also enjoy shooting pistols, both rimfire and centerfire. Accordingly, we try to provide helpful insights for the pistoleros out there. We found a great article on the Shooting Illustrated website that showcases a huge variety of holsters — 30 in fact. Each holster is illustrated, with pros and cons explained. These are all EDC holsters, meaning those designed for “Every Day Carry”.
Shooting Illustrated calls this article “HolsterPallooza” and it really does provide a ton of helpful information. Most other holster reviews on the web may feature a half-dozen holsters at the most. In this Holsterpallooza article you can see 30 holsters, with a wide variety of materials, designs, and applications. There are small molded IWB holsters for CCW, conventional on the belt holsters, leather shoulder holster rigs, and even ankle holsters. This is a great place to start if you are in the market for a holster.
Here’s sample of the many holster options reviewed, an innovative hybrid IWB holster constructed with leather over Kydex. That gives you the “best of both worlds” — the secure fit/retention of a molded Kydex shell, with an attractive leather exterior.
Shooting Illustrated explains: “As the interface between your gun and your body, the holster is a vital component of your carry rig. In many cases, the circumstances of your daily life will determine the method of carry you choose. This, in turn, will determine what type of holster you need, which may end up determining the handgun you carry. Therefore, choosing the method and type of holster may be as, or even more important than, choosing a firearm.”
Hickok 45 Reviews CCW Holsters:
If you want to see even MORE holsters for “Every Day Carry” (EDC), check out this video from Hickok 45. This popular YouTube host looks at 15 different IWB holsters from a number of manufacturers. Hickok 45 examines many hybrid holsters that combine Kydex or plastic with leather for increased comfort. He has his favorites… and they might not be what you’d expect. NOTE: As this video has been watched over 810,000 times, you may also want to read the viewer comments. There are many helpful suggestions from CCW holders who carry daily.
In the wintertime, it’s common to encounter problems with static electricity when throwing your powder charges. The static can cause powder kernels to cling to the surface of reloading components, and can cause powder clumping. Clumped or sticky powder may make your measure bind or grab in the middle of the cycle, which can throw off your charge weight. Here are a couple simple ways you can minimize the effects of static electricity and improve the consistency of your powder measuring.
Ground Your Powder Measure — If you’re throwing powder charges in the fall or winter and have problems with bridging or sticking powder, use a ground wire. Bullet-smith Victor Johnson (Johnson Precision Bullets) tells us: “I have a 25-foot piece of real small wire with alligator clips on each end. It’s that long so I can run it down the hall to a water pipe. Use the wire tie from a bread bag to hold it in a small roll to put in the range box. When using it at the range use a 6″ nail from the co-op or Lowe’s / Home Depot and just push it into the ground.”
Use Bounce Dryer Sheets — A quick pass with the thin sheets used in dryers will eliminate “static cling” on your plastic reloading parts like powder throwers, powder funnels, and reloading press guides. Thanks to Doc76251 for this tip.
Reduce Electronic Scales’ Drift with Anti-Static Spray
Reloading Tip by GS Arizona from Riflemans Journal
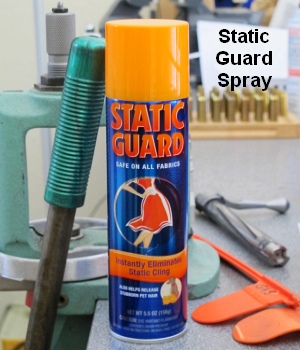
Apparently reducing static charges on and around electronic scales can reduce their propensity to drift, lessening the problem of “wandering zero”. Just how and why static charges interfere with scale performance is unclear, but many shooters have noticed that static electricity can cause electronic scales to behave strangely. So how do you reduce static charges around your digital balance? GS Arizona has found a very simple solution — an anti-static aerosol spray — that, by all indications, actually works. When this “spray-can solution” was suggested by a fellow shooter, GS was skeptical. However, he tried the stuff and he says that it really does help the scale maintain zero over time, with much less observed drift.
GS explains that the use of “Static Guard” spray helped mitigate the problem of a drifting zero on his Ohaus electronic scale: “My electronic scale… suffers from drifting zero (as they all seem to). I’ve read dozens of forum posts about drift and how to minimize its occurrence, so I know this problem isn’t limited to my scale or my workshop. Sometime last year, John Lowther mentioned the use of anti-static spray as a solution to the drift problem. John stated that the spray had virtually eliminated drift for him.”
GS found that the Static Guard actually worked: “The spray works great, just as John said it would. I spray all surfaces that I touch with my hands and arms as well as the pan (top and bottom), the metal tray on which the pan rests and the table under the scale. In six months or so of using the spray I’ve re-applied it about two or three times; it certainly isn’t something that you need to do each time you sit down to load. Before using the spray, it was not uncommon for me to re-zero the scale 10 times in the course of loading 72 rounds; now it might need it once during a session.”


 The folks at


 Apparently reducing static charges on and around electronic scales can reduce their propensity to drift, lessening the problem of “wandering zero”. Just how and why static charges interfere with scale performance is unclear, but many shooters have noticed that static electricity can cause electronic scales to behave strangely. So how do you reduce static charges around your digital balance? GS Arizona has found a very simple solution — an anti-static aerosol spray — that, by all indications, actually works. When this “spray-can solution” was suggested by a fellow shooter, GS was skeptical. However, he tried the stuff and he says that it really does help the scale maintain zero over time, with much less observed drift.


