Eurooptic vortex burris nightforce sale


teslong borescope digital camera barrel monitor


As an Amazon Associate, this site earns a commission from Amazon sales.


November 1st, 2018

How to Tame Vertical Stringing — Tips from Speedy

Speedy Vertical Stringing Tech tip

At the request of Forum members, we are reproducing this helpful article by gunsmith and Hall-of-Fame benchrest shooter Thomas “Speedy” Gonzalez

How to Reduce Vertical in Your Shot Groups

One of our Shooter’s Forum members recently built a new benchrest rifle. He was concerned because his groups were stringing vertically. This is a common problem that all precision shooters will face sooner or later. In addition to ammo inconsistencies, many other factors can cause vertical stringing. Accordingly, it’s important that you analyze your gun handling and bench set-up systematically.

READ Full ‘Cures for Vertical Stringing’ Article »

Hall of Fame benchrest Shooter Speedy Gonzalez has written a helpful article that explains how to eliminate mechanical and gun-handling problems that cause vertical spread in your groups. Speedy’s article addresses both the human and the hardware factors that cause vertical. CLICK HERE to read the full article. Here are a few of Speedy’s tips:
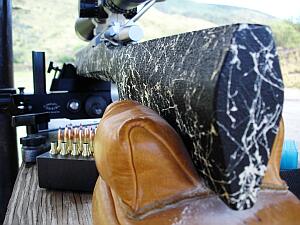
Front Bag Tension — Vertical can happen if the front sand bag grips the fore-arm too tightly. If…the fore-arm feels like it is stuck in the bag, then the front bag’s grip is too tight. Your rifle should move in evenly and smoothly in the sand bags, not jerk or chatter when you pull the gun back by hand.

Sandbag Fill — A front sandbag that is too hard can induce vertical. Personally, I’ve have never had a rifle that will shoot consistently with a rock-hard front sandbag. It always causes vertical or other unexplained shots.

Stock Recoil — Free-recoil-style shooters should be sure their rifle hits their shoulder squarely on recoil, not on the edge of their shoulder or the side of their arm. If you shoulder your gun, you need to be consistent. You can get vertical if your bench technique is not the same every shot. One common problem is putting your shoulder against the stock for one shot and not the next.

Front Rest Wobble — You will get vertical if the top section of the front rest is loose. Unfortunately, a lot of rests have movement even when you tighten them as much as you can. This can cause unexplained shots.

Stock Flex — Some stocks are very flexible. This can cause vertical. There are ways to stiffen stocks, but sometimes replacement is the best answer.

Rifle Angle — If the gun is not level, but rather angles down at muzzle end, the rifle will recoil up at butt-end, causing vertical. You may need to try different rear bags to get the set-up right.

Unbalanced Rifle — If the rifle is not balanced, it does not recoil straight, and it will jump in the bags. If the rifle is built properly this will not happen. Clay Spencer calls this “recoil balancing”, and he uses dual scales (front and rear) to ensure the rifle recoils properly.

Firing Pin — A number of firing-pin issues can cause vertical. First, a firing pin spring that is either too weak or too strong will induce vertical problems. If you think this is the problem change springs and see what happens. Second, a firing pin that is not seated correctly in the bolt (in the cocked position) will cause poor ignition. Take the bolt out of rifle and look in the firing pin hole. If you cannot see the entire end of firing pin it has come out of the hole. Lastly, a firing pin dragging in bolt or shroud can cause vertical. Listen to the sound when you dry fire. If you don’t hear the same sound each shot, something is wrong.

Be Consistent — You can get vertical if your bench technique is not the same every shot. One common problem is putting your shoulder against the stock for one shot and not the next.

Head Position — Learn to keep your head down and follow-through after each shot. Stay relaxed and hold your position after breaking the shot.

Last Shot Laziness — If the 5th shot is a regular problem, you may be guilty of what I call “wishing the last shot in”. This is a very common mistake. We just aim, pull the trigger, and do not worry about the wind flags. Note that in the photo below, the 5th shot was the highest in the group–probably because of fatigue or lack of concentration.

CLICK HERE for Speedy’s full article with more tips and advice.

Permalink Shooting Skills, Tech Tip No Comments »
November 1st, 2018

Shooter’s Bible — Most Popular Gun Reference Book in History

Shooters Bible Book 110th edition October 2018 most popular

Q: What is the most popular gun book ever published?

A: That distinction goes to the Shooter’s Bible, which has sold over 7 MILLION copies since it was first published over 80 years ago.

Released last month (October 2018), the 110th Edition of this respected resource is bigger and better than ever. This latest Shooter’s Bible boasts 608 pages with 275 color photos and more than 1000 black-and-white photos. The new 110th Edition features many new firearms as well as new optics.

Published annually for more than eighty years, the Shooter’s Bible is perhaps the most comprehensive reference guide for firearms and their specifications. The publishers claim that “nearly every firearms manufacturer in the world” is included. The 110th Edition also contains new and/or enhanced sections on ammunition, optics, and accessories, along with updated handgun and rifle ballistic tables. There are also extensive charts of currently available hunting and match bullets for hand-loaders.

While many shooters are now using the internet to get reloading data and equipment specifications, the Shooter’s Bible remains a valuable resource with a great legacy. As one recent Shooter’s Bible purchaser explains: “While it’s true that much of the information contained in the Shooter’s Bible can be found on the Internet, there are many of us who would first rather relax in our easy chair and page through the book at our leisure. If you find an item that catches your fancy, you can then follow up by going to their Web site.”

Another buyer observed: “This latest edition is proof that, even with all the attacks on our 2nd Amendment right over the years, the industry has persevered and grown. I hope the day never comes when there will no longer be a reason to publish the Shooter’s Bible.”

Permalink Bullets, Brass, Ammo, Reloading No Comments »
November 1st, 2018

How to Remove Primer Pocket Crimps from Fired Brass

Marksmanship Unit USAMU Army reloading primer pocket crimp milsurp brass reloading tip swage crimps

The U.S. Army Marksmanship Unit (USAMU) regularly releases a reloading “how-to” article on the USAMU Facebook page. Here’s a helpful USAMU guide on removing military primer pocket crimps. If you ever use surplus military brass, you really should this article. It contains vital information “learned the hard way”. The writer has tried many different options for removing/swaging out crimps. He weighs the pros and cons of various methods and provides some advice that will save you time and headaches. This article was the second in a 3-part series. Visit the USAMU Facebook page regularly for other informative articles on reloading methods.

A common question, and important issue with US GI surplus 5.56 brass is “what to do with the primer crimp?” Our Handloading Shop does not prime/re-prime GI 5.56 brass, as we receive it in virgin state (primed) and don’t reload it. However, our staff has extensive private experience handloading GI brass in our own competitive shooting careers, and have several tips to offer.

Once the brass is full-length sized and decapped, the staked-in ring of displaced metal from the primer crimp remains, and hinders re-priming. Some swaging tools exist to swage out this ring, allowing free access to the primer pocket. Some are stand-alone products, and some are reloading-press mounted. Early in this writer’s High Power career, he used the common press-mounted kit several times, with less than stellar results.

Setting Up Swaging Tools
Surplus brass tends to come from mixed lots, and primer crimp varies from very mild to strong. Also, primer pocket dimensions vary. So, setting up this “one size fits most” tool involves trying to find a happy medium for a selection of different types of brass in your particular lot. Some are over-swaged, some under-swaged, and some are “Just Right.” Overall, it was a time-consuming and sub-optimal process, in this writer’s experience.

Cutting Out the Crimp Ring with a Chamfer Tool
[After trying swaging tools] this writer evolved to using the ubiquitous Wilson/RCBS/Other brands chamfer and deburring tool to cut out only the displaced crimp ring at the top of the primer pocket. One caution: DON’T OVER-DO IT! Just a little practice will let the handloader develop a “feel” for the right degree of chamfer that permits easy re-priming without removing so much metal that primer edges start to flow under pressure. For this writer, it was three half-turns of the tool in the primer pocket, with medium pressure.

Here, as with all bulk reloading operations, mechanization is our friend. A popular reloading supply house has developed an inexpensive adaptor that houses the chamfer/deburr tool (retained by an allen screw) and allows mounting in a hand drill or drill press. This speeds the operation significantly, as does use of one of the popular Case Preparation Stations that feature multiple powered operations. (Say good-bye to carpal tunnel syndrome and arthritis!)

military crimp removal USAMU

One advantage of chamfering the primer pockets lightly to remove remnants of primer crimp, vs. swaging, is that primer pockets are not loosened in this process. US GI (usually LC) NATO 5.56 brass has a great reputation for longevity due to the superior hardness of the case head vs. some softer brands of commercial brass. This means the brass will stand up well to multiple full-pressure loads without loosening primer pockets, and the chamfering method helps support this benefit.

Powered Case Prep Centers — What to Look For
A word of advice (often learned the hard way) — think carefully before jumping on the “latest/greatest” case prep center. One with a proven, long-time track record of durability and excellent customer support has a lot going for it, vs. the flashy “new kid on the block.” Analyze the functions each case prep center can support simultaneously — i.e., can it chamfer, deburr and clean primer pockets all at the same time, without having to re-configure?

Do the tool-heads that come with it look truly functional and durable? If not, can they be easily replaced with proven or more-needed versions, such as a VLD chamfer tool, or a solid/textured primer pocket cleaner rather than a less-durable wire-brush type?

military crimp removal USAMUTips for Priming with Progressive Presses
When re-priming, a couple of factors are worth noting. When re-priming using either single-stage presses, hand tools, or bench-mounted tools (such as the RCBS bench-mounted priming tool), precise alignment of the primer pocket entrance with the primer is easily achieved, and priming goes very smoothly. When using certain progressive presses, due to the tolerances involved in shell-heads, etc., one may occasionally encounter a primer that isn’t quite perfectly aligned with the primer pocket.

If resistance is felt when attempting to re-prime, DO NOT attempt to force the primer in — doing so can be dangerous! Rather, just exert SLIGHT upward pressure to keep the primer in contact with the case-head, and with the support hand, move the case back/forth a trifle. The primer will drop into alignment with the primer pocket, and then prime as usual. After priming, check each seated primer by feel. Ensure it is below flush with the case head (cleaning primer pockets helps here), and that there are no snags, burrs or deformed primers.


More Info on Primer Pocket Swaging
For more information about removing military crimps in primer pockets, we recommend you read Get the Crimp Out on the Squibloads Gun Thoughts Blog. This is a detailed, well-illustrated article that shows how to use various primer pocket reamers/cutters. It also has a very extensive discussion of swaging using CH4D, RCBS, and Dillon tools. The Squibloads author had much better luck with swaging tools than did the USAMU’s writer — so if you are considering swaging, definitely read the Squibloads article.

The illustration of primer pocket types is from the Squibloads Blog Article, Get the Crimp Out.

Permalink Bullets, Brass, Ammo, Reloading 2 Comments »