The Giraud power trimmer indexes off the shoulder of the case. It is costly, but offers high production rates, trimming to length and chamfering in one operation.
The folks at PMA Tool, makers of arbor presses, neck-turning tools, and other case-prep tools, offer some good advice about case trimming on the PMA Tool Blog. Here we reprint a PMA blog post that explains case trimming basics and helps you choose the right case-trimming tool for your needs.
Case Trimming Basics
Trimming the cartridge case to the proper length is a crucial step in case preparation that should not be overlooked or underestimated. The cartridge case or the rifle can be damaged, or even worse you get badly injured. In most instances cases should be trimmed after firing and sizing. Trimming new brass is necessary for a lot of wildcats and can be beneficial in some instances, but by and large, trimming new brass is not necessary for most situations (unless you are neck-turning). Cases should be trimmed after you have sized the case, because the expander ball on the decapping pin can (and will) stretch the neck. Those of us who neck size should get into the habit of trimming after sizing as well. This is a good rule of thumb to go by, and hopefully it will keep you safe during the reloading and shooting process.
There are so many case trimmers out there that work, deciding which one is right for you can be confusing. Even though I have trimmed thousands of cases, using about every method possible, I can’t answer the question of what case trimmer is right for you because of all the variables that may be involved. I can, however shed some light on the subject.
The two most popular designs of trimmers either index (1) off the base or the head of the case, (2) off the shoulder or datum line of the case. There are pros and cons to each and it all depends on what you are willing to live with.
Indexing off the Base (Case Head)
Let’s talk about the first one I have listed, indexing off the base, or the head of the case. The pros to this method are that you can achieve a very accurate over all length and that is after all, what it is all about. The cons to this method are that you can get some variation doing it this way. Let me explain, the base is not always square to the body or can be damaged during firing especially if it is fired through a military style rifle with a very aggressive ejector. These cases should be discarded, but sometimes they can be overlooked. This condition can lead to an over all length that is incorrect. The case head being out of square will be corrected upon firing, however that case will wind up being shorter than the rest of your cases, possibly creating a difference in the neck tension on the bullet. The more you can do to eliminate variables in your reloads the better off you are going to be. This method can also be very slow, and if the user gets careless the result will be a inconsistent over all length.
Indexing off the Shoulder (Datum Line)
The second method I mentioned, trimming off the shoulder or the datum line of the case, has its pros as well. I have found this to be the quickest of the methods and very accurate as well. After the case has been sized through the die the dimensions (particularly the headspace) of the cases are usually very uniform and exact, this allows the case to be trimmed by indexing off the shoulder. This method can be done very quickly, by hand, or by powering either the case, or the trimmer. You also don’t have to worry about the case heads being out of square with the body using this method. Generally the trimming time is cut in half, and this leads to greater focus on the job, without becoming careless.
The PMA Micro-Adjust Case Trimmer indexes case length off of the shoulder of a properly fire-formed and full-length re-sized case. We accomplish this through the use of interchangeable Delrin™ inserts which capture the shoulder and neck of the case. This insert is contained in a spring-loaded tool head that rides on a linear bearing. When the case is captured within the tool head the tool head rotates along with the case, the spring allows for the case to self-align squarely to the cutter and allows you to control the feed rate into the cutter.
— Indexes off shoulder for easy, consistent trim length
— Fully rotating head with bearing for smooth operation keeps cuts square
— Large, ergonomic design fits the hand well
— Sharp carbide cutter for quick, smooth cuts with minimal bur
— Cases captured in Delrin™ (completely non-marring material)
— Spring loaded head allows complete control of rate of feed.
Our trimmer can be used in three ways. The first method utilizes our PMA Tool caseholder drivers and your power screwdriver, drill, case lathe, drill press or lathe. Trimming via this method the case is spun and fed into the trimmer while it is held in your hand. In the second method, the trimmer’s adjustment knob is removed (after adjusting and locking the setting) and the cutting shaft is chucked in a drill, drill press or lathe. Using this method, the case itself is held by hand and fed into the cutter. We’ve found this to be the quickest method to trim.
Summary
The choice is yours to make. I hope that this was some help to you, whether you are looking for your first trimmer or looking to replace the trimmer you have. Just remember to always put safety first and accuracy second, and you will start making little bug holes in no time.
Story Tip by EdLongrange. User submissions are welcome.
“Koenig” (or König) means “king” in German. That is indeed appropriate for Doug Koenig, 18-Time Bianchi Cup winner, who is now starting to conquer the rifle world as well. Koenig, considered by many to be the best action pistol shooter on the planet, proved he’s an ace with rifles too, as he recently won two PRS matches in Production Division. Koenig, Captain of Team Ruger, was shooting a Ruger Precision Rifle (RPR), chambered in 6mm Creedmoor. Notably, Production Division limits rifles to $2000.00 for the gun ($4000.00 overall with scope). You can buy an RPR for around $1100.00 typically ($795.00 at GrabAGun), so Koenig was shooting against competitors with rifles that cost nearly twice as much. That’s impressive.
Koenig Wins Production Class at two Spring PRS Matches
Koenig took home a pair of Production Division titles at this year’s WAR Rifles Shootout and MAP Spring Shootout Precision Rifle Series (PRS) matches.
With a final score of 128.00 and a time of 58.51, team captain Doug Koenig took first place in Production Division at the WAR Rifle Shootout PRS match in Mount Victoria, MD. The WAR Rifle Shootout has a challenging 22-stage course of fire. Along with winning Production Division, Koenig also finished twelfth overall. “The tough course of fire and 15-25 mph winds at the War Rifle match were brutal, but my Precision Rifle, equipped with a Leupold VX-3i LRP and loaded with Hornady ammunition, continued to perform,” said Koenig.
Koenig then secured another Production Division win at the MPA Spring Shootout held at the Arena Training Facility in Blakely, GA with a final score of 173.00 and a time of 58.89. “The MPA match had some long shots out to 800-1356 yards, but my factory rifle got the job done and helped me win my third production class title in a row. That proves you don’t need to spend a fortune to get started in PRS competition.”
According to PRS standards, Production Division rifles are not permitted to be altered or improved in any way from the original factory configuration, and the retail price may not exceed $2,000.
Pre-Fit Barrel Options for the Ruger Precision Rifle
While PRS Production Division competitors like Koenig must stick with factory barrels, there’s no law that says you can’t upgrade your own RPR that’s not used in PRS matches. A barrel swap is probably the single best hardware upgrade you can make. A new custom barrel will improve inherent accuracy and shot-to-shot consistency. Krieger Barrels offers Pre-Fit barrels for the RPR in many popular chamberings including 6XC, 6mm Creedmoor, .243 Win, 6.5 Creedmoor, 6.5 PRC, and .308 Win. These “Drop-In Ready” barrels come finish-chambered and threaded to fit the Ruger action, with factory-spec muzzle threads. The Ruger barrel attachment system allows correct headspace with a pre-chambered barrel. Krieger explains: “Thanks to Ruger’s proprietary barrel nut design, a competent gunsmith will be able to swap out your barrel using an AR15 barrel wrench and proper headspace gauges.”
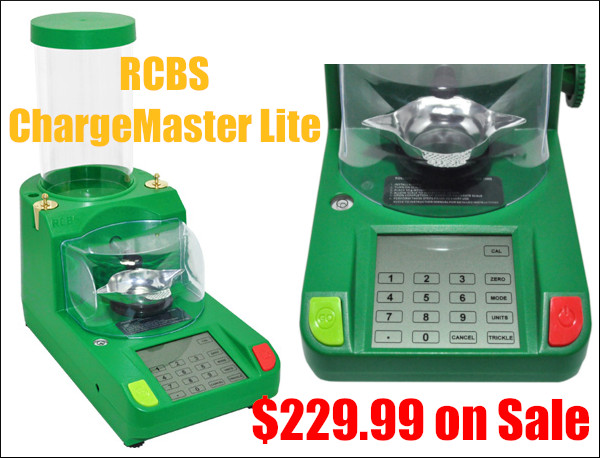
Do you need an electronic powder scale and dispenser? Check out this great deal at Midsouth Shooters Supply. Suggested retail for the ChargeMaster Lite is $299.99. Amazon’s best price for this unit is $269.49. But now you can get it for just $229.99 at Midsouth. So you can save at least $40 with this Midsouth sale. Put the money saved into bullets or powder.
The RCBS ChargeMaster Lite is the modern second generation Scale/Dispenser, descended from the original ChargeMaster. We have a 10-year-old first gen RCBS ChargeMaster in our loading room that is still going strong. The ChargeMaster Lite features an easy-to-use LCD touchscreen with many nice features. The hopper holds nearly one pound of powder. The unit comes with twin check weights and a convenient plastic cover for the powder pan. Your choice of propellant can be measured out 2 to 300 grains with a plus or minus accuracy of 0.1 grains.
Berger Match Solids are now government-endorsed. The U.S. military has selected Berger’s .375 caliber ELR Match Solid Bullet for the Extreme Sniper Strike Operations (ESSO) program (Phase 2). The ESSO program is a U.S. government project to develop a high performance, extreme long-range sniper weapon system built on a bolt-action, magazine-fed platform.
For ESSO, .375-cal Berger solids are loaded into the .375 EnABELR (Engineered by Applied Ballistics for Extreme Long Range) cartridge. This was designed to offer .375 CheyTac performance in a slightly shorter package that mag-feeds well.
Bryan Litz, Berger’s Chief Ballistician said: “The .375 caliber Berger ELR Match Solid Bullets were optimized for use in the ESSO project, which requires high performance and reliability over many rounds in adverse conditions. In addition to meeting the needs of our US military, the Berger Match Solids provide proven, match winning performance for the ELR competition shooter as well.”
ELR Match Solid Bullets drive state-of-the-art ESSO weapon systems. The EnABELR is designed to reliably engage targets at distances out to 2500 meters.
Table 1 below presents basic load data for the .375 EnABELR. Considering the Berger .375 Cal 379gr and 407gr solid bullets were developed in conjunction with the EnABELR case, load data is provided to achieve certain landmark velocities with these bullets, for a range of suitable powders. According to Applied Ballistics, with a 30″ barrel, “the .375 EnABELR can safely push the Berger 379gr Solid to 2900 fps, and the Berger 407gr Solid to 2800 fps.”
Table 1 — .375 EnABLER Load Data
Table 2 — .375 EnABELR Comparative Velocities
Applied Ballistics notes that: “These are conservative, baseline velocities. Higher velocities are possible but the above performance is safely achievable well within pressure limits of the cartridge. Note the performance of the .375 EnABELR is driven by the high BC Berger Solid bullets. If the .375 CheyTac were loaded with the same bullets, the performance would be about the same. ”
About Berger Bullets
Berger manufactures precision projectiles and match-grade ammunition for Target, Hunting and Tactical applications in Mesa, AZ. Berger is part of the Capstone Precision Group, the exclusive U.S. distributor for Berger, Lapua, Vihtavuori and SK-Rimfire products. For more information, visit Bergerbullets.com.
Each Wednesday, the U.S. Army Marksmanship Unit (USAMU) publishes a reloading “how-to” article on the USAMU Facebook page. A while back, the USAMU’s reloading gurus addressed a question frequently asked by handloaders: “How much neck tension is optimal, and how should I select a neck bushing size?” The USAMU offers a straight-forward answer, suggesting that hand-loaders start with a neck bushing that sizes the neck so that it is .003″ less than the loaded outside diameter with bullet in place. From there, you can experiment with more or less tension, but this is a good starting point for many popular cartridge types.
Determining Optimal Case-Neck Tension
This week, we examine determining the correct case neck tension for optimum accuracy. Our method is simple, but relies on the use of case sizing dies which accept interchangeable neck diameter bushings graduated in 0.001″ increments. (Those readers using fixed-diameter dies with expander balls aren’t forgotten, however. Methods of tailoring these dies for proper neck tension will be found below.)
In our experience across many calibers, sizing case necks 0.003″ under the loaded-case neck diameter usually yields excellent accuracy. In other words, the sized case neck expands 0.003″ when the bullet is seated.
Bushing Choice for Optimal Sizing
Over the years, we have periodically experimented with increasing neck tension to possibly improve accuracy. In testing with machine rests at 300/600 yards, accuracy often deteriorated as neck tension increased; thus, 0.003″ expansion (from sized neck to loaded neck) is where we usually start.
Using the .260 Remington as an example, our loaded cartridge case necks measure 0.292”. Simply subtract 0.003” from that, and use a bushing that sizes necks to 0.289” (after springback). There are exceptions — sometimes, brass may be a bit soft or hard. Some case necks might need, say, 0.001” more tension, but in general, this works well.
This .003″ standard of neck tension works very well for single-loaded, long range cartridges. Depending on your caliber and firearm, it MAY also work very well for magazine-fed cartridges. If this neck tension proves inadequate for your purpose, one can increase neck tension as needed while monitoring for possible accuracy changes.
Special Considerations for Coated Bullets: If you are using moly-coated bullets, this significantly reduces the “grip” of the case neck on the bullet, and you can expect to have to tighten your case necks accordingly — particularly for magazine-fed ammunition. In any event, we do not crimp rifle cartridges, and advise against it for accuracy handloads.
Tips for Using Expander Balls
Many savvy handloaders avoid the use of expander balls in high-accuracy reloading, if possible. These can stretch cases and/or disturb the concentricity of the case neck vs. case body. If using a die with an expander ball, tapering both ends of the ball and polishing it to a mirror finish can significantly reduce these effects. (Special carbide expander ball/decapping stem sets are available for this as well.)
The typical dies used with expander balls are intended to take any cases the user may find, and size them down well below the ideal “spec” to ensure any cases will give good neck tension. The necks are then expanded up to provide heavy to medium neck tension as the expander ball exits the neck. The brass is over-worked, leading to premature work-hardening, and seated-bullet concentricity may suffer. However, the cartridges produced are perfectly adequate for most handloaders. Those who seek finest accuracy generally prefer not to over-work their brass if possible.
Another Option — Custom-Honed FL Dies
There are companies which offer to convert one’s standard dies to accept neck bushings, and that gives excellent flexibility. Another, more “old-school” approach, is to have the neck of one’s FL die honed out to the desired diameter for sizing, based on one’s case neck thickness. The expander ball may then be reduced until it barely touches the case necks after sizing, or it may be eliminated entirely. However, once performed, this modification is permanent and leaves fewer options than the bushing route, if one later changes case neck thickness.
Those shooters who turn their case necks for optimum neck wall thickness uniformity, or for a tight-neck chamber, will want to take the reduced neck wall thickness into consideration. For example, when setting up a 7mm match rifle to use a standard hunting die without an expander ball, the slightly thinner necks resulted in a perfect 0.003″ reduction in the fired-neck diameter. The result was a low-cost die that fit with custom precision and yielded excellent, match accuracy!
Keeping your barrel cool has many important benefits — it will definitely enhance barrel life and can help maintain accuracy over the course of long shooting sessions. Now there is a new way to quickly dissipate heat from your rifle barrel — Barrel Blizzard
The makers of BarrelCool have created a new dual-fan barrel cooling device, called the Barrel Blizzard. Each powerful fan moves 30 cubic feet of air per minute — that’s serious cooling power. This unit is powered by a common USB-style battery. The housing mounts easily to the barrel, and the twin fans can each be adjusted 360° to various angles (You can even use one to cool the gun and the second to cool the operator on a hot day). This should be available very soon at the introductory price of $74.99
Reduce Barrel Cooling Time from 45 Minutes to 10 Minutes
How well does the Barrel Blizzard work? The makers tell us: “Repeated tests show that the Barrel Blizzard cuts barrel cool-down times significantly. What might take 45 minutes, can often be reduced to less than 10 minutes. And if you combine the new Barrel Blizzard with BarrelCool, the in-chamber fan, you can get a hot barrel down to near-ambient temperature in approximately 5 minutes.”
Barrel Cool-Down Times for Barrel Blizzard Alone and Blizzard + BarrelCool
We think this product will definitely be popular with varmint shooters in the summer months. Those guys may shoot hundreds of rounds in a day. Many serious varminters bring along a couple spare rifles, so that they can swap rigs when one barrel heats up. With the Barrel Blizzard they may be able to keep shooting with minimal wait time, and no rifle change-outs. Byron Sumoba, one of the designers, notes: “With a rechargeable 2600 mAh battery. We are getting about 2.5 hours of continuous use out of a battery pack.”
Who can benefit from this product? The makers say this is “For the shooter wanting to drastically reduce their load development time at the range… or the varmint hunter looking to cool that barrel down and increase barrel life.”
Barrel Blizzard Can Also Cut Mirage
This system can also cut mirage, by reducing the hot air rising from your barrel. If a mirage band is not enough on hot days, you can just rotate one of the fans to send the flow down the barrel towards the muzzle. This will help reduce mirage coming off the barrel.
Review by James Mock
If you were charged with building a scope for F-Class or long range Benchrest, what features would you want? Vortex asked that question, received feedback from many competitors, and then set out to build a new high-magnification, zoom comp scope that would set a new “performance for price” standard.
The new Vortex Golden Eagle has features that this shooter really appreciates. It has a power range of 15x to 60x with a 52mm objective lens. Vortex has attempted to keep the weight as low as possible and the cost reasonable. My initial impression is that Vortex spared no expense in developing this scope. The “street price” for this premium scope is a reasonable $1499.00. Plus it has Unconditional Lifetime Warranty. Given its features, performance, and price, I believe that this scope will sell very well.
Premium HD, extra-low dispersion glass
APO (apochromatic) objective lens system with index-matched lenses
XRP multi-coated lenses for max light transmission
ArmorTek extra-hard lens coating to protect lens from dust, dirt, and smudges
Fogproof and Waterproof (Argon gas purged)
Specifications
Field of View at 100 yards: 6.3 feet at 15X; 1.7 feet at 60X
Main Tube: One-piece 30mm
Length: 16.1 inches; Weight is 29.7 ounces
Objective Lens: 52mm
Eye Relief: 3.9 inches
Reticles: SCR-1 FCH; ECR-1 MOA
Testing the Golden Eagle
I recently tested a Golden Eagle with the ECR-1 reticle. On this model the Hash Marks subtend 1 MOA at 40X. There is also a fine crosshair reticle (SCR-1) available. Initial tests with the scope were done on June 28th and I was very impressed with what I saw. With a new scope I always shoot the square (box test) to test tracking and amount of movement. I shot the square today after shooting a 5-shot group at 250 yards (my longest available distance). Below is a picture of the box test target that I shot. Yes, shot #5 went through the exact same hole as shot #1.
Below is the 250-yard target I shot before doing the box test. To get to the 100-yard target, I clicked down 14 clicks (1/8th MOA) and the scope was spot on. It is really a pleasure to use instruments that do exactly what they are supposed to do. With the Louisiana mirage, I shot this orange/white target at 40X instead of the maximum 60X. I did not have any problem seeing the 6mm bullet holes at 40X. The optics in this scope are to my old eyes are as good as any that I have used (regardless of price).
Competition Test Success — Golden Eagle Delivers a Win
My next use of this scope was at our monthly 600-yard match on July 15th. It was a typical mid-July day in north Louisiana — very hot and humid with light switching winds. The mirage was terrible, but I managed to squeak out a victory with a 188/5X score out of 200/20X possible. I shot the Golden Eagle at 40X all day and it performed perfectly. No one could see bullet holes today, even with the high powered premium spotting scopes. This is a quality scope and it may be a “lucky” scope in that I did not expect a win with a 6mm Dasher barrel with 2500 or more rounds through it.
Point of Aim Test with Hood Scope Checker
I also tested the Golden Eagle for holding Point of Aim (POA). For this procedure, I used the Hood scope checker (loaned to me by Bart Sauter). To use this, one mounts two scopes side by side. Ideally one scope has proven its ability to hold POA. Here I used a Valdada 36X BR model as my control scope. It has proven over an 8-year period of time to hold its point of aim. I mounted these scopes on my BAT/Leonard 6mm PPC and adjusted each to the same point on the target.
As one can see in the above picture, these are big scopes. After the first shot, I noticed that the reticle dot on the Vortex seemed to be about 1/8th MOA to the right of its original position. I stopped to check for ring slippage (which I had experienced in prior tests). There was no apparent slippage, so I checked the parallax and found that there was some parallax correction needed. This was probably the source of the apparent shift in point of aim, but I cannot be sure of that. I fired three more shots (checking after each) and found no shift.
After testing for POA shift, I fired the remaining rounds using different aiming points. I fired 5 rounds (upper left) using the Vortex and 3 rounds to the right of those using the Valdada scope.
CONCLUSION — A Very Fine Optic at a Reasonable Price
While testing this Vortex Golden Eagle scope, I developed a real fondness for it. I appreciate its great optics, eye relief and crispness of adjustments. If I thought that this scope did not hold POA, I would use my old Valdada in the 600-yard matches in which I participate. Further testing has shown no tendency to shift point of aim.
If I am allowed to keep this scope until the fall, I am sure that I will be able to see 6mm bullet holes in the white at 600 yards. Seeing those 6mm holes is very difficult, but that is my dream for a premium high-powered scope. During the summer months in north Louisiana, the air is much too “dirty” to spot small holes at 600 yards. By October, there should be some conditions in which one can use the premium optics to see bullet holes in the white at 600.
In summary, let me say that this scope has become one of my all-time favorites because of its bright, clear images and its great reliability. If you are looking for a great long-range scope that is reasonable in cost, try the Golden Eagle from Vortex.– James Mock
When you need the ultimate in “knock-down” power, bigger is better. One of the most potent hunting rounds ever created is the mighty .500/.416 Nitro Express. For those who yearn for “More Power”, this is true “Extreme Ammo”.
Kreighoff unveiled the .500/.416 Nitro Express 3 ¼”, based on the proven .500 Nitro Express case, with a nice, long neck for good bullet tension, a good taper for easy feeding… and enough case capacity. The result was a winner — the .500/.416 NE pushes a 410-grain bullet at 2,325 fps, for just under 5,000 ft-lbs of energy at the muzzle.
Text by Norma Staff Writers
The history of double rifle cartridges is a long and colored one. These cartridges were largely designed around the heavy-for-caliber cup-and-core round-nosed and full-patch bullets of yesteryear, and the guns were regulated for relatively close shooting. Almost all of the designs were rimmed cartridges; the rimmed case giving just about the best headspacing available. While the rimmed cartridges didn’t work very well in the repeating rifles, they work just fine in the single-shot and double rifles.
There are some double rifles chambered for the rimless and belted cartridges, but the rimmed cases offer the easiest and most positive extraction. The reputation and performance of the .416 Rigby (and later the .416 Remington) were undeniable, and while there are doubles chambered for these cartridges, Kreighoff saw the wisdom of a rimmed cartridge using a .416″-diameter bullet.
Early in 1996, Kreighoff unveiled the .500/.416 Nitro Express 3 ¼”, based on the proven .500 Nitro Express case, with a nice, long neck for good bullet tension, a good taper for easy feeding under duress, and enough case capacity to mimic the performance of the rimless .416s. The result was a winner — the .500/.416 NE pushes a 410-grain bullet at 2,325 fps, for just under 5,000 foot-pounds of energy at the muzzle. This ballistic formula has been used on the largest game on earth with great results, and in a double rifle, will allow for the reliable, immediate second shot that double rifle shooters have come to appreciate.
The .500/.416 NE bridges a huge gap between the .450/400 and the .450 NE, and offers a shooting experience closer to the .450/400, while giving plenty of power for hunting any and all dangerous game. I think that the .450/.400 and .500/.416 make a great choice for the traveling sportsman. When comparing the two, the .500/.416 offers a bit more frontal diameter (.416” v. .411”) and a considerable increase in velocity (2,325 vs. 2,050 to 2,125, depending on manufacturer), so it boils down to whether you desire a bit more reach-out-and-touch-‘em or the lesser recoil of the lighter cartridge. What I see in the .500/.416 NE is a double rifle cartridge with a performance level on par with the highly familiar .416 Rigby, yet available in the quick-handling double rifles. [Norma’s African PH .500/.416 NE ammo, loaded with excellent Woodleigh projectiles, is an excellent choice.]
If you haven’t checked out NormaUSA’s website, you should. There you’ll find Norma’s Cartridge of the Month Archive. This great resource provides a detailed history of popular cartridges, along with a discussion of these cartridges’ hunting and target-shooting uses. There are currently 29 Cartridge of the Month articles, including the popular 6.5 Creedmoor.
Also on Norma-USA.com you’ll find information on Norma cartridge brass, bullets, powder and factory ammo. The site also offers a video archive plus links to Norma Reloading Data.
The Applied Ballistics 2019 Spring Seminar will be held at Snowbird Resort in Utah on June 1-2, 2019. The Seminar Fee is $625.00. However, now through April 21st you can use Code ABWIRE for $75 off registration. Note — Seminar fees do NOT include lodging! However, through May 4, 2019, attendees can reserve rooms at the Center-Cliff Lodge at the special seminar rate of $145.00 per night plus tax.
Primary speaker Bryan Litz will present material from his books, the Applied Ballistics Lab, and his experience shooting in various disciplines. Additional speakers addressing ballistics and long-range shooting topics will include Nick Vitalbo, Doc Beech, Alan Barnhart, Mitchell Fitzpatrick and other industry experts.
Seminar attendees will receive multiple Applied Ballistics products, all included in the registration fee:
1) Full library of Applied Ballistics Books and DVD set, valued at $275.
2) Applied Ballistics Analytics software, valued at $200.
3) Binder including hand-outs, articles, and worksheets.
2. Trajectory Features – Zeroing, Point Blank Range, Danger Space, and Uphill/Downhill Effects.
3. Sights – Tall Target Test (Sight Scale Factor and Cant), Aperture Sights, Turrets vs. Holding Reticles, and Extreme Adjustment for ELR.
4. Drag Modeling – What is a drag model, how is drag measured, how is a drag model used, and standard drag models.
5. Ballistic Coefficients – What is a BC, G1 and G7, Curve Fitting Challenges (averaged BCs, segmented BCs), and Estimating BCs.
6. Wind – Nature of wind, Mechanism of wind deflection (velocity scaling, lag time, wind deflection), near vs. far wind, wind measurement, terrain and vertical wind, competition Wind strategies, Wind coaching.
10. ELR Shooting – Transonic effects, Secondary Effects, Critical Nature of (Ranging, MV Measurement, Drag Modeling, Wind), Equipment Currently Being Used and Bullet Selection.
12. Ballistic Solvers – Components (Interface, Solver/Simulation, Model), Potential Accuracy, and walk-through of use with technical explanation of inputs.
13. Other Topics – Technology, Laser RangeFinders, Non-Linear Divergence, and Much More.
With this insanely good deal from Palmetto State Armory, you can get a pistol AND half an AR rifle for just $379.99 with FREE shipping. The deal is for a PSA AR-15 complete lower with Magpul stock PLUS a M&P Shield compact 9mm Pistol. This is an incredible deal. As Ammoland.com notes: “Compare that price [for pistol plus AR lower] to $430.00 for just the S&W M&P Shield 9mm Handgun elsewhere online.”
Smith & Wesson’s M&P Shield is a concealable, striker-fired polymer pistol with 3.1″ barrel. Overall legnth is 6.1 inches and unloaded weight is just 19 ounces. The Double-action-only (DAO) trigger break consistently at about 6.5 pounds.
The PSA AR-15 Complete Lower is the Magpul MOE Edition that features a quick-adjusting Magpul stock. This PSA lower will accept all AR15 magazines, however, no magazines are included. This quality, reliable lower assembly is reviewed in this video:


 Bushing Choice for Optimal Sizing


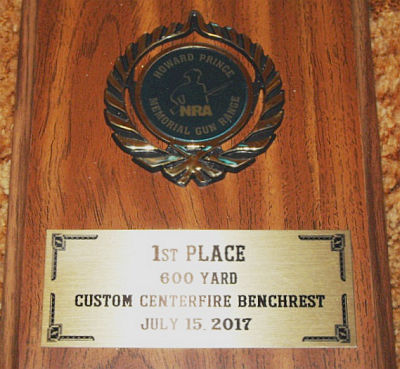 Competition Test Success — Golden Eagle Delivers a Win