Many novice hand-loaders believe that neck bushing Inside Diameter (ID) size is the only important factor in neck tension. In fact, many different things will influence the grip on your bullet and its ability to release from the case neck. To learn more about neck tension and “case grip”, take the time to read this article carefully. We bet you’ll gain knowledge that will let you load more accurate ammo, with better ES/SD.
Editor: Guys, this is a VERY important article. You really should read it over carefully, twice. Variations in the force required to release a bullet can significantly affect accuracy and ES/SD. You really need to know how the grip on bullet can be altered by many different factors.
Neck Tension (i.e. Grip on Bullets) Is a Complex Phenomenon
While we certainly have considerable control over neck tension by using tighter or looser bushings (with smaller or bigger Inside Diameters), bushing size is only one factor at work. It’s important to understand the multiple factors that can increase or decrease the resistance to bullet release. Think in terms of overall brass-on-bullet “grip” instead of just bushing size (or the internal neck diameter in non-bushing full-length sizing dies).
Bullet grip is affected by many things, such as:
1. Neck-wall thickness.
2. Amount of bullet bearing surface (shank) in the neck.
3. Surface condition inside of neck (residual carbon can act as a lubricant; ultrasonic cleaning makes necks “grabby”).
4. Length of neck (e.g. 6mmBR neck vs. 6mm Dasher).
5. Whether or not the bullets have an anti-friction coating.
6. The springiness of the brass (which is related to degree of work-hardening; number of firings etc.)
7. The bullet jacket material.
8. The outside diameter of the bullet and whether it has a pressure ridge.
9. Time duration between bullet seating and firing (necks can stiffen with time).
10. How often the brass is annealed.
11. Amount (length) of neck sized (e.g. you can size only half the neck).
12. Interior diameter of bushing, or neck section of non-bushing die. – and there are others…
One needs to understand that bushing size isn’t the beginning and end of neck tension questions, because, even if bushing size is held constant, the amount of bullet “grip” can change dramatically as the condition of your brass changes. Bullet “grip” can also change if you alter your seating depth, and it can even change if you ultrasonically clean your cases.
6-time U.S. National Long-Range Champion John Whidden adds: “Our tests show us that the condition of the necks in regards to lubed or not, carbon inside or not, squeaky clean or not, etc., matter even more than the size of the bushing used. An ultrasonically cleaned or brand new dry case neck make for some quite high seating force.”
In our Shooters’ Forum a reader asked: “How much neck tension should I use?” This prompted a lengthy Forum discussion in which other Forum members recommended a specific number based on their experience, such as .001″, .002″, or .003″. These numbers, as commonly used, correspond to the difference between case-neck OD after sizing and the neck OD of a loaded round, with bullet in place. In other words, the numbers refer to the nominal amount of interference fit (after sizing).
While these commonly-used “tension numbers” (of .001″, .002″ etc.) can be useful as starting points, neck tension is actually a fairly complex subject. The actual amount of “grip” on the bullet is a function of many factors, of which neck-OD reduction during sizing is just one. Understanding these many factors will help you maintain consistent neck tension as your brass “evolves” over the course of multiple reloadings.
Seating Depth Changes Can Increase or Decrease Grip on Bullet
You can do this simple experiment. Seat a boat-tail bullet in your sized neck with .150″ of bearing surface (shank) in the neck. Now remove the bullet with an impact hammer. Next, take another identical bullet and seat it with .300″ of bearing surface in another sized case (same bushing size/same nominal tension). You’ll find the deeper-seated bullet is gripped much harder.
Neck-Wall Thickness is Important Too
I have also found that thinner necks, particularly the very thin necks used by many 6mm PPC benchrest shooters, require more sizing to give equivalent “grip”. Again, do your own experiment. Seat a bullet in a case turned to .008″ neckwall thickness and sized down .003″. Now compare that to a case with .014″ neckwall thickness and sized down .0015″. You may find that the bullet in the thin necks actually pulls out easier, though it supposedly has more “neck tension”, if one were to consider bushing size alone.
In practical terms, because thick necks are less elastic than very thin necks, when you turn necks you may need to run tighter bushings to maintain the same amount of actual grip on the bullets (as compared to no-turn brass). Consequently, I suspect the guys using .0015″ “tension” on no-turn brass may be a lot closer to the guys using .003″ “tension” on turned necks than either group may realize.
Toward a Better Definition of Neck Tension
As a convenient short-cut, we tend to describe neck tension by bushing size alone. When a guy says, “I run .002 neck tension”, that normally means he is using a die/bushing that sizes the necks .002″ smaller than a loaded round. Well we know something about his post-sizing neck OD, but do we really have a reliable idea about how much force is required to release his bullets? Maybe not… This use of the term “neck tension” when we are really only describing the amount of neck diameter reduction with a die/bushing is really kind of incomplete.
My point here is that it is overly simplistic to ask, “should I load with .001 tension or .003?” In reality, an .001″ reduction (after springback) on a thick neck might provide MORE “grip” on a deep-seated bullet than an .003″ reduction on a very thin-walled neck holding a bullet with minimal bearing surface in the neck. Bushing ID is something we can easily measure and verify. We use bushing size as a descriptor of neck tension because it is convenient and because the other important factors are hard to quantify. But those factors shouldn’t be ignored if you want to maintain consistent neck tension for optimal accuracy.
Consistency and accuracy — that’s really what this all about isn’t it? We want to find the best neck tension for accuracy, and then maintain that amount of grip-on-bullet over time. To do that you need to look not only at your bushing size, but also at how your brass has changed (work-hardened) with time, and whether other variables (such as the amount of carbon in the neck) have changed. Ultimately, optimal neck tension must be ascertained experimentally. You have to go out and test empirically to see what works, in YOUR rifle, with YOUR bullets and YOUR brass. And you may have to change the nominal tension setting (i.e. bushing size) as your brass work-hardens or IF YOU CHANGE SEATING DEPTHS.
Remember that bushing size alone does not tell us all we need to know about the neck’s true “holding power” on a bullet, or the energy required for bullet release. True bullet grip is a more complicated phenomenon, one that is affected by numerous factors, some of which are very hard to quantify.
Wouldn’t it be nice to have a print resource at your fingertips that has hundreds of true-size cartridge illustrations, plus technical descriptions of thousands of popular cartridge types? That could be a real time-saver. It’s no wonder this book is an Amazon category best-seller.
If you’re a serious shooter, the latest 7th Edition of the Ammo Encyclopedia belongs in your library. Released in late 2022, this 928-page book is probably the most comprehensive and up-to-date book in print covering current and obsolete cartridge and shotshell types. The Ammo Encyclopedia is a massive resource work with 100+ chapters, covering thousands of handgun, rifle, and shotgun cartridges from the past century and a half. This 928-page edition includes over 150 new cartridge profiles. An expanded Trademark Index lists contact information for all current ammunition manufacturers.
One of the best features is a full-color section with actual size drawings of over 320 current rimfire/centerfire cartridges and shotshells. You won’t find that many “life-size” cartridge drawings in one place even on the internet. Cartridge profiles and ballistic charts have been expanded to include many new factory cartridges. An updated Cartridge Index lists both the standard and alternate names for each cartridge in chronological order. The authors have even included air rifle pellets and historical images and charts. This 928-page softcover book is now $44.93 on Amazon.
Comments from guys who bought the book:
“This book contains a vast array of information on many modern and even obsolete ammunition. Definitely recommend for any modern reloader novice or experienced.” – Duggaboy460
“It’s a great reference book for individuals who reload their own ammunition. There is a lot more info in this Edition. Everyone who likes this information should have it in their library.” – Reloader
“I like the general and technical comments that are available for each and every cartridge. Information that predicts if a cartridge will stay in production for many more years or rapidly become obsolete.” – RSL1
Howa Rifles — General Background
Howa is a Japanese heavy machinery company. One of its product lines are firearms, which are imported into the United States of America by two different companies, Legacy Sports International and Weatherby. Legacy sells the 1500 under the manufacturers name while Weatherby re-brands the guns as the Weatherby Vanguard. In general, the finishes on the Weatherby rifles are more refined than the LSI-imported 1500s.
Howa Centerfire Rifles In Review
Howa Rifles Come with Excellent HACT Two-Stage Triggers
Howa 1500 HACT 2-Stage Trigger
Howa 1500s feature the very nice Howa HACT trigger. This is an adjustable, two-stage trigger, set for about 3 pounds (combined stages). Crisp and repeatable, this is an excellent trigger for a factory gun. There is no annoying Glock-style safety lever in the middle of the trigger blade. The 2-stage design and pull weight range works well for a hunting rifle or a rig for PRS competition. Rifleshooter.com says the Howa trigger is “one of the best factory triggers, along with Tikka. I’ve found the Howa trigger superior to a Remington 700 — the Howas doesn’t need to be replaced.”
Writing for the Western Outdoor News, WONews.com, Steve Comus has field-tested the HACT Trigger. Steve writes: “I always liked two-stage triggers, because of the way I could take-up the slack and then actually know when the rifle was going to go off. The take-up on the [HACT] trigger was fast and easy. The crisp, positive release when pressure was put on during the second stage [reminded me] of some of the target rifles I shot through the years.”
Howa Barreled Actions Are Available Now at Brownells
A wide variety of Howa barreled actions are ON SALE now at Brownells.com starting at $409.99. That’s a good deal considering these include action, barrel, AND excellent HACT 2-stage trigger. These Howa barreled actions are offered in three sizes (Mini, Short, Long/Magnum) and with standard, heavy, and carbon-wrapped barrel types. Various barrel lengths are also offered for popular chamberings such as 6.5 Creedmoor and .308 Winchester. All these M1500 barreled actions come fully assembled with the barrel chambered, installed, and properly headspaced.
RifleShooter.com has articles showing how to build rifles with Howa barreled actions. Despite popular beliefs, Howa barrels are NOT that hard to remove. We asked Bill at RifleShooter.com about the process:
Q: Is it difficult to remove a barrel from a Howa 1500?
A: Not very. I’ve heard from some smiths that worked on Howas (years ago) that the factory barrels are difficult to remove. However of the half dozen or so Howa barrels that I’ve pulled, they’ve been very easy. I use a Brownells action wrench with the top piece for a Rem Model 700 and the flat bottom resting against the flat on the wrench.
You may have heard internet grumblings about removing Howa barrels. Some folks say they are extremely difficult to remove without a relief cut. Well Bill at Rifleshooter.com demonstrates that Howa barrels can be removed without trouble, provided you have the right tools. Watch this video:
Watch Howa Barrel Removal Video — Quick and Easy (Click Speaker Icon for Audio)
Howa Actions — Three Options
Howa offers three action lengths: Mini, Short, and Long. You can see the bolts for the three action lengths in the image below. The Mini-Action has similar external dimensions to the Remington Model Seven, however, the Mini-Action’s bolt does not travel as far to the rear. This is a mixed bag. The upside is you have a quicker action (shorter bolt throw). The downside is you are limited to shorter rounds such as the .223 Remington, 7.62×39mm Russian, and 6.5 Grendel. But if you need a bigger cartridge, just choose the standard or long action Howa variant.
Howa 1500 vs. Remington 700 — Important Differences
Is the Howa 1500 a Remington 700 clone, or some kind of improved Remington 700? No, not really. While the top radius of the Howa 1500 does match the Model 700, and they can both use the same two-piece scope bases, there are a number of differences.
If you look at the Howa 1500 alongside the Remington 700 you’ll note the M700 is a round action, while the Howa is a flat-bottom action. In many ways the Howa’s bottom half reminds me of a push-feed Winchester. This means the chassis and stocks that support a Howa 1500 are not V-block based like you’ll find on a 700, instead they have a flat bottom. While the bolt of the Howa is similar in external appearance to the Model 700, it does offer some improvements, notably an M16-style extractor and a firing pin assembly that can be easily removed without tools.
Howa 1500 action screws are metric and are in a different location from the 700. The Howa 1500 has an integral recoil lug that accepts the front action screw, this means you have more of the front action screw engaging the action. WARNING: If you install it into a poorly-fitted stock or action you may bind it.
Widener’s Reloading & Shooting Supply recently published a helpful introduction to reloading powders. Widener’s online Guide to Smokeless Powders shows the various types of powders, and explains how the differences in powder kernel/flake size and shape, and burn rate affect performance. We recommend you visit Widener’s website and read the Powder Guide in full.
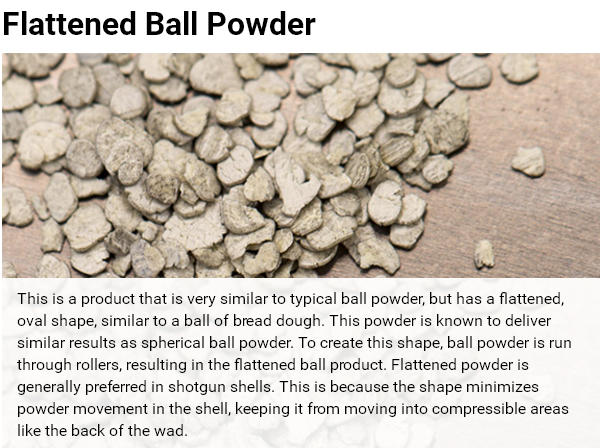
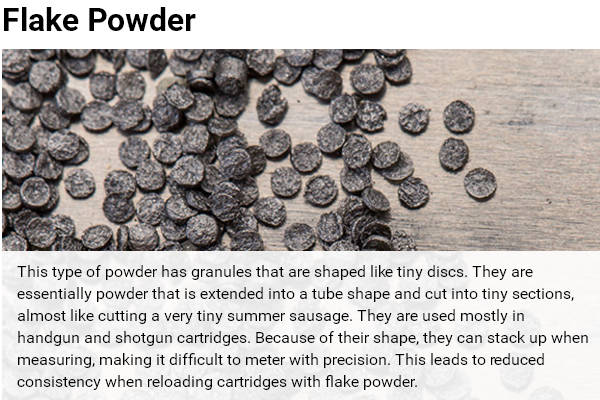
Take a close look at these illustrations which show the key differences between the four main powder types: extruded (stick) powder, ball (spherical) powder, flattened ball powder, and flake powder.
Burn Rate Basics
Widener’s Guide to Smokeless Powders also has a useful discussion of Burn Rate (a confusing topic for many hand-loaders). Wideners explains: “While a gun powder explosion in the cartridge seems instantaneous, if you slow it down you will actually find that each powder has a different ‘burn rate’, or speed at which it ignites.” This video shows powders with two very different burn rates. Watch closely.
Different burn rates suit different cartridge types notes Widener’s: “In general a fast-burning powder is used for light bullets and low-speed pistols and shotguns. Medium-rate powders are used for magnum pistols, while high-velocity, large bore rifle cartridges will need slow powders[.]
It should be noted that burn rate does not have a standardized unit of measurement. In fact, burn rate is really only discussed in comparison to other powders; there is no universal yardstick. Specifics will change by cartridge and bullet types[.]”
Yet another .300 Blackout disaster. Unfortunately, that .300 Blackout cartridge can fit in a .223 Rem chamber. Shooting a .308-caliber bullet in .223 bore is a recipe for disaster.
The .300 AAC Blackout aka “300 BLK”, is a compact 30-caliber cartridge designed to work in AR-15 rifles. It has a shorter cartridge case to accommodate the bigger 30-caliber bullet while still fitting in a standard AR-15 magazine. Unfortunately, that’s the danger. A careless shooter can toss a .300 Blackout cartridge in with .223 Rem rounds without noting. And because the case-head size is the same as the .223 Rem (5.56×45) the rifle’s bolt assembly will happily chamber and fire the .300 BLK round. Problem is, that forces a .308 diameter bullet down an undersized .223-caliber bore. Not good!
This images were provided by Tactical Rifle Shooters on Facebook. The message was clear: “Don’t try to run 300 Blackout in your .223/5.56mm. It won’t end well. The problem is identical rifles and identical magazines but different calibers.”
Image from Accurate Shooter Forum. Cutaway shows the jammed .30-Cal bullet:
For those who MUST have a .300 Blackout, here are some things you can do:
1. Use different colored magazines for .300 Blackout vs. .223 Rem.
2. Fit all your uppers with caliber-labeled ejection port covers.
3. Mark .223 Rem upper handguards with the caliber in bright paint.
4. Mark all .300 BLK Rounds with heavy black marker.
Comments by Folks Who Viewed these .300 Blackout Disaster Photos:
“The .300 Blackout is simply a badly-designed round. A properly-designed round would have had a feature in the shape that would have prevented cross loading in the first place.” — D. Santiago
“I almost made that mistake… I had a magazine of 300 BLK inserted in my .223/5.56 all night. Fortunately, I never pulled the trigger. Once I realized the mistake, I almost got ill. [After that incident] I no longer own a 300 BLK.” — B. Welch
“Happened to me hog hunting from a helo. Gun exploded in my face.” — B. Hood
“Fire-forming projectiles [is] so wrong in centerfire!” — M. Stres
“Had some dude come into the store the other day wanting .300 Blackout ammo to shoot in his 5.56 AR. It took 15 minutes of explaining for him to understand you got to have a .300 Blackout Upper!” — R. Williams
A while back, our friend Bill Marr of Rifleshooter.com conducted a fascinating 6mm Creedmoor barrel cut-down test that reveals how velocity changes with barrel length. This time Bill started with a 24″ Proof Research stainless steel barrel on a Howa action. Bill says this was a well-used barrel, with over 1800 rounds through it. So, the velocities might be a bit different than a new barrel of similar length. Bill cut the barrel down in one-inch increments. Here are some results from the test:
For this latest test, Rifleshooter cut the barrel in one-inch increments from 24″ to 16.1″ (just over legal minimum). Velocities were measured with a MagnetoSpeed V3 chronograph mounted on arm attached to the stock. This allowed the chrono to be adjusted inwards as the barrel was cut shorter, inch by inch.
For the 6mm Creedmoor cartridge, Bill loaded Hornady 108gr ELD Match bullets over 41.5 grains of Hodgdon H4350 with CCI 200 primers in new Starline brass.
The results were interesting to say the least. Bill reports: “Muzzle velocities ranged from 2,893 ft/sec at 24″ to 2,598 ft/sec at 16″ for a decrease in muzzle velocity of 295 ft/sec. Muzzle velocity changes per inch of barrel length ranged from 6 ft/sec per inch between 20 and 19 inches to 63 ft/sec per inch between 19 and 18 inches. Average velocity change per inch of barrel length was 37.9 ft/sec.”
Bill concludes: “An average drop of 37.9 ft/sec/inch of barrel is fairly significant and is what would be expected with a fast moving 6mm cartridge like the 6mm Creedmoor. While I’m used to seeing 6mm Creedmoors with slightly longer barrel lengths than 24″, when coupled with a sound suppressor the additional length can make moving the rifle quickly more difficult.
I’d suggest staying with longer barrel lengths wherever possible with this cartridge. At shorter lengths, it does give up more performance than its big brother the 6.5 Creedmoor.”
More 6mm Creedmoor Velocity Data from 2017 Cut-Down Test
If you’re curious about 6mm Creedmoor velocities at longer barrel lengths, back in 2017 Rifleshooter completed a 6mm Creedmoor barrel cut-down test from 31 inches all the way down to 17 inches. The test included four bullet types from 95 grains to 110 grains. With the 110gr Sierra MK, velocity at 31″ was an impressive 3110 fps. Surprisingly the velocity didn’t decrease that much for the first few inches. Even at 26″ (a five-inch reduction), measured velocity with the 110s was 3073 fps, a loss of 7.4 fps per inch on average. With a barrel shortened all the way to 20″ however, velocity had dropped down to 2949 fps, a significant (161 fps) loss. CLICK HERE for complete results from that 31″-17″ Barrel Cut-Down Test.
Sadly, Shooting USA host and respected outdoor sports journalist Jim Scoutten has passed at age 77, following a brief illness. Noted as “one of the most iconic voices in the shooting sports industry”, Jim Scoutten hosted the popular Shooting USA cable television broadcast for decades. He was a leading force in the firearms industry. This Editor had the chance to meet Jim on many occasions at SHOT Show, and I can confirm that he was a talented man of high integrity who was dedicated to advancing the shooting sports and protecting Second Amendment freedoms. The Shooting USA series will continue hosted by Jim’s capable son John Scoutten.
Yesterday, the Shooting USA Facebook page stated: “It is with great sadness that we announce the passing of Jim Scoutten. In his thirty years of reporting the shooting sports, Jim played a pivotal role in the industry and will be greatly missed.” Jim’s concluding message from each show was, famously: “As always, shoot safely, shoot often, and keep ‘em in the ten ring.”
Here are just a few of the 1,000+ comments on Facebook:
I watched Jim for many years. What a wealth of knowledge he was. Thank you Jim for all you did for the shooting sports, your legacy will live on! Even though I am rarely in the “ten ring”, I will keep shooting often! Rest in peace Sir!
There are a lot of heavy hearts tonight. Jim is a LEGEND. My condolences to the family. Thank You, Sir, for your devotion to the industry and to shooters everywhere. Rest easy.
He was such an icon in the shooting industry! Was so proud I made one his shows from Bianchi Cup. My condolences to the family.
He always made Wednesday night TV something to look forward to. He was so passionate towards the shooting sports and outdoors communities.
Jim did so much for the industry and was truly respected. Prayers to his family.
Jim Scoutten Was a Notable Defender of the Second Amendment
In the early 1990s Jim worked on the American Shooter TV program, which was then followed by the very popular Shooting USA series. Media leaders praised Jim’s contribution to the shooting world and his role in protecting Second Amendment Rights.
“Jim leaves a strong legacy as a tireless defender of shooting, firearms, and our Second-Amendment rights. His voice was unique and powerful; we will honor Jim by carrying on in the endless fight to defend the Constitution and will support his family and team as they forge a new future for Shooting USA.” — Mitch Petrie, V.P. Programming of Outdoor Sportsman Group Networks.
“Jim Scoutten [reported] the stories of the shooting industry and the competitive shooting disciplines since 1993. In [30] years of broadcasting on four national networks, he’s done more to popularize the shooting sports than any other individual or organization, reaching multiple generations with the invitation to bring out your guns and enjoy some competition.” — Garry Mason, Outdoor Legends Hall of Fame.
During [Jim Scoutten’s] tenure, the American Shooter TV program became the highest-rated outdoors television program in history, garnering more than one million fans nationwide. In recent years, Scoutten has been a part of the Shooting USA program, a show that he has co-hosted with his eldest son John, and the Sighting In with Shooting USA program, both series appearing on Outdoor Channel along with full seasons on My Outdoor TV (MOTV).
In this Shooting USA episode, Jim Scoutten showcased High Power Silhouette Rifles.
A Franklin, Tennesse resident, Scoutten’s firm but gentle voice and familiar smile were eagerly welcomed into the homes of America’s shooting enthusiasts for three decades, an invitation that made him the most watched firearms reporter in industry history thanks to his knowledge of firearms, his passion for the shooting sports, and journalistic integrity that marked his long career.
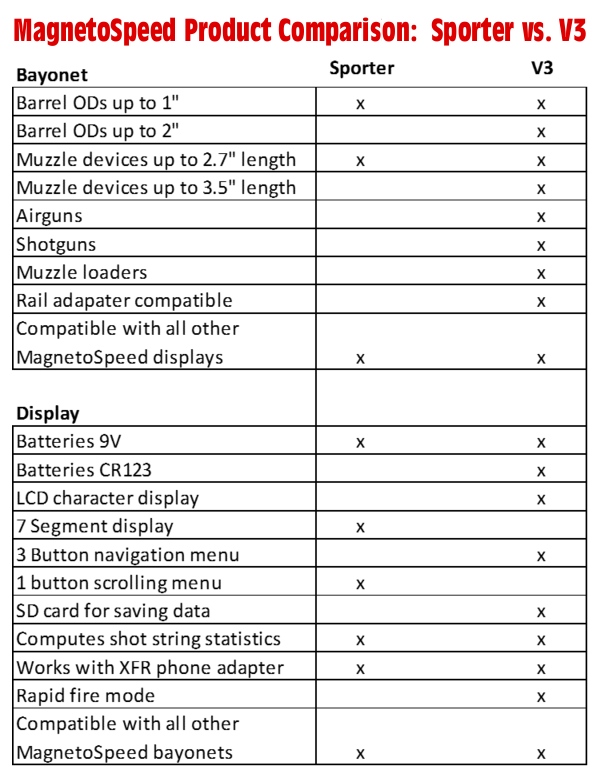
If you have been waiting to purchase a chronograph… now is a great time to buy. You can get the reasonably-priced MagnetoSpeed Sporter for $249.00. You can set up this device in a few minutes, and you never have to go downrange to fiddle with a tripod or fuss with wires. The MagnetoSpeed Sporter is simple and effective — a no-hassle solution.
See MagnetoSpeed Sporter Chronograph Features Reviewed in Video
We’re impressed by the Sporter chrono, as are other shooters — this unit is very popular. Like the MagnetoSpeed V3, the Sporter faithfully records shots, even in complete darkness. Shot strings are recorded digitally and can be transferred to a smart phone via MagnetoSpeed’s XFR accessory (and Apps).
The Magnetospeed Sporter offers most of the features of the more expensive models (see chart below for details) and has a updated sensor. MagnetoSpeed says the Sporter is “Ideal for contoured rifle barrels (sporter barrels) and long-barreled revolvers.” The Sporter Chronograph Kit (shown above) includes: Bayonet Sensor, 3.5 foot Data Cable, Remote Display (with Battery), Strap with thumb nut, Two V-block spacers, and compact storage box.
Q: Will the Sporter Chrono work with thicker barrel (i.e. greater than 1″ diameter)?
A: The manufacturer recommends the $449.00 V3 model for thicker barrels. But, wink-wink, if you have a 1.25″ barrel you can get this to work, based on what we’ve seen.. If you have a really fat barrel (up to 2.0″ diameter), get the V3. Magnetospeed also says the V3 is needed for airguns, shotguns, and muzzleloaders.
Click Image for Full-Screen Photo
The Sporter Chrono attaches quickly and easily. It has a 3.5-foot-long cord, and will work with Muzzle Brakes and Flash-hiders up to 2.7″ long.
NOTE: Respected Shooting USA host Jim Scoutten passed away yesterday, 7/18/2023. We were saddened to learn of his passing. Jim was a great defender of the Second Amendment and supporter of the shooting sports. The Shooting Wire Blog noted: “Scoutten has been a well-known and respected figure in the shooting industry, serving as the longtime host of Shooting USA. As managing editor of Tier One Media, LLC, he created two of the most successful cable television shows on the Outdoor Channel.”
The 2022 PRS Pro Series Finale was held November 5-6 at the K&M Precision Rifle Training Complex in Finger, Tennessee. The Finale brings together the best of the best within the PRS Pro Series to crown the annual champion. Competitors qualify through regional events to attend the Finale based on previous match results through the season. The 2022 PRS Finale is the headline feature on Shooting USA TV today.
Shooting USA SHOW TIMES: This Shooting USA Episode airs Wednesday, July 19, 2023 at 9:00 PM Eastern and Pacific; 8:00 PM Central. If you miss the regular broadcast, you can stream the show online at any time on Vimeo for $0.99 per episode.
The Precision Rifle Series (PRS) is the leading organization running Precision Rifle (tactical-style) competition. In ten years, PRS has grown exponentially, not only in the USA but also internationally. The PRS records results from local and regional competitions to establish a world leader board to invite the top competitors to the Finale at the K & M Precision Complex in Tennessee.
Great K&M Complex video — overhead and action shots — Click II pause button to halt:
PRS Finale Hardware
You’ll find the latest and greatest PRS hardware at the PRS Finale. Notable in recent seasons was the fact that many top competitors moved down from the 6.5/6mm Creedmoor to the smaller, more efficient 6mm Dasher, 6BRA, 6GT and other 6mm cartridges. The 6mm Dasher offers excellent accuracy with less recoil than the 6.5 Creedmoor. New magazine designs allow very reliable feeding with the shorter cartridges.
Allison Zane Takes Top Honors among Lady PRS Competitors
Congratulations to Team Lapua’s Allison Zane for winning overall Top Lady for the 2022 Precision Rifle Series (PRS). Zane, who scored a 169 at the PRS Pro Series Finale, clinched the Top Lady title for the third consecutive year. That’s an impressive “Three-Peat” for the Ladies’ title. Out of 260 competitors, Zane finished Top Lady and placed 27th overall.
Zane competed at the worlds with a 6mm Creedmoor rifle shooting Lapua brass and Berger 109gr LRHT bullets. Her precision rifle was built by Short Action Customs using a Defiance Machine Ruckus Tactical action, Modular Driven Technologies (MDT) ACC chassis system, Vortex Razor HD Gen III 6-36×56 scope, Hawk Hill Custom Marksman Contour barrel with MDT brake, and Huber two-stage trigger.
Precision Rifle Series (PRS) Finale
Attendance at the PRS Finale is by invitation. The Precision Rifle Series collects scoring information/results from regional competitions to compile a ranked world leader board over the course of an annual season. The top competitors from the season are thereby qualified for the Finale at the state-of-the-art K & M Training complex in Tennessee — one of the best precision shooting facilities in the world.
The Tactical Rifle Shooters Facebook Group recently showcased tools used to measure case headspace before and after “bumping” the shoulder. After a case is fired, hand-loaders who full-length size their cases will typically bump the shoulders back anywhere from .001″ to .0035″, depending on the rifle and application. With our 6mmBR and Dasher cases we like about .0015″ bump.
You want the amount of case sizing and bump to be the same for all your brass. To ensure uniformity, it makes sense to measure your cases before and after the FL sizing process. When we have time, we check every case. Other folks will simply check the first 3-4 cases coming out of the FL sizing die to ensure the FL die setting is correct and delivering desired headspace/bump.
1. Whidden Gunworks Shoulder Bump Gauge
There are a variety of tools that can be used to measure shoulder bump. Our favorite is a special cartridge-specific bushing made by Whidden Gunworks. The Whidden Shoulder Bump Gauge enables you to adjust your sizing die to the desired measurement. The bump gauge is attached to your calipers with a set screw and determines the measurement from the base to the shoulder of the case. The photo below, from Tactical Rifle Shooters, shows the Whidden Bump Gauge for the .375 CheyTac cartridge.
2. Dave Manson Vertical Comparator with Dial Read-Out
Dave Manson states: “This tool was designed to make life easier for the advanced shooter and re-loader by allowing precise measurement of ammunition, case, and chamber headspace. With this information, the re-loader will be able to fine-tune clearances and fits between his ammunition and chamber, with resultant improvements in accuracy and case life.” The functions of the Manson Comparator are:
1. Measure headspace of factory or reloaded ammunition
2. Quantify chamber headspace by measuring headspace of a fired case
3. Ensure minimal shoulder set-back when setting up re-loading dies
4. Compare base-to-ogive length to ensure consistent bullet-to-rifling relationship.
Hornady’s Lock-N-Load Headspace Comparator system is easy-to-use and handy. You can get a kit with Red bushing-holder body and 5 bushings for $43.43 at Midsouth. Hornady explains: “The Lock-N-Load® Headspace Comparator… gauge measures variations in brass before and after firing or re-sizing. It allows for headspace comparison between fire-formed brass and re-sized brass.” IMPORTANT: Hornady states: “To determine the proper bushing diameter for your cartridge, simply add the neck diameter and the shoulder diameter and divide that number by two. Use the bushing closest to that number.” Hornady offers five: .330″, .350″, .375″, .400″, and .420″.
One tip — We have found the Hornady gauges may vary a little from unit to unit even with the same nominal size. If you have more than one gauge for the same cartridge, test each on your brass — you may then note a slight difference in your bump measurements. Mark one and use that consistently. There is also an Anvil Base Kit that mounts to the opposite blade on the caliper. This provides a more stable surface for the base of your case.
4. L.E. Wilson Case Gage Depth Micrometer
If you are looking for precise “bump” measurements without having to mess with calipers and clamp-on gauge blocks, you may want to consider the L.E. Wilson Case Gage Depth Micrometer (currently $130.00). This takes very precise, repeatable measurements, but you need to know your starting point. The manufacturer explains: “Every reloader should know exactly how much your Full Length Sizing Die is pushing back the shoulder. With the NEW Case Gage Depth Micrometer you can do just that! It has never been easier to measure you cases headspace before and after sizing. The Depth Mic allows you to slip the micrometer perfectly over the top of the Gage with your case inserted into the Gage and take a measurement. Micrometer has graduations of .001″. The Case Gage Depth Micrometer is set to a zero of .100″ on the scale at our factory. Because of differences in ‘feel’ and temperature, we include a the Gage Block for you to test Zero and to adjust if necessary.”
5. Pistol Brass Case DIY Bump Gauge
Last is a “field expedient” set-up if you do not have any of the comparator tools shown above. A sized .45 ACP case (or other suitable pistol case) can be used to measure shoulder bump. The mouth of the pistol case sits on the shoulder of your rifle cartridge brass.
Make sure the .45 ACP case is trimmed square and that it is round. We recommend you first run it through an expander, then size it, trim it and chamfer. Next, take the .45 ACP case and slip it over the neck of a fired, unsized rifle case with the primer removed. Align the two cases between the jaws of your calipers and note the length from rim to rim (See left photo below).
OK, now you have the length for a fired rifle case BEFORE sizing. Next, take a full-length sized rifle case (without primer) and do the same thing, placing the .45 ACP case over the neck of the FL-sized case (Right Photo). The difference between the two numbers is the amount of “bump” or set-back you are applying to the shoulder. Here the difference is .0015″. The amount of bump you need varies with your chamber and your load, but .0015-.002″ is a good initial setting.


 In our Shooters’ Forum a reader asked: “How much neck tension should I use?” This prompted a lengthy Forum discussion in which other Forum members recommended a specific number based on their experience, such as .001″, .002″, or .003″. These numbers, as commonly used, correspond to the difference between case-neck OD after sizing and the neck OD of a loaded round, with bullet in place. In other words, the numbers refer to the nominal amount of interference fit (after sizing).
 Neck-Wall Thickness is Important Too


 Howa 1500 HACT 2-Stage Trigger


 The
The 


 For this latest test, Rifleshooter cut the barrel in one-inch increments from 24″ to 16.1″ (just over legal minimum). Velocities were measured with a