|
|
September 15th, 2026

Want to learn the basics of position shooting? Then you should check out an article by Gary Anderson, DCM Emeritus, in On the Mark digital magazine (Summer 2014, pp. 6-13). This article covers all the key elements: body position (prone, sitting, standing), sling use/adjustment, sight picture, aiming process, and trigger control. While this 8-page article was specifically written for Rimfire Sporter shooters, the techniques described by Anderson apply to all types of position shooting, whether you shoot air rifles, smallbore rifles, or centerfire rifles.
CLICK HERE for Position Shooting Article in On The Mark Magazine
NOTE: This is a large PDF Document — it may take some time to fully load. Scroll to page 6-13.
Here’s what Anderson says about aiming — how to keep your sights steady and get them centered on the middle of the target:
Trigger Contact and Center
 As soon as aiming at the target begins, the index finger must move from the trigger-guard to contact the trigger. It is important to get initial pressure on the trigger as soon as aiming begins. Then the shooter must focus on the sight picture and centering the sight picture movements over the aiming point. No one, not even champion shooters, can hold the aligned sights perfectly still. The sights are going to move a little bit or a lot, depending on the shooter’s skill level. The secret is to center those sight picture movements over the aiming point on the target (see trace illustration) before pulling the trigger. As soon as aiming at the target begins, the index finger must move from the trigger-guard to contact the trigger. It is important to get initial pressure on the trigger as soon as aiming begins. Then the shooter must focus on the sight picture and centering the sight picture movements over the aiming point. No one, not even champion shooters, can hold the aligned sights perfectly still. The sights are going to move a little bit or a lot, depending on the shooter’s skill level. The secret is to center those sight picture movements over the aiming point on the target (see trace illustration) before pulling the trigger.
When the sight picture movements on the target are centered, the last step in firing the shot is to add… smooth pressure on the trigger until the shot breaks.
Anderson also discusses the 5 Basics of Shot Technique:

September 15th, 2026

Whether you should from the bench, or from prone, it’s great to have your cartridges in a convenient, easy-to-reach position. This article explains how you can build your own height-adjustable ammo caddy for a very low price (likely under $10.00). Credit Martin Tardif for this great Do-It-Yourself (DIY) project. Martin’s flex-arm caddy design works great for F-Open competitors as well as anyone who shoots with a pedestal front rest, either on the ground or from a bench. The ammo caddy attaches, via a flexible arm, to your front rest. The flexy arm allows you to position your ammunition close to your rifle’s feeding port. That makes it easy to grab cartridges and load them into the chamber without shifting your shooting position.
Kudos to Martin Tardif for his clever use of inexpensive materials when he crafted this ammo-caddy a few seasons back. The total cost of the whole project, according to Martin, was just $8.00! (With inflation, materials could run a bit more these days, but the project would still be very inexpensive.)
Martin Explains How to Build the Ammo Caddy
Here are some pics of my DIY P.L.A.B. (Port Level Ammo Block). I cannibalized the goose neck from a Craftsman bendy-style utility light and bought a 3.5″x 1″ Acetal disk on eBay. I then drilled out the disk to accept twenty .284 Winchester rounds and screwed the disk to the bendy arm. The arm, by itself, wasn’t sturdy enough to support my fully loaded ammo block, so I inserted a 1/8″-diameter steel rod cut to length into the arm before I screwed it to the disk. On this Bald Eagle rest, I wasn’t using the windage adjustment cable. That allowed me to secure the bottom end of the arm to the unused 5/16″ x 18 bolt hole for the cable. [Editor’s Note: For other pedestal rest types/brands you may need to drill a hole for the base of the flexy arm.]

September 15th, 2026
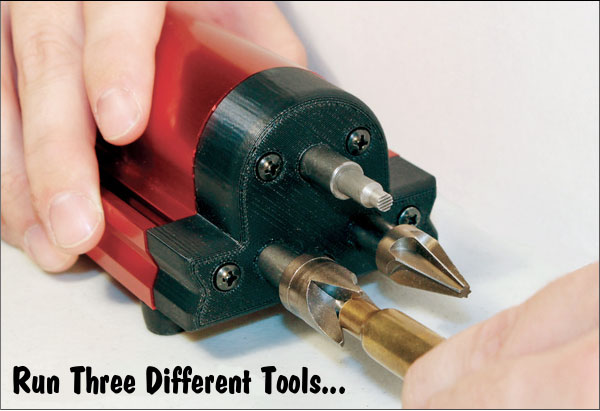
Nobody likes to spend hours manually chamfering cases and cleaning primer pockets. There are simple hand tools that will perform these tasks, but the process is time-consuming and tedious after a couple dozen cases. To speed up case prep duties, you can get one of the large, powered case prep centers. These function well, but frankly we didn’t want to give up that much precious space on our reloading bench. One good solution is Hornady’s compact Lock-N-Load Case Prep Trio (item 050160). This triple-threat tool packs a lot of functionality in a small package.

This cleverly-designed powered tool has a small footprint, yet it can perform three tasks as well as much more expensive, tower-style case prep units. The versatile Hornady Case Prep Trio is $139.99 at Brownells, $139.99 at Midsouth, and $155.95 on Amazon. We’ve used this machine and it works well. The only negative is that you will get metal shavings on your bench (unlike some of the larger case prep centers). We’ve seen some guys put a small pan under the power head — then you can just dump the shavings out of the pan.
With three active stations, you can chamfer, deburr and clean primer pockets without having to change tools. The Case Prep Trio ships with inside chamfer, outside chamfer, and deburr tools. You can also use the machine with other optional 8/32 threaded accessories such as primer pocket reamers, primer pocket uniformers, and case neck brushes. CLICK HERE to see all tool options. Conveniently, the Case Prep Trio has on-board storage for your tool-heads. User reviews have been very positive.
|


