Keith Glasscock is an outstanding competitive shooter, who has finished second at the F-Class National Championships (F-Open) multiple times. Keith is also a skilled wind coach who runs the popular Winning in the Wind YouTube Channel. Along with his interest in mid-range and long-range F-Class competition, Keith also enjoys game hunting and varmint adventures.
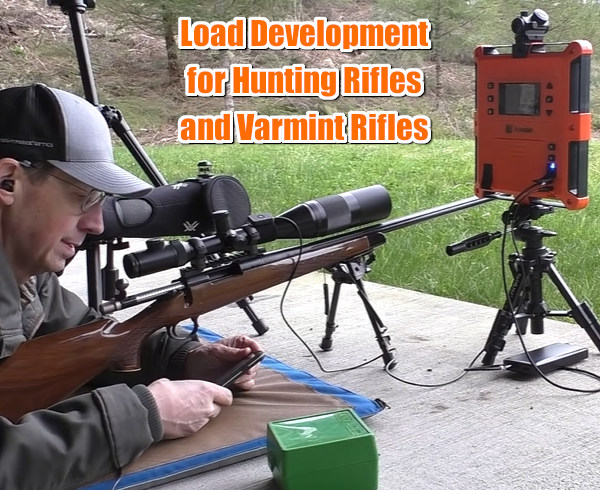
It’s hunting season now, so we showcase two videos Keith has made about developing hand-loads for hunting rifles. Developing accurate hand-loaded ammo for hunting and varmint rifles involves procedures that may be a bit different than load testing for a match rifle. You want to be efficient, and use the types of brass and bullets you’ll be using on the hunts. In two recent videos, Keith shows how he developed good, accurate loads for a .223 Rem varmint rifle and a .308 Win hunting rifle.
.223 Rem Load Development — Powder Charge and Seating Depth
In the first video, Keith covers the load development process for a Remington 700 bolt-action varmint rifle chambered in .223 Remington. Keith starts by full-length sizing the brass. Then he experimented with powder charge weights, and came up with a promising load of 24.7 grains of Alliant AR Comp with Hornady 50gr A-Max bullets.
Next Keith experimented with seating depths (see 5:30-6:100) and found that accuracy improved as he changed OAL length in .005 increments. Keith ended up with 2.270″ with a 3-shot group in the twos! This video shows the importance of testing your bullet choice at various seating depths. Keith shoots this rig prone off bipod, which is similar to the bipod shooting he does in the varmint fields. Keith explains key factors to consider when optimizing the .223 Rem cartridge in a varmint rig. Velocity readings are made with a LabRadar unit.
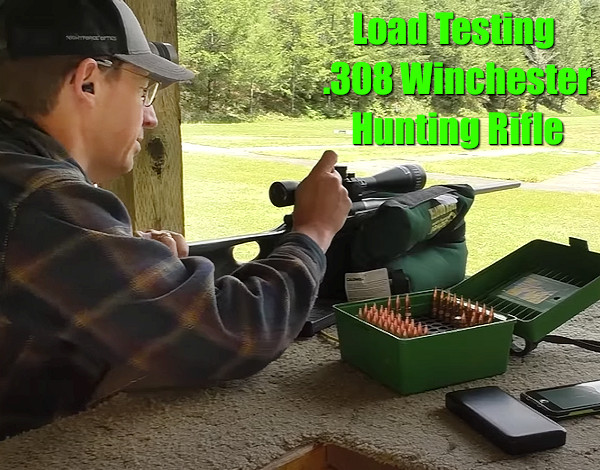
Load Development for .308 Win Hunting Rifle
In a second video, Keith shows the process for load development with a .308 Winchester hunting rifle. Here Keith uses a large X-type sandbag for a front support. Again, he was shooting a Remington 700 bolt-action rifle, this time with Barnes TSX solid copper bullets, PPU Brass, Federal 210m primers, and AR Comp powder. Keith said the Barnes bullets were excellent — he commented that these bullets were “match quality in terms of precision”. Keith achieved some very small three-shot groups with AR Comp and the TSX projectiles. Keith did note that point-of-impact shifted up significantly with increases in charge weight (see 6:20-7:10). With thinner-contour hunting barrels, this is not unexpected. But POI change should be observed carefully during load development, as you may need to adjust your zero after completing testing.
Three Bonus Videos for Hunters and Huntresses
Here are three videos with useful tips and techniques for hunters and huntresses. These cover rifle marksmanship, optics selection for deer hunting, and efficient methods for sighting-in hunting rifles.
How to Shoot Better with a Hunting Rifle
This “must-watch” video has great practical advice for hunters. It illustrates proper hand-hold and head position, and shows how to stay steady when breaking the shot. Even competition shooters can learn a few things. One viewer notes: “This was very informative. The footage through the scope showing how one’s position moves the sight alignment was particularly helpful.”
You’ll find more great videos on Thomas Haugland’s THLR.NO YouTube Channel, that offers videos for long-range hunters and marksmen. Haugland, who hails from Norway, is a serious shooter, who takes his rifles out into the field, in all conditions. The THLR.NO channel offers solid advice on scopes, reticles, wind-reading, field positions, and much more. Haugland’s team puts a wide variety of gear through serious field tests — every thing from suppressors to packs to electro-optical hardware. In addition the THLR.NO channel provides good advice on stalking techniques and hunting skills.
The Complete Optics Selection for For Deer Hunting
In this video, Vortex optics techs explain the optics package deer hunters will want to take into the field. Along with a good medium-power zoom riflescope, you’ll want binoculars and (probably) a spotting scope. You’ll also want a Laser Rangefinder (LRF) or laser-equipped binoculars. As the team points out, the LRF is not just to range your prey right before you take a shot. A top-quality LRF can range a reflective object as far as 1500 yards away. That helps you decide whether you want to hike a mile to reach that buck you see way out on the next ridge.
How to Sight-In Your Hunting Rifle
This video offers good basic advice for sighting-in a hunting rifle. There are a series of six points covered. Here’s Tip #1: “Find a safe place to shoot your rifle with a backstop. If possible, use a bench and a rock-solid shooting rest. Sighting-in is all about consistency, so the less human error you have, the better. For safety, be sure to also bring ear and eye protection.” READ FULL ARTICLE on NRAWomen.com.
The Magnetospeed V3 chronograph is affordable, easy to transport, and easy to set up. With a MagnetoSpeed barrel-mounted chrono you can quickly and easily record muzzle velocity (MV) without having to set up tripods or walk down-range. The compact MagnetoSpeed chronos are easy to operate and transport. With the full-featured V3 model, everything you need comes in a small fitted case. In the top photo are the components used with the MagnetoSpeed V3 Kit:
1. V3 Bayonet sensor
2. Display and control unit
3. Bayonet spacers (plastic and rubber)
4. Cords and mounting hardware (left), suppressor heat shield (right)
5. Alignment rod (square cross-section)
6. Rail adapter (sold separately)
Our friend Gavin Gear of UltimateReloader.com reviewed the MagnetoSpeed V3 and came away impressed. Gavin explains that a good chrono is essential: “If you want to load and shoot precision ammunition, you need the tools that will produce and validate the precision of your loads. A good chronograph is one of those tools! In this post I’m going to introduce you to the MagnetoSpeed V3 chonograph, the high-end electromagnetic chronograph which fills out the top slot in MagnetoSpeed’s equipment portfolio.”
In this 11-minute video Gavin reviews MagnetoSpeed’s top-of-the-line V3 Chronograph. He shows what ships with the unit, how to set it up for both rifles and pistols, and then he puts it through its paces showing how it captures velocity data. Gavin says he will follow-up with future videos showing how to link the MagnetoSpeed V3 to your mobile phone and how to log velocity data for future reference. To learn more about this high-tech chrono, visit UltimateReloader.com.
Given its compact size, reasonable price, and easy of set-up, we believe all serious shooters should have a MagnetoSpeed in their gear collection even if their primary chronograph is a LabRadar. The MagnetoSpeed V3 complete system is available now for $399.99 from Sportsman’s Warehouse (MSRP is $449.00). A Labadar Chrono by itself is $625.00 but they are currently out-of-stock.
September 23, 2023, was National Hunting and Fishing Day (NHFD). We’re proud to recognize how important hunting is for millions of Americans — as a source of food for families and as an important connection with nature and the outdoors. The NFHD website has helpful resources for hunters, and in this article we provide links for Where to Hunt, How to get Hunting Licenses, and Hunter Education.
NHFD was first established by President Nixon in 1972. According to NationalToday.com, NHFD’s “roots go back more than 100 years to President Theodore Roosevelt, who introduced the first laws regulating the hunting of wildlife in the United States.”
This month we hope some of our readers can take new shooters afield and introduce them to hunting. Many hunters receive their first introduction to hunting from family or friends as a tradition passed down from generation to generation. There are over 9.2 million hunters in the United States.
To have a successful hunt you must first get to areas where game thrives. Finding the right places to hunt is essential. The NSSF offers a nationwide Where-to-Hunt database of hunting areas. You can click on a particular state, then specify the specicies you wish to hunt. This is a very useful resource.
In most states, when hunting game animals, you’ll need a hunting license and/or zone permit. The Federal Fish & Wildlife Service has state-by-state listing for hunting licenses on FWS.gov. Click the box below to learn how to get hunting licenses in your region.
For all hunters, whether they have mentors to guide them or not, the most important first step into the woods begins with a state-certified hunter education course. Click the box below to see hunting education opportunities around the nation.
Game Resources — To learn more about different game species, click these NSSF links:
To help you prepare for a fall hunt, here is a free, printable Deer Practice target. Hone your skills on a trio of bucks with a red bullseye centered on the animals. You can print the targets in black and white, but they look best in color. Right-click the image below to download a FREE printable PDF file.
Ever wondered how factory ammunition is produced, from start to finish? How are brass cases made, how are bullets created, and how are finished cartridges produced on automated assembly lines? Today’s video showcase features six major factories that, collectively, produce bullets, powder, and finished ammo. We start with the Berger Bullet plant, follow by Vihtavuori powder production in Europe. Then we show the Remington (now Vista Outdoor) ammo plant in Utah, along with a Federal plant that produces rimfire ammunition. Last but not least, there’s an excellent, very informative video from the Norma ammo factory, plus a Hornady ammo plant video.
Bullets being seating at Hornady ammo factory.
Berger Bullets Factory Tour — Made in USA
In this video, Recoil TV takes a behind-the-scenes look at Berger Bullets, and how the outstanding, match-winning Berger bullets are created. The video covers the entire process — from raw materials, to the placement of bullet cores inside jackets, to the final ultra-consistent and uniform projectiles. To see the complete line of Berger Bullets, with full Ballistic data, visit BergerBullets.com
Vihtavuori Powder Production in Europe
Vihtavuori produces some of the most consistent, high-quality powder on the planet. Vihtavuori powders have been used to set world records and win countless championships in multiple disciplines. This excellent video goes inside Vihtavuori’s European production centers. It is really fascinating — you see how extruded powder starts with long spaghetti-like strings, before being finalized into the tiny sticks that we load.
Along with the powder production process, this video includes the entire VV production line, so you see how powder bottles are filled with powder and the tops of the bottles are secured by automated machines.
Remington Ammo Factory (Now Operated by Vista Outdoor)
This SHWATteam video visits the Remington ammunition plant in Arkansas. Vista Outdoor, the company that produces Federal, Speer and CCI ammo, purchased Remington’s ammunition business in Lonoke, Arkansas. Including the new high-tech plant in the back, this facility has the equivalent of 13+ football fields (1200 acres) under roof at its ammo plant, with over 1100 employees. Production capacity is impressive. When running at maximum output, this Remington ammo plant can crank out a staggering 7,000,000+ rounds every day. To produce that volume of ammunition, the facility needs a huge amount of resources: one million pounds of copper per month and 124,000 pounds of lead per day. Remington started manufacturing ammunition at this Lonoke facility in 1970, but some of the machines have been churning out ammo since long before.
Norma Factory Tour
Guys — honestly, if you do anything today on this site, watch this video. You won’t be disappointed. Guaranteed. This is a very informative (and surprisingly entertaining) video. Every serious hand-loader should watch this video to see how cartridge cases are made. The camera work and editing are excellent — there are many close-ups revealing key processes such as annealing and head-stamping.
VERY Informative Video Show Cartridge Brass and Ammunition Production:
Norma has released a fascinating video showing how bullets, brass, and ammunition are produced at the Norma Precision AB factory which opened in 1902. You can see how cartridges are made starting with brass disks, then formed into shape through a series of processes, including “hitting [the cup] with a 30-ton hammer”. After annealing (shown at 0:08″), samples from every batch of brass are analyzed to check metal grain structure and hardness. Before packing, each case is visually inspected by a human being (3:27″ time-mark).
Federal Rimfire Ammunition Production
Field & Stream Tours Federal Ammo Plant in Minnesota
A reporter for Field & Stream recently got a chance to tour the Federal ammunition production facility in Anoka, Minnesota. This large plant produces both rimfire and centerfire ammunition. While touring the plant, the reporter was allowed to capture video showing the creation of .22 LR rounds from start to finish. This is a fascinating video, well worth watching. Watch and learn how rimfire ammo is made.
Note to Viewers — After Starting Video, Click Speaker Icon to HEAR audio!
This revealing video shows all phases of .22 LR ammo production including cupping, drawing, annealing, washing, drying, head-stamping, priming, powder charging, bullet seating, crimping, waxing, inspection, and final packaging. We recommend you watch the video from start to finish. You’ll definitely learn some new things about rimfire ammo.
Hornady Ammunition Factory
If you wonder how ammo is made, starting with raw metal, check out this video from Hornady. It shows how bullet jackets are formed from copper, followed by insertion of a lead core. The jacket is then closed up over the core with the bullet taking its final shape in a die (a cannelure is applied on some bullet types). Next the video shows how cartridge brass is formed, starting with small cups of brass. The last part of the video shows how cases are primed and filled with powder, and how bullets are seated into the cases, using an automated process on a giant assembly-line.
Need a top-notch Ballistics App for your iPhone, iPad, or iPod? Start with Ballistic: Advanced Edition (AE), the number 1 (i.e. most installed) App for iOS systems (iPhones and iPads). Ballistics AE (Advanced Edition) is the most popular iOS ballistics program for many good reasons. It offers a full feature set with Ballistic Solver, Ballistic Comparison (with up to 8 projectiles), Target Log (records group sizes), Advanced WindKit, and more. The Ballistic: Advanced Edition software is easy to use, with nice controls. Underneath it all is the proven JBM Ballistics calculator. And here’s the kicker — this excellent mobile App software is now FREE to download and install on iPhones and iPads!
This Video Explains How to Set Up and Use Ballistic: Advanced Edition
Full-featured and easy to use, Ballistics AE has been refined over many years, and it supplies rock-solid solutions derived from JBM Ballistics solver (created by James B. Millard). Unlike some other Apps, Ballistics AE is STABLE on iPhones (with various OS levels). What’s cool is that Ballistics AE is now available for FREE for both iPhones and iPads. This software is now provided by Federal Premium Ammunition, with in-App purchase functionality.
We’ve used the Ballistic: Advanced Edition program on an iPhone 5S, iPhone 6, and iPad, and it performed well. Here are some of the features we liked:
1. Mirrors output from online version of JBM Ballistics we often use for initial calculations.
2. Controls are simple to use and (mostly) intuitive.
3. Handy comparison feature lets you compare ballistics for different projectiles side by side.
4. Advanced Wind Kit allows you to account for complex wind situations.
5. Projectile and BC Databases are very comprehensive.
6. Software is regularly updated to match Apple OS changes.
This article is Copyright 2023 AccurateShooter.com. No republication is authorized. Any appearance of this story on another site obliges that site to pay liquidated damages and/or licensing fees.
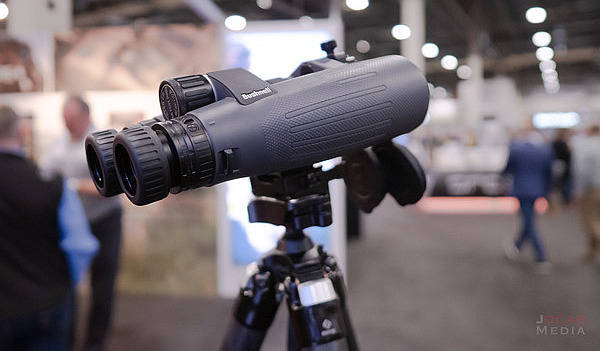
Bushnell offers Match Pro ED 15×56 Binoculars designed for PRS/NRL competition. These 15X Match Pro ED binoculars have a unique box-style MilRad reticle for ranging and determining shot locations. These new-for-2023 Match Pro ED Binoculars combine high-magnification binocular lenses with an MRAD-based reticle for ranging, target sizing, and shot correction. The benefit is that this 15X binocular optic could replace a bigger, heavier reticle-equipped spotting scope. This Match Pro ED Binocular can be quickly mounted on a tripod for enhanced stability. We recommend that because it is pretty hard to hold a 15X optic very steady with hands alone.
The Match Pro ED’s offset SHOT-CALL reticle, located in the right barrel, has a dedicated focus adjustment and can be rotated for leveling after IPD (interpupillary distance) adjustment (i.e. how far the eyepieces are spread apart). Users can secure their preferred IPD with the included BRIDGESET stabilizer, which ensures the binocular is set for quick use and is stable when mounted on a tripod. Claimed light transmission is 92%. Suggested MSRP for the Match Pro ED 15×56 binoculars is $699.99.
Our friend Jonathan Ocab reviewed the new Match Pro ED 15x56mm binoculars: “Bushnell Optics showed off their new Match Pro ED 15×56 binocular, which is based off of their Forge binocular design. The Forge 15×56 has a good reputation as a budget-friendly binocular with good performance at its price range. The Match Pro ED 15×56 is a hefty binocular with a magnesium chassis coming in at 51 ounces with what is dubbed the SHOT-CALL MRAD reticle. The reticle [rotates in the right barrel] so that it can be leveled for the user’s eyes after the barrels are adjusted to the pupil distance.”
Jonathan added: “My initial impressions of this binocular are positive. It is definitely a bigger, heavier binocular and is not going to be one for field use. This is definitely the type of binocular one would employ on the range at NRL/PRS matches to spot for a shooter.” CLICK HERE for full SHOT Show 2023 Optics report by Jonathan Ocab.
In this video, top PRS shooter Robert Brantley explains the features of the Match Pro ED 15X binoculars. He says these can replace a spotting scope, and he says the Shot-Call Reticle works very well for both ranging and calling hit locations.
Recoil Web also did a review of these new 15×56 binoculars stating: “The new Bushnell Match Pro ED 15×56 binoculars [offering] is a big deal, but maybe just to a niche crowd. For a long time, spotting scopes have often come with a MIL or MOA reticle in the eyepiece so one could spot shots at long range and call corrections or for use in ranging a target if a laser rangefinder wasn’t available. With a reticle in the right barrel, you get a MIL grid for ranging and shot correction like a spotting scope but the [wide] field of view and outstanding glass of the binoculars.”
One of our Forum members complained that he wasn’t able to set his primers flush to the rim. He tried a variety of primer tools, yet no matter what he used, the primers still didn’t seat deep enough. He measured his primers, and they were the right thickness, but it seemed like his primer pockets just weren’t deep enough. He was mystified as to the cause of the problem.
Well, our friend Boyd Allen diagnosed the problem. It was the decapping rod. If the rod is adjusted too low (screwed in too far), the base of the full-diameter rod shaft (just above the pin) will contact the inside of the case. That shaft is steel whereas your case is brass, a softer, weaker metal. So, when you run the case up into the die, the shaft can actually stretch the base of the primer pocket outward. Most presses have enough leverage to do this. If you bell the base of the primer pocket outwards, you’ve essentially ruined your case, and there is no way a primer can seat correctly.
The fix is simple. Just make sure to adjust the decapping rod so that the base of the rod shaft does NOT bottom out on the inside of the case. The pin only needs to extend through the flash hole far enough to knock the primer out. The photo shows a Lyman Universal decapping die. But the same thing can happen with any die that has a decapping rod, such as bushing neck-sizing dies, and full-length sizing dies.
Whenever you use a die with a decapping pin for the first time, OR when you move the die to a different press, make sure to check the decapping rod length. And it’s a good idea, with full-length sizing dies, to always re-check the height setting when changing presses.
There are a variety of decapping dies currently on the market, with models available from LEE, Lyman, Hornady, RCBS, Redding, and Sinclair Int’l.
LEE Universal Decapping Die Costs Just $11.49
Speaking of decapping tools, Midsouth Shooters Supply sells the LEE Universal Decapping Die for just $11.49 (item 006-90292), a very good deal. There are many situations when you may want to remove primers from fired brass as a separate operation (prior to case sizing). For example, if your rifle brass is dirty, you may want to de-cap before sizing. Or, if you load on a progressive press, things will run much more smoothly if you decap you brass first, in a separate operation.
Decapping Dies for Cases with Smaller Flashholes
TAKE NOTE: Some Euro Small Flash Holes are spec’d at 1.5mm or 0.059″, and max out at about .062″, so these need a smaller die pin.
The low-cost LEE Universal Decapping Die will work with cartridges from 17 Fireball all the way up to big Magnums. However, NOTE that the decapping pin supplied with this Lee die is TOO LARGE for LAPUA 220 Russian, 6mmBR, 6.5×47, 6.5 Creedmoor, .308 Win (Palma) and Norma 6 PPC flash holes. Because the pin diameter is too large for these brass types, you must either turn down the pin, or decap with a different tool for cases with .059-.062″ flash-holes.
Sinclair Int’l offers a Stainless Decapping Die that comes with BOTH .080 and .060 Pins. The $46.99 die ships with three decapping pins for standard .080″ flash holes, and two pins for .060″ flash holes.
Redding makes a Universal Decapping Die with an optional smaller-diameter decapping rod for the smaller .059-.062″ flash holes found on the BR and PPC cases. The use of this die is explained in the video below:
Guys — honestly, if you do anything today on this site, watch this video. You won’t be disappointed. Guaranteed. This is a very informative (and surprisingly entertaining) video. Every serious hand-loader should watch this video to see how cartridge cases and loaded ammo are made. Your Editor has watched the video multiple times and I still find it fascinating. The camera work and editing are excellent — there are many close-ups revealing key processes such as annealing and head-stamping.
VERY Informative Video Show Cartridge Brass and Ammunition Production:
Norma has released a fascinating video showing how bullet, brass, and ammunition are produced at the Norma Precision AB factory which first opened in 1902. You can see how cartridges are made starting with brass disks, then formed into shape through a series of processes, including “hitting [the cup] with a 30-ton hammer”. After annealing (shown at 0:08″), samples from every batch of brass are analyzed (at multiple points along the case length) to check metal grain structure and hardness. Before packing, each case is visually inspected by a human being (3:27″ time-mark).
The video also shows how bullets are made from jackets and lead cores. Finally, you can watch the loading machines that fill cases with powder, seat the bullets, and then transport the loaded rounds to the packing system. In his enthusiasm, the reporter/narrator does sometimes confuse the term “bullets” and “rounds” (5:00″), but you can figure out what he means. We definitely recommend watching this video. It’s fascinating to see 110-year-old sorting devices on the assembly line right next to state-of-the art, digitally-controlled production machinery.
Video tip by EdLongrange. We welcome reader submissions.
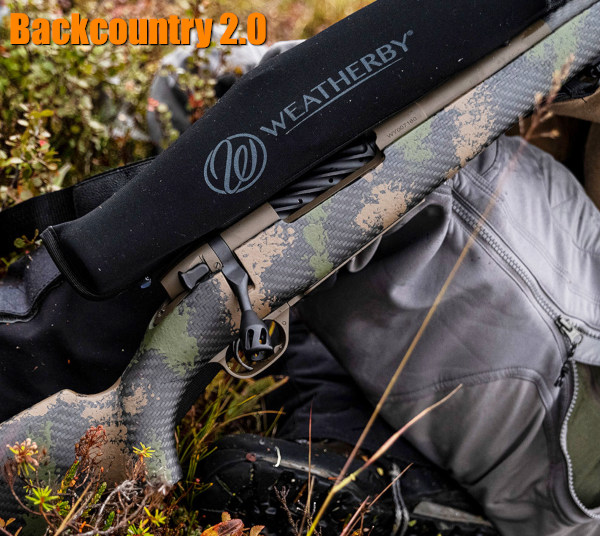
Hunting season is here. Around the country, game hunters are getting prepared for fall deer hunts. For hunters making long treks in the back-country, reducing carry weight is a big deal. That’s why we’ve seen a trend among rifle-makers to introduce rifles that weigh significantly less. This is accomplished through use of carbon fiber stocks, carbon-wrapped or fluted barrels, and even titanium actions. Today’s showcased Weatherby rifles feature these lightweight components. As a result, the Weatherby Backcountry 2.0 Ti (Titanium) model comes in at just 4.7 pounds before optics. That’s mighty light for a hunting rifle.
Weatherby Backcountry 2.0 Ti with titanium action, fluted barrel, and carbon-fiber stock, 4.7 pounds.
Light-Weight, Carbon-Stock Backcountry 2.0 from Weatherby
Here is good news for backcountry hunters. Weatherby’s Backcountry 2.0 carbon-stocked hunting rifles weigh well under 6 pounds before optics. There is even one titanium action model series that weighs just 4.7 pounds. The 2.0 series now offers both standard steel receivers or even lighter titanium receivers. And Backcountry 2.0 Carbon models are equipped with a new carbon fiber stock that is the lightest in the industry — weight is a mere 20 ounces for standard actions. For further weight savings, some models feature a tensioned carbon fiber-wrapped barrel. But all that high-tech doesn’t come cheap — MSRP for the Titanium action, carbon-wrapped barrel model is $3849.00!
Ultralight Carbon Stock — Weatherby’s new Blacktooth stock features a Carbon Link™ bedding system which engages the recoil lug and distributes recoil throughout the stock without the weight of a traditional aluminum bedding block. This makes the overall stock lighter and stiffer.
The Backcountry 2.0 Ti Carbon combines a tensioned carbon fiber barrel with the ultra-lightweight Titanium Weatherby Mark V action. This barrel system has shown excellent accuracy, making it a good choice for a long-range hunter. Registering a very low 5.3 lb starting weight, the Backcountry 2.0 Ti Carbon combines a titanium action with the Peak 44 Blacktooth stock — which Weatherby claims is the “lightest production carbon fiber stock on the market.”
Along with the new ultra-light elements, these Weatherbys have premium Mark V features: 54-degree bolt lift for fast cycling, fluted bolts, TriggerTech triggers, and Cerakote finish on metal parts. All the Backcountry 2.0 series rifles have a sub-MOA accuracy guarantee. CLICK HERE for Weatherby Backcountry 2.0 Field Test by Peterson’s Hunting.
Light is Right — Weatherby’s Backcountry 2.0 rifles weigh as little as 4.7 pounds (before optics).
Weights for Backcountry 2.0 Models range with chamberings:
Weight Saving Secrets — How Weatherby Achieved Such Light Weights GunsAmerica Digest reports: “A huge amount of the weight savings comes thanks to the updated carbon fiber Blacktooth stock by Peak 44. This stock uses what they call their Rock Solid Carbon Link bedding system which eliminates the need for a metallic bedding block. The Blacktooth stock weighs less than 20 ounces. The Backcountry 2.0 [series adds] both a carbon fiber stock and either fluted #1 MOD-profile or #2 MOD-profile carbon steel barrels or #4 MOD-profile BSF carbon fiber-tensioned barrel to achieve these light weights.” READ GunsAmerica Review.
To mitigate recoil Weatherby developed its new 3DHEX recoil pad — the gun industry’s first production 3D-printed pad. The 3DHEX’s three-dimensional honeycombed design extends the duration of the recoil pulse — taking away the sharp kick. Weatherby explains: “With the same amount of recoil spread out over a much greater time period, felt recoil is greatly reduced[.]” Backcountry 2.0 rifle recoil is also reduced by factory-fitted Accubrakes, contoured to match barrel profile.
Field Test of Titanium Action Weatherby Backcountry in 6.5-300 Whby Magnum
In this video, Hunter Todd Helms reviews Weatherby’s Backcountry T1 rifle in 6.5-300 Weatherby Magnum. This rifle is meant for fast and light travel in the backcountry. A fluted barrel, titanium action, and carbon fiber stock minimize weight. Todd says the 3DHEX recoil pad really does tame the magnum kick. This model also features a new streamlined muzzle brake.
Preparations Before The Hunt
1. Map Your Hunt and Notify Others — Before your hunt, make a plan and notify friends and family members about WHERE you are going and your intended return date and time. Print out a Google Satellite map and locate landmarks and trailheads. Mark where you plan to park your vehicle and give a copy of this map to friend and/or family members. A hunter may injure himself by falling off a rock, or tumbling in a creek-bed. After that kind of injury the hunter may be confused or unable to walk. If you get stranded in the wilderness, you want trusted persons to know where you are. So, before you leave on a trip, provide a map to a friend or family member. Show them where you will leave your vehicle, and where you expect to be every day of your hunting adventure.
2. Licenses and Permits — Make sure you have a valid hunting licenses and all the necessary tags. Begin this process with ample time before your intended hunt(s). The NSSF adds: “If you are crossing state or national borders, find out about any special considerations you must take care of. Border crossings can mean knowing about firearm transport laws or Chronic Wasting Disease-related regulations.”
3. Work on Your Fitness — On a multi-day hunt you may be trekking many miles. You need to be in good shape. If you are out of shape you may be putting yourself in a precarious situation, particularly if you underestimate the terrain difficulty. As the NSSF says: “Not being able to handle the conditions lessens your chances of success, can turn a great experience into an agonizing one and can endanger your health.”
4. Do Your Homework — Study the area you will be hunting. Talk to other hunters. Look at satellite photos. Get a real sense of the walking and terrain challenges. For a multi-day hunt, MAKE a PLAN. The NSSF states: “Eliminate surprises. Learn as much about where you will be staying, the area you will be hunting, what the weather might be like and what you need to bring[.]”
5. Rifle and Ammo — Make sure your rifle is sighted-in and your ammo is tested. Sight-in your rifle with the ammo you plan to use on your hunt. CLICK HERE for 4-Shot Sight-in Method. After sighting-in from the bench, confirm your zero by shooting from typical hunting positions (kneeling and with forearm supported on a rock or post).
6. Communications and GPS — Bring a GPS if you are in a wilderness area far from civilization. It’s a good idea to bring a cell phone, but you may not have coverage if you’re quite a distance from populated areas. A smart-phone also doubles as a digital camera to record your trophies. For navigation and safety, consider getting Garmin inReach Explorer+. This high-tech handheld unit features interactive SOS, connecting you to the GEOS 24/7 search-and-rescue monitoring center. They also allow you to send and receive text messages, no matter where you are, via advanced inReach satellite technology. Yes you can communicate even if you are miles from the nearest cell tower.
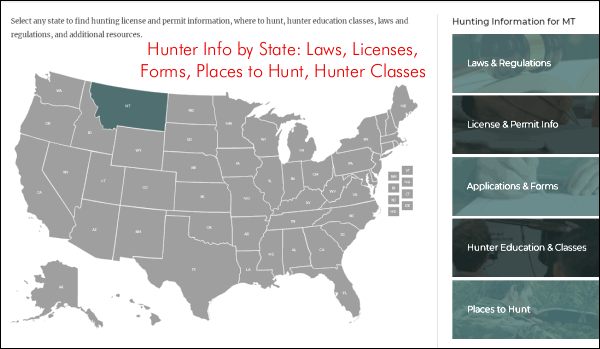
Visit WhereToHunt.org
There’s a great online resource for hunters that will help you find game locations in your state and ensure you have all the proper permits and game tags. WheretoHunt.org features an interactive map of the country. For all 50 states, the NSSF has compiled information about hunting license and permits, where to hunt, hunter education classes, laws and regulations and more. For each state you’ll also find a link for required applications and license forms.
KEY FEATURES: Ballistics Solver, GPS Tagging, Weather Forecast, Field Notes with Photos
Hunters, here’s a great FREE mobile APP for both Apple and Android systems. The ZEISS Hunting App offers many practical functions: full-featured ballistics calculator, field notes with photo archive, compass function, GPS tagging for documentation of hunting experiences, and a detailed weather forecast service. The Hunting App is offered as a FREE download for Android and iOS (iPhone/iPad) mobile devices.
Three Minute Video Explains Zeiss Hunting App Features:
The Zeiss Hunting App integrates multiple useful features — ballistics solver, compass, GPS tagging, hunt history. The “Field Notes” function can record a wide variety of info — you can save photos, record your shots and hits, log animal sightings during the hunt, and even plot game locations on a map. Zeiss explains: “This allows users to optimally record events, the game population in the hunting territory, and their own hunting experiences.” Shots can be tagged via GPS through the shooter’s and the target’s position, and then displayed on a map. The Field Notes hunt diary shows all entries in chronological order.
Full-Featured Ballistics Solver
The integrated ballistic calculator allows hunters to easily customize the settings to suit their favorite cartridges. You can enter your own data, or choose bullet/cartridge info from a database containing over 7000 ammunition types from a variety of manufacturers. The ballistics solver can be programmed for for current weather conditions (temp/humidity), and the angle (inclination) of the shot.
Weather Functions
The weather tool offers a Five-Day Forecast, and you can choose multiple locations. In addition to the current location, users can also display the weather for their hunting areas of choice. The weather forecast includes temperature, precipitation, wind direction, wind speed, humidity, and air pressure. (Note: For precise ballistics solutions, you must input the ACTUAL conditions at your shooting location).
This video explains how to define a hunting zone and set GPS location tags on the map:
Hunt Log and Photos
The Field Notes function can do many things. You can log all your shots and hits, and you can plot game sightings during the hunt. Events can be augmented with photos and GPS data. With the Field Notes mapping function, you can even locate game populations in the hunting territory. A compass and automatic night mode round off the list of smart features.


 Norma has released a fascinating video showing how bullets, brass, and ammunition are produced at the
  If you wonder how ammo is made, starting with raw metal, check out this video from


 The Match Pro ED’s offset SHOT-CALL reticle, located in the right barrel, has a dedicated focus adjustment and can be rotated for leveling after IPD (interpupillary distance) adjustment (i.e. how far the eyepieces are spread apart). Users can secure their preferred IPD with the included BRIDGESET stabilizer, which ensures the binocular is set for quick use and is stable when mounted on a tripod. Claimed light transmission is 92%. Suggested MSRP for the Match Pro ED 15×56 binoculars is $699.99.


 Norma has released a fascinating video showing how bullet, brass, and ammunition are produced at the