I absolutely love using this press stand. I use it with my Forster Co-Ax as well as my Dillon 550. The stand mounts those presses at the right height to minimize fatigue and maximize torque. Some products I merely review and return but this one is a keeper and won’t be leaving my bench anytime soon. — F-Class John
Lyman Universal Press Stand REVIEW
Product Review by F-Class John
Positioning your press at the optimal height is one of the oldest problems in reloading. Most presses sit low off the edge leading to uncomfortable arm strain or inconsistent pressure being applied while using. Lyman has set out to fix that problem with a reasonably-priced ($69.46 at Midsouth) press riser that works with the vast majority of reloading presses. This unit will raise just about any press up off your bench securely, allowing you to working more comfortably from a standing position. This also frees up vital bench space UNDER the press. Unfortunately this press stand is so popular it is back-ordered at most vendors.
I have used a variety of presses over the years. At times I’ve run into issues mounting a press at a level that doesn’t promote arm or hand strain during normal operations. In the past I’ve used blocks of wood or even tried other brands’ proprietary stands. But I had very limited success with those options. Accordingly, I was very excited to give the Lyman Universal Press Stand a chance.
Lyman’s Universal Press Stand comes complete with side plates, two different top plates, and a large collection of mounting hardware. The two top plates are pre-drilled for numerous popular Single Stage or Progressive presses. Helpful diagrams and instructions show which side of the top plate you need to use. The pre-drilled holes accommodate a variety of presses from RCBS, Dillon, Lyman, Redding, and Hornady. But surprisingly, the plates are not pre-configured for the Forster Co-Ax Press.
CLICK to WATCH VIDEO Showing Lyman Universal Press Stand
Setting up the stand was very simple. The two sides bolt to the lower shelf unit at which point you attach the top plate. All the supplied bolts made this a breeze and once everything was snugged down, I was able to place it on my bench where I wanted it and mark the drill holes to mount it. After securing the stand to my bench it was time to mount my press.
Lyman Universal Press Stand with Dillon 550 Press
Adapting Lyman Universal Press Stand for Forster Co-Ax
At the time of testing I was primarily using a Forster Co-Ax press. With no pre-drilled Co-Ax configuration for either Lyman top plate, I decided to customize the blank side of one of the top plates. I opted to position the mounting holes so that the press could sit 100% on top of the mounting plate and not just off one edge. I found this process simple to execute. Mark your drill holes, then drill the plate. This can easily be done with regular drill bits although using a step-bit worked faster and cleaner to help enlarge the holes just a little when I needed some extra clearance.
Lyman Universal Press Stand Is Stable and Strong
Once set-up, I found the stand to be incredibly stable. The design allows for full force to be applied to the press no matter what the operation. Having used this Lyman Press stand regularly over the past few months with both my Co-Ax and a Dillon 550c, I still find myself loving it. The height is perfect and allows me to load as much as I like without straining my arm or getting fatigued. With an attractive price point (under $55.00 street price) and a simple design, I feel this is a great system for those looking for a secure and raised platform for their reloading presses.
The Universal Press Stand comes with two plates. If you have different presses that fit each plate you could easily swap presses just by changing plates while leaving the presses attached. It’s less functional if you have two presses that share one plate and would require removing one press before installing the next one.
Lyman Press Stand Unboxing and Set-Up (KFW Video Review):
When a rifle isn’t shooting up to it’s potential, we need to ask: “Is it the gun or the shooter?” Having multiple shooters test the same rifle in the same conditions with the same load can be very revealing…
When developing a load for a new rifle, one can easily get consumed by all the potential variables — charge weight, seating depth, neck tension, primer options, neck lube, and so on. When you’re fully focused on loading variables, and the results on the target are disappointing, you may quickly assume you need to change your load. But we learned that sometimes the load is just fine — the problem is the trigger puller, or the set-up on the bench.
Here’s an example. A while back we tested two new Savage F-Class rifles, both chambered in 6mmBR. Initial results were promising, but not great — one gun’s owner was getting round groups with shots distributed at 10 o’clock, 2 o’clock, 5 o’clock, 8 o’clock, and none were touching. We could have concluded that the load was no good. But then another shooter sat down behind the rifle and put the next two shots, identical load, through the same hole. Shooter #2 eventually produced a 6-shot group that was a vertical line, with 2 shots in each hole but at three different points of impact. OK, now we can conclude the load needs to be tuned to get rid of the vertical. Right? Wrong. Shooter #3 sat down behind the gun and produced a group that strung horizontally but had almost no vertical.
Hmmm… what gives?
>
Shooting Styles Created Vertical or Horizontal Dispersion
What was the problem? Well, each of the three shooters had a different way of holding the gun and adjusting the rear bag. Shooter #1, the gun’s owner, used a wrap-around hold with hand and cheek pressure, and he was squeezing the bag. All that contact was moving the shot up, down, left and right. The wrap-around hold produced erratic results.
Shooter #2 was using no cheek pressure, and very slight thumb pressure behind the tang, but he was experimenting with different amounts of bag “squeeze”. His hold eliminated the side push, but variances in squeeze technique and down pressure caused the vertical string. When he kept things constant, the gun put successive shots through the same hole.
Shooter #3 was using heavy cheek pressure. This settled the gun down vertically, but it also side-loaded the rifle. The result was almost no vertical, but this shooting style produced too much horizontal.
A “Second Opinion” Is Always Useful
Conclusion? Before you spend all day fiddling with a load, you might want to adjust your shooting style and see if that affects the group size and shape on the target. Additionally, it is nearly always useful to have another experienced shooter try your rifle. In our test session, each time we changed “drivers”, the way the shots grouped on the target changed significantly. We went from a big round group, to vertical string, to horizontal string.
Interestingly, all three shooters were able to diagnose problems in their shooting styles, and then refine their gun-handling. As a result, in a second session, we all shot that gun better, and the average group size dropped from 0.5-0.6 inches into the threes — with NO changes to the load.
That’s right, we cut group size in half, and we didn’t alter the load one bit. Switching shooters demonstrated that the load was good and the gun was good. The skill of the trigger-puller(s) proved to be the limiting factor in terms of group size.
With schools closing soon for the summer and kids spending more time at home, firearms safety is more important than ever. Given that fact, the NSSF reminds gun owners to keep their guns locked up so they cannot be accessed by children. The National Shooting Sports Foundation (NSSF) and its partners urge gun owners to keep firearm safety a top priority and are making safety resources widely available as gun and ammunition sales increase, especially among first-time firearm purchasers.
For anyone considering buying a gun, Project ChildSafe’s Road To Responsible Firearm OwnershipMany Paths to Firearm Safety video series helps gun owners determine the best safe storage device for their home/lifestyle. You also view the Safe Storage Options chart.
NSSF encourages gun owners and non-gun owners to use the firearm safety resources available on its Project ChildSafe website. These include the McGruff Gun Safety videos for young children and this educational video explaining how to discuss gun safety with children:
“More parents are assuming the role of educators in their homes, so it’s a good to time have a talk with your kids about gun safety, even if you don’t own a gun”, states Joe Bartozzi, NSSF President and CEO. “If you do own a firearm, be sure your family understands the safety rules regarding firearms in your home, and always store guns responsibly when not in use.”
Each year, on the last Monday in May, Americans honor the sacrifices of military men and women who paid the ultimate price in their service to our nation. More than 1.3 million American men and women have died in military service during wartime, including more than 666,400+ combat deaths. On May 30, 2022, we again pay tribute to these men and women and remember their service to their country.
This is what Memorial Day symbolizes — a time Americans take a clear look at both our past and our future. One day each year, when we acknowledge the debt we owe to those men and women who — because they so cherished peace — chose to live as warriors.
Could anything be more contradictory than the lives of our soldiers? They love America, so they spend long years in foreign lands far from her shores. They revere freedom, so they sacrifice their own that we may be free. They defend our right to live as individuals, yet yield their individuality in that cause. Perhaps most paradoxically of all, they value life, and so bravely ready themselves to die in the service of our country. — Deborah Y. Parker
Moment of Remembrance
Memorial Day Observances will range from parades to memorial ceremonies and organized moments of silence. The Memorial Day National Moment of Remembrance honors America’s fallen warrriors. Established by Congress in 2000, the “Moment” asks Americans, wherever they are at 3:00 p.m. local time on Memorial Day, to pause for one minute, in an act of national unity and respect for the fallen.
What Is Memorial Day?
Memorial Day is a federal holiday in the United States for remembering the men and women who died while serving in the country’s armed forces. The holiday, which is celebrated every year on the last Monday of May, was formerly known as Decoration Day and originated after the American Civil War to commemorate the Union and Confederate soldiers who died in the war. By the 20th century, Memorial Day had been extended to honor all Americans who have died while in the military service.
On Memorial Day, the United States flag is traditionally raised to the top of the staff, then solemnly lowered to half-staff position until noon, when it is raised again to full-staff for the rest of the day. The half-staff position is to remember the more than one million men and women who have given their lives for this country.
Flags placed in Arlington National Cemetery by members of the 3rd Infantry Regiment, the “Old Guard”.
Many people visit cemeteries and memorials, particularly to honor those who have died in military service. Many volunteers place an American flag on each grave in national cemeteries.
The 2022 NRA Annual Meetings and Exhibits in Houston, Texas gets underway this afternoon, May 26th, with on-site registration and lobby displays. Then this evening, there will be two ticket-required special events: 1) Houston Metro Friends of NRA Event, Ballroom of Bayou Place at 5:30 pm; and 2) 2022 NRA Hunters’ Leadership Forum, Dinner & Awards Ceremony, Rice Hotel, Crystal Ballroom at 6:00 pm.
Following the Thursday evening events, the full NRA convention opens up Friday morning at 8:00 am at the George R. Brown Convention Center. There will be over 1400 exhibitors showcasing products at the Exhibit Hall, and there will be numerous important meetings throughout the weekend, including the NRA-ILA Leadership Forum at 2:00 pm on Friday, and the Annual Meeting of Members at 10:00 am on Saturday. The Exhibit Hall closes at 5:00 PM on Sunday, May 29, 2022, so the event will fully conclude prior to the Memorial Day holiday (Monday 5/30/22).
Coalinga Range in California. At dawn we could clearly see 7mm and .30 Cal bullet holes at 1000 yards.
While attending the CA Long Range Championship a few seasons back, we had the opportunity to test the performance of a high-magnification (63X) spotting scope in near-ideal conditions (maybe the best I’ve ever witnessed). On the event’s last day we arrived at 5:45 am, literally as the sun was cresting the horizon. I quickly deployed our Pentax PF-100ED spotting scope, fitted with a Pentax SMC-XW 10mm fixed-power eyepiece. When used with the 100mm Pentax scope, this 10mm eyepiece yields 63X magnification. Befitting its $299.00 price, this eyepiece is extremely clear and sharp.
At the crack of dawn, viewing conditions were ideal. No mist, no mirage, no wind. The first thing this Editor noticed was that I could see metal nail heads on the target boards. That was astonishing. As soon as the first practice targets went up, to my surprise, I could see 6.5mm, 7mm, and 30-caliber bullet holes in the white at 1000 yards. No lie…
That’s right, I could see bullet holes at 1000. I know many of you folks may not believe that, but there was no mistaking when I saw a 7mm bullet cut the white line separating the Nine Ring and Eight Ring on the target in view. (I was watching that target as the shot was fired and saw the shot-hole form). And when I looked at the 30-cal targets, the bullet holes in the white were quite visible. In these perfect conditions I could also make out 3/8″ bolt heads on the target frames.
The Human Factor — Good Vision Required
When viewing the bullet holes, I was using my left naked eye (no safety glasses or magnification). I also had a contact lens in my right eye (needed for distance vision). To my surprise, while I could see the bullet holes without much difficulty with my left eye, things were fuzzier and slightly more blurry with the right eye, even when I re-focused the scope. That contact lens was degrading the fine resolution.
Then I invited 3 or 4 shooters to look through the scope. One younger guy, with good eyes, said immediately: “Yeah, I can see the holes — right there at 4 o’clock and seven o’clock. Wow.” Some older guys, who were wearing glasses, could not see the holes at all, no matter what we did to the scope’s main focus and diopter adjustment.
The lesson here — if you have to wear glasses or corrective contact lenses, just that extra bit of optical interference may make a difference in what you can see through the scope. Basically anything that goes between the scope eyepiece and your eyeball can degrade the image somewhat. So… you may be better off removing your glasses if you can still obtain good focus sharpness using the diopter adjustment and focus ring. I did the left vs. right eye test a half dozen times, and I could definitely see small features at 1000 yards with my naked eye that I could not see with my right eye fitted with a contact lens. (I did have to re-focus the scope for each eye, since one had a corrective lens while the other did not.)
Mirage Degrades Image Sharpness and Resolution
The “magic light” prevailed for only an hour or so, and then we started to get some mirage. As soon as the mirage appeared I was no longer able to see raw bullet holes, though I could still easily see black pasters on the black bulls. When the mirage started, the sharpness of the visible image degraded a huge amount. Where I could see bullet holes at dawn, by mid-morning I could barely read the numbers on the scoring rings. Lesson: If you want to test the ultimate resolution of your optics, you need perfect conditions.
Chromatic Aberration Revealed
As the light got brighter and the mirage increased I started to see blue and red fringing at the edges of the spotting disk and the large numerals. This was quite noticeable. On one side of the bright, white spotting disc you could see a dark red edge, while on the other side there was a blue edge (harder to see but still present).
The photo below was taken through the Pentax spotter lens using a point and shoot camera held up to the eyepiece. The sharpness of the Pentax was actually much better than this photo shows, but the through-the-lens image does clearly reveal the red and blue fringing. This fringing is caused by chromatic aberration — the failure of a lens to focus all colors to the same point. Chromatic aberration, most visible at high magnification, causes different wavelengths of light to have differing focal lengths (see diagram). Chromatic aberration manifests itself as “fringes” of color along boundaries that separate dark and bright parts of the image, because each color in the optical spectrum cannot be focused at a single common point on the optical axis. Keep in mind that the Pentax does have “ED” or low-dispersion glass, so the effect would be even more dramatic with a cheaper spotting scope.
If you wonder why top-of-the-line spotting scopes (such as the $2980 Swarovski ATS-80 ) cost so much, the answer is that they will deliver even LESS chromatic aberration at long range and high magnification. With their exotic apochromatic (APO), ultra-low-dispersion glass, a few ultra-high-end spotting scopes can deliver an image without the color edging you see in the photo above.
The Pentax PF-100ED is a heck of a spotting scope. Any scope that can resolve bullet holes at 1000 yards is impressive. But if you want the ultimate in optical performance, with minimal chromatic aberration, you may need to step up to something like the 88mm Kowa Prominar TSN-884 with Flourite Crystal lenses ($2450.00 body only), or the 82mm Leica APO ($3899.00 with 25-50X eyepiece).
EDITOR’s NOTE: The purpose of this report is to show what is possible… in IDEAL conditions. With this Pentax 100mm, as well as a Swarovski 80mm, we can often resolve 6mm bullet holes at 600 yards. But again, that performance requires really good viewing conditions. By 10:00 am at my range, even with the 100mm Pentax at 75 power, seeing 6mm bullet holes is “iffy” at best. So don’t go out and mortgage the house to buy a $4000 optic with the hope that you’ll be able to spot your shots at 1000 yards. If conditions are anything less than perfect, you’ll be lucky to see bullet holes at 500 yards. The real solution for very long-range spotting is to set up a remote target cam that broadcasts a video picture to a screen at your shooting station. Among the target cams on the market, we recommend the LongShot LR-3. It boasts excellent resolution and incredible range. The LongShot LR-3 target cam is used in major ELR competitions.
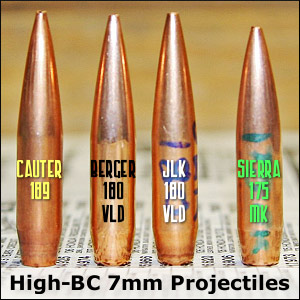
7mm (.284) remains the caliber to beat in F-Class Open Division (though some shooters have had success with .30-Cal short magnums.) With a standard .284 Winchester, or better yet, a .284 Improved, you can drive the high-BC Berger 180gr and 184gr bullets to competitive velocities.
The straight .284 Win is an excellent cartridge, quite capable of winning F-class matches. However, in most barrels, it can’t push the 180s at 2900-2950 fps velocity levels*. A lot of barrels will top out at about 2850 fps. That’s where the .284 Shehane comes into play.
The .284 Shehane is a slightly modified wildcat that retains the same 35° shoulder as the parent case. However, by blowing the sidewalls out 0.010″, the .284 Shehane picks up about 3.3 grains of extra case capacity. That enhancement makes a BIG difference. The extra boiler room is enough to drive the 180s at 2900-2950 fps with 30-32″ barrels using H4831sc, Vihtavuori N560, or Alliant Reloder 16. (That’s with a reasonably fast barrel. Some barrels are faster than others.)
Norm Harrold Won 2018 F-Class Open Division Nationals with .284 Shehane Rifle
Norm Harrold (above) won the 2018 USA F-Class Nationals shooting a .284 Shehane. Norm’s F-Open rig features a McMillan Kestros ZR stock and Bartlein barrel chambered for the .284 Shehane, which has a bit more case capacity than a standard .284 Winchester. Norm loaded Berger 184gr 7mm bullets in Lapua brass. Norm revealed his load in an Erik Cortina YouTube Video.
F-Class shooter Erik Cortina notes that the .284 Shehane has a velocity edge over the straight .284 Win because it holds more powder: “The Shehane has more capacity than the .284 Winchester. Ryan is using 54.0 grains simply as a fire-forming load. Typical load for a Shehane is around 57.0 grains of Hodgdon H4831 SC.” By blowing the sidewalls out 0.010″, the .284 Shehane picks up about 3.3 grains of extra case capacity. That enhancement makes a BIG difference. The extra boiler room is enough to drive the 180s at 2900-2950 fps with H4831sc, with long barrels.
Forum member Jim Hardy has shot the .284 with great success. He tells us: “In my humble opinion, the .284 Shehane is the best balanced long-range round there is — bar none. Here is why:
You have to shoot a 30 Cal Magnum with a 240gr bullet to equal the performance of most 7mm chamberings with the 180 Berger VLD. With the .284 Shehane, you have a .308 bolt face, medium action, and Lapua brass. You use less powder than the 7 mags, and have great accuracy and ballistics even while fire-forming. The .284 Shehane shoots inside the 6.5 AND the straight .284, the .300 WSM, and the .300 Win Mag with less recoil. What is not to love about the 284 Shehane? It is a no-brainer for long range — F-Class or Prone or 1000-yard Benchrest.”
Amazing Accuracy When Fire-Forming .284 Shehane
If you look at that 5-round group you might think it was shot with a 6 PPC or maybe a 6mmBR. But no, this was done with heavy 180gr Berger Hybrid bullets and the .284 Shehane. In fact, this impressive sub-quarter MOA group was shot while fire-forming with a very well-worn barrel! Gun builder Ryan Pierce of Piercision Rifles explains: “Here’s a 5-shot 0.191″ group at 100 yards with my .284 Shehane fireforming loads. This barrel has 2200 rounds through it. It had 2000 as a straight .284 Win and then I set it back to .284 Shehane to form brass with. [The load was] 180 Hybrids with 54.0 grains of H4831 SC.”
Scotland’s Grant Taylor. who used the .284 Shehane to finish third at the 2009 F-Class Worlds in England says the .284 Shehane is “very accurate with superb vertical spreads at 1000 yards. [This] caliber… has awesome accuracy. I’m getting 2930-2950 fps with spreads in the 3-5 fps range. I use Hodgdon H4831sc powder, CCI BR2 primers, and pointed 180gr Bergers.”
.284 Shehane Showcase — Two Special F-Open Rifles
Jason Cohen’s “We the People” patriotic .284 Shehane F-Class rifle. This rig scored second place in its very first match, a 3×20 at 1000 yards in Wyoming.
Here’s another handsome .284 Shehane F-Open rifle. Owner Jason Cohen explained why he chose the .284 Shehane chambering: “The .284 Shehane has a proven record of accomplishments and that is why I have chosen it. I use Lapua brass (6.5-284 necked-up), CCI BR-2 primers, Hodgdon H4350 powder, and Berger 184gr bullets. All these components have been a successful combination that has worked flawlessly[.]”
The barrel is a Blake Machine 1:8″-twist finished at 32 inches. It was fitted to my action by Dale Woolum of Woolum Accuracy. Dale also threaded the barrel for a Woolum Accuracy tuner. This has proven to be a valuable tool in my load development.
The rifle began its life as a Will McClosky Cerus stock. This was sent that to Bryan Blake at Blake Machine. Jason noticed that Bryan had been adding aluminum rails to the front of Cerus stocks to lower the center of gravity and improve tracking. Jason asked Bryan to fit the stock with forearm rails, shown in the photo below. Bryan did all the stock work and fitted the action, rails, and RAD recoil pad.
The .284 Shehane — Accurate and Forgiving Wildcat
Jason explains why he selected the .284 Shehane chambering: “The .284 Shehane is amazing, very forgiving and not temperamental. Straight .284 or Shehane — you cannot go wrong. I run a 184gr Berger at about 2850 FPS and get great brass life in my other rifles. I usually start to consider tossing the brass around 15 firings. Primer pockets start to get a little looser and the brass seems to need more sizing than the newer brass with less firings.”
.284 Shehane Load Development
Load development for me starts with each new barrel. I screw on the new barrel, fire 25 rounds of whatever I have left over and then clean it. I push out to 600 yards and do a ladder test in round-robin format. I start 0.6 grains lower than my last charge that worked. I work up from that reduced charge weight in increments of 0.3 grains. The paper tells the rest of the story. Once I get something that works well at 600 yards I go back in work around that by 0.1 grains. After that I play a little with seating depth and look for a change. I will occasionally mess with the tuner and tighten things up if possible.
.284 Shehane Raffle Prize Rifle for Team USA
This stunning .284 Shehane rifle was constructed as a raffle prize to benefit Team USA members preparing for the F-Class World Championship. This eye-catching F-Open rifle was crafted by Blake Barrel and Rifle in Arizona. This prize rifle features all top-of-the-line components: Borden BRMXD Action, Cerus multi-laminate stock with forearm extension, R.A.D. recoil reduction system (hydraulic-damped buttpad), Bix ‘N Andy trigger, and Nightforce Competition scope. The stainless Blake barrel is chambered for the .284 Shehane wildcat, and sports an F-Class Products tuner on the end.
.284 Shehane Also Shines in 1K Benchrest Competition
The .284 Shehane has won in Benchrest as well as F-Class competition. In 2013, Henry Pasquet won the IBS 1000-Yard Nationals shooting a .284 Shehane. Henry’s Championship-winning rig is shown below. Note the 5″-wide fore-end which is not legal for F-Class. Henry also runs a combo tuner/muzzle-brake.
*Some exceptional barrels chambered in straight .284 Win can reach 2900 fps with the 180s. Ryan Pierce has a 32″ Brux barrel that is delivering 2900 fps with the straight .284. However, Ryan acknowledges that his velocities are not typical: “A lot of .284 Win barrels top out at around 2850 fps with the 180s”.
This popular video, viewed nearly 1.9 million times on YouTube, provides a clear explanation of Minute of Angle (MOA) and how that angular measurement is used. Among novice shooters, there is much confusion over this term. In this NSSF Video, Ryan Cleckner, a former Sniper Instructor for the 1st Ranger Battalion, defines the term, “Minute of Angle” (MOA) and explains how you can adjust for windage and elevation using 1/4 or 1/8 MOA clicks on your scope. This allows you to sight-in precisely and compensate for bullet drop at various distances.
For starters, Ryan explains that, when talking about angular degrees, a “minute” is simply 1/60th. So a “Minute of Angle” is simply 1/60th of one degree of a central angle, measured either up and down (for elevation) or side to side (for windage). At 100 yards, 1 MOA equals 1.047″ on the target. This is often rounded to one inch for simplicity. Say, for example, you click up 1 MOA. That is roughly 1 inch at 100 yards, or roughly 4 inches at 400 yards, since the target area measured by 1 MOA increases in linear fashion with the distance.
More Minute of Angle (MOA) Explanatory Videos
This Gunwerks video explains that Minute of Angle subtends approximately 1″ for each 100 yards (well, 1.047″ to be exact). That means a Minute of Angle increases in actual measured size the greater the distance of the target from the shooter.
This lengthy (24-minute) video defines Minute of Angle, and uses multiple diagrams to illustrate how MOA angular measurements works. The video also how MOA-based click values translate to point-of-impact changes at various distances.
This week’s featured firearm belongs to John “SnakeEye” Seibel, founder of the VarmintsForFun website. In recent years, John has become a “true believer” in the little 20-Caliber cartridges. He says this light-recoiling 20 PPC, Rampro-actioned pistol is perfect for a quick shot on a critter, taken from the front seat of his truck. John tells us: “A long-range pistol is an ideal truck gun in my opinion. It stows in a small area and doesn’t take up the room a rifle does. Just keep ear protection near by at all times! I’ve taken varmints as far as 400+ yards with this 20 PPC pistol, so why would you need a rifle?”
Perspectives on Pistols for the Varmint Hunter
by John Seibel
I decided to try my hand at shooting varmints with a pistol one day when I grew tired of wrestling a rifle around in the truck for a quick shot. Many times when traveling around on the farm you’ll spy a groundhog or fox that usually isn’t more than 200 yards away. A single-shot pistol like the Thompson Contender could fit the bill. With its compact length, around 20 inches, a long-barrel pistol can lay on the truck’s passenger seat for easy access. I usually keep my two leather brick-style sandbags laying beside the console and seat. I have a box made from hard rubber that I lay across the top of the door. I then lay the two bags on top. This makes a nice platform to rest the pistol’s forearm. I like to use a forearm that is at least two inches wide. That lets the gun lay steady—almost like you are shooting from a bench rest. For the shooting hand, I prefer a pistol grip with finger grooves and a slight overhang or flare for the web of your hand.
As for optics, I tried long-eye-relief pistol scopes but they lacked the magnification you need for long-range target shooting or varminting. Those pistol scopes have really long eye-relief because they are designed to work with the pistol held at arm’s length. When shooting at the bench or from a truck that’s not what you want. By the time you find the target and get your eye in the exact location, the varmint has moved on or died of old age! After much fiddling around with pistol-type scopes, I finally decided to use rifle scopes on my long-range pistols. The minimum I use is a 4.5-14×40. Eye relief on a Leupold 4.5-14x40mm is about 3.5 inches at 4.5 power. Field of view is better with rifle scopes too and it’s easier to acquire your target. For this type of shooting a light-recoiling caliber is essential or you will have scope-eye bad! I currently have three long-range pistols and use them to shoot 17M4, 20 PPC, 22 BR, and .223 Rem. The featured gun may be the most accurate of my pistols, and your editor thinks it’s the most handsome of the three.
The Rampro Pistol Project — Working with John Illum
A couple of years ago I called John Illum of Rampro about building the ultimate long-range pistol. It just so happens that John was a big time long-range pistol shooter. I told him that I wanted a gun that didn’t recoil badly and wouldn’t torque when fired. As I am a quadriplegic, with no grip in my hands, the gun had to handle well under recoil so I didn’t drop it. Recoil had to be straight back–no twisting.
Well Illum listened to me and came up with a gun that performs just the way I wanted. Illum suggested a rear grip stock of his own design. It has a 2.25″ wide forearm and a rear grip with a slight palm swell that fits your hand perfectly. Another nice feature is the finger grips. It has an extended overhang or “beavertail” that fits comfortably in the web of your hand. Of course it had to be walnut! I chose Rampro’s STP small action with a PPC bolt. His bolt uses a Sako-type extractor. The action is a single-shot. Being right-handed, I chose a right bolt, left port configuration. This works really well in a pistol. You can load with your left hand and see the round laying in the action–that’s what you want in a pistol without a safety.
Gun Specifications John Illum’s Rampro actions are chrome-moly steel. Commonly you’d see them blued, but I had him put a brushed nickel finish on the action and rings. From a few feet away it looks like stainless. The trigger is Illum’s own design set at 8 ounces, and there’s no creep that I can detect. The action has Remington barrel threads and will accept Remington type triggers. One neat thing is that the action was milled with an integral recoil lug (much like the current Surgeon Action). And the bolt is milled all in one piece–no soldered-on handles. My only gripe with this bolt handle is that it could be a tad longer, but it still is manageable for a single-shot. You’ll also note how slick and streamlined the scope rings are. Illum made those as well. His rings mount to the action via two screws from the inside of the ring, a very elegant set-up for sure. (I currently have a 6.5-20x40mm Nikon scope on this gun. If I had to do this project over again the only thing I would change would be installing a 30mm scope because I like ‘em!).
The barrel is a PacNor Super-Match heavy taper with flutes milled by John Illum, who did all the gunsmithing on this pistol. Twist rate is 1 in 12 inches, with an 11° crown, polished to a mirror finish. The barrel was bead-blasted on the exterior to cut glare. I had Illum cut a 20 PPC minimum-spec chamber, with a .237″ neck. That way I don’t have to turn necks on the Lapua Brass (220 Russian necked down to .204). This is a varmint gun–there’s no need for turned necks. [Editor’s Note: Rampro is no longer in business. However, John tells us “I haven’t had any problems with the action so far. If I did, most competent gunsmiths could fix them easily.”]
Handgun Handling Tips
If you want to shoot a long-range pistol but have never have shot this kind of gun before, try to find a mentor — someone with a gun like this who can school you a bit in the correct technique. The first thing you notice is that you have no comb or cheek piece to help align your head and neck. And getting used to the optics takes some practice. Most people fit a pistol-type (long eye-relief) scope, but these can be awkward to use, and somewhat frustrating at first — the field of view is very restricted. Move your head very slightly and you can lose the sight picture completely. You can solve that problem by using a standard rifle scope, but that will put your head very close to the eye-piece — just three to four inches. With that arrangement, if you don’t hold the gun correctly … POW instant scope-eye!
Now once you get the hang of shooting a long-range pistol you will find it can be just as accurate as a rifle. But there is a trick to shooting them. Shooting a long-range pistol is a whole new world — you need to hold it just right. If you don’t let the gun roll back a little (i.e. if you grip too hard) you will get vertical stringing. I hold my hand against the back of the grip to guide the gun but let it almost free recoil. Looking at how compact the pistol is, you might think “Hey, this would make an ideal ‘walking-around’ varminter.” Well, that’s not really the case. For real precision shooting a solid benchrest type set-up is a must. You can attach a bipod to a long-range pistol, but you would need a flat surface. A fence-post top would work pretty well without a bipod if you carry a small light bag. Overall though, this type of pistol works best as a sandbag gun. For a walking-around gun, you’d be happier with a rifle I think.
Load Development and Accuracy
When I built this gun, Hornady had just released the 32gr V-Max (see footnote), a good match for my barrel’s 1:12″ twist. I choose the 20 PPC because of the very good Lapua brass (220 Russian parent case). I figured teaming Lapua brass with the little .204 bullet would offer excellent accuracy combined with very low recoil. My expectations were fulfilled. The brass proved to be excellent and the PacNor loved the little V-Max pills.
I tried quite a few different loads and most powders that I tried worked very well. These included: H322, Benchmark, AA 2460, and Reloader 7. Amazingly, with just 14″ of barrel, all of these powders delivered impressive velocities–ranging from 3914 to 4074 fps. I settled on 48 Harrell’s clicks of Accurate Arms (AA) 2460, which drives the 32gr V-Maxs to 3995 fps.
With AA 2460 the gun will shoot in the low 3s at 100 yards consistently — as long as I steer the gun right, which takes some practice. I think groups in the low 0.3″ range is excellent for a non-benchrest factory bullet. Despite having no buttstock to grab, recoil on my 20 PPC pistol is very minimal — it just rocks back into your hand. The main problem is to keep the scope from smacking you, since I used a rifle scope with short eye-relief. Muzzle flash and noise are tolerable but DO NOT shoot one of these without good ear protection. Your ears are very close to the muzzle.
I also have a 20 PPC rifle built on a BAT action with a Richard’s #008 laminated stock cut down in size. That gun’s 1:9″-twist Lilja barrel lets me shoot the Berger 50gr LTB bullets. In the wind, these perform quite a bit better than the 32s. My two favorite loads for the 50 grainers are: a) 26.0gr VV N135, CCI 450 primers, 3615 fps; and b) 27.3gr Hodgdon Varget, CCI 450s, 3595 fps. The BAT 20 PPC also shoots really well with the 40gr V-Max, pushed by N135 and Fed 205M primers.
Pistol Action Legal Issues
One important thing to remember if you build a pistol is to make sure the receiver came from the factory as a pistol and was titled as a pistol. Rifle actions are illegal to use as a pistol. Yes, that’s a nonsensical law, but it’s still on the books. You can use factory pistol actions such as the XP 100.
If you want a new custom action such as a BAT (my favorite), you can order it as a pistol action and when you get it, register it as a pistol. Note, in some states there may be additional fees, waiting periods, or restrictions for pistol actions (as opposed to rifle actions). Check your local laws before ordering the action.
Future Trends in Varmint Hunting — Plenty of Twenties
I think these sub-caliber rounds, both 20s and the 17s, are the future of recreational varminting, at least out to medium distances. The Twenties offer low recoil, excellent accuracy, and components keep getting better and better. The bullet-makers are finally making high-quality bullets in appropriate weights. Compared to something like a 22-250, I’ve noticed that my 20 PPC rifle has a lot less noise, a plus when you want to be quiet around other people and varmints.
The flat trajectory is another big advantage in the field. With the 20 PPC, zeroed at 100 yards, I can pretty much hold dead center and get hits out to 300 yards or so without touching the scope to add elevation. [Editor: The same is true with the 20 Practical cartridge, basically a .223 Rem necked down to .20 Caliber. It has proven very accurate and easy to tune.]
The 20-Caliber cartridges we have now, in particular the 20 PPC and 20 BR, are very well-refined. You don’t have to do a lot of tuning or tinkering to have a very accurate, effective varmint-slayer. In fact, if I could dream up a signature “20 VFF” (Varmints For Fun) cartridge it would basically be the 20 PPC. In truth, nearly any of the popular 17- or 20-Caliber cartridges will perform well if you start with top-quality brass. The sub-calibers have less recoil and burn less powder, and there are very good components for most varmint and target-shooting applications. To me it seems that these small calibers work so well because of good components, low recoil, and efficient cartridge designs (particularly in the VarTarg and PPC cases).
WARNING: For your own safety, ALWAYS reduce all starting charges by 10% and work up carefully! Ambient temperature changes, powder lot variations, and differences in barrel friction can result in significantly increased pressures.
20 PPC LOAD MAP
Bullet GR
Maker
Powder
Charge
Primer
Case
Velocity fps
Barrel Twist
Comments
32
Hornady V-Max
H322
27.6
Rem 7½
Lapua
4000
Lilja 1:12
WarrenB Form Load
32
Hornady V-Max
AA 2460
29.5
Rem 7½
Lapua
3995
PacNor 1:12
SnakeEye Pistol Load
32
Hornady V-Max
H4198
25.1
CCI BR4
Lapua
4222
PacNor 1:12
A. Boyechko Load
39
Sierra BlitzKing
H322
26.0
Rem 7½
Lapua
3700
Lilja 1:12
WarrenB Load
39
Sierra BlitzKing
VV N540
28.8
CCI BR4
SAKO
4064
PacNor 1:12
D.Moore, Low 2s
40
Hornady V-Max
VV N135
27.8
Fed 205m
Lapua
3950
Lilja 1:9
SnakeEye Load
50
Berger LTB
VV N135
26.0
CCI 450
Lapua
3615
Lilja 1:9
SnakeEye Load
50
Berger LTB
Varget
27.3
CCI 450
Lapua
3595
Lilja 1:9
SnakeEye Load
Footnote: When first manufactured, the small Hornady 20-Caliber V-Max bullet was actually 33 grains, not 32 grains as sold currently. I still have some of the 33-grainers. I’ve observed no functional difference between the 33s and the current 32-grainers.
Our take on Bore-Store Gun sleeves is simple: They work great, so buy them and use them — for ALL your valuable firearms.
These thick, synthetic-fleece sacks cushion your guns, preventing nicks and scratches. The breathable fabric wicks away moisture, and the fibers are coating with corrosion inhibitors. I personally use Bore-Stores for in-safe storage with all my guns, and I have never had one of my guns rust inside a Bore-Store, even when I lived a stone’s throw from the ocean.
Bore-Stores are offered in a wide range of sizes that fit everything from a Snub-nosed revolver to a 33″-barrelled Black Powder Rifle. Bore-Stores can be purchased for $9.97 – $29.97 from Borestores.com. For most scoped rifles, we recommend the 10″x46″ SCR-1 case. The Bore-Store manufacturer, Big Spring Enterprises will also craft custom sizes on request. For a long-barreled F-Class or ELR rig you may need a custom length. Or you can remove the scope and use the 7″x60″ MUS-1 Musket Bore-Store.
Get Your Guns Out of Foam-lined Cases — They Are Rust Magnets
Just about the worst thing you can do for long-term storage (short of leaving your rifle outside in the rain) is to store firearms in tight, foam-padded cases. The foam in these cases actually collects and retains moisture from the air, acting as the perfect breeding ground for rust. Even in warm summer months, humid air can leave moisture in the foam.
Remember, those plastic-shelled cases with foam interiors are for transport, not for long-term storage. Don’t repeat the mistake of a wealthy gun collector I know. He stored four valuable Colt Single Action Army (SAA) revolvers in individual foam-padded cases, and locked these away in his gun safe. A year later, every one of his precious SAAs had rusted, some badly.
Consider Military-Style, Triple-Layer Bags for Long-Term Storage
While we prefer Bore-Stores for regularly-used guns, if you have heirloom firearms that will be kept in storage for very long periods without seeing any use, you may want to grease them up and place them in the thin, but rugged three-layer storage bags sold by Brownells. The bags are made from a three-layer laminate of polyester, aluminum, and polyethylene film, with a shiny silver exterior. Though the laminate is thin, the Brownells storage bags are puncture-resistant, and have a 0% moisture transmission rating so moisture can’t get inside. These bags are also resistant to petroleum-based chemicals and they won’t break down even in contact with soil or moisture.
Here’s one VITAL bit of advice for using these bags. Be absolutely sure, before you seal up the bags, that your guns are DRY and that all metal surfaces have been coated with an effective anti-corrosive, such as BoeShield T9 or Eezox. Brownells’ storage bags are inexpensive. A three-pak of 12″x 60″ rifle sacks (item 083-055-003WB) costs just $21.99 — about seven bucks a gun. That’s cheap insurance for rifles and shotguns that may cost thousands of dollars.


 >
>


 While attending the CA Long Range Championship a few seasons back, we had the opportunity to test the performance of a high-magnification (63X) spotting scope in near-ideal conditions (maybe the best I’ve ever witnessed). On the event’s last day we arrived at 5:45 am, literally as the sun was cresting the horizon. I quickly deployed our
  Then I invited 3 or 4 shooters to look through the scope. One younger guy, with good eyes, said immediately: “Yeah, I can see the holes — right there at 4 o’clock and seven o’clock. Wow.” Some older guys, who were wearing glasses, could not see the holes at all, no matter what we did to the scope’s main focus and diopter adjustment.
 Chromatic Aberration Revealed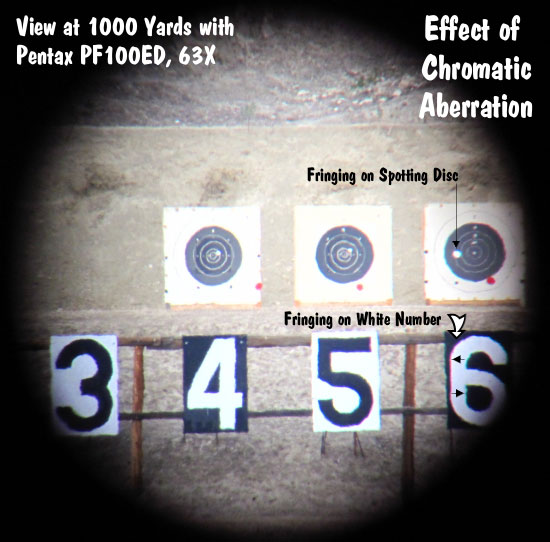


 7mm (.284) remains the caliber to beat in F-Class Open Division (though some shooters have had success with .30-Cal short magnums.) With a standard .284 Winchester, or better yet, a .284 Improved, you can drive the high-BC Berger 180gr and 184gr bullets to competitive velocities.


 John Illum’s Rampro actions are chrome-moly steel. Commonly you’d see them blued, but I had him put a brushed nickel finish on the action and rings. From a few feet away it looks like stainless. The trigger is Illum’s own design set at 8 ounces, and there’s no creep that I can detect. The action has Remington barrel threads and will accept Remington type triggers. One neat thing is that the action was milled with an integral recoil lug (much like the current Surgeon Action). And the bolt is milled all in one piece–no soldered-on handles. My only gripe with this bolt handle is that it could be a tad longer, but it still is manageable for a single-shot. You’ll also note how slick and streamlined the scope rings are. Illum made those as well. His rings mount to the action via two screws from the inside of the ring, a very elegant set-up for sure. (I currently have a 6.5-20x40mm Nikon scope on this gun. If I had to do this project over again the only thing I would change would be installing a 30mm scope because I like ‘em!).
 Handgun Handling Tips
 Load Development and Accuracy
 Pistol Action Legal Issues
 I think these sub-caliber rounds, both 20s and the 17s, are the future of recreational varminting, at least out to medium distances. The Twenties offer low recoil, excellent accuracy, and components keep getting better and better. The bullet-makers are finally making high-quality bullets in appropriate weights. Compared to something like a 22-250, I’ve noticed that my 20 PPC rifle has a lot less noise, a plus when you want to be quiet around other people and varmints.
 Remember, those plastic-shelled cases with foam interiors are for transport, not for long-term storage. Don’t repeat the mistake of a wealthy gun collector I know. He stored four valuable Colt Single Action Army (SAA) revolvers in individual foam-padded cases, and locked these away in his gun safe. A year later, every one of his precious SAAs had rusted, some badly.
 Here’s one VITAL bit of advice for using these bags. Be absolutely sure, before you seal up the bags, that your guns are DRY and that all metal surfaces have been coated with an effective anti-corrosive, such as BoeShield T9 or Eezox. Brownells’ storage bags are inexpensive. A


