Berger Twist-Rate Stability Calculator On the Berger Bullets website you’ll find a handy Twist-Rate Stability Calculator that predicts your gyroscopic stability factor (SG) based on mulitiple variables: velocity, bullet length, bullet weight, barrel twist rate, ambient temperature, and altitude. This cool tool tells you if your chosen bullet will really stabilize in your barrel.
How to Use Berger’s Twist Rate Calculator
Using the Twist Rate Calculator is simple. Just enter the bullet DIAMETER (e.g. .264), bullet WEIGHT (in grains), and bullet overall LENGTH (in inches). On its website, Berger conveniently provides this info for all its bullet types. For other brands, we suggest you weigh three examples of your chosen bullet, and also measure the length on three samples. Then use the average weight and length of the three. To calculate bullet stability, simply enter your bullet data (along with observed Muzzle Velocity, outside Temperature, and Altitude) and click “Calculate SG”. Try different twist rate numbers (and recalculate) until you get an SG value of 1.4 (or higher).
Gyroscopic Stability (SG) and Twist Rate
Berger’s Twist Rate Calculator provides a predicted stability value called “SG” (for “Gyroscopic Stability”). This indicates the Gyroscopic Stability applied to the bullet by spin. This number is derived from the basic equation: SG = (rigidity of the spinning mass)/(overturning aerodynamic torque).
If you have an SG under 1.0, your bullet is predicted not to stabilize. If you have between 1.0 and 1.1 SG, your bullet may or may not stabilize. If you have an SG greater than 1.1, your bullet should stabilize under optimal conditions, but stabilization might not be adequate when temperature, altitude, or other variables are less-than-optimal. That’s why Berger normally recommends at least 1.5 SG to get out of the “Marginal Stability” zone.
In his book Applied Ballistics For Long-Range Shooting (3rd Ed.), Bryan Litz (Berger Ballistician) recommends at least a 1.4 SG rating when selecting a barrel twist for a particular bullet. This gives you a safety margin for shooting under various conditions, such as higher or lower altitudes or temperatures.
Story idea from EdLongrange. We welcome reader submissions.
For today’s Sunday GunDay story, we head across the Atlantic to the famed Bisley range in the United Kingdom (UK). There the historic Imperial Meeting took place last month. This shooting competition is steeped in history, first being held 161 years ago in 1860. Today we highlight the .300 WSM rifles shot by F-Open winner (and Forum member) Gary Costello. Gary came home with a huge haul of trophies. He won the F-Open Grand Agg on V-count scoring 665-76V, 19Vs more than second place Lance Vinall’s 665-57V. In the UK the “V” is equivalent to our “X”, and the target has five number rings, with five being the highest numerical shot value.
Gary posted: “Finally cooled down after the Bisley Imperial Meeting. What a week, 8 trophies, 14 gold medals, two silver, two bronze and the big one — the Grand. It was an experience shooting in 86+ F degree heat and at some unusual times. Congratulations to all the medal and comp winners, in particular to second-place Lance Vinall, who shot a great match”.
About the Imperial Meeting at Bisley in the UK
The Imperial Meeting is a large, multi-discipline rifle shooting match contested annually in the United Kingdom. This article spotlights Gary Costello, who won the 2021 Imperial F-Open division with his pair of handsome .300 WSM rifles.
The first Imperial Meeting event was contested on Wimbledon Common, in southwest London, in 1860 when Queen Victoria fired the first shot and gave a prize of £250 to the best individual marksman. Originally the Meeting was only available to Volunteers (regular and reserve military personnel) using the issued service rifle of the day.
Today the UK National Rifle Association holds the Imperial Meeting as an open competition with the aim to promote and encourage marksmanship throughout the Queen’s (or King’s) dominions. The event has grown to include many different disciplines. The largest entry is for Target Rifle, which dominates the final week of the Meeting and culminates with the final of the Queen’s Prize. The Queen’s Prize remains the premier award for the Meeting’s top shot, with the £250 prize still given to the winner.
Host to the competition is the National Shooting Center at Bisley, the world-renowned range complex which can host virtually all forms of shooting from air rifle to 1200-yard full-bore matches. Set in 3000 acres of heathland, Bisley is unique in character with a wide variety of ranges.
Report from Imperial Meeting at Bisley by Gary Costello
The recent 2021 Imperial Meeting was the 152nd event of its kind. Last year was my first Meeting and it was a condensed version as the COVID lockdown had just been relaxed (but later revived). This 2021 Imperial was the full version. In F-class we had 15 scheduled matches, held at 300, 500, 600, 900 and 1000 yards. In these matches you get two sighters and the 15 shots for record. This year was my second Imperial Meeting. Lots of shooters were keen to enjoy some shooting freedom now that the UK national lockdowns had ended. However the NRA was still practicing COVID safety protocols.
Three very prestigious competitions are qualifiers for the final matches. These three are: the St. Georges, the Donaldson, and the Farquharson (named after George Farquharson, the father of F-Class). The finals add another three matches if you qualify. Also there are three range Aggregates which qualify for medals/trophies.
Twin Winning .300 WSM F-Open Rifles
Gary brought TWO .300 WSM F-Open match rifles to the Imperial Meeting. Gary notes: “I had two .300 WSM rifles ready for the competition. I have managed to tune both rifles to take the same ammo and seating depth allowing me to alternate and use the same lot of ammo. My philosophy was to alternate both rifles as to not cause too much attrition/wear (due to the high round count and multiple matches). One .300 WSM rifle has a Borden BRMDX action, with some Thomas “Speedy” Gonzales mods and the trademark Speedy bolt shroud fluting. This has a 1:9.5″-twist Benchmark 5-groove barrel, actually chambered by Stuart Anselm at GS Precision Engineering Services.”
Gary’s second .300 WSM F-Open rifle features a BAT M RBLP dual port fitted with a 1:10″-twist Bartlein barrel (supplied by Speedy), with action tuned and modified by Speedy. Both rifles are chambered virtually identically. Both rifles have Cerus stocks, blueprinted Jewell triggers, and Ezell PDT tuners.
The rifles are supported with a Lenzi front coaxial rest and a Lenzi rear bag, spec’d to the Cerus stocks.
Match .300 WSM Load — Berger Bullets, Norma Brass, H4350, Fed 210M
I run the .30 Cal Berger 215gr Hybrid bullet exclusively. I have not found a better long range bullet for F-Class. I use neck-turned Norma .300 WSM brass, H4350 powder, and Federal 210gm match primers. Unfortunately H4350 is not available in the UK anymore, but I was lucky to buy up a decent amount before it was banned. I anneal the Norma brass with an AMP 2 annealer every firing. But I do NOT trim and chamfer after every firing — only when the brass gets to the point of requiring it.
Here is the .300 WSM compared to a .284 Shehane (7mm), another popular F-Open cartridge Cartridge comparison image by Kris Wilson, aka “Willow” on our AccurateShooter Forum.
The .300 WSM has been described as a “super-sized Dasher”.
OPTICS — March 10-60x56mm High Master Scopes
Both .300 WSM rifles have March 10-60x56mm High Master (HM) riflescopes. Gary notes: “In my slightly biased opinion, this scope is simply the best F-Class and long-range scope money can buy. I was using a MTR-3 reticle in one scope and the slightly thinner MTR-1 reticle in the other. The HM temp lens system is astonishingly clear and bright. It’s very easy on the eye, reducing strain and fatigue during long shoots.”
March optics have a clever system which enables shooters to use their scopes like a FFP scope on specific zoom power. The MTR1 and MTR3 reticles are subtended with hash marks at 1 MOA on 40X and 2 MOA at 20X, this allows the shooter to calibrate the necessary hold from a sighting shot without even looking at a plotting sheet, it also makes very precise hold over and follow up shots, (which proved invaluable during the week with the very switching and changing conditions) it also gives you the choice to turn down the power if mirage and conditions call for it.
March 10-60×56 HM scopes feature a Temp anti-drift lens system. This has really proved its worth in searing temps. The clarity and image quality helped me achieve three personal bests and wins. (TIP: Use the MD disk supplied with your scope if you have one. Mine never left the rifle all week.) In fact I actually stopped using my spotting scope on some of the shoots as I could see mirage better through the March than anything else.
Mental Preparation — Be Confident and Consistent
I went into the Imperial after having a very good season so far. I was unbeaten in three National 2-day matches. So my confidence was high and I was feeling good about the competition. This confidence proved a massive advantage — you have to believe in your abilities.
My main focus was to be consistent. At the Imperial it’s almost impossible to win every single competition, as there are 18 in total. However one must not to make too many mistakes and be consistent. As Brian Litz says, a “train wreck” will finish your comp. However if you stay consistent and only drop a few points here and there, you will be all right, as most other competitors will drop a few points as well. The key is not to make BIG mistakes.
Here’s an example of avoiding the “train wreck” disaster when conditions are tough:
Final Final — the Farquharson. It was super hot, the wind was up and conditions were very tricky, I knew this was going to be a survival match and it was. I saw many 3s going in, however I did have a pretty good hold on the conditions losing a few 4s but nothing major until a big fat 3 came out of nowhere. But I persevered and did not let this upset me as I could see lots of points being lost around me. When the dust had settled I won by 2 points in this match and 4 points overall in the Aggregate.
Physical Fitness — Training Is Important
I have been working hard on my physical fitness for the past two years (after a pretty serious condition). Fitness really helps in a long competition and especially in the heat, with the stress it can cause. During the Imperial match, vehicles are only allowed in certain areas so you have to be able to hand-carry your shooting kit all over the range, a very large area. In recent months, I’ve dropped 25 pounds in weight. That helped — I found myself very physically able to cope with the exertions.
Reloading Advice from Gary Costello
Check and Double-Check Everything! Often I have found errors and mistakes which would not bode well for accuracy.
Label Everything! This is especially important when preparing for a long competition, and when shooting different rifles.
Choose a Temp-Stable Powder. Make sure you select a powder that is not sensitive to temp variations. Hodgdon, and Alliant would be my choice, and of course some Vihtavuori powders.
Load to the MIDDLE of your Accuracy Node. This way you can allow for warmer or cooler temps and conditions. I see lots of guys just pick the fastest speed and/or smallest group. But that can get you in trouble on hot days.
Use Quality Tools and Dies. Buy the best reloading gear your budget allows. Quality kit will last forever and stand you in good stead.
Thanks to Speedy, Cerus, and March Scopes
A big mention has to go to my good friend and master gunsmith Thomas (“Speedy”) Gonzales. This man is a legend and has taught me more about the dark arts than anybody. I think he produces the finest rifles known to man. Give credit also to Cerus Rifleworks. All my rifles have Cerus stocks and they are just awesome. Final mention is to March Optics. I have the honor to work with this company since 2010. I believe they make the finest optics in the world.
Gary also shot with the winning White Horse Lodge F-TR Team coached by Stuart Anselm.
Many of our readers have been interested in learning how modern bullets are made. While a “boutique” bullet-maker, supplied with appropriate cores and jackets, can craft bullets using relatively simple hand dies and manual presses, factory production is different. The major bullet-makers, such as Barnes, employ huge, complex machines to craft their projectiles on an assembly line.
Modern hunting bullets are made with a variety of sophisticated (and expensive) machines, such as Computer Numerical Control (CNC) lathes, giant multi-stage presses, and hydraulic extruding machines that draw lead ingots into lead wire. Barnes offers an “inside look” at the bullet production process in a series of videos filmed at its Mona, UT factory. We’ve embedded four videos from the series here. These videos can also be viewed on the Barnes Bullets YouTube Channel.
Milling Slots in TSX All-Copper Bullet
This video shows how the slots (between the drive bands) in the TSX all-copper bullet are cut. The slots reduce the bearing surface that contacts the rifling. This helps reduce friction and heat, extending the life of barrels used with all-metal, drive-band bullets:
Varminator Bullets Produced in Jumbo Transfer Press
Here is the transfer press used in the production of Varminator and MPG Bullets. The process begins with a giant spool of flat copper material. The copper is stamped into jackets and eventually the formed Varminator bullets are ejected one by one into a bucket.
CNC Lathe Turns Bullets Automatically
In the video below, a Bar-Feed CNC crafts mono-bloc bullets from metal bar stock. Barnes uses a small CNC lathe to turn .50-caliber bullets from brass bar stock. We’re not sure which bullet is being made in this video. The material looks to be sintered metal. In the close-ups you can gold-colored shavings from when the machine was previously used for CNC-turned brass bullets.
Accuracy Testing in 100-yard Tunnel
Barnes regularly tests bullet samples for accuracy. In the video below, a Barnes technician loads sample rounds and tests them for accuracy in a 100-yard tunnel. The rounds are shot through a special fixture — basically a barreled action connected to parallel rods on either side. This allows the testing fixture to slide straight back on recoil (see it move back at 1:07-08 minute mark).
Upside-Down Trigger — Application for Unlimited Benchrest Competition?
Note how the tester actuates the trigger, which points UPWARDS, just the opposite of a normal rifle. The technician lightly taps the upward-pointing trigger shoe with a metal rod. Could this upside-down trigger work in benchrest shooting — perhaps with railguns? It could make for an interesting experiment.
Story suggestion by EdLongrange. We welcome reader submissions.
August is National Shooting Sports Month. The NSSF, through its “+ONE” campaigns, encourages all dedicated gun owners invite a new shooter to the range. Here’s the challenge to our readers — make a commitment to introduce at least one new person to the shooting sports this year.
Be sure to tell the new shooter about the 10 Commandments of Firearm Safety:
The +ONE Movement — The Mission
The goal of the +ONE campaign is to build the ranks of shooters. The idea is basic — make a commitment to act as a MENTOR and encourage at least ONE new person to get involved. As the NSSF says: “If just one in three of America’s recreational shooters adds one new person to the shooting sports, we’ll secure a strong future for generations to come.”
We’ve been fans of the Howa Mini Action rifles since they were introduced a few years ago. With actions that are nearly an inch shorter than typical “short actions”, these Mini Action rigs work great as a compact “truck gun” or carry-around varminter. Current chamberings are: .223 Rem, 6.5 Grendel, 7.62x39mm, and .350 Legend. There are 20″ heavy contour and 22″ standard contour barrel options, plus a 16.25″ heavy for the .350 Legend only.
6.5 Guy Ed Mobley Tests the 7.62×39 Howa Mini Action Rifle
The Howa Mini Action rifles come with the excellent HACT 2-stage trigger and a 5-round or 10-round, synthetic detachable box mag (depending on caliber). The Mini Action’s bolt is 13% shorter than on regular short actions, providing a shorter, faster bolt throw. Weight is also reduced. This makes for a nice, compact (and very shootable) package.
6.5 Guys Test Howa Mini Actions in 6.5 Grendel and 7.62×39
The 6.5 Guys recently secured a pair of Howa Mini Actions, one chambered in 6.5 Grendel and the other in 7.62×39 Russian: “After trying out the Howa Mini Action rifles at SHOT Show 2017, we got a couple of loaners in 6.5 Grendel and 7.62×39 courtesy of Legacy Sports. These rifles are known for their smooth cycling and lightweight actions, as well as some unique chamberings for bolt rifles (6.5 Grendel, 7.62×39). Long story short, we really enjoyed them.” In fact Steve liked his 6.5 Grendel enough that he plans to purchase the gun. Get the full scoop in this VIDEO REVIEW:
The folks at Legacy Sports also conducted extensive accuracy tests of commercial ammunition in 6.5 Grendel and 7.62×39. The most accurate 6.5 Grendel ammo, with a stunning 0.29″ group, was Alexander Arms with Lapua 123gr Scenar; second best (0.56″ group) was Hornady with 123gr A-Max bullet. The most accurate 7.62×39 ammo was Hornady 123gr SST with a 0.62″ group in the 20″ Heavy Barrel version. View Howa’s Test Reports with these links:
When we first ran this story a while back, it generated great interest among readers. By popular request, we’re reprinting this story, in case you missed it the first time around. — Editor
Precision Benchrest and F-Class shooters favor premium brass from Lapua, Norma, Peterson, or RWS. (Lake City also makes quality brass in military calibers.) Premium brass delivers better accuracy, more consistent velocities, and longer life. Shooters understand the importance of good brass, but many of us have no idea how cartridge cases are actually made. Here’s how it’s done.
The process starts with a brass disk stamped from strips of metal. Then, through a series of stages, the brass is extruded or drawn into a cylindrical shape. In the extrusion process the brass is squeezed through a die under tremendous pressure. This is repeated two or three times typically. In the more traditional “draw” process, the case is progressively stretched longer, in 3 to 5 stages, using a series of high-pressure rams forcing the brass into a form die. While extrusion may be more common today, RWS, which makes some of the most uniform brass in the world, still uses the draw process: “It starts with cup drawing after the bands have been punched out. RWS cases are drawn in three ‘stages’ and after each draw they are annealed, pickled, rinsed and subjected to further quality improvement measures. This achieves specific hardening of the brass cases and increases their resistance to extraordinary stresses.” FYI, Lapua also uses a traditional draw process to manufacture most of its cartridge brass (although Lapua employs some proprietary steps that are different from RWS’s methods).
After the cases are extruded or drawn to max length, the cases are trimmed and the neck/shoulder are formed. Then the extractor groove (on rimless cases) is formed or machined, and the primer pocket is created in the base. One way to form the primer pocket is to use a hardened steel plug called a “bunter”. In the photos below you see the stages for forming a 20mm cannon case (courtesy OldAmmo.com), along with bunters used for Lake City rifle brass. This illustrates the draw process (as opposed to extrusion). The process of draw-forming rifle brass is that same as for this 20mm shell, just on a smaller scale.
River Valley Ordnance explains: “When a case is being made, it is drawn to its final draw length, with the diameter being slightly smaller than needed. At this point in its life, the head of the draw is slightly rounded, and there are no provisions for a primer. So the final drawn cases are trimmed to length, then run into the head bunter. A punch, ground to the intended contours for the inside of the case, pushes the draw into a cylindrical die and holds it in place while another punch rams into the case from the other end, mashing the bottom flat. That secondary ram holds the headstamp bunter punch.
The headstamp bunter punch has a protrusion on the end to make the primer pocket, and has raised lettering around the face to form the headstamp writing. This is, of course, all a mirror image of the finished case head. Small cases, such as 5.56×45, can be headed with a single strike. Larger cases, like 7.62×51 and 50 BMG, need to be struck once to form a dent for the primer pocket, then a second strike to finish the pocket, flatten the head, and imprint the writing. This second strike works the brass to harden it so it will support the pressure of firing.”
Thanks to Guy Hildebrand, of the Cartridge Collectors’ Exchange, OldAmmo.com, for providing this 20mm Draw Set photo. Bunter photo from River Valley Ordnance.
Texas Governor Greg Abbott recently signed legislation that provides a Constitutional Right to Carry in the state of Texas. This new law goes into effect September 1, 2021. To help Texans understand how the new Constitutional Carry law works, U.S. LawShield has prepared a free, 28-page downloadable Guide.
Guide Prepared by Texas Attorneys
The U.S. LawShield Texas Constitutional Carry Guide was prepared by the Independent Program Attorneys. The FREE 28-page Guide covers the essential information gun owners need to know, explaining the new law in an easy-to-understand way. Download the free U.S. LawShield Texas Constitutional Carry Guide here: www.uslawshield.com/txcarry.
U.S. LawShield cautions that there are some pitfalls with the new Texas Carry Law: “You could say Constitutional Carry is as simple as carrying without a permit… but you’d be wrong. There’s a reason why gun owners refer to this law as ‘complicated carry’ — it can be an easy trap with severe penalties for the uninformed and irresponsible.”
P.J. Hermosa, CEO of U.S. LawShield, warns: “Constitutional Carry doesn’t mean that anyone can just carry a gun – you must meet the requirements of the law. If not, then you are now a criminal”. That is why we recommend that all Texans who currently carry a firearm, or contemplate doing so in the future, download the FREE TX Constitutional Carry Guide.
More Information for Gun Owners with Carry Permits
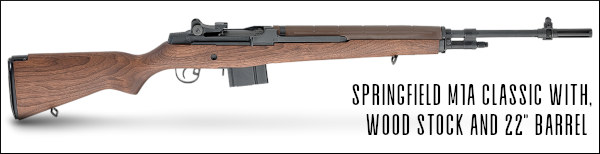
2021 CMP Springfield M1A Match at Camp Perry
Today we feature the M1A rifle. This is the one day in the year when the rugged M1A rifle, descended from the M1 Garand, is the star of the show at Camp Perry. The 14th Annual Springfield Armory M1A Match takes place today, August 8, 2021 at the CMP National Rifle Matches.
History of the Springfield M1A Match
The Springfield Armory M1A match began with one man’s idea and passion. Springfield Armory’s Mike Doy witnessed the waning of classic M1 Garand and M1A rifles from the competitive High Power firing lines. “I really wanted to get those M1A rifles out of safes and closets and back out onto the field. So [13] years ago, I promoted the idea of running an M1A-specific match at Camp Perry. That first year we had over 600 competitors and spectators.” Now the match offers some of the biggest pay-outs at Camp Perry. In recent years, Springfield Armory has donated over $25,000 worth of cash and prizes, including a $2,000 cash award to the overall winner.
Folks, take the time to WATCH this 3-minute video. It has great match footage of Camp Perry and interviews with M1A competitors. Well worth watching!
Nick Till in 2009 M1A Match. Nick was the 2007 Service Rifle Nat’l Champion. Photo courtesy NRA Blog.
Springfield M1A at Camp Perry National Matches
For many years, the semi-auto version of the M14 was “top dog” in iron sights Service Rifle competition. Now that discipline is dominated by .223 Rem (5.56×45) AR-type rifles, but the bigger .308-caliber rifle, now sold as the M1A, remains popular. The CMP hosts a major M1A Match every year at Camp Perry, sponsored by Springfield Armory. Significant prizes are awarded. In past years M1A Match competitors took home over $25,000 worth of cash and merchandise. This year’s Springfield M1A match will be held at Camp Perry on August 8, 2021.
Springfield M1A Match 2016 — Rapid Fire Sitting Stage
In the April 2018 issue of Shooting Sports USA, you’ll find a good article on the civilian version of the M14, now sold commercially as the Springfield M1A. An evolution of the battle-proven M1 Garand, the M14 was designed to shoot the 7.62×51 (.308 Win) round instead of the larger .30-06 Springfield cartridge used in WWI, WWII and Korea. While the vast majority of today’s M1As are chambered for .308 Win/7.62×51, Springfield Armory also produces a 6.5 Creedmoor version.
Dick Jones reports that accurized M14/M1As could post remarkable scores: “The accuracy potential of the M14/M1A is unquestionable. During their reign as service rifles, they produced multiple perfect 200 scores at 600 and 1000 yards in the hands of top shooters. This is a difficult feat with a modern, scoped, magnum-caliber rifle and remarkable with an iron-sighted battle rifle. Good competition rifles can group 10 shots under one MOA, and the meticulously-massaged rifles used by the top shooters during my career would consistently put up 10 shots under an inch at 200 yards off a test cradle.”
In this video, YouTube Reviewer Hickok 45 compares the M1 Garand and the M14/M1A:
“Descended from the M1 Garand, the M14 utilized multiple improvements that made it a far superior firearm for combat and a much better rifle for competition.” — Dick Jones, Shooting Sports USA.
M1A Match Equipment Rules and Course of Fire
Renewed interest in the M1A, coupled with major sponsorship from Springfield Armory, led to the the first dedicated Camp Perry M1A match in 2008. That first-ever match proved a huge success, drawing over 500 shooters. This year, match organizers also expect hundreds of shooters.
Equipment rules allow pretty much all types/grades of M1As in the match. The one-day course of fire consists of 50 shots at 300 yards on the NRA MR-65F target, as follows: 5 sighters; 20 shots slow-fire prone; 10 shots rapid-fire prone; 10 shots rapid-fire, kneeling or sitting; and 10 shots slow-fire standing. Here are photos from the 2014 Springfield MIA match, courtesy NRA General Operations.
See how the modern M1A is built in this Springfield Armory Video:
As racing improves automobiles, competition improves firearms, and the current crop of Springfield M1As, from the Basic to the top-of-the-line Super Match and Loaded models, reflects the years of development. The M14 and its variants are … still considered by many to be the best battle rifle in the history of the U.S. Military. — Dick Jones, Shooting Sports USA
Military Version Operation Revealed — M14 Training Film
The original military version of the M1A was the select-fire M14. The 27-minute official U.S. Army video below demonstrates the operation of the M14. Field-stripping is shown from the 5:13 time-mark through 8:30. Cut-away drawings show the M14’s gas operation at 8:40.
Watch M14 Functioning Cycle Starting at 9:25 Mark:
The M14’s complete 8-step functioning cycle is demonstrated from the 9:25 time-mark through 22:41. These eight operations are: 1) Feeding; 2) Chambering; 3) Locking; 4) Firing; 5) Unlocking; 6) Extracting; 7) Ejecting; and 8) Cocking. This movie is fairly long, but fans of battle rifles will find it well worth their time. Every M1A owner should definitely watch this video start to finish.
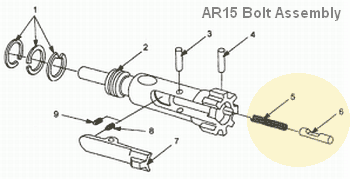
Accurate, modular, and supremely versatile, the AR15 is America’s favorite semi-auto rifle. But let’s face it, the AR is a maintenance hog. The AR’s gas tube blows carbon and soot right into the middle of the bolt assembly where it cakes on to the metal. The AR bolt also has many tiny parts, and small recesses, which must be cleaned regularly. This author has seen numerous ARs fail simply because there was gunk (dried lube, carbon, brass shavings) in the ejector slot or extractor spring recess.
A Clean AR is a Happy AR — Whether You Run ‘Wet’ or ‘Dry’
There are various schools of thought when it comes to maintaining an AR. Some folks prefer to run their AR “dry” with minimal lube on the lugs and friction surfaces. Other shooters prefer to run their ARs “wet”, with lots of lube. But whatever your preference, you need to clean your AR regularly. And nothing is more important than the AR’s bolt/carrier assembly. Because it is involved in feeding, firing, and extracting, the AR-15 bolt/carrier assembly can be considered the most critical portion of the AR-15 from a maintenance standpoint.
Bolt Take-Down Guide on Top Quark Blog
The editor of the Top Quark Blog has created an excellent illustrated AR15 Bolt Take-Down Guide that shows how to disassemble an AR15 bolt and carrier for regular cleaning. Even if you’re an experienced AR15 shooter, you can learn something from this page (sample at right), and you may want to bookmark it for future reference. The photos are large and clear and there are helpful hints for each step of the process.
The author knows his stuff and offers some important insights. For example, he notes that “Extractor springs in most AR15 bolt assemblies are fairly weak, and this can lead to various extraction-related failures. One of the few high points about Colt assemblies is their usage of higher-strength extractor springs. You can tell the difference by looking at the inner plastic insert. ‘Normal’ springs feature a blue plastic insert, Colt strong springs have a black insert.”
There is one notable oversight on this page — the author doesn’t cover disassembly and cleaning of the ejector assembly. This is actually quite important. A few small brass shavings, combined with carbon and lube in the ejector slot, WILL cause malfunctions. In fact, when this editor is called to diagnose problem ARs, the first things I look at (after swapping magazines) are the ejector recess and the slot for the extractor. Clogged ejectors are responsible for fail-to-ejects and other jams. It is essential that you keep the ejector hole clean. Old, gooey lube residues mixed with carbon and tiny brass shavings in the ejector recess will create all sorts of problems. As shown in the diagram below, it is simple to remove the ejector (#6) and ejector spring (#5), by drifting the ejector retaining pin (#4).
NOTE: The original Quark Blog Article appears to be offline (See Quark LINK.) However, this excellent article has been preserved via the WayBack Machine Internet Archives. CLICK HERE to access the Full Quark Blog Article via WayBack Machine Archive.
OK this is no novice. But even champion pistol shooter Jessie Harrison, Captain of Team Taurus, had to start with the basics. Jessie says that safety should always be your number one priority.
At AccurateShooter.com, our primary focus is precision target shooting with rifles. But it’s definitely fun to shoot pistols too, and we bet most of our regular readers own handguns. Here are six tips for shooting safely and accurately with handguns. These pointers will help you advance your skills and have more fun with your pistols and revolvers.
1. Make Sure Safety Is Number One
Whether you own one gun or one hundred, gun safety must always be your main priority. In this video, Smith & Wesson Team Captain Julie Golob covers the basics of gun safety.
2. Start with a .22 LR Handgun
We strongly recommend that new pistol shooters start off with a .22 LR rimfire handgun. The .22 LR cartridge is accurate but has very low recoil, less “bark” than a centerfire, and very little smoke and muzzle flash. New shooters won’t have to fight muzzle flip, and won’t develop a flinch from the sharp recoil and muzzle blast common to larger calibers. With the .22 LR, the trainee can focus on sight alignment, breathing, and trigger pull. When he or she has mastered those skills, move on to a .38 Special or 9mm Luger (9x19mm).
What gun to use? We recommend the 10-shot Smith & Wesson Model 617. Tthis is ideal for initial training, shooting single action, slow-fire. You want to focus on sight picture and holding steady. Shown above is the 4″-barrel Model 617 which balances well. There is also a 6″-barrel version. It has a longer sight radius, but is a little nose-heavy. Both are great choices. They are extremely accurate and they boast a very clean, precise trigger.
If you prefer a semi-auto .22 LR pistol, we recommend the Browning Buck Mark series. Buck Marks are very accurate and very reliable. This rimfire pistol is available in a variety of models starting at under $350.00. Like the S&W Model 617, a good Buck Mark will serve you for a lifetime.
3. Use Quality Targets with Multiple Aim Points
It’s common for new pistoleros to start shooting at cans or clay birds at a public range. That can be fun, but it’s better to start with proper targets, placed at eye level, at 7-10 yards. We like to use targets with large, brightly colored circles. Focus on putting 5 shots in a circle. We recommend targets that have multiple bullseyes or aiming points — that way you don’t have to constantly change your target. There are also special paper targets that can help you diagnose common shooting problems, such as anticipating recoil. EZ2C makes very good targets with bright, red-orange aim points. You can also use the bright orange Birchwood Casey stick-on Target Dots (right). These come in a variety of diameters. We like the 2″ dot at 10 yards.
4. Shoot Outdoors If You Can
We recommend that new pistol shooters begin their training at an outdoor range. There are many reasons. First, the light is better outdoors. Indoor ranges can be dark with lots of shadows, making it harder to see your target. Second, sound dissipates better outdoors. The sound of gunfire echoes and bounces off walls indoors. Third, an outdoor range is a more comfortable environment, particularly if you can get out on a weekday morning. Indoor ranges, at least in urban areas, tend to be crowded. Many also have poor ventilation. If you can make it to an outdoor range, you’ll be happy. Many outdoor ranges also have some steel pistol targets, which offer a fun alternative to paper. When shooting steel however, we recommend polymer encased or lead bullets to avoid ricochets.
Too many new pistol shooters try to move right to rapid fire drills. It’s better to start slow, practicing the basics, under the guidance of a good mentor. If you belong to a club, ask if there are certified instructors who will help out. This Editor learned pistol shooting from a seasoned bullseye shooter, who got me started with a .22 LR revolver and very close targets. Over the course of a few range sessions we progressed to farther targets and faster pace. But the fundamentals were never forgotten. When starting your pistol training, it’s wise to view some instructional videos. Top Shot Champion Chris Cheng hosts an excellent Handgun 101 Series produced by the NSSF. We’ve linked one of these Handgun 101 videos for Tip #6.
6. SLOW DOWN — This Is Not a Race
When you learned to ride a bicycle, you started slow — maybe even with training wheels. The same principle applies to pistol shooting. When you get started with handguns, we recommend you shoot slowly and deliberately. Start with the handgun unloaded — just work on your sight alignment and breathing. With snap caps in place, try some dry-firing drills. Then progress to live fire. But be deliberate and slow. With the target at 20 feet, see if you can get three successive shot-holes to touch. Believe it or not, many common pistols are capable of this kind of accuracy (but you won’t see many shooters at indoor ranges who pursue that kind of precision). Once you master your form and accuracy, then you can work on your speed.


 On the Berger Bullets website you’ll find a handy Twist-Rate Stability Calculator that predicts your gyroscopic stability factor (SG) based on mulitiple variables: velocity, bullet length, bullet weight, barrel twist rate, ambient temperature, and altitude. This cool tool tells you if your chosen bullet will really stabilize in your barrel.
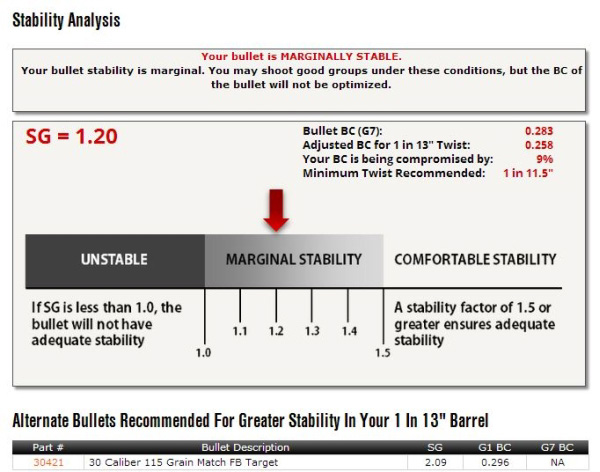


 Many of our readers have been interested in learning how modern bullets are made. While a “boutique” bullet-maker, supplied with appropriate cores and jackets, can craft bullets using relatively simple hand dies and manual presses, factory production is different. The major bullet-makers, such as


 Precision Benchrest and F-Class shooters favor premium brass from


 The headstamp bunter punch has a protrusion on the end to make the primer pocket, and has raised lettering around the face to form the headstamp writing. This is, of course, all a mirror image of the finished case head. Small cases, such as 5.56×45, can be headed with a single strike. Larger cases, like 7.62×51 and 50 BMG, need to be struck once to form a dent for the primer pocket, then a second strike to finish the pocket, flatten the head, and imprint the writing. This second strike works the brass to harden it so it will support the pressure of firing.”
 Texas Governor Greg Abbott recently signed legislation that provides a Constitutional Right to Carry in the state of Texas. This new law goes into effect September 1, 2021. To help Texans understand how the new Constitutional Carry law works,


 It’s common for new pistoleros to start shooting at cans or clay birds at a public range. That can be fun, but it’s better to start with proper targets, placed at eye level, at 7-10 yards. We like to use targets with large, brightly colored circles. Focus on putting 5 shots in a circle. We recommend targets that have multiple bullseyes or aiming points — that way you don’t have to constantly change your target. There are also special paper targets that can help you diagnose common shooting problems, such as anticipating recoil. EZ2C makes very good targets with bright, red-orange aim points. You can also use the bright orange Birchwood Casey stick-on Target Dots (right). These come in a variety of diameters. We like the 2″ dot at 10 yards.


