With reloading components and factory-loaded ammunition still in very short supply, gun owners are justifiably concerned. Every day, in our AccurateShooter Forum, members ask “Where are the primers?”, “Why can’t I get loaded ammo?”, “Why have component prices doubled or tripled?”. The answer is complex. Yes there have been production shortfalls (with the Remington Bankruptcy and some raw material shortages), yes there has been a reaction to the Biden election (causing panic buying), and yes there have been hoarding and profiteering (just look as the prices of primers on Gunbroker — over $300 per 1000!).
But probably the number one factor in the supply shortages has been the increase in gun owners in the past year, fueled in part by concerns over the BLM/Antifa led riots and social unrest, and Democratic Party attacks on gun rights. And, according to the NSSF, roughly 8,400,000 Americans purchased their first firearm in 2020. If each of these new gun owners purchased just two, 50-round boxes of ammo, that equates to 840,000,000 rounds of ammo. Think about that…the gun industry would have to produce an additional 2.3 million rounds of ammo EVERY DAY just to fill the demands from new gun owners. There are consequences for this increased production. Primers are in short supply because much of the available inventory is being used in loaded ammo.
This NSSF Infographic helps explain the situation. Among gunshops/dealers nationwide, there was a 95% increase in gun sales for the first half of 2020 (compared to 2019). And ammunition sales rose by 139%.
Look and be amazed. What you are seeing is the smallest 5-Shot group ever shot in 1000-yard competition. And it is also perfectly centered for a 50-5X max score, yes ALL Xs. Brilliant! This amazing group was shot by Mike Wilson in July of 2018 with his 17-lb Light Gun, chambered for a 6mmBR wildcat he calls the 6 BRAW (BR Ackley Improved Wilson). This spectacular feat of accuracy demonstrates the potential of the 6BR family of cartridges even at 1000 yards. For his record group, Mike shot Vapor Trail 103-grain bullets in Lapua 6mmBR fire-formed brass. He loaded Hodgdon H4895 powder with CCI 450 primers. The action was a BAT, the barrel a Brux.
The Best 5-Shot 1000-Yard Group in History
Story based on report by Sam Hall
Look at that target by Mike Wilson. This is one of the most remarkable displays of accuracy (and precision) in the history of long range shooting. This past weekend, Mike (aka “GA. Dawg” in our Forum) drilled a truly spectacular 1.087-inch, 5-shot group at 1000 yards, all centered up in the X-Ring. Yes, you read that right, a group barely over an inch at 1000, shot in competition at an official IBS benchrest match on July 21, 2018. Note, the group was measured at the range at an even smaller 1.068″ (see target). However, as certified by the IBS as a IBS Light Gun World Record, the group is listed as 1.087″.
How small is that in angular measurement? Well 1 MOA at 1000 yards is 10.47 inches, so Mike’s 50-5X masterpiece is 0.1038 MOA! Yes that is an IBS group size AND score World Record. And it is also smaller than the current NBRSA 1000-yard 5-shot LG world record, 1.473″ by Bill Schrader in 2002. This best-ever 1K group* was shot at an IBS registered 1000-yard match at Hawks Ridge Gun Club in North Carolina. Other records have been shot at Hawks Ridge in the past, but this is the most jaw-dropping.
Sam Hall (left, green shirt) holds record target by Mike Wilson (right, white shirt).
Sam Hall, past IBS National Champion and IBS 600-Yard Shooter of the Year, was stunned by Wilson’s accomplishment: “This is a truely awesome marksmanship feat — one of the best in history. I think I would trade all 14 of my 600-yard records for that one!”. Mike’s amazing target will be submitted for approval as new Group Size and Score IBS World Records. Official approval is pretty much a certainty. The previous 5-shot, 1000-yard IBS record is 1.397″ (50 score) by Tom Sarver in 2007. (The NBRSA 1000-Yard 5-shot LG record is 1.473″ by Bill Schrader in 2002.)
Posting on our Shooters’ Forum, Mike wrote: “Thanks everyone for the kind words. As humbling as this game is, when it comes together makes it all worthwhile! A very special THANK YOU to my traveling buddy, my son, Blake, and my wife Debra for allowing me to enjoy this crazy game.” Mike also wanted to thank his smiths and component suppliers.
Mike Wilson IBS 1000-Yard Light Gun Specifications
Action: BAT ‘B’ 1.550 Melonited Action with Jewell Trigger
Barrel: Brux HV 28″ Finished Length, 1:8″ Twist Rate
Chambering: 6 BRAW (6mmBR Ackley Improved Wilson), Chambered by Darrell Jones
Chamber Specs: 0.272″ No-turn Neck with 0.135″ Freebore
Stock: Shehane ST 1000 Fiberglass Stock (with stock work by Larry “Bullet” Archer)
Optics: Nightforce 12-42x56mm Benchrest NP-2 DD
LOAD Specs: Lapua 6mmBR brass (formed to 40° Ackley Improved), Vapor Trail 103gr bullets, Hodgdon H4895 powder, CCI 450 primers.
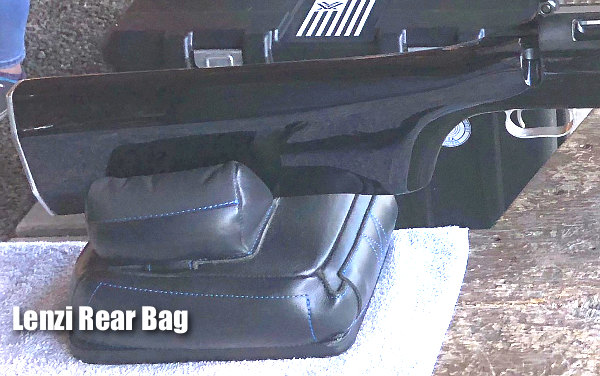
Leonard Baity front rest with Protektor Bag. Italian Lenzi bag in rear.
World Record-Setting Cartridge and Load
Mike was shooting a 40-degree Improved version of the 6mmBR Norma cartridge. Long popular with Benchrest and 300M shooters, the 6mmBR was the original inspiration for this website. Yep, we started as www.6mmBR.com. The Improved version has extra capacity, allowing about 100 FPS more velocity when chambered with a long throat. For his record group, Mike shot Vapor Trail 103-grain bullets in Lapua brass. He loaded Hodgdon H4895 powder with CCI 450 (small rifle magnum) primers.
Praise from Fellow Competitors
Here are some reactions to Mike’s amazing group by our Forum members:
“Amazing target Mike Wilson! Your group might last forever as ‘the goal’ of 1000-yard Benchrest! Heck that’s a great target even at 600 yards.” — Mike J.
“Think about this for a second. That group was barely larger than the size of your index finger’s first digit and he printed it at 1000 Yards.” — Carlos
“Unbelievable!! Doing that under chosen prime conditions is an amazing feat but to do that in competition and to have everything to come together is just unbelievable. Amazing how far skill, precision, knowledge, and the products of this sport have come. Never thought we would see a group this small and well placed especially in the hills of North Carolina where the wind always blows. Congratulations. A true lifetime achievement.” — Yote Hunter
“I think that one will stand for a while. Hard work does pay off, but it don’t hurt to be one of the givers in the sport. Mike, you are ‘The Man’!” — Bill Shehane
“Awesome, awesome. Now the goal is to shoot UNDER an inch!” — Alex Wheeler
The 6mmBR Ackley Improved
Mike Wilson shot his spectacular group with a 40° Improved version of the 6mmBR cartridge with less body taper than a standard 6BR — the design is 0.463 at the body/shoulder junction (vs. 0.460 for standard 6BR). Mike calls his version of the 6BR Ackley a 6BRAW (“W” for Wilson). Sam Hall explained: “The 6BRAW is pretty much the same as a 6BRA or 6BR-AI (Ackley Improved). I sold the reamer to Mike last year. This has a 0.272 ‘No-Turn’ chamber with a 0.135 Freebore”.
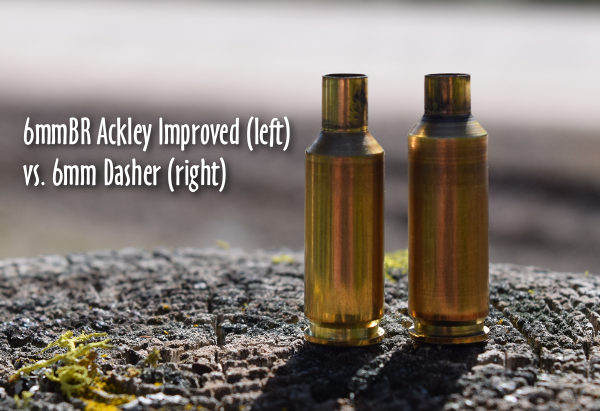
This photo shows a 40° 6mmBR Ackley Improved (6BRA), as used by Tom Mousel in Deep Creek, Montana. Mike Wilson’s 6BRAW may be very slightly different. For Mousel’s 6BRA with 28″ Krieger barrel, the accuracy node is about 2980-2990 fps, so this gives up only 30-50 fps compared to typical Dasher velocities. Mike Wilson’s load runs about 2980 fps also.
In the past couple of years, the 6BR Ackley-type cartridges have been hugely successful in 600-yard and 1000-yard Benchrest. Sam Hall notes: “This year the little 6BR-AI has shot the smallest groups ever fired in 600-yard and 1000-yard competition. Back in April 2018, bullet-maker Bart Sauter, using a 6BRA, shot a 0.311″ 50-score 5-Shot group at 600 yards.” (Read Sauter Story). Bart’s stunning 0.05 MOA group is now the 600-yard IBS HG World Record.(Note: Bart’s target was originally measured at 0.282″ but was later IBS-certified at 0.311″.)
Mike used an Italian Lenzi rear bag. Mike says the super-slick nylon on the ears of this high quality rear bag make for better tracking. The ears provide support but don’t “grab” the stock, reports Mike.
More Comments by Fellow Shooters:
“Truly an amazing feat. The 5X was the icing on the cake! Many shooters would be very happy with that group size at 200 yards.” — Mr. Zero
“Words cannot adequately express how many of us feel about your magnificent accomplishment at 1000 yards. Congratulations — that is terrific!” — Gene Beggs
“Truly amazing … well done on a great achievement… RESPECT!” — Elardus
“Bravo Mike pour ce tir incroyable. Ton exploit est sur le forum de tir longue distance en France bonne continuation.” — Frederic Riso
* There are two North American sanctioning bodies for 1000-Yard Benchrest, the IBS and the NBRSA. The previous 5-shot, 1000-yard IBS record is 1.397″ (50 score) by Tom Sarver in 2007. The existing NBRSA 1000-Yard 5-shot Light Gun record is 1.473″, shot by Bill Schrader in 2002.
The Legal Brief is a feature of TheGuncollective.com that focuses on firearms rules and regulations. In this Legal Brief video, Attorney Adam Kraut explains key State and Federal regulations governing firearms, and explains how to ensure compliance with all applicable laws.
This five-minute video explains barrel length rules for rifles and shotguns, and also explains the best (and most fool-proof) methods to measure your barrel. In addition, the video explains how to measure firearm overall length. A rifle or shotgun which is less than 26 inches overall can also be classified as a “Short-barreled” rifle/shotgun subject to the NFA. NOTE: Under federal law “If the rifle or shotgun has a collapsible stock, the overall length is measured with the stock EXTENDED”.
Highlights of LEGAL BRIEF Discussion of Barrel Length and Firearm Overall Length
The ATF procedure to measure the length of a barrel is to measure from the closed bolt or breech face to the furthest end of the barrel or permanently attached muzzle device. ATF considers a muzzle device that has been permanently attached to be part of the barrel and therefore counts towards the length.
How to Measure Barrel Length: Drop [a] dowel or rod into the barrel until it touches the bolt or breech face, which has to be closed. Mark the outside of the rod at the end of the muzzle crown (if you don’t have a permanently attached muzzle device) or at the end of the muzzle device if it is permanently attached. Remove the rod and measure from the mark to the end of the rod. That is your barrel length[.]
Remember, if the barrel length is less than 16 inches, it is possible that the firearm could be a short barrel rifle (if you are building a rifle or it is already on a rifle) and if the barrel length is less than 18 inches, it is possible the firearm could be a short barrel shotgun (again if you are building a shotgun or it is already a shotgun). Both of these firearms would be subject to the purview of the National Firearms Act and would require the firearm to be registered accordingly.
How to Measure Overall Length:The overall length of your rifle or shotgun may also classify it as a Short Barrel Rifle or Short Barrel Shotgun. The overall length of a firearm is the distance between the muzzle of the barrel and the rearmost portion of the weapon measured on a line parallel to the axis of the bore. … If the rifle has a permanently attached muzzle device, that is part of the overall length. … If the rifle or shotgun has a collapsible stock, the overall length is measured with the stock extended.
The late Bill Myers was recognized as one of greatest rimfire gunsmiths who ever lived. Myers crafted many match-winning, record-setting rimfire benchrest rigs. Here we feature one of Bill’s most interesting creations — a clamping action that allows a rimfire barrel to be indexed (rotated) around the bore axis.
Bill was a creative thinker, and his own exhaustive testing has convinced him that barrel indexing can enhance accuracy in rimfire benchrest guns. Myers did acknowledge that, particularly with a very good barrel, the advantages of indexing may be subtle, and extensive testing may be required. Nonetheless, Myers believed that indexing could improve rimfire accuracy.
Indexing with the Myers’ Clamping Action
To index the barrel, Myers simply loosens the three clamping-bolts and rotates the barrel in the action. Because there is no thread to pull the barrel in or out, the headspace stays the same no matter how much the barrel is rotated. In other words you can rotate the barrel to any position on the clockface and the headspace remains unchanged.
The Challenge of Barrel Indexing With a conventional barrel installation, employing a shoulder with a threaded tenon, it is difficult to index the barrel. Even with a cone breech (photo right) that eliminates the problem of extractor cuts, you’d have to use shims to alter the barrel index position, or otherwise re-set the shoulder each time you screwed the barrel in further.
Clamping Action Allows Barrel to Be Rotated to Any Position
Bill has come up with a masterful solution to barrel indexing. He designed and built his own prototype custom action that clamps the barrel rather than holding it with threads. The front section of the action is sliced lengthways, and then clamped down with three bolts. A special bushing (the gold-color piece in photos) fits between the barrel and the action. By using bushings of different inside diameters, Bill can fit any barrel up to an inch or so diameter, so long as it has a straight contour at the breech end. To mount the barrel, Bill simply places the fitted bushing over the barrel end-shank, then slips the “sleeved” barrel into the front end of the action. Tighten three bolts, and the barrel is secure.
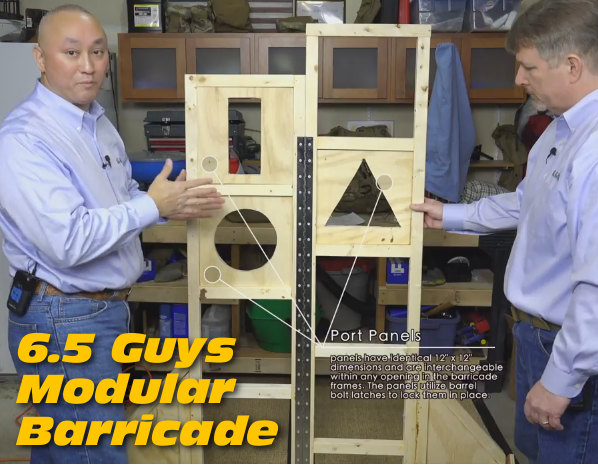
Here’s a great Do-It-Yourself project for tactical shooters. Ed and Steve of the 65Guys.com have created a versatile wooden barricade designed for easy transport. The goal with this design was to create a stable barricade that offers a variety of shooting positions, but can also fit in the bed of a pick-up or the back of an SUV. The 69″ tall barricade is hinged in the middle, so it’s just 27″ wide. To deploy the Barricade you simply fold it open and then nest the lower wings in ground-level stands.
We call this the BYOB Project — Build Your Own Barricade. Anyone with basic wood-working skills should find the Barricade prettyeasy to make. The only tricky part is cutting the side Dado joints for the left and right lower wings. But when you’ve got it completed, you have a low-cost unit that is versatile and sturdy yet easy to pack in a truck and carry out on the range. In the video below the 6.5 Guys showcase their Gen 2 barricade and explain how to build one just like it.
Looking at the 6.5 Guys Modular Barricade
The Modular Barricade was drawn up by Steve in PowerPoint and then dimensions added. Once the entire plan was created, Steve cut components to size and then used ordinary wood screws and wood glue to assemble the barricade frame. This was done to ensure maximum rigidity due to the light weight construction using 2″ x 2″ frame members. A long piano hinge was used to allow the Barricade to fold in half, while still having high torsional rigidity. Each of the Barricade openings are 12″ x 12″ square. This consistent ‘window’ spacing allows interchangeable panels with different cut-out shapes to be placed at varies heights/locations in the Barricade.
Modular Barricade Key Features
— Lightweight construction using low-cost 2×2 wood beams.
— Collapsible frame with center hinges for easy transport and deployment.
— Multiple Support levels at 6″ vertical intervals (6″ variance R to L).
— Modular port design allows ports to be changed and moved as desired.
6.5 Guys’ Modular Barricade — Construction Tips
The Modular Barricade can be constructed over a weekend with the proper materials and basic shop tools such as a power saw and electric screwdriver. Steve used a router for the side panel dado joints but a table saw could also be used for that task. Steve’s only real issue with the build involved the port panels — getting them to fit right. The 2″ x 2″ frame wood wasn’t always straight; even a small variation in the wood could cause a port panel to be too tight or too loose. Steve had to do a lot of extra sanding and planing to get the port panels to fit just right.
Where and How to Use the Barricade for Training
Because the 6.5 Guys’ Modular Barricade is so easy to move, you can simply pack it up and deploy it at your local range for practice. (Do ensure club/range rules allow shooting from barricades.) While the Barricade is designed to sit on the natural ground, the base stands can also be placed on concrete if your range does not allow deployment forward of the normal firing line. While you can use the Barricade for training on your own, Ed and Steve say novice shooters can benefit from a formal clinic.
In the video below, the 6.5 Guys discuss precision rifle training with Scott Satterlee, an instructor with Core Shooting Solutions. This video explains why new shooters should consider enrolling in a formal training clinic. Topics covered are: typical course format and “curriculum”, the gear needed to participate in a precision rifle clinic, and skills shooters should practice before attending the clinic.
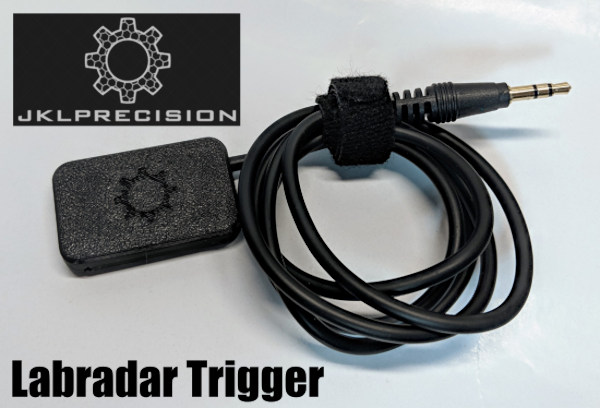
SUMMARY: This article reviews a device that “triggers” the LabRadar chronograph to register bullet speed. Rather than activate by sound or Doppler reading, this $35 JKL Inertial Trigger works from the rifle’s instantaneous recoil pulse when a shot is fired. After some frustration with his LabRadar when shooting at a range with reflective surfaces, our tester is now reporting that 100% of his actual shots are being captured correctly by his LabRadar chrono equipped with the JKL Inertial Trigger. He won’t use his LabRadar without it now. Other users have become instant fans of this inertial LabRadar trigger as well. It is very affordable and it works great. VIEW LARGE PHOTO.
JKL Inertial Trigger for LabRadar Chronograph
Product Review by F Class John
The LabRadar chronograph has been one of the most revolutionary tools in the shooting world because of how it collects velocity data, how it reports (and stores) that data, and, ultimately, the ease with which it can be positioned and operated. However, it’s not a perfect system. A majority of the complaints come from users whose LabRadar’s sometimes fail to record all the shots fired in a string. For the average plinker, this may not be an issue. But for serious shooters trying to do ladder tests or load development requiring all shots to be reported, it can be frustrating when a shot is missed.
Traditionally, LabRadar has recommended trying different settings that compensate for the gap between the unit and muzzle as well as well as having different options for how the unit recognizes a shot fired. While these options work to some degree, they aren’t a guaranteed fix especially when shooting at ranges with concrete baffles or with roofs, walls, and dividers that can alter sound waves. While nobody can precisely explain why shots are lost under certain circumstances, the fact remains it DOES happen. In addition, the default system can sometimes pick up stray shots from nearby rifles.
Not willing to give up on this sophisticated chronograph, many shooters have looked for a foolproof way to prevent such failures from happening. In fact, for this shooter, the frustration was so high that I actually sold my first LabRadar and went back to another chronograph before ultimately buying another LabRadar almost a year later. But I made that repeat purchase only after vowing to finding a way to make the LabRadar work — EVERY time, for EVERY shot.
See How JKL Inertial Trigger Works in this Video
JKL Inertial Trigger — Outstanding Product That Works Great
Enter the JKL Trigger for the LabRadar. This is an easy-to-use, inertial-driven trigger that activates simply from the recoil of your gun. The unit consists of a small rectangular pad attached to a long audio cable. All you do is plug in the audio cable, attach the pad to your gun with the provided hook and loop (Velcro) material. Then (important), you must change the LabRadar trigger settings from “Doppler” to “Trigger”. The unit works great and is easy to set up. In my experience, the unit will activate no matter where you place it on a stock. However the recoil of every gun is slightly different, so you will need to make sure you find a location that doesn’t interfere with your shooting setup.
An unexpected benefit of using the JKL trigger is that it gives you a larger area in which to place your Labradar unit, making it more convenient to setup on benches or range stations. I found this a welcome relief since the LabRadar originally seemed somewhat fussy about where I placed it. Now I can place the LabRadar in more convenient locations — as long as it’s still near my gun and pointed at the target correctly, I get consistent bullet speed data.
Are There Issues with “False Positives”?
If there is any downside to using the JKL Inertial Trigger, it’s that a very hard bump or aggressive working of the action can trigger a false reading. However these are easy to identify in your data, because the speed value is way lower than true fired shot values. Simply remove that low entry or otherwise ignore it in your calculations. To be fair, this “bump activation” really doesn’t happen very often once you get used to using the inertial trigger.
SUMMARY — Outstanding Accessory for LabRadar Users
Bottom line — if you own a LabRadar, then definitely get a JKL Inertial Trigger. Priced at just $35.00 this device is not expensive, yet it’s one of the most effective accessories you can buy for the LabRadar. I’ve recommended these inertial triggers to dozens of shooters. Every one of those guys who did buy a JKL trigger says they can’t imagine using a LabRadar without one. If you love what the LabRadar can do, but have been frustrated with shots not getting recorded 100% of the time, then definitely get yourself a JKL Inertial Trigger. It turns a good system into an amazing system. JKL Industries states that its inertial trigger “will work on anything from a .22 LR to a suppressed system or with standard rifle and brake.”
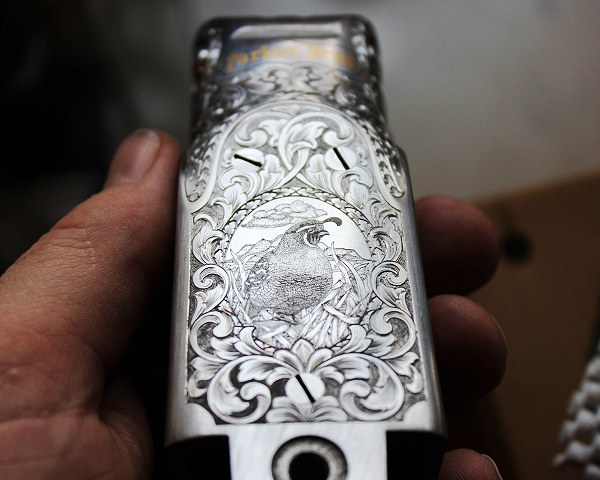
Impressive engraving by Jesse Kaufmann. Note how the scope rings have been engraved to perfectly match the engraving pattern on the Remington 547 action.
Who says fine craftsmanship is dead? There’s a fellow up in South Dakota, Jesse Kaufmann, who produces some of the most handsome engraving we’ve seen. Jesse, who operates Black Hills Gunstocks and Engraving LLC, is a true master at metal engraving and he also does superb stock checkering. Here are some examples of Jesse’s engraving work:
About Jesse Kaufmann, Master Engraver
Jesse Kaufmann was a professional stockmaker for Dakota Arms for over a decade. In 2009, he was inducted in the American Custom Gunmakers Guild as a checkering specialist. In January 2017, Jesse was awarded his Master Engraver certification by the Firearms Engravers Guild of America. With his broad skill set, Jesse is able to offer his clients a unique and complete package of stock work, finish, checkering, and engraving for a custom package that is all completed under one roof by his own hands.
Jesse Kaufmann’s work has been featured in American Rifleman, American Hunter, FEGA’s The Engraver, Sports Afield, Waidmannsheil Journal of German Gun Collectors Assn., Gun Digest 71st Edition, Modern Custom Guns Volume 2, Dangerous Game Rifles 2d. Edition. For more info, visit BlackHillsgunstocksandengraving.com, email blackhillsgunstocks [at] gmail.com, or call Jesse at (605) 499-9090.
Most of us own a .223 Rem rifle. Now, thanks to our friends at Rifleshooter.com we can assess exactly how velocity changes with barrel length for this popular cartridge.
Rifleshooter.com performed an interesting test, cutting the barrel of a .223 Rem rifle from 26″ all the way down to 16.5″. The cuts were made in one-inch intervals with a rotary saw. At each cut length, velocity was measured with a Magnetospeed chronograph. To make the test even more interesting, four different types of .223 Rem/5.56 ammo were chron’d at each barrel length. The Rifleshooter.com team that conducts these tests has a full-service gun shop, 782 Custom Gunworks — visit 782guns.com.
Test Barrel Lost 25.34 FPS Per Inch (.223 Rem Chambering)
How much velocity do you think was lost, on average, for each 1″ reduction in barrel length? The answer may surprise you. The average speed loss of the four types of .223/5.56 ammo, with a 9.5″ shortening of barrel length, was 240.75 fps total (from start to finish). That works out to an average loss of 25.34 fps per inch.
5.56/.223 Barrel Cut-Down Speed Test 26″ to 16.5″
Start FPS at 26″
End FPS at 16.5″
Total Loss
Average Loss Per Inch
UMC .223 55gr
3182*
2968
214
22.5 FPS
Federal M193 55gr
3431
3187
244
25.7 FPS
Win m855 62gr
3280
2992
288
30.3 FPS
Blk Hills .223 68gr
2849
2632
217
22.8 FPS
*There may have been an error. The 25″ velocity was higher at 3221 fps.
Rifleshooter.com observed: “Cutting the barrel from 26″ to 16.5″ resulted in a velocity reduction of 214 ft/sec with the UMC 223 55-grain cartridge, 244 ft/sec with the Federal M-193 cartridge, 288 ft/sec with the Winchester M855 cartridge and 217 ft/sec with the Back Hills 223 68-grain match cartridge.”
How the Test Was Done
The testers described their procedure as follows: “Ballistic data was gathered using a Magnetospeed barrel-mounted ballistic chronograph. At each barrel length, the rifle was fired from a front rest with rear bags, with five rounds of each type of ammunition. Average velocity and standard deviation were logged for each round. Once data was gathered for each cartridge at a given barrel length, the rifle was cleared and the bolt was removed. The barrel was cut off using a cold saw. The test protocol was repeated for the next length. Temperature was 45.7° F.”
See More Barrel Cut-Down Tests on Rifleshooter.com
Rifleshooter.com has performed barrel cut-down tests for many other calibers/chamberings including 6mm Creedmoor, .308 Winchester, and .338 Lapua Magnum. See these test results at Rifleshooter.com.
Much Different Results with 6mmBR and a Longer Barrel
The results from Rifleshooter.com’s .223/5.56 test are quite different than the results we recorded some years ago with a barrel chambered for the 6mmBR cartridge. When we cut our 6mmBR barrel down from 33″ to 28″ we only lost about 8 FPS per inch. Obviously this is a different cartridge type, but also our 6mmBR barrel end length was longer than Rifleshooter.com’s .223 Rem start length. Velocity loss may be more extreme with shorter barrel lengths. And, of course, different cartridge types and powder/bullet combinations will yield different results.
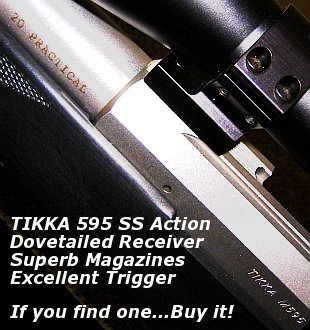
Do you have .20-Cal fever? Do you yearn to see what a 4200+ fps projectile can do to an unsuspecting prairie dog? Well you could go out and purchase a 204 Ruger rifle, fork over the money for a new, complete die set, and hope that the brass is in stock. Warren B (aka “Fireball”) has a more cost-effective solution. If you have .223 Rem dies and brass, all you need to shoot the 20 Practical is a new barrel and a .230″ bushing to neck down your .223 cases. Warren’s wildcat is simple, easy, and economical. And the 20 Practical matches the performance of the highly-publicized 20 Tactical with less money invested and no need to buy forming dies or fire-form cases. Warren’s cartridge was aptly named. Practical it is.
20 Practical Tikka Bolt Action for Varminting
by Warren B (aka “Fireball”) and Kevin Weaver
After building my 20 PPC, I wanted to do another .20 caliber, this time a repeater for predator hunting that could also serve as a gopher/prairie dog rifle. I wanted to use a Tikka M595 stainless sporter I had. This rifle is the ultimate repeater with an extremely smooth-feeding cycle from its single-column magazine. Since the Tikka was a .223 Remington from the factory, I first looked at possible case designs that would fit the magazine. The 204 Ruger was a very new round at the time and brass was scarce. I also didn’t care for the overly long case design or the standard throat dimensions of the cartridge. I then looked at the 20 Tactical. It was a nice cartridge but I didn’t like the fact that (at the time) an ordinary two-die Tac 20 set with just a plain full-length die and standard seater were $150. Not only did the costs bother me, but I was accustomed to using a Redding die set featuring a body die, a Type-S bushing neck die, and a Competition seater. To be honest, I also didn’t care for the 20 Tactical’s name–there is absolutely nothing tactical about the cartridge. I didn’t want to adopt a new cartridge based on what I perceived to be a marketing gimmick (that “tactical” title).
Warren B, aka “Fireball”, with his Tikka 595. With its smooth action and phenolic single-column mag, it cycles perfectly in rapid fire.
Simply Neck Down .223 Rem to Make a 20-223 Wildcat
I decided the best thing to do for my purposes was to simply neck down the .223 Rem case and make a 20-223. I already had the dies, the brass, and a rifle that would feed it perfectly. I decided to call the cartridge the 20 Practical because as you will see in this article, it truly is a very practical cartridge. In addition to the generous and inexpensive availability of brass and dies, the 20 Practical is an easy case to create, requiring no fire forming as a final step. Simply neck your .223 Rem cases down, load and shoot.
[Editor’s Note: Over the years, other shooters have experimented with .223 Remington cases necked down to .20 caliber, some with longer necks, some with different shoulder angles. Warren doesn’t claim to be the first fellow to fit a .20-caliber bullet in the .223 case. He gives credit to others who did pioneering work years ago. But he has come up with a modern 20-223 wildcat that involves no special case-forming, and minimal investment in dies and tooling. He commissioned the original PTG 20 Practical reamer design, and he and Kevin did the field testing to demonstrate the performance of this particular version.]
I chose Kevin Weaver at Weaver Rifles to fit and chamber the barrel to my rifle. Kevin does excellent work and is great to work with. Kevin liked the idea of the 20 Practical so much he agreed to purchase the project reamer. (BTW Kevin didn’t even need to purchase a Go/No-Go gauge, he just used an existing .223 Rem gauge.)
Before Kevin ordered the reamer, I talked over the reamer specs with him. My priorities were tolerances on the tight end of the .223 Rem SAAMI specification, a semi-fitted neck with no need for neck-turning, and a short throat so that we could have plenty of the 32gr V-Max in the case and still touch the lands. I also wanted this short throat in case [anyone] wanted to chamber an AR-15 for the 20 Practical. A loaded 20 Practical round will easily touch the lands on an AR-15 while fitting into the magazine with no problem. With its standard 23-degree shoulder, the 20 Practical case also feeds flawlessly through an AR-15.
As for the barrel, I only use Liljas on my rifles. I have had great luck with them. They have always shot well and they clean up the easiest of any barrels that I have tried. I had previously sent my Tikka barreled action to Dan Lilja so that he could program a custom contour into his equipment and turn out a barrel that would perfectly fit the factory M595 sporter stock. There isn’t much material on an M595 sporter stock so the contour had to match perfectly and it did. Dan Lilja now has this custom contour available to anyone who would like to rebarrel their M595 sporter with one of his barrels.
There Are Plenty of Good .204-Caliber Varmint Bullet Options
How to Form 20 Practical Cases — Simple and Easy
Forming 20 Practical cases is very easy. No fire-forming is required. Start with any quality .223 Rem brass. Then simply run the case into your bushing die with the appropriate bushing and call it done.
Project Componentry
My 20 Practical rifle started out as a Tikka Model 595 Stainless Sporter in .223 Remington. Though the M595 is no longer imported, if you shop around you can find M595 Sporters for bargain prices. Mine cost under $500. I think the action alone is worth that! The receiver has a milled dovetail for scope rings plus a side bolt release like expensive BR actions. The bolt cycles very smoothly. Ammo is handled with super-reliable 3- or 5-round detachable single-column magazines (FYI, Tikka’s M595 22-250 mags will feed a 6BR case flawlessly.) We kept the standard Tikka trigger but fitted it with a light-weight spring. Now the trigger pull is a crisp 1.8 pounds–about as good as it gets in a factory rifle. We replaced the factory tube with a custom, 24″, 3-groove Lilja 12-twist barrel. Dan Lilja created a special M595 sporter contour to allow a perfect “drop-in” fit with the factory stock. For optics, I’ve fitted a Leupold 4.5-14x40mm zoom in low Talley light-weight aluminum mounts. All up, including optics and sling, my 20 Practical weighs just under 8.5 pounds.
Test Report–How’s It Shoot?
I sent the barrel and barreled action to Kevin and in a very short time it was returned. Kevin did a perfect job on the rifle. I had asked him to try to match the bead blasted finish of the Tikka when he finished the new barrel. It came out perfect and the only way one can tell it is a custom is the extra two inches of length and the “20 Practical” cartridge designation.
So, no doubt you’re asking “how does she shoot?” Is my “prototype”, first-ever 20 Practical an accurate rig? In a word, yes. Even with the standard factory stock, and light contour barrel, it can shoot 3/8″ groups. Take a look at the typical target from this rifle. This is from an 8.5-pound sporter with a very skinny fore-end and a factory trigger.
Gunsmith’s Report from Kevin Weaver The 20 Practical: Origins and Development
Editor’s NOTE: We can’t say for sure who first necked down the .223 Rem to .20 caliber and chambered a rifle for that wildcat (as opposed to the .20 Tactical). But here is an account from way back in 2006 when the Warren B first came up with the idea of a .20 Practical cartridge, complete with reamer specs.
A year ago I received a call from Warren with a great idea. Warren asked “Why couldn’t we simply neck down the .223 Remington case to 20 caliber and get basically the same performance as the 20 Tactical? This way you can forgo the expensive forming dies that are needed for the 20 Tactical.” The idea made perfect sense to me, and I saw no major technical issues, so we got started on the project. I ordered a reamer from Dave Kiff at Pacific Tool & Gauge (PTG) with a .233″ neck. The .233″ neck should allow for a simple necking-down of the 223 Remington case to produce the 20 Practical in just one step. No fire-forming necessary! Furthermore, the PTG 20 Practical reamer Dave created should work with any available .223 Rem brass, commercial or military.
The first 20 Practical round was launched down range (through Warren’s Tikka) just a few months later. The brass formed as easily as expected. All one needs is a Redding type “S” bushing die with a .230 bushing and with just one step I had a .20 caliber case ready to shoot. Warren is brilliant. [Editor’s Note: We concur. For more details on Warren’s case-forming methods and his tips for adapting .223 Rem dies, read the technical sections further down the page.]
It would be almost six months later until I got around to building a dedicated test rifle chambered for the 20 Practical. I used a Remington 722 action, Remington synthetic semi-varmint stock, and a 24″ Douglas stainless steel XX 12-twist barrel. I formed and loaded about 30 cases using Remington brass in about 20 minutes. I used a .223 Rem seating die to seat the 20 Practical bullets. The .223 seating stem seated the small 20-Cal bullets just fine. The first loads sent the 40gr Hornady V-Max bullets down range at a modest 3500 FPS. I did not shoot for groups. I just wanted to use this load to sight in the rifle and break in the barrel. Load development was painless–I used reduced .223 Rem loads for 40gr bullets and worked up from there. In the table below are some of my preferred loads as well as Warren’s favorite recipes for his 20 Practical.
Bullet Wt.
Powder
Charge Wt.
Velocity FPS
Comments
32GR
H4198
24.1
4025
Warren’s lighter gopher load
32GR
AA2460
27.8
4154
Warren’s coyote/prairie dog load
32GR
N133
26.0
4183
Coyote/PD load, clean burn
33GR
H4198
26.0
4322
Hot Load. Use with Caution!
33GR
N133
27.0
4255
Kevin: 0.388” 5 shot group
40GR
H335
25.0
3583
Kevin’s barrel break-in load
40GR
H4198
24.0
3907
Hodgdon “Extreme” Powder
40GR
IMR4895
26.0
3883
Kevin: 0.288″ 5-shot group
40GR
N133
25.0
3959
Kevin: 0.227″ 5-shot group
Warren’s Load Notes: My pet loads are all with IMI cases, 32gr Hornady V-Maxs, and Fed 205 primers (not match). These are the most accurate loads in my rifle so far. I haven’t even bothered with the 40s as I have the 20 PPC and 20 BR for those heavier bullets. I prefer the lighter bullets in the 20 Practical because I wanted to keep speed up and recoil down in this sporter-weight predator rifle. Also, the 32gr V-Max is exceptionally accurate and explosive. I like N133 the best as it burns so clean. IMI cases are tough and well-made.
Kevin’s Load Notes: I used Remington 223 cases, Hornady V-Max bullets, and Remington 6 1/2 primers to develop the above loads. CAUTION: all loads, both Warren’s and mine, should be reduced 20% when starting load development in your rifle. All load data should be used with caution. Always start with reduced loads first and make sure they are safe in each of your guns before proceeding to the high test loads listed. Since Weaver Rifles has no control over your choice of components, guns, or actual loadings, neither Weaver Rifles nor the various firearms and components manufacturers assume any responsibility for the use of this data.
Comparing the 20 Practical and 20 Tactical
Kevin tells us: “The 20 Practical and the 20 Tactical are almost identical cartridges. There are only slight differences in case Outside Diameter, shoulder angle, and case body length. The neck length on the 20 Tactical is a bit longer, but there is still plenty of neck on the 20 Practical to grip the popular bullets, such as the 32gr V-Max. Here are some specs:
Cartridge
Bolt face to shoulder
Shoulder O.D.
Shoulder Angle
Total length
20 Tactical
1.5232″
.360
30°
1.755″
20 Practical
1.5778″
.3553
23°
1.760″
Both the 20 Tactical and the 20 Practical are fine .20 caliber cartridges. At present, the 20 Tactical is the more popular of the two because it has had more publicity. However, my favorite would be the 20 Practical. Warren’s 20 Practical gives the SAME performance as the 20 Tactical without fire-forming, or having to buy expensive forming dies. So with the 20 Practical you do less work, you shell out a lot less money, yet you give up nothing in performance. What’s not to like? To create 20 Practical cases, just buy a .223 Rem Redding Type “S” Bushing Die set with a .230 or .228 bushing and have fun with this great little cartridge.”
Shoot 101 Quiz
How much of an expert are you when it comes to firearms and ballistics? Test your knowledge with this interactive test. Vista Outdoor, parent of CCI, Federal, Bushnell, RCBS and other brands, has a media campaign called Shoot 101, which provides “how to” information about shooting, optics, and outdoor gear. There were a variety of interactive offerings that let you test your knowledge.
On the Shoot 101 website, you’ll find a Ballistics Quiz. The questions are pretty basic, but it’s still fun to see if you get all the answers correct.
You don’t need a lot of technical knowledge. Roughly a third of the questions are about projectile types and bullet construction. Note, on some platforms the layout doesn’t show all FOUR possible answers. So, for each question, be sure to scroll down to see all FOUR choices. REPEAT: Scroll down to see ALL answers!


 With a conventional barrel installation, employing a shoulder with a threaded tenon, it is difficult to index the barrel. Even with a cone breech (photo right) that eliminates the problem of extractor cuts, you’d have to use shims to alter the barrel index position, or otherwise re-set the shoulder each time you screwed the barrel in further.


 About Jesse Kaufmann, Master Engraver


 After building my 20 PPC, I wanted to do another .20 caliber, this time a repeater for predator hunting that could also serve as a gopher/prairie dog rifle. I wanted to use a Tikka M595 stainless sporter I had. This rifle is the ultimate repeater with an extremely smooth-feeding cycle from its single-column magazine. Since the Tikka was a .223 Remington from the factory, I first looked at possible case designs that would fit the magazine. The 204 Ruger was a very new round at the time and brass was scarce. I also didn’t care for the overly long case design or the standard throat dimensions of the cartridge. I then looked at the 20 Tactical. It was a nice cartridge but I didn’t like the fact that (at the time) an ordinary two-die Tac 20 set with just a plain full-length die and standard seater were $150. Not only did the costs bother me, but I was accustomed to using a Redding die set featuring a body die, a Type-S bushing neck die, and a Competition seater. To be honest, I also didn’t care for the 20 Tactical’s name–there is absolutely nothing tactical about the cartridge. I didn’t want to adopt a new cartridge based on what I perceived to be a marketing gimmick (that “tactical” title).
 Simply Neck Down .223 Rem to Make a 20-223 Wildcat
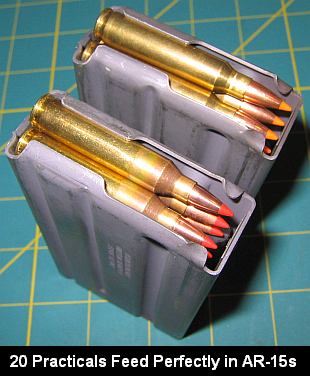 I chose Kevin Weaver at
 Project Componentry
 Test Report–How’s It Shoot?
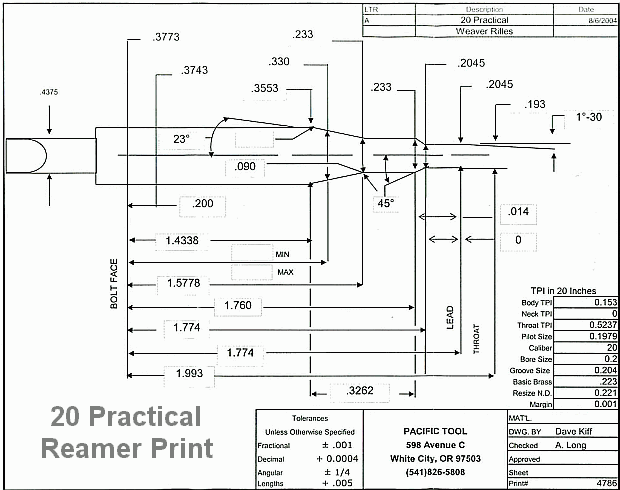
 Comparing the 20 Practical and 20 Tactical
 Shoot 101 Quiz


