Adam Scepaniak, of The Guns and Gear Store, has written an interesting story about Prairie Dog Hunting in North Dakota. If a P-Dog safari is on your “bucket list”, you’ll want to read the full story in the Sierra Bullets Blog. Adam provides many tips that can help you plan a successful prairie dog adventure.
Prairie Dog Hunting in North Dakota with Sierra Bullets
It’s that time of year where lots of men and women point their vehicles westward and try to push the limits of their rifles on prairie dogs. [A few seasons back] I was a part of this group of people… while in northwestern North Dakota. CLICK HERE to Read Full Story.
Little Missouri National Grassland
Once my hunting party arrived at the Little Missouri National Grassland in North Dakota we immediately began scouting for prime prairie dog towns. There is a certain amount of strategy involved in choosing a prairie dog town … for several reasons. For one, you should try to always stay “above” the prairie dogs.
Small objects like rocks, cactuses, and prairie vegetation can easily obstruct your view if you’re shooting prone on a level plane. We encountered this in the first small prairie dog town we stopped and shot at. The prairie dog town was very visible while walking and standing, but once we laid down with our rifles on bipods the two-foot prairie grass became a severe obstruction. We shortly moved on because the small town became quick-studies to our shooting.
The second prairie dog town we hunted was at the base of a small ridge with a dried, cattle creek at the bottom. This area offered better shooting opportunities because we were above most of the prairie dog holes, and if we were not above them, a deep ravine separated us from the prairie dogs removing any obstructions from our rifle scopes which was our previous problem. This area had its own disadvantage though because of some other wildlife present. There were approximately fifty head of cattle in our close vicinity grazing, which was to no surprise because many ranchers utilize the National Grassland for grazing. We had to wait for the cattle to leave our area as to not have an incidental hit due to a rare ricochet. As the sun passed over the horizon we decided to return to this spot the next morning, but would change our shooting position to increase our advantage.
This Location Offered a Nice Overlook.
Zoomed Image Shows Individual Prairie Dog Mounds.
My previous varminting best was a 275-yard shot near Mobridge, South Dakota on a separate prairie dog hunting trip. With more experience and better reloading, Here in North Dakota I was able to make a solid hit on a prairie dog just over 400 yards which made me ecstatic! For a central Minnesota, shotgun-raised guy, I was pretty happy that my bullet selection and hand-loading ability produced a 125-yard improvement.
Once we cleaned and cased our rifles for the journey home we had shot a little over 200 rounds of my Sierra® reloads. This was a lot less than previous prairie dog trips I have been a part of, but our hit percentage was substantially higher as well. Traveling into a new area meant a lot more scouting and experimentation for us as a group. In future trips or hunts of your own, it can be very beneficial to schedule an extra day just for scouting[.]
Little Missouri National Grassland is a National Grassland located in western North Dakota. At 1,033,271 acres, it is the largest grassland in the country. Within its borders is Theodore Roosevelt National Park. The Little Missouri National Grasslands was once a part of the Custer National Forest, but is now a part of the Dakota Prairie Grasslands, a National Forest unit consisting entirely of National Grasslands. A predominant feature of the grassland is colorful and beautiful badlands, a rugged terrain extensively eroded by wind and water. It is a mixed grass prairie, meaning it has both long and short grass.
The boundaries of the grasslands on certain maps can be misleading. Within the boundaries of the national grassland are significant portions of state-owned and privately-owned land, much of it leased by cattle ranchers for grazing.
The grassland is administered by the Forest Service as part of the Dakota Prairie Grasslands from offices in Bismarck, ND. There are ranger district offices in Dickinson and Watford City.
As the November 2020 election quickly approaches, many of the candidates’ platforms include proposals that severely threaten your Second Amendment rights. Presumptive Democratic Nominee Joe Biden endorses a broad ban on semi-automatic rifles and further restrictions on handguns. From proposed bans on popular modern sporting rifles and ammunition to mandates for federal licensing and registration, these ill-informed proposals would strip away the rights of law-abiding citizens while doing nothing to protect public safety. It is time you make a choice and take a stand.
As target shooters, hunters, and gun owners, we must not risk our rights! On Election Day 2020, vote to protect America’s firearms freedoms: #GUNVOTE.
Even between elections, target shooters, hunters, and gun owners would do well to stay informed about the issues that affect us. Becoming educated about the views, votes, and decisions of officeholders and those positioning themselves to run for office should be an ongoing concern. #GUNVOTE is here to help you to protect America’s firearms freedoms. Don’t wait until election time. Become educated and keep yourself informed before it’s time to #GUNVOTE.
Protecting your rights has never been more important than it is today. Our national crisis has exposed the politicians who want to strip away our constitutional freedoms. Send them a message! Be a voter in the 2020 elections to protect your rights!
Help Drive Pro-Second Amendment Voter Registration
NSSF is urging all industry businesses and activist-minded individuals to download and display NSSF’s #GUNVOTE Banners on their company websites and incorporate #GUNVOTE messages in their social media campaigns. You can link to Gunvote.org, where visitors can find voter-registration information for their states and other helpful resources.
This message is provided by the National Shooting Sports Foundation, the trade association for the firearms, ammunition, hunting and shooting sports industry.
This article comes from the Criterion Barrels website. It provides good, conservative advice about barrel cleaning. Understand that cleaning methods may need to be adapted to fit the amount and type of fouling (and the particular barrel). In general, we do try to minimize brushing, and we follow the procedures Criterion recommends respecting the crown/muzzle. We have also had very good success using wet patches followed by Wipe-Out bore foam. Along with the practices outlined by Criterion below, you may want to try Wipe-Out foam. Just be sure to use a fitted cleaning rod bore guide, to keep foam out of the action recesses and trigger assembly.
The above video shows how to apply Wipe-Out or other bore-cleaning foam. We use a slightly different method. First, we use 3-4 wet patches to remove loose carbon fouling. Then we apply the foam as shown, but usually from the muzzle end (with bore guide in chamber). Here’s the important point — after 20-30 minutes, once the bubbles have dissipated, we apply the foam a second time, getting more of the active ingredients into the barrel. We then patch out, as shown, after 3-4 hours.
What is the Best Way to Clean a Rifle Barrel?
We are asked this question quite frequently alongside requests for recommended break-in procedures. Improper barrel cleaning methods can damage or destroy a barrel, leading to diminished accuracy or even cause a catastrophic failure. When it comes to barrel maintenance, there are a number of useful techniques that we have not listed. Some techniques may work better with different barrel types. This series of recommendations is designed to incorporate a number of methods that the Criterion Barrels staff has used successfully both in the shop and on their personal rifles. Please feel free to to list your own recommendations in the below comments section.
We recommend the use of the following components during rifle cleaning:
• Cloth patches (sized for the appropriate caliber)
• Brass jag sized properly for your bore
• One-piece coated cleaning rod
• General bore cleaner/solvent (Example: Hoppes #9)
• Copper solvent of your choosing (Example: Sweets/KG 12)
• Fitted cleaning rod bore guide
• Plastic AP brush or toothbrush
• Q-Tips
• Plastic dental picks
• CLP or rust preventative type cleaner
There are a number of schools of thought relating to the frequency in which a barrel should be cleaned. At minimum we recommend cleaning a barrel after each shooting session to remove condensation, copper, and carbon build-up. Condensation is the greatest immediate threat, as it can cause the barrel to rust while the rifle sits in storage. Copper and carbon build-up may negatively impact future barrel performance, increasing the possibility of a failure in feed or function. Fouling should be removed whenever possible.
The below tips will help limit the wear of different parts of your barrel during routine maintenance, helping extend the life of the barrel and improving its performance.
The Crown
The crown is the portion of the barrel where the bullet loses contact with the lands and grooves and proceeds to exit the firearm. The area most critical to accuracy potential is the angle where the bullet last touches the bore of the barrel.
Avoid damage to this area by using a plastic toothbrush and CLP type cleaner to scrub the crown from the exterior of the barrel. Even the most minimal variation in wear to the crown will negatively impact barrel performance, so be careful to avoid nicking or wearing away this part of the barrel.
Reducing Cleaning Rod Wear to the Crown
When running a patch through the barrel, place the muzzle about a ¼” from a hard surface that runs flat at a perpendicular angle to the cleaning rod’s direction of travel, like a wall or the edge of a work bench (pictured). When the jag impacts the hard surface, retract the cleaning rod and remove the patch.
By withdrawing the jag prior to its exit from the barrel, you are limiting the possibility of the brass dragging upon the crown if the rod is at all bent or misaligned. The soft cloth patch will continue to serve as the point of contact between the jag and the barrel, minimizing potential wear.
If possible, insert the rod through the chamber, pushing it forward toward the muzzle. Some rifles, such as the M1 Garand or M14, will require you to insert the cleaning rod through the muzzle. In these situations the use of a cleaning rod guide is recommended to limit the friction placed upon the crown.
Avoid using cleaning rod segments for scraping carbon from the recessed muzzle of an AR-15 barrel. We used this trick in the Marine Corps to impress the armorers and NCO’s with the cleanliness of our muzzles, but it likely played a significant role in reducing the service life of the rifle barrel in question.
Use a Q-Tip soaked in solvent to remove any copper or carbon residue from the recessed muzzle of an AR-15 barrel. A little bit of remaining carbon on the face of the muzzle will not negatively affect bullet travel so long as the crown edge remains consistent around the circumference of the bore.
The Lands and Grooves
This portion of the barrel may experience reduced efficiency due to copper fouling and cleaning rod damage. If copper fouling takes place during the initial break-in of the rifle, make sure to check our barrel break-in article.
For many riflemen, reading the wind is the toughest challenge in long-range shooting. Wind speeds and directions can change rapidly, mirage can be misleading, and terrain features can cause hard-to-predict effects. To become a competent wind reader, you need range-time and expert mentoring. In the latter department, Frank Galli, founder of Sniper’s Hide, offers a detailed digital resource: Wind Reading Basics for the Tactical Shooter.
Wind Reading Basics is much more than a 47-page eBook — it has charts, instructions for ballistic calculators, and even embedded videos. Galli explains: “We break down the formulas, walk you through using a ballistic computer, and give you all the information in one place. From videos, to useful charts, we make it simple to get started. It’s all about having a plan, and we give you that plan.”
Galli’s Wind Reading Basics, priced at $7.99, can be downloaded from iTunes for iPads, iPhones and iOS compatible devices. Here are sample sections from the eBook (which includes videos):
It’s the first day of July, and the big holiday weekend is coming up. Do you have a good first-aid kit in your vehicle to deal with possible injuries to family members of all ages? For just $20.00 you can get an excellent kit from Be Smart/TRI, the #1 maker of First Aid Kits in the USA.
TRI’s Be Smart Get Prepared First Aid Kit has 201 items inside a sturdy case with shoulder strap and carry handle. There is also a handy, detachable mini pouch with key essentials for first aid on-the-go. You can easily bring the mini-pouch along on a bike ride or hike.
This multi-purpose First Aid Kit includes:
• 50 – Bandages 3/4 x 3
• 30 – Bandages 3/8 x 1 1/2
• 6 – Bandages Closure
• 3 – Knuckle Bandages
• 1 – Tapes – .5 x 2.5yd Waterproof
• 10 – Cotton Tips – 2.75″”/10 Pack
• 4 – Finger Splints
• 1 – First Aid Guide
• 4 – Gauze Pad – 2 x 2 / 4 ply
• 4 – Gauze Pad – 4 x 4 / 4 ply
• 1 – Gauze Pad – 5 x 9
• 2 – Nitrile Gloves
• 1 – Instant Cold Pack – 5 x 6
To help ensure that outdoor adventures remain safe and trouble-free, the CTD Shooters’ Log has a helpful Essential Summer Survival Guide. This is worth reading before you venture away from civilization.
Here are some highlights of the article with links for MORE INFO:
First Aid Kits for Campers
You should never venture outside without a first aid kit close at hand. While exploring the outdoors, all types of accidents can occur—from cuts, scrapes, and burns to broken limbs and severe allergic reactions.
Basic Survival Skills
Basic survival skills are a necessity if you plan to spend any amount of time outdoors. These five tips, plus a how-to on what to pack in a lightweight, basic survival kit will help if you are ever stuck, lost, stranded or injured in the field.
How to Treat Burns
Fireworks, barbeques and campfires — in the summer we are frequently around fire, which increases our chance of getting burned. A first-degree burn is most likely home treatable, while a third degree burn requires immediate medical attention. Learn how to spot the differences between minor and severe burns.
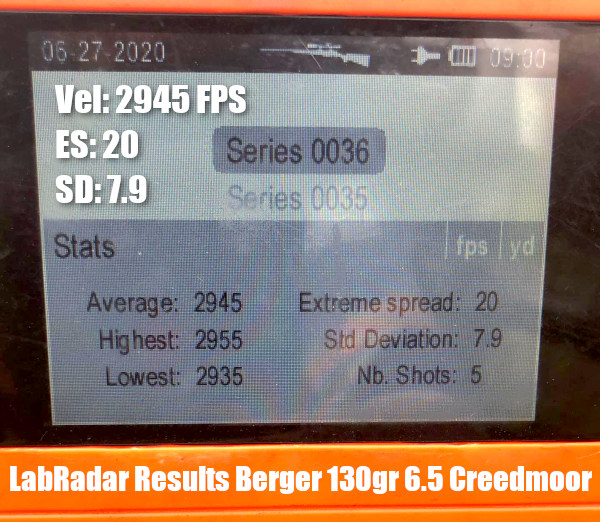
Is factory 6.5 Creedmoor ammunition good enough to win a PRS or NRL competition? The answer is a resounding “YES” if we’re talking about Berger ammunition. Produced with Berger match bullets and premium Lapua brass, this Berger 6.5 ammunition demonstrated excellent accuracy, impressive velocity, and very good ES/SD numbers. When tested at 1000 yards with an MPA-stocked PRS rig with Rem 700 action, this ammo showed just half-MOA of vertical, and produced a group that would have been a 50-1X in F-Class competition. That’s quite impressive for a PRS rig.
This ammo test was performed by our friend Erik Cortina from Texas. Erik is a top F-Class competitor who also shoots tactical matches (for fun and glory). Erik recently built a new 6.5 Creedmoor with a Remington 700 action. Though this rifle sports a top-shelf MPA chassis and premium Kahles scope, Erik calls this his “budget build” because it has a plain Rem 700 factory action rather than the elite Borden actions he normally runs. Erik’s actions of choice are the Borden Mountaineer for PRS and Borden BRM-XD for F-Class.
Erik posted: “Shot my budget 6.5 Creedmoor today with Berger Bullets factory ammo. I shot five rounds over the chrono to get speed. I used BC info from the box and it all lined up properly. I adjusted my ECTuner to tune load and it took just 15 shots to get it shooting well. It’s simple with good components.”
This Berger factory ammo features Berger 130gr Hybrid OTM Tactical bullets. The Lapua 6.5 Creedmoor cases have a large rifle primer. You can see this ammo displays good velocity with Extreme Spread and Standard Deviation rivaling good hand-loads.
Cortina says the very accurate Brux barrel and razor-sharp 6-24x56mm Kahles scope help achieve this kind of outstanding performance at 1000 yards. Here are the key components for Erik’s latest PRS rig:
Barrel Tuner by Erik Cortina — Fits Behind Muzzle Brake
This rifle features a barrel tuner designed and crafted by Erik Cortina. You can the ECTuner alone, or, as you can see, the ECTuner can be fitted BEHIND a muzzle brake. Erik tells us: “The ECTuner allowed me to tune the barrel to my ammo rather than tuning the ammo for barrel as is done when reloading. With the tuner, there is no need to try different brands of ammo as they can all be tuned to shoot as good as possible in my rifle.”
MPA Chassis Configuration Guide
Erik’s “budget” PRS rifle employs a MasterPiece Arms (MPA) BA Competition Chassis with Rapid Adjustment Technology (RAT). This MPA Arms Video shows how to set up an MPA Chassis to suit the owner:
Are you a do-it-yourself kind of guy with a creative eye? Then you’ll love the FREE Target Generator from the folks at ShooterShed.com. This free, interactive webpage allows you to design a variety of fun targets, including grids, benchrest-type Score Shooting targets, sight-in targets, and even playing card targets. Choose the paper size and orientation (vertical or horizontal), then select the number of target elements on the page. For example, you could have four (4) bulls or 52 playing cards. You can include a grid on the target, or tell the program to include load information blocks. For bullseye targets, you can control the number, color, and spacing (diameter) of the rings. LINK to TARGET GENERATOR.
The program provides a preview of each target you generate. If you like a particular design, save the file, and then print as many targets as you want. Check it out, this program is fun and handy to use. Here are four (4) targets your Editor created just for this article. With a bit of practice, you can be generating your own custom targets in minutes. Have fun.
About the Creator of the Target Generator
The Target Generator program was created by Rod Brown of Sheridan, Wyoming. Rod tells us: “I build custom rifles and coach shooters. I’ve got a 100-yard range out my back door. I shoot short- and long-range benchrest competitively around the country. I’m a full-time software development consultant and an FFL holder. When I’m not developing custom software for my clients, I’m usually fiddling in the shop, building a custom benchrest rifle, traveling to a match, chambering a barrel, or reloading some ammunition.
Story tip from Boyd Allen. We welcome reader submissions.
Mr. Smith’s Tack-Driving Thumbhole Trio
What is it they say? “Can’t have too much of a good thing?” We’ll in the case of Sam Smith of Wisconsin, that goes for beautiful wood-stocked thumbhole rifles that shoot like the blazes. This week we feature a troika of thumbholes, all smithed and stocked by Richard Franklin of Richard’s Custom Rifles (Richard is now retired but still offers DVDs). Not content with a single caliber or twist, Sam commissioned three different chamberings and barrel twist rates.
First, in Fiddleback Walnut — a 6PPC Walking Varminter The most elegant of the three thumbholes is this handsome .261″-neck 6PPC. The blue-printed Rem 700 action is pillar-bedded in a highly-figured stock of laminated Curley Fiddleback Walnut, in Richard’s #004 pattern. Richard uses three sections of wood bonded together so the outside looks like a single piece of Walnut.
The lead photo at top, and the image at right show more details of this rifle. The grain really takes on a rich color in sunlight, with the Tiger-stripe figure showing brilliantly through the clearcoat. Believe it or not, Sam doesn’t even consider this one of his best-looking rifles. Sam tells us, “these three thumbhole stocks are not even close to the prettiest guns Richard has built for me–you should see the Maple ones he did for me–they are unbelievable.”
Sam tells us the gun’s 1:14″-twist Krieger barrel is a hummer — it regularly shoots one-holers at 100 yards. Sam has even logged some groups in the Zeros with the gun–awesome accuracy for a varmint rifle/Sam tells us that, using VV N133 and 58gr V-max bullets, this gun is absolutely deadly on prairie dogs out to 500 yards. (SEE: One-hole Sample Target.)
Rifle #2 — Cherry and Walnut Together in a 6mm Rem Improved
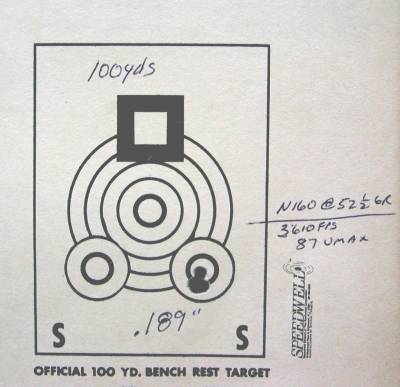
When more knock-down power or more distant targets are in order, Sam pulls out his 6mm Rem Improved 1:12″-twist thumbhole Varminter. Like the other two guns, this features a pillar-bedded Remington 700 action and Krieger barrel. While the 6mm AI’s #004 stock shares the same shape and form as the 6PPC above, it is much more colorful, employing a seven-layer laminate in Cherry and Walnut, covered with multiple coats of automotive clear-coat. One of Sam’s favorite varminters, this rifle sees more range use than his 6PPC because “the PPC is so accurate I want to keep the round count down.” That’s not to say the 6mm Improved is any slouch in the accuracy department. Using VV N160 and 75gr V-max bullets, the gun averages in the 2s and 3s. The best group to date was .189″ with the 87gr V-Max (See V-Max Target below). Chalk that up to another superbly accurate Krieger barrel combined with outstanding chambering work by Richard.
6mm Rem Improved with 87gr V-Max at 100 Yards
Rifle #3 — Fast-Twist 6.5-284 with Benchrest Forearm
Last but not least is Sam’s handsome 6.5-284 (below), also in a laminated Walnut and Cherry stock. The Krieger barrel is a Heavy Varmint contour, with an 8-twist and .290″ neck. This gun hasn’t been shot much yet, but during initial testing it grouped in the mid-threes with 53gr of H4831 and 142gr Sierra MKs. You’ll note the stock is a bit different than the other two guns–this is the #005 stock pattern, which boasts a 3″-wide, flat forearm. It is identical to the #004 from the recoil lug rearward. Sam tells us that the #005 tracks better than the #004, though he prefers the rounded forearm of the #004 for a walking varminter.
Sam’s all-time favorite stock pattern in Richard’s #007, a roll-over comb design with conventional wrist and Cooper-style Beavertail forearm. Sam has a similar Maple #007 that he says is “even nicer than the gun in the picture.”
Nice Wood? You Ain’t Seen Nothin’ Yet!
After this trio of thumbhole rifles, Sam commissioned two more rifles — a matched pair in 6mm BR Norma and 6PPC, done up in absolutely amazing 500 year-old Turkish Walnut, sourced from a one-of-a-kind 48″ diameter Burl. What does a piece of wood like this cost? Trust us, if you have to ask, you couldn’t possibly afford it. Let us just say these are some of the most spectacularly figured blanks ever shipped from Turkey and they are priced accordingly. Here’s a preview, taken right before Richard bonded the first stock together. The lower two pieces look lighter because of the flash angle but the upper section more accurately shows how all three pieces appear in natural light. “Wow” is right!
Richard Franklin is Now Retired in Montana
The last we heard, gunsmith Richard Franklin was enjoying his retirement years up in Montana. On RichardsCustomRifles.com Richard posted: “I built fine custom rifles and for many years. I was the first stock maker to laminate woods such high-grade walnut, fiddleback maple and other fancy woods. I designed my own ideas into my patterns and carved, finished, pillar bedded thousands of stocks on the rifles I built. My most popular stock pattern was my Model 11 thumbhole.
I love building rifles but my health has forced me to retire and to take time to smell the roses. I made many great videos on how to build rifles and have been selling them for many years. They are still in great demand.” CLICK HERE to check out Richard’s DVDs about rifle building and varmint hunting.
Are you looking to get started in PRS and NRL practical precision rifle competition? Or perhaps you’d like to advance your skill set so you can place higher in big matches (and get your hands on some of those prize table items)? Of course there is no substitute for trigger time in the field, but there ARE some great print resources. These four books can help you select the right equipment, improve your shooting skills, make better wind calls, increase your fitness level, and develop a more efficient between-match training program.
1. IMPACT! — Training and Preparing for Precision Rifle Matches
Rodney Maze, $19.99 Paperback, $4.99 Kindle
Impact!, by PRS competitor Rodney Maze, is an entry/intermediate level guide to preparing yourself and your equipment to compete in precision rifle type matches. It will also benefit anyone looking to learn about practical-style long range and precision shooting. We recommend you check it out for yourself — there are 20 Pages of free sample content on Amazon. Topics covered include:
— Rifle, optic, and equipment selection
— Setting up your rifle, bags, tripods for PRS/NRL matches
— Understanding ballistics and how to record and use ballistic data
— Techniques for using holdovers for multi-target stages
— Gun skills, rapid fire techniques, clearing malfunctions
— Shooting off of barricades, and specialty stages
— Effects of wind and how to improve your wind calls
— Tips for live fire and dry fire practice
— Preparing yourself and your equipment for a match
— Mental strategies and techniques
Impact! is illustrated with plenty of photographs. Topics are divided logically, and concepts are explained in clear language. Also included is an extensive glossary of terms used in precision shooting and a list of additional resources you can use to further pursue your precision shooting knowledge. This book also includes a handy Appendix with formatted pages for recording data about your rifle, scope, and ammunition. There is also a Wind table for recording your rifle “dope” and wind hold-offs. Lastly, Impact! has a useful table of unit conversions.
2. Practical Shooter’s Guide
Marcus Blanchard, $19.99 Paperback, $9.99 Kindle
Thinking of getting started in the Practical/Tactical shooting game? Looking for ways to be more stable when shooting from unconventional positions? Then you may want to read Marcus Blanchard’s Practical Shooter’s Guide (A How-To Approach for Unconventional Firing Positions and Training). Unlike almost every “how to shoot” book on the market, Blanchard’s work focuses on the shooting skills and positions you need to succeed in PRS matches and similar tactical competitions. Blanchard provides clear advice on shooting from barricades, from roof-tops, from steep angles. Blanchard says you need to train for these types of challenges: “I believe the largest factor in the improvement of the average shooter isn’t necessarily the gear; it’s the way the shooter approaches obstacles and how they properly train for them.”
3. Long Range Shooting Handbook
Ryan Cleckner, $19.85 Paperback, $9.99 Kindle
Ryan Cleckner’s Long Range Shooting Handbook is the best-selling modern book on practical rifle skills. A former U.S. Army sniper instructor, Cleckner is knowledgeable, and his text is well-organized and chock full of good information. You can view Sample Chapters on Amazon.com.
Ryan Cleckner’s highly-regarded Long Range Shooting Handbook is designed as an intro to important fundamental concepts such as MOA vs. Mils, External Ballistics, and Environmental Effects. Included are personal tips and advice based on Cleckner’s years of experience as a sniper instructor and special operations sniper.
The Long Range Shooting Handbook is divided into three main categories: What It Is/How It Works, Fundamentals, and How to Use It. “What It Is/How It Works” covers equipment, terminology, and basic principles. “Fundamentals” covers the theory of long range shooting. “How to Use It” gives practical advice on implementing what you’ve learned, so you can progress as a skilled, long range shooter. This book will benefit any long-range shooter, not just PRS/NRL competitors.
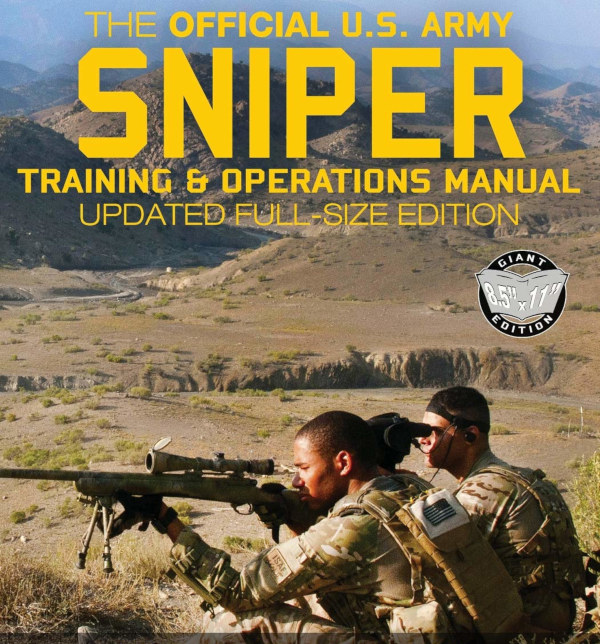
4. Official U.S. Army Sniper Training and Operations Manual
From U.S. Army Sources, $17.59 paperback.
This U.S. Army Sniper Training Manual is a very comprehensive resource, with over 450 pages of information in a large 8.5″x11″ format. NOTE: Unlike other editions on Amazon, this is NOT the basic, outdated FM 23-10. This is the completely-overhauled 450+ page edition (FM 3-22.10). Heavily illustrated, this is a very useful resource for tactical/practical precision shooter. Employed as the “textbook” for the U.S. Army Sniper School at Fort Benning, GA, this big manual explains ranging methods, rifle handling, optics selection and operation, and rifle maintenance.
There is also extensive discussion of ballistics, wind reading, and weather effects. Practical competitors will appreciate the discussions of moving targets, range estimation, and range safety procedures. One reviewer explains: “This book contains the distilled wisdom of the Sniper School’s instructors and expert marksmen, giving you over 450 pages of unique insight into the long range combat shooter’s art.”
With the civil disorder, rioting, and looting happening in major U.S. cities, many Americans are getting very serious about armed self-defense. But if you own defensive firearms, you definitely need to train with them. Indoor ranges are most convenient for those who live near urban centers, where the biggest threats to public safety currently exist. This article talks about indoor firearms training and the proper procedures you should follow at indoor ranges.
This Video Covers Basic Gun Range Safety Rules and Etiquette
FIVE IMPORTANT SAFETY PROCEDURES for Indoor Ranges
1. Follow the Three Fundamental Rules for Safe Gun Handling
ALWAYS keep the gun pointed in a safe direction. ALWAYS keep your finger off the trigger until ready to shoot. ALWAYS keep the gun unloaded until ready to use.
2. Follow ALL Range Officer Instructions
ROs are the first and final authority on any range and their decisions are generally final. Arguing with a Range Officer may just get you thrown out.
3. Don’t Bother Others or Touch Their Guns
Respect other shooters’ privacy unless a safety issue arises. Do NOT engage other shooters to correct a perceived safety violation unless absolutely necessary – inform the RO instead. NEVER handle or touch another shooter’s firearm without their permission!
4. Know Your Range’s Rules
Review and understand any and all range rules and requirements/expectations. For example, what is the range’s maximum rate of fire? Are you allowed to collect your brass?
5. Know What To Do During a Cease Fire
IMMEDIATELY set down your firearm, pointed downrange, and STEP AWAY from the shooting booth (or bench). Range Officers do not want shooters trying to “secure/unload” their firearms in a cease fire situation — they want the shooters separated from their guns instantly.
BAD RANGE BEHAVIOR — Five Things NOT to Do at the Range
Here are the five worst behaviors we’ve seen at indoor ranges. These behaviors are both dangerous and inconsiderate. Any one of these behaviors can get you permanently banned from an indoor range.
1. Sweeping other individuals after loading a weapon behind the firing line is very bad. All your weapons should be empty until you reach your shooting station.
2. Turning the handgun sideways while trying to clear a malfunction or insert/remove a magazine. This will point the muzzle at a fellow shooter. Or, after shooting a gun, the shooter fails to clear the weapon and then places the gun somewhere near the shooting station with the muzzle in an unsafe position.
3. Reacting unpredictably when firing a high recoil handgun. We’ve seen people take a second shot by accident with the muzzle way off target.
4. Not obeying range commands — in particular continuing to shoot during called cease-fires.
5. Poorly aimed shooting that hits target frames or carriers, causing ricochets.
Double-Up on Hearing Protection When Shooting Indoors
When shooting indoors we recommend quality muffs with earplugs underneath, offering double protection. When inside an enclosed range, with other shooters blasting away right next to you, you really need effective hearing protection. But you also need to hear range commands and be able to communicate. That’s why we recommend electronic muffs with plugs underneath.
For pistol shooting, we like the latest Howard Leight Impact Pro Muffs. These offer an impressive 30 dB Noise Reduction Rating (NRR). In addition, these muffs are pretty comfortable and offer Headphone Functionality so you can connect to your smartphone, MP3 player, or other audio device. These muffs are a good value. They are currently offered for $39.50 on ALLMAX.


 Little Missouri National Grassland


 Protecting your rights has never been more important than it is today. Our national crisis has exposed the politicians who want to strip away our constitutional freedoms. Send them a message! Be a voter in the 2020 elections to protect your rights!
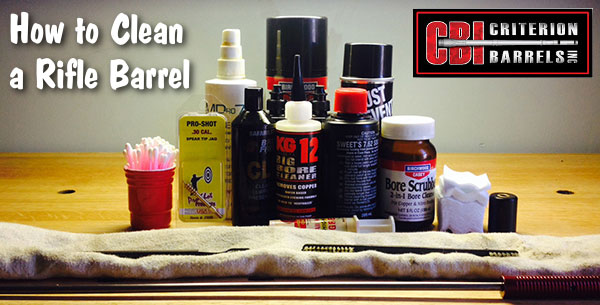


 Cortina says the very accurate Brux barrel and razor-sharp 6-24x56mm Kahles scope help achieve this kind of outstanding performance at 1000 yards. Here are the key components for Erik’s latest PRS rig:


 The most elegant of the three thumbholes is this handsome .261″-neck 6PPC. The blue-printed Rem 700 action is pillar-bedded in a highly-figured stock of laminated Curley Fiddleback Walnut, in Richard’s #004 pattern. Richard uses three sections of wood bonded together so the outside looks like a single piece of Walnut.