Eurooptic vortex burris nightforce sale


teslong borescope digital camera barrel monitor


As an Amazon Associate, this site earns a commission from Amazon sales.


March 8th, 2016

Air Travel with Guns — Expert Advice from Security Professional

Airport security travel bag check-in O'hare TSA

Before he retired, Forum member Ron D. served as a Police Officer assigned to Chicago’s O’Hare airport. Ron offers some excellent advice for shooters traveling with firearms and expensive optics.

gun transport caseFirst, Ron explains that airport thieves can spot bags containing firearms no matter how they are packaged: “Don’t think you’re safe if your guns are placed in cases designed for golf clubs or trade show items. Baggage is X-Rayed now and cases are tagged with a special bar code if they contain firearms. It doesn’t take long for bad guys to figure out the bar coding for firearms.”

Carry-On Your Scopes and Expensive Items
Ron advises travelers to avoid placing very expensive items in checked baggage: “When traveling by air, carry on your rangefinder, spotting scope, rifle scope, medications, camera, etc. You would be surprised at the amount of people that carry-on jeans and shirts, but put expensive items in checked baggage. Better to loose three pairs of jeans than some expensive glass.”

Mark Bags to Avoid Confusion
Ron notes that carry-on bags are often lost because so many carry-on cases look the same. Ron reports: “People do accidentally remove the wrong bag repeatedly. I frequently heard the comment, ‘But it looks just like my bag.’ When de-planing, keep an eye on what comes out of the overhead that your bag is in. It’s easy to get distracted by someone that has been sitting next to you the whole flight. I tie two streamers of red surveyors’ tape on my carry-on bag.” You can also use paint or decals to make your carry-on bag more distinctive.

Choosing a Rifle Transport Case
Ron advises: “Buy the best [rifle case] that you can afford. Don’t cry when your $3,000+ Benchrest rifle has a cracked stock or broken scope. Think about what it would be like to travel across the country (e.g. to Montana or the Cactus Classic) and arrive with a damaged rifle. Remember the Samsonite commercial. (For you younger shooters, it shows a monkey throwing the suitcase around in his cage at the zoo.) Baggage handling is NOT a fine art. There is no guarantee that your rifle case will be on top of all the other baggage. Then there is shifting of baggage in the belly of the plane. Ponder that for a while. Rifle and pistol cases must be locked. It doesn’t take a Rocket Scientist to figure out that a simple pry tool will open most case locks. There is not much that you can do to disguise a rifle case. It is what it is, and opportunists know this. Among thieves, it doesn’t take long for the word to get around about a NEW type of case.”

gun transport case

General Advice for Air Travelers
Ron cautions: “Keep your hands on your items before boarding. One of the most often heard comments from theft victims was, ‘I just put my computer down for a minute while I was on the phone.’ Also, get to the baggage claim area quickly. If your family/friends can meet you there, so can the opportunists. Things do get lost in the claim area. Don’t be a Victim. Forewarned is forearmed.”

Permalink - Articles, Tech Tip 2 Comments »
March 1st, 2016

Bob Gill Wins CA Fullbore Championship with .223 Palma Rifle

Bob Gill California Fullbore elesio R1 .223 Rem championship

Report by Johnny Fisher
Here’s something you don’t see very often — a fullbore shooter with a .223 Remington topped a field of talented .308 Win shooters. Not only that, he scored more points than any F-Class competitor (however, F-Classers shot a smaller target). Bob Gill’s performance proves that, even in an era of high-BC .308 bullets, the little .223 Rem cartridge can still hold its own in the hands of a great shooter.

At last weekend’s California State Fullbore Championships, Bob Gill bested over 30 competitors for the championship with a .223 Palma rifle, only dropping 7 points over the weekend for a 993-56X. The event was sponsored by the California Rifle & Pistol Association and hosted by the Coalinga Rifle Club.

Bob Gill California Fullbore elesio R1 .223 Rem championship

Bob Gill Talks about the ‘Mental Game’
Conventional wisdom when shooting any match is to just stay focused on each and every shot and let the scores work themselves out after all firing is complete. “Two To The Mound” shooting changes all of that, as each competitor is not only aware of their own standings throughout the course of the match – but also of their closest competitor during these pair-fire strings. With this championship never further out than a 2-point lead throughout the weekend, stress was high and every once of mental focus needed to be tapped.

Bob recalls, “The entire match was neck and neck. After a few mental mistakes and a few wind mistakes, with three shots remaining the thought is three shots and a 1X lead. I need to shoot three 10s. Everything else goes away. Shoot three 10s and he can’t catch me.”

Three 10s later, Bob won the CA State Fullbore Championship by one point and one X. Well done!

Gun Specifications
Bob was shooting a 1970s-era .223 Remington B-40X action inside a Competition Machine R1 chassis. The barrel is a 30.5″ Heavy Palma taper, 1:7″-twist Brux with a Wylde chamber and .220 freebore done up by Randy Gregory at Accuracy Unlimited. The Tubb 7T7 two-stage trigger was set at 1 + 1 pounds.

.223 Remington Accuracy Load — Berger 90gr VLDS, Varget and BR4s
Gill loaded 90gr Berger VLDs in front of 25.0 grains of Hodgdon Varget powder, jumping 15 to 20 thousandths for a 2.708 COL with a BR4 primer inside Lapua brass. Bob uses a Redding Full-Length S-Die to push the shoulders back .004 to match that of new Lapua brass and a bushing chosen to achieve .004 neck tension. He sorts his brass by weight into 0.5 grain lots and each piece is trimmed on a Giraud trimmer after sizing because he says “it grows like crazy”.

Bob Gill California Fullbore elesio R1 .223 Rem championship

Fullbore Course of Fire — Pair Firing on Day 2 at Coalinga
The Fullbore Course-Of-Fire for this match was squadded on the first day by classification for 15-shots string-fire at each yard-line: 300 / 600 / 900 / 1000 yards. These scores were then used to determine “two to the mound” squadding for the second day, when each competitor pair-fired with his closest competitor, and also kept score in between his own shots. In this “pair fire” arrangement, only 45 seconds are allowed between shots after a shooter accepts his shot score. This forces competitors to shoot through condition changes as opposed to waiting for a more favorable pattern.

CLICK HERE for CA Championship Individual Results | CLICK HERE for Team Results

Permalink - Articles, Competition 12 Comments »
February 26th, 2016

1000-Yard Benchrest State of the Art .284 Shehane

Henry Pasquet IBS 1000 yard Nationals champion two gun overall .284 shehane

The IBS 2016 Long-range shooting season is starting soon, so we thought our readers might enjoy learning about a state-of-the-art 1000-Yard Benchrest rig. This article features the impressive .284 Shehane Light Gun used by Henry Pasquet to capture the 2013 IBS 1000-yard Nationals. With a 5″-wide “hammerhead” front and a special 3″-wide bag-rider plate in the rear, this 17-lb rig is ultra-stable in the bags, and tracks like a dream. In this story, Henry explains his set-up plus his processes for loading super-accurate ammo. Every long-range shooter can benefit from some of tips revealed here. And F-Class guys — if you’re shooting a .284 Win-based case in F-Open you should definitely read Henry’s precision reloading advice.

EDITOR: Guys, there is a ton of solid gold information in this article — take your time and read it carefully.

Henry Pasquet IBS 1000 yard Nationals champion two gun overall .284 shehaneYes old dogs can learn new tricks. Just five years ago Forum member Henry Pasquet (aka “HenryP”) got started in 1000-yard benchrest shooting. He was 66 at the time. Henry worked hard, learned fast, and pursued accuracy with a vengence. That all paid off when Henry won the 2013 IBS 1000-yard Nationals this summer, finishing as the Two-Gun Overall National Champion. Henry was kind enough to talk about his rifle, his reloading methods, and his strategy for success. In fact, Henry was eager to share “everything he knows, so that other guys can fast-track their learning process”. Henry told us: “I want to share every lesson I’ve learned, so that other guys can improve their game and enjoy the sport more.” Henry also wants to encourage other senior shooters: “If you pay attention to details (when reloading), and get a good rifle with a good barrel, age is not a handicap. With a good set-up, older guys can compete with anyone out there. This is one sport where you can be a champion in later life.”

Click on Rifle Photos to View Full-screen Versions

Protektor bag benchrest rifle Light gun IBS 1000 yard Nationals champion two gun overall .284 shehane

Q&A with Henry Pasquet, IBS 1000-Yard National Champion

Q: First, do you have any advice for older shooters getting started in their golden years?

Henry: You’re never too old. In this sport, you can excel even in your 60s, 70s and beyond. At this stage in life, we now have the time and money to get good equipment and rifles. Plus, our years of work experience help us to think, analyze, and thereby make progress. In this game, we older guys can definitely compete on a par with younger shooters.

HARDWARE

Q: Tell us about your Nationals-winning rifle and bench gear. Is there anything unique about your hardware that gave you an edge?

Henry: At the Nationals, I used my 17-lb Light Gun for both Light and Heavy Class. This rifle has a 1.55″, round BAT LP/RE action, fitted with a Bartlein barrel chambered for the .284 Shehane (an improved version of the .284 Winchester). The barrel was near-new; this was the first time I had used it this year. A great barrel and great batch of Berger 180gr VLDs all made a difference. Jay Cutright chambers my barrels. Jay’s metal-work is so precise that I can screw any barrel he’s chambered to any BAT action I own. The laminated stock was modified by Tommy Shurley from a standard 3″-wide fore-end to a 5″-wide True-Trac with an adjustable 3″-wide rear plate. It’s not pretty but it tracks like a Heavy Gun stock. Tommy made my other stocks as well.

Protektor bag benchrest rifle Light gun IBS 1000 yard Nationals champion two gun overall .284 shehane

Protektor sand bag 3M material IBS 1000 yard Nationals champion two gun overall .284 shehane
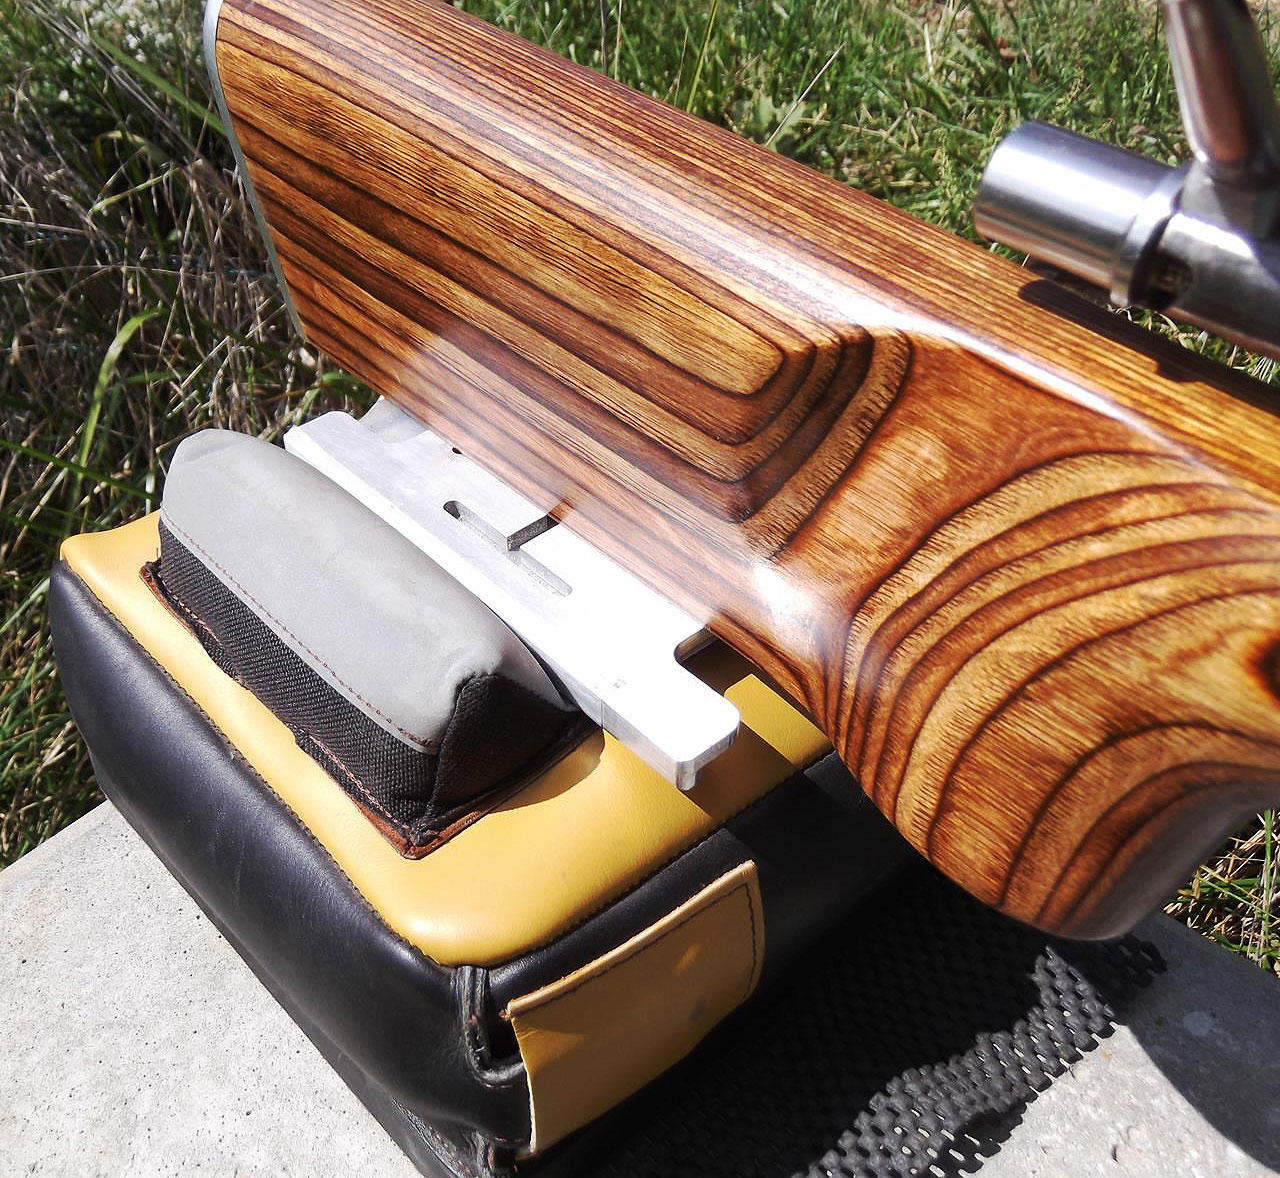
On top is a Nightforce 12-42x52mm Benchrest scope with CH-3 reticle. I used a Fulghum (Randolph Machine) front rest with an Edgewood bag made with the low-friction 3M material. In the rear I use a special-order Protekor rear “Doctor” bag with ears spaced 3 inches apart. The rear bag also has the new 3M material on contact surfaces (photo at right).

Q: During the Nationals, at the last minute you switched guns. Why did you go from a 6mm Dasher to a 7mm Shehane?

Henry: I had planned to use my Light and Heavy Dashers, but after placing the Dasher on the ready line, decided to switch to the .284 Shehane. It was still early in the morning and I felt that the heavier bullets would be easier to see against the berm. The Dasher had actually been giving tighter groups under perfect conditions, but seeing the impact is important.

Q: Tell us about the combined tuner/muzzle brake on some of your barrels. How does this improve rifle performance and how do you set the “tune”? Do you tune the barrel to the load?

Henry: I use a tuner or tuner/brake on every barrel. I started with Time Precision tuners. Art Cocchia advised getting a load with a good known accuracy node with minimum extreme spread, which controls vertical. Do not go for the hottest loads, which just reduces brass life. Then use the tuner and tune the barrel to the load. The .284 Light Gun needed a muzzle brake and tuner. I had a local gunsmith cut a thread on the muzzle brake for a tuner I got from Sid Goodling. (Eric Bostrom developed an almost identical unit at the same time. I use Eric’s tuner/brakes on all my new barrels.) Just before Nationals, I tried going up and down one marker. Down one mark cut the group in half! Think how much range time (and barrel life) that saved me. Using a tuner is easier than messing around changing loads and tweaking seating depths. Tuners definitely can work. Last year I shot a 3.348″ 10-shot group at 1000 with my .284 Win Heavy Gun fitted with a Time Precision Tuner.

IBS 1000 yard Nationals champion two gun overall muzzle brake tuner .284 shehane

Q: What are the advantages of your stock’s 5″-wide fore-end and 3″-wide rear plate? Is there a big difference in tracking and/or stability? Does the extra width make the rifle easier to shoot?

Henry: I had true Heavy Guns with 5-inch fronts and 3-inch rears. They tracked well. I felt the same result could be had with a Light Gun. I talked two stock makers into making them. I initially had the standard rear stock until Tommy Shurley and Mike Hearn came out with an adjustable rear plate. The stocks track perfectly. You can see your scope’s crosshairs stay on the target the whole time and push the rifle back for the next shot. There is no torquing (gun wobbling) when cycling the bolt. Us old guys need all the help we can get. I am getting rid of my 45-pound Heavy Guns and replacing them with Light Guns with heavy barrels.

Protektor bag benchrest rifle Light gun IBS 1000 yard Nationals champion two gun overall .284 shehane

Q: Some people say the .284 Shehane is not as accurate as the straight .284 Winchester. You’ve proved them wrong. Why do you like the .284 Shehane? More speed, less pressure?

Henry: The reason I rechambered my 7mm barrels to .284 Shehane was not velocity, pressure, or brass life. It was all about bolt lift. My straight .284 almost required me to stand up to eject brass. I damaged an extractor and had to send the bolt back to BAT. With the .284 Shehane, my bolt cycles like there is no case to eject.

Reloading Methods

Q: People want to know about your load and your loading methods. What can you reveal?

Henry: For my .284 Shehane at the Nationals, I loaded 52.5 grains of Hodgdon H4350 and Federal BR-2 primers behind Berger 180gr VLDs. I usually anneal the brass each winter. I have used the same brass for years. I use Redding bushing dies, apply Imperial sizing wax, resize, wipe off wax, clean and uniform the primers pockets using the RCBS Trim Mate Case prep center, then apply Imperial dry neck lube with a bore mop.

K & M arbor seating force dial gaugeTo dispense powder, I use a RCBS ChargeMaster set 0.1 grain below my desired load and then weigh them on a Sartorius GD-503 magnetic force restoration scale to get identical charges. I use a K&M Arbor Press with seating force gauge when seating the bullets with a Wilson inline die. My “target” seating force on the K&M dial is 20-23 units for Dashers and 35-40 units for the .284 Shehane. I put any variables aside for sighters. I do not weigh brass, bullets, or primers. My bullets were so consistent that I did not sort by bearing surface. I did trim the Berger VLDs to the shortest bullet length with a Hoover Trimmer, and then pointed the meplats just enough to close them with a Whidden pointer. I sort my bullets to 0.005″ overall length, rejecting about five percent.

Q: What kind of precision are you looking for in your reloads? Do you trickle to the kernel? Does this really help reduce extreme spread?

Henry: I try to keep my charge weights consistent to one kernel of powder. I use the Omega powder trickler with a Sartorius GD-503 lab-grade balance to achieve that. For accurate dispensing, put very little powder into the Omega so you can drop one kernel at a time. Single digit ES (Extreme Spread) is the goal. This does make a difference at 1000 yards. If you get the same push on the same bullet with the same neck tension, good things are going to happen.

Q: You believe consistent neck tension (i.e. grip on the bullet) is really important. What methods are you using to ensure consistent bullet release?

Henry: I apply Imperial dry neck lube to the inside of my case-necks with a bore mop. The K&M arbor with seating force gauge shows the need to do this. If you put a bullet into a clean case, it will be jerky when seating the bullet. You may see 40 units (on the K&M dial) dropping to 20, then slowly increasing pressure. I explained to a friend that not lubing the neck is like overhauling an engine without lubing the cylinders. Smooth entry gives the bullets a smooth release.

Barrel Cleaning

Henry Pasquet IBS 1000 yard Nationals champion Carb out Carb-out WipeOut .284 shehane
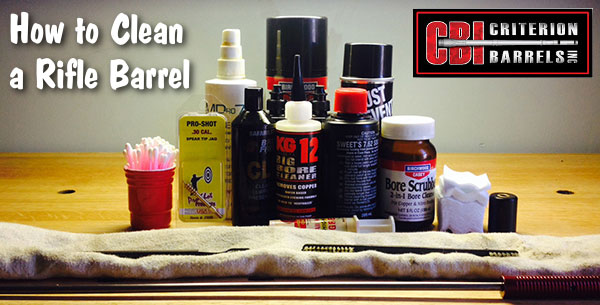
Q: You go 60-80 rounds between cleaning and the results speak for themselves. What is your barrel cleaning procedure? Do you think some guys clean too often or too aggressively?

Henry: I cringe when I see people wearing out their barrels with bronze brushes between relays. I clean my barrels at the end of each day when I get home. I shot my best-ever 1K Heavy Gun group (3.348″) at day’s end after 60 to 80 rounds. After trying other solvents, I have gone back to Wipe-out’s Carb-Out and Patch-Out products. I use about four patches of Carb-Out, let it sit a few minutes, then use one stroke of a nylon brush followed by Patch-Out until the barrel is clean. I use a bore mop to clean inside the chamber, then some Break Free LP on the bolt followed by bolt grease on the lugs and cocking part. I use a bore guide when anything goes down the barrel.

Shooting Skills and the Learning Process

Q: Henry, you can shoot long-distance on your own property in Missouri. How important is practice, and what do you do during a typical practice session?

Henry: I can shoot 1000 yards on my farm. I have a concrete bench using a slab from a yard furniture place on concrete blocks. Two 4 x 8 sheets of plywood hold four IBS targets. I never practice. I only test, keeping a notebook with all the info. I do most of my testing at 300 to 500 yards, shooting off my deck so I can see my shots immediately.

Protektor bag benchrest rifle Light gun IBS 1000 yard Nationals champion two gun overall .284 shehane

Q: How much of your success do you credit to really accurate rifles, versus superior shooting skills?

Henry: I do not consider myself another Carlos Hathcock or some master marksman. I am an average 1000-yard shooter, but I do work hard getting the most out of my rifles. Four other people have shot their first 1000-yard matches with my rifles, including my wife, and all of them won relays! I loaned my Dasher to another shooter two years ago and he got second at the 600-yard Nationals. Others will tell you that the rifle must be “on” to win. If your barrel or bullets are average, don’t expect to perform above average in competition.

Q: What you do enjoy most about long-range benchrest shooting? What are the attractions of this sport?

Henry: The sport offers good people and a real challenge. 1000-yard shooting keeps us all humble, but we still keep trying to see how good we can do. I am thankful for Robert Ross providing the only match location that I can shoot regularly.

Q: Henry, you have been a Forum member for many years. Have you learned important techniques from other Forum members and other shooters?

Henry: I have followed the AccurateShooter Forum since 2008. At my age I am not good at computers. I copied and analyzed many articles, especially on the .284 and the Dashers. Without AccurateShooter.com, I would probably still be shooting double-digit (10″+) groups at 1000 yards, and I sure wouldn’t have my name on a National Championship trophy.

Q: You are in your 70s now and have only been shooting competitively for a few years. How did you get so good so fast? How did you manage to beat shooters who are decades younger?

Henry: I had 20/10 vision when I was young, but am down to only 20/20. I have been interested in long range shooting for a long time including ground hog hunting. I went to some VHA jamborees also. In 2008, I went to the Williamsport Benchrest School with a friend from Pennsylvania, John Haas. We would compare notes frequently. I bought a BAT three lug from Tom Mousel in Montana. We also compared notes and made each other better. At IBS matches I studied other shooters’ equipment and techniques. I tried some, accepting some and rejecting some.

Here’s my advice:
Always be ready to learn something new. If it makes sense, try it. I would also encourage other older shooters not to quit. Stick to it. You can make enormous progress in a few seasons.

Permalink - Articles, Competition 3 Comments »
February 25th, 2016

Legendary Shooter Mid Tompkins Profiled in Shooting Sports USA

Middleton Tompkins SSUSA High Power Interview video

On the Shooting Sports USA website, legendary shooter Middleton (“Mid”) Tompkins is profiled this week. One of the great figures in American rifle shooting, Mid is also the patriarch of the greatest family of shooters in American history. Mid’s wife Nancy Tompkins, and daughters Michelle Gallagher and Sherri Jo Gallagher, have all been National Champions. Mid himself is a six-time, across-the-course national High Power rifle champion. He’s also been on 18 Palma teams as captain, coach or shooter. Mid started shooting smallbore rifle over 60 years ago, competing in that discipline at Camp Perry in 1954. But he committed to High Power in 1955 and never looked back: “I liked High Power’s diversification of standing, sitting, rapid fire and long range shooting.”

READ Complete Mid Tompkins Profile in Shooting Sports USA

Berger Nightforce Ben Avery Building 1000-yard range Middleton Tompkins MidHighlights of the SSUSA Story:

Practice Ammo: Mid does not use practice ammo, saying: “If it isn’t the best ammo he owns, the shooter learns absolutely nothing because they don’t know—when they shoot an 8, if they shot it, the ammo shot it or the gun shot it.”

On Scorebooks: “I totally, totally do not believe in scorebooks. It takes away your concentration from what you should be doing, which is doping the wind and pointing the rifle downrange. Shooting is not about book-keeping. Shooting is about putting a bullet in the middle of the target.”

Practice Makes Perfect: For decades, Mid shot every Saturday and Sunday, whether for practice or in a match. Mid shot with four different clubs, each hosting their own match on a different weekend. He shot them all, as well as practicing the day before each match. That’s in addition to competing in Sanctioned and Registered matches.

Middleton Tompkins Interview from 2015:

In the video above, Mid talks candidly about his storied career as a shooter and a shooting coach. He explains what it takes to win, and offers advice on how new shooters can improve their skill sets. Mid also talks about advancements in rifle hardware and bullet design. Mid also offers invaluable advice on how to dope the wind at Ben Avery. Last year, the 1000-yard Range at the Ben Avery Shooting Facility in Phoenix was officially dedicated as the “Middleton Tompkins Range”.

Permalink - Articles, Competition 1 Comment »
February 12th, 2016

Getting Started in F-Class Competition (F-TR and F-Open)

Vince Bottomley Target Shooter F-Class F-Open F-TR

Our friend Vince Bottomley in the UK has written an excellent article for Target Shooter Magazine. Vince offers “solid-gold” advice for new F-TR and F-Open shooters. Vince reviews the cartridge options, and offers suggestions for a shooter’s first (and hopefully affordable) F-Class rifle. Vince also reviews various bipod choices for F-TR and discusses optics options (from $300 to $3000).

Here’s a short sample from the Target Shooter Magazine article:

(more…)

Permalink - Articles, Competition 4 Comments »
February 4th, 2016

Rimfire Training Can Benefit F-Class Competitors

rimfire practice Berger SWN

The 2016 Berger Southwest Nationals event is less than a week away. If you need some last-minute practice before this match and you don’t have the time (or money) to load a couple hundred rounds of centerfire ammo, consider rimfire practice. Past F-TR National Champion James Crofts attributes much of his success to plenty of trigger time with his rimfire training rifle.

Rimfire Training for F-Classers

2014 and 2012 U.S. National F-TR Champion James Crofts is one of America’s top F-Class shooters. A member of the 2013 World Championship-winning F-TR Team USA squad, James knows a thing or two about long-range shooting, that’s for sure. But you may be surprised to learn how James sharpens his shooting skills at relatively short distances. You see, James often practices with a .22 LR rimfire rifle at distances from 50 to 200 yards. James tells us: “Shooting my F-Class rimfire trainer saves me money and improves my shot process and wind-reading abilities.”

Remington rimfire 40X barreled action in PR&T LowBoy stock with PT&G bolt.
James Crofts F-TR Rimfire .22 LR

Rimfire Training Teaches Wind-Reading Skills by James Crofts
Training with the rimfire is extremely useful and can be done from 25 yards out to 200 yards. I am lucky and can shoot 50 yards right off my back deck. That is far enough that any miscue on rifle handling will show up on the target. I use a two dry-fire to one actual shot routine for my practices. This gives me much more positive reinforcement without any negative reinforcement.

Wind reading is extremely important with a .22 LR rifle. I use a set of smallbore flags to aid my wind calls. The smallbore flags are a must and force you to look at the flags and mirage on each and every shot. If you think the flags at Camp Butner move a lot, try smallbore flags around tall pine trees.

James Crofts F-TR Rimfire .22 LR
James Crofts — Photo by Kent Reeve.

Rimfire Training Is Cost-Effective
Rimfire ammunition is much less costly than centerfire ammo. Though .22 LR prices have risen in recent years (and rimfire ammo is harder to find), even now I can get a 500-round brick of .22 LR ammo for less than $75.00. That works out to fifteen cents a round. That’s a fraction of the cost of handloading .308 Win match ammo. Heck, you can pay 40 cents a piece for match-grade .308-cal centerfire bullets. Then you have to figure in brass, primers, and powder.

James Crofts F-TR Rimfire .22 LR

My CMP 40X Rimfire F-TR LowBoy Clone
My quest into the .22 LLR rimfire field started with an email from the Civilian Marksmanship Program (CMP) announcing Rem 40X stripped barreled actions for sale. I thought, “Hmmm… Could one of those little 40X barreled actions be turned into a F-Class training rifle?” My gunsmith Ray Bowman of Precision Rifle & Tool was brought in at this point.

After conferring with Ray, it was decided that he could indeed turn this into a F-Class training rifle. Ray contacted Dave Kiff of PT&G and ordered a new bolt for the Remington 40X rimfire action. Next was the stock decision. I decided to go with a PR&T Low Boy F-Class stock — this is an exact clone of the stock for my .308 Win F-TR competition rifle. Then a Jewell trigger was acquired to complete the components. Ray built this just like he would any custom rifle, other than using the stock barrel. The project turned out awesome. The rifle was a hammer from the beginning even with the stock barrel.

James Crofts F-TR Rimfire .22 LR

Permalink - Articles, Competition, Shooting Skills 1 Comment »
January 26th, 2016

Punching a Quarter at 800 Yards

t-dome birdog 6 BRDX diamondback Tennessee Junebug

If you were challenged to hit a quarter (i.e. a 25-cent piece) at 800 yards, how would you respond? Well here’s the story of a man who did take that challenge, and proceeded to put a bullet right through the quarter. Forum member Randy D., aka “Birdog”, provides this entertaining account of how his friend Junebug drilled a quarter at 800 yards one Tennessee evening….

t-dome birdog 6 BRDX diamondback Tennessee JunebugHitting a Quarter at 800 Yards

Story and photos by Birdog
A friend from Indy visited the DOME last summer and returned home telling stories of eggs at 800 yards. He called me back and said his friends did not believe it and wanted to know if I could hit a quarter out at 800 and mail it to him.

Well, I had finally got the time for that challenge last Sunday. My friend Junebug came over and I told him about a new challenge. Junebug is sort of like Voldoc and does not like to be told it can’t be done and set his sights on the quarter. George Clay had his sleeved 700 6XC with 115gr DTACs and Bug had his Diamondback 6 BRDX and 103gr Vapor Trail bullets.

Junebug and Shayne. The quarter was at back fence row on left of photo, 80 yards short of a half-mile
t-dome birdog 6 BRDX diamondback Tennessee Junebug

Early to mid-afternoon is not the time for precision 800-yard shooting as the mirage was terrible and the wind was gusting in the high humidity and 95 temps. We took a few shots and got close but no HIT.

I told Junebug to go home and load some shells and come back at 7:00 and I believed we could make it happen. After 7:00 pm is the best time to shoot as the mirage disappears and the wind goes to zero. We met again at 7:00 and had Shayne Halliburton as witness. I took a few shots then Junebug took a few zeroing shots on metal. He was not satisfied with the grouping so he switched brass.

He had some new Hydro-formed brass that had never been fired. He took three sighters on the metal plate and the first two made two little black spots that were touching. Followed with a third shot that almost touched the first two. Darkness was setting in and I told Bug he better try the quarter now. Through my March scope I could barely see the bright quarter and my 1/16th dot completely covered the quarter.

Junebug moved the Diamondback to the quarter and touched her off. A half second later the bright spot on the black paper was gone. I jumped up and did a dance and war hoop and the Bug jumped up for a high five. Now we hoped we could find the quarter. Luckily it jumped out in front of the backer less than five feet and Bug found it immediately.

Junebug’s Rifle Specifications
Stock: Zebra-painted stock (Shehane ST1000 we believe)
Action: Stiller Diamondback
Scope: March 10-60x52mm with 1/8 MOA clicks
Cartridge: 6mm BRDX (6mmBR Norma 40° Improved similar to Dasher)
Bullet: 103-grain Vapor Trail
Gunsmith: Barrel smithed by Tim Claunch, Memphis, Tennessee

t-dome birdog 6 BRDX diamondback Tennessee Junebug

For more information (including history of the Zebra rifle), view this Shooters’ Forum Thread. Credit Boyd Allen for finding this story in our 6mmBR and 6BR Improved Sub-Forum. T-DOME photo by Forum member George.

Permalink - Articles, Hunting/Varminting, Shooting Skills 2 Comments »
January 24th, 2016

Rifle Barrel Cleaning 101 — The Criterion Way

Editor: This article appears on the Criterion Barrels website. It provides good, conservative advice about barrel cleaning. Understand that cleaning methods may need to be adapted to fit the amount and type of fouling (and the particular barrel). In general, we do try to minimize brushing, and we follow the procedures Criterion recommends respecting the crown/muzzle. We have also had very good success using wet patches followed by Wipe-Out bore foam. Along with the practices outlined by Criterion below, you may want to try Wipe-Out foam. Just be sure to use a fitted cleaning rod bore guide, to keep foam out of the action recesses and trigger assembly.

Criterion Barrels Cleaning Clean Solvent rod guide Hoppes Wipe-Out

What is the Best Way to Clean a Rifle Barrel?

We are asked this question quite frequently alongside requests for recommended break-in procedures. Improper barrel cleaning methods can damage or destroy a barrel, leading to diminished accuracy or even cause a catastrophic failure. When it comes to barrel maintenance, there are a number of useful techniques that we have not listed. Some techniques may work better with different barrel types. This series of recommendations is designed to incorporate a number of methods that the Criterion Barrels staff has used successfully both in the shop and on their personal rifles. Please feel free to to list your own recommendations in the below comments section.

We recommend the use of the following components during rifle cleaning:

• Cloth patches (sized for the appropriate caliber)
• Brass jag sized properly for your bore
• One-piece coated cleaning rod
• General bore cleaner/solvent (Example: Hoppes #9)
• Copper solvent of your choosing (Example: Sweets/KG 12)
• Fitted cleaning rod bore guide
• Plastic AP brush or toothbrush
• Q-Tips
• Plastic dental picks
• CLP or rust preventative type cleaner

There are a number of schools of thought relating to the frequency in which a barrel should be cleaned. At minimum we recommend cleaning a barrel after each shooting session to remove condensation, copper, and carbon build-up. Condensation is the greatest immediate threat, as it can cause the barrel to rust while the rifle sits in storage. Copper and carbon build-up may negatively impact future barrel performance, increasing the possibility of a failure in feed or function. Fouling should be removed whenever possible.

The below tips will help limit the wear of different parts of your barrel during routine maintenance, helping extend the life of the barrel and improving its performance.

The Crown
The crown is the portion of the barrel where the bullet loses contact with the lands and grooves and proceeds to exit the firearm. The area most critical to accuracy potential is the angle where the bullet last touches the bore of the barrel.

Avoid damage to this area by using a plastic toothbrush and CLP type cleaner to scrub the crown from the exterior of the barrel. Even the most minimal variation in wear to the crown will negatively impact barrel performance, so be careful to avoid nicking or wearing away this part of the barrel.

Reducing Cleaning Rod Wear to the Crown
When running a patch through the barrel, place the muzzle about a ¼” from a hard surface that runs flat at a perpendicular angle to the cleaning rod’s direction of travel, like a wall or the edge of a work bench (pictured). When the jag impacts the hard surface, retract the cleaning rod and remove the patch.

By withdrawing the jag prior to its exit from the barrel, you are limiting the possibility of the brass dragging upon the crown if the rod is at all bent or misaligned. The soft cloth patch will continue to serve as the point of contact between the jag and the barrel, minimizing potential wear.

If possible, insert the rod through the chamber, pushing it forward toward the muzzle. Some rifles, such as the M1 Garand or M14, will require you to insert the cleaning rod through the muzzle. In these situations the use of a cleaning rod guide is recommended to limit the friction placed upon the crown.

Avoid using cleaning rod segments for scraping carbon from the recessed muzzle of an AR-15 barrel. We used this trick in the Marine Corps to impress the armorers and NCO’s with the cleanliness of our muzzles, but it likely played a significant role in reducing the service life of the rifle barrel in question.

Use a Q-Tip soaked in solvent to remove any copper or carbon residue from the recessed muzzle of an AR-15 barrel. A little bit of remaining carbon on the face of the muzzle will not negatively affect bullet travel so long as the crown edge remains consistent around the circumference of the bore.

The Lands and Grooves
This portion of the barrel may experience reduced efficiency due to copper fouling and cleaning rod damage. If copper fouling takes place during the initial break-in of the rifle, make sure to check our barrel break-in article.

For regular maintenance we suggest using a single piece coated cleaning rod rather than the traditional segmented rod or bore snake. While segmented rods and bore snakes may be convenient for field use, the corners between the segments may bow out and catch on the lands, scraping along the length of the rifling. Residual grit and particles from expended cartridges may also get caught between segments, resulting in an abrasive surface working its way down the length of the barrel. Most bore snakes will remove significant amounts of carbon fouling, but may fall short in the removal residual carbon buildup and copper fouling during deep cleaning. Good rods can be sourced from multiple manufacturers, but we have found good results using both Pro-Shot and Dewey brand products.

General cleaning requires the use of patches rather than nylon or brass bore brushes. Brass brushes may be required when aggressive cleaning is required, but can lead to unnecessary wear on the barrel if used frequently. This is not due to the nature of the soft brushes themselves, but from the abrasive particles of grit that become embedded in the material that is being run repeatedly through the bore. We recommend the use of bore guides when cleaning from both the muzzle and breech. These bore guides will help serve to protect the crown and throat from cleaning rod damage.

If significant resistance develops while running the cleaning rod through the bore, no attempt should be made to force it in further. Back the rod out and inspect the barrel to determine the cause of the resistance. The jag may be pushing between a bore obstruction and the rifling, digging a divot into the barrel before pushing the obstruction back through the muzzle. One way to minimize the risk of a stuck rod is by utilizing a slightly smaller patch during the initial push.

The process of cleaning the length of the rifling is relatively straightforward:

1. Check to make sure the rifle is safely unloaded.
2. Carry out any necessary disassembly procedures prior to cleaning.
3. Remove bolt (if possible) and insert fitted cleaning rod bore guide in action.
4. Soak a patch in bore solvent (similar to Hoppes #9).
5. Center and affix the patch on the brass jag, inserting it into the chamber end of the barrel. A misaligned patch may cause the jag to damage the lands of the rifling, so make sure the patch is centered on the jag.
6. Run the patch the full length of the barrel, retracting it upon reaching the end of the muzzle.
7. Let the solvent sit for a minute.
8. Continue to run patches through the bore until carbon residue is minimized.
9. Run a dry patch through the bore to ensure carbon residue has been removed.
10. Soak a patch in copper solvent (Sweet’s or KG-12).
11. Run the patch through the bore, leaving it to sit for 3-5 minutes (do not let solvent sit for more than 15 minutes.*)
12. Repeat this process until no blue residue remains on the patches.
13. Run a patch of Hoppes #9 and a dry patch through the bore to neutralize the copper solvent.
14. Inspect the barrel prior to reassembling the rifle, verifying that no bore obstructions remain.

*Please note that some ammonia-based copper solvents may prove to be corrosive if left sitting in the barrel for an extended period of time. It is essential that these solvents be removed within 15 minutes to avoid ruining the bore.

The Chamber
Proper cleaning of the chamber is a critical component of a general cleaning procedure. Carbon rings can build up near the neck and throat of the chamber wall, leading to feeding malfunctions and pressure spikes inside the chamber.

The chamber can be the trickiest part of the barrel to effectively clean, due to its fluctuation in size and the awkward ergonomics often required to remove carbon residue. Numerous chamber specific devices have been created to address this problem, and while some should be avoided (steel chamber brushes), others can be used to great effect (cleaning stars and plastic dental picks). The simplest approach to cleaning a chamber is to apply solvent to a couple patches, and use the cleaning rod to spin the wadded up patches inside the confines of the chamber. This should aid in removing any excess carbon. A Q-Tip can be used to reach portions of the chamber unreached by patches.

The Barrel Exterior
While the condition of the crown, rifling, and chamber are essential to firearm performance, the finish of the exterior should also be cleaned after handling. Condensation, humidity, direct water contact, and salt residue from skin contact can cause rust or corrosion. An application of anti-corrosion products is recommended when placing a firearm into deep storage for an extended period of time. [Editor: AccurateShooter.com recommends Corrosion-X or Eezox, but other products work well too.]

Finding Cleaning Components
While most cleaning components can be found at your local gun shop, some specialty items may need to be sourced through online retailers such as Brownell’s. Criterion utilizes both Dewey and Pro-Shot brand cleaning components during our day-to-day operations.

Do you have any rifle cleaning tips or tricks not mentioned in the above article? We’d love to hear about them. You can post your comments below.

Permalink - Articles, Tech Tip 4 Comments »
January 19th, 2016

Tech Tip: How to Print Better, More Durable Targets

Printing Targets card stock heavy paper benchrestMost of us have access to a printer at home or at work. That means you can print your own targets. You’ll find hundreds of free target designs online, including dozens of downloadable targets on our AccurateShooter.com Target Page. If you’re feeling creative, you can design your own target with a computer drawing program such as MS Paint.

Paper Stock Is Important
If you want your self-printed targets to show shots cleanly (and not rip when it gets windy), you should use quality paper stock. We recommend card stock — the kind of thick paper used for business cards. Card stock is available in both 65-lb and 110-lb weights in a variety of colors. We generally print black on white. But you might experiment with bright orange or yellow sheets. Forum Member ShootDots report: “They sell cardstock at Fed-Ex Kinko! I use either Orange or Yellow. That makes it easy to see the bullet holes clearly.” On some printers, with the heavier 110-lb card stock, you will need to have the paper exit through the rear for a straighter run.

Printing Targets card stock heavy paper benchrest

Here are some Target-Printing Tips from our Forum members:

“Staples sells a 67-lb heavy stock that I have settled on. I use the light grey or light blue, either of these are easy on the eyes on bright days. I have used the 110-lb card stock as well and it works fine. It’s just a little easier to print the lighter stuff.” (JBarnwell)

“Cardstock, as mentioned, works great for showing bullet holes as it doesn’t tear or rip like the thin, lightweight 20-lb paper. I’ve never had a problem with cardstock feeding in the printer, just don’t stick too many sheets in there. If I need three targets, I load only three card stock sheets”. (MEMilanuk)

“I’ve used Staples Sticker paper. This works well and no staples are required (joke intended). It helps if you put slight tension on the lighter weight paper when mounting it on the target frame.” (Mac 86951).

Printing Targets card stock heavy paper benchrest

Here are some tips for using lighter weight paper (if you want to save money or your printer won’t work with heavier stock):

“20-lb bond works pretty well for me if I use a spray adhesive and stick the entire back of the paper’s surface to the backer board.” (Lapua40X)

“I use the regular 20-lb paper but the only time it tears is when there is no backer to support it. This can be an issue when going to a public range and the backer are all shot out. I use a large construction paper backer that I clip onto the stands.” (CPorter)

Here Are Three of Our Favorite Targets. Click to Download PDFs.

FREE Accuracy Precision Rifle Shooting Target

FREE Accuracy Precision Rifle Shooting Target FREE Accuracy Precision Rifle Shooting Target
Permalink - Articles, Tech Tip 8 Comments »
January 16th, 2016

Getting Down to the Nitty-Gritty — How to Clean Your AR

AR15 AR-15 gun cleaning maintenance

AR-platform rifles can be maintenance-intensive beasts. But some AR owners make the situation worse by not regularly cleaning important small parts, or by using too much oily/greasy lubricants in the wrong places. A properly maintained and lubricated AR15 can shoot hundreds of rounds (between cleanings) without a problem. If you learn where (and where not) to apply lubricant, you’ll find that your AR will run more reliably and the task of cleaning the bolt and bolt carrier will be less of a burden.

Here is a good video that explains AR-15 Cleaning and Maintenance. In this 30-minute NSSF video, Gunsite Academy instructor and gunsmith Cory Trapp discusses the proper way to clean and maintain the AR-15 carbine. Very knowledgeable, Trapp provides rock-solid advice for AR owners. Along with cleaning producedures, this video explains how to inspect key components and how to function-test your AR before each shooting session.

AR15 AR-15 gun cleaning maintenance

AR15 AR-15 gun cleaning maintenance

AR15 AR-15 gun cleaning maintenance

Permalink - Articles, - Videos No Comments »