Shooting Sports USA (SSUSA) offers a wide selection of informative articles on marksmanship techniques. If you shoot prone, “hard-holding”, you know how important proper positioning and technique can be. There is a SSUSA article that every prone shooter should read — whether you shoot air rifle, smallbore, or High Power. Compiled wtih the help of some of the country’s best prone marksmen, this article, How to Master Prone Shooting, provides a step-by-step guide to perfecting your prone position technique.
How to Master Prone Shooting — SSUSA by NRA Staff
The prone position is the most precise of the rifle shooting positions. It is used in many different shooting events at distances as close as 5 meters and as far away as 1,000 yards, and beyond that in long-range disciplines such as PRS and NRL. Prone shooting is very popular among shooters whose training time is limited, because it does not require as much practice. Age has little effect on a shooter’s ability to do well in prone; many older shooters are able to continue competing successfully in prone matches.
Here is a sample, listing STEP ONE, the basics of the prone position:
Step One: Study the Position
The prone position is steady because it is low, which gives a wide base of support to help keep the rifle still. Below are the key features of the prone position.
1. Straight line form left hand through left arm, side and leg.
2. Head tipped down comfortably.
3. Right hand grips rifle lightly.
4. Body lies behind rifle. Angle to rifle is 10 to 20 degrees.
5. Right knee bent slightly, toe pointing out.
6. Rifle lies on heel of left hand, fingers relaxed.
7. Left elbow rests to left of rifle.
8. Sling (if present) supports weight of rifle. Left arm relaxed.
9. Body rests slightly more on left side.
10. Left leg straight, toe pointing inward or straight back.
There are FIVE MORE STEPS described in detail with specific actions to perform, in the FULL Article. For example, in STEP FOUR (Sling Adjustment), the article explains: “Put the sling high on the arm and tighten the sling keeper. Wrap the arm around the sling so that the sling comes across the left hand and forearm.”
“The press is the heart of the handloading operation, also traditionally the most expensive single tool employed…” — Laurie Holland
British competitive shooter Laurie Holland has reviewed three popular, single-stage reloading presses for Target Shooter Magazine (targetshooter.co.uk). Laurie bolted up a Forster Co-Ax, RCBS Rock Chucker Supreme, and RCBS Summit to his reloading bench and put the three presses through their paces. These three machines are very different in design and operation. The venerable Rock Chucker is a classic heavy, cast-iron “O”- type press that offers lots of leverage for tough jobs. The smaller RCBS Summit press is an innovative “upside-down” design with a large center column and open front. It offers a small footprint and easy case access from the front. The Co-Ax is unique in many respects — dies slide in and out of the upper section which allows them to “float”. The cartridge case is held in the lower section by spring-loaded jaws rather than a conventional shell-holder.
If you are considering purchasing any one of these three presses, you should read Laurie’s article start to finish. He reviews the pros and cons of each press, after processing three different brands of brass on each machine. He discusses ergonomics, easy of use, press leverage, smoothness, priming function, and (most importantly), the ability to produce straight ammo with low run-out. The review includes interesting data on case-neck run-out (TIR) for RWS, Federal, and Norma 7x57mm brass.
Review Quick Highlights:
RCBS Rock Chucker Supreme
“My expectations of the antediluvian RCBS Rock Chucker Supreme’s performance weren’t over high to be honest as I mounted it in the place of the Summit. As soon as I sized the first of the stretched RWS cases though, I saw why this press has been such a long-running favorite. The workload was considerably reduced compared to the other two presses and doing 40-odd cases took no time at all with little sweat — it just eats hard-to-size brass.”
RCBS Summit Press
“Despite its massive build and long-stroke operating handle, [the Summit] took more sweat than I’d expected, even if it was somewhat less work than with the Co-Ax. Although the Summit is apparently massive, I noticed that the die platform would tilt fractionally under the heaviest strains[.] It is nevertheless a very pleasant press in use and bullet seating was a doddle — the few examples tried proving very concentric on checking them afterwards. The optional short handle would be valuable for this task.”
Forster Co-Ax
“[On the Co-Ax], the operating handle is above the machine, located centrally [with] twin steel links at the top end of the press dropping down to the moving parts. The Co-Ax incorporates [many] novel features, principally its automatic and multi-case compatible shell-holder assembly with spring-loaded sliding jaws, very neat spent primer arrangements that allow hardly any gritty residues to escape and foul the moving parts and, the snap-in/out die fitment that allows rapid changes and lets the die ‘float’ in relation to the case giving very concentric results. I own this press and it meets my handloading needs very well.”
For many Americans, real incomes have stayed flat in recent years, while inflation has increased the cost of living very significantly in the past four years under Biden. Accordingly, it’s important to save money whenever possible. Prices are going up, but wages aren’t following (for most of us). Here are six ways shooters can save money on gear purchases and other shooting-related expenses.
1. Watch for Our Deals of the Week. Every Monday, in our Daily Bulletin, AccurateShooter.com offers some of the best deals to be found. We search the web to find great deals on ammo, reloading components, optics, tools, firearms, gun safes, electronics and more. It’s not unusual to find savings of 20-35% through our Deals of the Week. And many of our vendors are now offering special deals just for AccurateShooter.com readers.
2. Check Out the Forum Classifieds. There are great deals to be found every day in the AccurateShooter Shooters’ Forum. The latest deals are displayed in the right column of every Forum page. To see all the listings, browse through the Forum MarketPlace section which has four main categories:
Guns, Actions, Stocks, & Barrels
Tools, Dies, Rests, Reloading Components & Misc
Scopes, Optics, Sights, Rings, Bases Etc.
Commercial Sales by Paid Sponsors
3. Share a Ride to Matches. Fuel prices are on the rise — Regular-grade gasoline is over $5.00 per gallon in California now and around $3.10/gallon nationwide. With many shooters living 30-100 miles from the nearest range, fuel remains a big part of a shooter’s hobby budget. We’d say 90% of shooters drive solo to matches, often in large, gas-guzzling trucks. If you drive 200 miles round-trip to attend a match in a 20-mpg vehicle, you’ll burn over $31.00 worth of gasoline on your trip. That adds up. By simply sharing the ride with one fellow shooter you cut your fuel expenditures in half. And, if you alternate vehicles with a buddy from one match to the next, you save on vehicle wear and tear. At $0.65/mile (overall operating costs) consider the savings.
4. Use Discount Codes to Save. It’s always smart to check for discount codes before you buy. In the Daily Bulletin, we feature “Deals of the Week” every Monday morning, and we provide discount Coupon Codes when available. These can reduce the price substantially or lower shipping costs. Search codes for Brownells, Creedmoor Sports, EuroOptic, Graf’s, Midsouth, Powder Valley, Sportsman’s Warehouse, KYGUNCO, MidwayUSA, and Precision Reloading. Check your email also — some discount codes are only announced in email newsletters. If you can’t find a Coupon Code for your preferred vendor, visit Gun.deals and/or RetailMeNot.com. Both those sites list current coupon codes, and RetailMeNot.com covers thousands of vendors.
5. Shop for “Demo” Optics. Modern high-quality optics can easily cost $2000.00 or more, often exceeding the value of the rifle on which they are mounted. However, you can often save 20-30% by purchasing demo optics. These are normally display units used at trade shows. They may have slight ringmarks, but otherwise they are “as new”, having never been carried in the field or used on a rifle that has fired live ammo. When purchasing demo scopes, you should always ask about the warranty before consummating the sale. However, most demo scopes from name-brand manufacturers come with full factory warranties. EuroOptic.com and Natchezss.com are two respected vendors that offer a good selection of demo optics.
6. Train with Rimfire Rifles. Good match-grade centerfire, hand-loaded ammo, counting premium bullets, powder, primers, and brass (figuring 10X loads), can now exceed $1.60 per round. And if your $600 (as chambered and fitted) competition barrel is toast after 1500 rounds, add $0.40 for barrel deprecation per shot. So you’re effectively spending two bucks a round total! By contrast, you can get quite good .22 LR target ammo for under $0.18 per round. Good rimfire barrels last a long, long time, so you don’t have to be concerned about wearing out your barrel quickly. A quality rimfire barrel can retain its accuracy for 7,000 rounds or more. If you run the ballistics, a .22 LR round at 100 yards can emulate the wind drift experienced by a centerfire cartridge at long range. This allows for effective cross-training with much less expensive ammo.
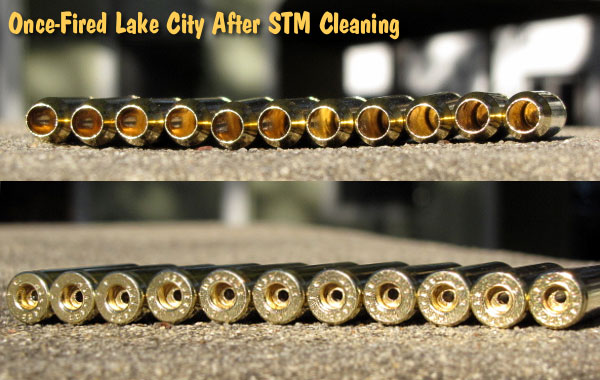
The U.S. Army Marksmanship Unit regularly published a reloading “how-to” article on the USAMU Facebook page. One excellent “Handloading Hump Day” post covered preparation of once-fired 5.56x45mm brass. This article, the first in a 3-part series, has many useful tips. If you shoot a rifle chambered in .223 Rem or 5.56x45mm, this article is worth reading. You can obtain once-fired Lake City 5.56x45mm brass for less than half the cost of premium .223 Rem brass.
This week, Handloading Hump-Day will answer a special request from several competitive shooters who asked about procedures for morphing once-fired GI 5.56mm brass into accurate match brass for NRA High Power Rifle use. The USAMU has used virgin Lake City (LC) 5.56 brass to win National Championships and set National Records for many years. In this 3-part series, we’ll share techniques proven to wring match-winning accuracy from combat-grade brass.
GI brass has an excellent attribute, worth noting — it is virtually indestructible. Due to its NATO-spec hardness, the primer pockets last much longer than most commercial brass when using loads at appropriate pressures.
Preparing Once-Fired GI 5.56 Brass for Reloading (Part 1 of 3)
Assuming our readers will be getting brass once-fired as received from surplus dealers, the following steps can help process the low-cost raw material into reliably accurate components.
1. Clean the Brass
First, clean the brass of any dirt/mud/debris, if applicable. Depending on the brass’s condition, washing it in a soap solution followed by a thorough rinsing may help. [This step also extends the life of the tumbling media.] Approaches range from low-tech, using gallon jugs 1/2 full of water/dish soap plus brass and shaking vigorously, to more high-tech, expensive and time-consuming methods.
2. Wet-Tumbling Options (Be Sure to Dry the Brass)
When applying the final cleaning/polish, some use tumblers with liquid cleaning media and stainless steel pins for a brilliant shine inside and out, while others take the traditional vibratory tumbler/ground media approach. Degree of case shine is purely personal preference, but the key issue is simple cleanliness to avoid scratching ones’ dies.
If a liquid cleaner is used, be SURE to dry the cases thoroughly to preclude corrosion inside. One method is to dump the wet brass into an old pillow case, then tilt it left/right so the cases re-orient themselves while shifting from corner to corner. Several repetitions, pausing at each corner until water stops draining, will remove most water. They can then be left to air-dry on a towel, or can be dried in a warm (150° F-200° F max) oven for a few minutes to speed evaporation.
Shown below are Lake City cases after cleaning with Stainless Media (STM). Note: STM Case cleaning was done by a third party, not the USAMU, which does not endorse any particular cleaning method.
NOTE: The USAMU Handloading (HL) Shop does not RE-load fired 5.56 brass. We use virgin LC brass with our chosen primer already staked in place. However, our staff has extensive personal experience reloading GI brass for competition, which will supplement the Shop’s customary steps. In handloading, as in life, there are many ways to accomplish any given task. Our suggestions are note presented as the “only way,” by any means. Time for loading/practicing is always at a premium. Readers who have more efficient, alternative methods that maintain top accuracy are invited to share them here.
3. Inspect Every Case
Once dry, inspect each case for significant deformation (i.e., someone stepped on it), damaged mouths/necks and case head/rim damage. Some rifles’ ejectors actually dig small chunks of brass out of the case head — obviously, not ideal for precision shooting. Similarly, some extractors can bend the case rims so badly that distortion is visible when spinning them in one’s fingers. These can be used for plinking, but our match brass should have straight, undamaged rims.
Dented case mouths are common, and these can easily be rounded using a conical, tapered tool, [such as a .223 expander mandrel. A dummy 7.62 or .30-06 cartridge with a FMJ spitzer can also work.] If most of your brass is of one headstamp, this is a good time to cull out any odd cases.
4. Check the Primers Before Decapping
Your clean, dry and inspected brass is now ready for full-length sizing, decapping and re-priming. Historically, primer crimps on GI brass have caused some head-scratching (and vile language) among handloaders. Our next installment will detail efficient, easy and practical methods to remove primer crimp, plus other useful handloading tips. Until next week, Good Shooting!
Accuracy Potential of Mil-Surp 5.56×45 Brass
So, how accurate can previously-fired GI surplus brass be in a good National Match AR-15? Well, here’s a data point from many years ago that might be of interest. A High Power shooter who wrote for the late Precision Shooting magazine took a Bill Wylde-built AR match rifle to a registered Benchrest match. He had no difficulty obtaining consistent 0.5-0.6 MOA accuracy at 200 yards using LC brass and a generic “practice” load that was not tuned to his rifle.
Rimfire benchrest rifle of Forum member Peebles24.
With the variety of rimfire disciplines, from cowboy action to Olympic three-position smallbore, there are countless different rimfire designs on the market — bolt guns, lever guns, single-shots, toggle-links and more. These may shoot the same ammo, but they certainly vary in looks and ergonomics. This is testimony to human creativity.
In our Shooters’ Forum, you’ll find a long-running thread showcasing rimfire rifles for plinking, hunting, 3P Target Shooting, Silhouette, Benchrest, Rimfire F-Class, NRL22 and more. Here are some of the notable rifles in that Forum thread, with brief build/component details.
Rimfire F-Class Competition Rifle in Eliseo Stock
Here is a cool rimfire rifle featuring an Anschutz Model 1813 action in an Eliseo (Competition Machine) F-Class Chassis resting on a SEB Mini front joystick rest. This rig belongs to Forum member 10XShooter who won a Silver Medal at the Firecracker match at the NRA Whittington Range in Raton, NM. This rifle has a Maven 5-30X scope, Shilen Ratchet barrel smithed by Mark Penrod, plus a Harrell’s tuner. Gary Eliseo makes excellent metal stocks for centerfire and rimfire rifles with models for a variety of disciplines — Palma, F-Class, PRS/NRL and more. Check out all the Eliseo models at GotXRing.com.
IR 50/50 Sporter with 2500 XS Action and Muller 7R Barrel
Here is member doclu60’s Holeshot Arms (Stiller) 2500XS IR 50/50 Sporter. It features a polished action, barrel, rings/bases, trigger guard, and bolt knob. There are premium components: Bix ‘N Andy trigger, Peightal stock, and Muller 7R barrel. The optic is a Leupold Custom Shop VX3i 6.5-20x40mm wearing Rick Averill custom leather scope caps.
Anschutz BR-50 Benchrest Rifle with Upgrades
This is member BHarvey’s rare Anschutz 2013 BR50, with upgrades. This is actually a factory BR-50 stock, but the owner fitted a custom Benchmark barrel, along with a Fudd barrel tuner. That massive butt-plate is three POUNDS of custom-crafted copper, which helps with balance. This rifle was also featured in our popular Guns of the Week collection.
Rimfire F-Class Rig with Curly Maple Stock
This handsome, ultra-accurate Smallbore F-Class rig belongs to member RMist of Team Pro-Shot Products. It has a Holeshot (Stiller) 2500X, stunning Cerus Curly Maple wood stock, Nightforce scope. Up front is the joystick co-axial SEB Joy-Pod.
How does this impressive rimfire F-Classer shoot? Amazingly well. That target at right shows TEN (10) rounds fired at 100 yards. Most centerfire rifles would have trouble beating that level of accuracy.
Rimfire Tactical Rig with CZ Action and McRees Precision Chassis
Here’s a modern chassis rig built with a CZ 455 action. Forum member A-Rob upgraded the CZ 455 with a SCAR 2-stage trigger. This rifle features a Keystone Accuracy-fitted glue-in barrel, Athlon 10-40x scope and McRees Precision chassis. As you can see from the target, it shoots great. Note: CZ has replaced its 455s with the new CZ 457 series with available metal chassis precision model. CLICK HERE to see full target sheet with six 5-shot groups at 50 yards, averaging 0.270″.
Rampro .22 LR Pistol by Gre-Tan
This is a very rare .22 LR bolt-action silhouette pistol. It is a RamPro 22 LR single-shot crafted by Greg Tannel of Gre-Tan Rifles. Member Tonedaddy says this is the only .22 LR Rampro bolt-action pistol built by Gre-Tan in existence. Not the beautifully-figured wood stock.
Benchrest Rimfire with Turbo V3 Action and Owner-Crafted Stock
Member J.J. Coe reports: “Here is a little side project I recently finished. It features a
Turbo V3 action, Benchmark 3-groove barrel chambered by Mark Penrod, Jewell trigger, and Leupold 40X barrel in Harrell’s offset rings.” Notably, J.J. made the 5-piece laminate stock himself. Nice work! Yes this gun is very accurate as you can see from the match target. Below that is another one of J.J.’s rimfires, an Anschutz 54 in another handsome stock he made himself. This guy has talent!
SAKO P94S Rimfire Trio
This trio of SAKO P94S rimfire rifles belongs to Forum member “Thomasconnor”. He tells us: “The one in the middle is probably the most accurate .22 LR rifle I’ve owned. It was about 6 pounds (without the scope or rings) before I made a heavy buttplate for it. In its current configuration it’s under 8 pounds with a giant scope and steel rings. It now has a Jewell trigger, Benchmark barrel, oversized action screws, and Alex Sitman stock”.
Springfield Model 1922s
Member SnapDraw posted: “Here are my Springfield Model 1922s. One is an M1 I got from a shooting club back East. It has an NRA stock with upgraded M2 bolt and Lyman super target spot 15X scope. And the other (below) is an unmolested (except front sight) M2 with military stock. Both are amazing shooters!”
Benchrest Modified Anschutz 2013
Member Esk308 Picked up this pre-owned rifle in the summer of 2020. Along with the Anschutz 2013 action it features a 27″ Lilja barrel, laminated Shehane stock, and Nightforce 15-55x52mm scope in Kelbly rings. On the end of the barrel is a Harrels tuner with Don Blue tube. Esk308 now uses a John Loh front rest with SEB Bigfoot rear bag.
Anschutz 2013 in M. Werks Stock
Here is another Anschutz model 2013, but in a completely different configuration. This is a rimfire prone match rifle upgraded with a Bartlein gain-twist barrel and an M. Werks tuner stock. Note how the barreled action is secured. This handsome rig belongs to Forum member Jeffrey.
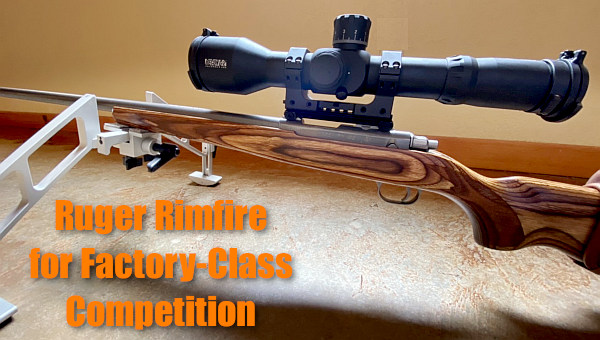
Factory-Class Ruger with Big Bipod
Forum member DavidJoe from Texas put together this rig for a local factory-class rimfire series. He reports: “There’s a discipline where a factory rifle under $1000.00 gets to shoot at a bigger-ringed target. I’m going to try out this new Ruger combination in those limited matches, weighed down with an enormous Valdada scope on a Sinclair bipod.”
Wood-Stocked Trio — Two Remingtons and a Kimber
Here are three .22 LR rigs belonging to member Alamo308. Note the competition iron sights on the middle rifle, a Remington M37 which features a Custom Birdseye Maple stock. The Kimber 82G was sold directly by the CMP as a training rifle. These CMP Kimbers were often extremely accurate.
Marlin 980S Custom with Owner-Crafted Stock
The rifle is based off a Marlin 980S action with a Green Mountain 20″ fluted barrel. The action was bedded with a one-piece aluminum bedding block and Devcon 10110. Owner Kakotoch tells us: “Trigger is a Rifle Basix I took down to just over 16 oz. by using a different pull weight screw. The scope is a Japanese-made Tasco 36x that I picked up NIB for $100 and is surprisingly clear. The stock was my winter project — it’s laminated carbon fiber and walnut, finished with Tru-Oil. I cut, shaped, and polished the buttplate by hand.”
What a tale this rusty Colt could tell — this M1911 pistol is more than a vintage military side-arm. It is a symbol of courage, determination, and triumph over adversity. This pistol was carried on a 2,060-mile open-boat ocean crossing from the Philippines to Australia. In May of 1942, the skipper and 17 crewmen of the Minesweeper U.S.S. Quail courageously decided to sail from Manilla to Darwin, Australia rather than surrender to the Japanese. Lt. J.H. Morrill and his crew made that long ocean journey in a 36-foot launch, braving enemy air and sea forces and dangerous ocean conditions.
This pistol is part of the NRA Museum Collection in Fairfax, Virginia. This historic Colt M1911 was a featured “Gun of the Day” on the NRA Museum Facebook Page where you’ll find hundreds of other interesting firearms. We believe the remarkable story of this pistol deserved to be told here…
Colt M1911 Pistol — Escape from Corregidor
The minesweeper U.S.S. Quail was the last operational American naval vessel in the Philippines when Japan began its occupation of the country in May 1942. After his vessel was disabled at the strategically-important island of Corregidor near the entrance to Manilla Bay, Lt. Commander J. H. Morrill scuttled the ship and gave his crew a choice: either surrender to the Japanese or attempt to escape, by sea, to Allied territory thousands of miles away. Rather than surrender, 17 crew members elected to join Morrill on a dangerous passage in a 36-foot open launch/lifeboat. Gear was scavenged including this M1911 recovered from a dead serviceman. With few charts or navigational aids, Morrill and his men successfully completed an epic 58-day 2,060-mile journey to Australia and safety.
Today we share some smart tips from a past F-Class and Sling Champion who is both a great shooter AND a ballistics wizard. Founder of Applied Ballistics LLC, Bryan Litz is the author of multiple books and creator of advanced Ballistics Software.
Bryan is also a highly skilled competitor. In 2015, Bryan Litz won the F-TR Mid-Range AND Long-Range National Championships hosted at Ben Avery. And at the 2014 Berger SW Nationals (SWN), Bryan took top honors among all sling shooters. If you only know Bryan Litz from his Applied Ballistics Books and DVDs, you may not realize that this guy is a also great marksman along with being an actual rocket scientist!
Given his impressive track record in both F-Class and Palma (Fullbore) out to 1000 yards, we asked Bryan if he had any advice for other long-range competitors.
First Bryan provided three tips concerning Ballistics, his special area of expertise. Next Bryan offered three more general tips about long-range competition — how to analyze your shooting, how to choose your ‘wind strategy’, and how to avoid the most costly mistakes, i.e. how to avoid the “train-wrecks”.
Bryan Litz won the 2015 F-TR Mid-Range and Long-Range Championships with this sleek rig:
Litz Ballistics Tips
Ballistics TIP ONE. If you’re having trouble getting your ballistic software to match actual drops, you need to look at a number of possible reasons. Here are some common issues that can cause problems.
Click Values Are Not Exact. Scopes and iron sights don’t always produce accurate adjustments. In other words, if your ballistics program predicts 30 MOA of drop, and you dial 30 MOA but hit low, it might be that your sight actually only moved 28 MOA (for example). To see if your sight is adjusting accurately, shoot a tall target at 100 yards and measure group separation when dialing your sight.
Barometric vs. Station Pressure. This is a commonly misunderstood input to ballistics programs. You can avoid this pitfall by remembering the following: station pressure is the actual measured pressure at your location, and you don’t need to tell the program your altitude when using station pressure. Barometric pressure is corrected for sea level. If you’re using barometric pressure, you also have to input your altitude.
Muzzle Velocity. Chronographs are not always as accurate as shooters think they are — your true MV may be off by 10-20 fps (or more). If your drop is different than predicted at long range, it might be because your muzzle velocity input is wrong.
Mixing Up BC (G1 vs. G7). Knowledgeable long range shooters know that the G7 standard is a more representative standard for modern LR bullets. However, using G7 BCs isn’t just a matter of clicking the ‘G7′ option in the program. The numeric value of the BC is different for G1 and G7. For example, the G1 BC of the Berger 155.5 grain Fullbore bullet is .464 but the G7 BC is .237. If you were to enter .464 but click on G7, the results would be way off.
Ballistics TIP TWO. A properly installed level is absolutely essential for long range shooting. Without a good level reference, your long range wind zero will be off due to minor canting of the rifle from side to side. You can verify that your level is installed correctly on a 100-yard ‘tall target’. Draw a plumb line straight up the target and verify that your groups track straight up this line as you go up in elevation.
Ballistics TIP THREE. If your long range ballistic predictions aren’t tracking, always come back and verify your 100-yard zero. Sometimes a simple zero shift can be misconstrued as errors in long range ballistics predictions.
Litz Competition Shooting Tips
Competition TIP ONE. Improving your scores in long range competition is a constant process of self-assessment. After each match, carefully analyze how you lost points and make a plan to improve. Beginning shooters will lose a lot of points to fundamental things like sight alignment and trigger control. Veteran shooters will lose far fewer points to a smaller list of mistakes. At every step along the way, always ask yourself why you’re losing points and address the issues. Sometimes the weak links that you need to work on aren’t your favorite thing to do, and success will take work in these areas as well.
Competition TIP TWO. Select your wind shooting strategy carefully. For beginners and veterans, most points are typically lost to wind. Successful shooters put a lot of thought into their approach to wind shooting. Sometimes it’s best to shoot fast and minimize the changes you’ll have to navigate. Other times it’s best to wait out a condition which may take several minutes. Develop a comfortable rest position so you have an easier time waiting when you should be waiting.
Competition TIP THREE. Actively avoid major train wrecks. Sounds obvious but it happens a lot. Select equipment that is reliable, get comfortable with it and have back-ups for important things. Don’t load on the verge of max pressure, don’t go to an important match with a barrel that’s near shot out, physically check tightness of all important screws prior to shooting each string. Observe what train wrecks you and others experience, and put measures in place to avoid them.
Looking down-range with F-TR rifle at Ben Avery Shooting Facility in Phoenix, Arizona.
Bullet Stability and Twist Rates
In this video, Bryan Litz talks about bullet in-flight stability and how to calculate barrel twist-rate requirements for long-range bullets. Bryan explains that bullet stability (for conventional projectiles) is basically provided by the spinning of the bullet. But this spin rate is a function of BOTH the nominal twist rate of the barrel AND the velocity of the projectile. Thus, when shooting the same bullet, a very high-speed cartridge may work with a slower barrel twist rate than is required for a lower-speed (less powerful) cartridge. For match bullets, shot at ranges to 1000 yards and beyond, Bryan recommends a twist rate that offers good stability.
You’ll find more expert information on long-range shooting and ballistics on the Applied Ballistics website and the Bryan Litz Ballistics Facebook page. Bryan’s most recent Facebook post talks about the Coriolis effect — the apparent drift of a rifle trajectory due to the rotation of the earth.
To learn more, we recommend you subscribe to the Applied Ballistics Science of Accuracy — with in-depth articles, brilliant podcasts, exclusive videos and more.
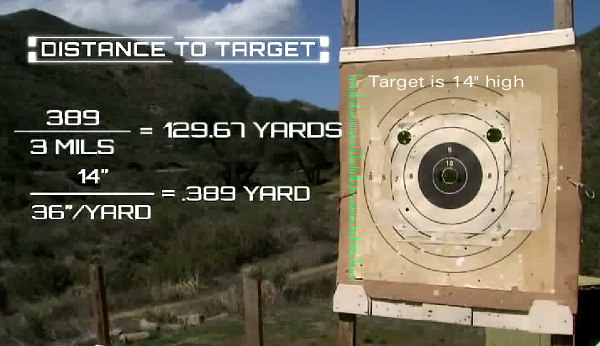
MIL-system scopes are popular with tactical shooters. One advantage of MIL scopes is that the mil-dot divisions in the reticle can be used to estimate range to a target. If you know the actual size of a target, you can calculate the distance to the target relatively easily with a mil-based ranging reticle. Watch this helpful NRA video to see how this is done:
Milliradian Definition and Yardage Ranging Formula
“MIL” or “Milrad” is short-hand for Milliradian, a unit of angular measurement. The subtension of 1 mil equals 3.6 inches at 100 yards or 36 inches at 1,000 yards. (In metric units, 1 mil equals 10 centimeters at 100 meters or 1 meter at 1,000 meters.) Knowing this subtension and knowing the size of the target (or a reference object near the target) allows the distance to the target to be estimated with considerable accuracy. The formula used to calculate range (in yards) based on MIL measurement is:
Height of Target in inches (divided by 36) x 1000, divided by the number of mils.
For example, if a 14″ tall target spans 3 mils from top to bottom, the distance is 129.67 yards calculated as follows: 14/36 x 1000 = 389, then divided by 3 = 129.67. You can also use a different conversion to find distance in meters.
Can You Estimate Range with an MOA-Marked Reticle? Yes You Can…
Reader Josh offers this handy advice: “It worth noting that the ability to measure range is not unique to mil-based systems. A MIL is just another unit for measuring angles, and any angular measurement will work. Considering that just about everybody knows that 1 MOA is about an inch per hundred yards, similar formulae can be developed for ranging with MOA marks. The advantage with mils is the precise relationship between units — the MOA-inch measurement is imprecise (being off by 0.047″) — so in principle MILs are a better unit”.
Smart gun owners know they need a good, solid gun safe. But when choosing a gun safe, what kind of lock should you select — electronic or mechanical? Both types have their advantages and disadvantages. This article will help you make the right choice for your needs and also get the most reliable performance from either type.
Gunsafes can be fitted with either an electronic keypad-style lock, or a conventional dial lock. In our Gunsafe Buyer’s Guide, we explain the important features of both dial and electronic lock systems. Many safe-makers will tell you that consumers prefer electronic locks for convenience. On the other hand, most of the locksmiths we’ve polled believe that the “old-fashioned” dial locks, such as the Sargent & Greenleaf model 6730, will be more reliable in the long run. CLICK HERE to learn more about the Pros and Cons of Mechanical (dial) Lock vs. Electronic (keypad) safe locking systems.
One safe supplier, The Safe Keeper, notes that mechanical (dial) locks tend to be more reliable over long periods: “When it comes to reliability, a mechanical lock is the way to go. Anything electronic is designed to fail sooner or later. For every 20 broken electronic locks we will get one mechanical. Bottom line is, it’s not that complicated to input a combination on a mechanical lock. Those extra 7 seconds just might save you from being locked out and having your safe drilled opened.”
This Liberty Safe video compares Mechanical (dial or key) vs. Electronic (keypad) safe locking systems.
Here is the opinion of RFB from Michigan. He is a professional locksmith with over two decades of experience servicing locks and safes of all brands and types:
What a Professional Locksmith Says:
For the convenience of quick opening, the electronic locks can’t be beat. However, for endurance and years of trouble-free use, the electronics can’t compare with the dial lock.
I’ve earned my living, the past 22 years, servicing locks of all types. This includes opening safes that can’t otherwise be opened. I do warranty work for several safe manufacturers (including Liberty). What I’ve learned in all those years is that manual dial locks have very few problems. The most common is a loose dial ring which can shift either left or right, which will result in the index point being in the wrong place for proper tumbler alignment. This is simple to fix.
Electronic locks, however, can have all kinds of issues, and none (except bad key-pad) are easy to fix, and when one goes bad, it must be drilled into to open it. IMO, it’s not a matter of ‘if’ an electronic lock will ultimately fail, but a matter of ‘when’ it will fail. Over the past 10 years or so, since electronics have become more and more prevalent, I’ve had to drill open bad electronic locks vs. bad manual dial locks on a ratio of about 20-1.
My professional opinion is to get the manual dial lock, unless you’ve got a good friend who is a locksmith/safecracker.
How Secure is Your Lock?
RFB tells us that both dial and electronic locks offer good security, provided it’s a good quality lock made by LaGard, Sargent & Greenleaf, Amsec, or Kaba/Ilco. However, RFB warns that “Some of the ‘cheaper’ locks (both manual and electronic) however, are very simple to bypass.
An electronic lock that’s glued or ‘stuck’ to the door with double-sided tape, and has its ‘brain’ on the outside of the lock in the same housing as the keypad, and merely sends power to an inner solenoid via a pair of wires through the door, is a thief’s best friend. The good ones have the brain inside the safe, inaccessible from the outside.
No amateur can ‘manipulate’ either a good manual or electronic lock. Both give you a theoretical one million possible combinations. I say ‘theoretical’ because there are many combinations that cannot, or should not, be used. You wouldn’t set your combo on a dial lock to 01-01-01 etc., nor would you set an electronic to 1-1-1-1-1-1, or 1-2-3-4-5-6.”
Tips for Dial Locks
RFB notes that “The speed, and ease of use, of a manual dial lock can be improved upon, simply by having your combo reset using certain guidelines. Avoid high numbers above 50. Having a 1st number in the 40s, 2nd number anywhere from 0-25, and 3rd number between 25 and 35 will cut dialing time in half, without compromising security. (For mechanical reasons I won’t get into here, the 3rd number of a good manual dial lock cannot — or should not — be set to any number between 95 & 20).”
Tips for Electronic Locks
Electronic locks can have the combination changed by the user much more easily than dial locks. That should be a good thing. However, RFB explains: “That can be a double-edged sword. More than a few times I’ve had to drill open a safe with an electronic lock that has had the combo changed incorrectly by the user, resulting in an unknown number that nobody can determine. Also, don’t forget that electronic locks have a ‘wrong-number lock-out’. I would NOT rely on the normal quickness of an electronic 6-number combo in an emergency situation. If for any reason (panic etc.) you punch in the wrong number several times, the lock will shut down for a 5-minute ‘penalty’.
Replace Electronic Lock Batteries Every Year
To get the most life out of any electronic (keypad Lock), you should change the battery at least once a year, whether it needs it or not. Low voltage won’t necessarily shut down the lock, but using it in a low voltage situation is bad for the electronics, and eventually will cause lock failure. So, If you do nothing else to maintain your digital-lock safe, replace the battery every year.
And get a fresh battery (with a release date) from the store — don’t just pull a battery out of a storage bin, even if it’s never been used. Old batteries can lost “juice” and physically degrade, even when in storage.
This article is Copyright 2023 AccurateShooter.com. No reproduction on any other website is authorized without payment of licensing fees or liquidated damages.
Welcome to 2025 — a new year, with new hunting opportunities in the months ahead. While we’re in the midst of winter, many readers are already thinking about hunting in the months ahead. And in some areas The National Shooting Sports Foundation (NSSF) has a large selection of online resources that can help hunters achieve success in the field in 2025. While fall is the most popular hunting period, in many states there is also a spring hunting season which begins in late March or April. During spring there are opportunities for hunting a variety of game such as wild turkey and various small game species. Specific season dates can vary by state and game species.
Visit WhereToHunt.org
There’s a great online resource for hunters that will help you find game locations in your state and ensure you have all the proper permits and game tags. WheretoHunt.org features an interactive map of the country. For all 50 states, the NSSF has compiled information about hunting license and permits, where to hunt, hunter education classes, laws and regulations and more. For each state you’ll also find a link for required applications and license forms.
Click Map to Get State-by-State Hunting INFO
Hunting Affiliation Groups
There are many good organizations dedicated to promoting hunting and preserving our hunting habitats. These groups all offer valuable information for hunters:
Winter is a good time to read about hunting, both to get motivated and to learn more about hunting skills. Here are some of the best books written about hunting.


 Review Quick Highlights:

 2. Check Out the Forum Classifieds. There are great deals to be found every day in the AccurateShooter
  3. Share a Ride to Matches. Fuel prices are on the rise — Regular-grade gasoline is over $5.00 per gallon in California now and around $3.10/gallon nationwide. With many shooters living 30-100 miles from the nearest range, fuel remains a big part of a shooter’s hobby budget. We’d say 90% of shooters drive solo to matches, often in large, gas-guzzling trucks. If you drive 200 miles round-trip to attend a match in a 20-mpg vehicle, you’ll burn over $31.00 worth of gasoline on your trip. That adds up. By simply sharing the ride with one fellow shooter you cut your fuel expenditures in half. And, if you alternate vehicles with a buddy from one match to the next, you save on vehicle wear and tear. At $0.65/mile (overall operating costs) consider the savings.
 4. Use Discount Codes to Save. It’s always smart to check for discount codes before you buy. In the Daily Bulletin, we feature “Deals of the Week” every Monday morning, and we provide discount Coupon Codes when available. These can reduce the price substantially or lower shipping costs. Search codes for Brownells, Creedmoor Sports, EuroOptic, Graf’s, Midsouth, Powder Valley, Sportsman’s Warehouse, KYGUNCO, MidwayUSA, and Precision Reloading. Check your email also — some discount codes are only announced in email newsletters. If you can’t find a Coupon Code for your preferred vendor, visit
  5. Shop for “Demo” Optics. Modern high-quality optics can easily cost $2000.00 or more, often exceeding the value of the rifle on which they are mounted. However, you can often save 20-30% by purchasing demo optics. These are normally display units used at trade shows. They may have slight ringmarks, but otherwise they are “as new”, having never been carried in the field or used on a rifle that has fired live ammo. When purchasing demo scopes, you should always ask about the warranty before consummating the sale. However, most demo scopes from name-brand manufacturers come with full factory warranties.
  6. Train with Rimfire Rifles. Good match-grade centerfire, hand-loaded ammo, counting premium bullets, powder, primers, and brass (figuring 10X loads), can now exceed $1.60 per round. And if your $600 (as chambered and fitted) competition barrel is toast after 1500 rounds, add $0.40 for barrel deprecation per shot. So you’re effectively spending two bucks a round total! By contrast, you can get quite good .22 LR target ammo for under $0.18 per round. Good rimfire barrels last a long, long time, so you don’t have to be concerned about wearing out your barrel quickly. A quality rimfire barrel can retain its accuracy for 7,000 rounds or more. If you run the ballistics, a .22 LR round at 100 yards can emulate the wind drift experienced by a centerfire cartridge at long range. This allows for effective cross-training with much less expensive ammo.


 This handsome, ultra-accurate Smallbore F-Class rig belongs to member RMist of Team Pro-Shot Products. It has a Holeshot (Stiller) 2500X, stunning Cerus Curly Maple wood stock, Nightforce scope. Up front is the joystick co-axial SEB Joy-Pod.


 Gunsafes can be fitted with either an electronic keypad-style lock, or a conventional dial lock. In our
  Tips for Dial Locks
 Replace Electronic Lock Batteries Every Year